¶ A1 Belt Tensioning
There are 3 timing belts on the A1 printer, which are transmission components that enable the toolhead (X), the heatbed (Y), and the X-axis (Z) to move in the set direction. Timely tightening of the belts is an essential guarantee for the print quality. During the printer calibration process, the A1 printer will perform a frequency scan and determine whether the belts need to be re-tensioned based on the results collected.
If it is confirmed that re-tensioning is necessary, a relevant prompt message will pop up during printing.
Please re-tension the corresponding belt according to the prompt message.

¶ Tools required
H2.0 Allen Key

¶ X axis Belt Tensioning
¶ Location of the tensioning screw
The tensioning position of the X belt is on the back of the toolhead, as shown in the following figure.

¶ How to tension the belt on the X axis
1. Operate the printer to raise the X-axis to the middle position of the Z-axis to avoid scratching the heatbed when moving the toolhead, and turn off the printer;

2. Loosen the tension screw with an H2.0 Allen key by one turn (do not fully loosen them), and move the toolhead back and forth along the X-axis 3 times by hand (from the top left of the axis to the top right), then retighten the tensioning screw.
 |
 |
3. Power on the printer, select Vibration Compensation in the calibration menu, and complete the calibration process.
 |
 |
¶ Y axis Belt Tensioning
¶ Location of the tensioning screws
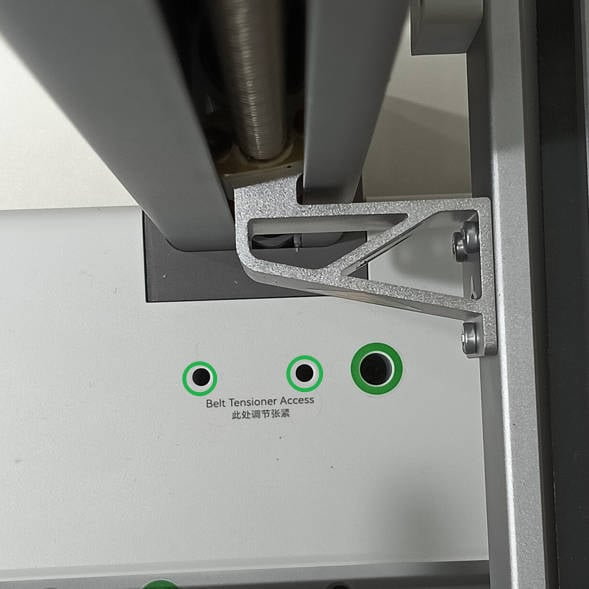
The tensioning screws for the Y axis belt are located in front of the bottom base, covered by a small cap, which needs to be removed first.
 |
 |
¶ How to tension the belt on the Y axis
1. Move the heatbed backward to expose the tension position of the Y Belt and remove the little cap;
 |
 |
2. Loosen the two tension screws with an H2.0 Allen key by one turn (do not fully loosen them), then manually move the heatbed back and forth along the Y-axis three times. Afterward, tighten the tension screws again.
Note: Do not fully loosen or remove the Y tension screws, as you may need to reassemble the Y tensioner.
 |
 |
3. Select Vibration Compensation in the calibration menu and complete the calibration process.
 |
 |
¶ Z Belt Tensioning
¶ Location of the tensioning screw
The tensioning position of the Z Belt is located near the right column of the Z-axis, which can be seen by moving the heatbed forward.

¶ How to tension the belt on the Z axis
1. Move the heatbed forward to expose the tensioning position of the Z Belt, and loosen the two tension screws with an H2.0 Allen key by one turn (do not fully loosen them)
 |
 |
2. Enter the Control menu and perform Homing; Then hold down the Z-axis up (down) button to move the X-axis up and down once along the Z-axis direction (Be careful not to make the nozzle hit the heatbed), and then retighten the 2 tensioning screws ;
 |
 |
3. Select Vibration Compensation in the calibration menu and complete the calibration process.
 |
 |
¶ End Notes
We hope the detailed guide provided has been helpful and informative.
To ensure a safe and effective execution, if you have any concerns or questions about the process described in this article, we recommend submitting a technical ticket regarding your issue.
Please include a picture or video illustrating the problem, as well as any additional information related to your inquiry.