¶ Safety Warning
IMPORTANT!
It's crucial to power off the printer before performing any maintenance work on the printer and its electronics, including tool head wires, because leaving the printer on while conducting such tasks can cause a short circuit, which can lead to additional electrical damage and safety hazards.
When you perform maintenance or troubleshooting on the printer, you may be required to disassemble some parts, including the hotend. This process can expose wires and electrical components that could potentially short circuit if they come into contact with each other or with other metal or electrical components while the printer is still on. This can damage the electronics of the printer and cause further damage.
Therefore, it's essential to switch off the printer and disconnect it from the power source before doing any maintenance work. This will prevent any short circuits or damage to the printer's electronics. By doing so, you can avoid potential damage to the printer's electronic components and ensure that the maintenance work is performed safely and effectively.
If you have any concerns or questions about following this guide, open a new ticket in our Support Page and we will do our best to respond promptly and provide you with the assistance you need.
¶ Causes of Circuit Breaker Tripping and Inspection Requirements
The common cause of printer tripping is usually due to the presence of leakage in other electrical appliances in the household (within standard range), combined with the printer's own leakage (also within the standard range). When the total leakage exceeds the threshold of the leakage protector, it will result in tripping.
The leakage of the Bambu Lab printer complies with the IEC62368 safety standard, with leakage current limited to half of the maximum limit specified by regulations.
If your printer has leakage or tripping issues, please ensure that the printer and the electronic household meet the following three requirements:
🔧 Requirement 1: Ensure proper grounding of the household electrical system (please seek professional assistance for this).
⚡ Requirement 2: Ensure proper grounding of the machine.
¶ Required Tools
Multimeter
For instructions on how to use a multimeter to check if the circuit is functioning properly, please refer to How to Use a Multimeter to Check Circuits
¶ Leakage Detection Guide
¶ A1 Printer
¶ Step 1. Preparation
-
Power off the device: Ensure the device is completely powered off by unplugging it.
-
Remove the printing plate.
-
Select the resistance mode: Set the multimeter to the resistance mode. Typically, choose the Ω (Ohm) symbol on the multimeter's dial to measure resistance. To ensure accuracy, select the lowest range to ensure the measurement range covers the expected resistance value.
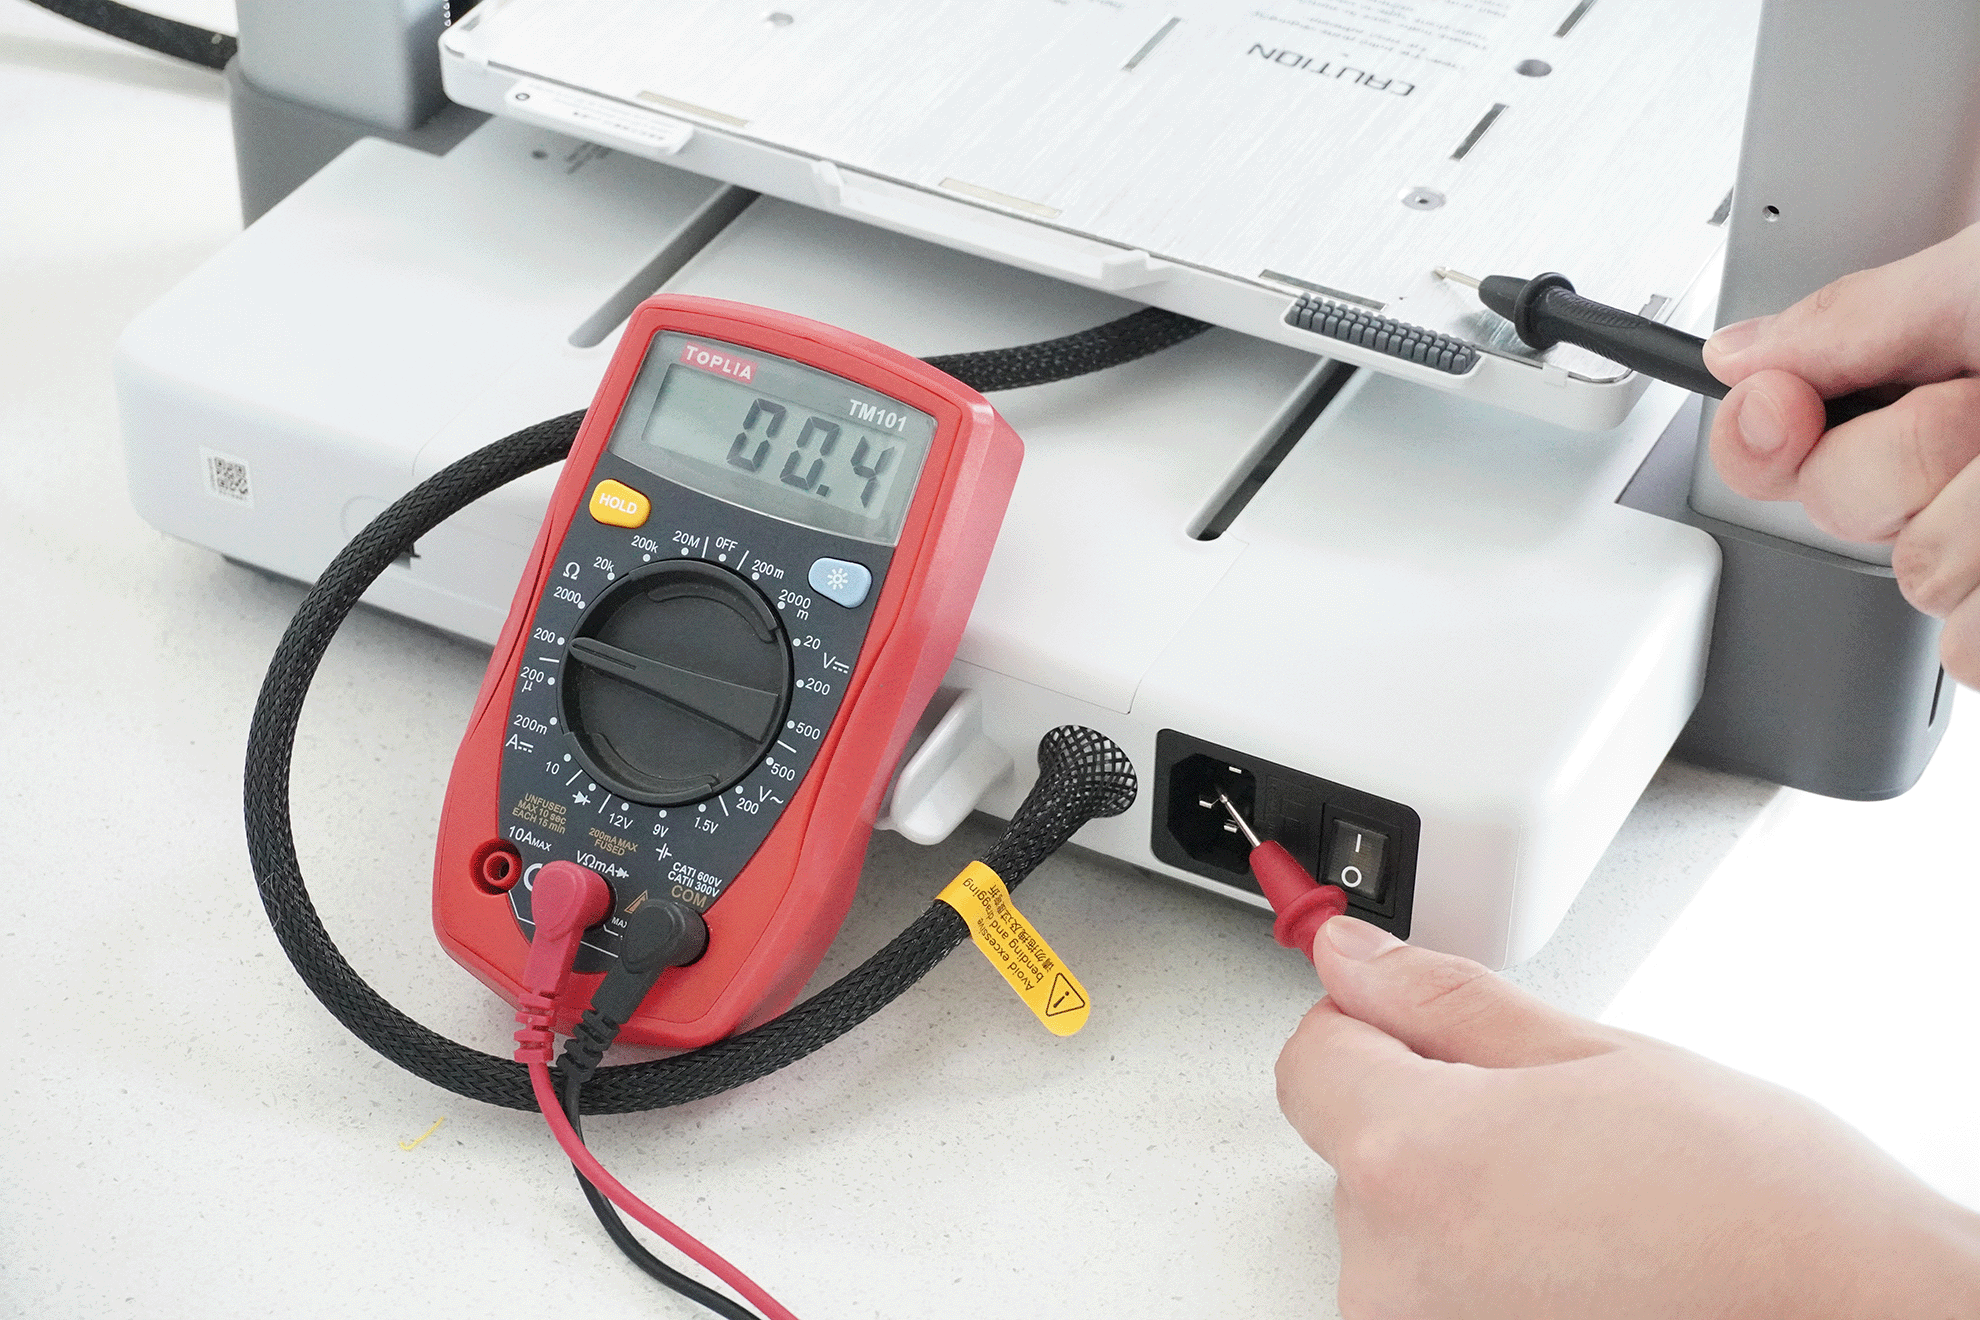
¶ Step 2. Test the Device’s Grounding
This step is designed to check whether the device’s grounding connection to earth is normal and whether there are any leakage issues.
- Connect the multimeter probes:
-
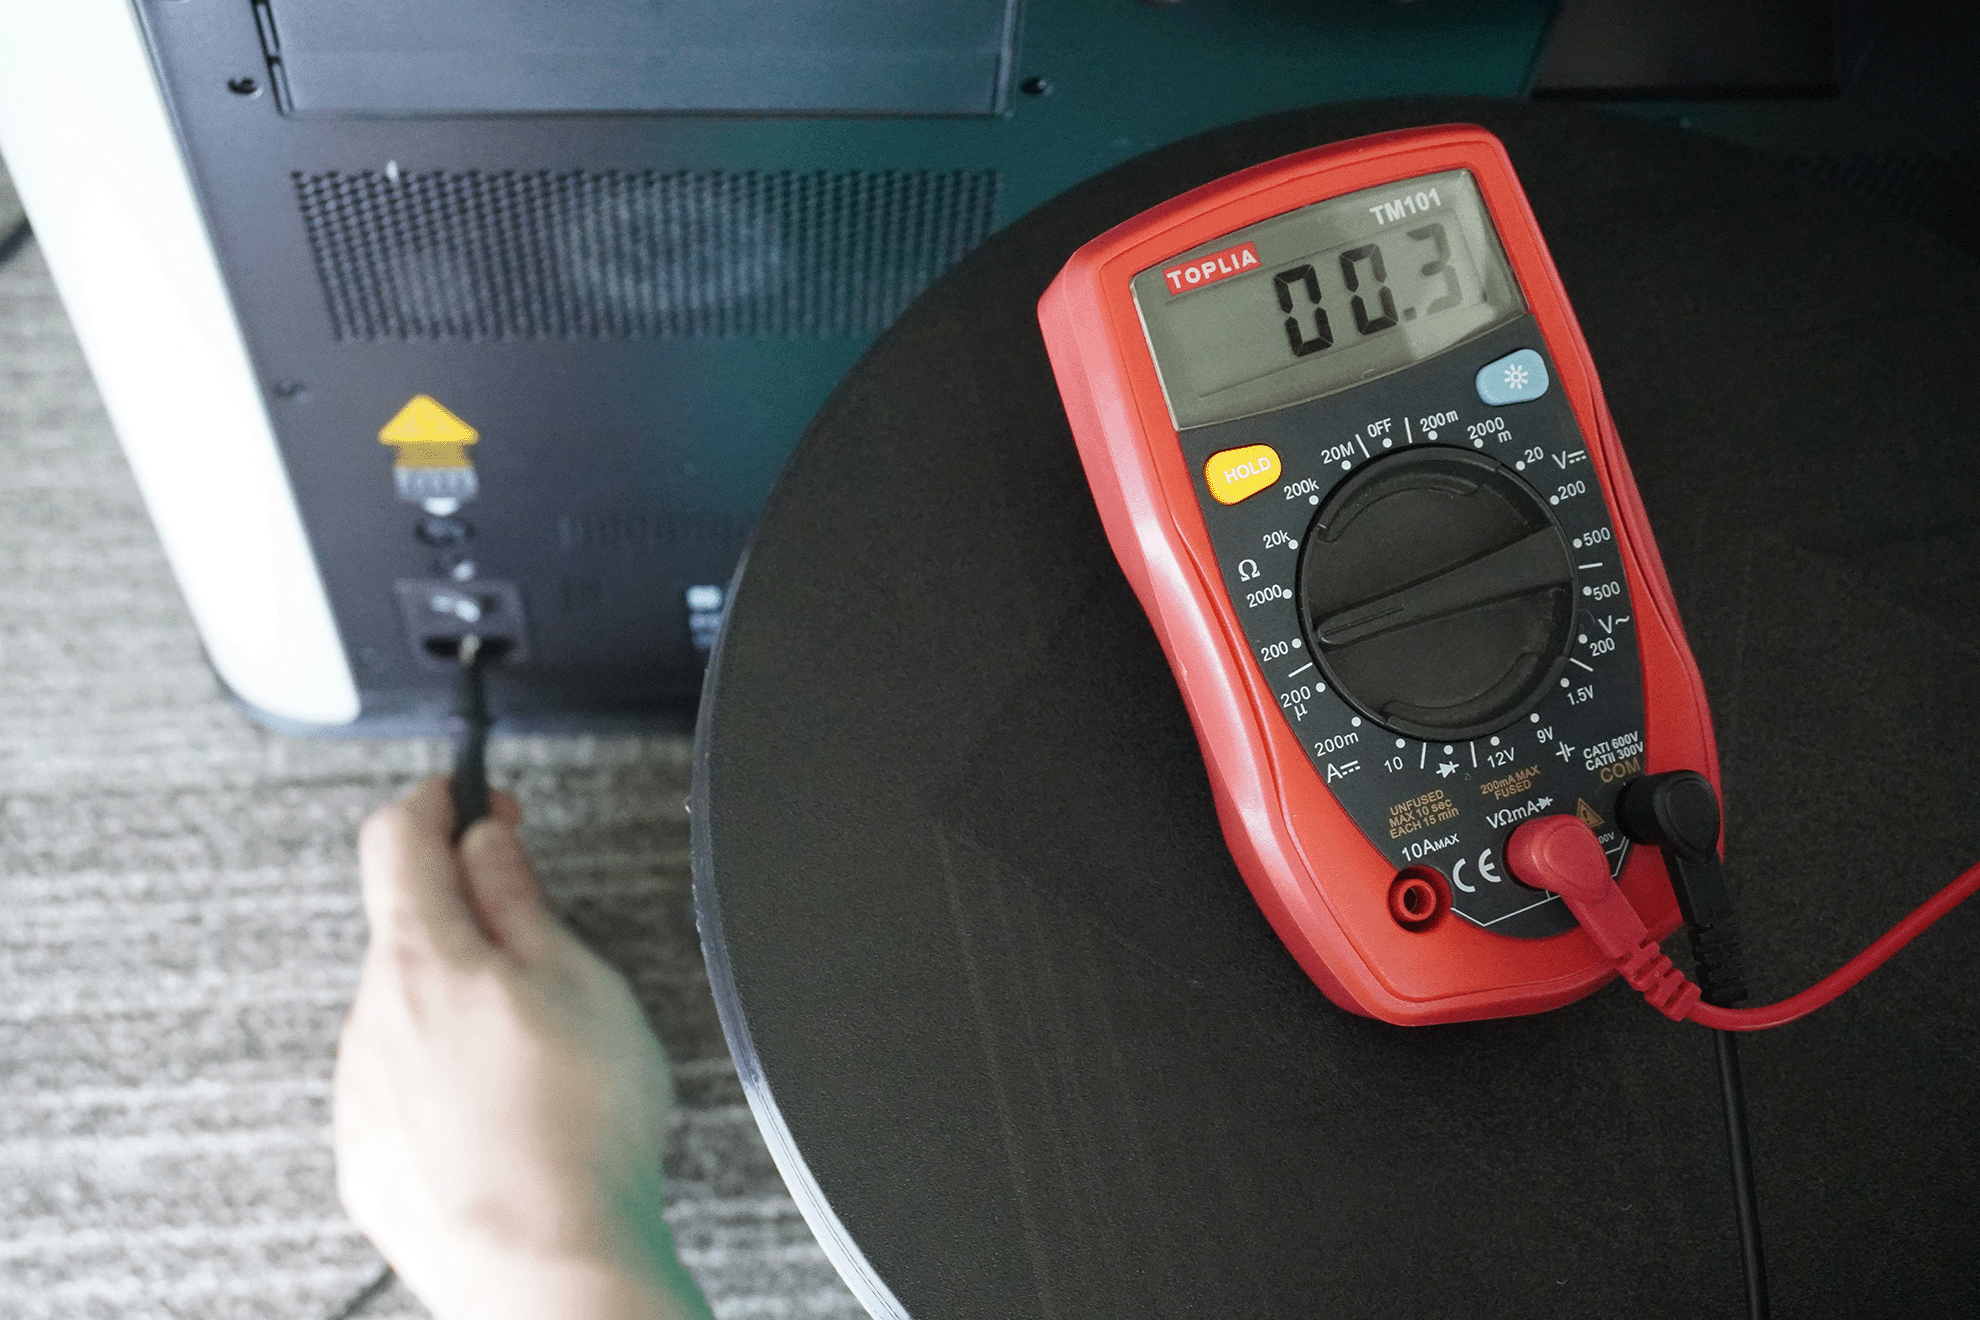
Attach the red probe to the metal surface of the heatbed.
-
Attach the black probe to the ground terminal of the AC power outlet.
- Check the reading: The resistance should ideally be close to 0. If the reading is significantly high, it indicates an issue with the grounding, and you should check whether the grounding screw is loose or not making proper contact.
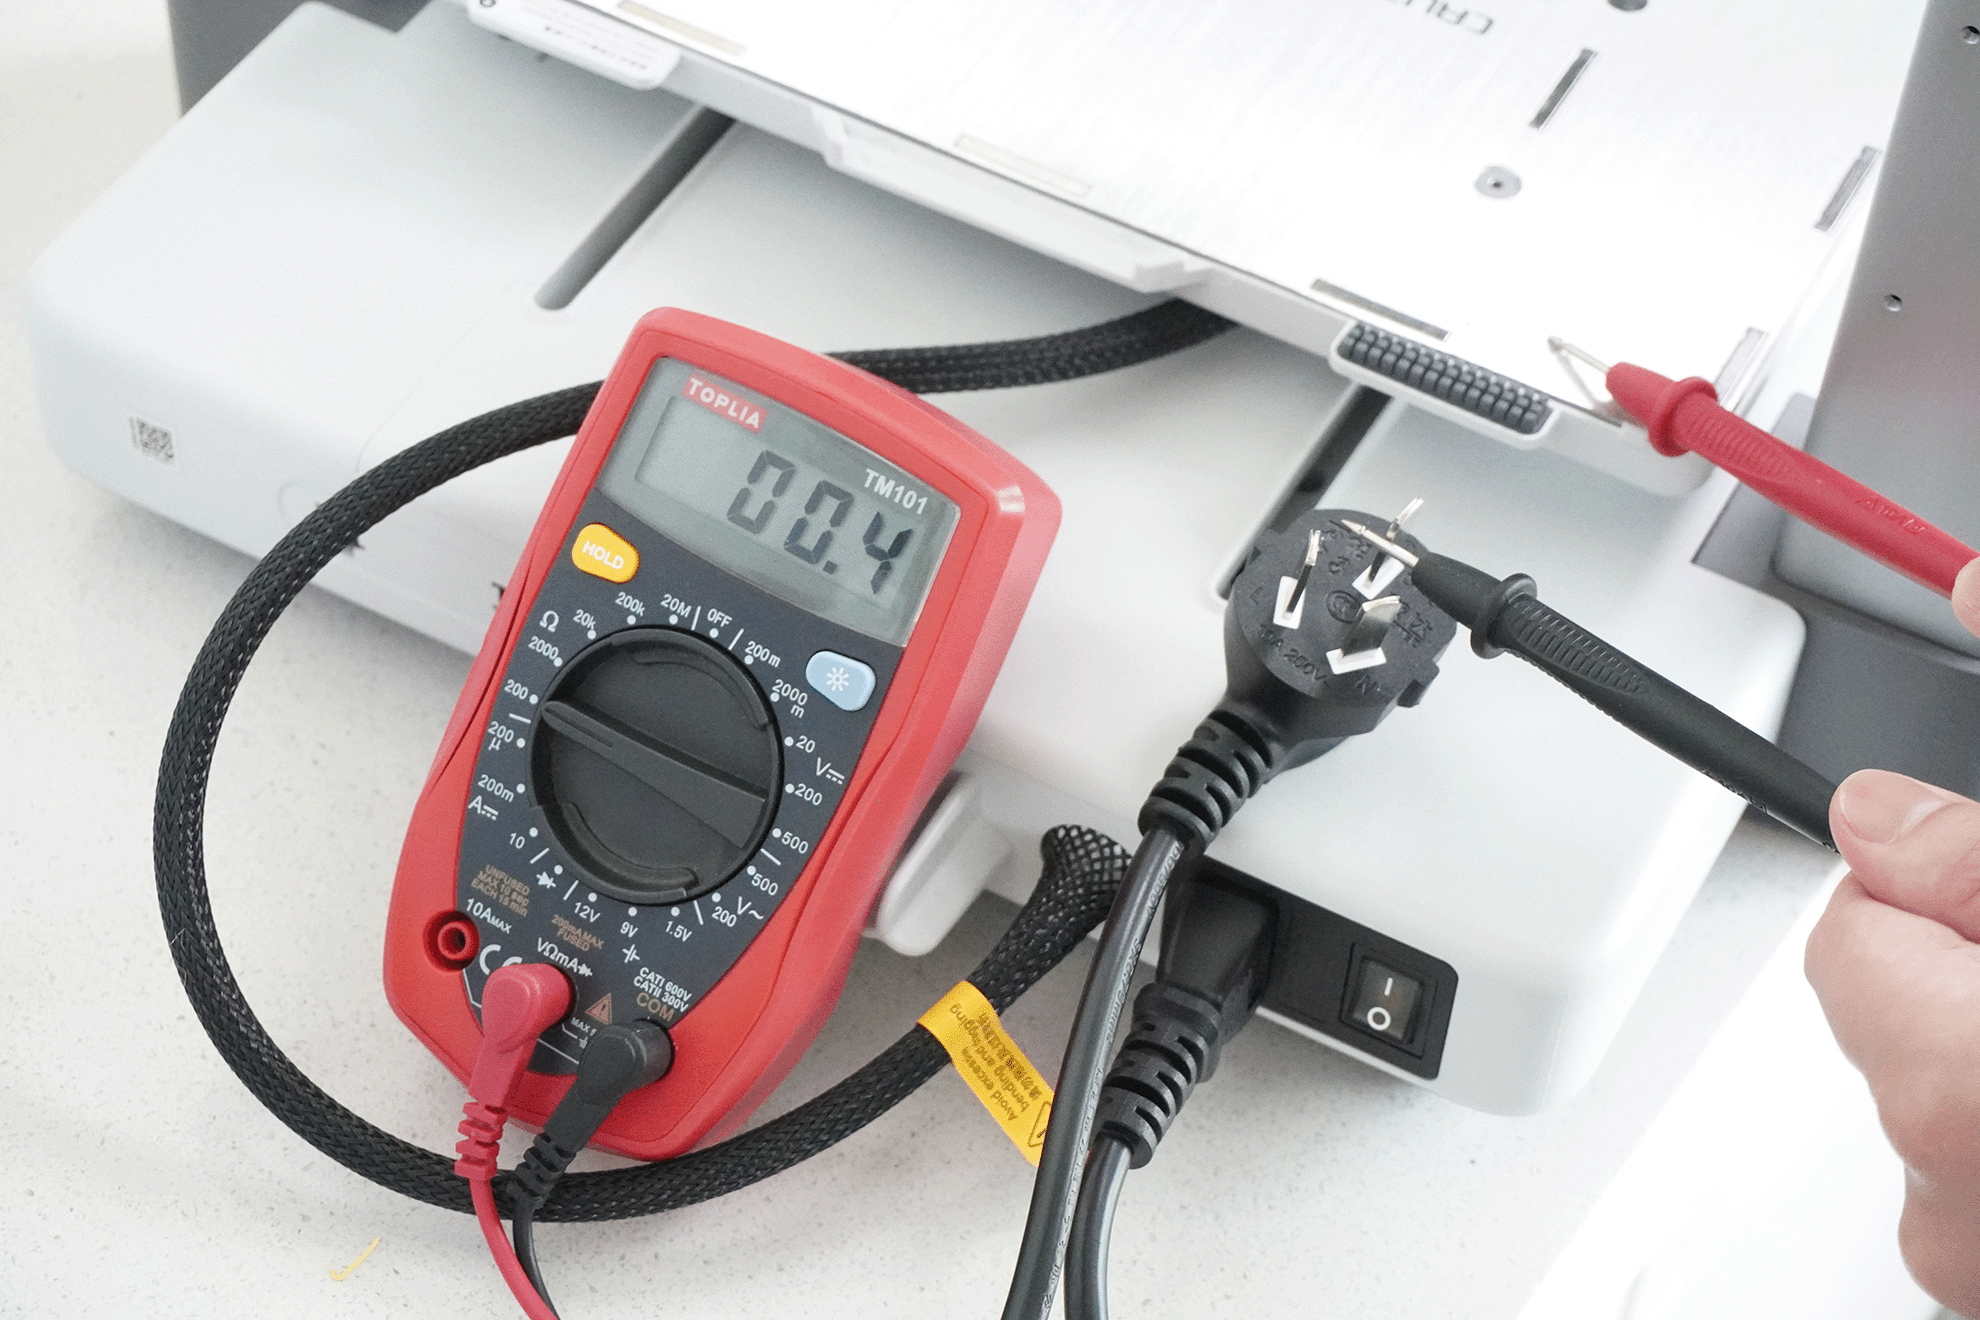
¶ Step 3. Test the Grounding of the Power Cord and the Device
This step is designed to ensure the grounding connection between the power cord and the device is correct.
-
Insert the Power Cord: Plug one end of the power cord into the device and leave the other end unplugged from the socket.
-
Connect the Multimeter Probes to the Power Plug and HeatBed:
-
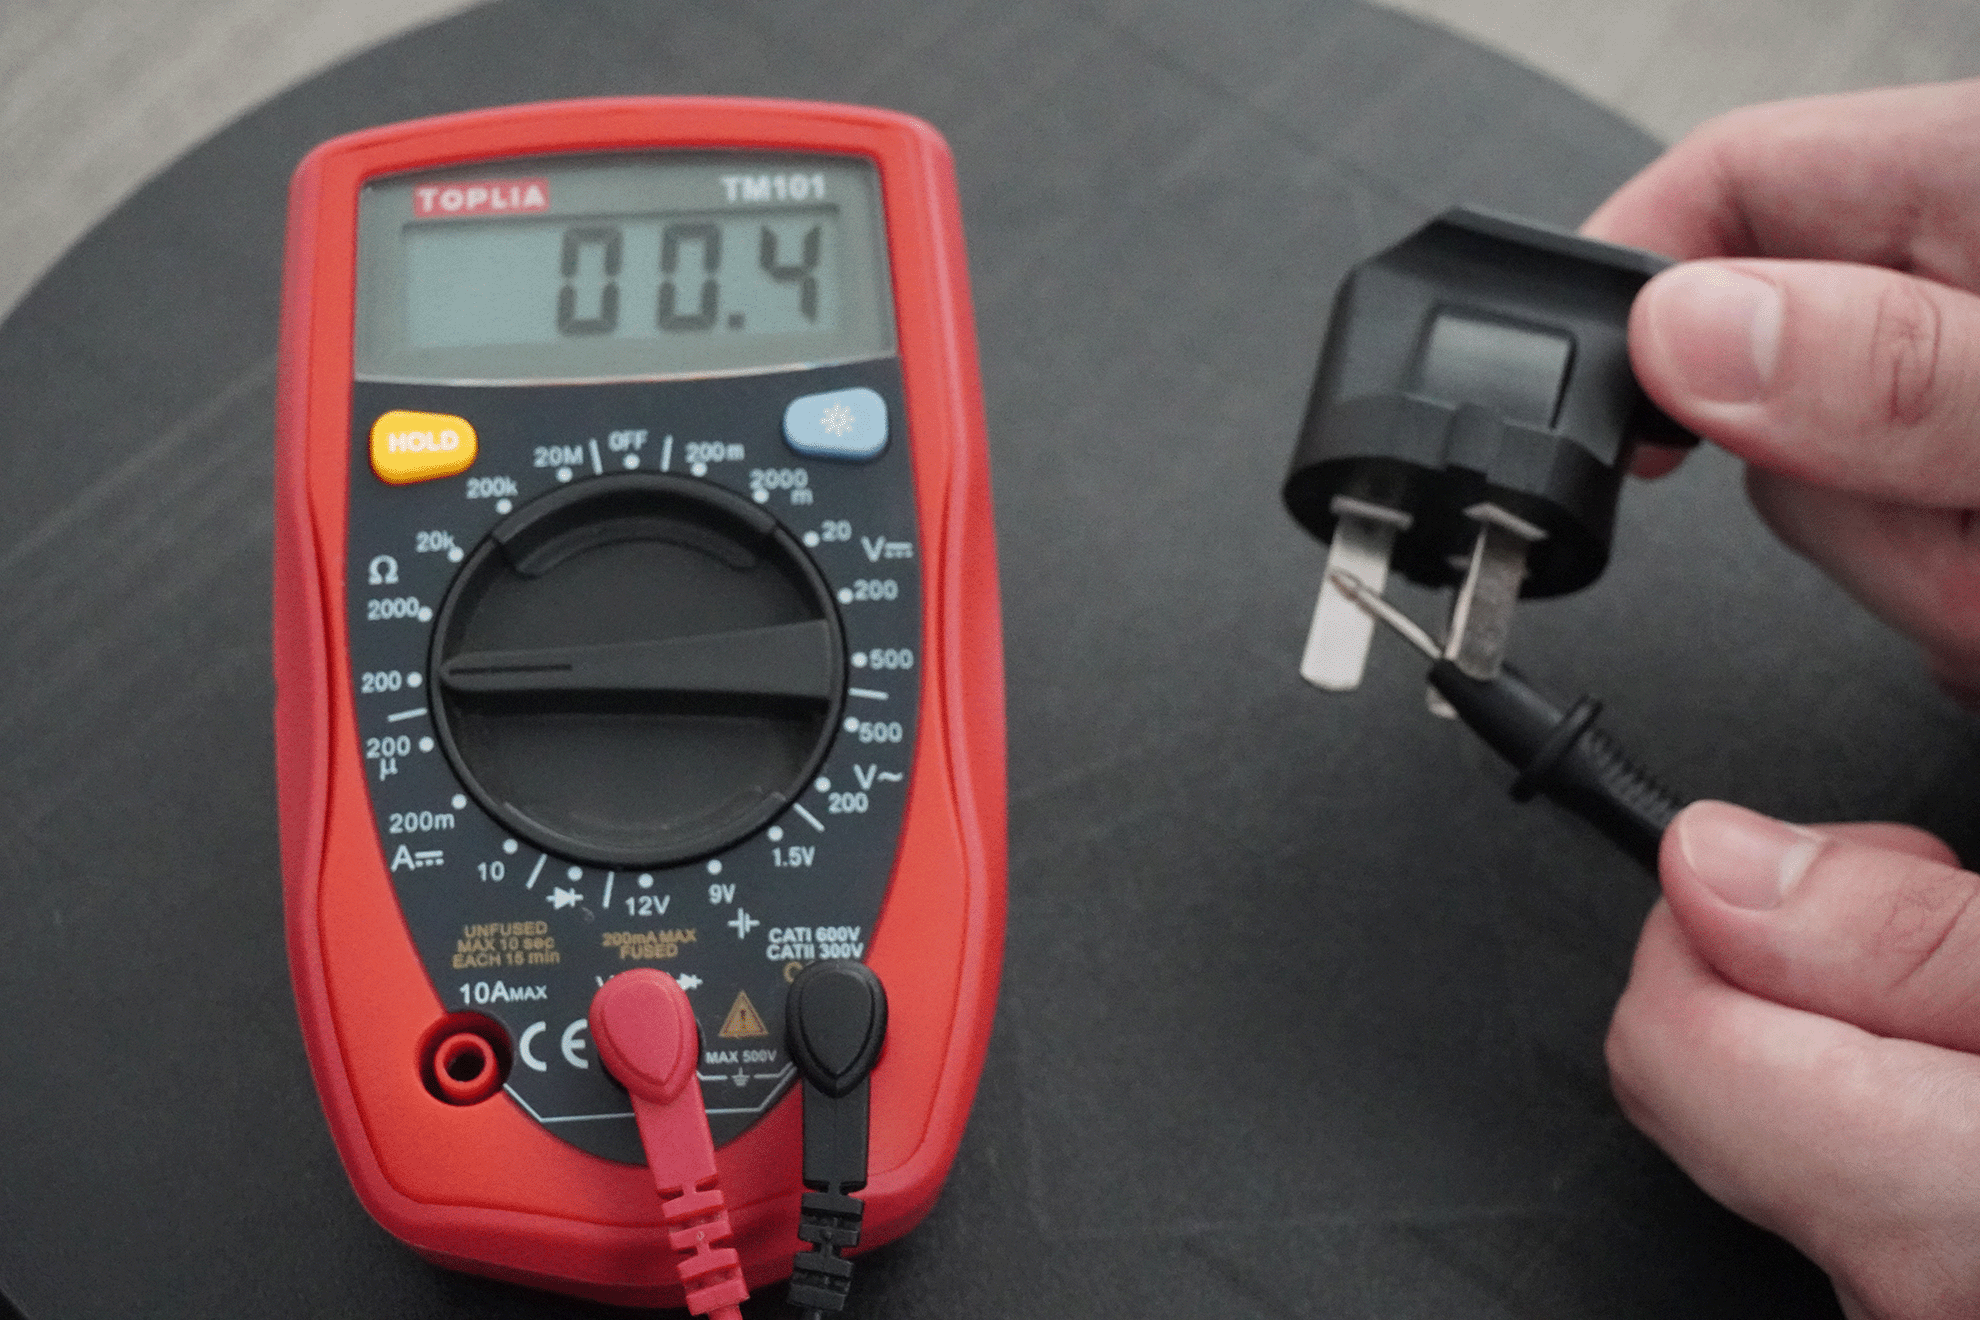
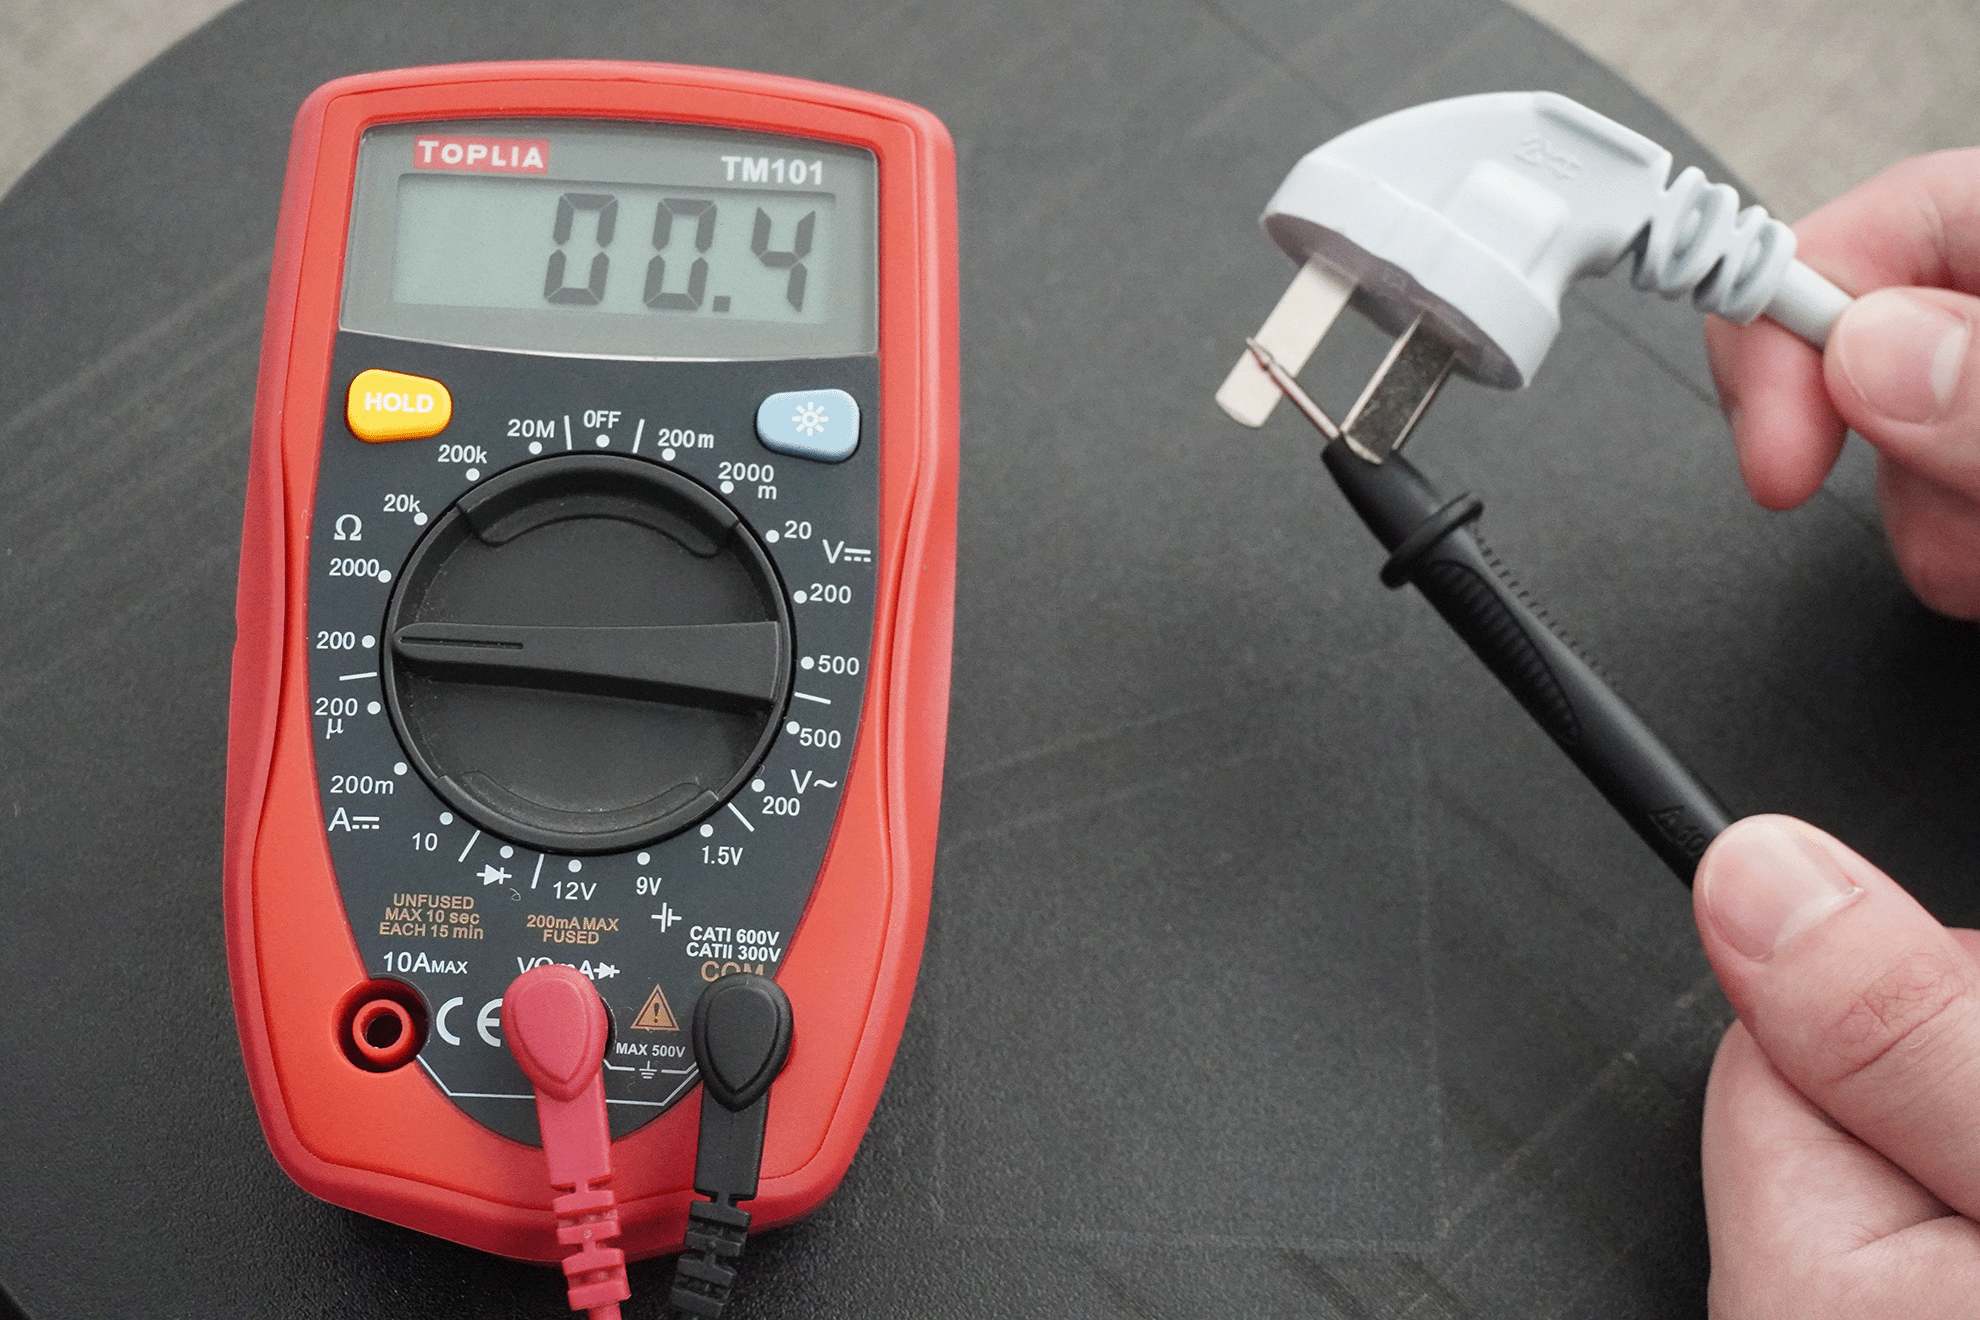
Attach the black probe of the multimeter to the grounding terminal of the power cord plug.
-
Attach the red probe to the metal part of the heated bed.
- Check the Resistance Reading: The resistance should ideally be close to 0. If the reading is significantly high, it indicates an issue with the connection between the power cord and the device, and you may need to replace the power cord.
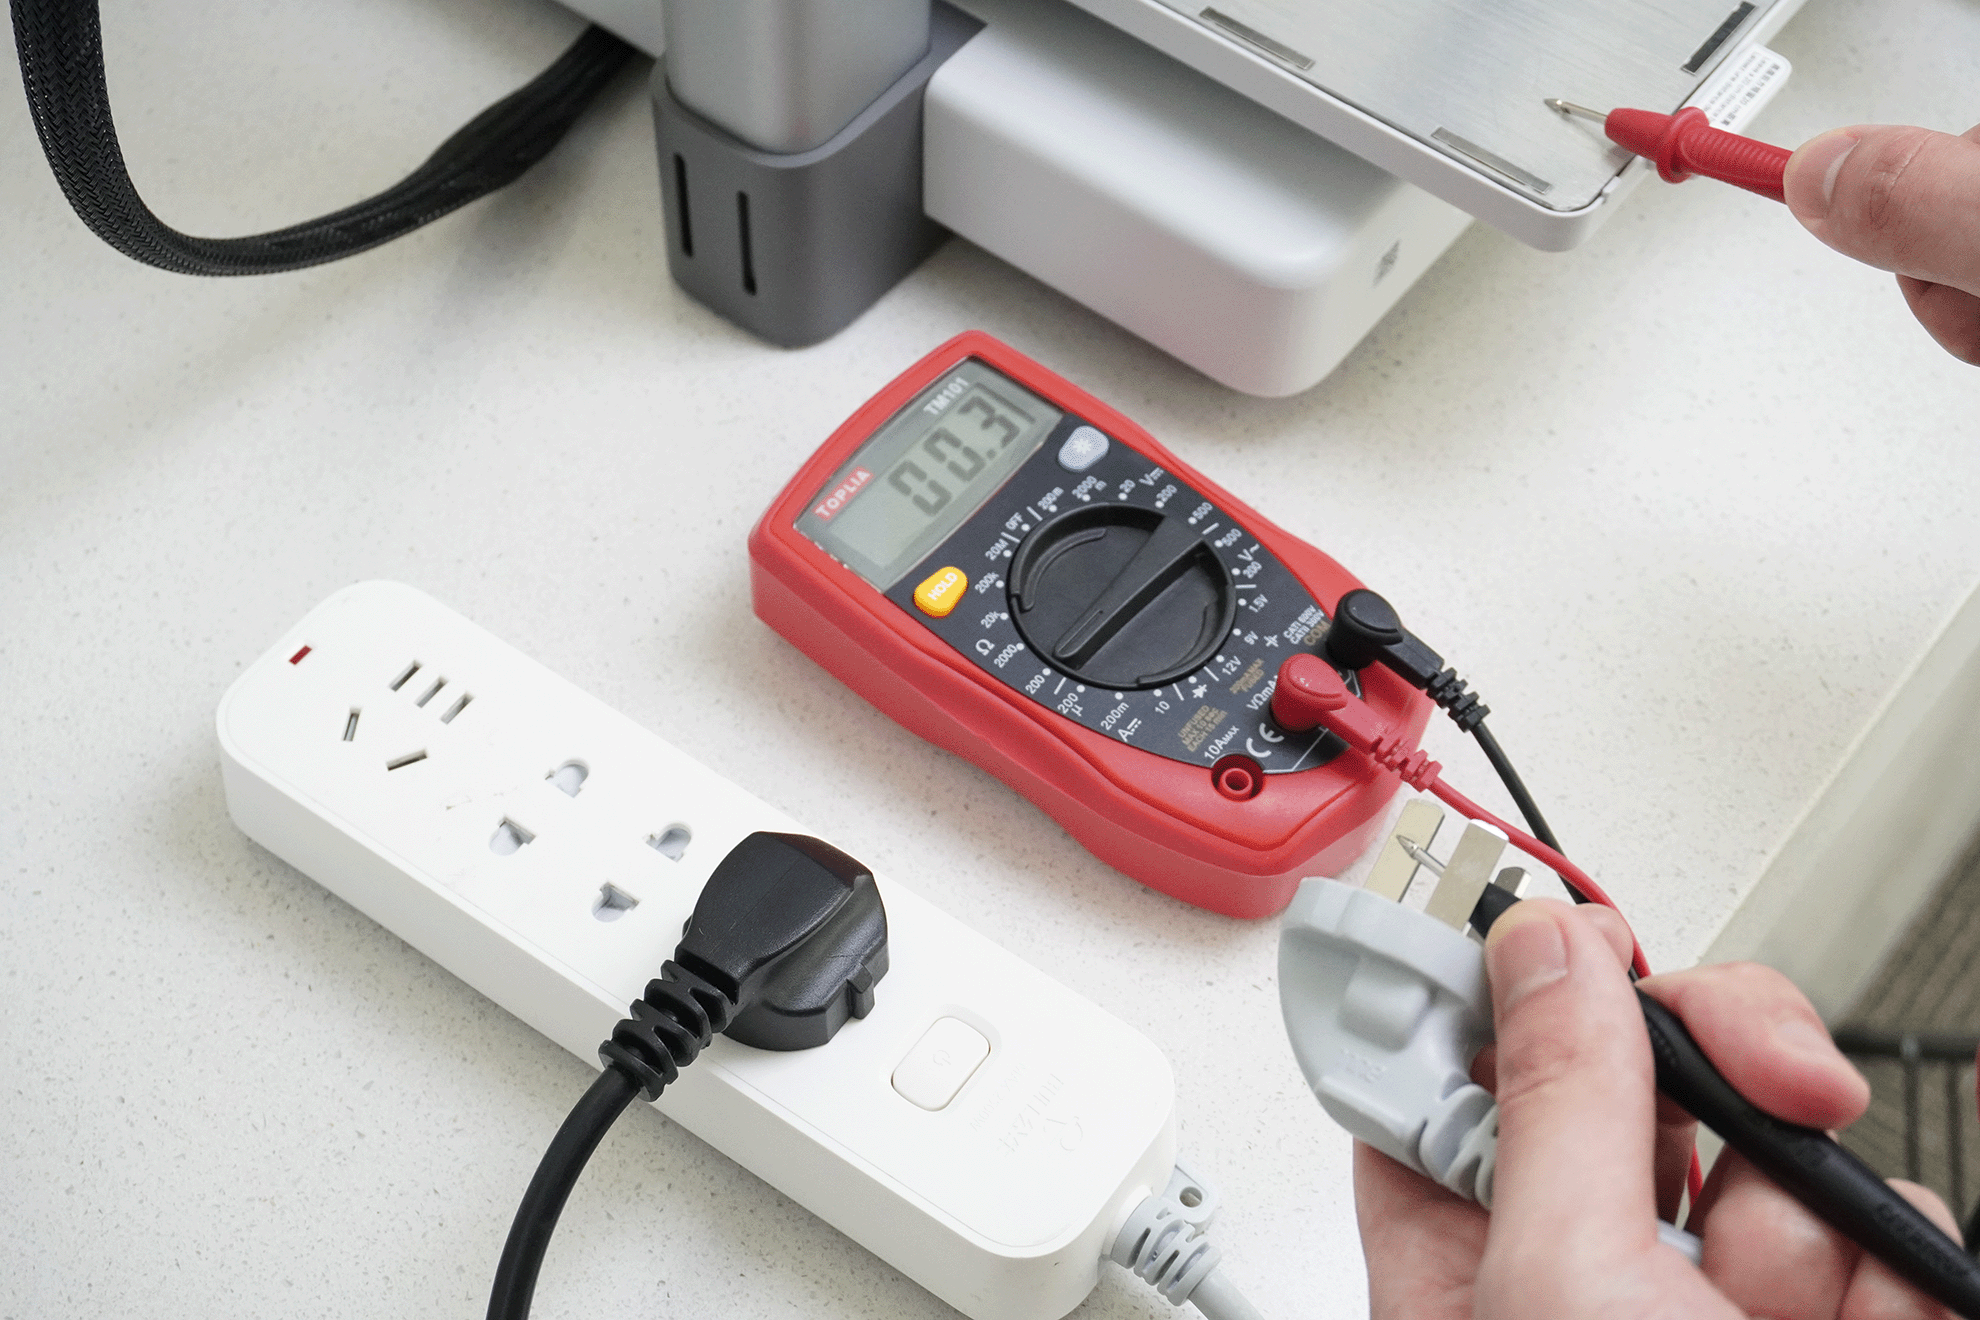
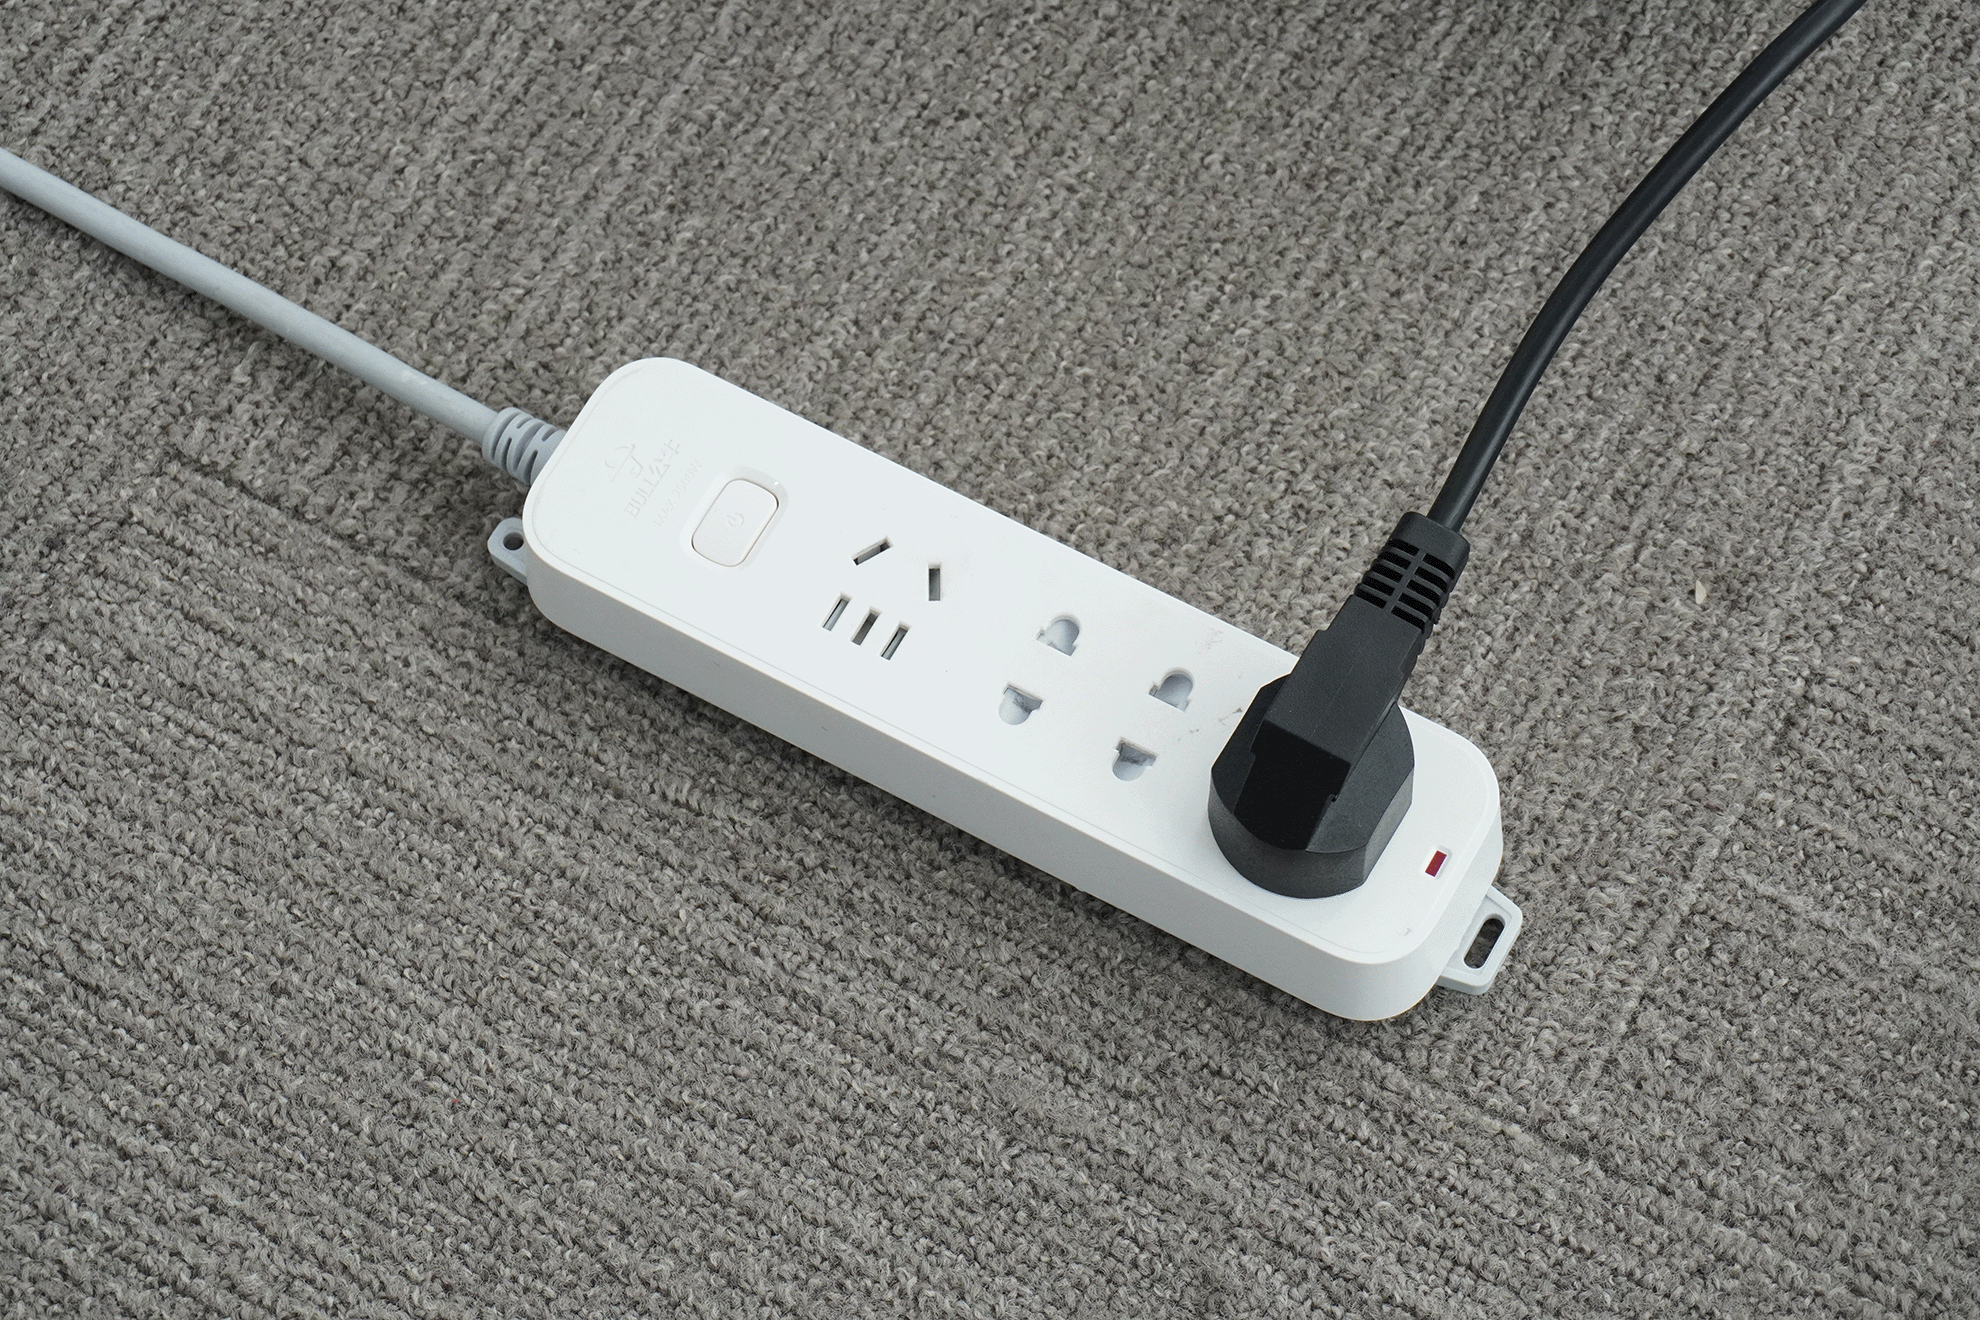
¶ Step 4. Check the Grounding of the Power Strip and the Device(If the printer is connected directly to a household wall outlet, you may skip this step)
This step ensures the device is properly grounded through the power strip. Make sure the power strip is not connected to power during this test.
-
Insert the Power Cord Without Powering On: Plug the power cord into the printer's power strip, but leave the power strip unplugged to ensure it is not powered.
-
Connect the Multimeter Probes:
-
Attach the black probe to the ground terminal of the power strip plug.
-
Attach the red probe to the metal part of the heated bed.
- Check the Resistance Reading: The resistance should ideally be close to 0. If the reading is significantly high, it indicates an issue with the grounding between the device and the power strip. You may need to check whether the power strip is grounded or if the ground wire is broken, and consider replacing the power strip.
¶ Step 5. Household Wiring Check
If all the above steps are normal, we recommend checking for similar leakage sensations with other household appliances (such as induction cookers or air conditioners). If you find similar issues, your home wiring might be problematic. In this case, you should:
-
Use a grounding tester to check the grounding of your household wiring.
-
Contact a professional electrician to inspect your home wiring and ensure that all outlets are properly grounded and meet safety standards.
¶ A1 Mini Printer
¶ Step 1. Preparation
-
Power Off the Device: Ensure that the device you are testing is completely powered off by unplugging it.
-
Select the Screw Hole Gap to Test: Choose a screw on the Z-axis assembly and insert the probe into the gap between the screw and the hole.
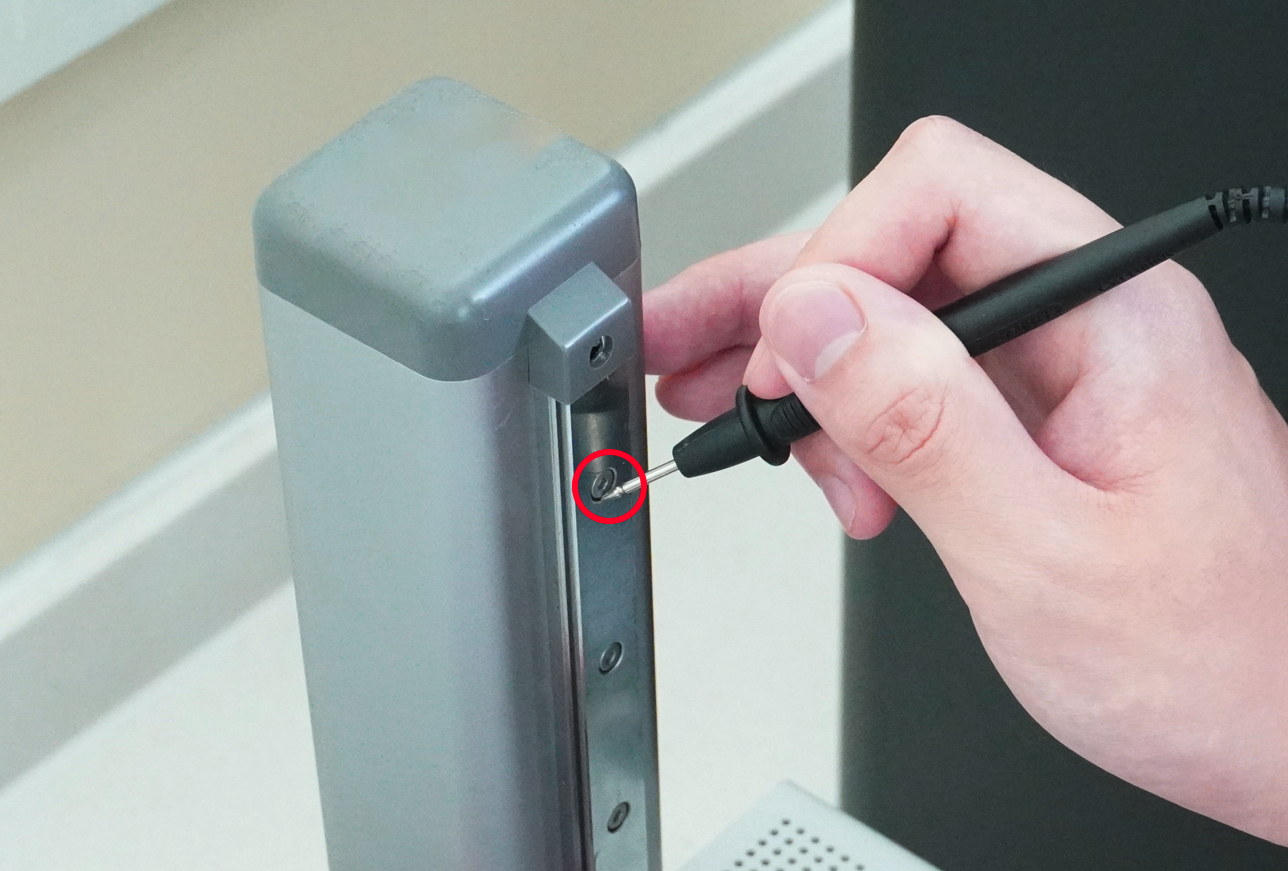
- Set the Multimeter to Resistance Mode: Set your multimeter to the resistance (Ω) mode. Choose the lowest setting to ensure that the measurement range covers the expected resistance values.
¶ Step 2. Test the Grounding of the Power Cord and Device
This step ensures that the grounding connection between the power cord and the device is correct.
- Connect the Multimeter Probes to the Power Cord Ground Terminal and the Tested Screw Hole Gap:
-
Connect the red probe of the multimeter to the ground terminal of the power plug.
-
Connect the black probe to the gap between the screw and the hole.
- Check the Resistance Reading: The resistance should be less than 5Ω. If the resistance is higher, there may be an issue with the power cord or the grounding connection, and the power cord may need to be replaced.
¶ Step 3. Check the Grounding Between the Power Strip and the Device(If the printer is connected directly to a household wall outlet, you may skip this step)
This step ensures that the device is properly grounded through the power strip. Ensure that the power strip is not powered during this test.
- Insert the Power Cord Without Turning On the Power: Plug the power cord into the power strip, but do not connect the power strip to the electrical outlet so it remains unpowered.
- Connect the Multimeter Probes:
-
Connect the black probe to the ground terminal of the power strip plug.
-
Connect the red probe to the gap between the screw and the hole on the device.
- Check the Resistance Reading: The resistance should be less than 5Ω. If the reading is higher, there may be an issue with the grounding between the device and the power strip. Check whether the power strip has a proper ground connection or if the ground wire is broken. Consider replacing the power strip if necessary.
¶ Step 4. Household Wiring Check
If all the above steps are normal, we recommend checking for similar leakage sensations with other household appliances (such as induction cookers or air conditioners). If you find similar issues, your home wiring might be problematic. In this case, you should:
-
Use a grounding tester to check the grounding of your household wiring.
-
Contact a professional electrician to inspect your home wiring and ensure that all outlets are properly grounded and meet safety standards.
¶ H2 Series Printer
¶ Step 1. Preparation
-
Power Off the Device: Ensure that the device you are testing is completely powered off by unplugging it.
-
Locate the Grounding Hole Inside the Printer: Find the grounding hole inside the printer, which will be used as the connection point for testing (located beneath the AP board).
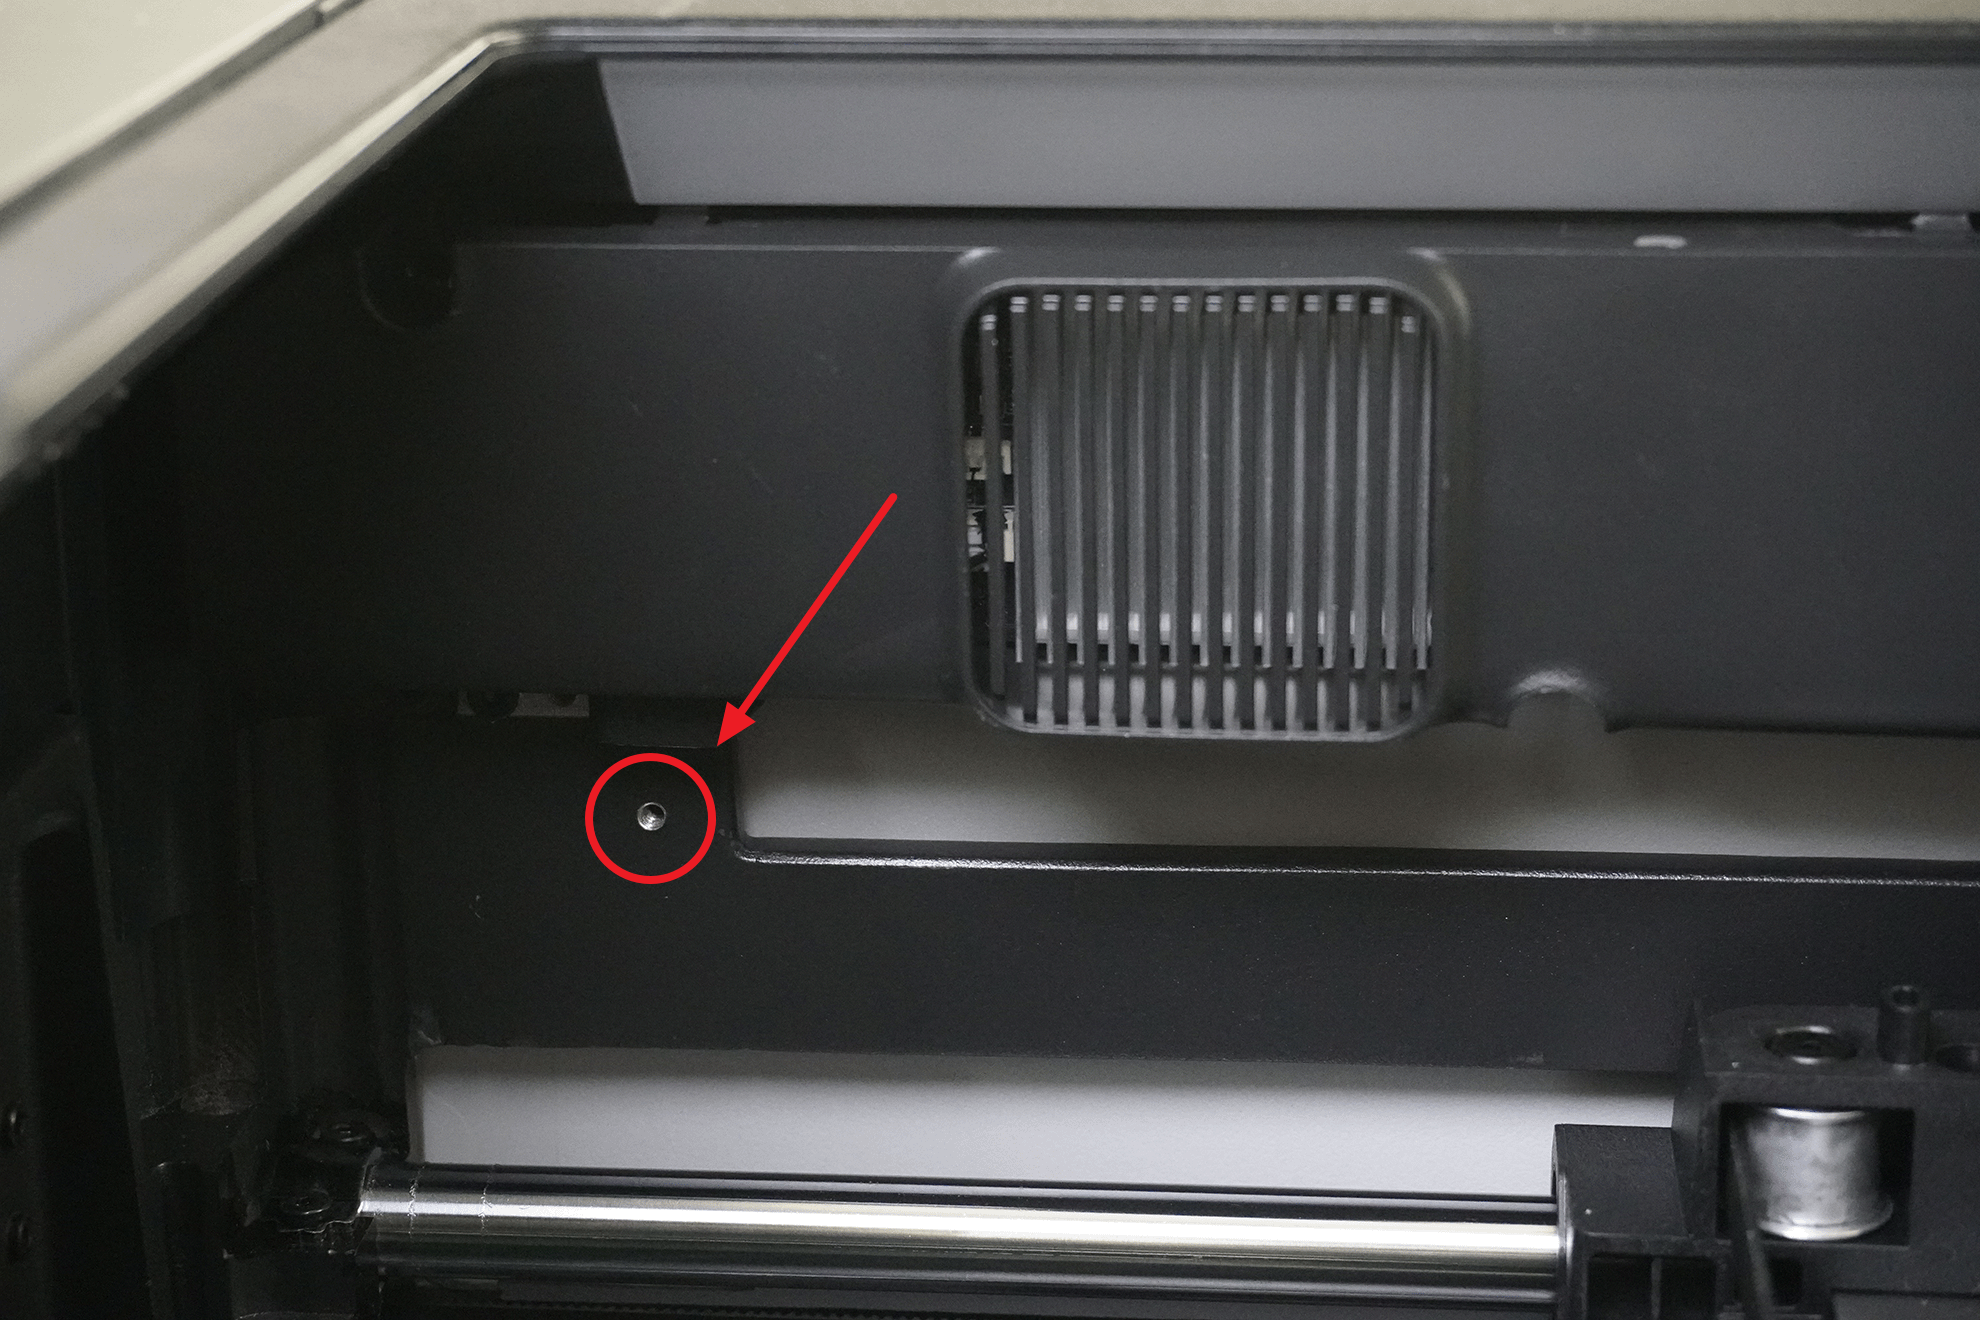
- Set the Multimeter to Resistance Mode: Set your multimeter to the resistance (Ω) mode. Select the lowest setting to ensure that the measurement range can cover the expected resistance values.
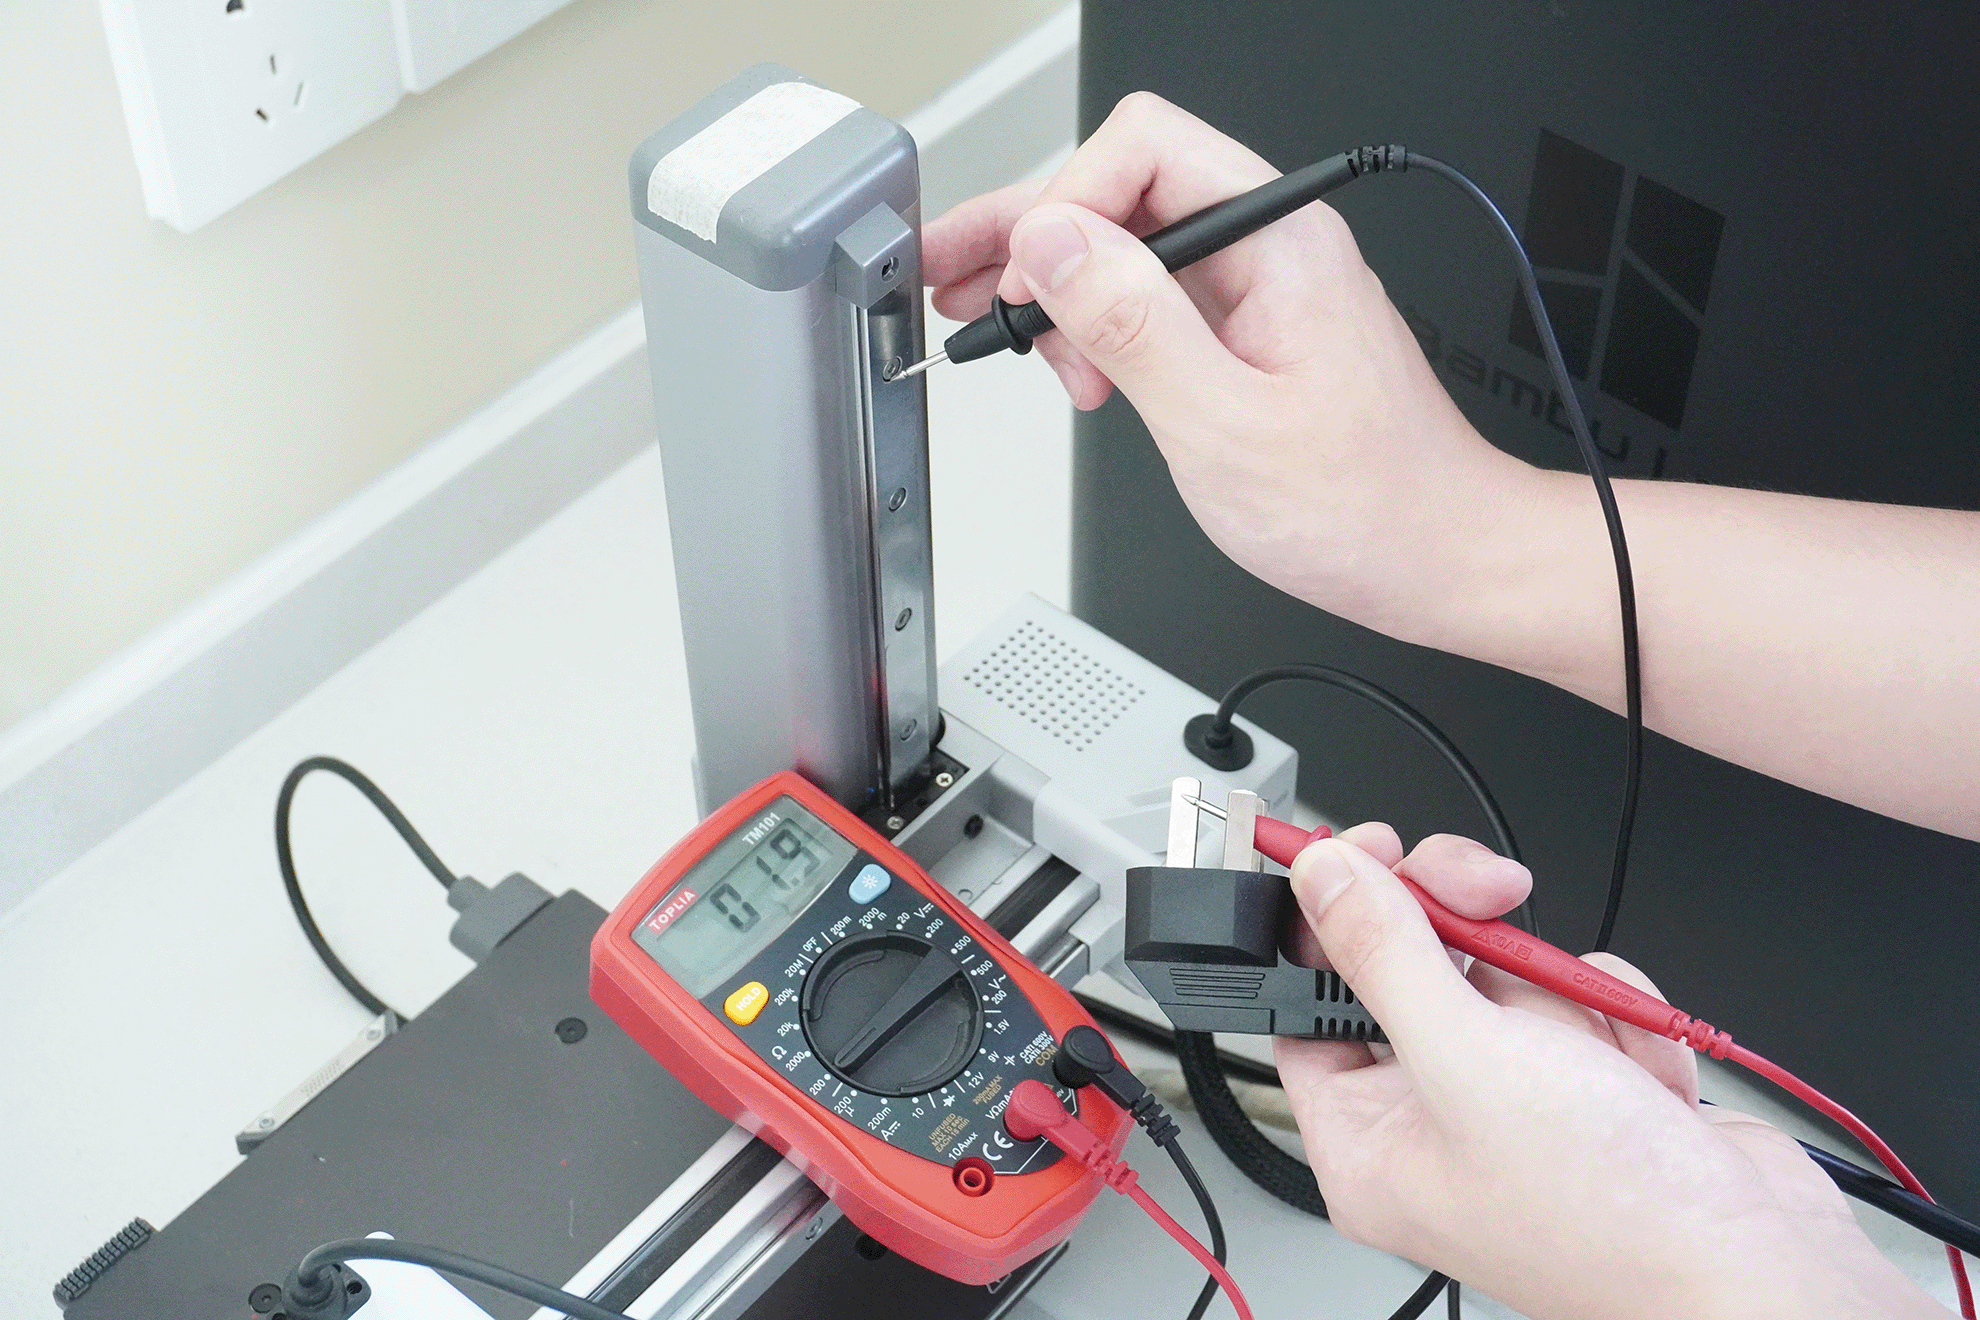
¶ Step 2. Test the Device’s Grounding
This step is designed to check whether the device’s grounding connection to earth is normal and whether there are any leakage issues.
- Connect the multimeter probes:
-
Attach the red probe of the multimeter to the grounding hole.
-
Attach the black probe to the ground terminal of the AC power socket.
- Check the reading: The resistance should ideally be close to 0. If the reading is significantly high, it indicates an issue with the grounding, and you should check whether the grounding screw is loose or not making proper contact.
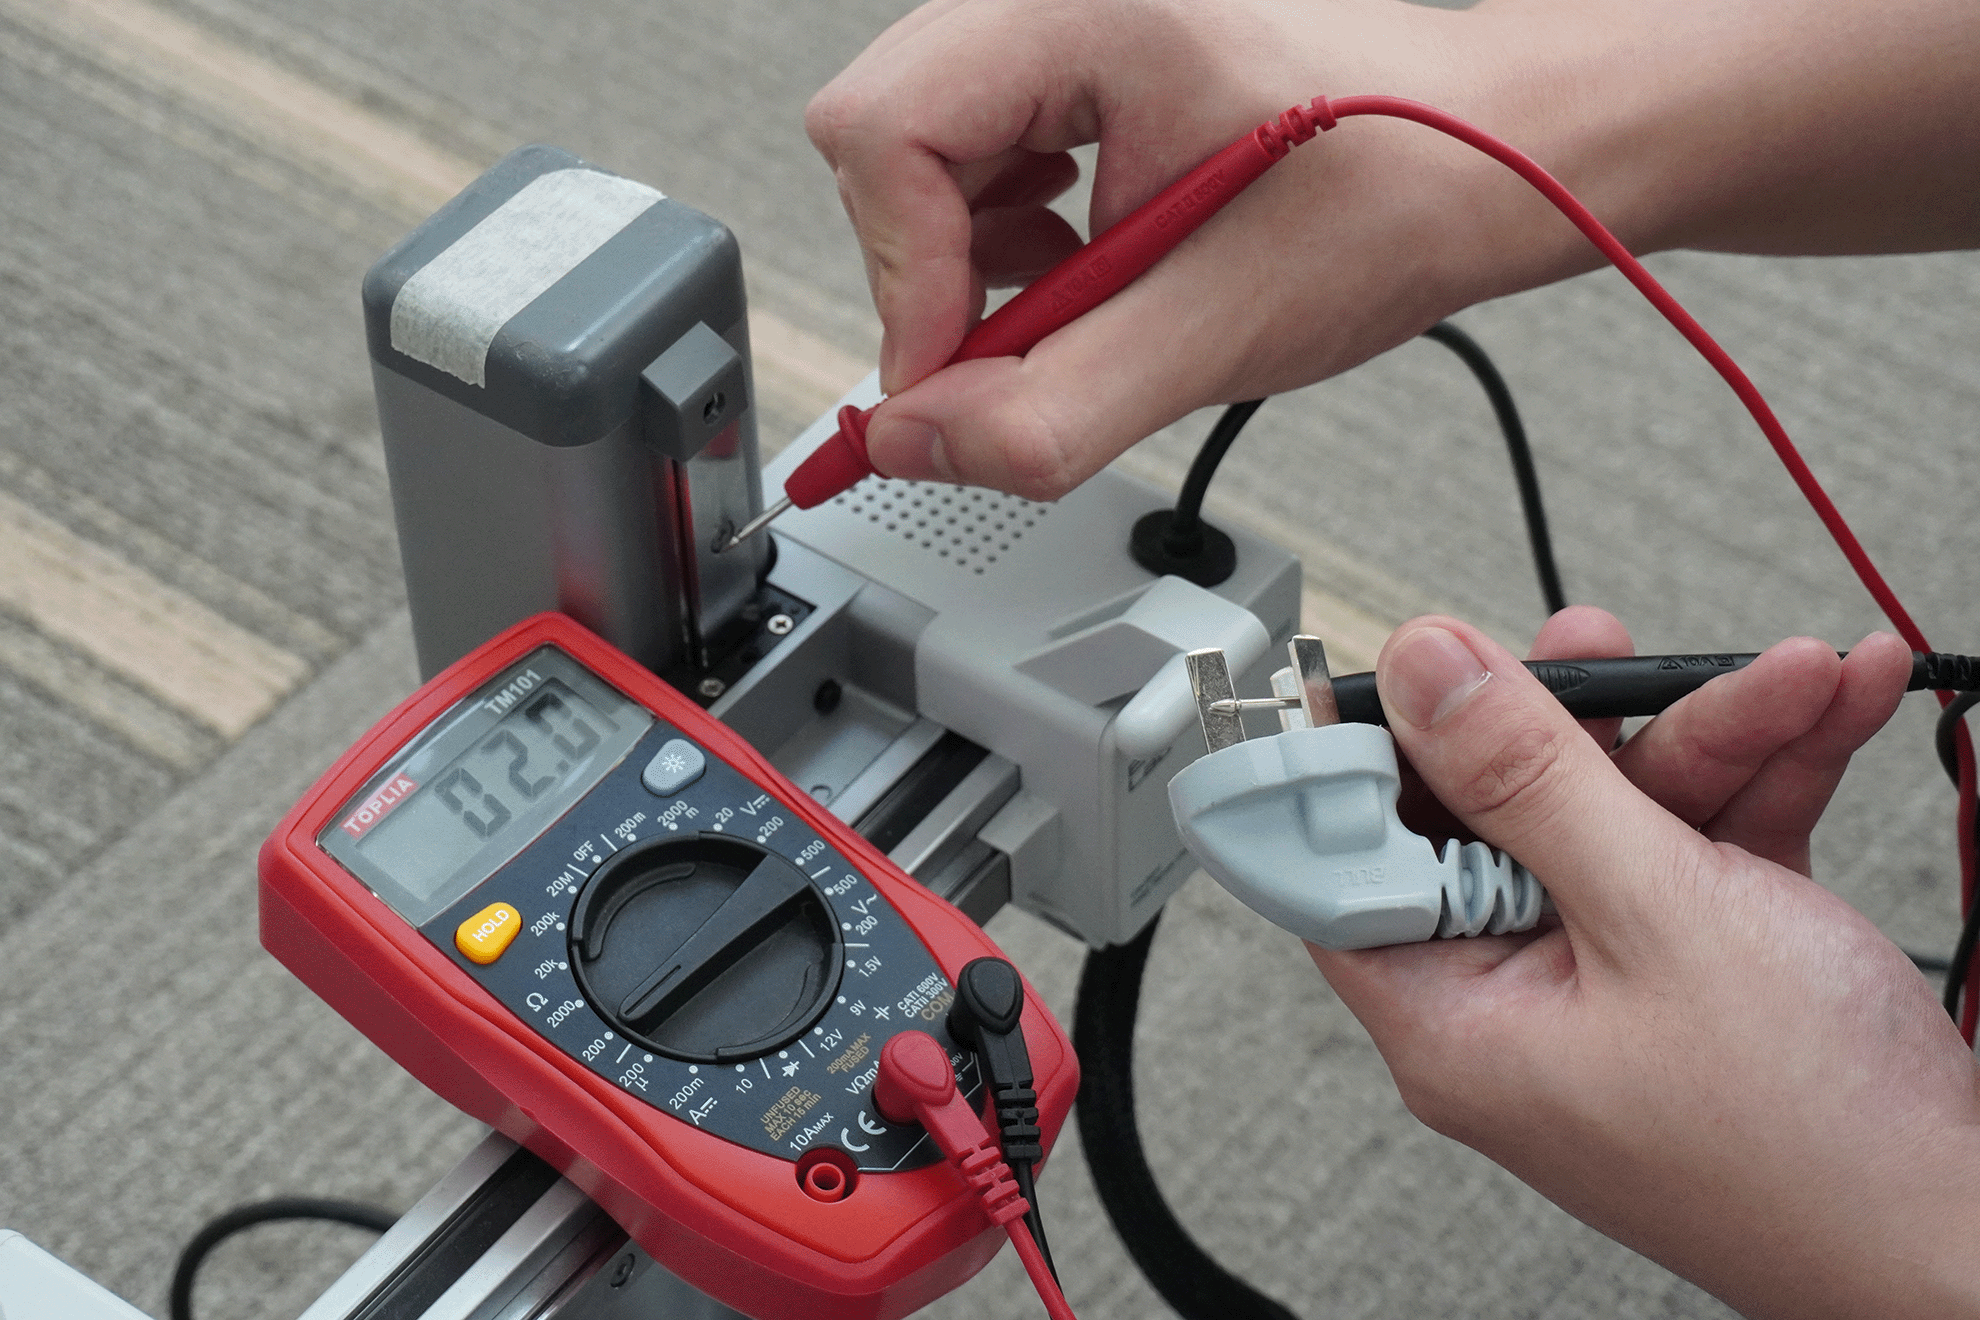
¶ Step 3. Test the Grounding of the Power Cord and the Device
This step is designed to ensure the grounding connection between the power cord and the device is correct.
-
Insert the Power Cord: Plug one end of the power cord into the device and leave the other end unplugged from the socket.
-
Connect the Multimeter Probes to the Power Plug and HeatBed:
-
Attach the black probe of the multimeter to the grounding terminal of the power cord plug.
-
Attach the red probe to the grounding hole
- Check the Resistance Reading: The resistance should ideally be close to 0. If the reading is significantly high, it indicates an issue with the connection between the power cord and the device, and you may need to replace the power cord.
¶ Step 4. Check the Grounding of the Power Strip and the Device(If the printer is connected directly to a household wall outlet, you may skip this step)
This step ensures the device is properly grounded through the power strip. Make sure the power strip is not connected to power during this test.
-
Insert the Power Cord Without Powering On: Plug the power cord into the printer's power strip, but leave the power strip unplugged to ensure it is not powered.
-
Connect the Multimeter Probes:
-
Attach the black probe to the ground terminal of the power strip plug.
-
Attach the red probe to the grounding hole on the device.
- Check the Resistance Reading: The resistance should ideally be close to 0. If the reading is significantly high, it indicates an issue with the grounding between the device and the power strip. You may need to check whether the power strip is grounded or if the ground wire is broken, and consider replacing the power strip.
¶ Step 5. Household Wiring Check
If all the above steps are normal, we recommend checking for similar leakage sensations with other household appliances (such as induction cookers or air conditioners). If you find similar issues, your home wiring might be problematic. In this case, you should:
-
Use a grounding tester to check the grounding of your household wiring.
-
Contact a professional electrician to inspect your home wiring and ensure that all outlets are properly grounded and meet safety standards.
¶ X1/P1 Series Printer
¶ Step 1. Preparation
-
Power Off the Device: Ensure the device you are testing is completely powered off by unplugging it.
-
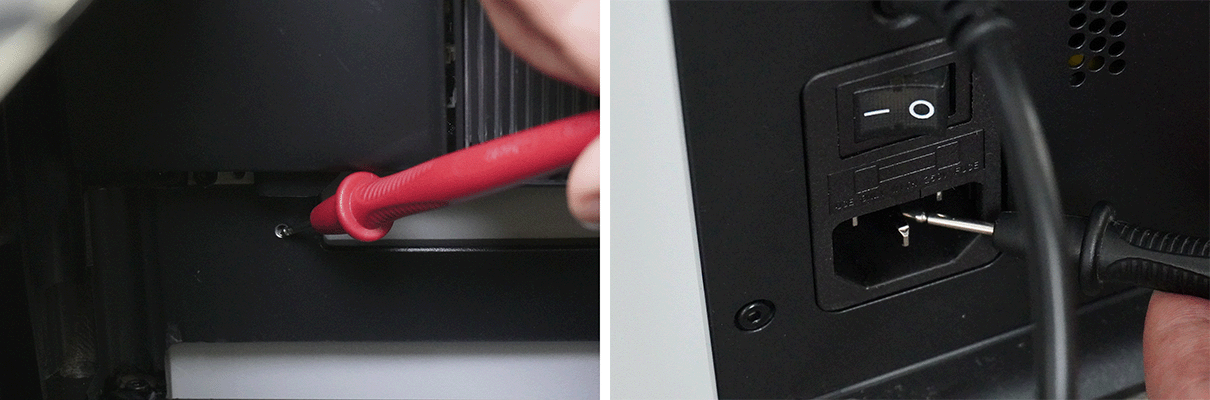
Exposed Metal Parts: You will need to use an exposed screw as the connection point for testing. To do this, remove the coating from a screw on the device to expose the metal, which will serve as the test point.
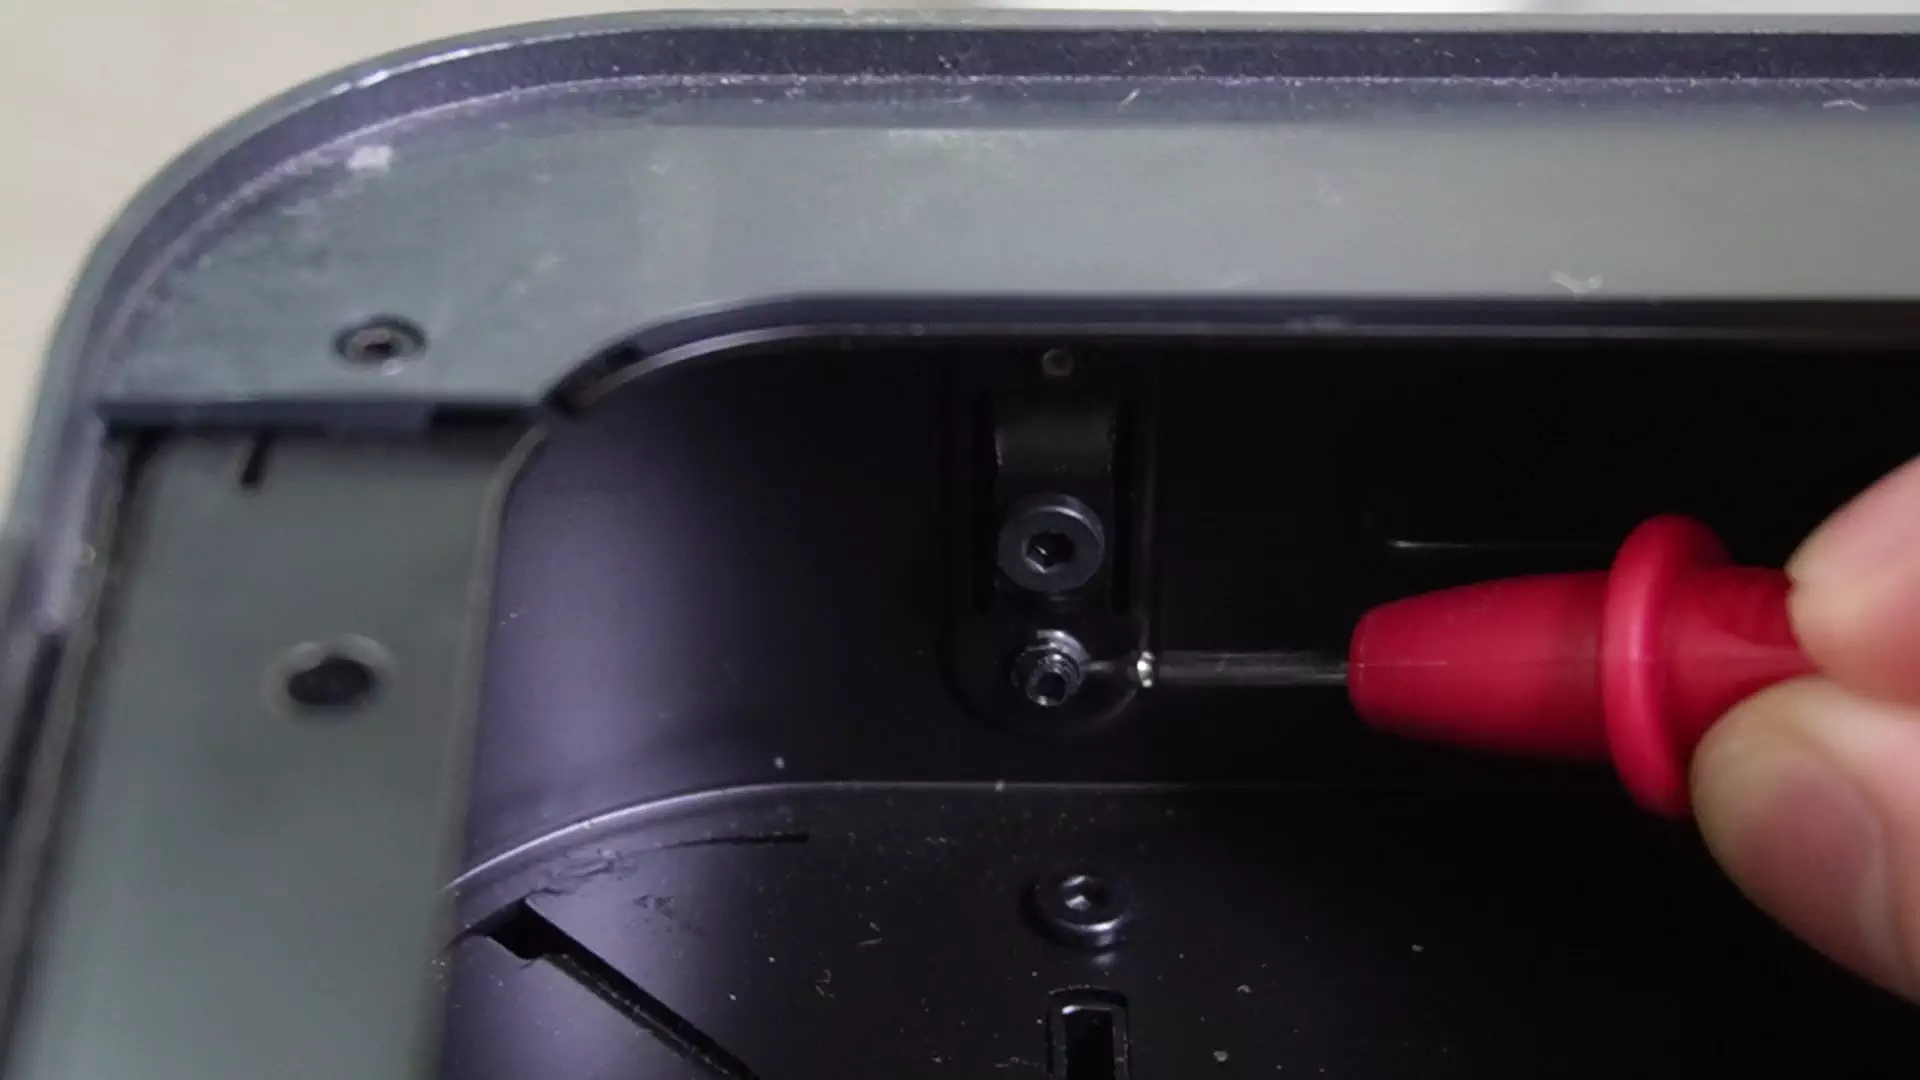
- Set the Multimeter to Resistance Mode: Set your multimeter to the resistance (Ω) mode. Choose the lowest setting to ensure that the measurement range can cover the expected resistance values.
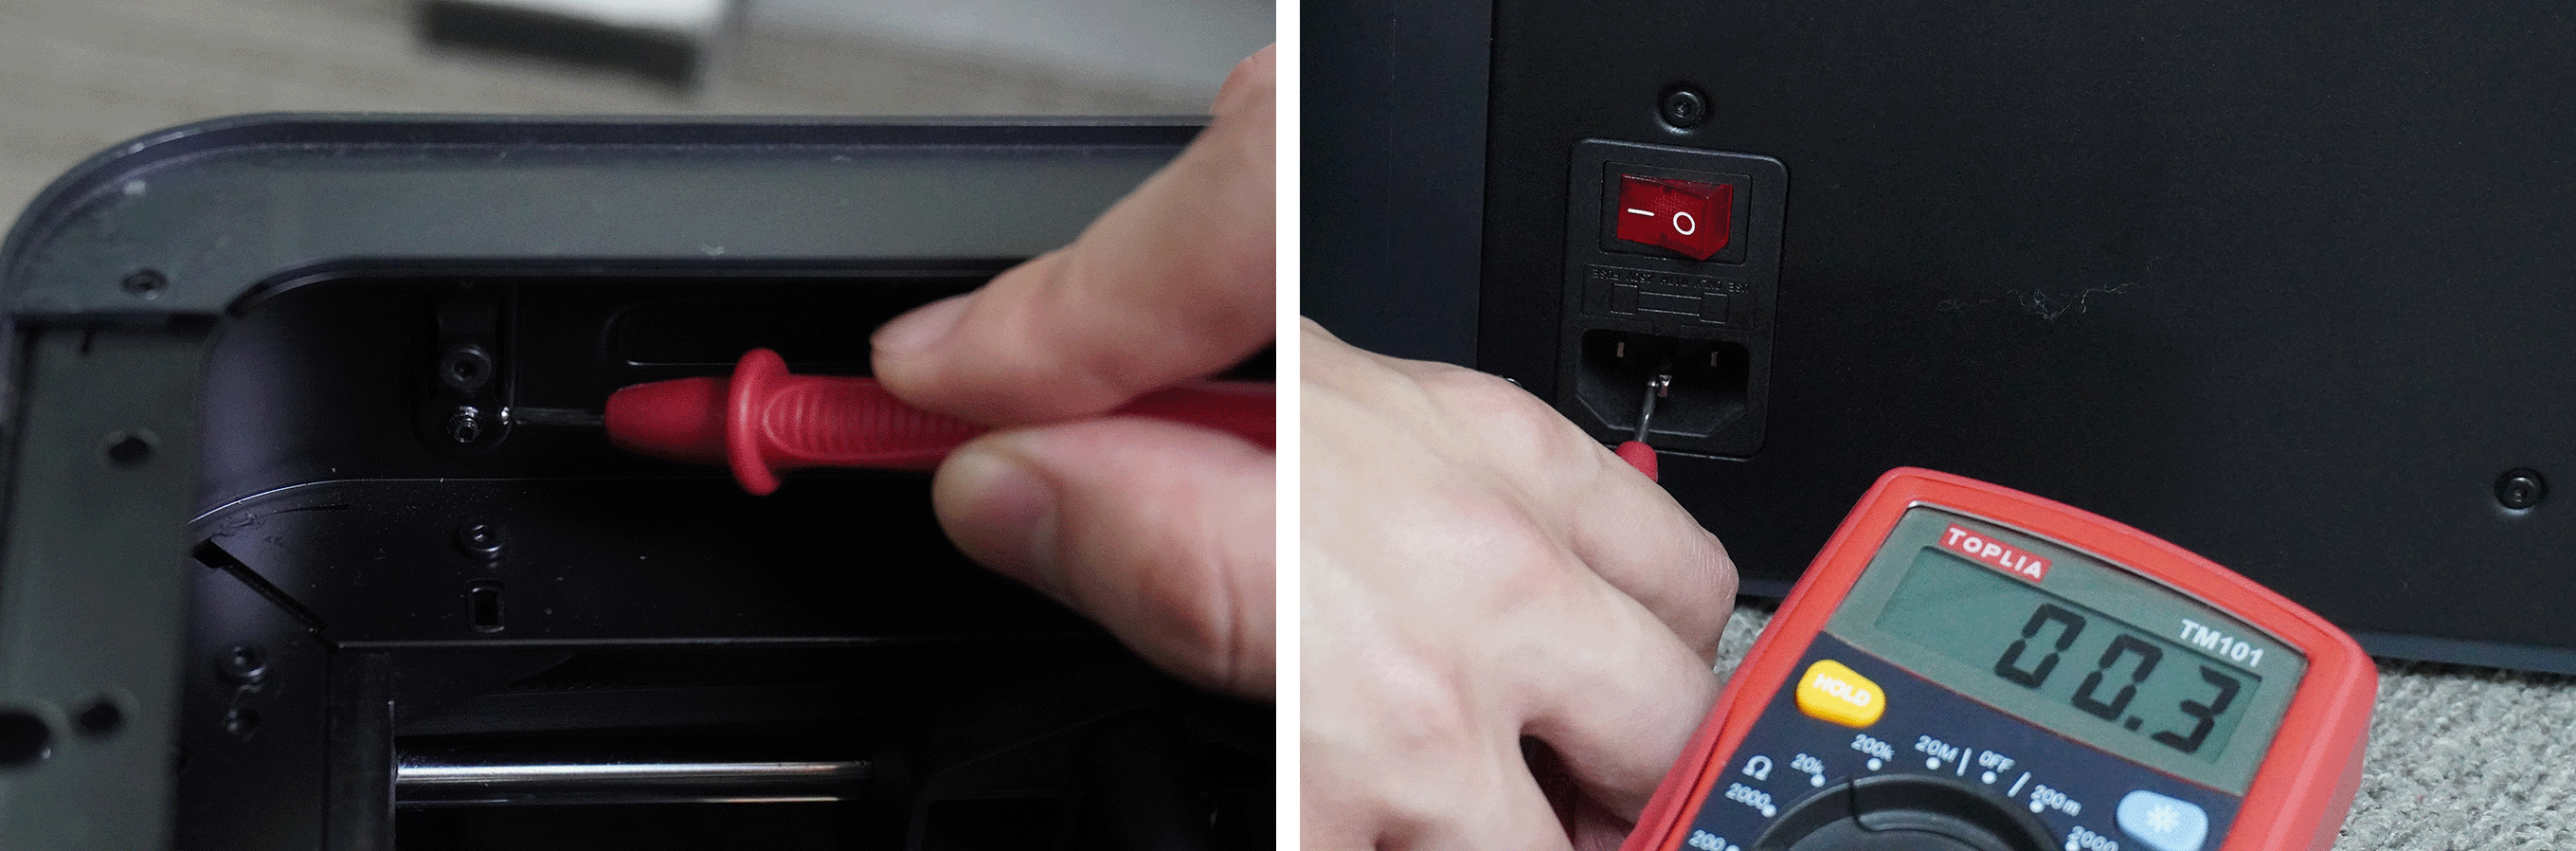
¶ Step 2. Test the Device’s Grounding
This step is designed to check whether the device’s grounding connection to earth is normal and whether there are any leakage issues.
- Connect the Multimeter Probes to the Exposed Metal Part and Ground Wire:
-
Attach the red probe of the multimeter to the exposed metal part from Step 1.
-
Attach the black probe to the ground terminal of the AC power outlet.
- Check the reading: The resistance should ideally be close to 0. If the reading is significantly high, it indicates an issue with the grounding, and you should check whether the grounding screw is loose or not making proper contact.
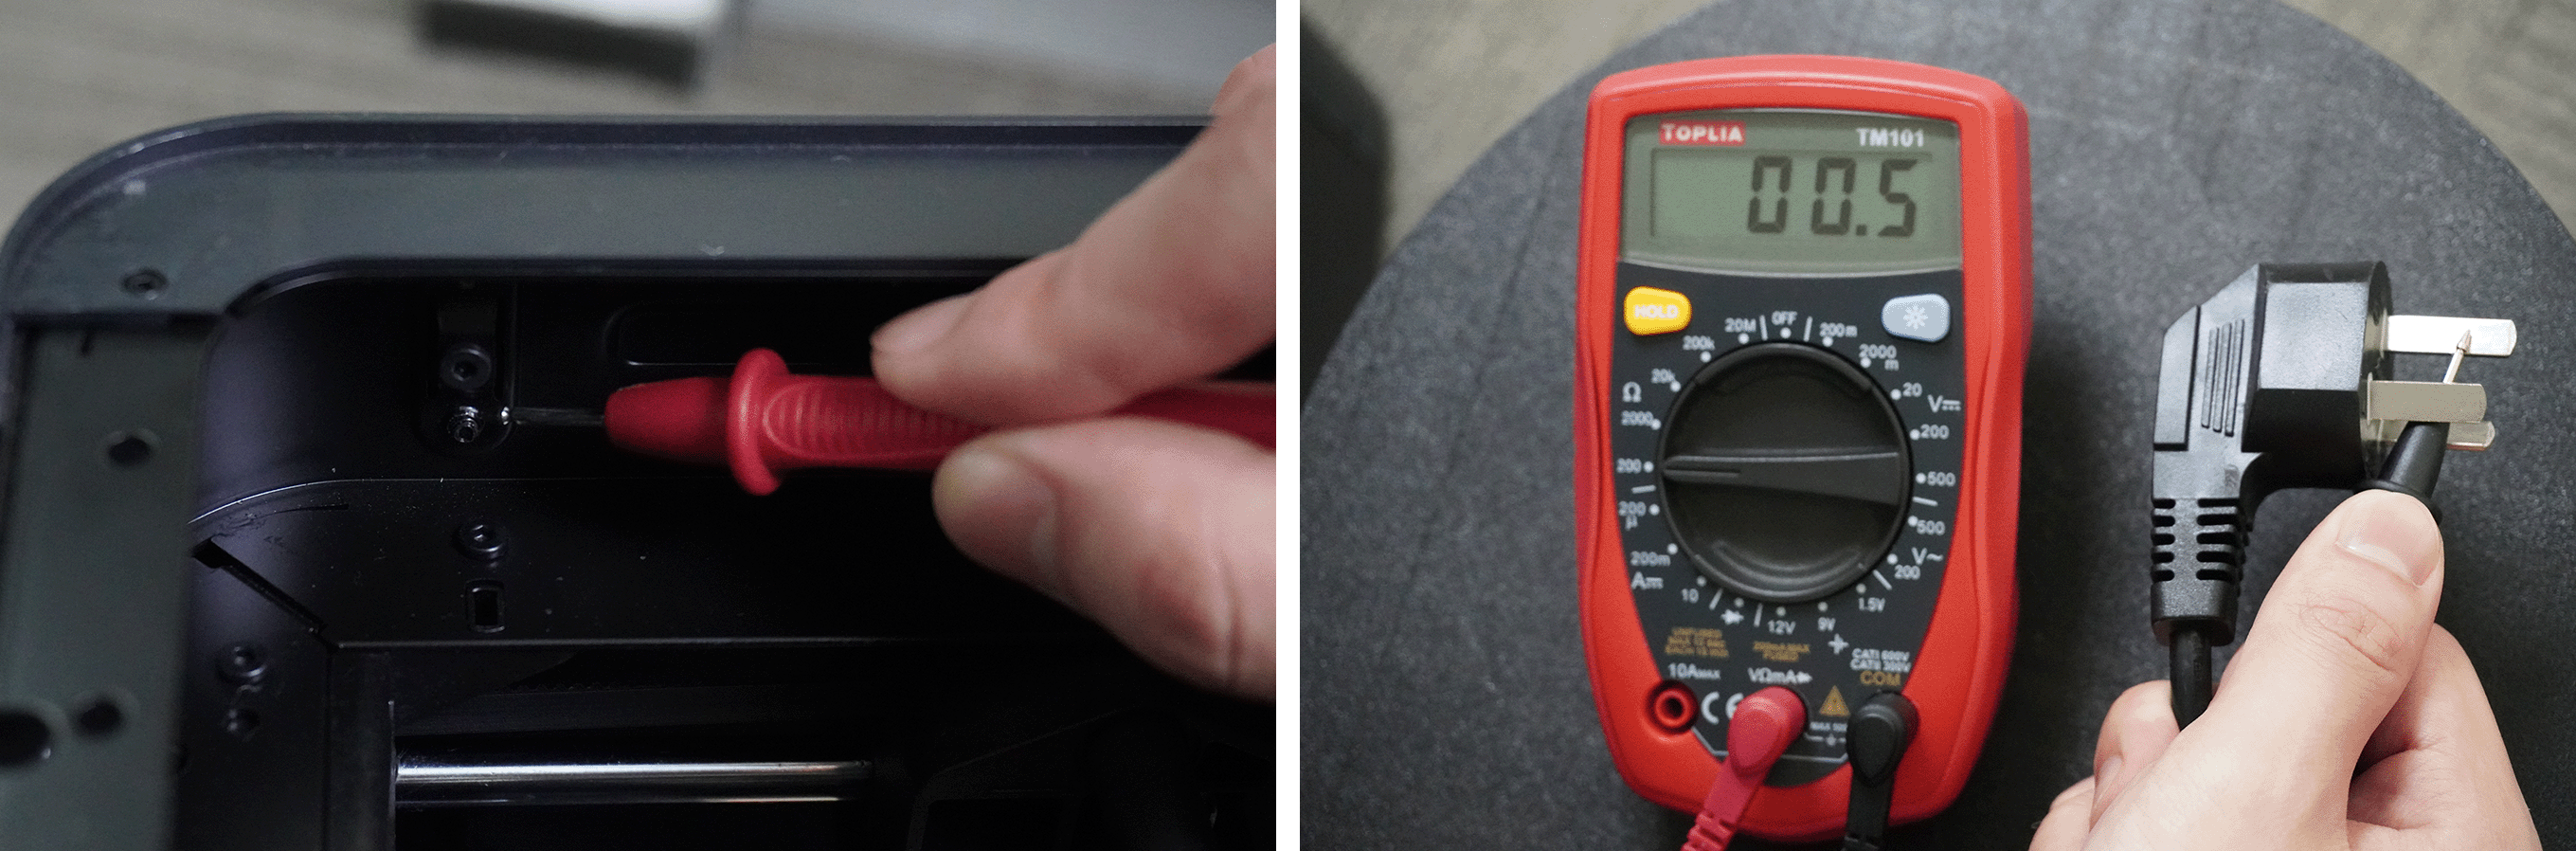
¶ Step 3. Test the Grounding Between the Power Cord and the Device
This step ensures that the device is properly grounded through the power strip. Ensure that the power strip is not powered during this test.
-
Insert the Power Cord: Plug the power cord into the power strip, but do not connect the power strip to the electrical outlet so it remains unpowered.
-
Connect the Multimeter Probes:
-
Attach the red probe of the multimeter to the exposed metal part from Step 1.
-
Attach the black probe to the ground terminal of the power plug of the printer.
- Check the Resistance Reading: The resistance should be less than 5Ω. If the reading is higher, there may be an issue with the grounding between the device and the power strip. Check whether the power strip has a proper ground connection or if the ground wire is broken. Consider replacing the power strip if necessary.
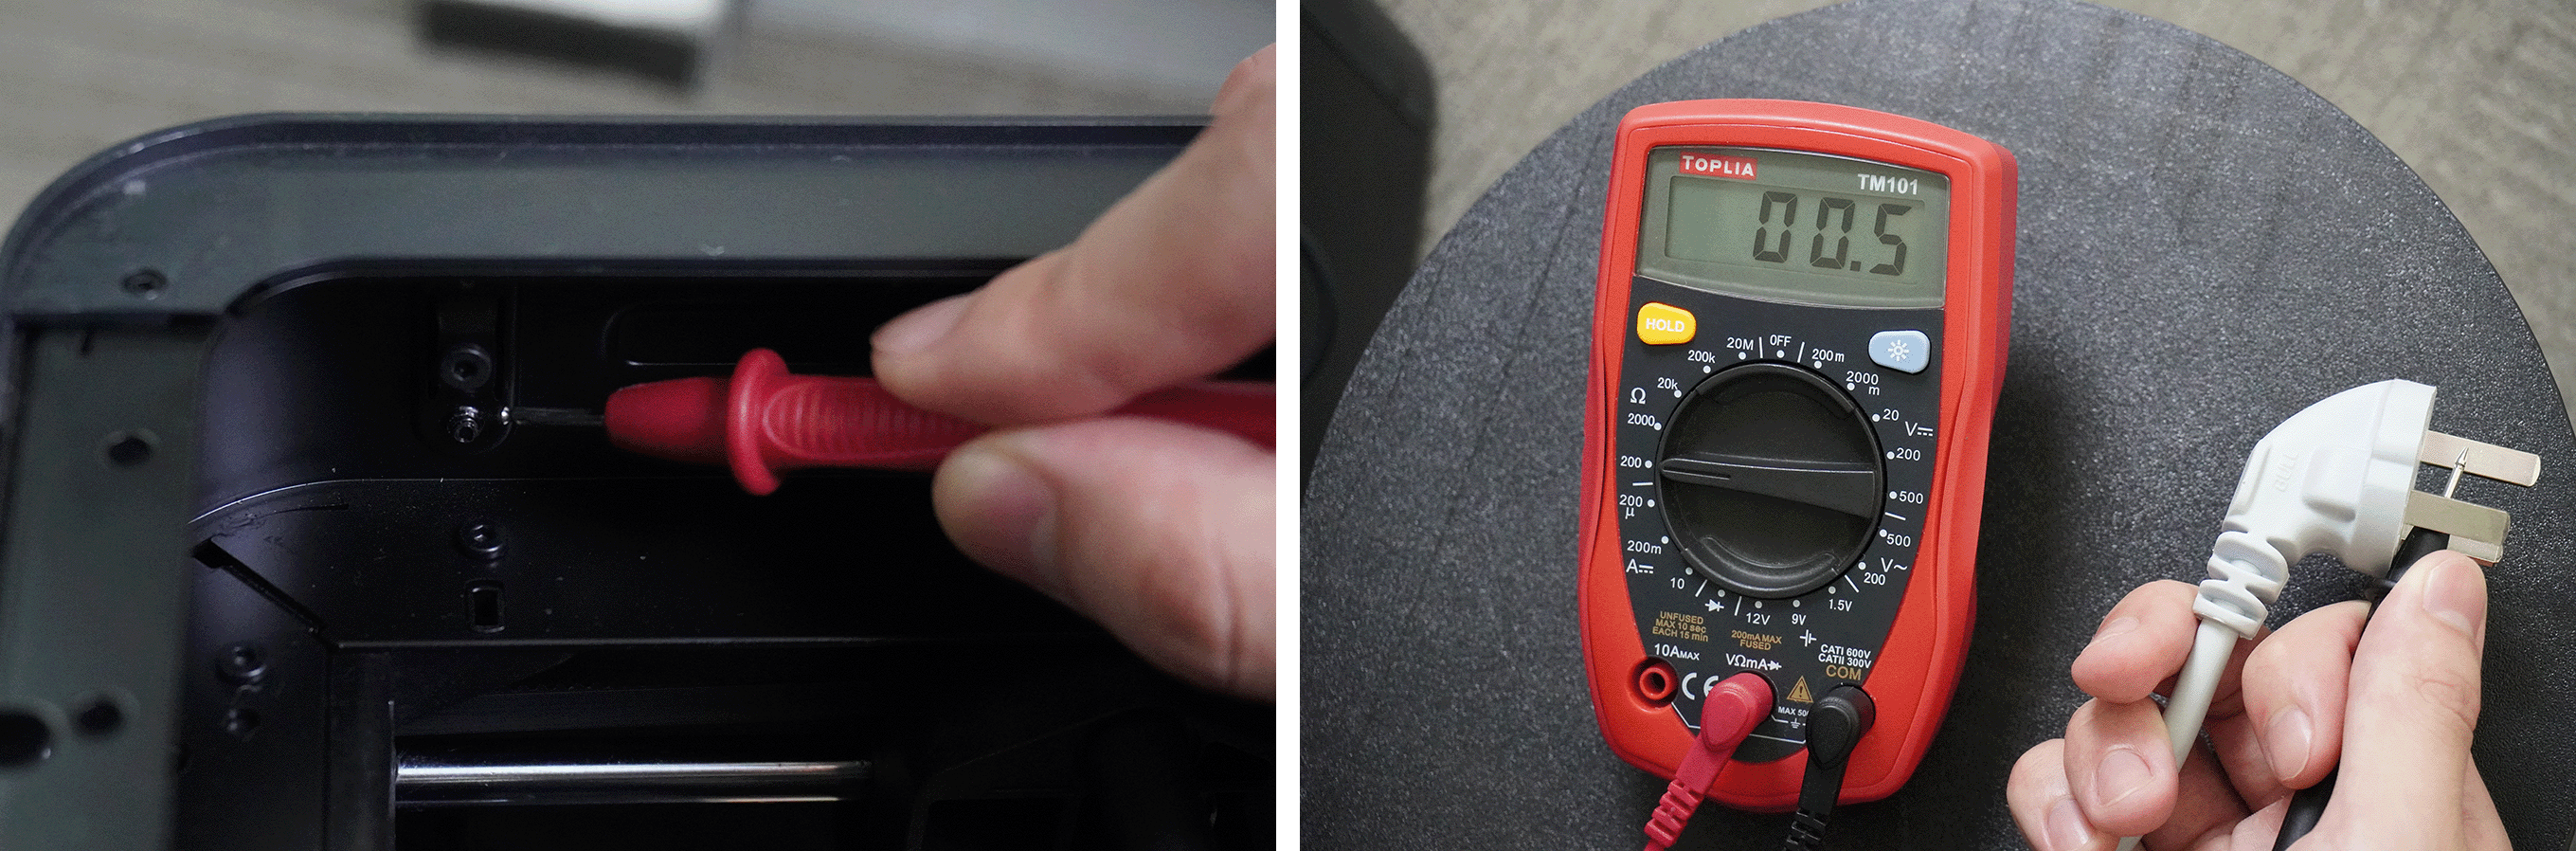
¶ Step 4. Check the Grounding Between the Power Strip and the Device(If the printer is connected directly to a household wall outlet, you may skip this step)
This step ensures that the device is properly grounded through the power strip. Ensure that the power strip is not powered during this test.
-
Insert the Power Cord Without Powering On: Plug the power cord into the power strip, but do not connect the power strip to the electrical outlet, leaving it unpowered.
-
Connect the Multimeter Probes:
-
Attach the red probe to the exposed metal part from Step 1.
-
Attach the black probe to the ground terminal of the power strip plug.
- Check the Resistance Reading: The resistance should ideally be close to 0. If the reading is significantly high, there may be an issue with the grounding between the device and the power strip. Check whether the power strip has a proper ground connection or if the ground wire is broken. Consider replacing the power strip if necessary.
¶ Step 5. Household Wiring Check
If all the above steps are normal, we recommend checking for similar leakage sensations with other household appliances (such as induction cookers or air conditioners). If you find similar issues, your home wiring might be problematic. In this case, you should:
-
Use a grounding tester to check the grounding of your household wiring.
-
Contact a professional electrician to inspect your home wiring and ensure that all outlets are properly grounded and meet safety standards.
Note: The test method for EU plugs is the same as above and the middle of the EU plug is the ground.**

¶ Troubleshooting
After confirming that both the household grounding and the machine's grounding are normal, please proceed with further troubleshooting based on the situation you encounter:
¶ Case 1: Only one printer is in operation, and there is leakage or tripping when the heatbed is heating.
If you encounter this situation, please contact customer support for assistance. Click here to open a new ticket in our Support Page.
¶ Case 2: You have multiple printers, and there is leakage or tripping when multiple printers are operating simultaneously.
The heatbed is a high-voltage device, and it's possible for the aluminum substrate of the heatbed to have leakage issues. It's common for household appliances, such as computers, to have a certain level of leakage. The leakage current of the Bambu Lab printer complies with the GB4341 and IEC62368 safety standards, with the leakage current limited to half of the maximum regulatory limit.
If you need to use multiple printers simultaneously, it may cause the total leakage current to exceed the threshold of the leakage protection device and result in tripping. After consulting with a professional electrician, it is recommended to upgrade the leakage circuit breaker or install dedicated leakage circuit breakers for the printers.
For users with printers powered by 220/230V, if you need to use multiple printers simultaneously, it is advisable to install a transformer that converts 220/230V to 110V with the assistance of a professional electrician. It's important to note that using a transformer doesn't guarantee that tripping won't occur, but increasing the capacity can reduce the risk of tripping.
¶ Case 3: When you connect the power cord to the printer and turn on the power switch, the power switch indicator light does not illuminate.
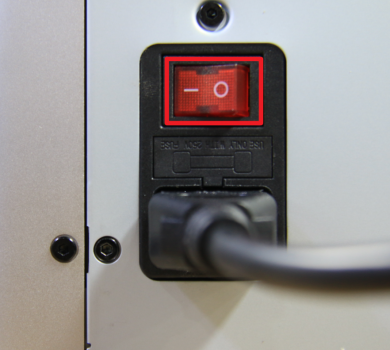
In this situation, it is highly likely that the fuse has blown, and you will need to replace the fuse.
¶ Appendix: X1 Series Printer Wiring Check
Ensure the optimal wiring method for the AC control board is used.
Before proceeding with any troubleshooting, please first check the wiring of the AC control board in the printer. The printer has two wiring ways (both compliant with the IEC 62368 safety standard). Using the wiring on the right side may reduce leakage current, but both wiring ways have leakage current within regulatory limits.
- AC board installation tutorial(V2 version )
- AC board installation tutorial(V3 version)

The wiring on the right side has a lower leakage current: the blue wire is connected to the first terminal, and the brown wire is connected to the second terminal.
After meeting the above three requirements, please proceed with troubleshooting based on the situation you encounter.
¶ End Notes
We hope that the detailed guide we shared with you was helpful and informative.
We want to ensure that you can perform it safely and effectively. If you have any concerns or questions regarding the process described in this article, we encourage you to reach out to our friendly customer service team before starting the operation. Our team is always ready to help you and answer any questions you may have.
Click here to open a new ticket in our Support Page.
We will do our best to respond promptly and provide you with the assistance you need.