A1 mini can be used to play electronic music without speakers. This wiki describes how to play midi files with the A1 mini.
¶ Preparation
Before we get started, we need to get the following items ready
- A1 mini
- Micro SD card
- Computer or other devices used to write into Micro SD card
- MIDI file
MIDI files can be downloaded online, imported from other MIDI editors or created with the online editor. If you want to customize the start/finish sound, a computer is needed.
¶ Step-by-Step Guide - I just want my A1 mini to sing
This section describes how to use A1 mini to play music.
¶ 1. Open the following webpage https://midi-to-gcode.bambulab.com/edit
¶ 2. Import the MIDI file. (If you want to create music yourself, jump to step3)
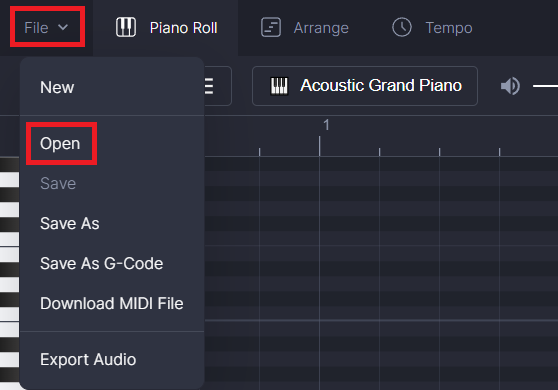
Click the File tab on the top left corner, select Open, then select the MIDI file(*.mid)you want to import in the pop-up window.
¶ 3. Edit MIDI file
After the MIDI file is imported, the whole webpage should look like this. You can click the Play button at the bottom to play the entire track.
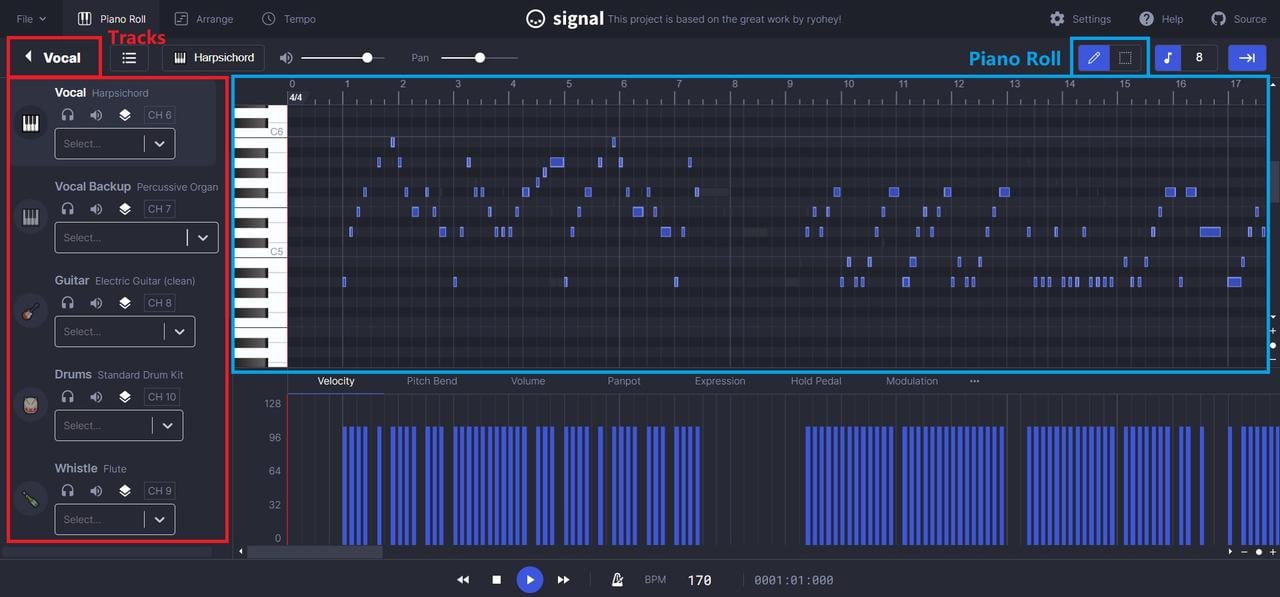
The track window is on the left. You can click the triangle next to the track name on the top left corner to hide/show this section. The MIDI file you imported might have multiple tracks, click the🎧icon on each track to select tracks you want to listen to, or click🔈icon to mute those you don't. The notes corresponding to the track you want to listen to will be highlighted in the piano roll section.
The piano roll section is used to edit the notes in each track. The left scale corresponds to the piano keys and the top scale corresponds to the beat time. You can edit notes with the pencil tool and selection tool on the top right corner.
¶ 4. Allocate track to corresponding motor
The printer has only three motors that can be used to play music, so up to three tracks can be played, and you will need to make a selection for the track you want to play. Click 🎧icon on the track to select the track you want to listen to, then click the play button to play it. Select the track you want to play on the printer.
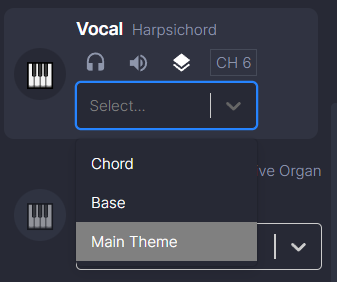
After you have finished selecting the track you want to play, you can allocate the motor that will play the track by using the drop-down box in the corresponding track section. One track can be played by multiple motors at the same time, but a motor can only play one track at a time.
¶ 5. Export G-Code
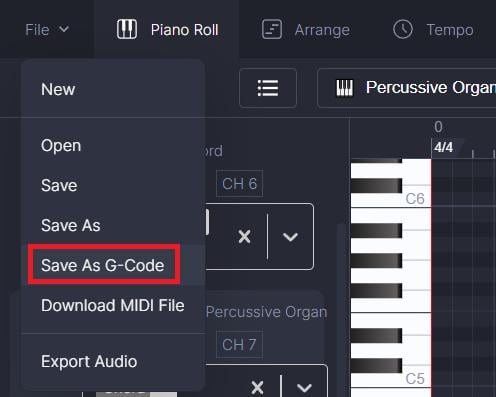
Click File tab on the top left corner, select Save As G-Code option to export the generated G-Code to your computer.
¶ 6. Play the music
Copy the saved G-Code to a Micro SD Card, and plug it into A1 mini. Select the G-Code and press print, then enjoy the music.
¶ Customize Print Start/Finish sound
The G-Code generated by Bambu Studio includes start and finish prompt sound. We can use the same principle to customize print start/finish sound.
⚠ CAUTION:Please follow the instructions strictly and DO NOT MODIFY OTHER PART OF THE G-CODE unless you know what you're doing, or it might lead to printing errors or printer malfunction!
¶ 1. Completing MIDI file transcoding
Transcoding MIDI file to G-Code using the same steps as the last section.
¶ 2. Correctly set the printer model and nozzle size
Launch Bambu Studio, and select the printer you are using from the drop-down list under the Printer section in the Prepare tab. This will also include the nozzle size you will be printing with.
¶ 3. Open the Configuration editor and enable Advanced Options
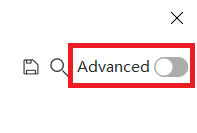
Click the edit preset button to open printer settings, and then click the advanced switch on the top right corner to enable advanced settings.
 |
 |
¶ 4. Edit the G-Code
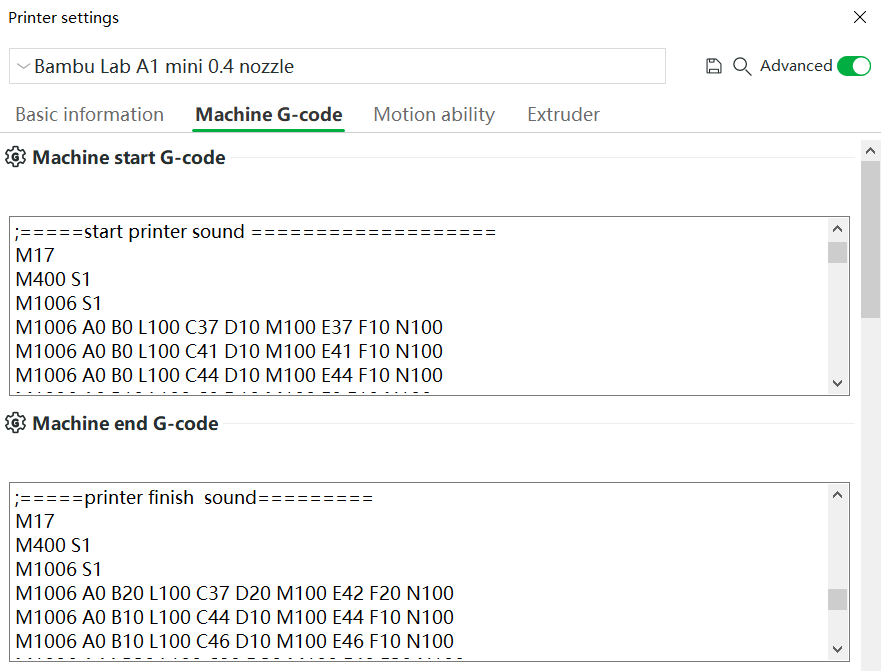
Click the Machine G-Code tab
To set the start sound, find start printer sounddivider in Machine start G-codesection, and replace all the code between this divider and next one with the code generated by the MIDI file.
To set the end sound, find printer finish sounddivider in Machine end G-codesection, and replace all the code between this divider and next one with the code generated by the MIDI editor.
NOTE:The line breaks in the generated code need to be preserved when pasting G-Code. Windows users can use
Wordpadto open G-Code file and copy-paste it into Bambu Studio. UsingNotepadmight cause line break loss and lead to code error!
¶ 5. Save the Preset
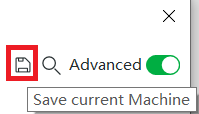
Click Save button on the top right corner to save the current preset. You can choose to save it as a user preset or project inside(internal) preset according to the frequency you want to use it.
 |
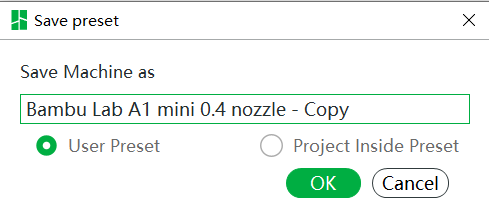 |
If the preset is saved as a user preset, all the projects can apply this preset, and the printer will play a customized start/end sound if this preset is selected.
If the preset is saved as a project inside the preset, the customized start/end sound will only be played when this specific project is been printed.
¶ 6. Finish Printing
Finish printing as normal. For more information about the printing process, refer to Bambu Studio Quick Start Guide.
¶ FAQ
¶ Why my printer show printing completed immediately after I selected the G-Code file on my SD Card and doesn't play any sound?
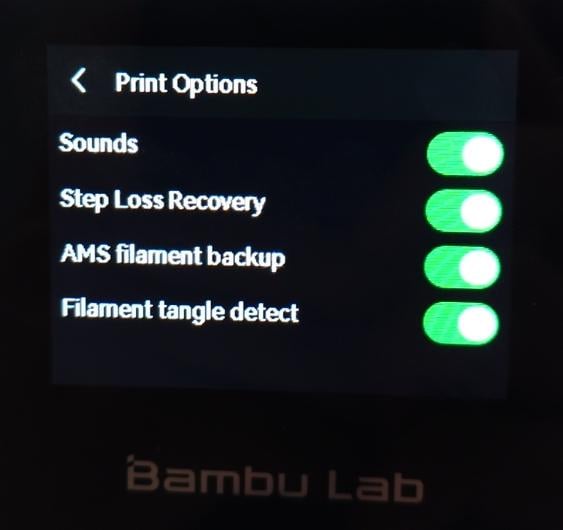
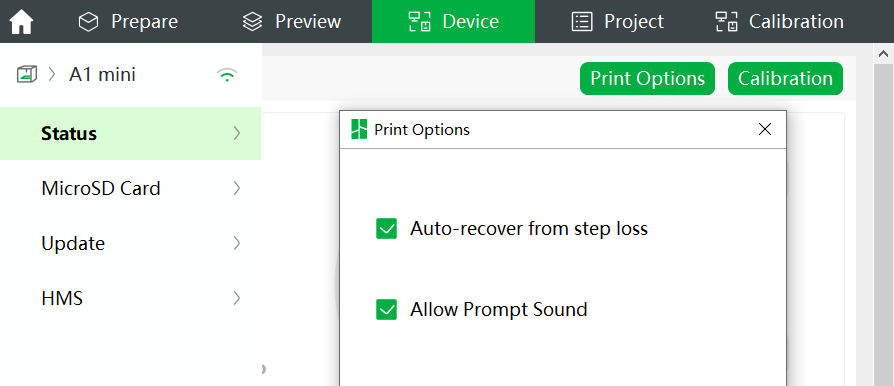
If the sound is not enabled in the setting, the printer will ignore all sound commands. You can enable sound on the printer or on your computer.
- On printer: Setting->Print options->Sound
- On Computer: Bambu Studio->Device->Print Options->Allow Prompt Sound
 |
 |
¶ Why is the music played not the same as in the MIDI editor?
As the printer is playing music using the vibration of its motor instead of using speakers, each motor can only play one frequency at a time. If there are multiple notes on one track at the same time, the motor assigned to that track can't play all the notes thus leading to end result that sounds nothing like what you heard in the MIDI editor.
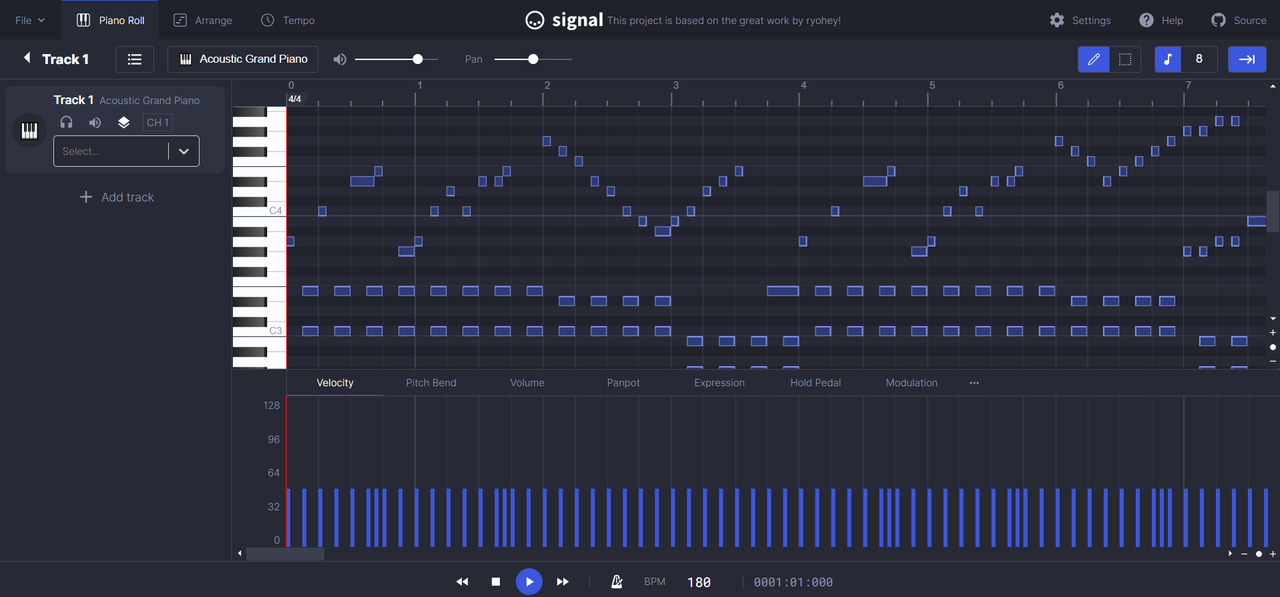
We advise you to avoid this kind of MIDI file. If you must use it, please use the editor to separate different musical compositions into different tracks and assign each track to a different motor to get a better result.
¶ End Notes
We hope that the detailed guide we shared with you was helpful and informative.
We want to ensure that you can perform it safely and effectively. If you have any concerns or questions regarding the process described in this article, we encourage you to reach out to our friendly customer service team before starting the operation. Our team is always ready to help you and answer any questions you may have.
Click here to open a new ticket in our Support Page.
We will do our best to respond promptly and provide you with the assistance you need.