¶ Calibration Toolbox
¶ What are begin setup calibration and mount calibration? Why must these calibrations be performed?
Installation calibration and mount calibration are used to measure the laser focus or tip positions, enabling the machine to enter absolute positioning mode. Without completing these calibrations, a machine cannot use the laser and cutting functions.
¶ What is the difference between initialization calibration and mounting calibration of laser modules?
Laser Module Begin Setup:
The XYZ position of the laser focus is positioned by calibration, and laser test materials are required for assistance. It is generally used when the machine and laser are used together for the first time.
Laser Module Mount Calibration:
The XY position of the laser focus is positioned, and the Z position is positioned using the calibration data of laser module begin setup (generally does not affect the processing effect). No laser test materials are required for assistance. It is generally used after machine begin setup, when the laser focus position needs to be repositioned each time.
Please note: After the laser focus position is positioned, the positioning will fail if the following occurs. After the positioning fails, it can only be repositioned by recalibration.
The printer is powered off;
X/Y/Z-axis homing;
Perform other calibration tasks;
Step loss.
When repositioning is required, the "Assistant" page will remind you and recommend the most appropriate calibration type.
¶ What to do if the laser working position is incorrect?
During transportation and usage, vibrations may cause slight shifts in the position and orientation of the BirdsEye Camera, leading to inaccuracies in laser processing positions.
When this occurs, you can perform a "BirdsEye Camera Calibration" by connecting the laser module and clicking "Toolbox -> BirdsEye Camera Calibration" to recalibrate the position and orientation of the BirdsEye Camera.
In the future, H2D will introduce an automatic detection feature for BirdsEye Camera pose deviations. When significant deviations are detected, the machine will proactively remind the user to re-execute the BirdsEye Camera calibration.
¶ Accessories Used
¶ Laser Slats Pack and Laser Grid Panel
Introduction to the Laser Platform and Cutting Platform
¶ During laser processing, is it possible to process directly on the bottom surface of the laser base without using a support (slats pack and grid panel)?
It is not recommended for the following reasons:
Without the support, only laser surface engraving can be performed; laser cutting is not possible.
Without the support, the laser module may interfere with the platform when processing objects close to the edge, leading to processing failures.
The height measurement function is based on the surface of the support; without the support, the height measurement results will be approximately 15mm lower and may even yield negative values. (While it is still possible to complete the task using the measurement results forcefully, this practice is not recommended.)
¶ Tips for Use
¶ Photographing for Height Measurement
¶ How is the height measurement point for the visual position selected? What should I do if I can't get the machine to measure the height at the desired location?
The height measurement point is crucial because the "visual position" relies on the height of this measurement point. The visual position results are only accurate when they are near that height.
The height measurement point is automatically selected based on the object's contour recognized by the machine.
In the current version, there is only this method for selecting the height measurement point. Therefore, please do not place any objects unrelated to the processing in the chamber before the height measurement, as this may lead to errors in selecting the measurement point. Additionally, when processing irregularly shaped parts, the selection of the height measurement point may not be ideal (for example, when processing a very small top surface of a trapezoidal part). In such cases, please pay attention to whether the measurement results meet expectations.
In the future, we will introduce a manual point-selection height measurement function and a manual height input for visual position to address situations where the automatic selection of the measurement point is not satisfactory.
¶ Why can height measurement be inaccurate? Will this affect processing?
Please refer to: Material thickness measurement
¶ How to maintain the laser module?
Please refer to this document: Laser Module Module Periodic Maintenance Recommendations
¶ What are the safety precautions when the laser module is working?
The top laser protection plate filters out the laser.
The emergency stop switch allows users to turn off the power in an emergency.
After initiating a task, you need to press the physical button to ensure that the user stays in front of the machine when initiating the task.
During the use, the user is reminded not to leave the machine during processing and to pay attention to risks such as fire and smoke.
Identify some materials through QR codes and intercept them when the materials are misplaced or the acrylic film is forgotten to be torn off. (Only applicable to some official materials)
Flame sensor, vision, and temperature triple-flame detection: after detecting a fire, the buzzer reminds the user.
Drop protection + communication protection: the laser module will automatically turn off the laser after the laser module drops or the communication is disconnected.
Door opening protection: the laser will be turned off immediately when the door is opened accidentally.
Platform inspection: processing will be prohibited if non-compliant pads are placed.
¶ Troubleshooting
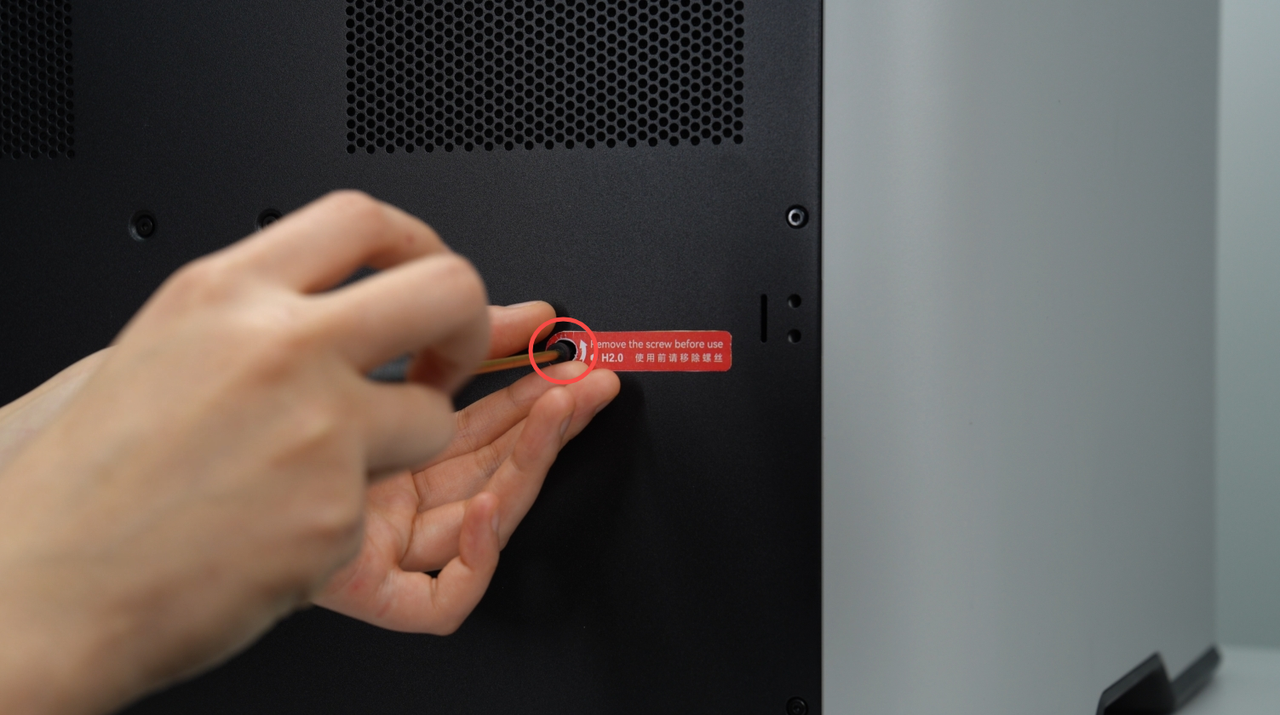
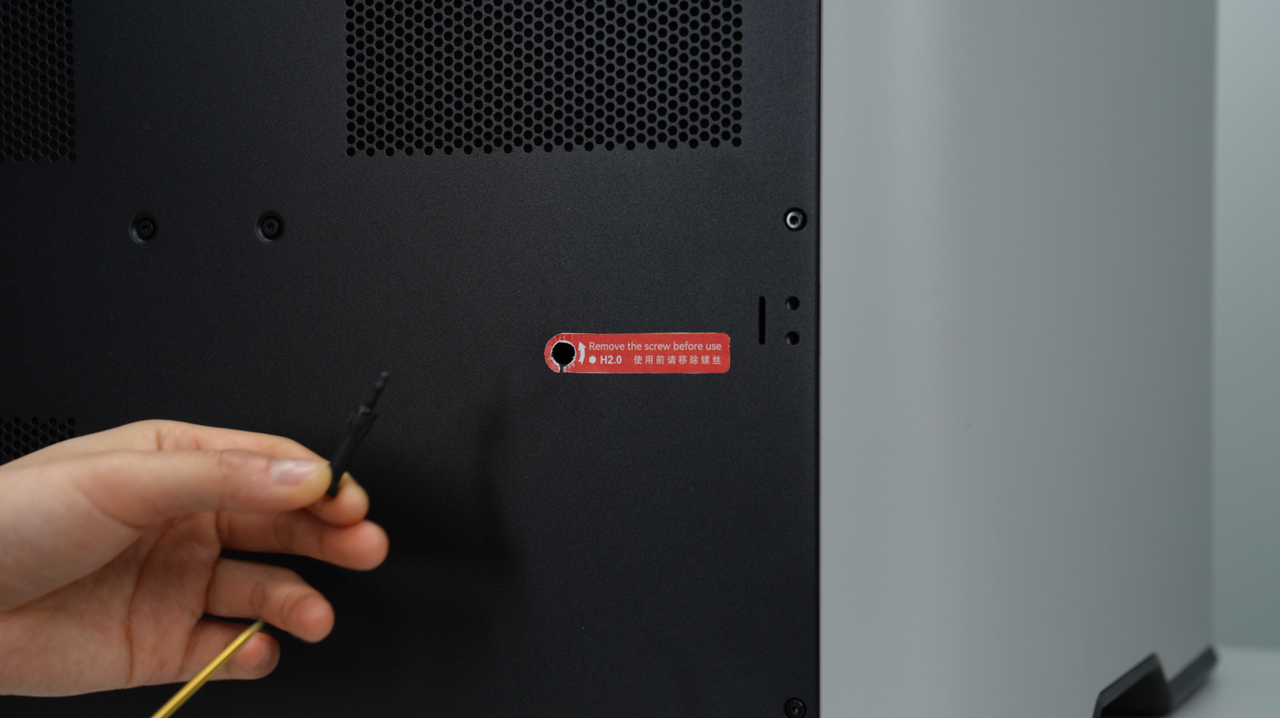
¶ The laser module initialization calibration has significant vibration and noise. What should I do?
First, please confirm whether the air pump fixing screw is unscrewed. The operation method is to use an H2.0 Allen key to unscrew the air pump fixing screw marked in red. After seeing the screw head, catch the screw with your hand and slowly remove the screw to avoid dropping it into the printer. It is recommended to keep the screws that you removed. If the printer needs to be transported, the original packaging will minimize shipping damage.
 |
 |
If you have confirmed that the air pump fixing screws have been removed, but it still produces unusually loud noises, please record a video of the anomaly and contact after-sales technical support for assistance.
¶ How should I troubleshoot if the laser module does not emit light or there is no trace of engraving?
This phenomenon may be caused by the following reasons:
The light is blocked;
Check whether the nozzle and laser lens mirror are assembled correctly, whether there is any foreign matter blocking them, or whether the window lens is dirty. If so, please clean it in time.
Insufficient engraving energy or weak laser absorption of the material;
Check whether the current engraving speed & power can produce clearer engraving marks. Users can confirm this by consulting the material WIKI, making a power-speed matrix, etc.
Whether there is moisture on the surface of the material, or if the moisture content is high, it will reduce laser engraving performance. It is recommended to wipe it clean or dry it properly (excessive drying may cause the material to warp, deform, etc., so users should pay attention to it at any time).
Whether the surface of the material is blue or close to blue, or has high transparency or strong reflection, in which case the material cannot absorb the blue wavelength of the laser and cannot be processed. You can try to use a black paint pen, sticker, etc. to cover the surface to improve the surface laser energy absorption. The specific improvement depends on the material and the method of covering. Users should pay attention to material safety when trying.
Is the material copper, gold or other metals, or mirror materials (see the laser applicable material table for details)? Such materials cannot absorb the blue wavelength of the laser and cannot be processed. Please change the material.
Incorrect engraving position or thickness measurement;
Check whether the engraving pattern placement position coincides with the workpiece. You can first confirm the actual position of the material by taking a photo to turn it straight, and then move the engraving pattern to the material.
Check whether the value in the thickness measurement column is correct. If the difference with the actual thickness is too large, you can adjust it by re-calibrating the height or manually entering the material thickness. In addition, materials with strong reflectivity or high transparency may also cause automatic thickness measurement to fail.
Laser module damage;
If the above reasons have been checked and confirmed to be the laser head is damaged, please contact customer service for repair or replacement.
¶ I set up cutting in Bambu Suite, but the material did not cut through. What should I do?
Please refer to the previous article "How should I troubleshoot if the laser module does not emit light or there is no trace of engraving?" First check whether the light and engraving are normal. If the above are normal, it may be caused by the following reasons:
The air pump is not connected correctly, or the air assist nozzle is not emitting air normally.
¶ I have placed the correct platform, but why does the screen show that the platform type is wrong when I start production?
This issue may be caused by the failure to update the platform type.
The platform type is refreshed only when taking photos and initiating production. If it isn't refreshed, the platform type will always remain in the previous state, so the screen may always show that the platform type is incorrect.
You can resolve this by taking photos to refresh the platform type. Alternatively, you can ignore the error and start the task directly. After initiating the task, the machine will check and refresh the platform type.
In the future, H2D will implement an automatic refresh of the platform type when the door is closed, so you will only need to close the hatch before starting production, and the platform type will be refreshed automatically.
¶ I always fail when using laser processing on small objects. What should I do?
Small objects typically encounter the following issues during processing:
The object is too small, leading to false positives in visual recognition indicating that the material does not exist.
Solution: After confirming the material is present, directly click the "Ignore" option to dismiss the false positive.
Plans: In the future, H2D will optimize the detection algorithm for small objects and address the false positive issue.
Photographing failure for small objects
Solution: Please select the correct material and enter the correct thickness before photographing. If the photographing fails, the machine will use the thickness you entered for the visual position, allowing you to place your design directly on the photo result for processing.
Plans: We will continue to optimize the recognition capability for small objects and will introduce a manual height input for the visual position function and point selection for height measurement function as backup solutions.
The object is too light and small, causing it to be blown by the fan during processing, or even to slide off the support.
Solution: To prevent the object from falling, please use a grid panel to support the object, instead of using slats to elevate light small items. If necessary, you can also use a weight block to secure small light objects to avoid movement during processing.
Please ensure that the weight block is placed horizontally, not vertically, as this may cause a collision with the tool.
Please avoid covering the object with the weight block, as this may result in inaccurate height measurement results.