¶ Ⅰ. Kit Overview
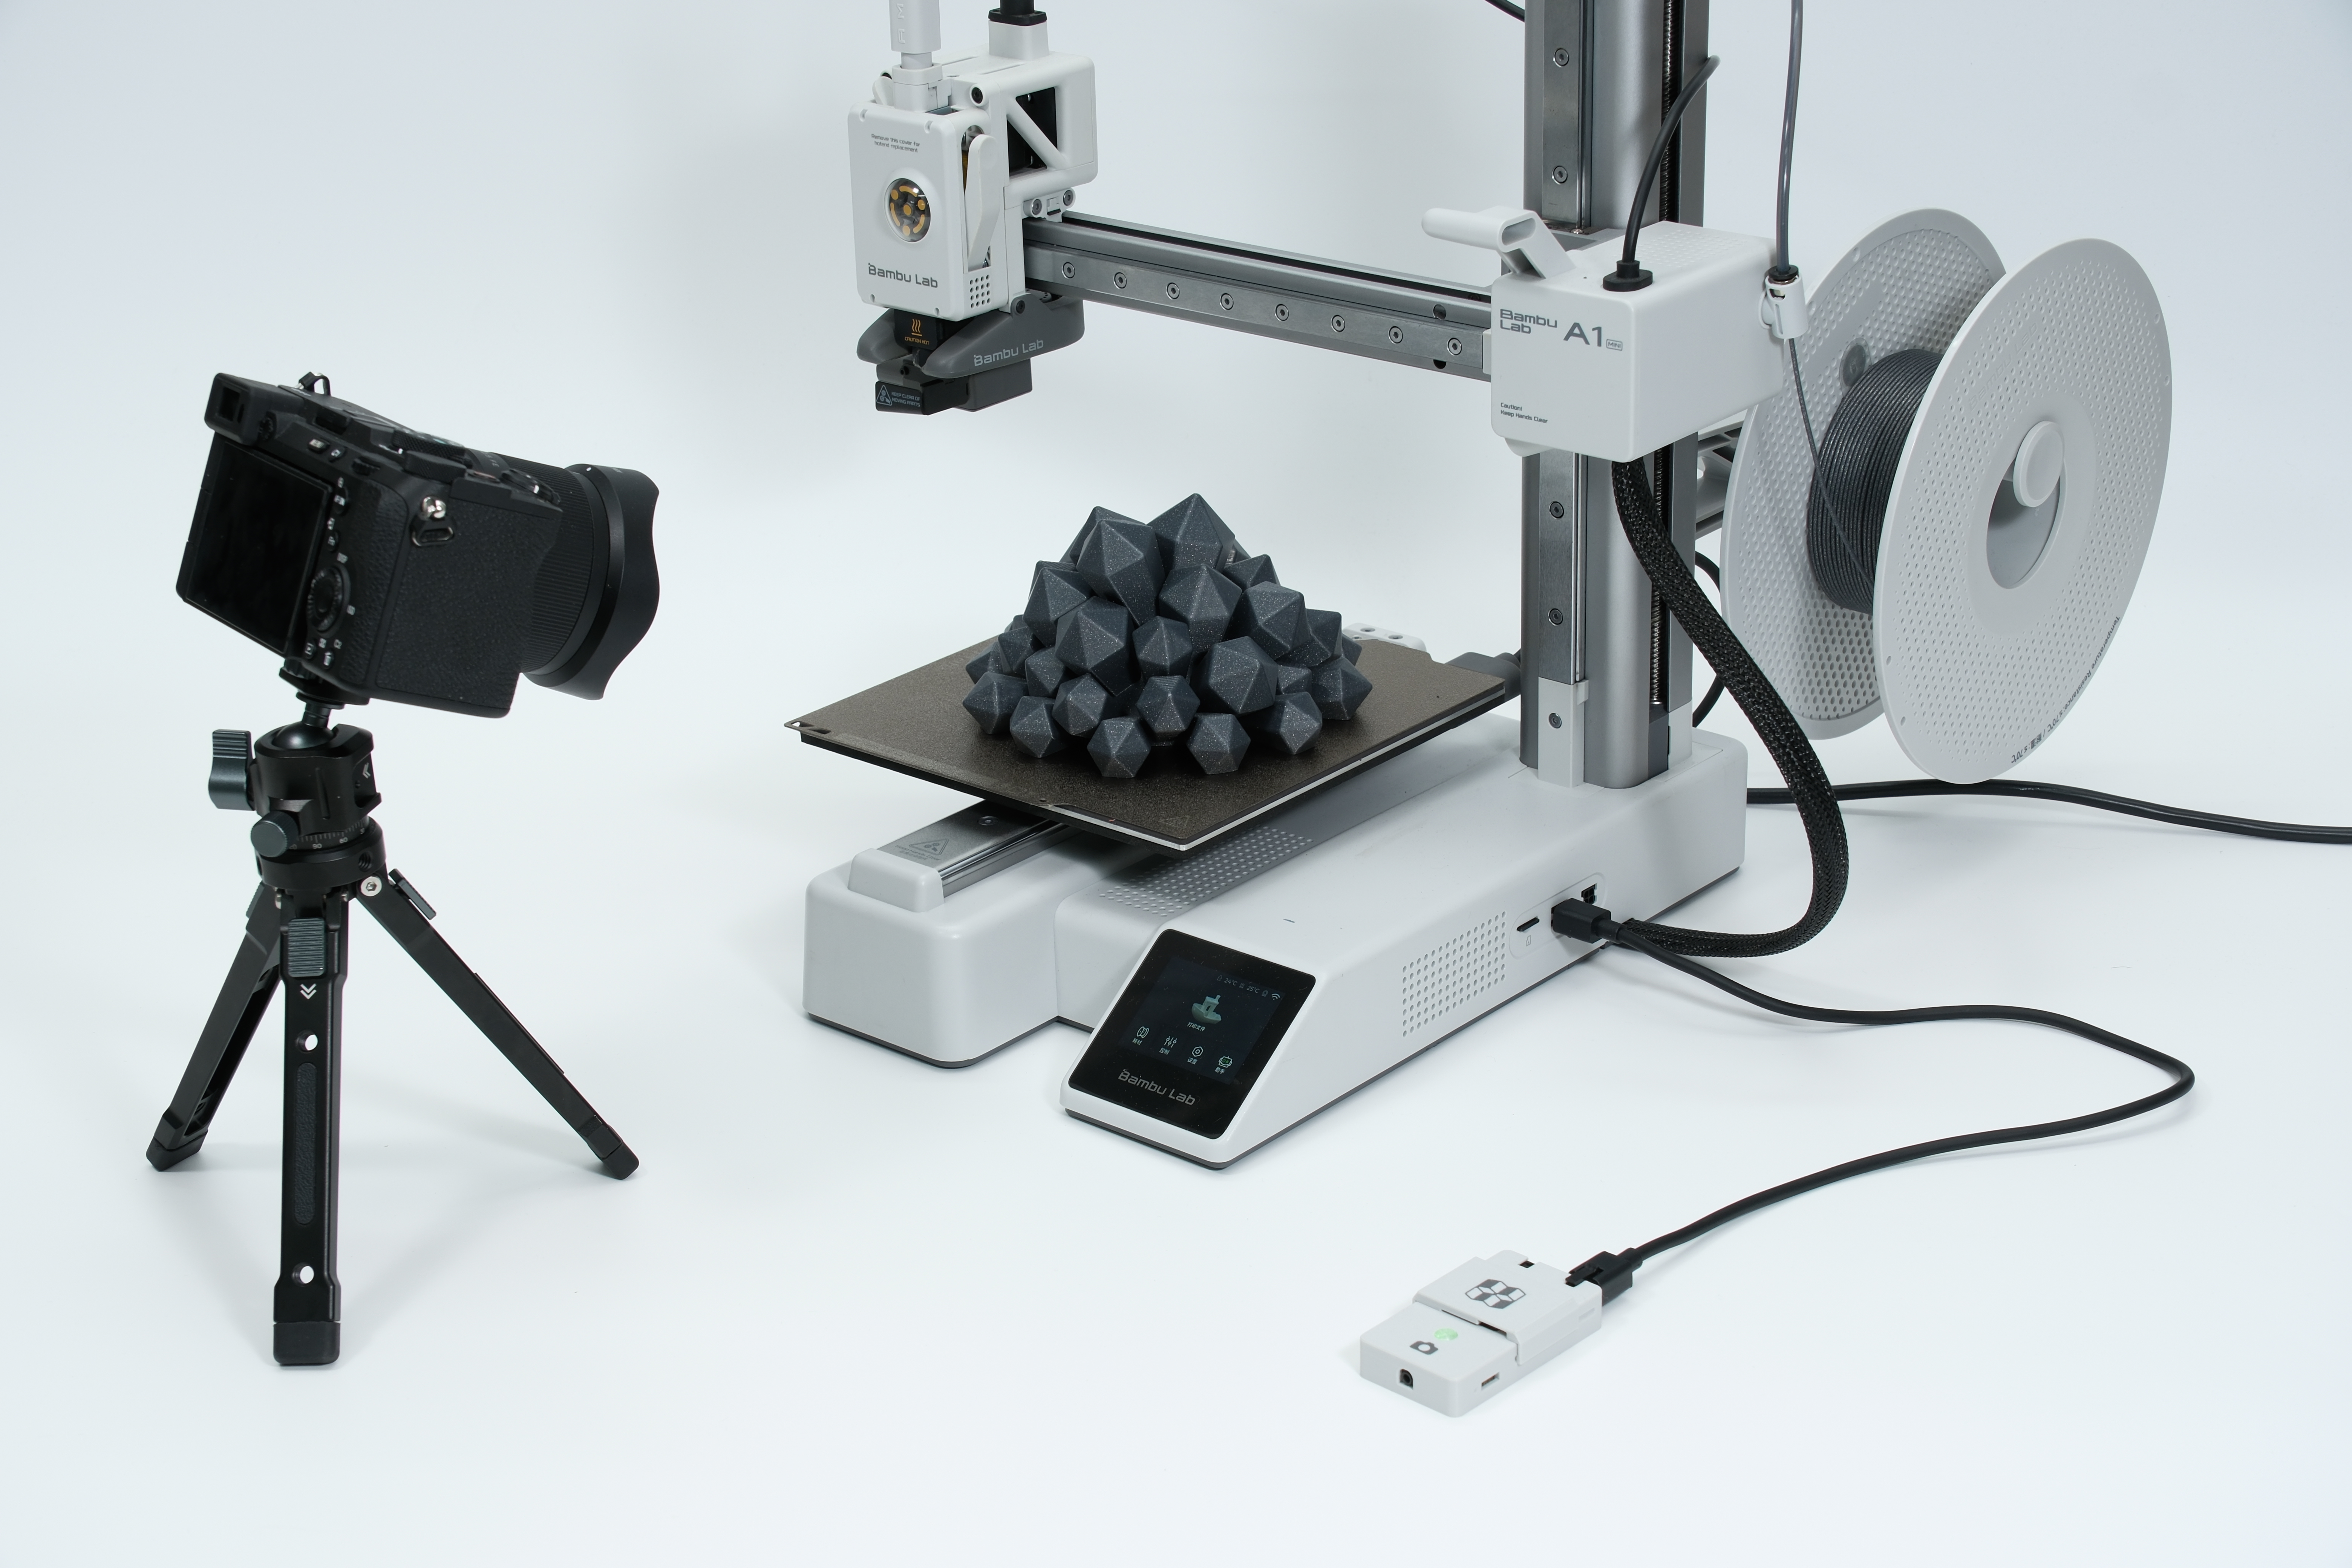
The timelapse photography kit is specifically designed for the Bambu Lab series 3D printers, providing external photography devices with Bluetooth shutter, wired shutter, and mechanical servo shutter options. The printer sends a shutter signal to trigger the external camera, capturing still images of each layer of the print process and compiling them into a timelapse video.
¶ Core Board
The core processing unit of the timelapse photography kit features built-in Bluetooth and WiFi functionality. It is not only compatible with this kit but can also be used for other RC projects. The board utilizes dual-row pin connectors for quick plug-and-play installation, allowing for flexible switching between different expansion boards.
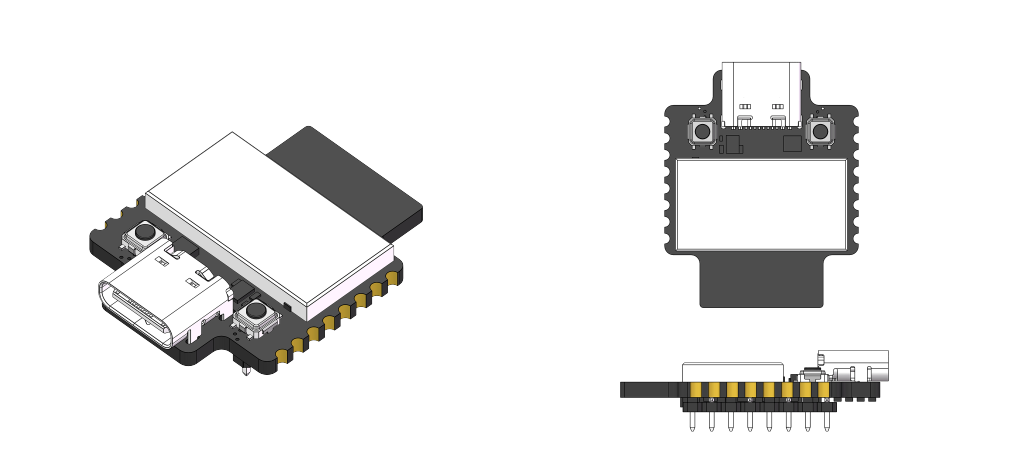
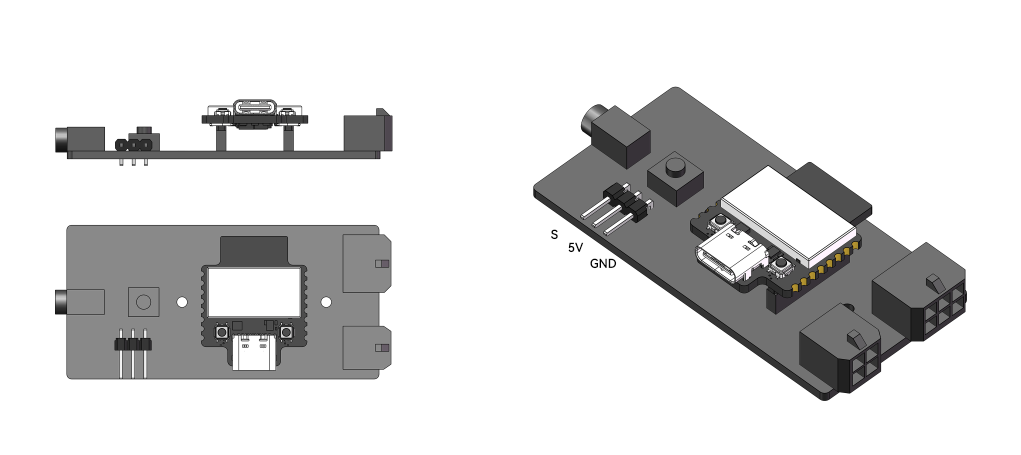
¶ Expansion Board
The core board is mounted onto the expansion board, which provides essential I/O functions for timelapse photography. The timelapse expansion board includes:
-
One 2.5mm universal shutter cable interface
-
A servo connection port
-
Two printer connection ports (4-pin and 6-pin)
-
A function button
-
An RGB indicator light
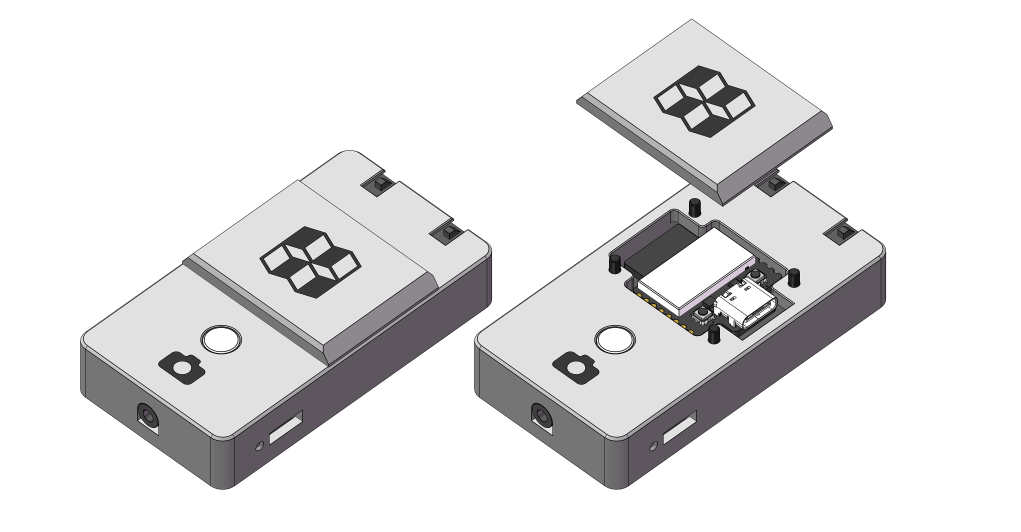
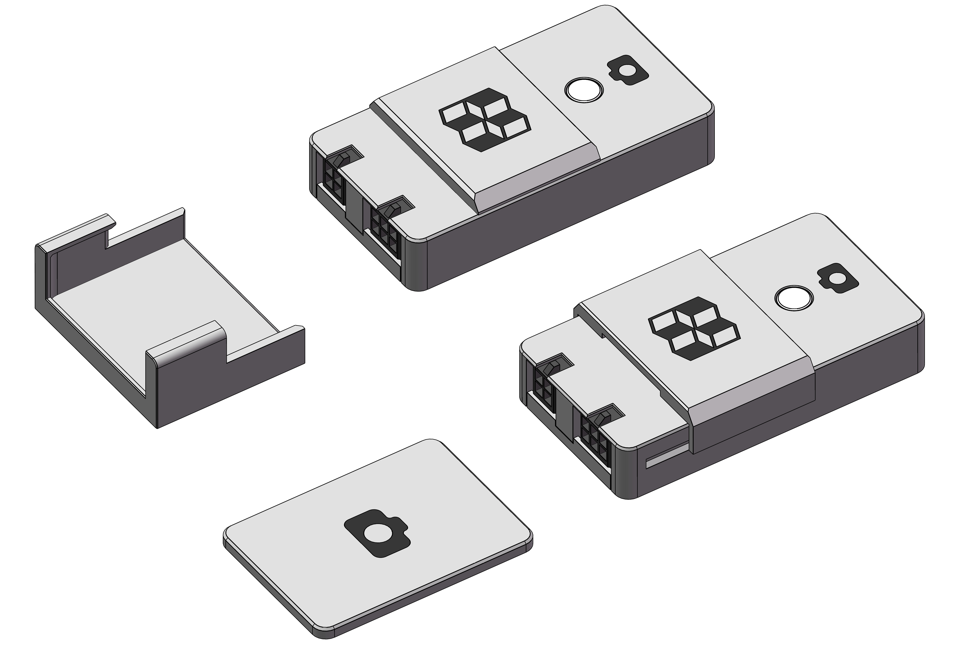
¶ Enclosure
Two 3D-printed enclosure designs are available. One is the Sliding Cover, which allows quick access to the core board compartment, making it easy to remove and replace the core board. This is ideal for users who frequently switch the core board between multiple devices. The other option is the Fixed Cover, which is more suitable for users who do not need to replace the core board frequently.
¶ Sliding Cover
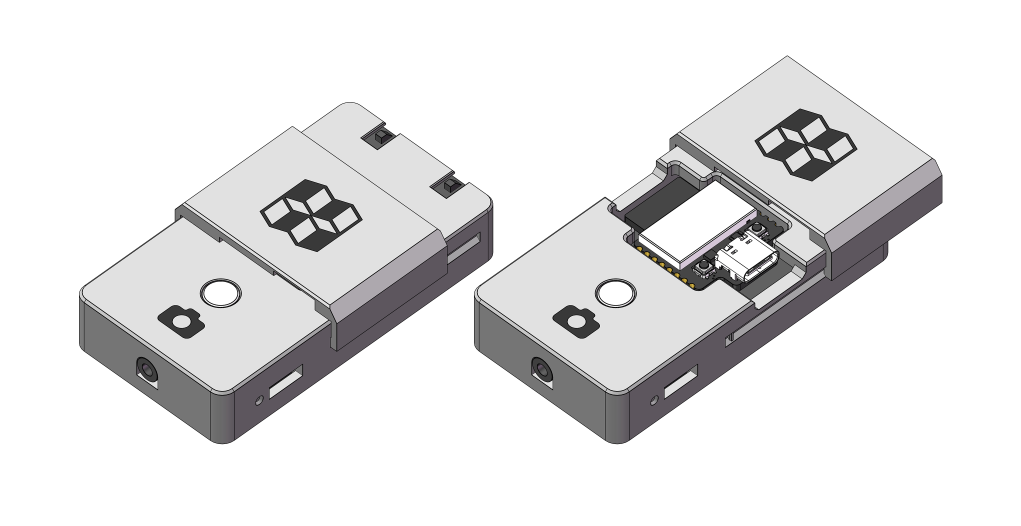
¶ Fixed Cover
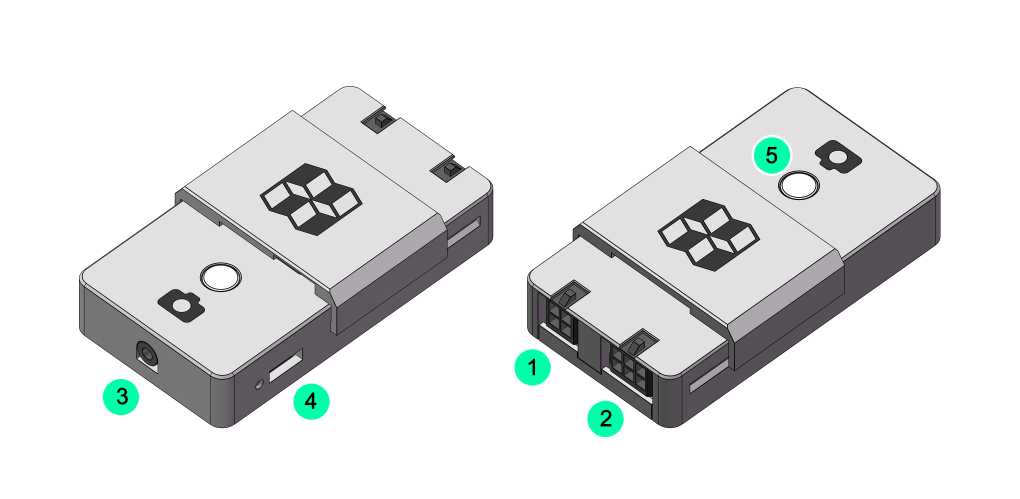
¶ I/O Interface Description
(1) Printer 4-pin interface; (2) AMS 6-pin interface; (3) 2.5mm shutter cable interface; (4) Servo connection port; (5) Multi-function button & indicator light
¶ Mounting Options
The timelapse photography kit offers two convenient mounting solutions: plug-in mounting and magnetic mounting. Users need to purchase adhesive tape and magnets separately.
Adhesive Tape Specification: Rectangular Transparent Double-Sided Adhesive - NB008
Magnet Specification: Round Magnet - CA005
¶ Enclosure Printing Files
Recommended Materials:
Bambu PLA Basic Light Gray (10104): Main body of the enclosure
Bambu PLA Basic Dark Gray (10105): Logo section
Bambu PETG Translucent (32101): Multi-function button (requires light transmission)
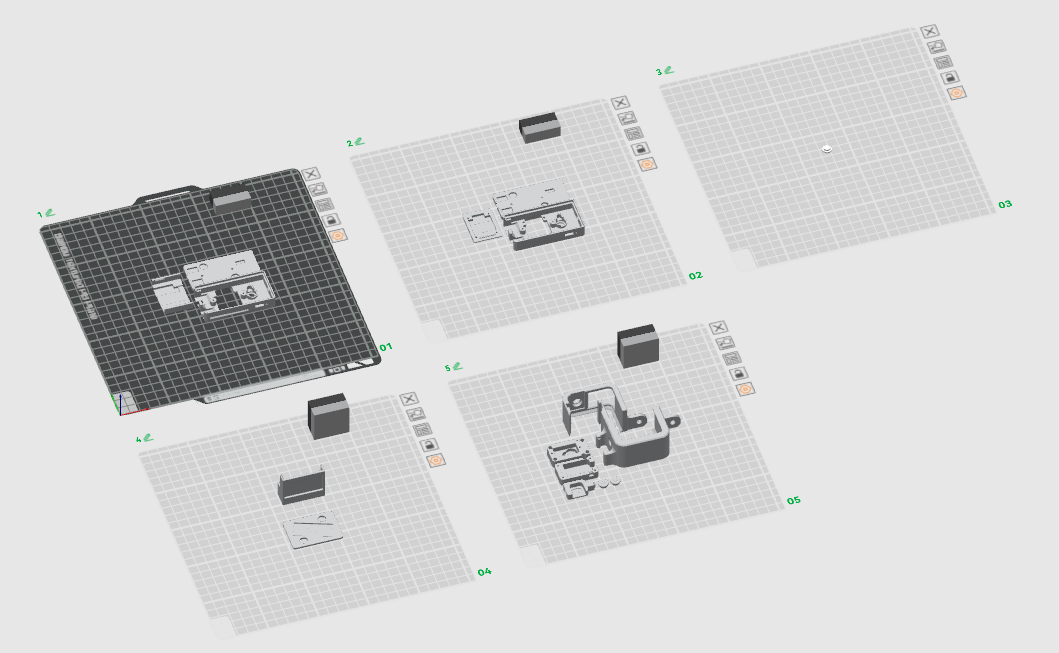
The files on Plate 01 are for the sliding cover version, and the files on Plate 02 are for the fixed cover version. Please choose the appropriate plate based on your specific needs before printing. The logo and icon sections require multi-color printing, but since the color change only occurs for 1-2 layers, the process will not take much additional time.
The files on Plate 03 are for transparent buttons. Please use transparent PETG material for printing. The infill pattern has been modified to optimize transparency. Keep the default print settings to avoid affecting print quality in the final product.
The files on Plate 04 are for the magnetic base, which requires adhesive backing and magnets to be purchased separately.
The files on Plate 05 are for the servo shutter, which simulates button presses via a servo motor to control shutter release. This version is currently compatible with DJI ACTION 4-5 Pro.
Servo Motor Specification: 9g Servo Motor with Clutch Protection - PG001
Spring Specification: Compression Spring - BB007
¶ Ⅱ. Printer Connection and Setup
¶ A Series
Use a 4-pin cable to connect to the printer’s 4-pin interface.
A1: the interface is located at the back of the printer.
A1 Mini: the interface is located on the right side of the printer.
¶ X-P Series
Without AMS: Use a 4-pin cable to connect to the printer’s 4-pin interface.
With AMS: Use a 6-pin cable to connect to the AMS 6-pin interface.
¶ H2D
For the connection method, please use a 4-pin cable to connect to the 4-pin interface on the back of the printer, or you may need to use a 6-pin cable to connect to the 6-pin interface of the AMS.
¶ Ⅲ. Connecting to Photography Equipment
¶ Bluetooth Pairing with a Smartphone
-
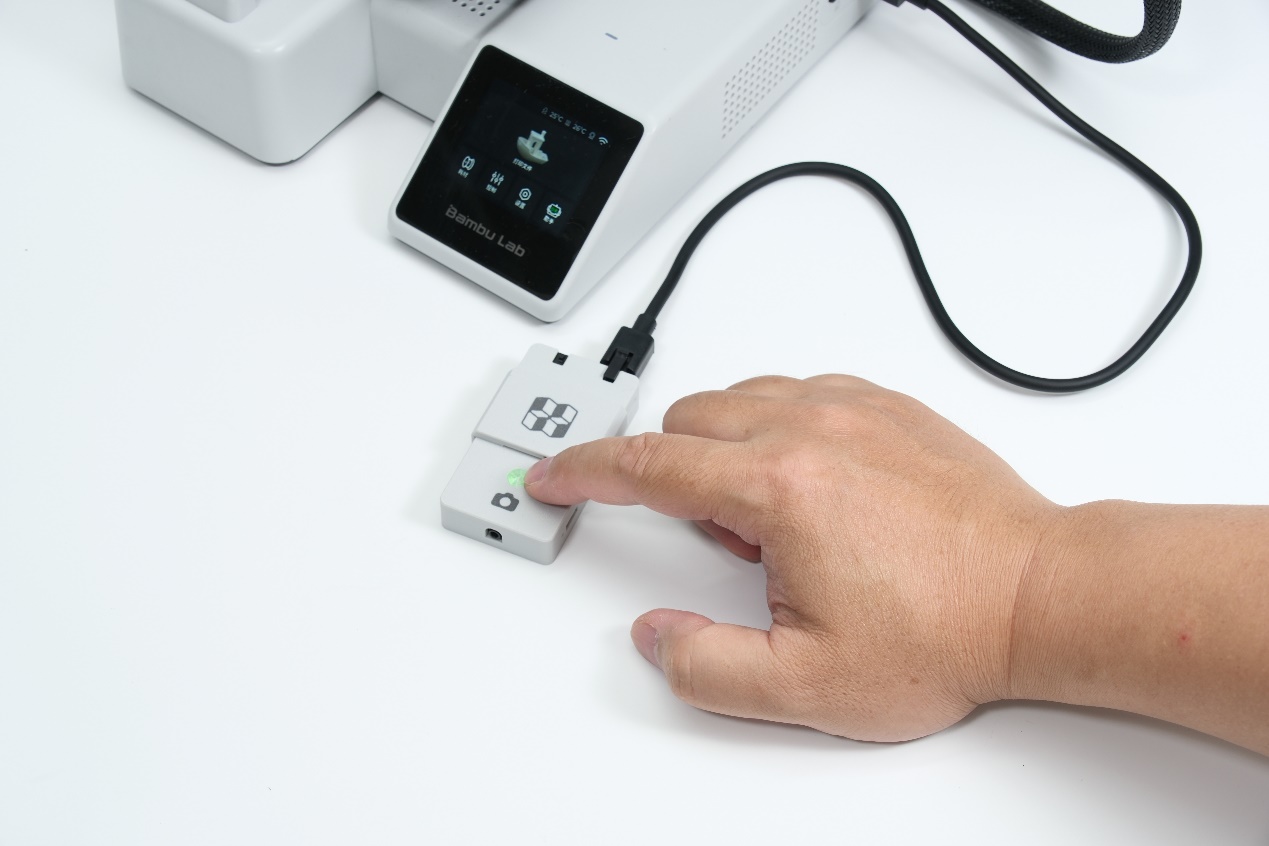
Connect the timelapse photography kit to the printer, and then press and hold the multifunction button for one second.
-
Open the Bluetooth pairing menu on your phone and select "BBL_SHUTTER" to pair.

-
If your phone cannot detect the timelapse photography kit, disconnect the kit from the printer for 2 seconds, then reconnect it. Other devices might be occupying the Bluetooth pairing port.
-
Ensure the device being paired is within 50 cm of the timelapse kit for optimal connection.
-
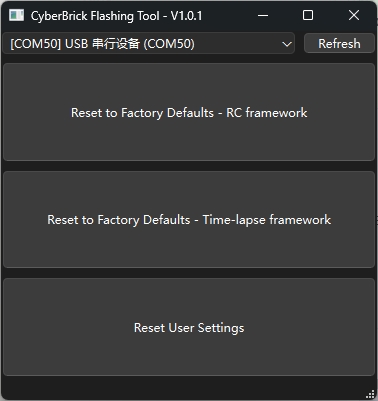
If the device cannot be properly paired, you can use the following flashing tool to restore the timelapse kit to factory settings.
Win: cyberbrick_flashing_tool-v1.0.1.zip
Mac: cyberbrick_flashing_tool-mac.zip
Firmware Flashing Tool User Guide:
1.Unzip the compressed package and open CyberBrick_Flashing_Tool.
2.Connect the core board to the computer using a Type-C data cable.
3.Click "Refresh," and a new COM port will appear on the left.
4.Select the new COM port, then click the corresponding firmware flash button below (for the remote control kit, click "RC framework"; for the time-lapse photography kit, click "Time-lapse-framework"; to clear the PIN code, click "Reset user setting"). Wait for the firmware flashing process to complete.
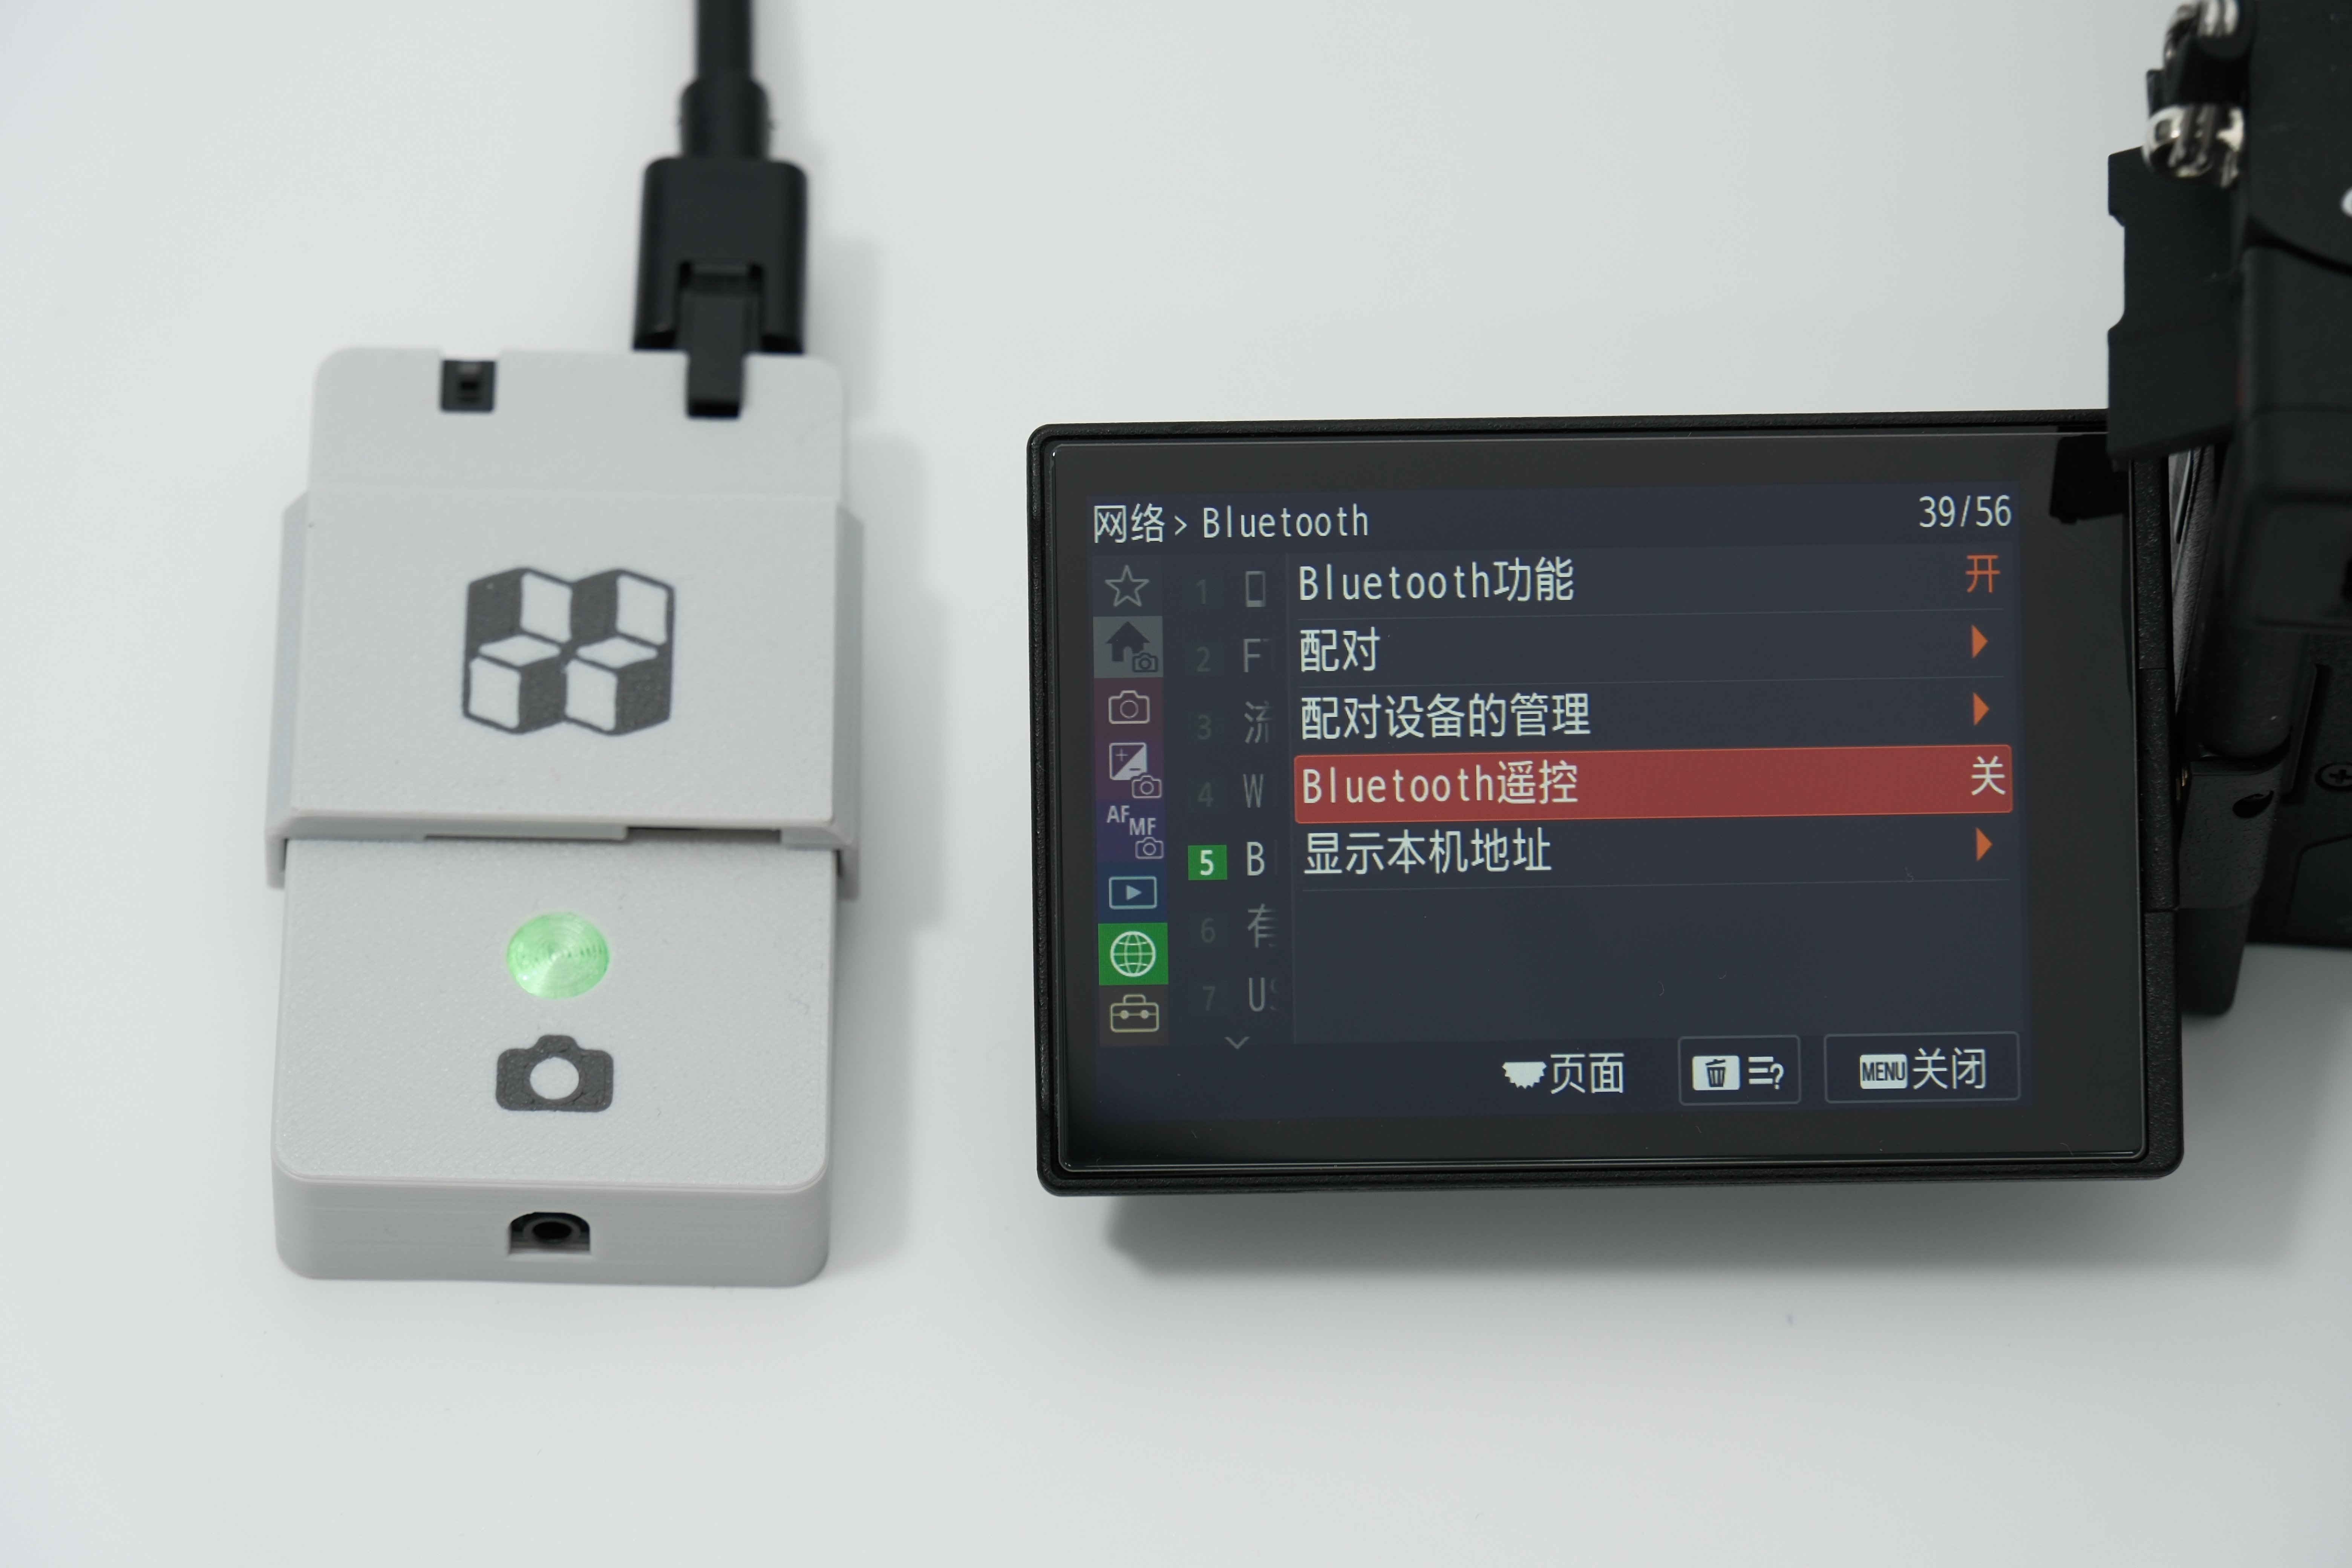
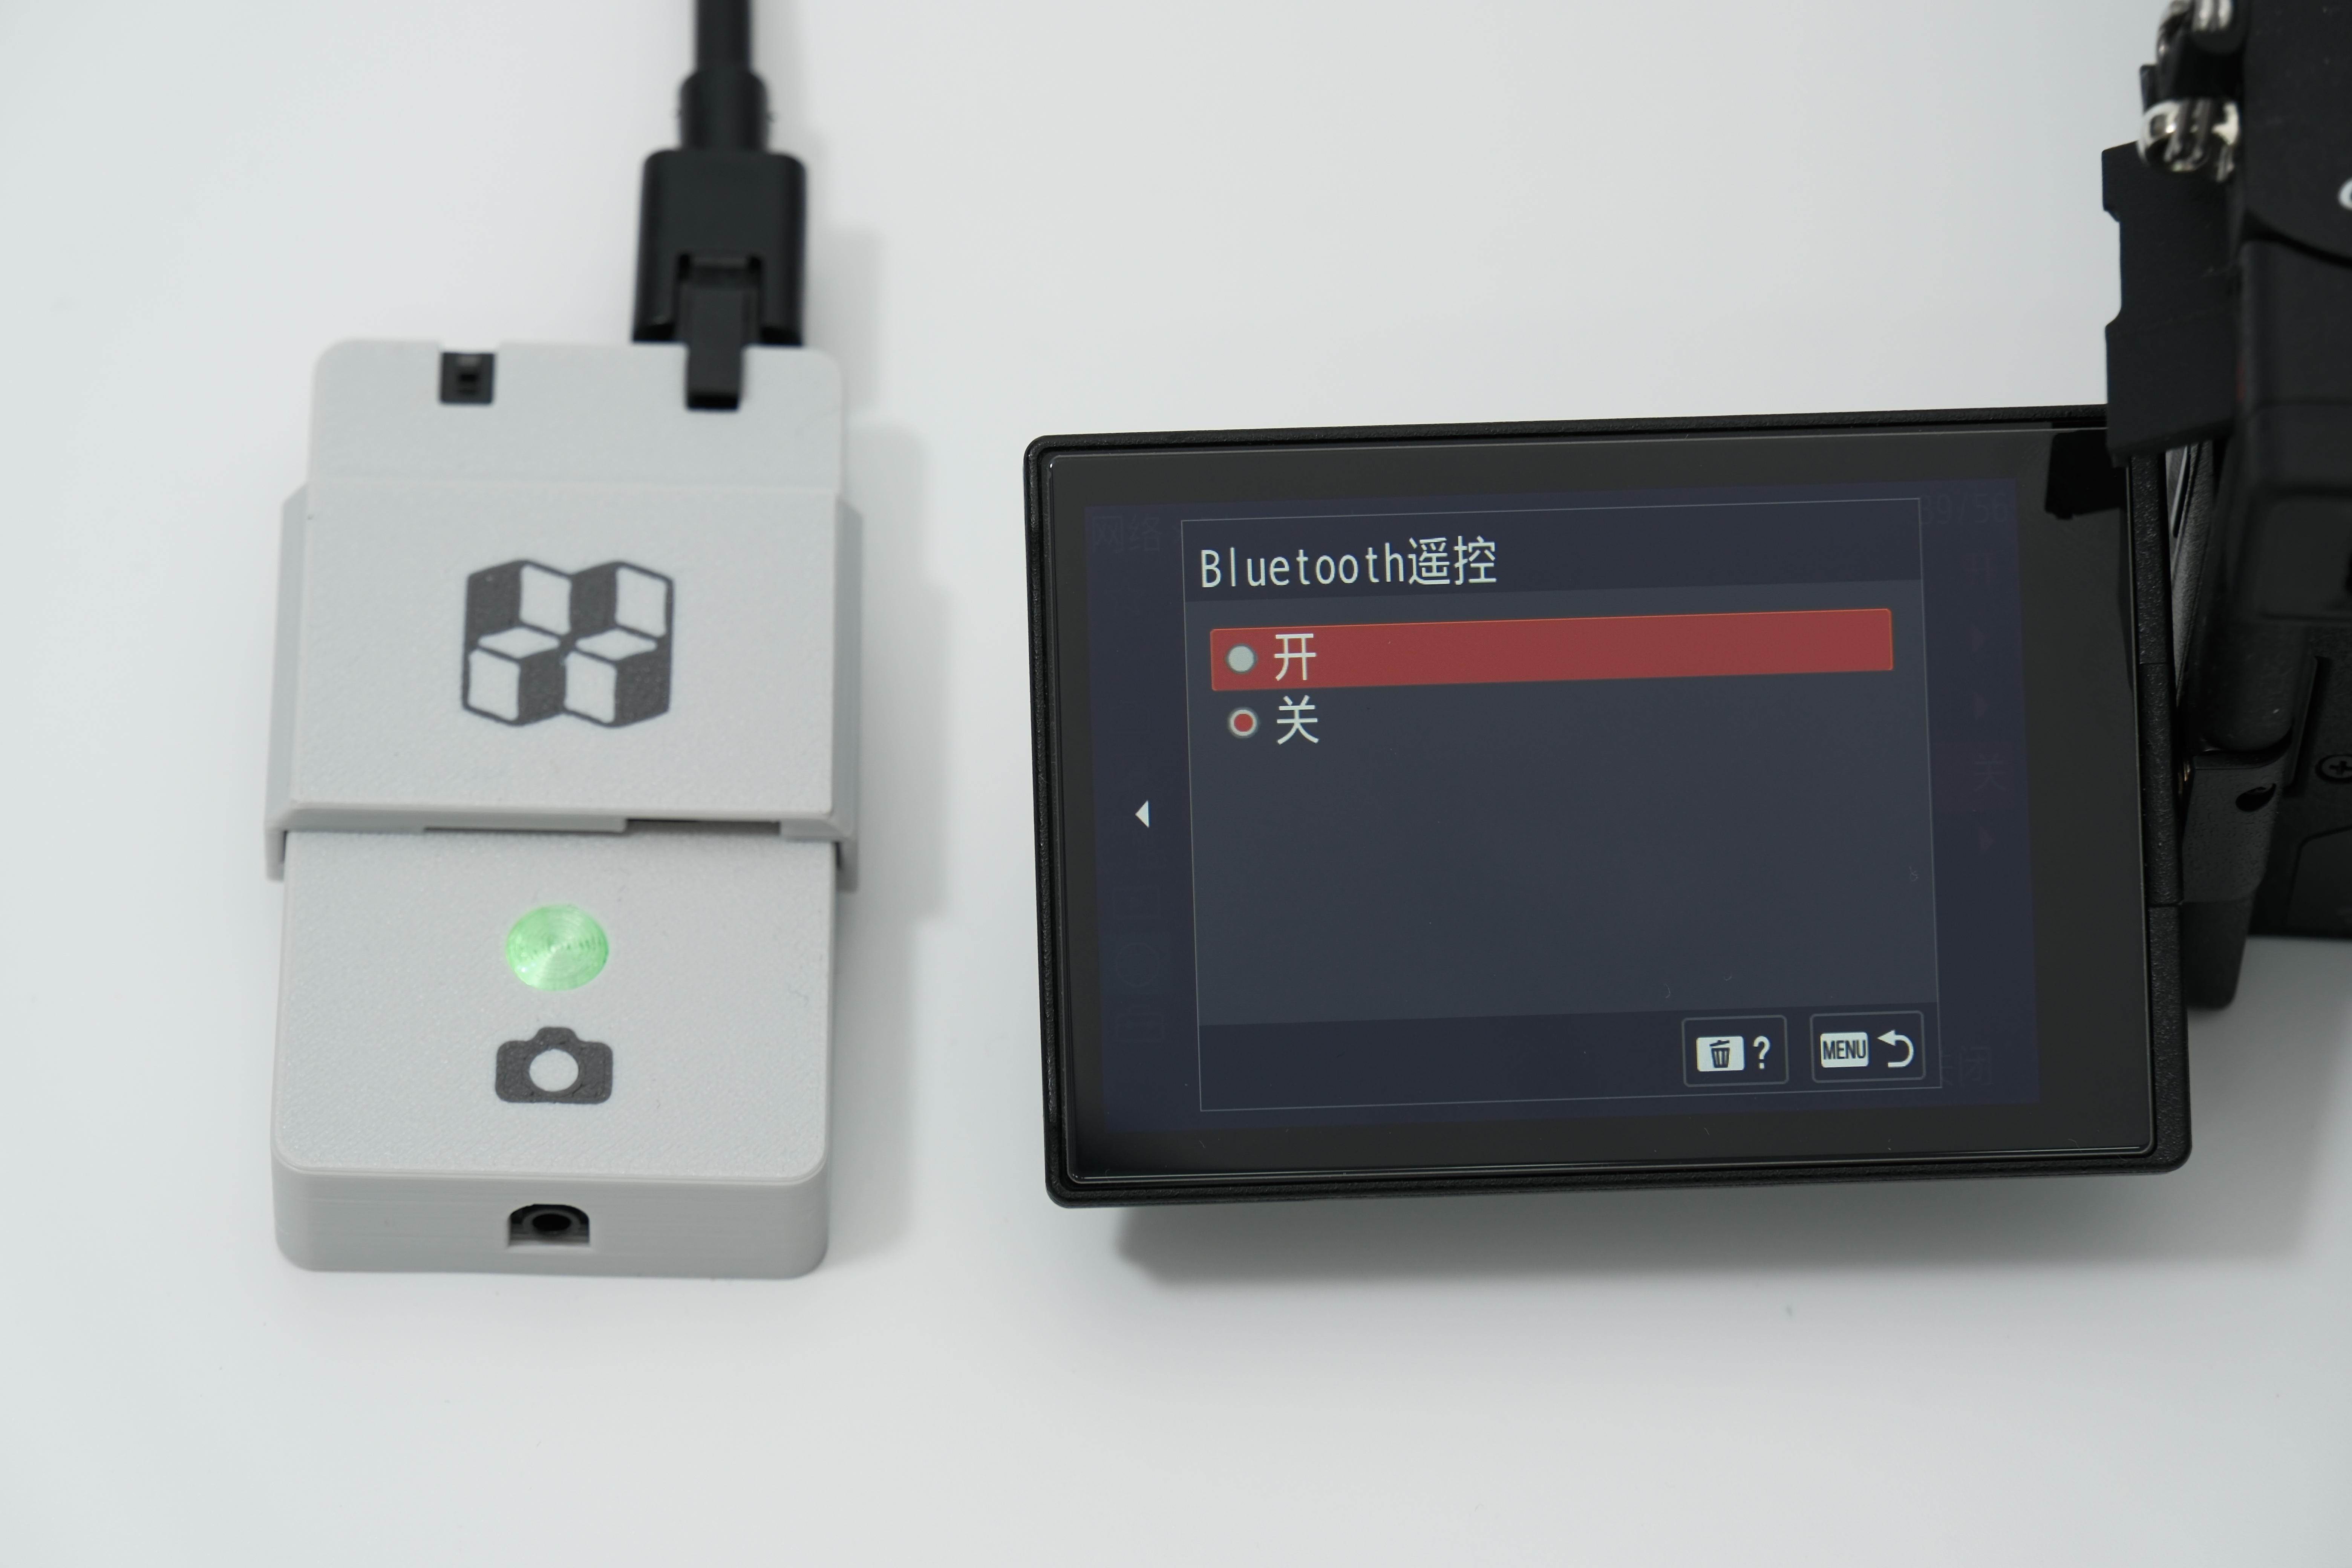
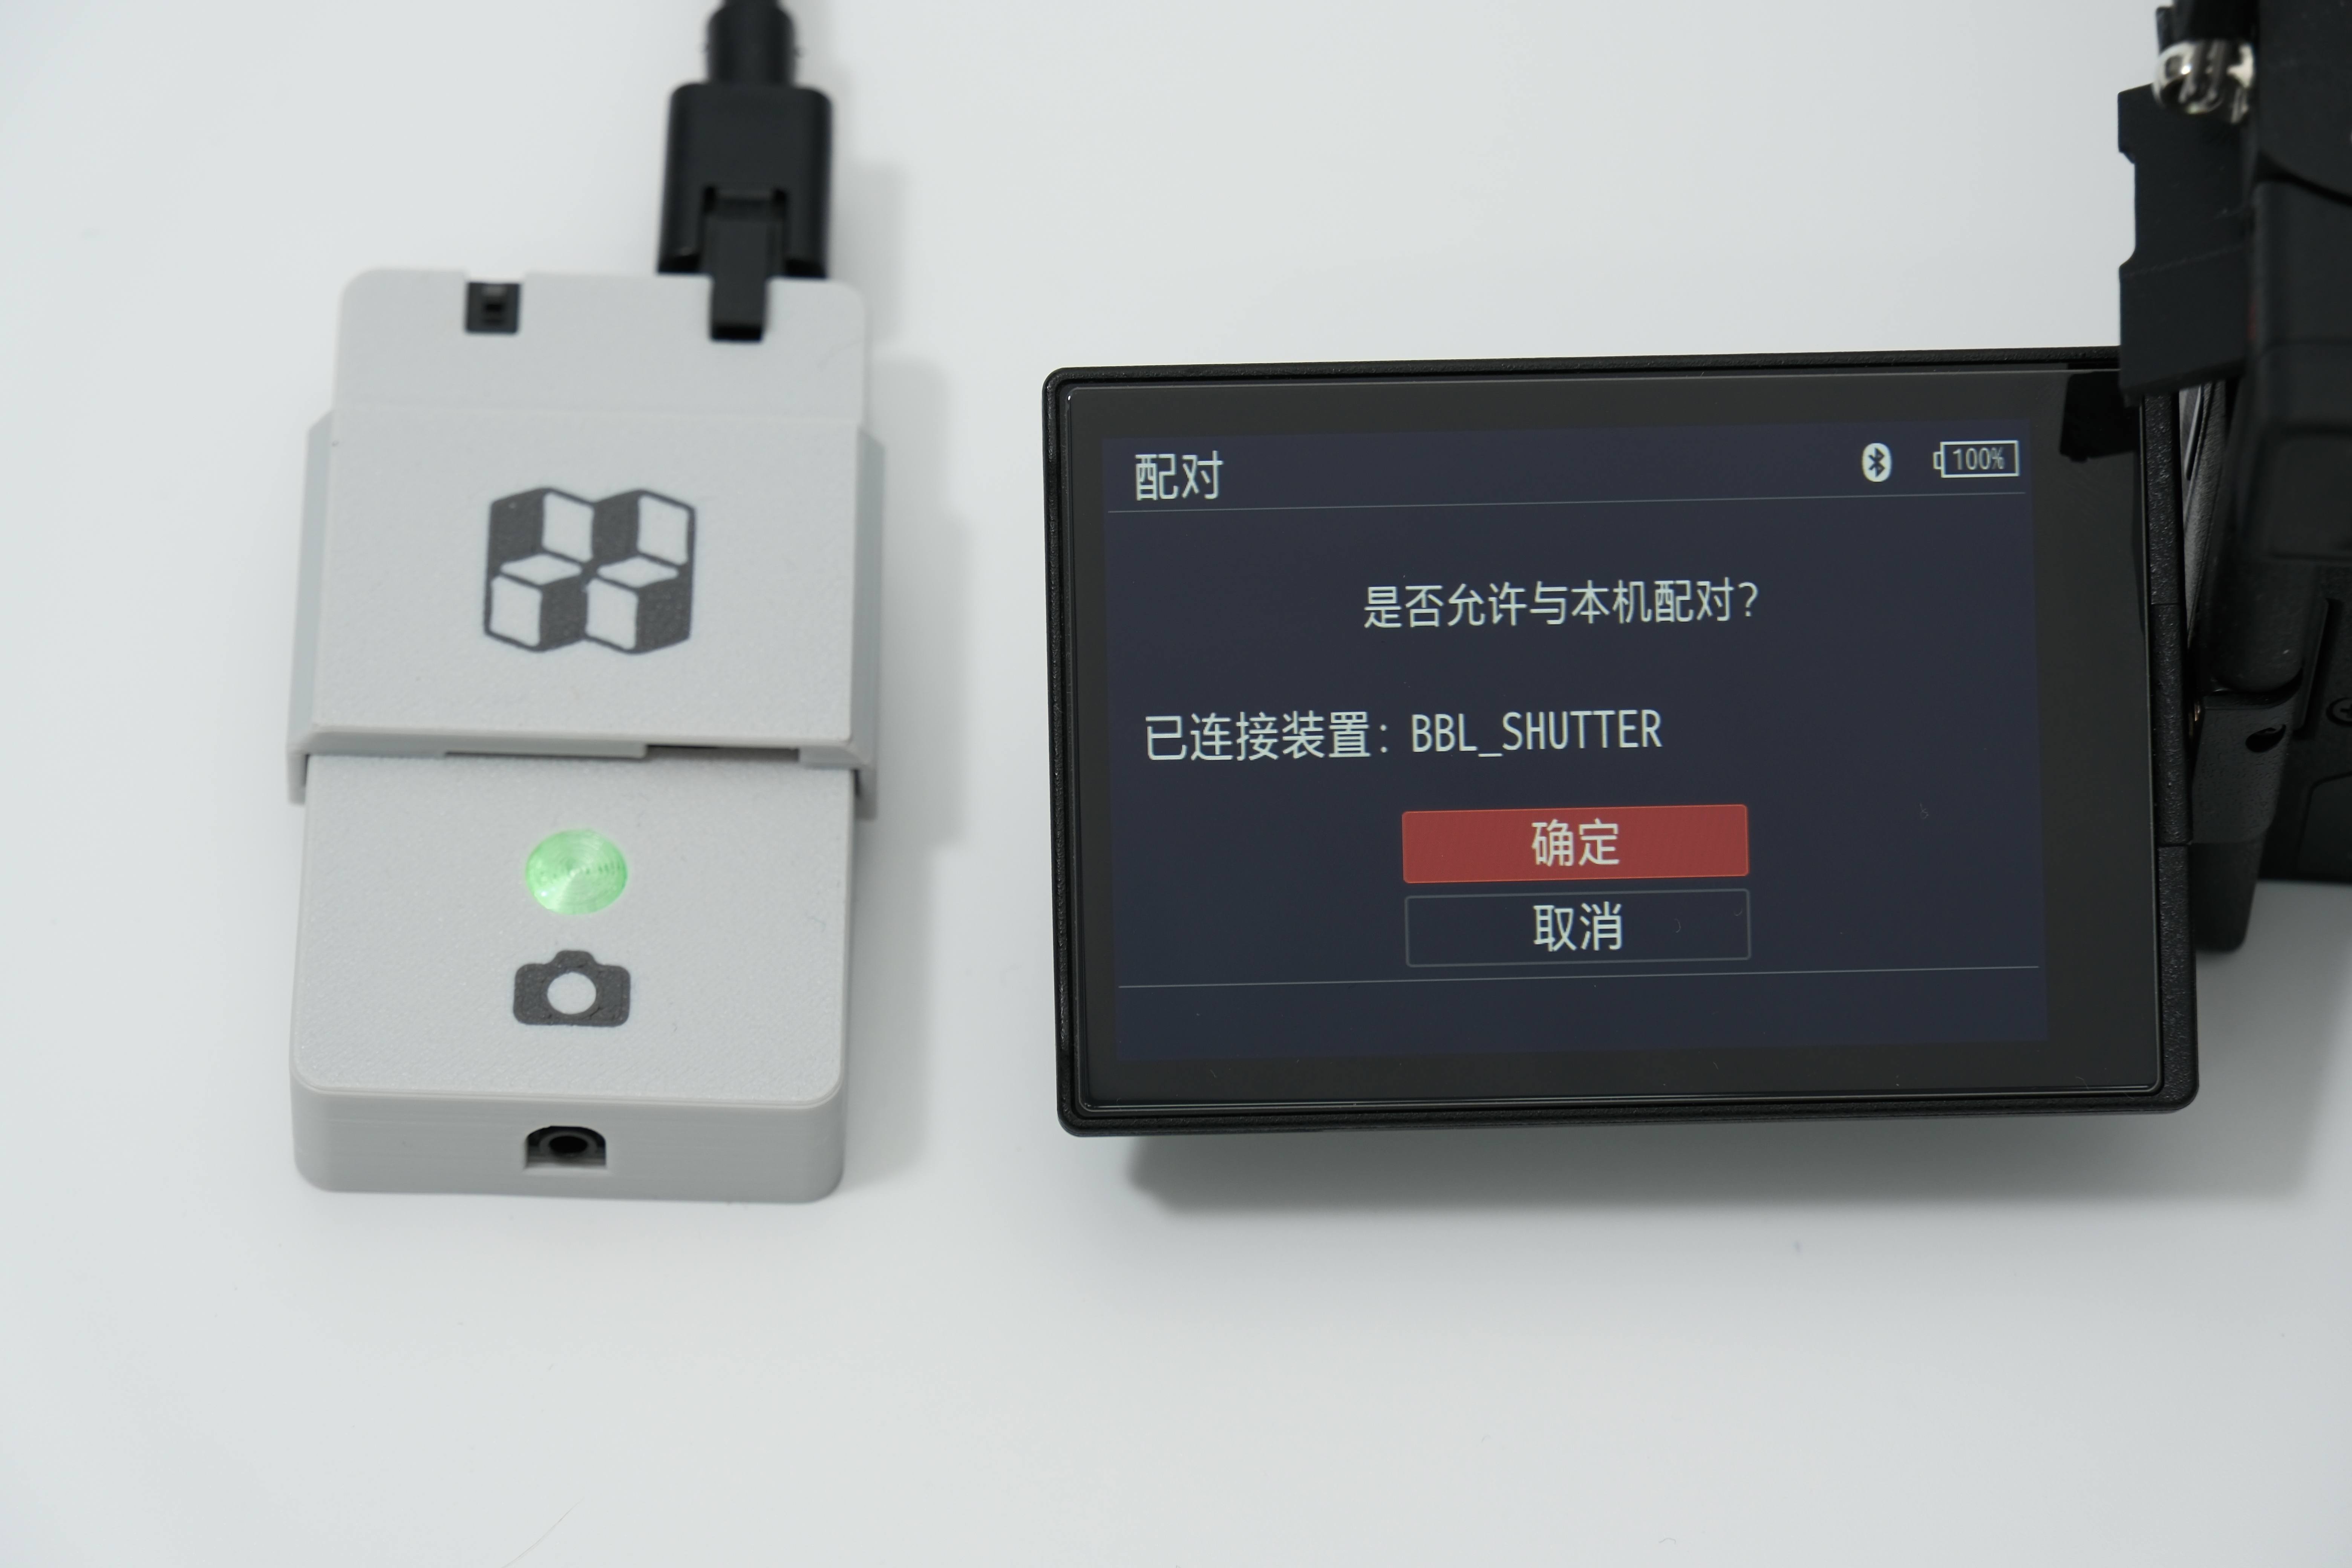
¶ Bluetooth Pairing with a Camera
¶ Sony A7C2 (First-Time Connection Example)
-
Connect the timelapse photography kit to the printer, and then press and hold the multifunction button for one second.
-
Open the camera menu, navigate to Bluetooth, and enable Bluetooth functionality.
-
Enable Bluetooth Remote Control; the camera will search for the "BBL_SHUTTER" device. Confirm pairing.
-
If the camera cannot detect the kit, disconnect the kit from the printer for 2 seconds and reconnect it. Ensure no other devices are interfering with the Bluetooth pairing port.
-
Maintain a pairing distance of 50 cm or less.
¶ Canon EOS R50 (First-Time Connection Example)
-
Connect the timelapse photography kit to the printer, and then press and hold the multifunction button for one second.
-
Open the camera menu, go to Bluetooth Settings, enable Bluetooth, and select Connect to Wireless Remote.
-
Choose Add a Device to Connect To, then select "BBL_SHUTTER" when detected. Confirm pairing.
.png)
-
If the camera cannot detect the kit, disconnect the kit from the printer for 2 seconds and reconnect it. Ensure no other devices are interfering with the Bluetooth pairing port.
-
Maintain a pairing distance within 50 cm.
Note: For some Canon models, you need to select "Selfie" in "Drive mode" in "Self-timer" of the menu to trigger the wireless shutter.
.png)
¶ Nikon Camera
Note: Since the Bluetooth connection will be disconnected when the screen is turned off on Nikon devices, please set the screen off time to the maximum when performing time-lapse photography to avoid the time-lapse photography being unable to proceed normally due to Bluetooth disconnection.
¶ GoPro HERO13 Pairing
-
Connect the timelapse photography kit to the printer, and then press and hold the multifunction button for one second.
-
Turn on the GoPro HERO13, tap "Pair Device," and start Bluetooth search. The "Quik App" prompt will confirm a successful pairing.
.png)
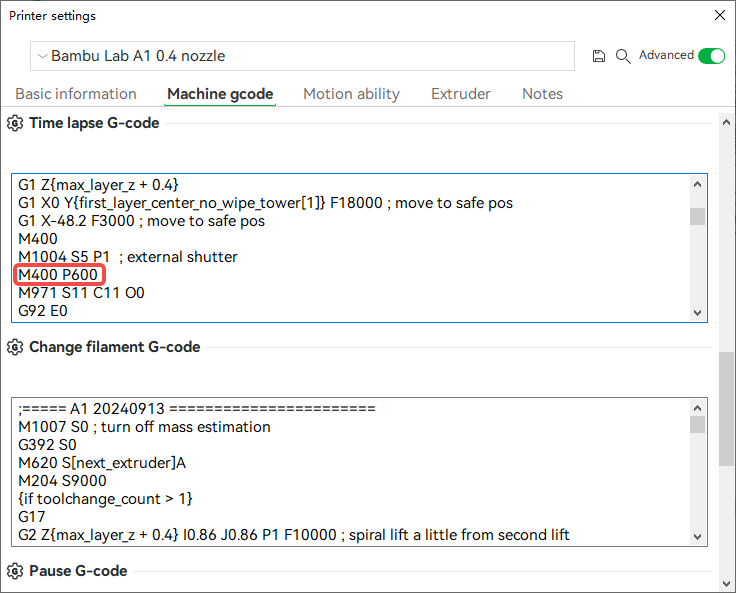
- When using GoPro, manually modify the G-code to extend the shutter delay to 600ms and enable using a purge tower.
-
If the camera cannot detect the kit, disconnect the kit from the printer for 2 seconds and reconnect it. Ensure no other devices are interfering with the Bluetooth pairing port.
-
Maintain a pairing distance of 50 cm or less.
- Once a GoPro is connected via Bluetooth, it cannot shut down properly. You must disconnect the Bluetooth connection before shutting it down.
¶ Multi-Device Bluetooth Pairing
-
This device supports simultaneous connection to two Bluetooth wireless devices: one mobile device and one camera device.
-
If two devices are already paired and both are online, new device pairing is not possible. To pair a new device, disconnect one of the existing devices. Once the new device is paired successfully, it will automatically replace the earlier paired device.
-
If an old device needs to be re-paired after being replaced, delete the previous Bluetooth pairing record before initiating a new pairing process.
-
If the camera's Bluetooth cannot detect the timelapse photography kit, disconnect the kit from the printer for 2 seconds before reconnecting. Other devices may have occupied the Bluetooth pairing port, preventing detection.
- If the camera is paired with the timelapse photography kit via Bluetooth but fails to establish a connection after restarting, press and hold the multifunction button for 2 seconds. The timelapse photography kit will attempt to reconnect to the previously paired device.
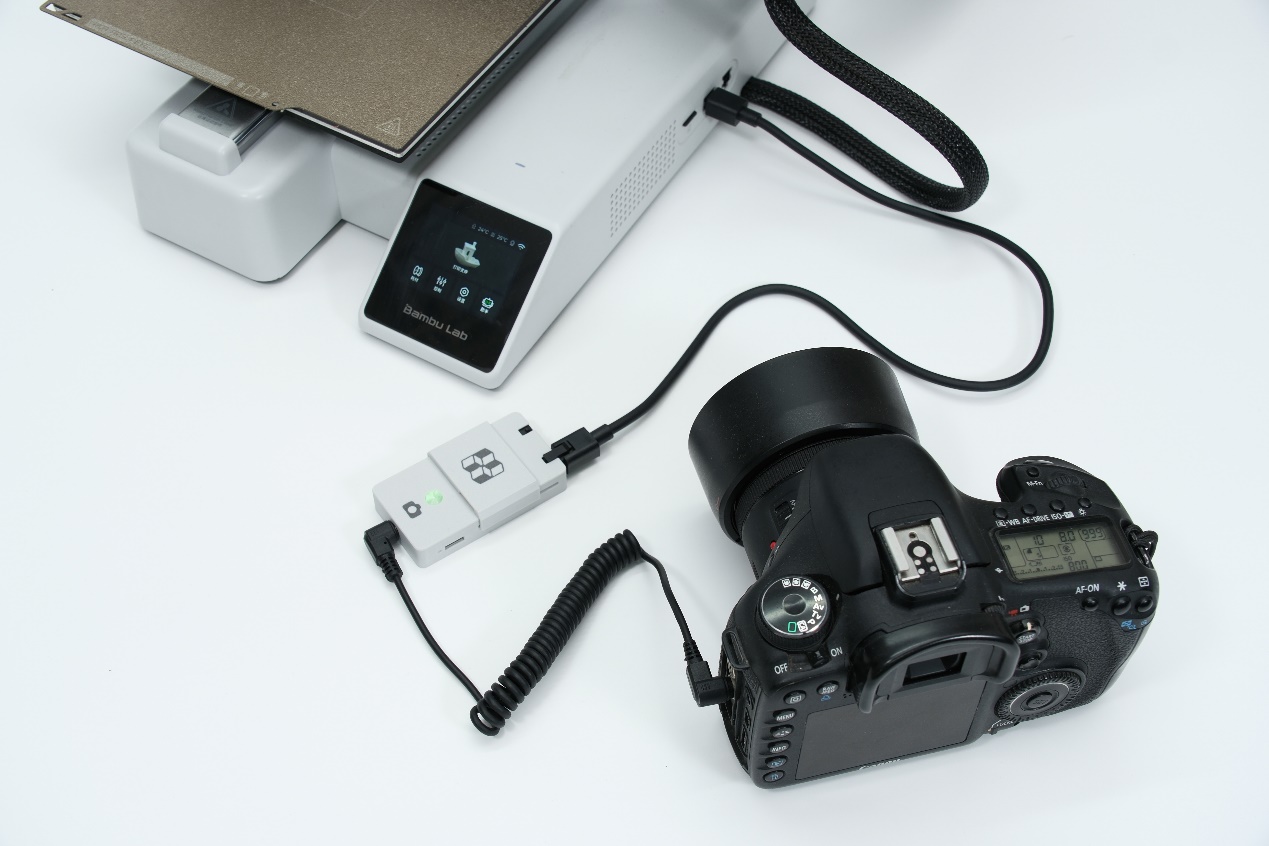
¶ Shutter Cable Connection
-
The timelapse photography kit is equipped with a 2.5mm universal shutter cable interface, compatible with cameras that support external shutter cables. Once connected, it is ready for use without additional configuration.
-
While using the shutter cable for shooting, the wireless Bluetooth shutter can also be used simultaneously, enabling multi-camera synchronized shooting for greater flexibility and diversity in photography.
¶ Servo Shutter Connection
- If your shooting device is incompatible with Bluetooth and lacks a shutter cable interface, you can use the servo shutter kit. This operates the shutter mechanically through button pressing.
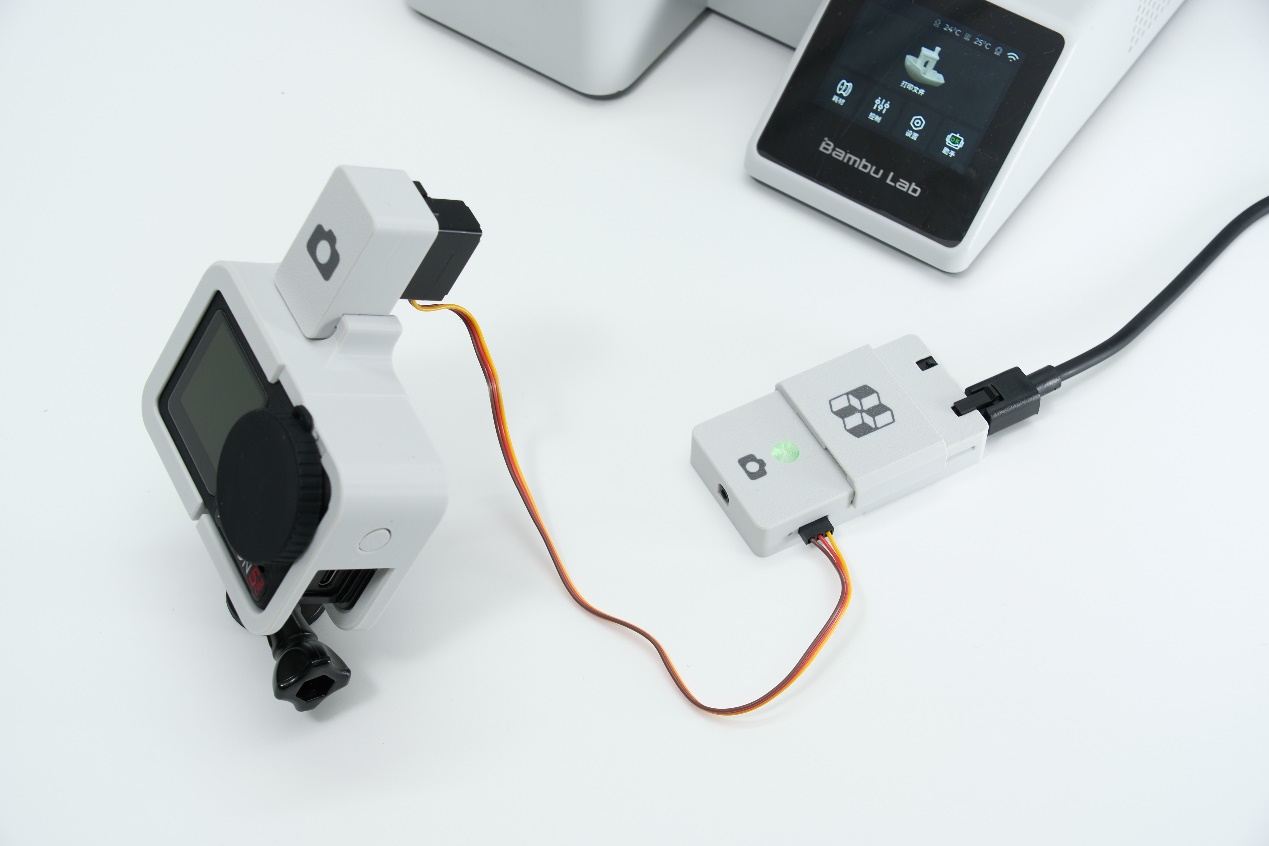
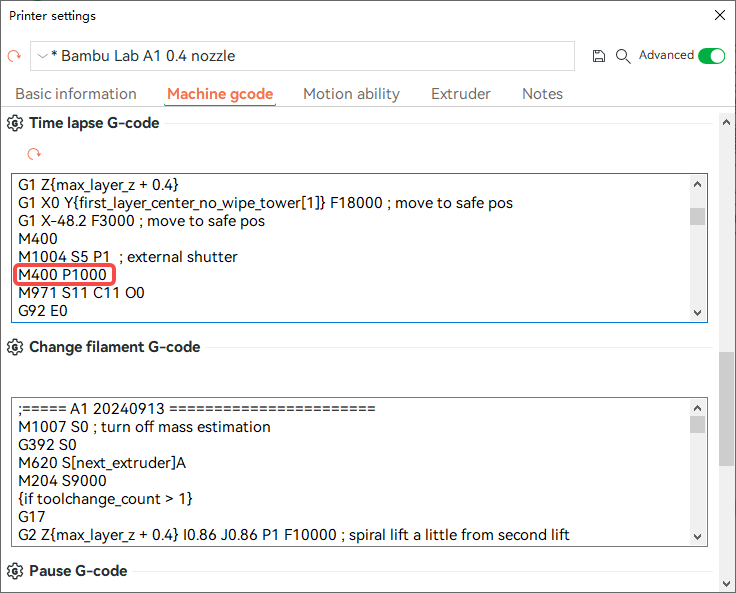
- When using the servo shutter, manually modify the G-code to increase the shooting delay to 1000ms and enable the use of a purge tower.
¶ Ⅳ. How to Start a Timelapse Photography Session
¶ Update Bambu Studio to the Latest Version
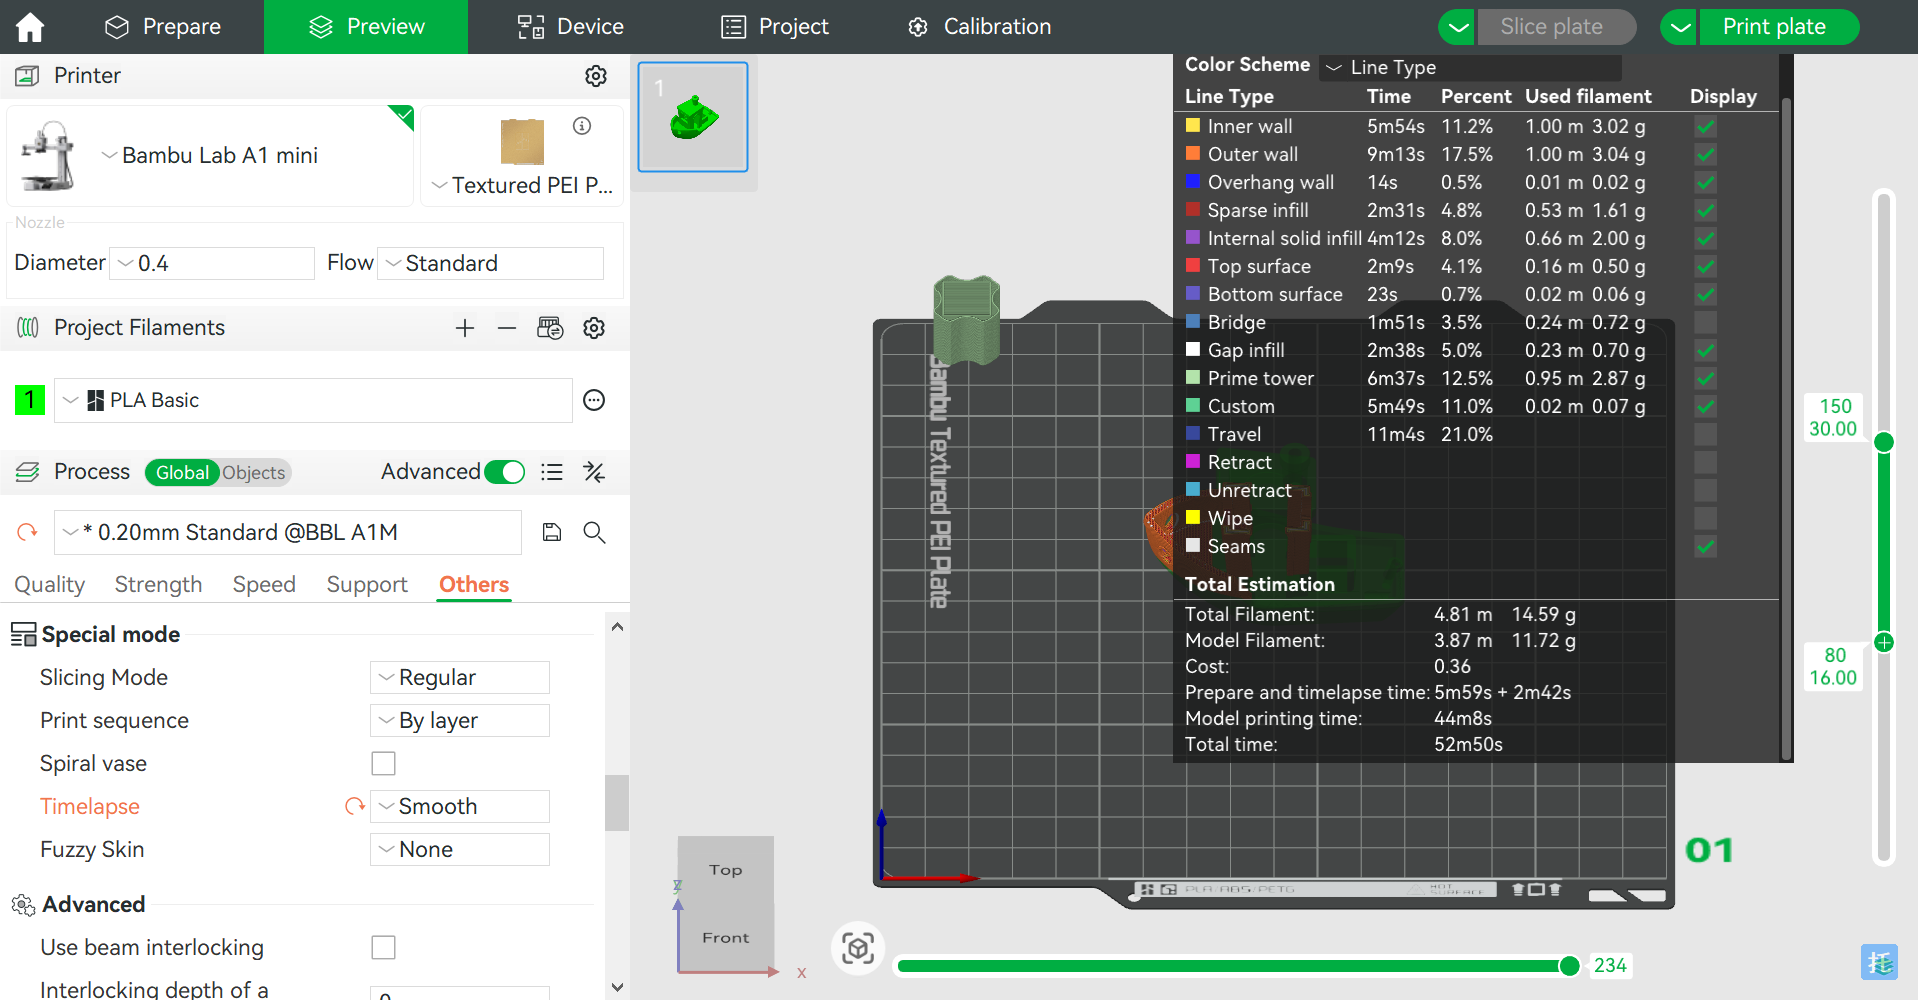
¶ Slicing Process
- Open Bambu Studio, import the model, and set the printing parameters.
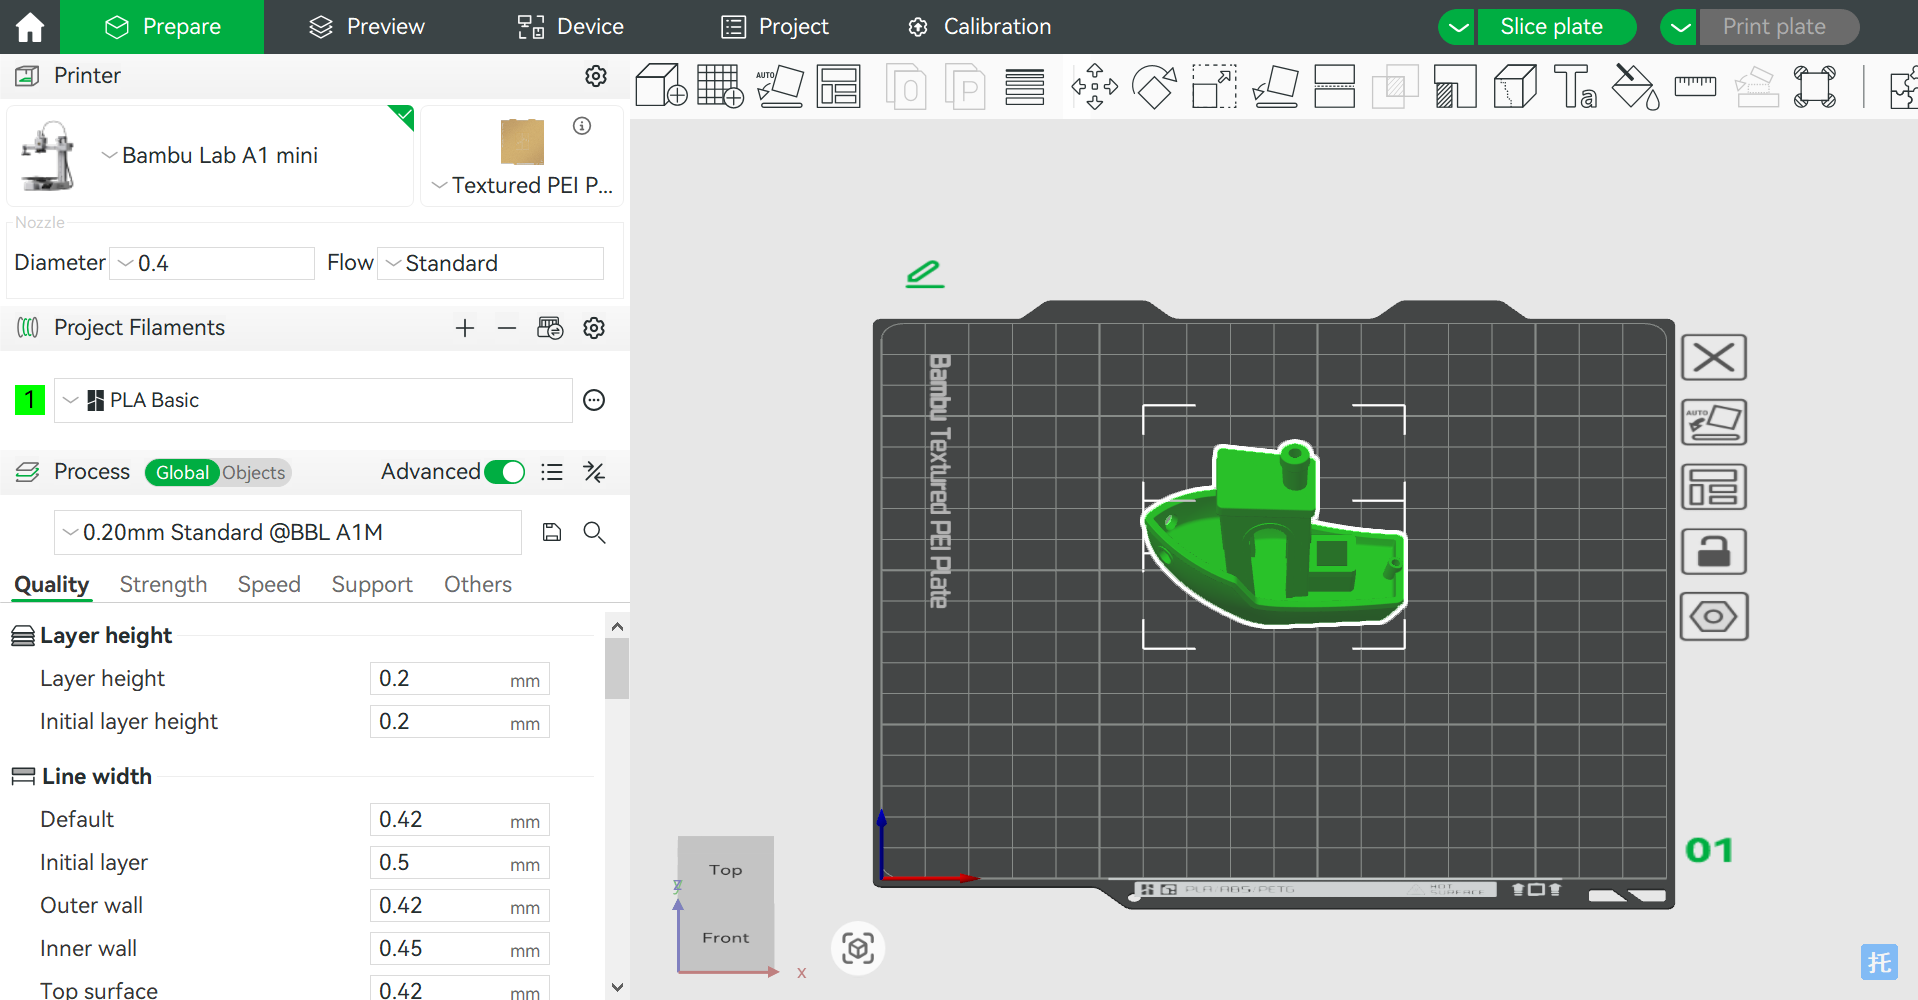
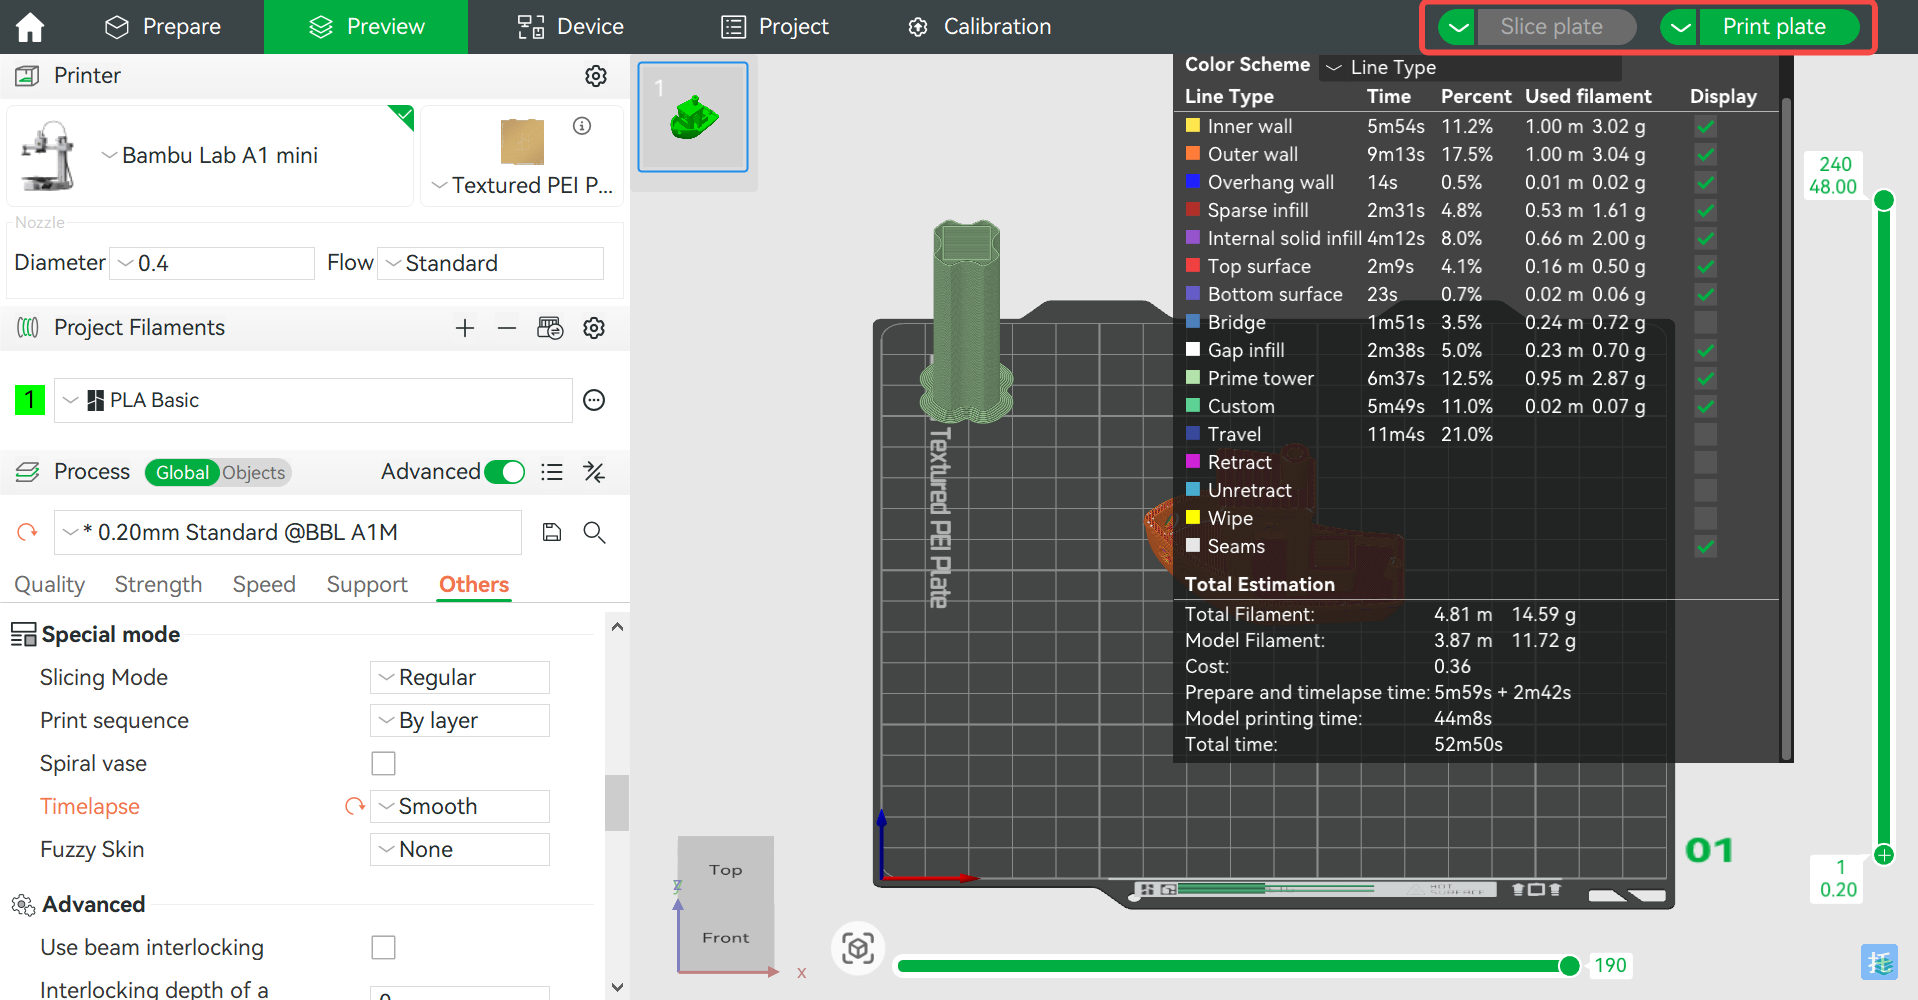
- In the "Process" interface, find the "Others" option and scroll down to "Special mode" settings. Change the "Timelapse" mode to "Smooth" Mode. A purge tower will be generated on the heated bed to clean up excess material during timelapse photography.

- In the upper right corner of the interface, click the "Slice plate" button to execute slicing. Check the slicing parameters in the preview. Once confirmed accurate, click "Print plate." In the subsequent print task interface, check the "Timelapse" option and click "Send" to start printing.

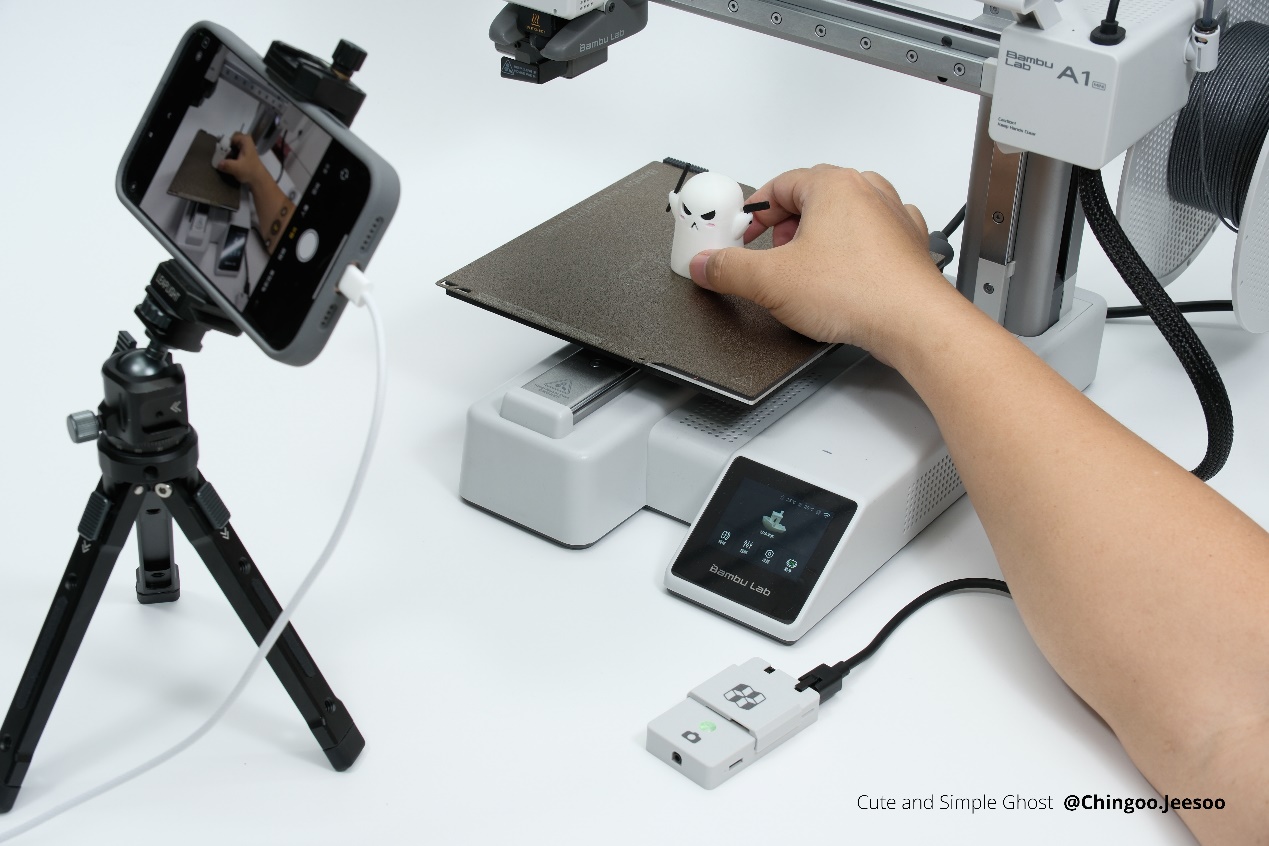
¶ Mobile Phone Setup
- Connect the mobile phone to the timelapse photography kit via Bluetooth. Increase the auto-lock time in the phone settings to prevent screen locking during shooting. Since the shooting process is long, keep the phone connected to a charger.
-
Place the phone in front of the printer. For A-series models, leave space for the heated bed to move, preventing collisions with the phone.
-
Place a reference object of similar size to the printed model on the heated bed and adjust the phone’s angle for the best view.
- During preview, long-press the shooting area on the screen to lock focus and exposure.

- If the phone has a professional photography mode, manually adjust the focus, shutter speed, aperture, ISO, and white balance for more professional results.
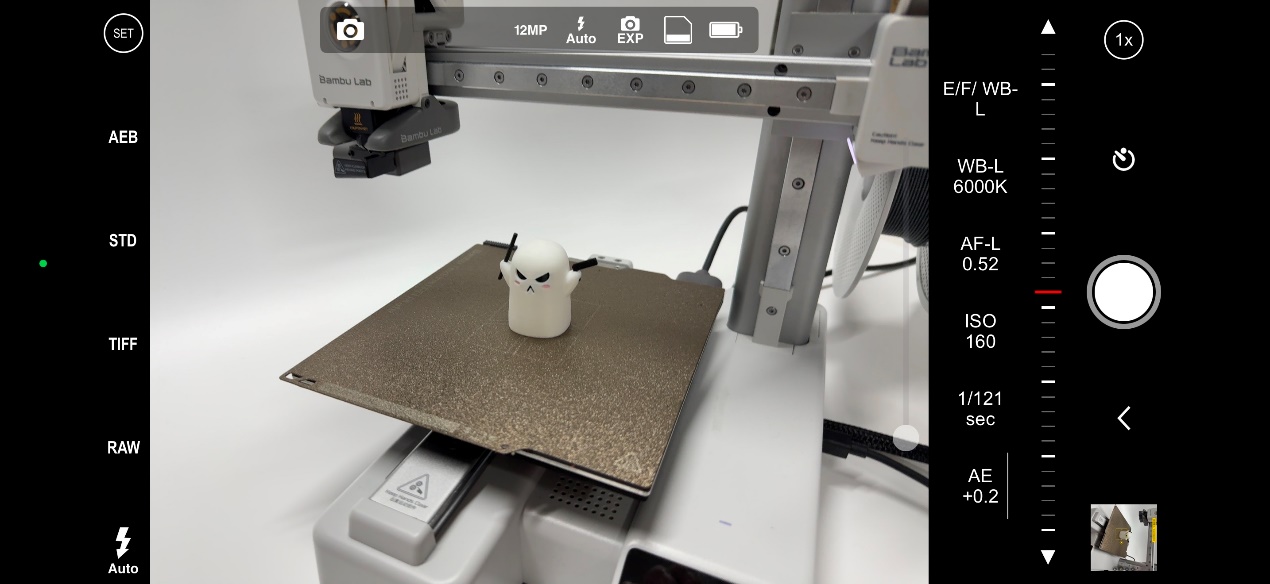
- Test the remote shutter function by short-pressing the timelapse photography kit’s multifunction button to check whether the camera successfully triggers the shutter.
- Ensure the shooting device remains stable during timelapse photography to prevent misalignment due to movement.
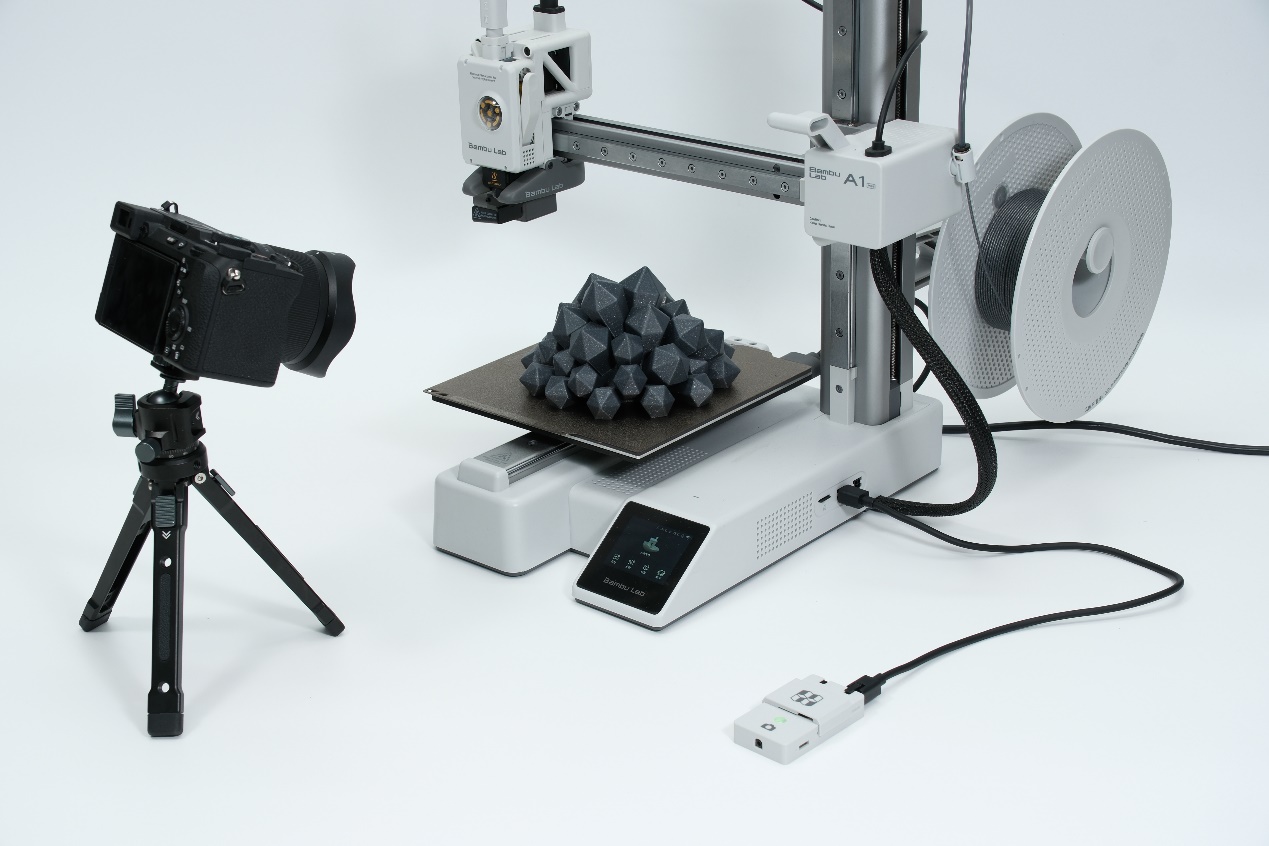
¶ Camera Setup
-
Connect the camera to the timelapse photography kit via Bluetooth or shutter cable. Increase the auto-lock time in the camera settings to prevent screen locking. Since the shooting process is long, connect the camera to a charger.
-
Set up the camera in front of the printer. For A-series models, leave space for the heated bed to move, preventing collisions with the camera.
-
Place a reference object of similar size to the printed model on the heated bed and adjust the camera angle for the best composition.
-
Set the camera to M mode (Manual). It is generally recommended to use a small aperture range between f/5.6 and f/11 to ensure sufficient depth of field, which is suitable for most shooting needs.
-
If a blurred background effect is desired, increase the aperture. Accurate focus estimation is crucial. A larger aperture highlights the subject but increases the difficulty of shooting.
-
Manually set the shutter speed, recommended between 1/60s and 1/200s. If using a flash for supplementary lighting, match the shutter speed to the flash sync speed. The recommended ISO range is 100-800 to minimize noise. Manually adjust white balance to the appropriate color temperature to prevent color shifts due to white balance fluctuations.
-
It is recommended to shoot in JPG format with an image size of "S." A resolution exceeding 4K is sufficient for video production, but excessively high resolution may slow down post-processing software.
-
The above settings are for reference only—photography has no fixed rules. Feel free to explore more techniques and unleash your creativity.
-
Test the remote shutter function by pressing the multi-function button on the timelapse photography kit to ensure the camera successfully triggers the shutter.
-
Ensure the camera remains stable throughout the timelapse shooting process to prevent misaligned images due to movement.
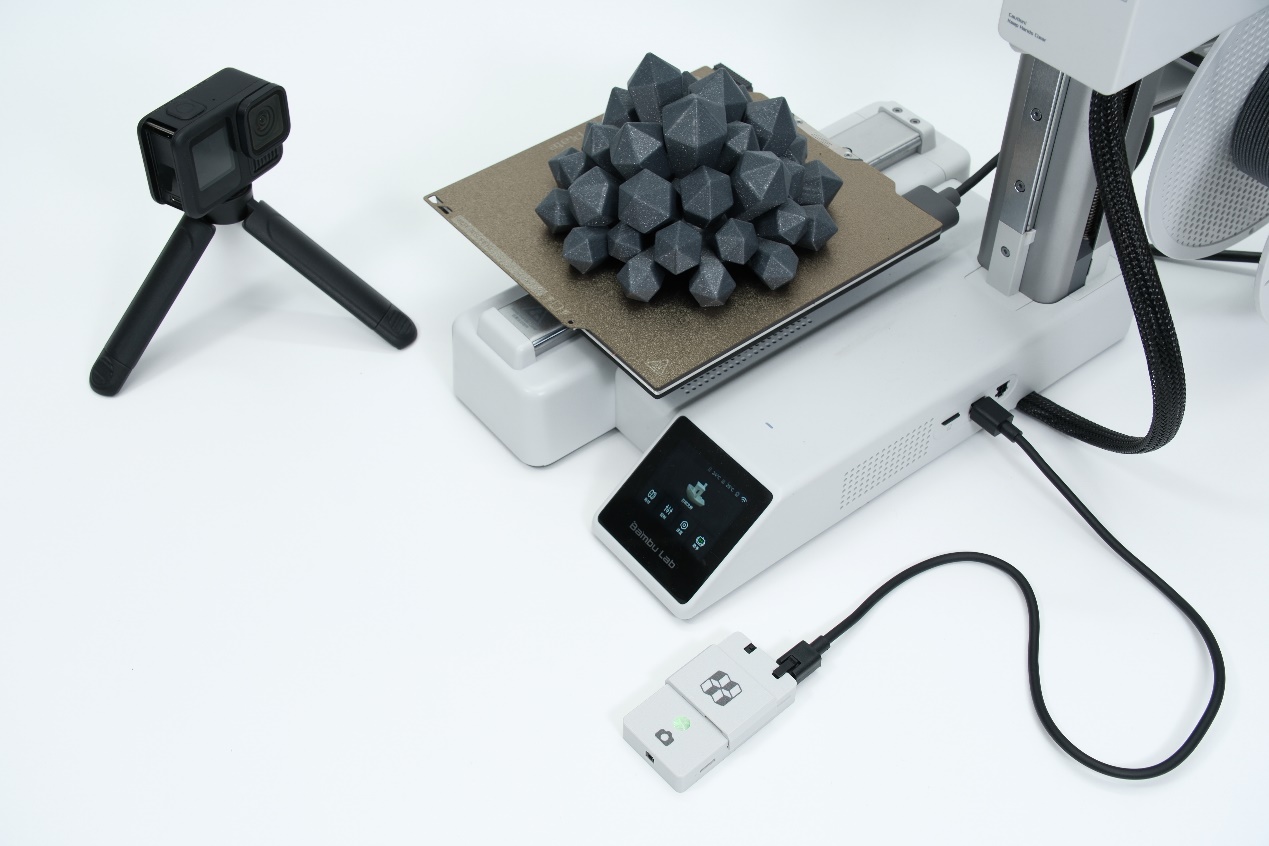
¶ GoPro HERO13 Setup
-
Connect the GoPro HERO13 to the timelapse photography kit via Bluetooth. Increase the auto-lock screen time in the GoPro settings to prevent the screen from locking during shooting. Since the shooting duration is long, connect the GoPro HERO13 to a charger.
-
Mount the GoPro HERO13 in front of the printer. For A-series models, leave enough space for the heated bed to move to avoid collisions.
-
Place a reference object similar in size to the printed model on the heated bed and adjust the framing angle for the best view.
-
Switch the GoPro HERO13 to photo mode. Be mindful of the lens’s closest focusing distance to avoid blurry images. Use manual mode, similar to standard cameras. Since action cameras are compact with short focus distances, they can capture unique angles that traditional cameras might miss.
Issue: After connecting the timelapse photography kit to the GoPro via Bluetooth, the GoPro cannot shut down properly and must Bluetooth must be disconnected before shutting down.
¶ Photography Techniques
¶ Segment Shooting
If you only need to capture specific printing phases (e.g., from layer 80 to layer 150), use Bambu Studio’s printing timeline to determine the exact shooting period. For example, if layer 80 begins at 26 minutes and layer 150 ends at 40 minutes, set up the camera only during this time frame. This method significantly reduces the number of captured images, making it ideal for users with limited storage space on their phones.
The timelapse photography kit supports hot-swapping, meaning you can connect or disconnect it anytime during printing without affecting the process.
¶ Environmental Timelapse Photography
Consider capturing the background changes along with the printer’s timelapse to enhance visual appeal. For instance, place the printer near a window and adjust the shooting angle to include the outdoor scenery. This approach records the printing process while capturing the dynamic changes outside, creating a more visually engaging and artistic timelapse video.
¶ Ⅴ. Timelapse Video Composition
After importing the timelapse photos to a computer, choose a suitable video editing tool based on your experience level.
If you have no experience in video editing and don’t want to spend too much time, Shutter Encoder is an efficient and convenient option. For beginners with limited video editing experience, CapCut is recommended due to its intuitive interface and easy-to-use features. For experienced video creators who require professional editing and more creative possibilities, Premiere Pro is the ideal choice.
| Software | Difficulty | Platform | Cost | Recommended for | Download Link |
|---|---|---|---|---|---|
| CapCut****剪映 | Low | PC / Mac | Free | Video creators | https://www.capcut.com/https://www.capcut.cn/ |
| Premiere Pro | Medium | PC / Mac | Paid | Professional video creators | https://www.adobe.com/ |
| Shutter Encoder | Very Low | PC / Mac | Open-source | Beginners & engineers | https://www.shutterencoder.com/ |
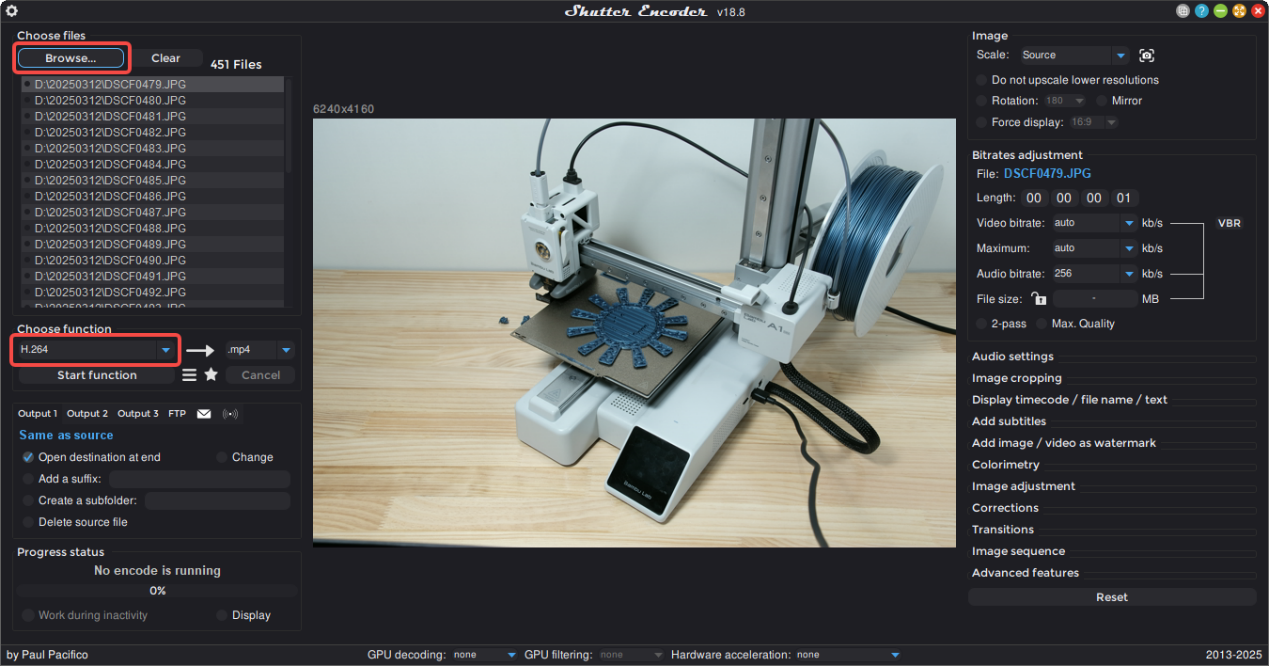
¶ Shutter Encoder
Shutter Encoder is a video and audio encoding software designed for fast and batch encoding tasks. It is suitable for individual users and small studios, especially those who need to frequently convert video formats or handle large-scale video encoding tasks. Its goal is to provide an efficient, stable, and user-friendly encoding solution.
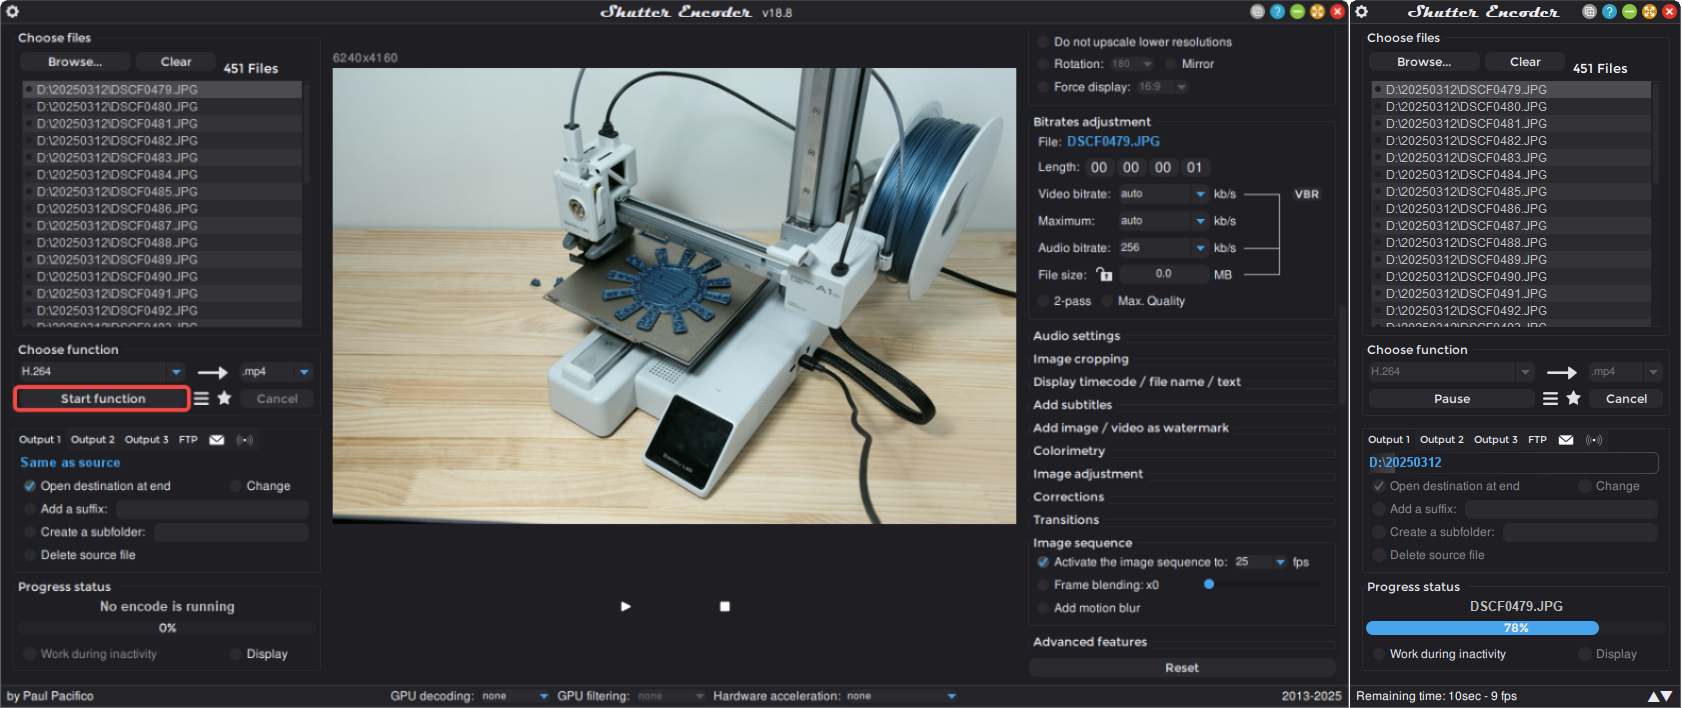
- Open Shutter Encoder, click "Browse..." to import the entire sequence of images. Ensure all images are selected. In the "Choose Function" menu, choose H.264 or H.265 encoding format and set the video output to MP4 for the best compatibility and compression.
- On the right panel, expand "Image Sequence", check "Activate Image Sequence...", and adjust video parameters as needed. If your computer can handle it, preview the video by clicking the play button.

- Once settings are configured, click "Start Function" to complete the video composition.
¶ Ⅵ. Technical Parameters
¶ Indicator Light Status
| Light | Status |
|---|---|
| Green | Printer connection normal |
| White | Printer connection abnormal |
| Rapid Blinking | Connection mode active |
¶ Button Functions
| Action | Function |
|---|---|
| Short Press | Manually trigger shutter (for connection test) |
| Long Press (1s) | Enter connection mode |
¶ Bluetooth Compatibility
| Mobile Phones | Android | Android 12+ |
|---|---|---|
| HarmonyOS | 4.2.0+ | |
| iOS | iOS 16+ | |
| Cameras | Sony | α1 / α7C2 / α7M4 / α7R5 / α7S3 / FX30 / α6700/ a6400 / ZV-E10 II /ZV-E10 / ZV-1 / ZV-1 II / RX100VII /ZV-1F etc. |
| Canon | EOS R8 / EOS R7 / EOS R6 / EOS R6 Mark II/ EOS R5 / EOS R5 Mark II / EOS R10 / EOS R50 / EOS R50V / M50 mark II etc. | |
| Nikon | Z30 / Z50 / Z50II / Zfc / Z6II / Z6III / Zf / Z5 / Z5II etc. | |
| Action Cameras | GoPro | HERO13 etc. |
¶ Shutter Cable Compatibility
Ensure the shutter cable has a 2.5mm universal plug to fit the timelapse photography kit. The cable must be purchased separately.
¶ Ⅶ. Frequently Asked Questions
-
1. Why am I unable to pair with the “BBL_SHUTTER” device?
Please delete the existing “BBL_SHUTTER” pairing information from your phone and try pairing again. -
2. Why can't the camera find the “BBL_SHUTTER” device?
If other devices are occupying the Bluetooth port, it may prevent the camera from detecting the Bluetooth connection. Please disconnect the timelapse photography kit from the printer for 2 seconds and reconnect it. -
3. After restarting the camera, it cannot reconnect to the previously paired timelapse photography kit via Bluetooth?
Press and hold the multifunction button for 2 seconds to attempt reconnection. If the issue persists, delete the camera’s pairing information and re-pair the device. -
4. After both the camera and the timelapse photography kit have been powered off, the camera does not automatically reconnect to the kit upon restarting?
Press and hold the multifunction button for 2 seconds to reconnect to the previously paired device. -
5. How can I prevent timelapse video captured with GoPro HERO13 from appearing shaky?
Due to Bluetooth communication latency on the GoPro HERO13, manually increasing the delay time is recommended. Please refer to the GoPro G-code settings for detailed adjustments. -
6. How to set manual exposure (M mode) on a smartphone?
iOS devices do not support this function by default, but you can download a professional camera app to enable it. Most Android devices include a built-in professional camera mode that supports manual exposure (M mode).
-
7. Why does the brightness of the timelapse video fluctuate?
If people walk around or observe the printing process, it may cause light obstruction or reflection, affecting the uniformity of video exposure. -
8. Why does the timelapse video have missing frames?
When transferring photos on iOS devices, some files may be missing. Please reconnect your phone to your computer and ensure all images are copied successfully. -
9. Why do volume buttons respond when connecting the kit via Bluetooth to a phone?
This is normal because the smartphone’s Bluetooth shutter is triggered via the volume button function. -
10. Which 3D printers are compatible with the timelapse photography kit?
Compatible with Bambu Lab H2D,X1, P1, and A1 series. -
11. How many devices can be controlled simultaneously?
A maximum of 4 devices can be controlled at the same time, including: 1 smartphone via Bluetooth, 1 camera via Bluetooth, 1 device via shutter cable, 1 device via servo shutter. -
12. Does the timelapse photography kit support hot-swapping during printing?
Yes, hot-swapping is supported. -
13. Can the firmware of the timelapse photography kit be updated to support more cameras?
Yes, firmware updates can be applied to increase camera compatibility.
¶ End Notes
We hope the detailed guide provided has been helpful and informative.
If this guide does not solve your problem, please submit a support ticket, we will answer your questions and provide assistance.
If you have any suggestions or feedback on this Wiki, please leave a message in the comment area. Thank you for your support and attention!