The Bambu Lab P1S 3D printer is equipped with a stainless steel hotend and extruder, which are well-suited for printing standard, non-abrasive filaments like PLA, PETG, ABS, PA (Nylon), and TPU.
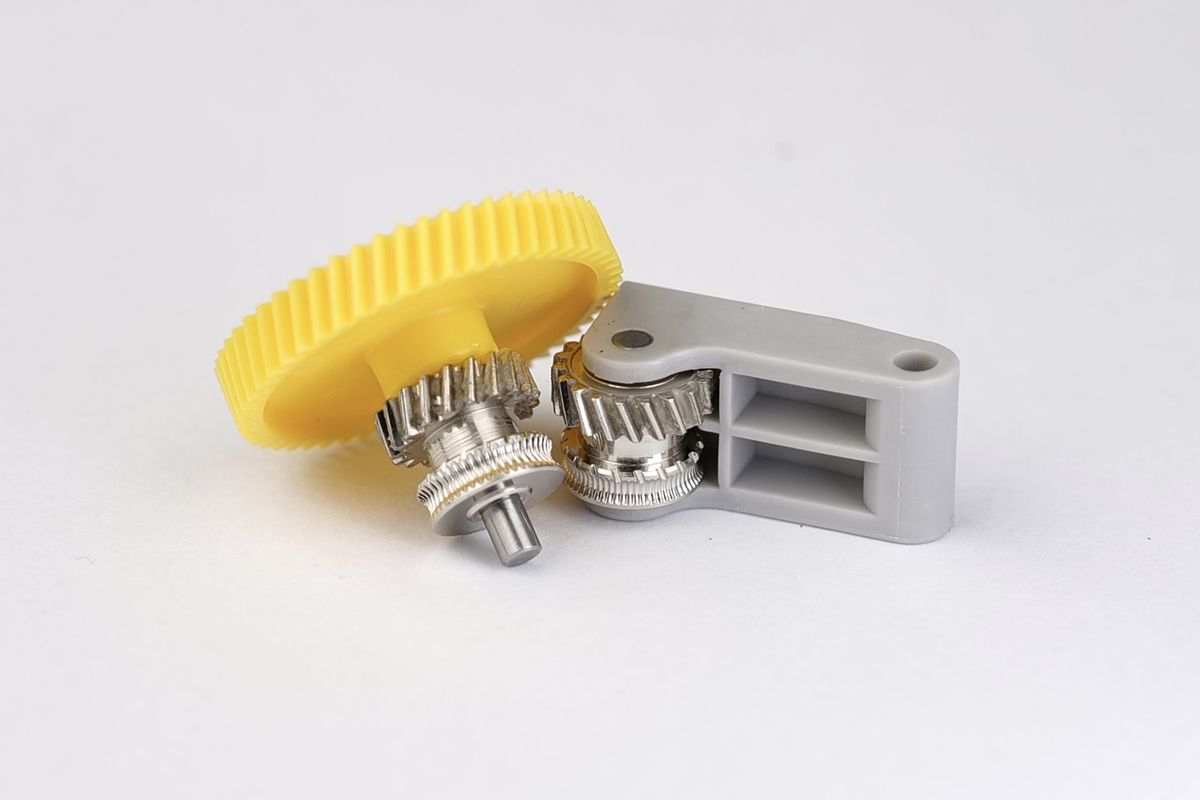
However, when printing abrasive filaments, such as carbon fiber, glass fiber, metal-filled, or glow-in-the-dark filaments, the stainless steel components can wear out quickly due to the abrasive particles in these materials. For the most abrasive filaments, the nozzle can be damaged after a single print.
In the example below, you can observe the differences between a brand new nozzle (left) and a worn-out nozzle (right). The right Stainless Steel Nozzle was used to print PETG-CF for 10 hours.
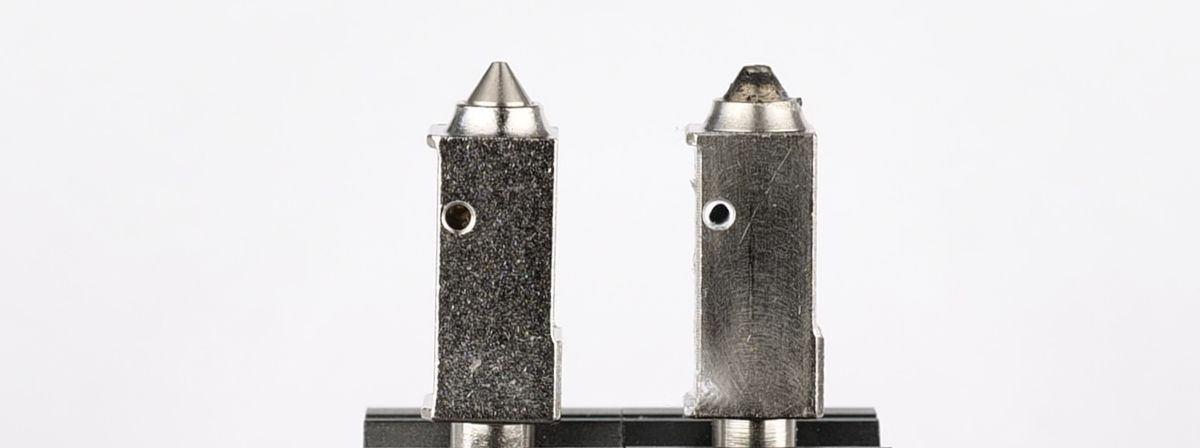
Looking at the nozzles from the front, you can see how the worn-out nozzle has developed a larger orifice due to the abrasion of the filament used.
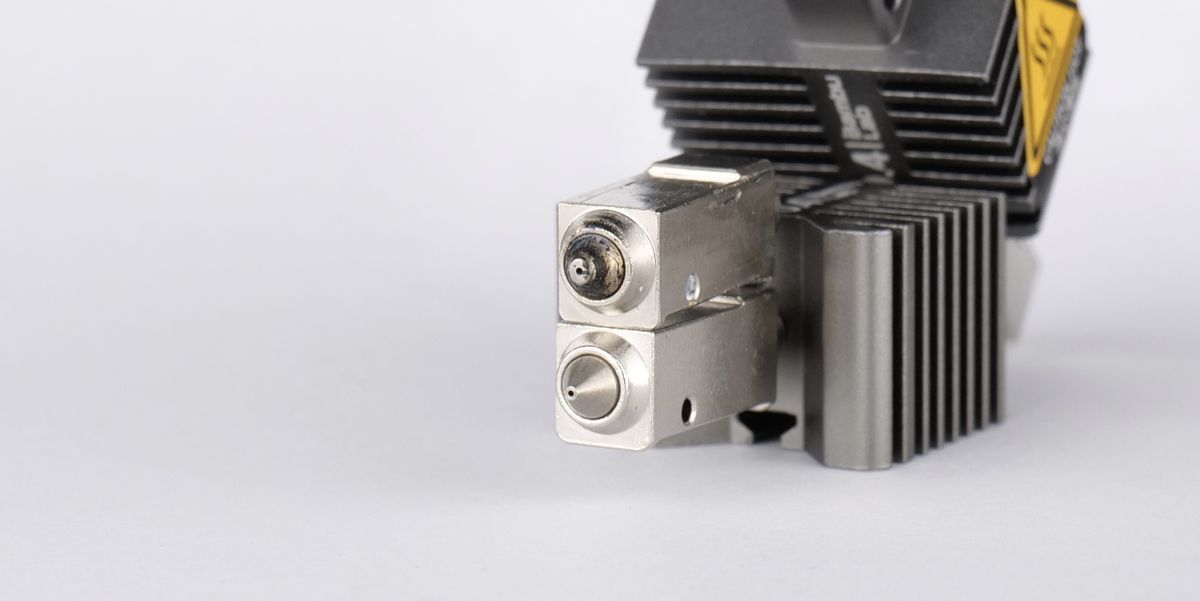
Upgrading to a hardened steel hotend and extruder is a cost-effective way to enhance the P1S’s performance, enabling it to handle these advanced materials reliably.
¶ Why Stainless Steel Isn’t Ideal for Abrasive Filaments
Stainless steel hotends and extruders are durable for general-purpose filaments but are softer compared to hardened steel. Abrasive filaments contain particles (e.g., carbon fiber, glass fiber, or phosphorescent particles in glow-in-the-dark filaments) that act like sandpaper, eroding the inner surfaces of the nozzle and extruder gears over time. This wear can lead to:
- Inconsistent extrusion: Worn nozzles develop irregular or enlarged orifices, causing uneven filament flow, poor layer adhesion, and reduced print quality.
- Frequent replacements: Stainless steel components may need to be replaced often when printing abrasive materials, increasing maintenance costs and downtime.
- Reduced precision: Wear in the extruder gears can cause filament slippage, leading to under-extrusion or skipped layers.
¶ Benefits of Upgrading to Hardened Steel Hotend and Extruder
Upgrading the Bambu Lab P1S 3D printer with a hardened steel hotend and extruder unlocks significant benefits, making it a cost-effective way to enhance performance. Hardened steel’s superior hardness and wear resistance allow the P1S to reliably print abrasive filaments like carbon fiber, glass fiber, metal-filled, or glow-in-the-dark materials without rapid component wear.
The upgrade is also affordable, leveraging the P1S’s existing high-speed printing and enclosed design to rival pricier printers designed for engineering filaments. This makes it an ideal solution for hobbyists and professionals seeking to maximize the P1S’s capabilities without investing in a new machine.
While the upgrade is highly beneficial, users should keep in mind that hardened steel nozzles are available in various diameters (e.g., 0.4mm, 0.6mm, 0.8mm) but the 0.2mm nozzle is not available. Larger nozzles (e.g., 0.6mm or 0.8mm) are recommended for abrasive filaments to reduce clogging risks and improve flow, though they may slightly reduce fine detail.
¶ How to upgrade the Extruder and Hotend?
¶ Choose Your Upgrade Path
Start by purchasing the hardened steel parts for your P1S. You have two options:
- Complete Units: Buy a full hardened steel extruder gear and hotend assembly (ensure you choose the one for P1 Series). This is a bit more expensive but gives you spare stainless steel parts (the originals) in case something fails later. It’s also the quickest upgrade since you swap out the hotend easier.
- Individual Components: Get just the hardened steel gears (for the extruder) and nozzle (for the hotend). This is slightly cheaper but takes a bit longer because you’ll need to take apart the existing extruder and hotend to install these parts.
Considering that direct upgrades of the complete units are simpler, we have prepared this dedicated video to show the process:
If you wish to upgrade individual parts, the steps below will help complete the procedure.
¶ Steps to upgrade the Extruder Gears
The following steps assume that you have followed the video above to remove the extruder and hotend from the printer. If you haven't watched the video, please do it before moving to this step.
Once the extruder is removed, remove the four screws holding the back cover.
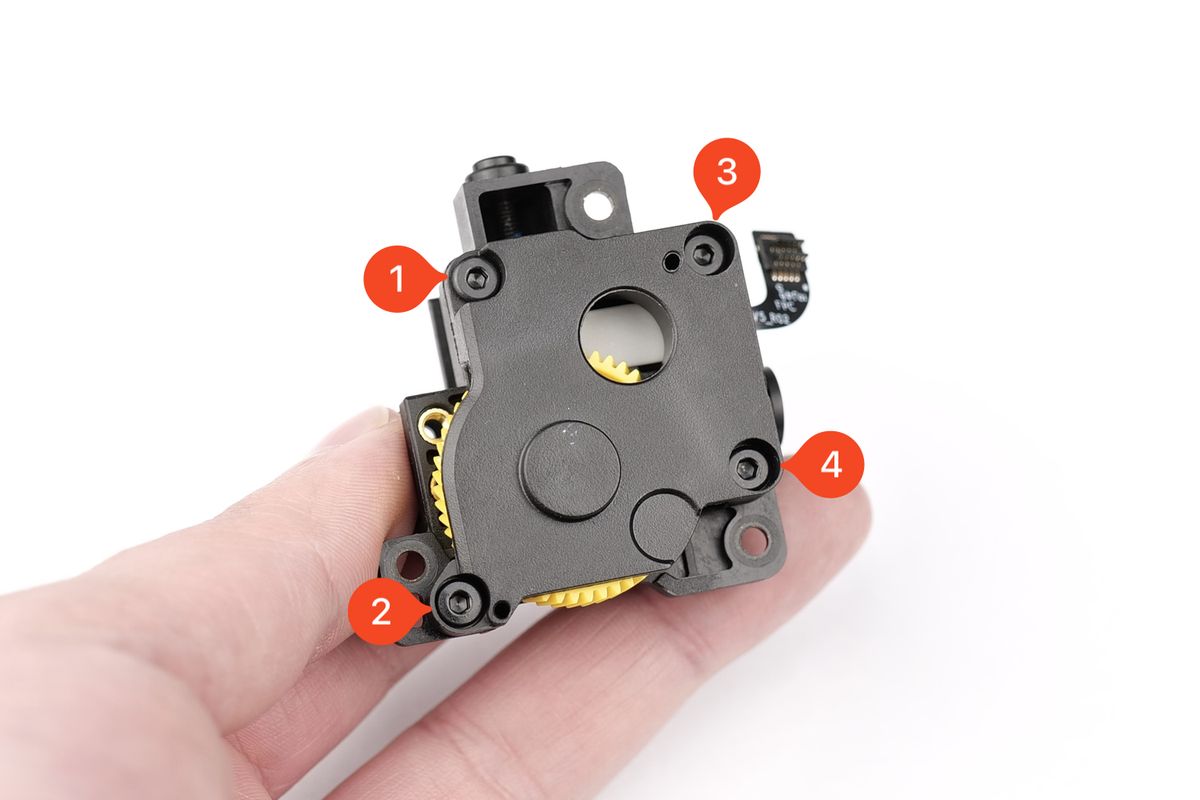
With the cover removed, you can remove the yellow extruder gear. Grab it from the side and gently pull it towards you, while being careful not to lose the bearing in the center.
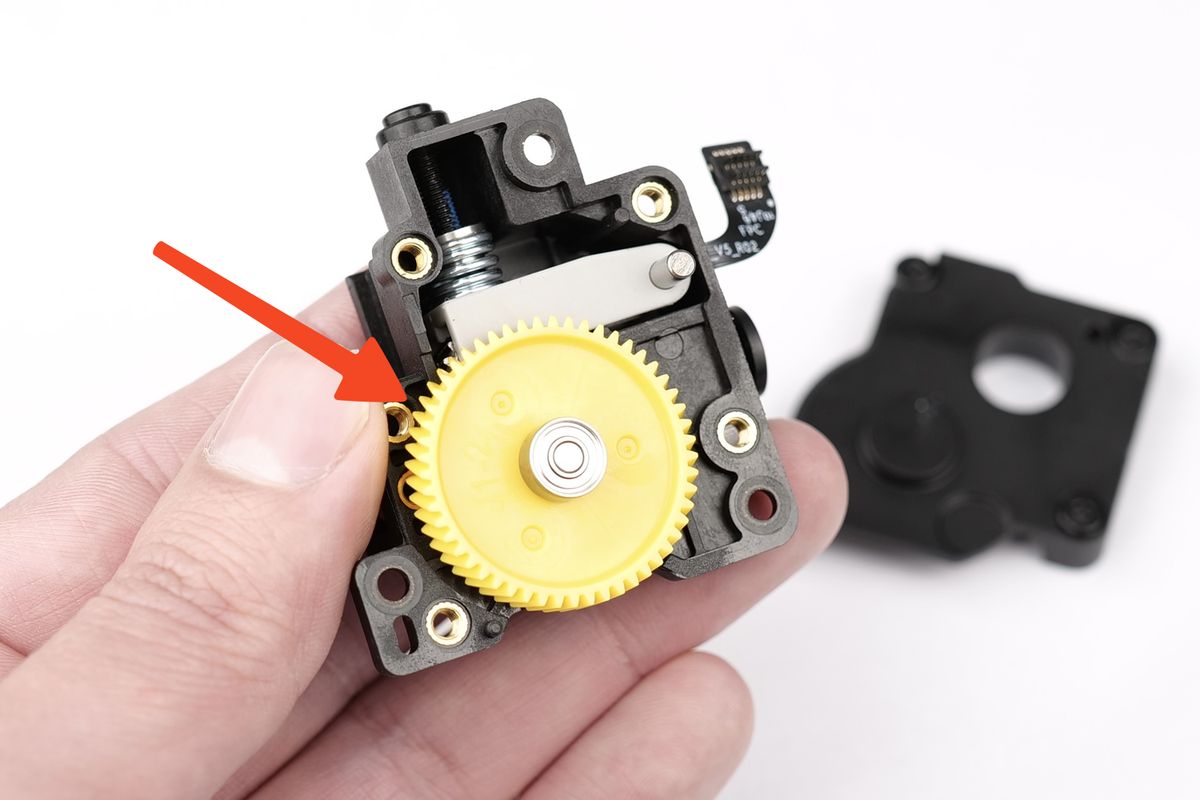
It's time to remove the extruder idler gear. To do so, you need to loosen the screw on the side, as shown in the image below. Pay close attention to this step, as next to the spring, there is a metallic cap which should stay in place.
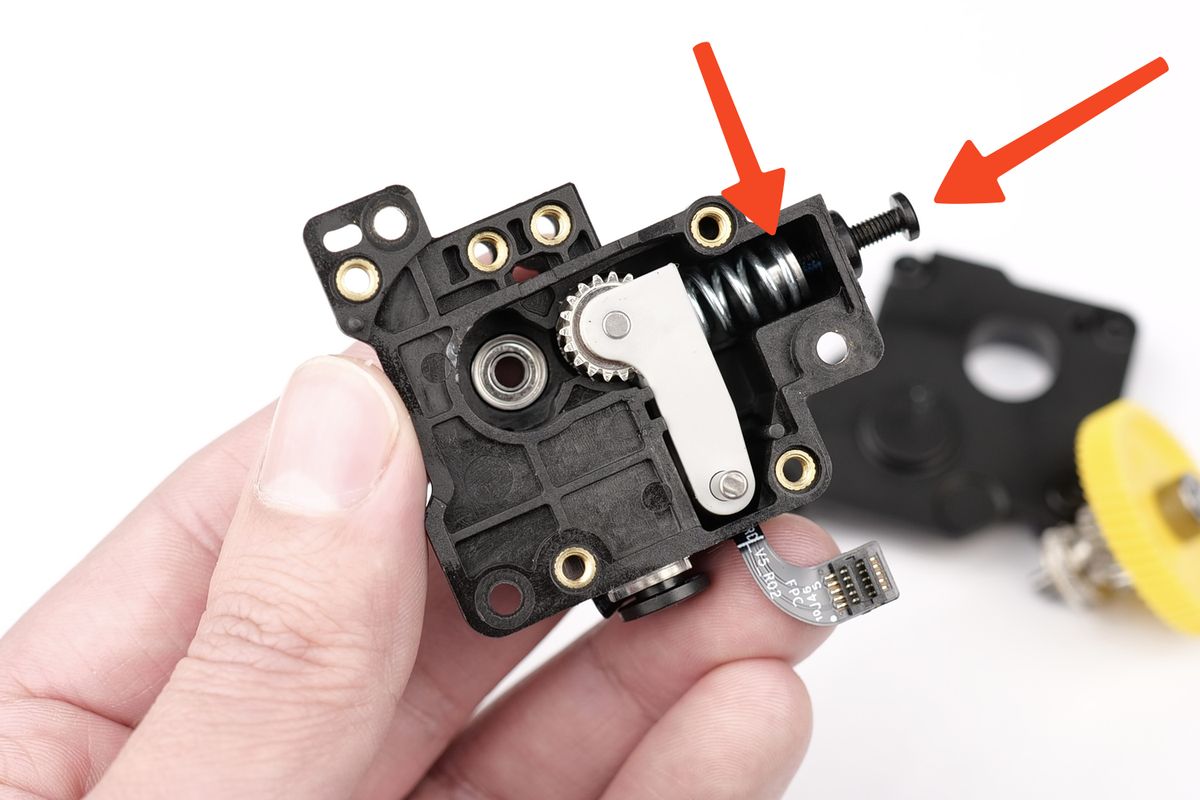
Once the idler screw is loose, the gear can be pulled up to remove it from the extruder. At this stage, handle the extruder carefully, to avoid the spring and the metallic cap from falling out.
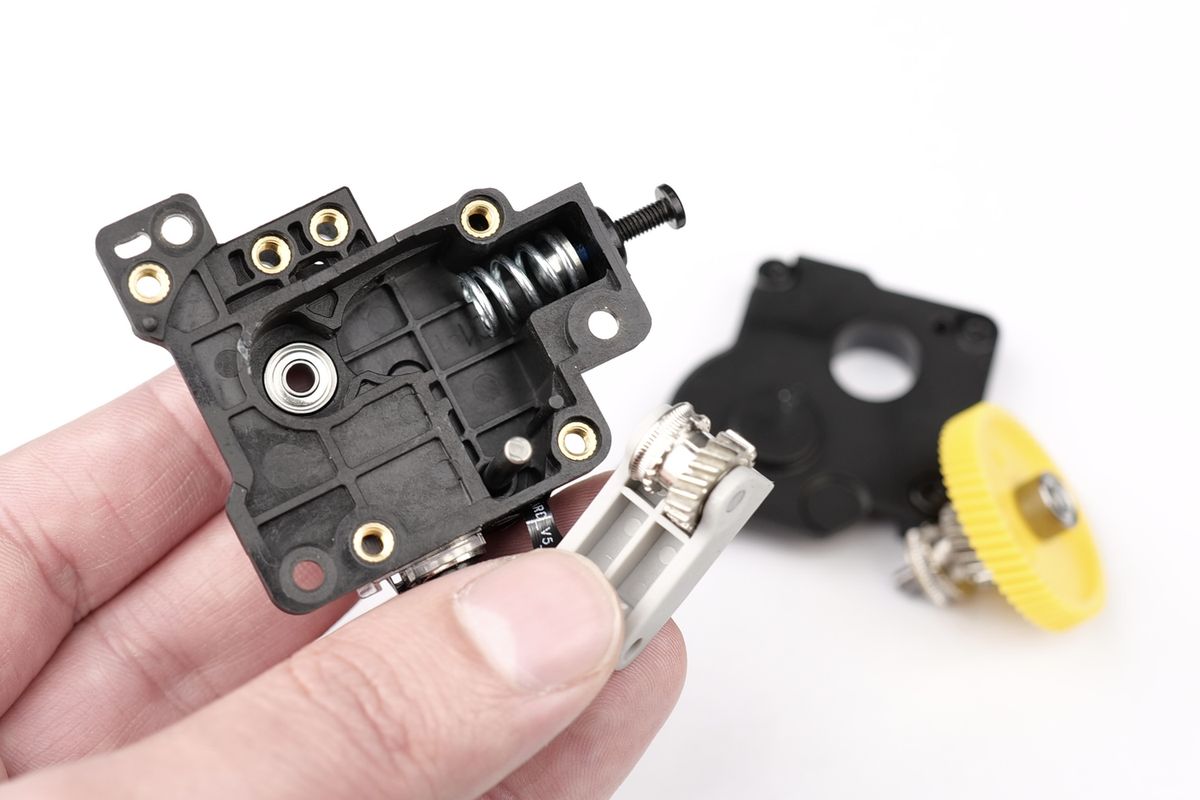
With the stainless gears off, we can repeat the process in reverse to install the hardened steel gears. Insert the idler gear assembly in the extruder, and align the spring as shown below. Once installed, re-tighten the screw you previously loosened, to compress the spring against the idler.
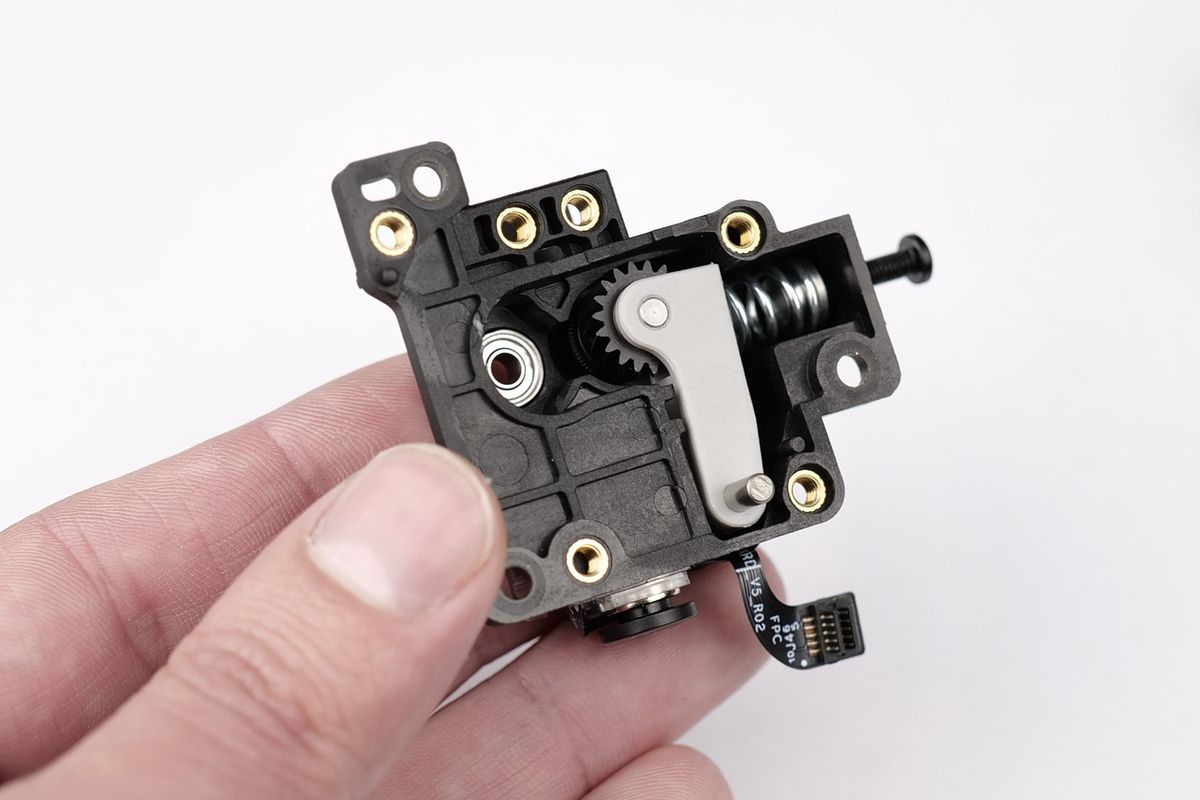
Now, carefully align the shaft of the yellow extruder gear, and carefully insert it into the extruder body. Once installed, it will look like this. Don't forget to also install the round bearing on the back.
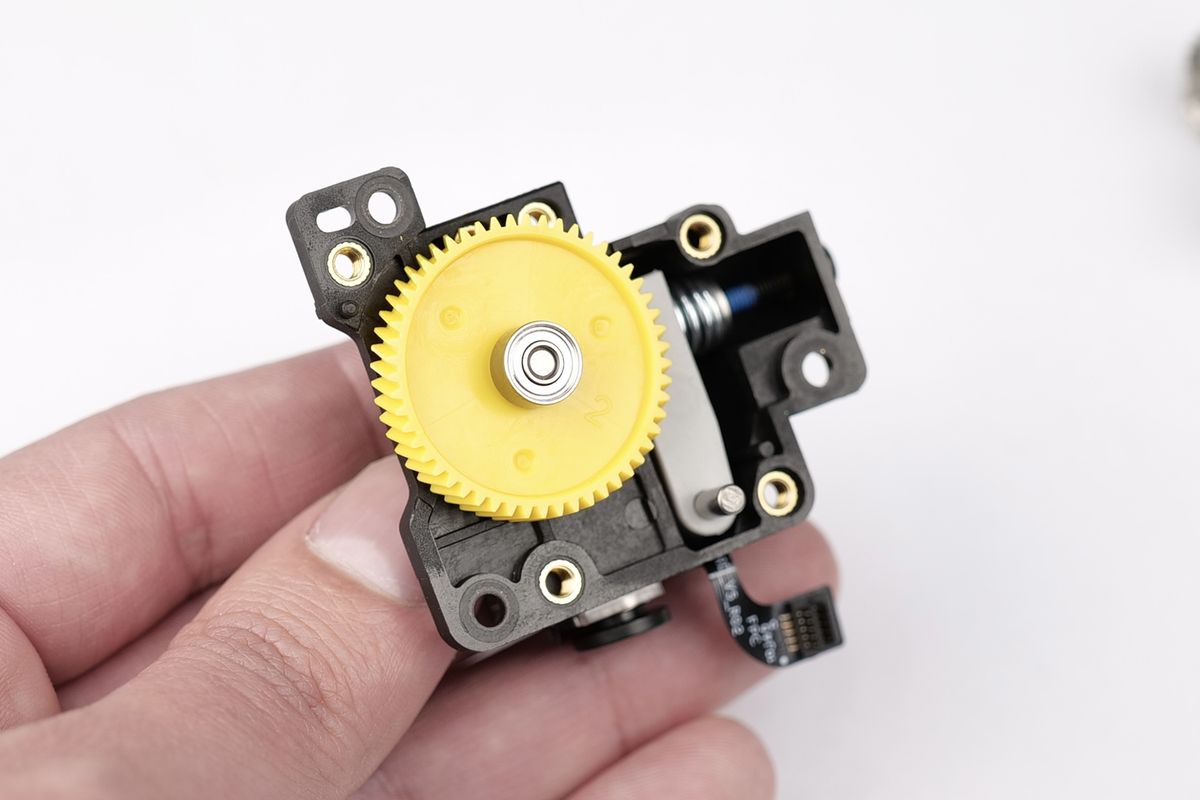
All that's left is to re-install the back cover onto the extruder, and tighten the four screws.
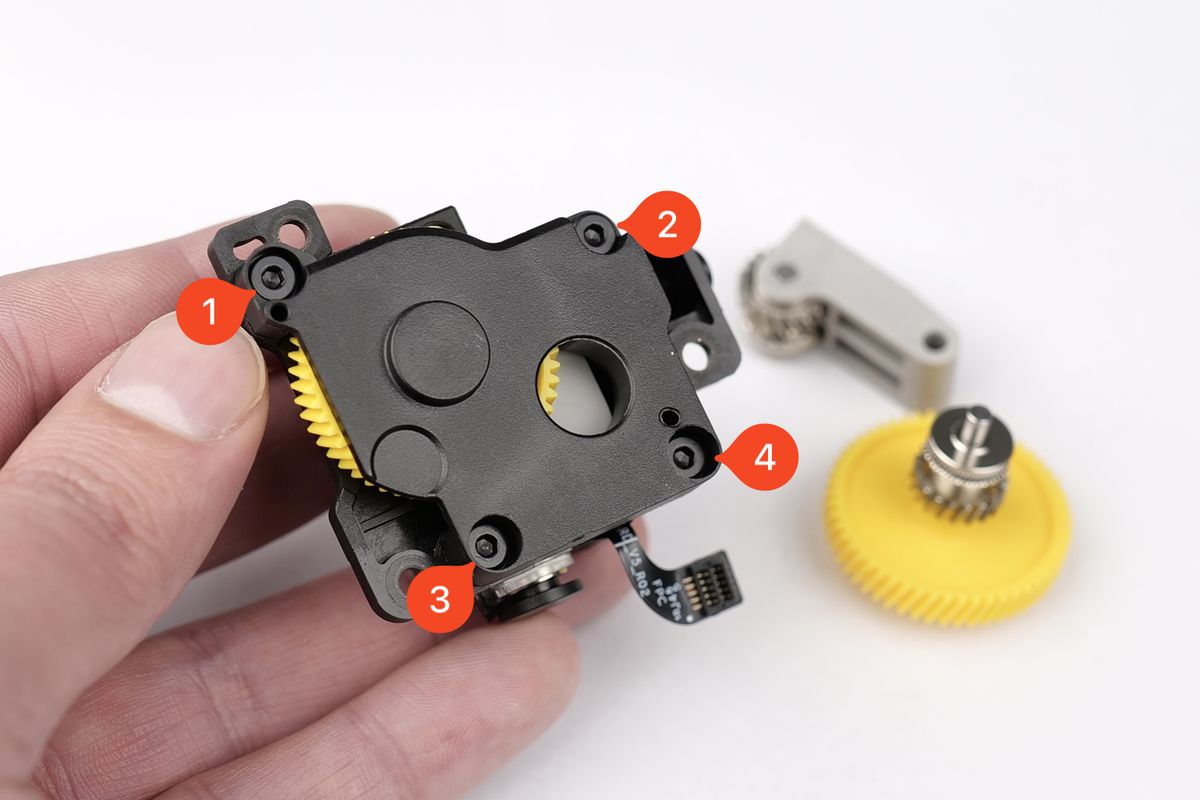
This completes the extruder gear upgrade.
¶ Steps to upgrade the Nozzle
The nozzle upgrade procedure is a bit more involved, as it requires a few more steps. After removing the hotend from the printer it will look like this.
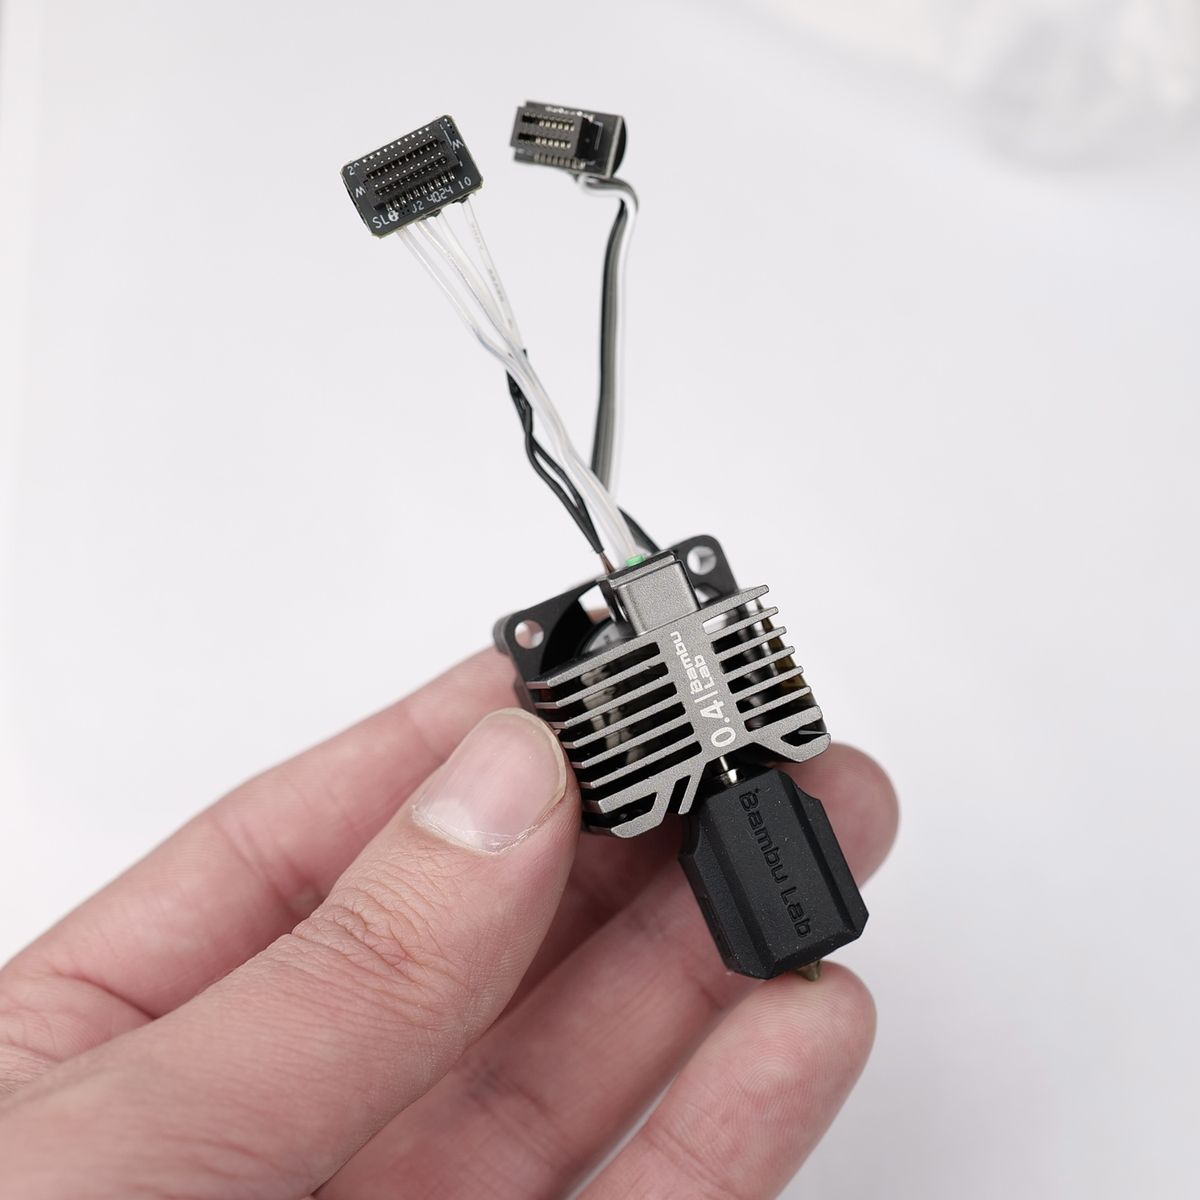
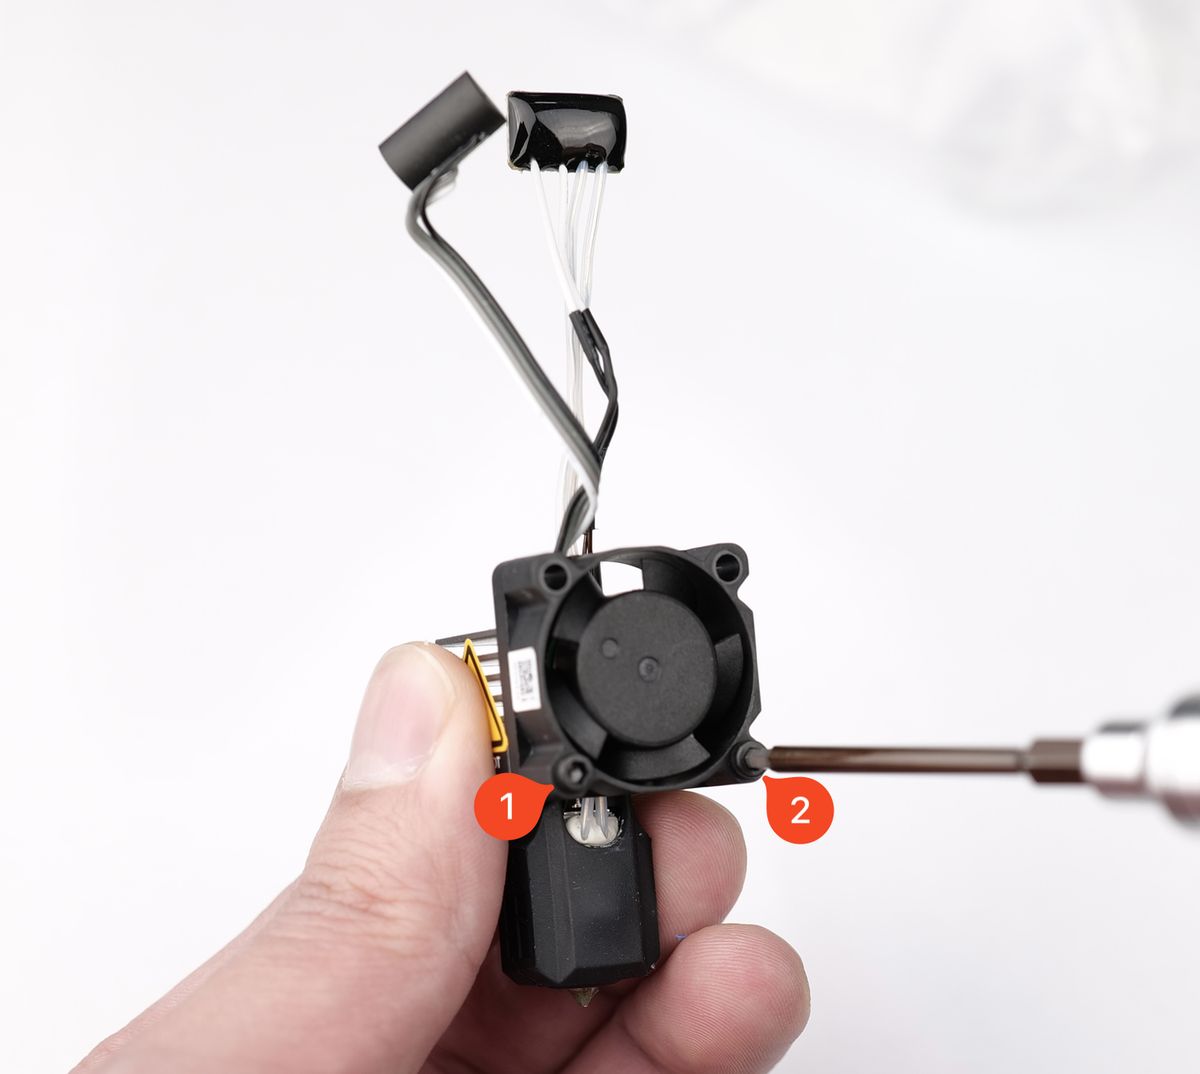
Start by removing the two fan screws, then the fan.
Next, carefully pull out the silicone sock from the nozzle.
![]()
Once the silicone sock is removed, it's time to remove the metallic clip holding the heating assembly in place. Simply grab it and pull it downwards.
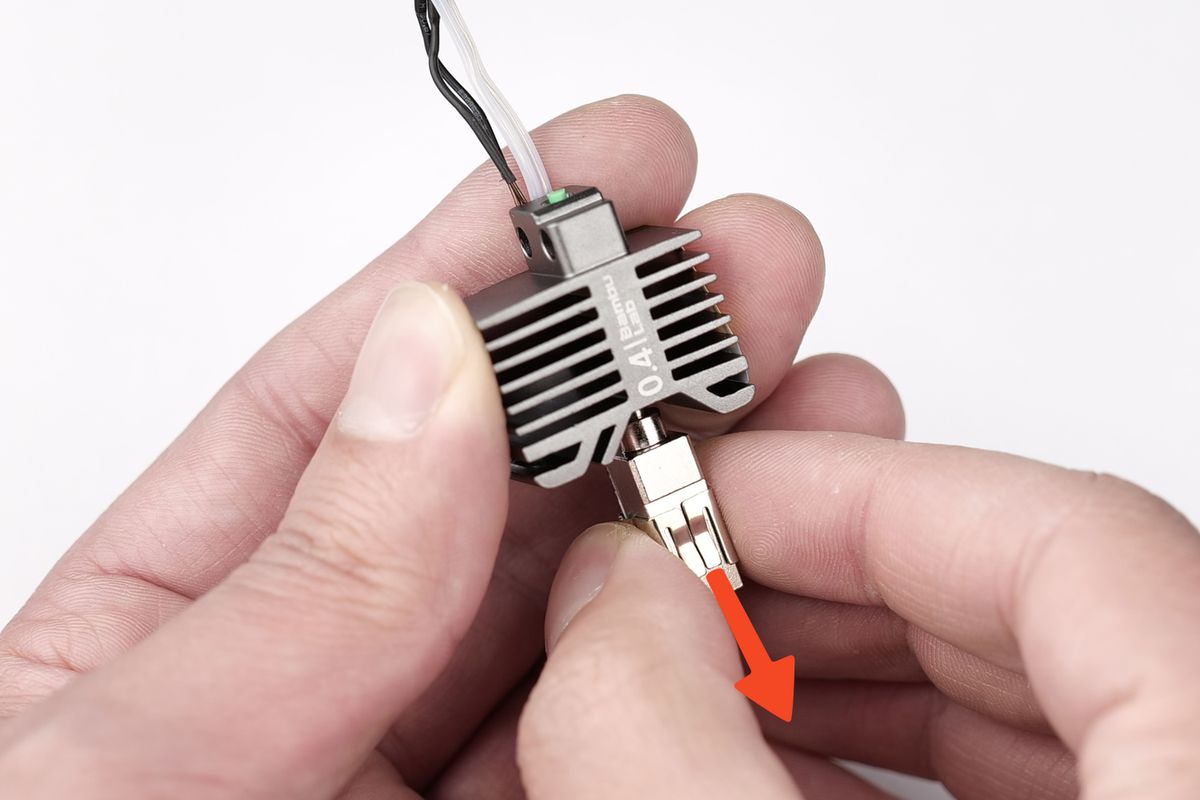
Now, it's time to remove the heater and thermistor. They are attached to the nozzle with some thermal grease, to facilitate the heat transfer between the components. This thermal grease might be dry, so it is important to be gentle and avoid pulling hard by the wires, to prevent damage.
The white heater assembly will slide out, but the thermistor must be gently pulled from the hole on the side of the nozzle.
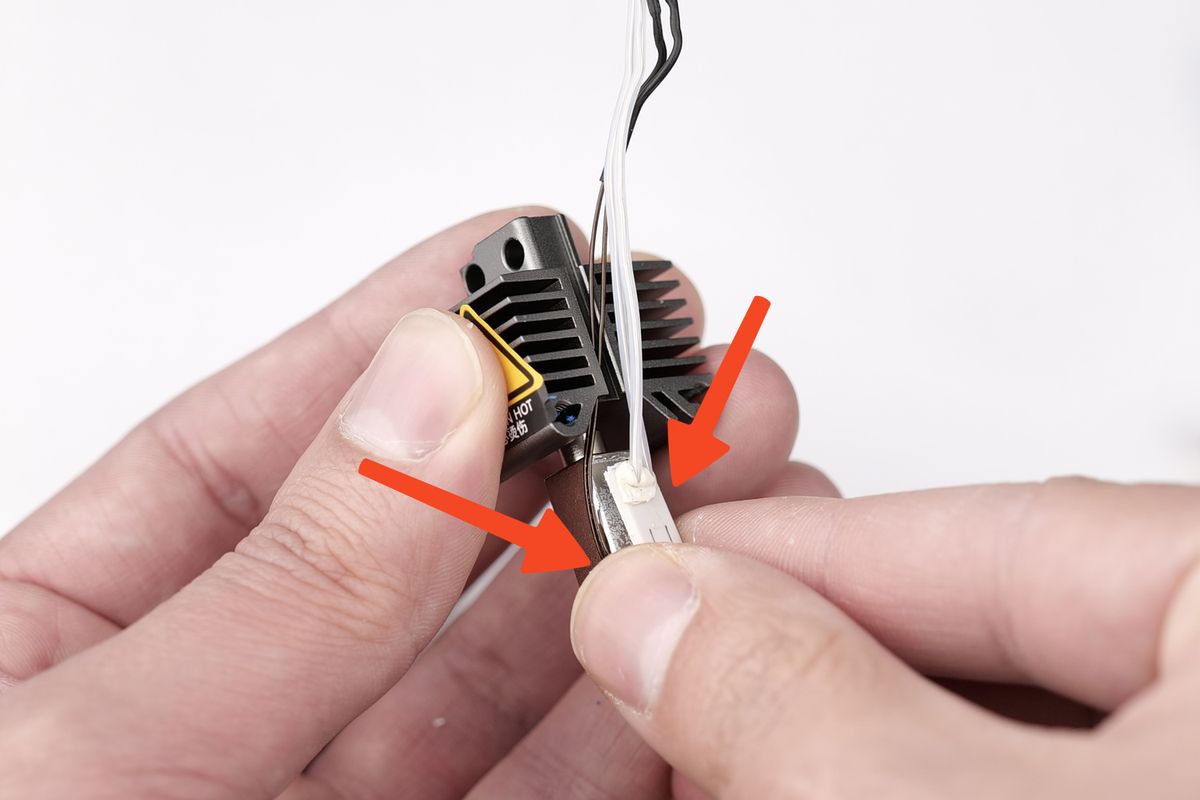
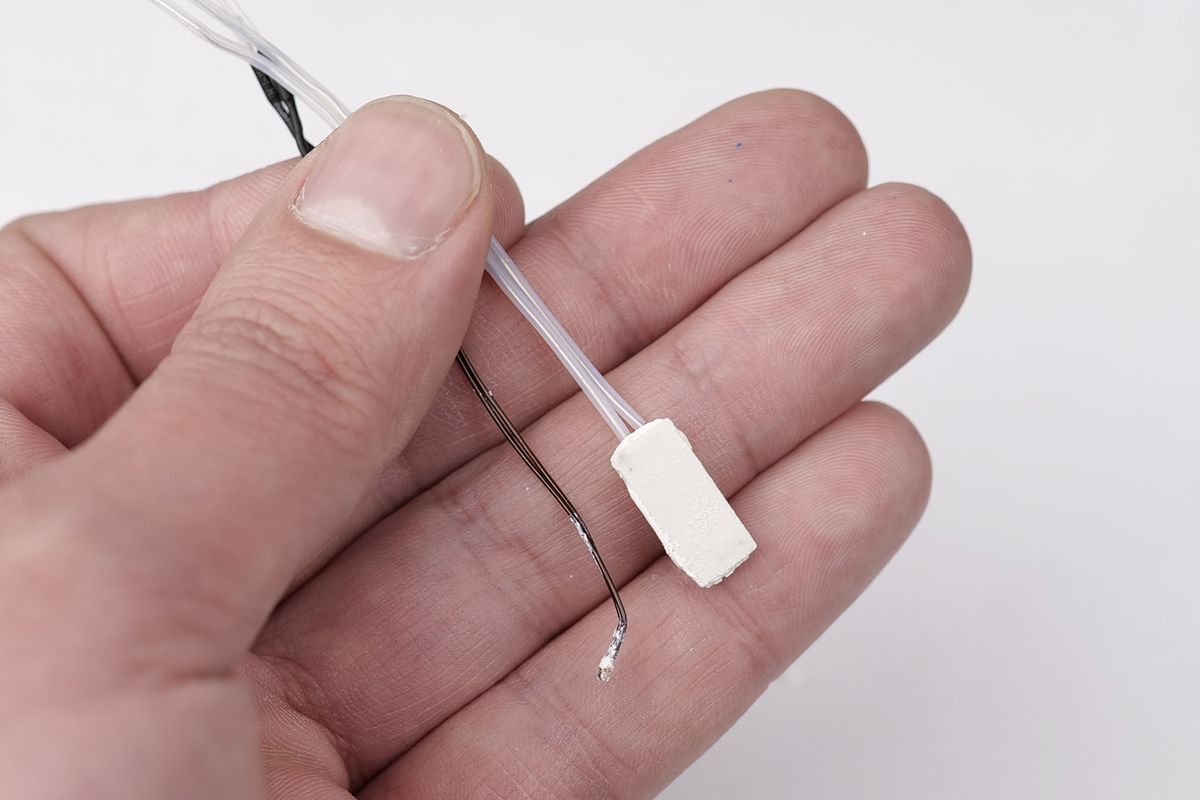
Once removed, the thermistor and heater will look like this. Use some IPA (isopropyl alcohol) to clean any remaining thermal grease from them, to prepare for the installation on the new hardened nozzle.
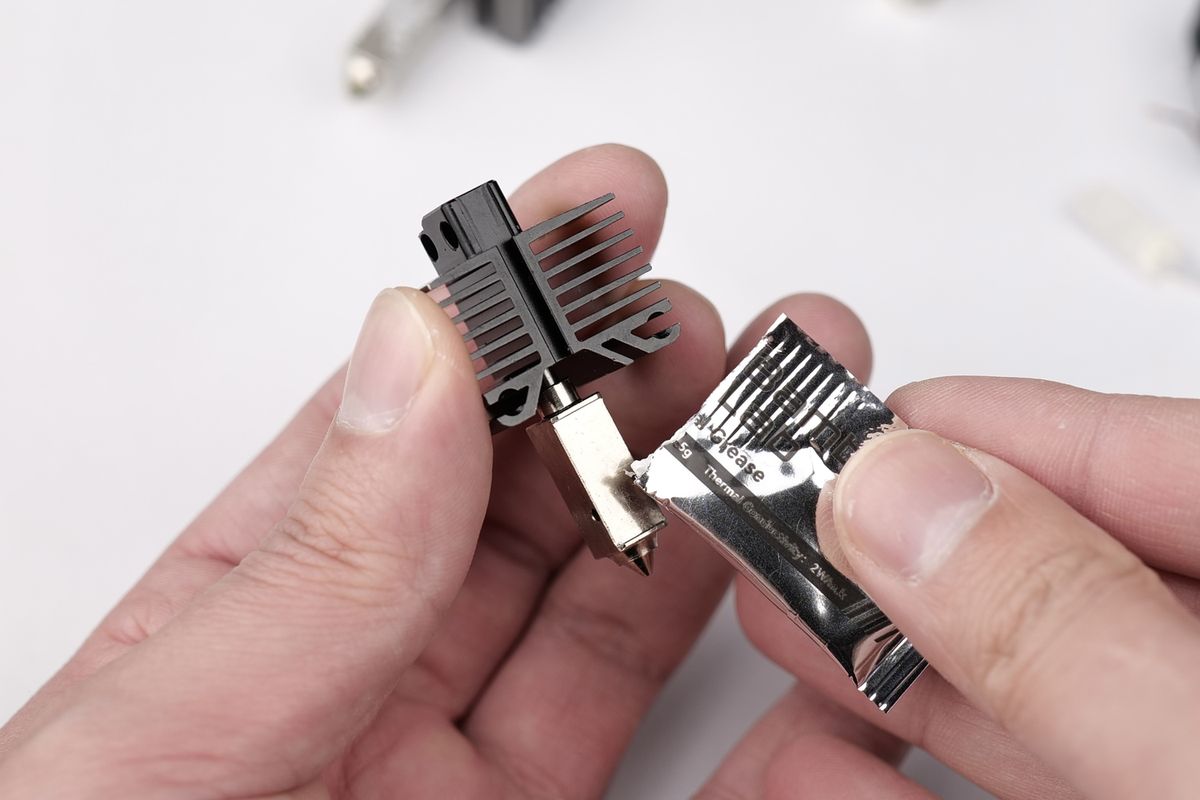
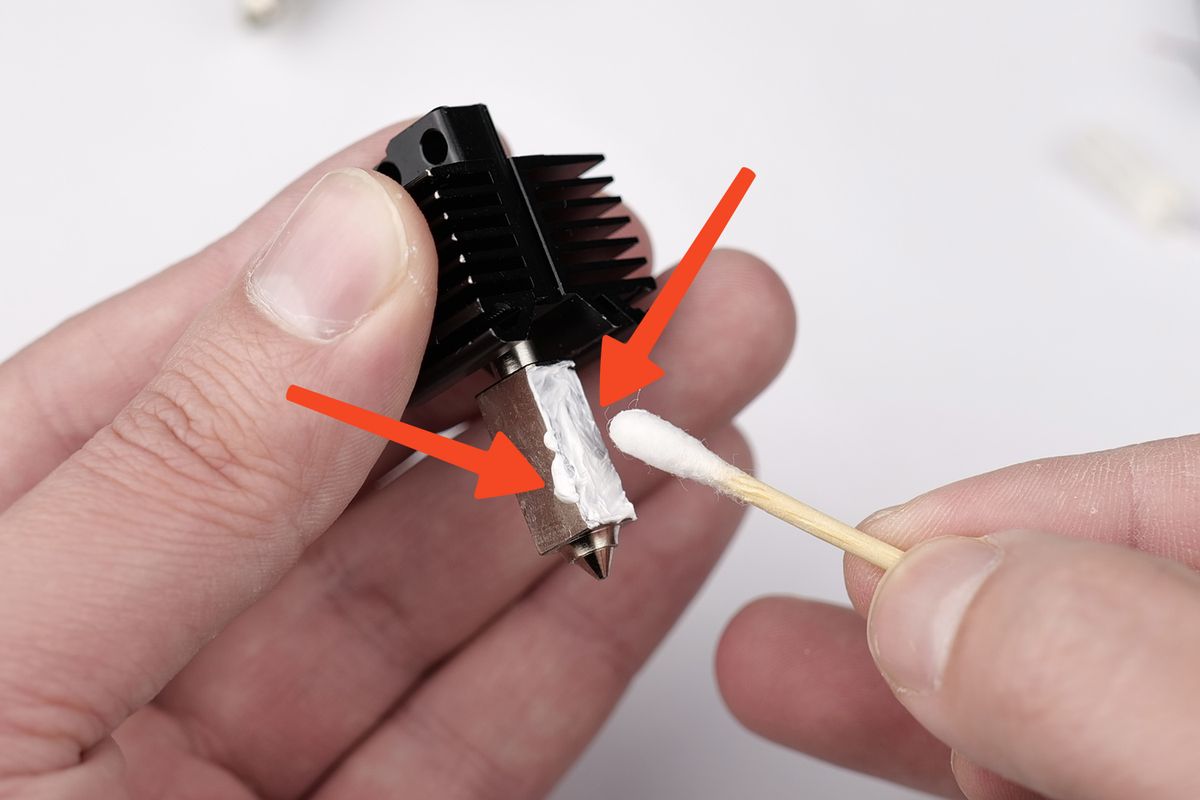
The new hardened steel nozzle doesn't have thermal grease applied, so carefully apply a small amount. Notice the orientation of the nozzle, to apply it on the correct side.
Using a q-tip, carefully spread the thermal grease in a thin layer across the hotend surface, while making sure to also add some inside the thermistor hole from the left side. Don't add too much, as it will be squeezed out.
In this step, install the heater on the prepared surface, and insert the thermistor tip, then align the wires as shown. Pressing the heater and thermistor might squeeze out some thermal paste, so you can take the opportunity to gently clean around them before the next step.
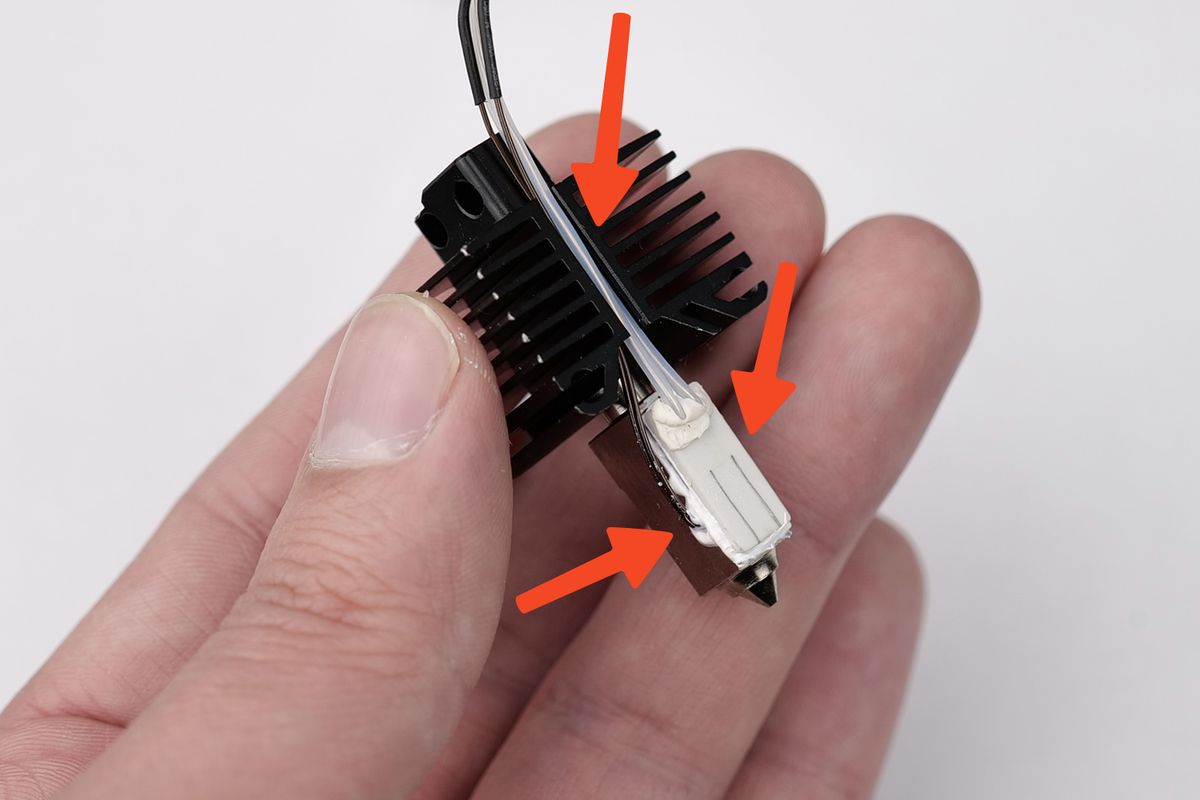
To keep everything secure, you need to install the metallic clip back on the hotend section. Carefully push it upwards until it reaches the middle section. Pay close attention to the orientation of the clip, as it is important to orient it with the thermistor channel towards the thermistor wire. This ensures the wire will not be damaged during the installation.
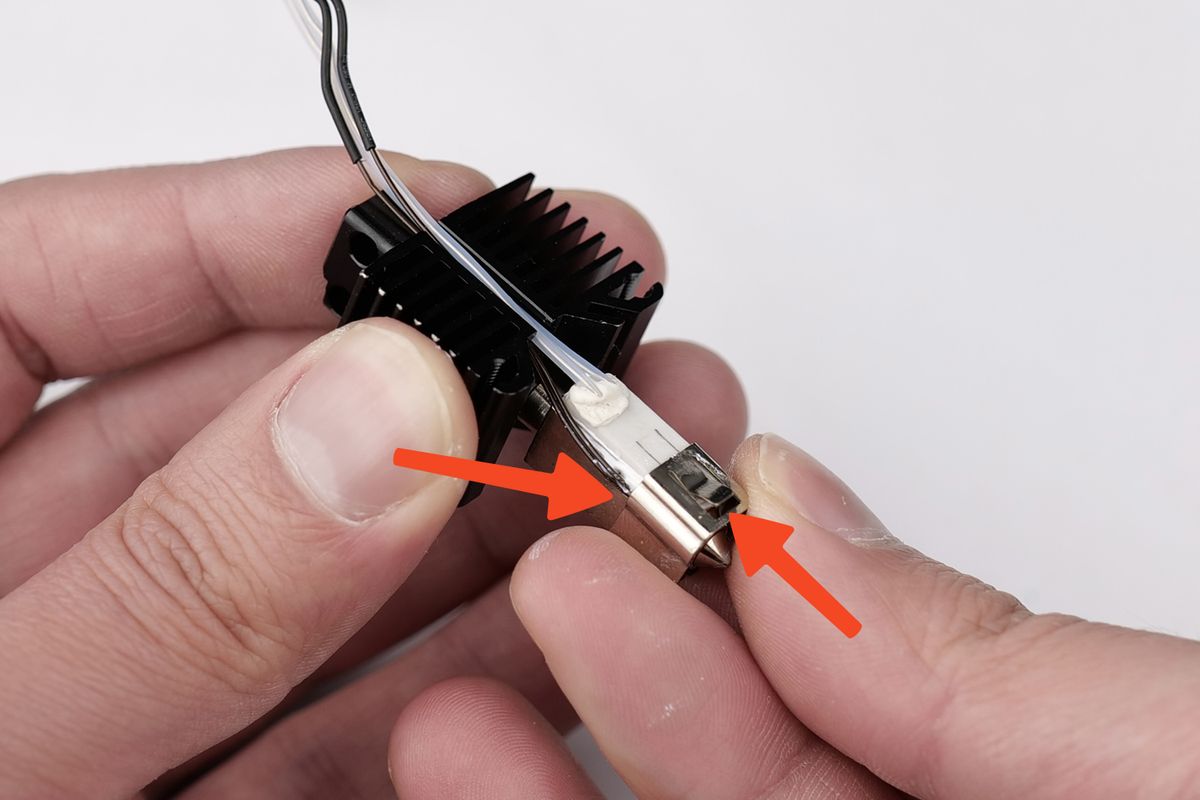
Once done, the hotend will look like this. At this point, re-install the silicone sock to cover the wires and protect it.
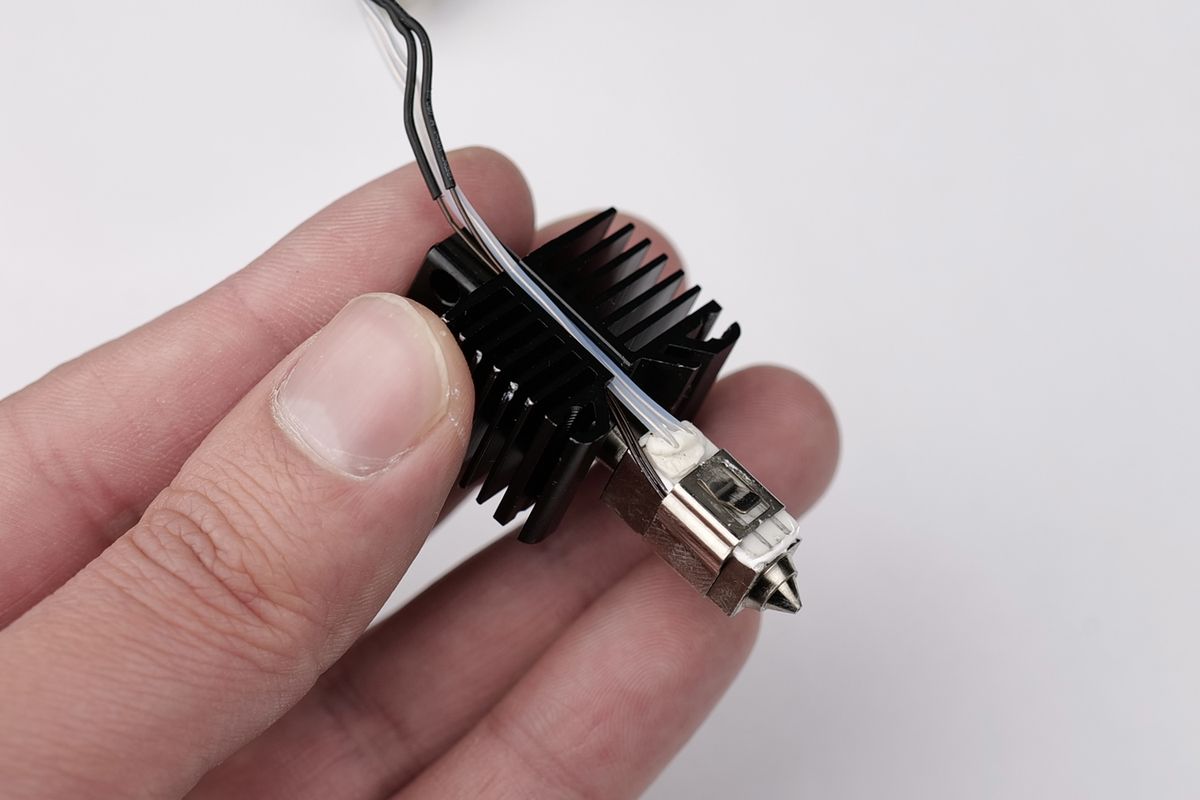
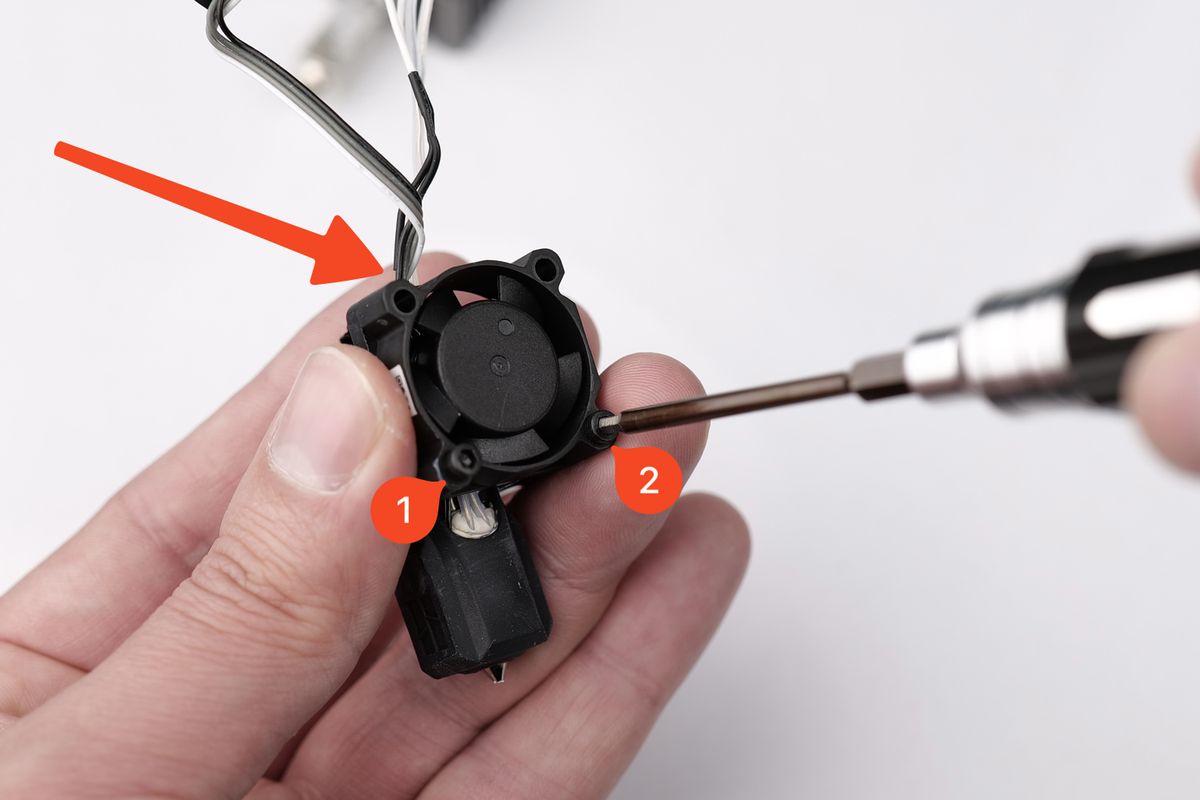
The final step is to install the hotend fan, using the two screws. Pay close attention to the wire orientation shown in the image below to complete the process.
¶ Install everything back to the printer
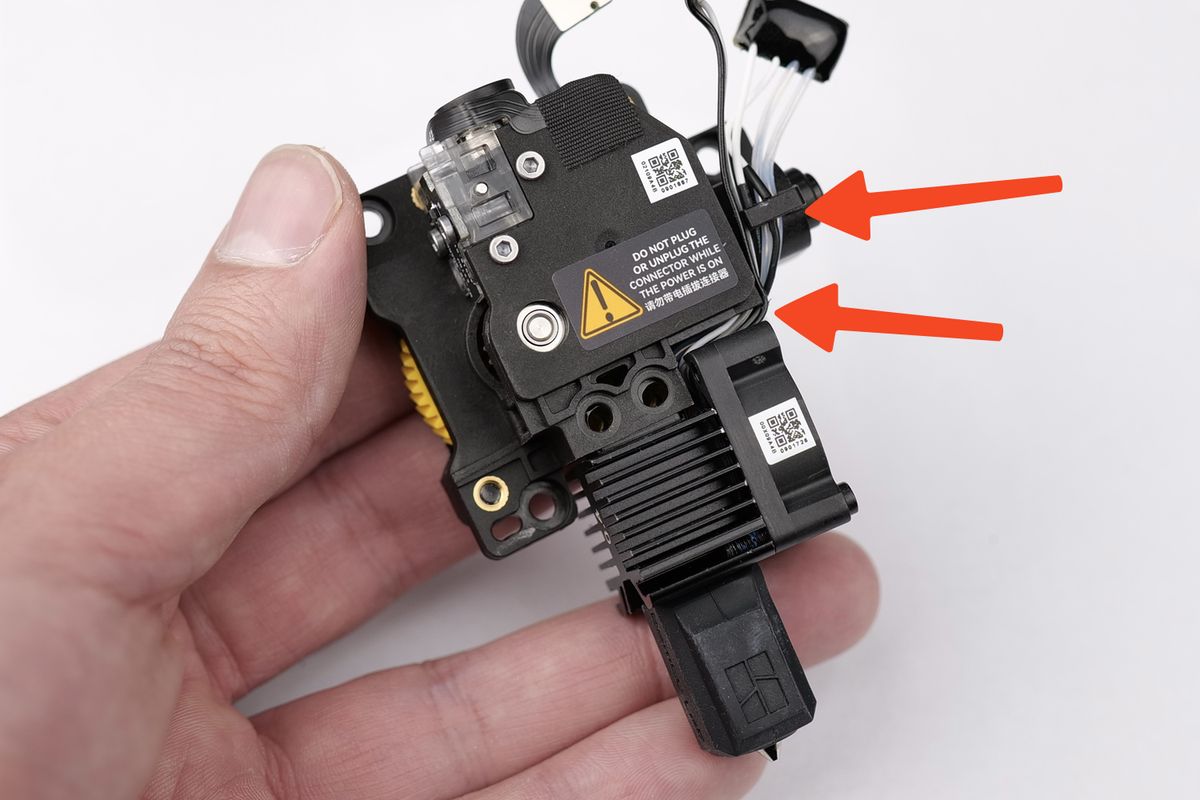
Now that the extruder and hotend are assembled, all that's left is to re-install them to the printer. The easiest way to do it is to combine the extruder and hotend outside the printer. Align the wires of the hotend as shown in the image, while routing them through the wire management clip on the side.
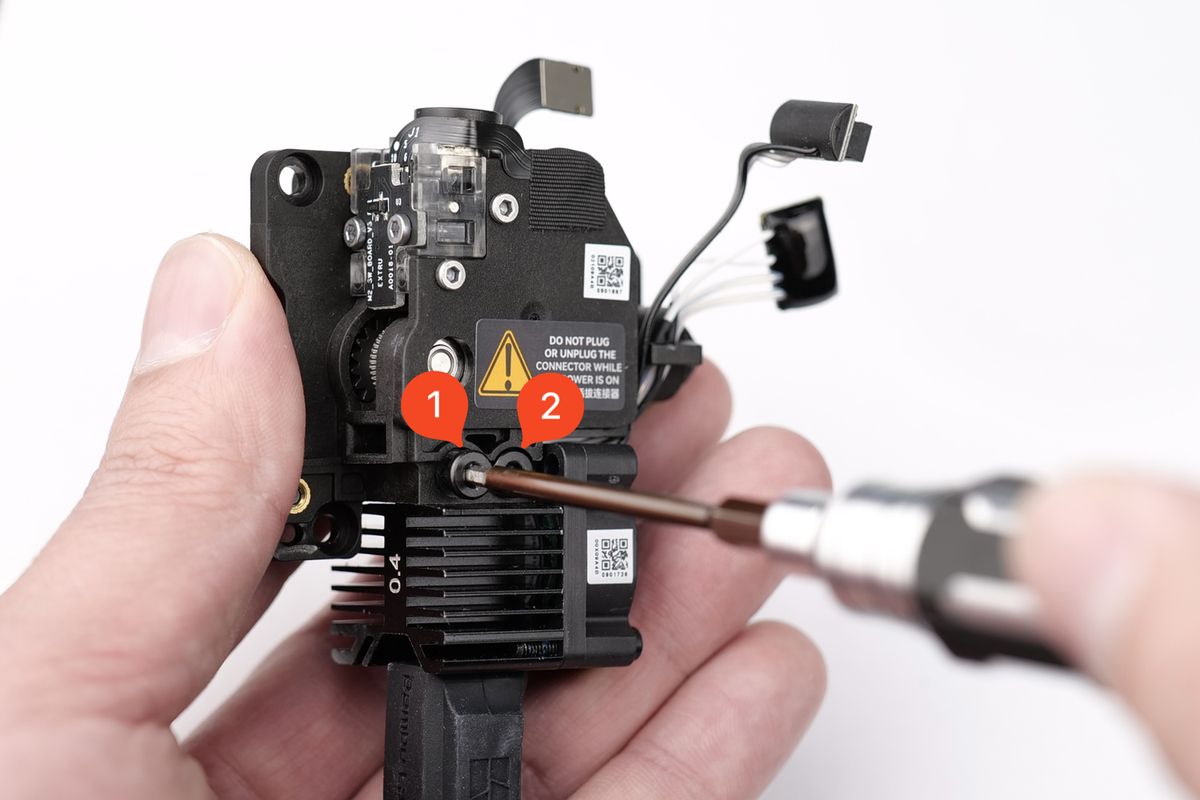
Next, install the two screws to attach the hotend to the extruder body.
It's time to install the extruder and hotend assembly to the printer. Carefully align the extruder to the toolhead, and install the three screws shown below.
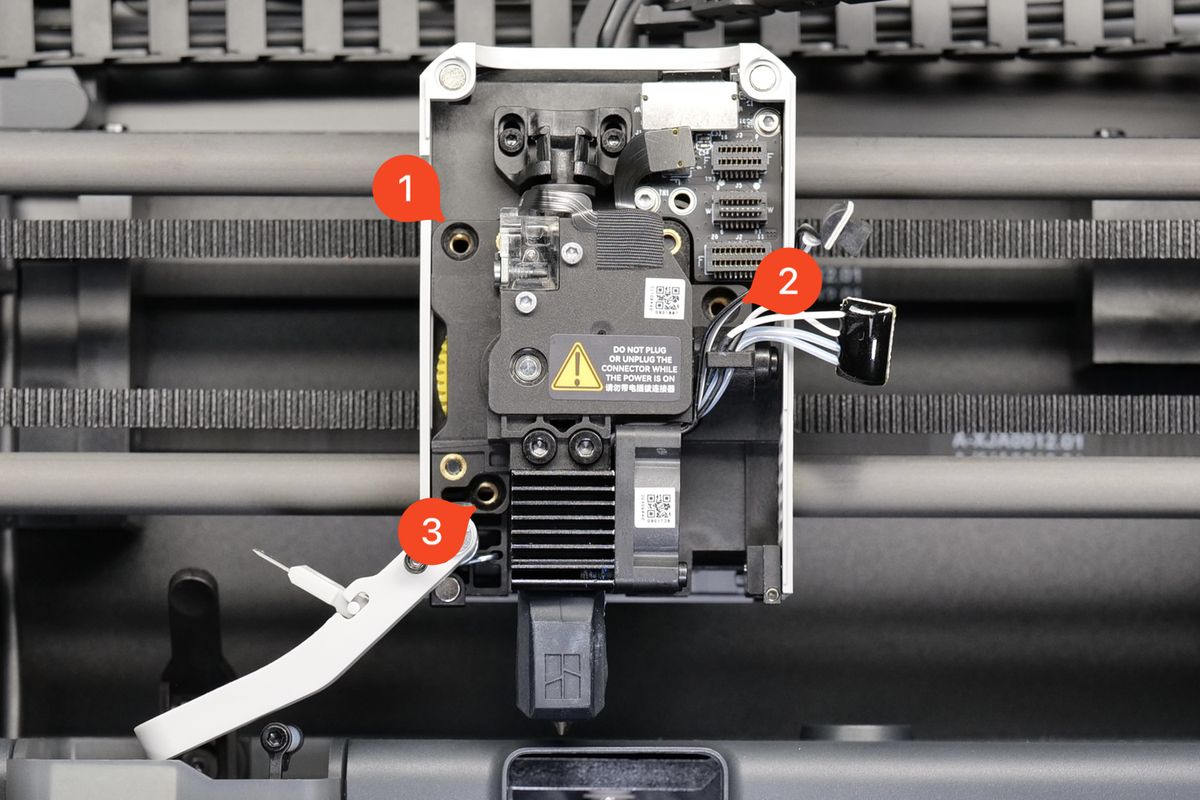
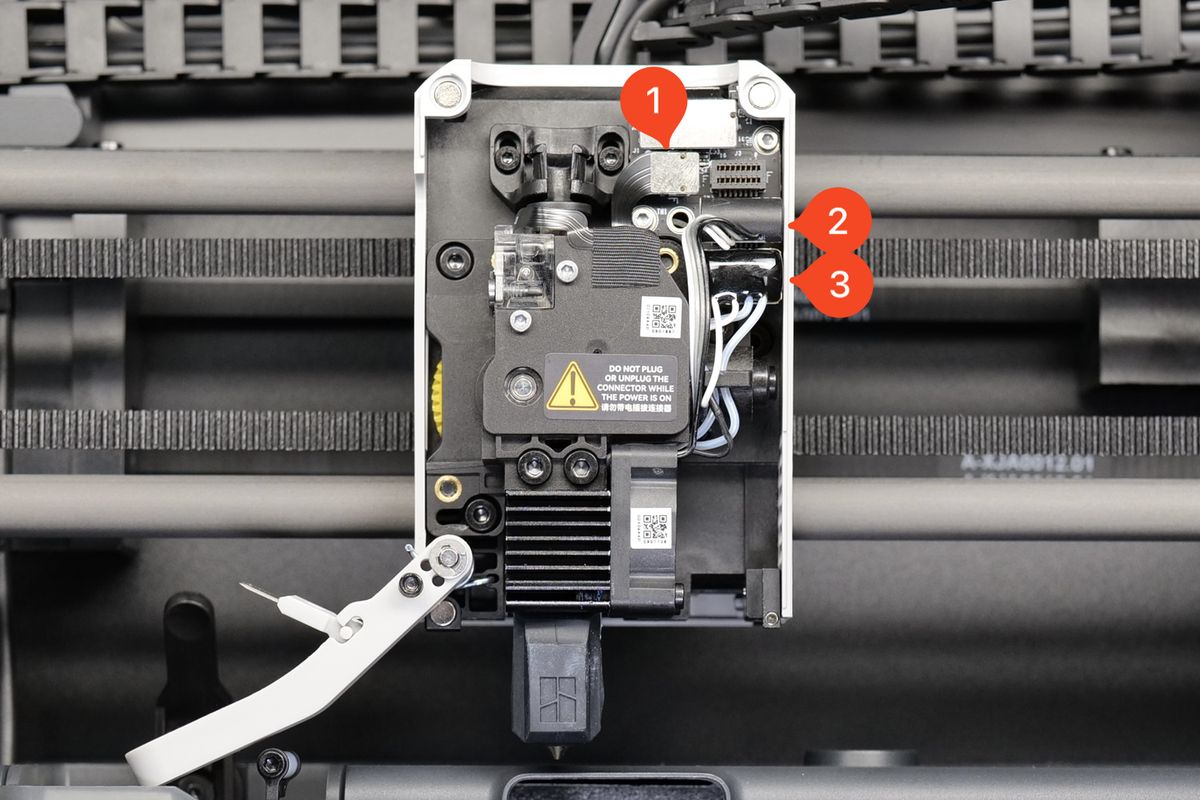
Once installed, connect the three connectors back to the toolhead board. Pay close attention to the pins of each connector, and align them carefully, to avoid damaging the connectors and ensure a correct installation.
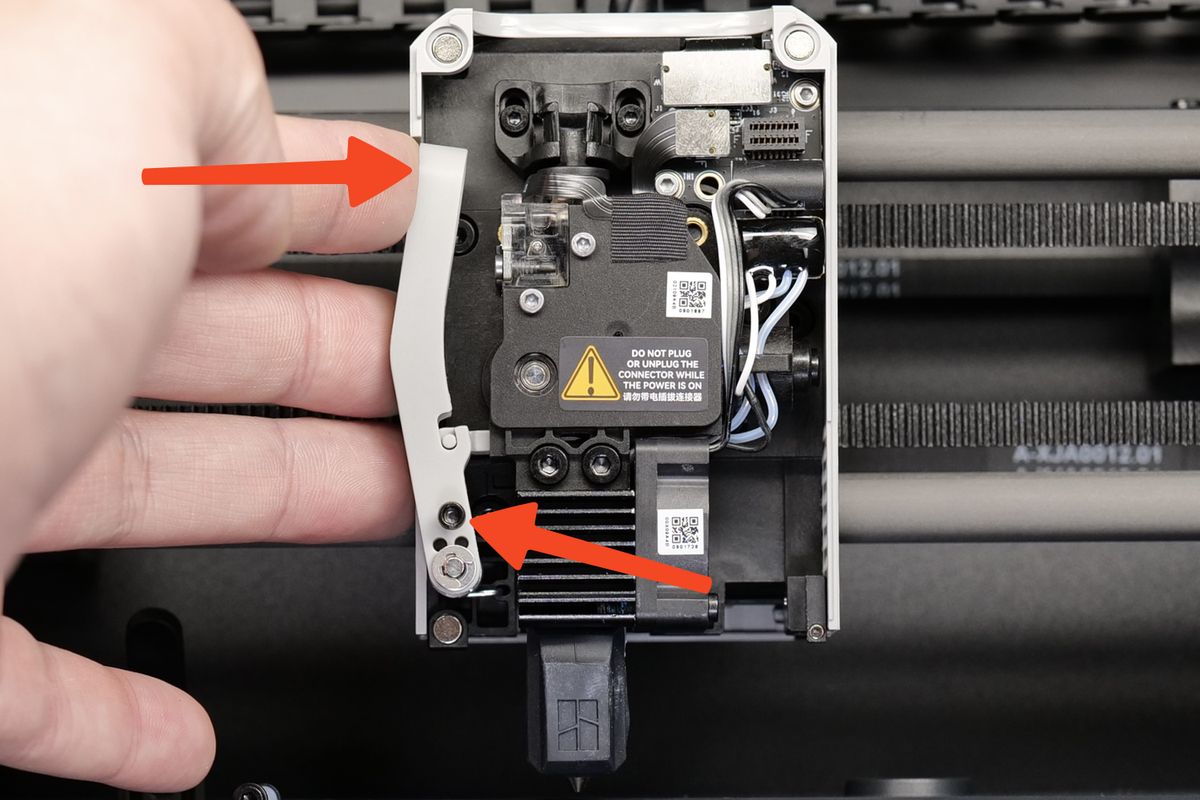
Complete the upgrade by carefully inserting the cutter blade in the extruder, and tightening the lever's screw, as shown below.
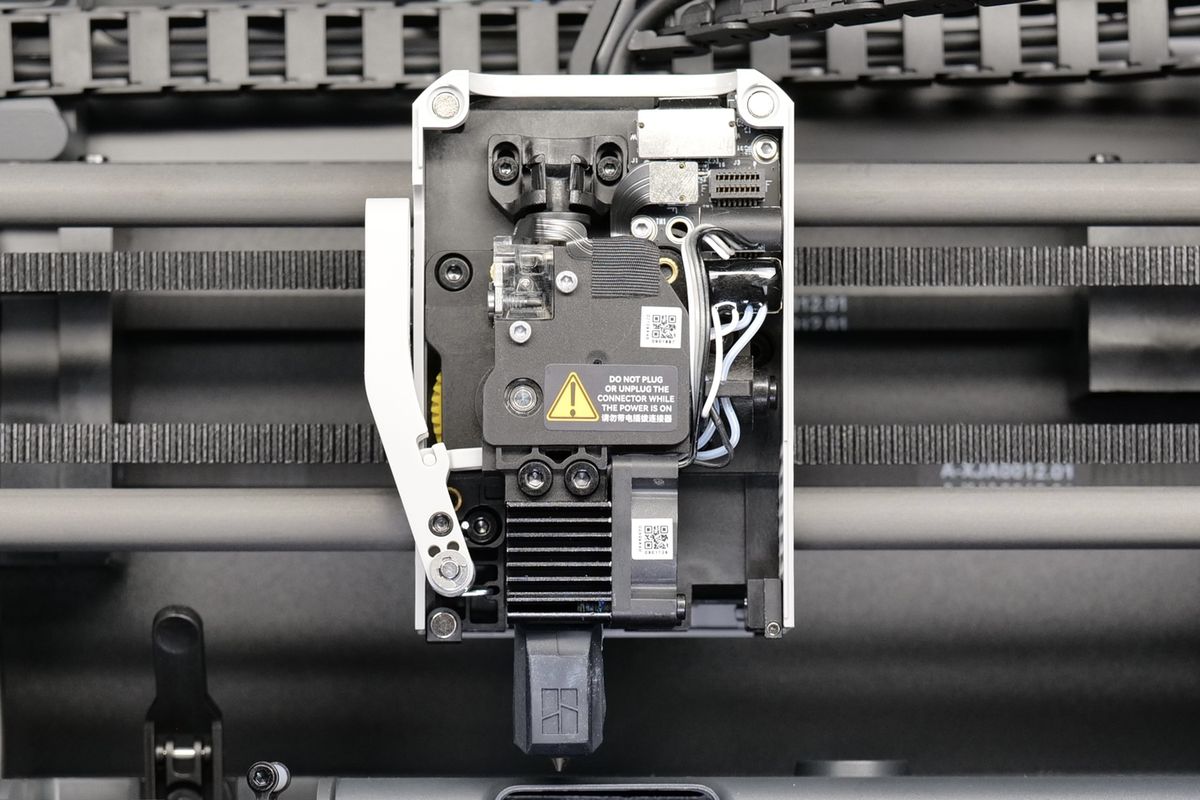
Job done! Below you can find a picture of how the toolhead will look after the installation is complete.
⚠️Note
After completing the upgrade, navigate to Settings on the printer screen, then click Accessories > Nozzle, and select the specification of the hardened steel nozzle you have installed.
You are now ready to print abrasive filaments! Simply attach the front cover, load some filament and start your print.
¶ End Notes
We hope this detailed guide has been helpful and informative.
If this guide does not solve your problem, please submit a support ticket. We will answer your questions and provide assistance.
If you have any suggestions or feedback on this Wiki, please leave a message in the comment area. Thank you for your support and attention!