¶ Flow Dynamics Calibration
¶ What is Flow Dynamics Calibration?
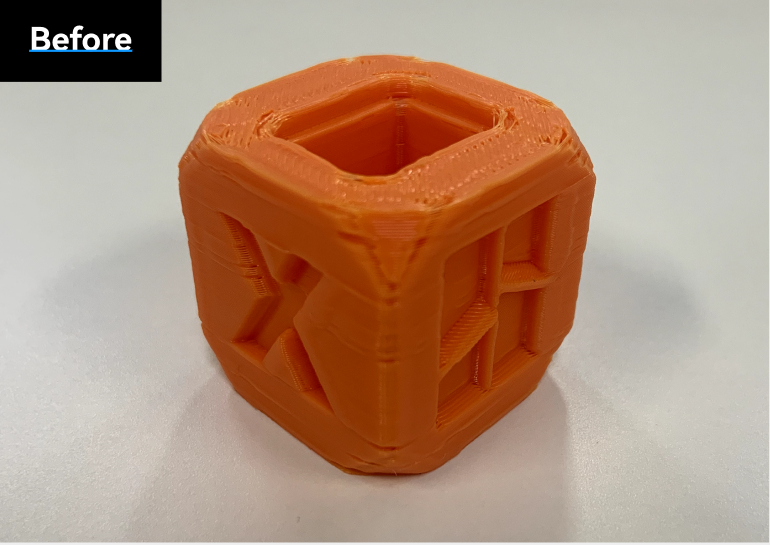
Flow Dynamics is a feature in 3D printing firmware that compensates for the lag in extrusion pressure, improving print quality, especially at higher speeds. When filament is extruded, it takes time for the pressure in the nozzle to build up to a level where plastic flows consistently.
During acceleration, this lag can cause underextrusion, resulting in gaps or thin lines. Conversely, when decelerating, the residual pressure causes excess filament to ooze out, leading to blobs or stringing. These issues worsen with faster print speeds.
Flow Dynamics counter these effects by preemptively adjusting the filament flow:
- During acceleration, the Flow Dynamics algorithm increases the extrusion rate slightly to build pressure faster, reducing underextrusion.
- During deceleration, the Flow Dynamics algorithm reduces or reverses the filament flow (similar to a mini-retraction) to relieve built-up pressure, preventing oozing.
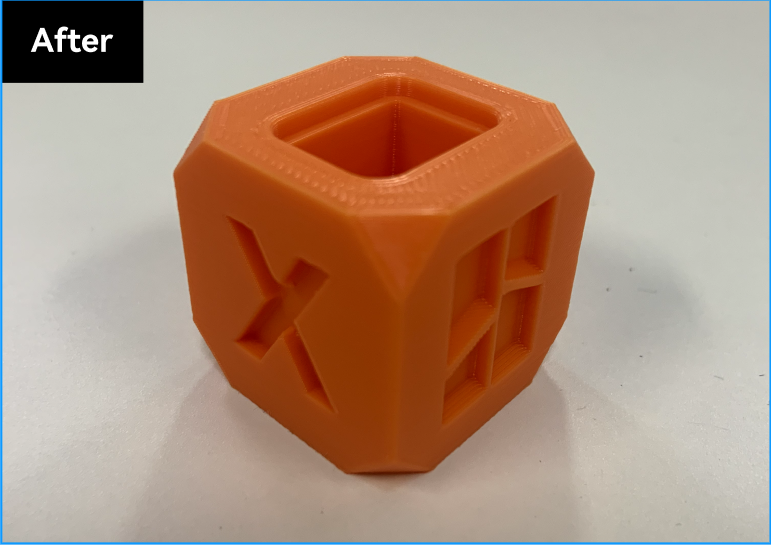
This results in cleaner corners, sharper details, and more consistent extrusion, especially in complex prints with frequent speed changes.
 |
 |
¶ When should the Flow Dynamics Calibration be performed?
Bambu Studio has auto-calibration for different filaments, which is fully automated. The result will be saved in the printer for future use. The following are scenarios in which you need to perform flow dynamics calibration:
- When you introduce a new filament from a different brand or model.
- When the nozzle is worn out, increased friction will affect the flow.
- When you replace the nozzle, due to manufacturing tolerances.
- When the maximum volumetric speed or print temperature is changed in the filament settings.
¶ Is Flow Dynamics Calibration Reliable?
It depends. There are a few cases that can make the calibration results unreliable:
- The filament is damp, which will render the calibration results unsuitable for use with fresh filament.
- The filament is transparent, which can affect the Lidar scan results on X1 series printers.
- The build plate is not sticky (please wash the build plate or apply glue stick); this causes the calibration lines to not adhere properly, which can impact Lidar scan results on X1 series printers.
- The nozzle is worn out or has internal blockage.
- The material is particularly soft, such as TPU. Flexible filaments, such as TPU, have a high probability of calibration failure.
- A third-party hotend is used. This is especially relevant for the A1 series and H2D printers, where Flow Dynamics Calibration uses an eddy current sensor to detect extrusion pressure. Using a third-party hotend may lead to inaccurate calibration results.
Except for the cases mentioned above, the calibration results are reliable.
¶ Why are Calibration Results Always Not the Same in Each Calibration?
The calibration results have about 10% jitter in our test. We are still investigating the root cause.
¶ Flow Dynamic Calibration Process
Bambu Studio offers two calibration modes: Manual and Automatic.
- Manual mode: In this mode, the user must judge which parameter to use by observing the quality of the calibration line on the printed board.
- Automatic mode: The user only needs to start the calibration, and the printer will return the calibration results after the printing.
Note: H2D, X1 and A1 series printers support auto calibration. The A1 series printer only supports auto-flow dynamic calibration from firmware version 01.04.00.00. Please ensure the printer firmware and Bambu Studio are updated to the latest version. P1 supports only manual calibration.
¶ Automatic Mode
Automatic flow dynamic calibration is available in H2D, X1, and A1. Before you begin the calibration, ensure the 3D printer is connected. Follow the steps below to use the Automatic mode.
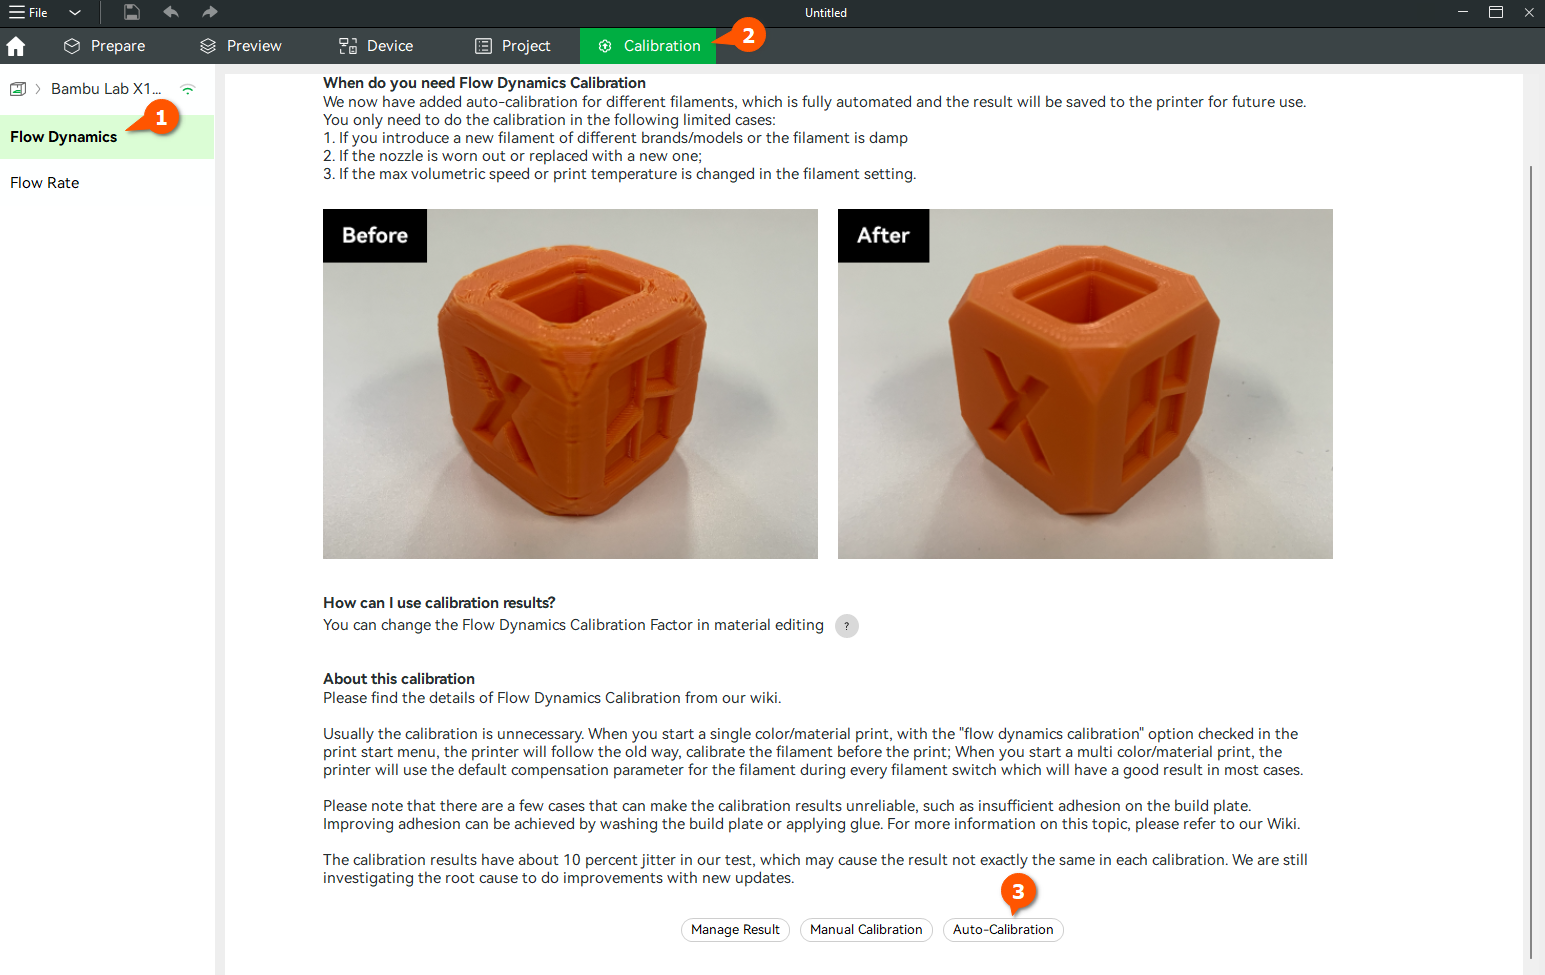
¶ Step 1: Open Bambu Studio and Access Calibration
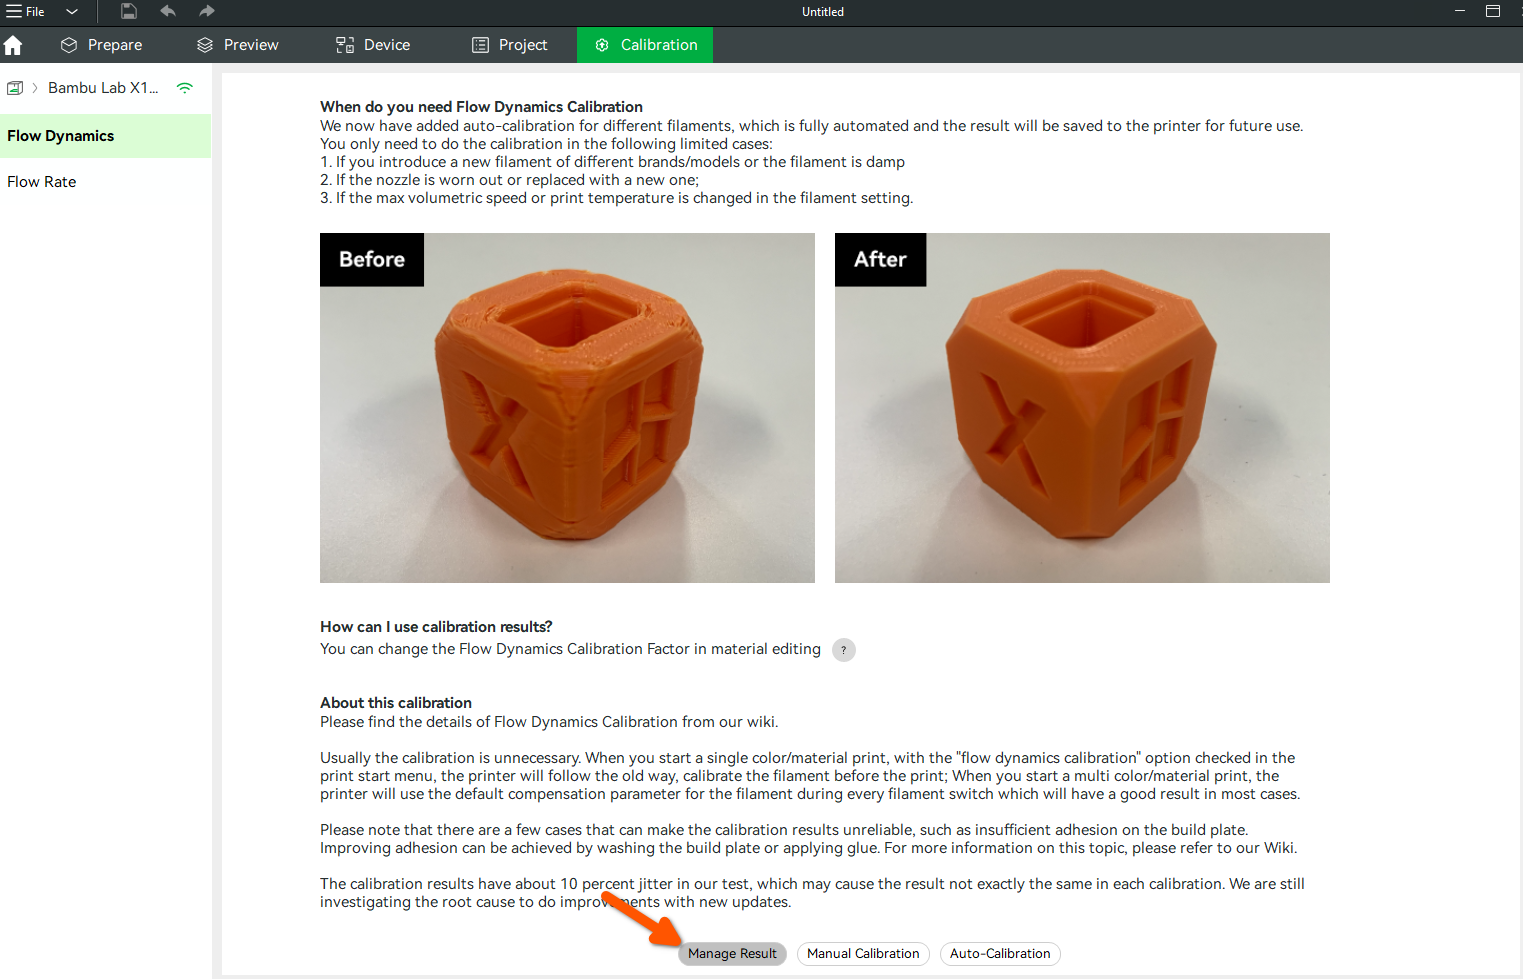
Click “Calibration”, Flow Dynamics, and thereafter Auto-Calibration.
¶ Step 2: Select the Nozzle, Plate Type, and Filament to be Calibrated
For the nozzle, we shall select 0.4 mm, a plate type Smooth PEI Plate, and Bambu PLA Basic for the filament in our case. If AMS is connected, you will see an option to select the filaments for calibration.
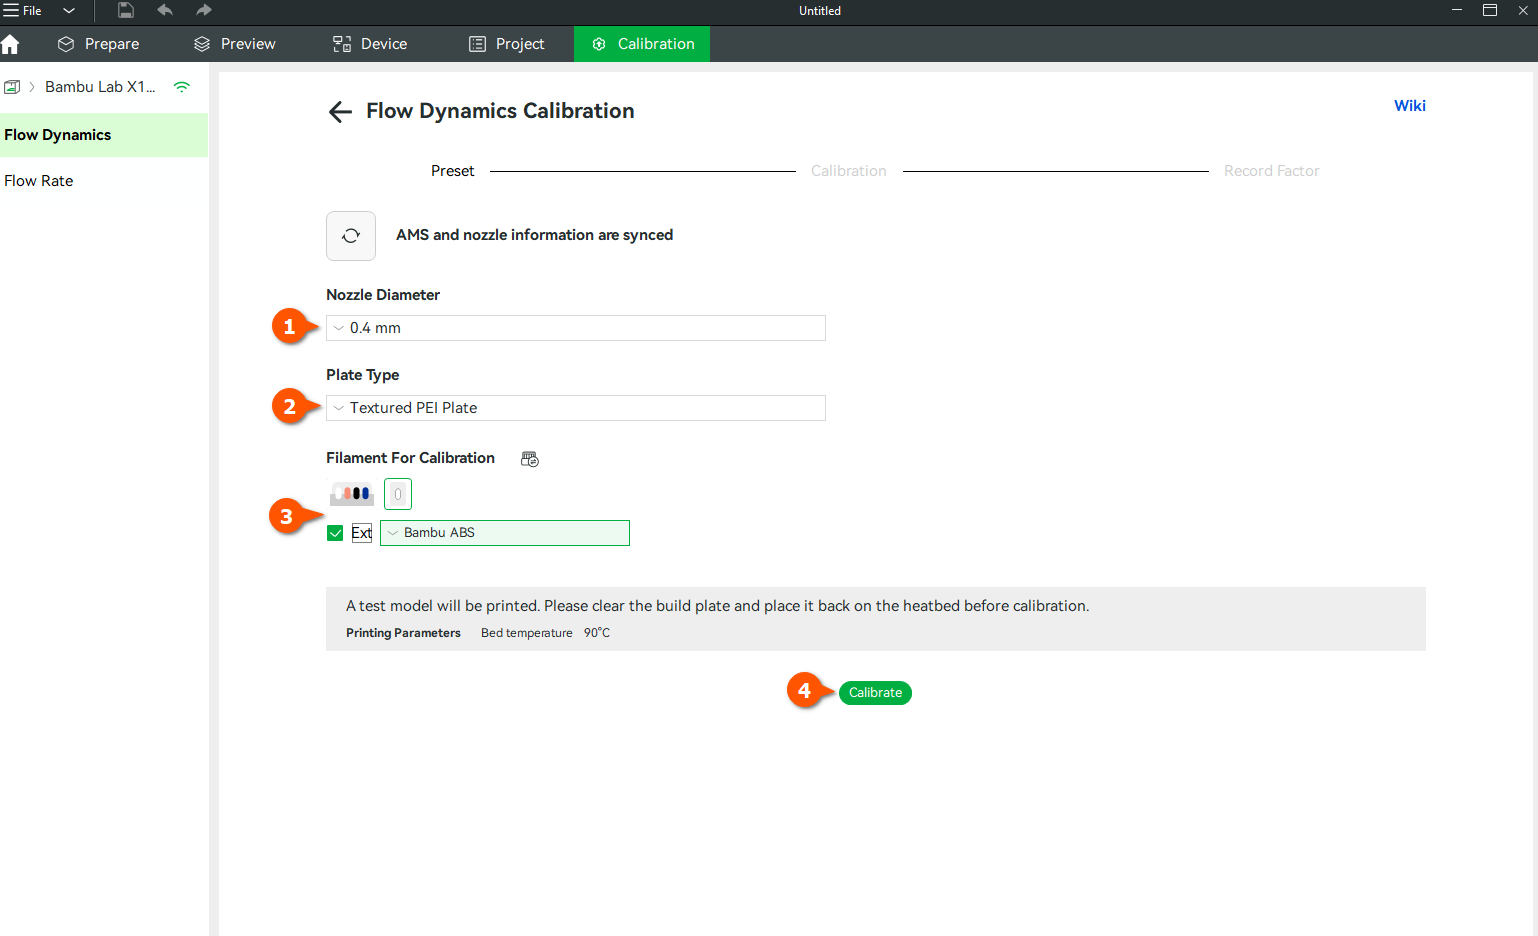
Once you have entered the required information, you can begin the calibration by pressing the "Calibrate" button.
¶ Step 3: Calibration Process
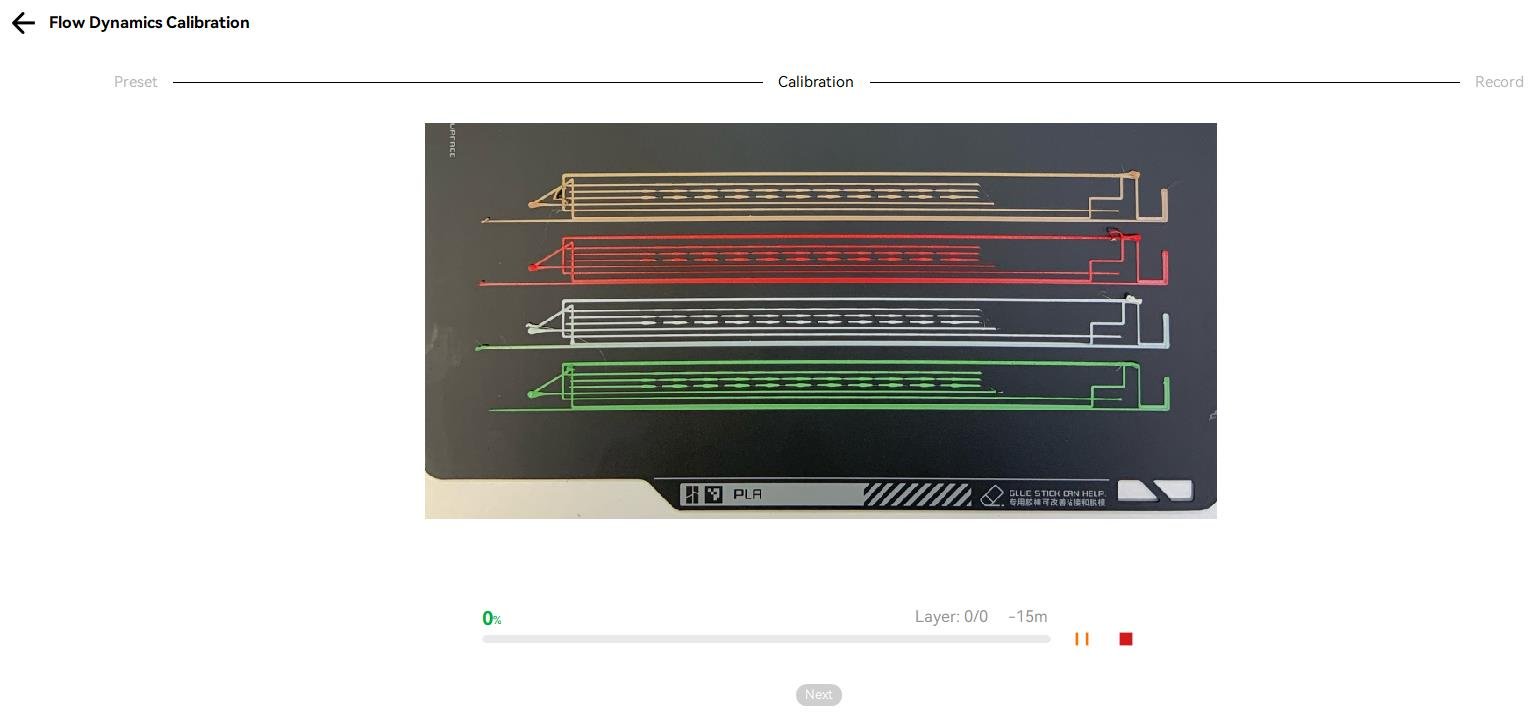
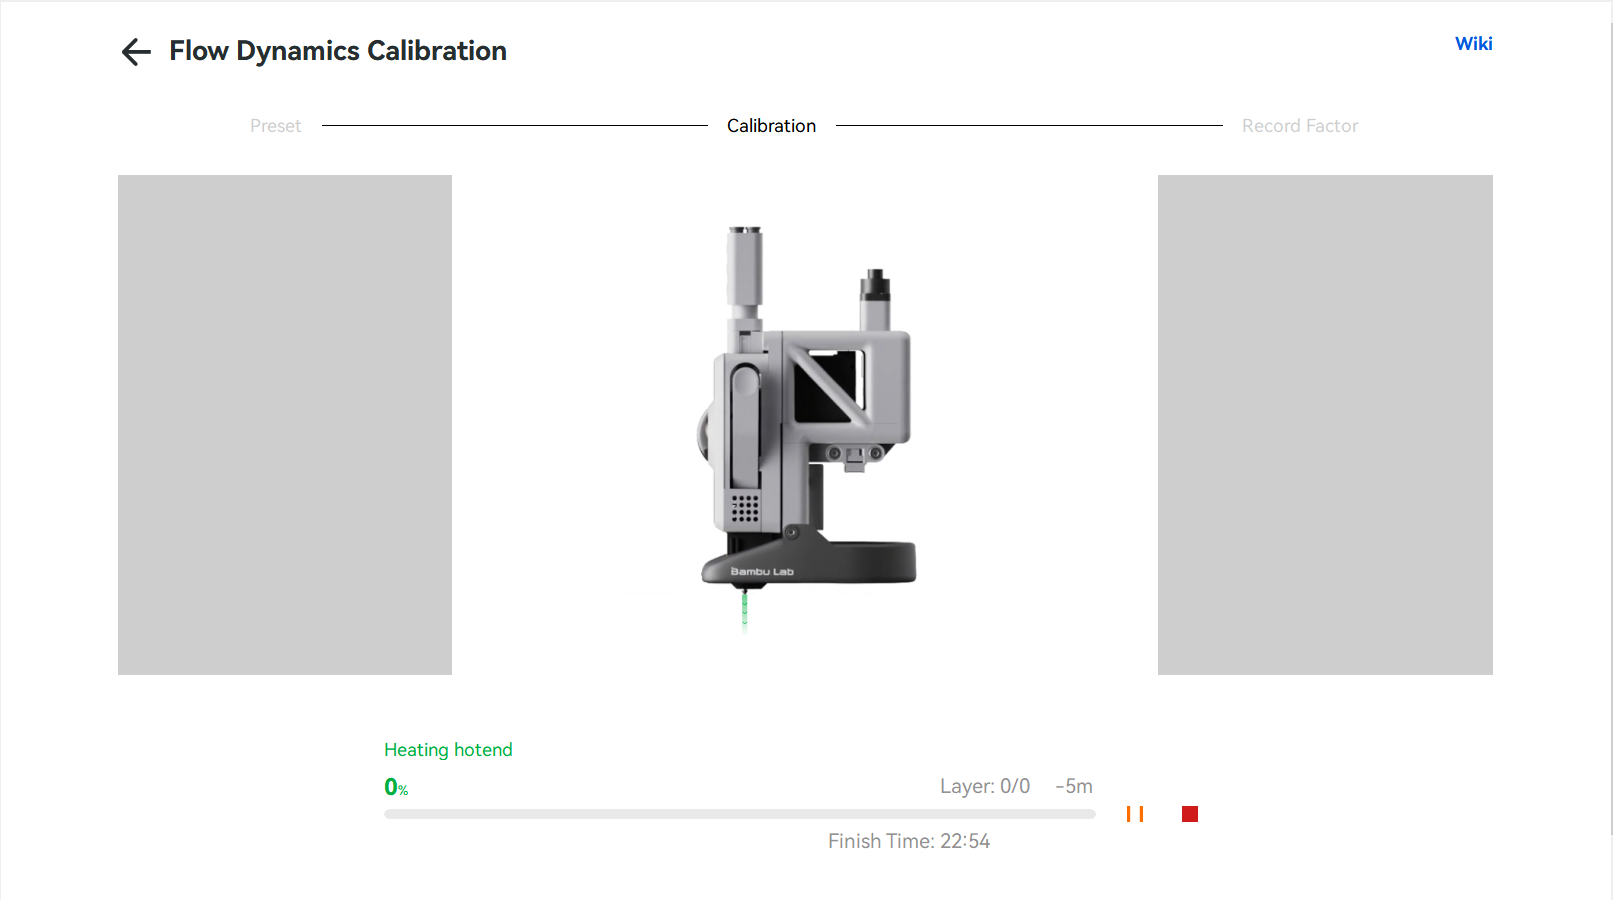
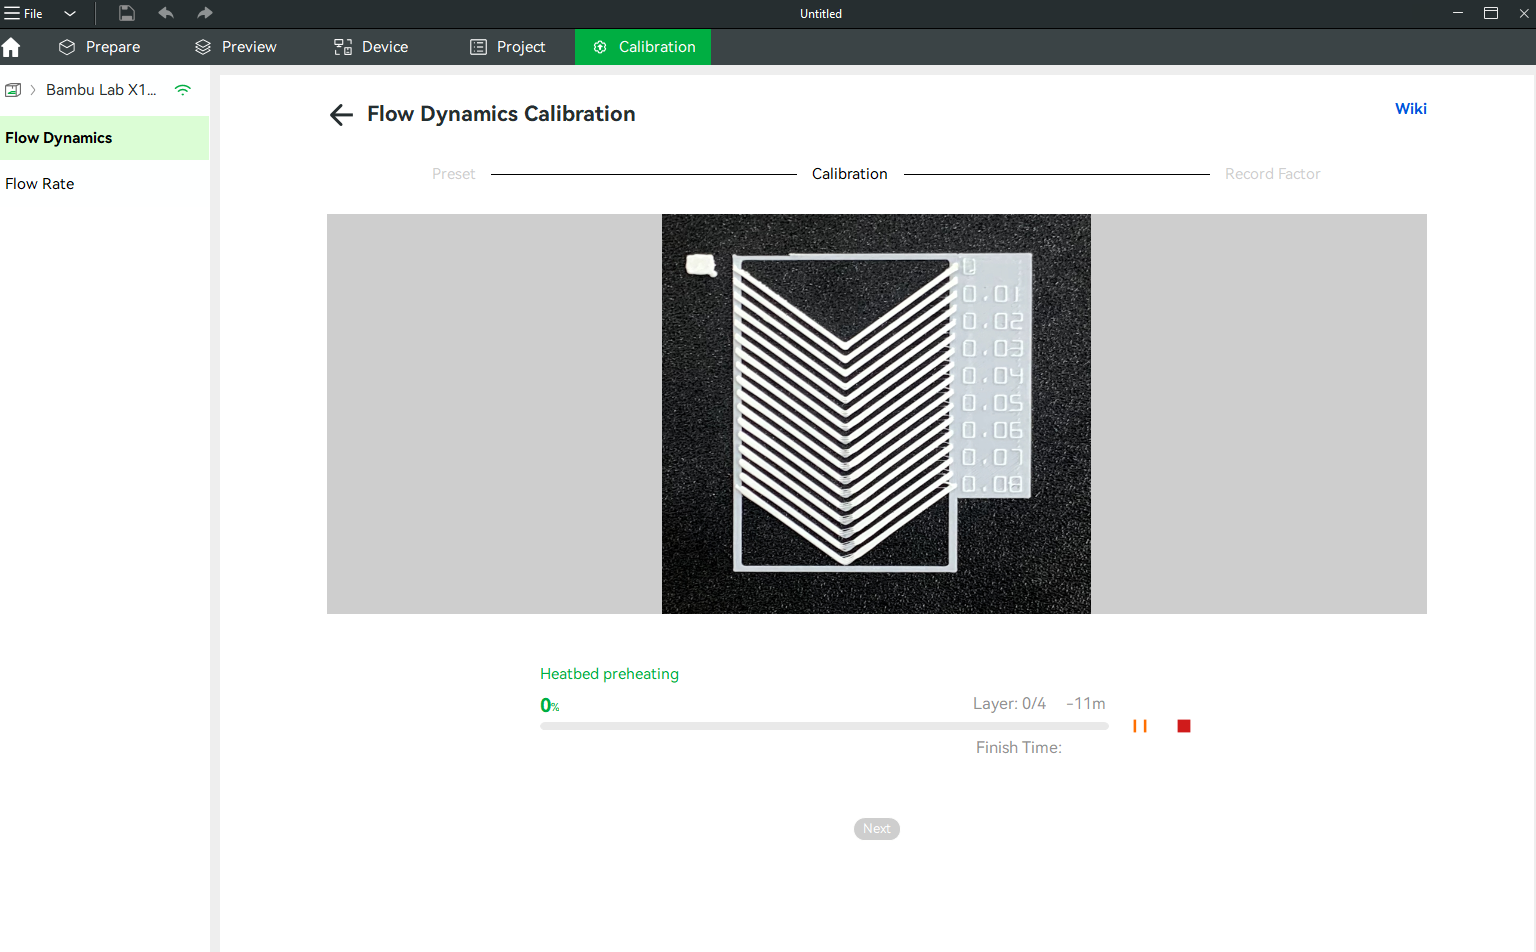
The X1 series printer will print calibration lines on the build plate and then use the lidar to scan these lines for auto dynamic flow calibration. The A1 and H2D printers will move the toolhead to the purge wiper to purge the filament and use the eddy current sensor of the toolhead to detect the extrusion force, thereby calibrating the dynamic flow.
| The X1 series printer will print calibration lines on the build plate | The A1 series printer will extrude the filament at the purge wiper |
 |
 |
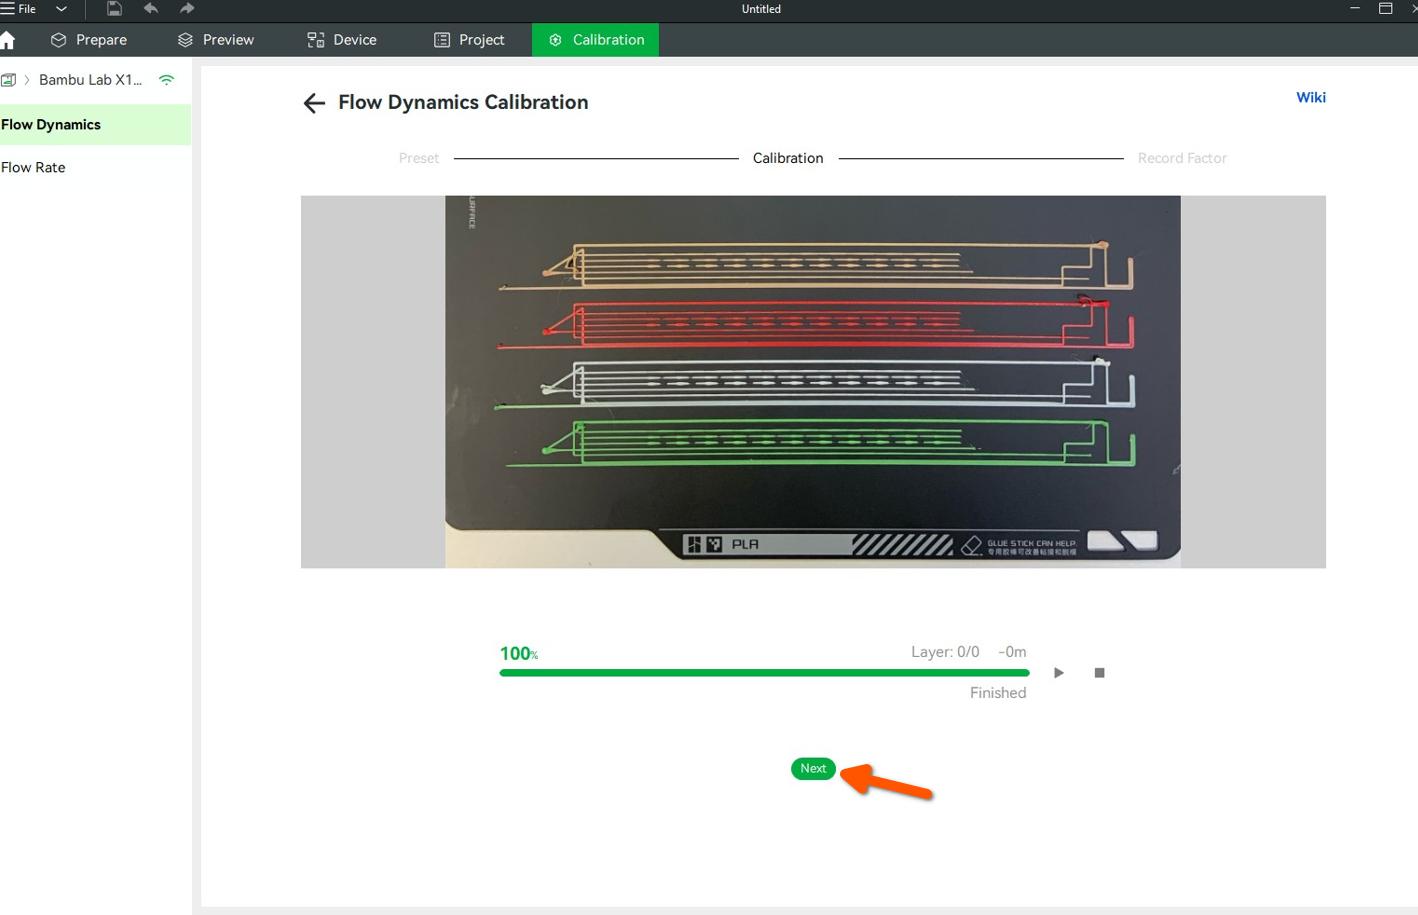
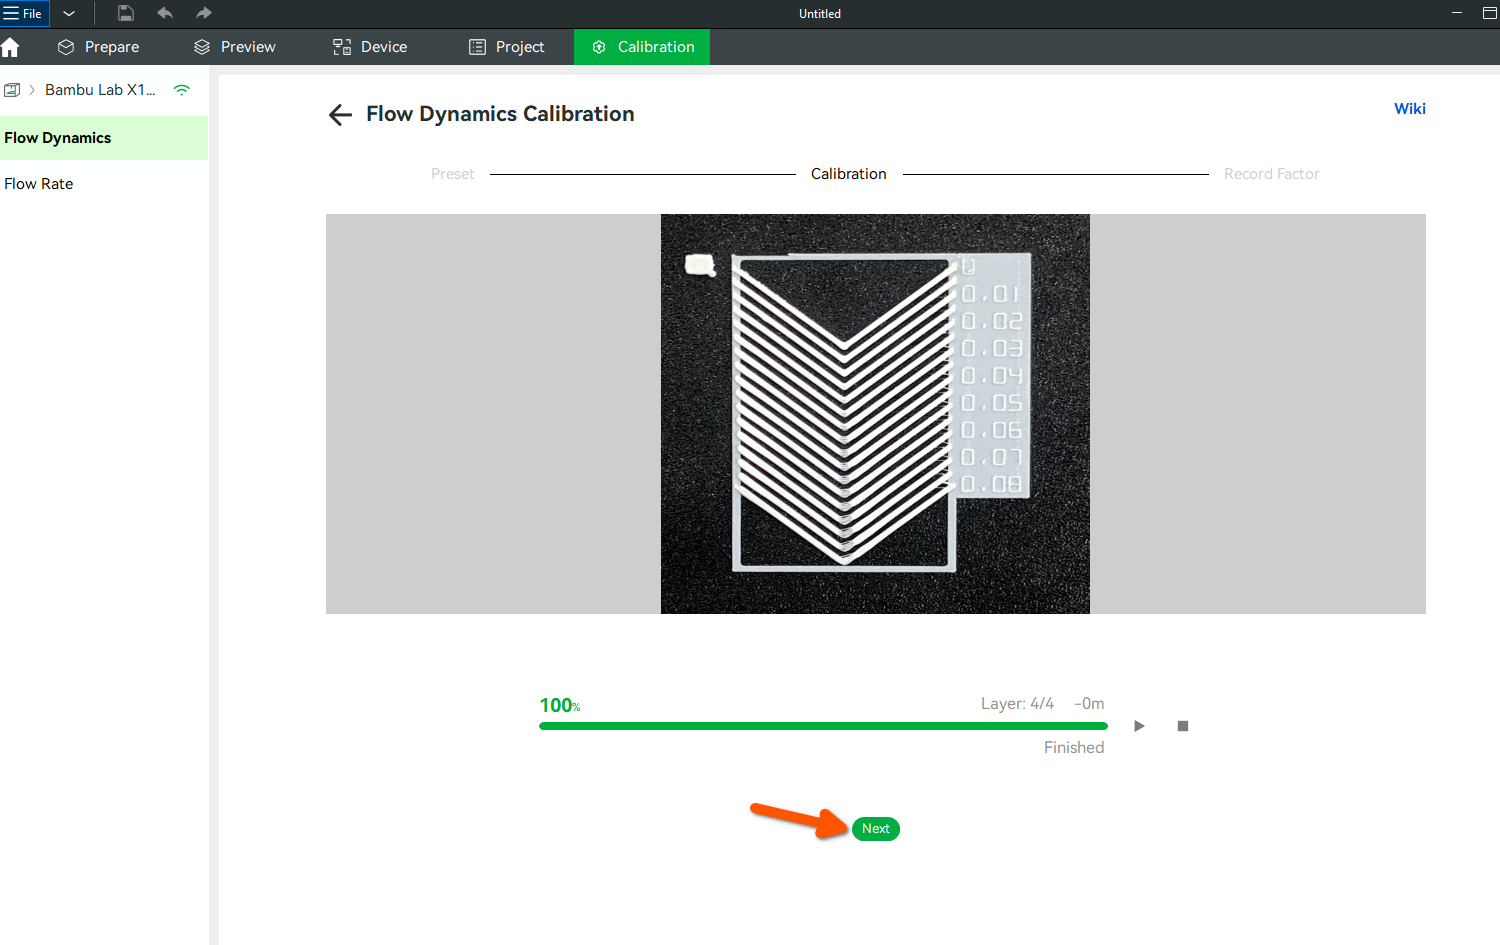
Once finished, you can click the Next button to proceed to the next step.
¶ Step 4: Analyze the Results
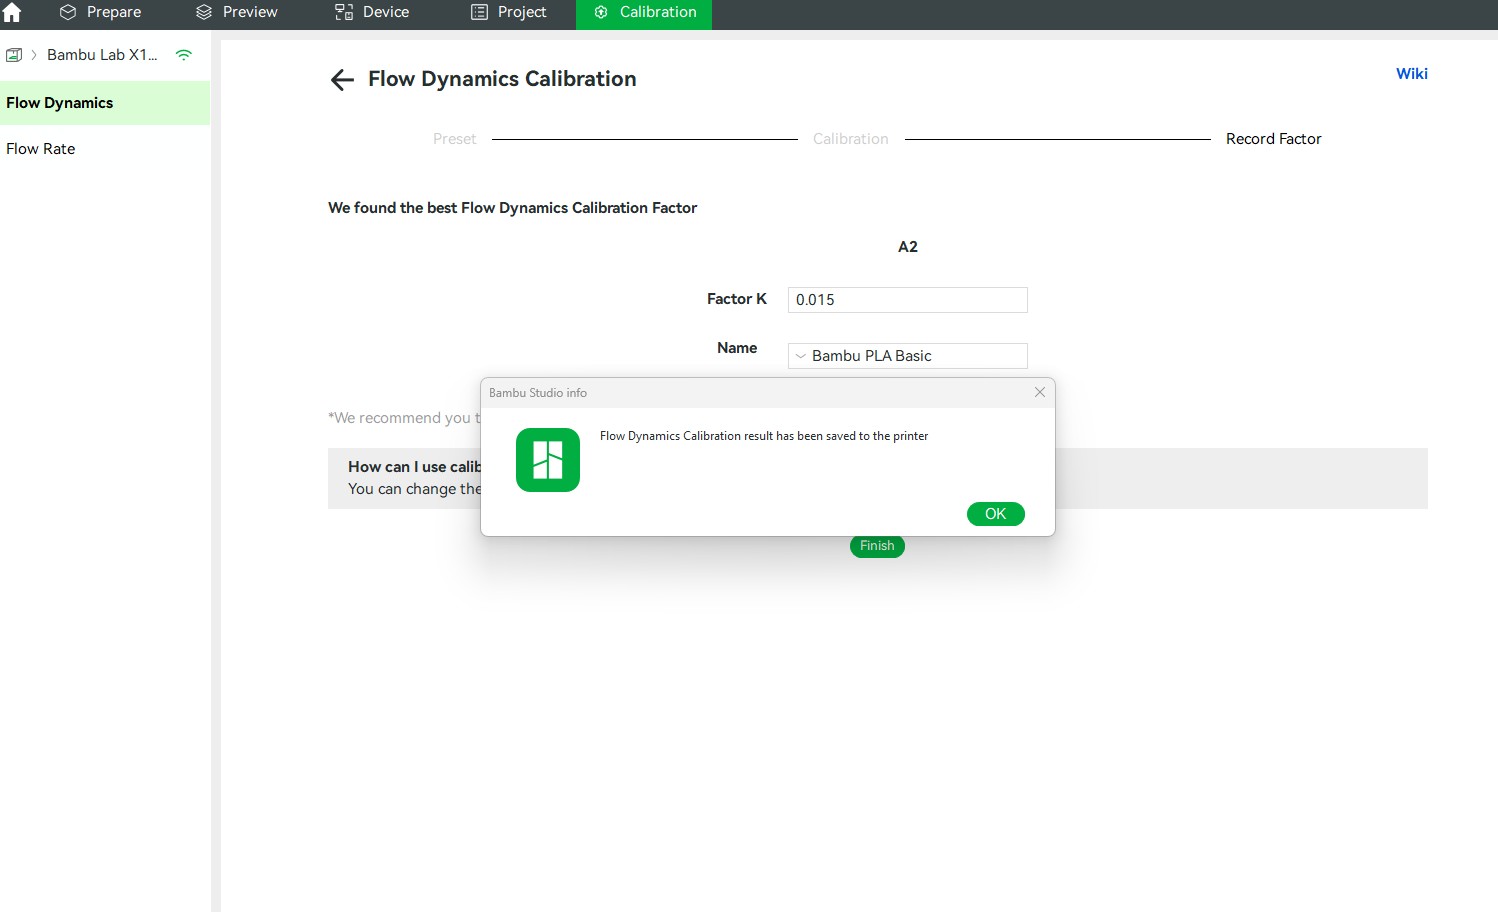
After clicking Next, the recommended K-value will be displayed. In our case, it is 0.015.
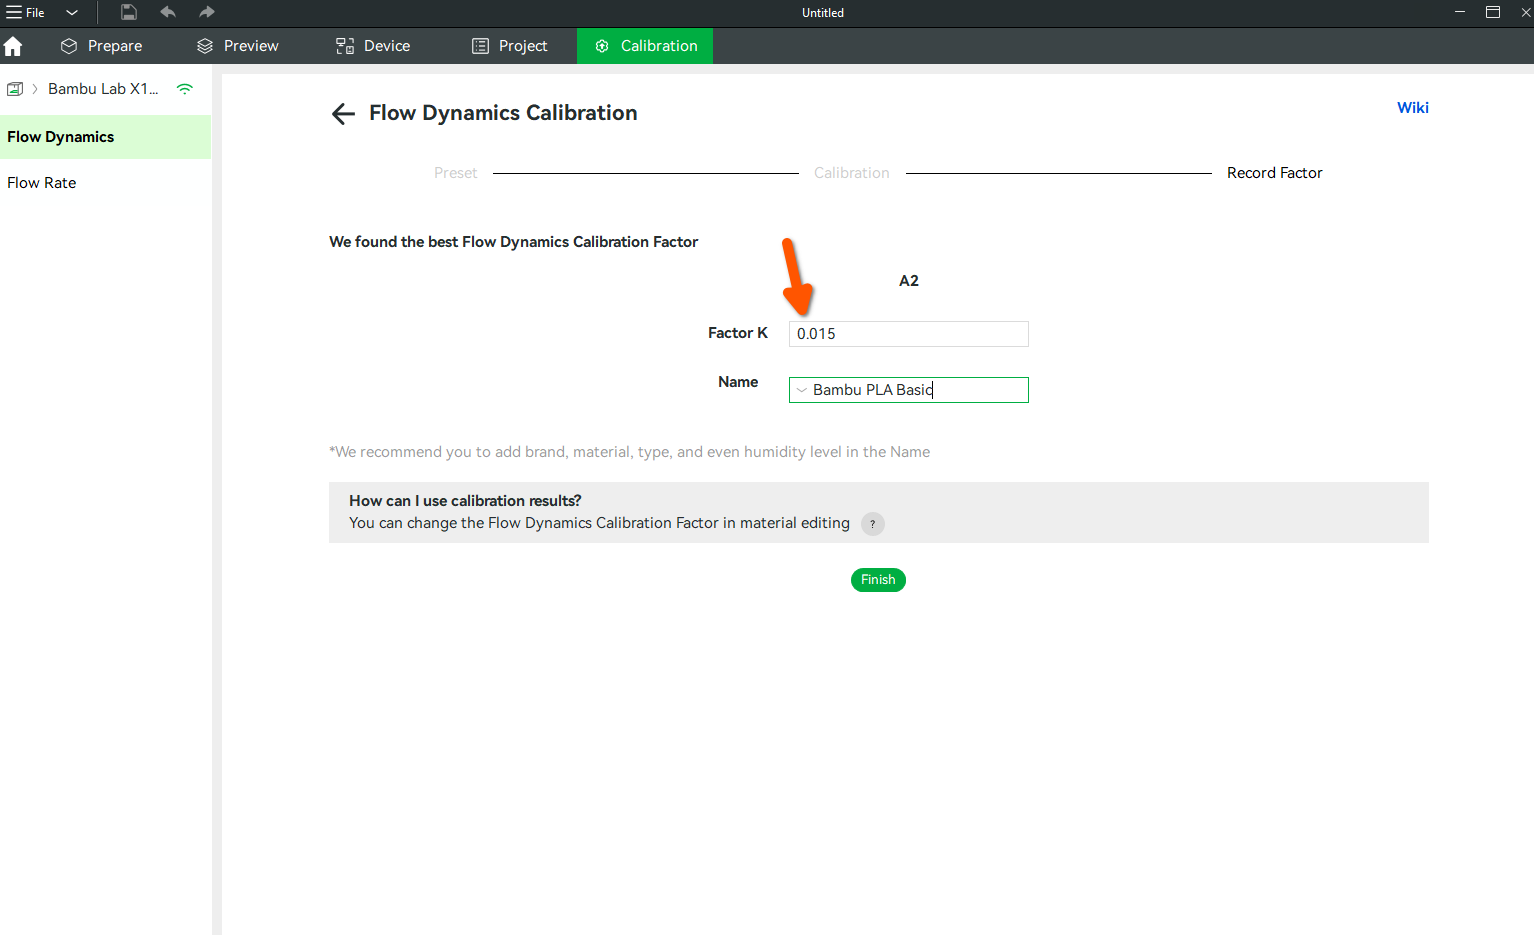
Then, click 'Finish,' and the results will be saved to the 3D printer.
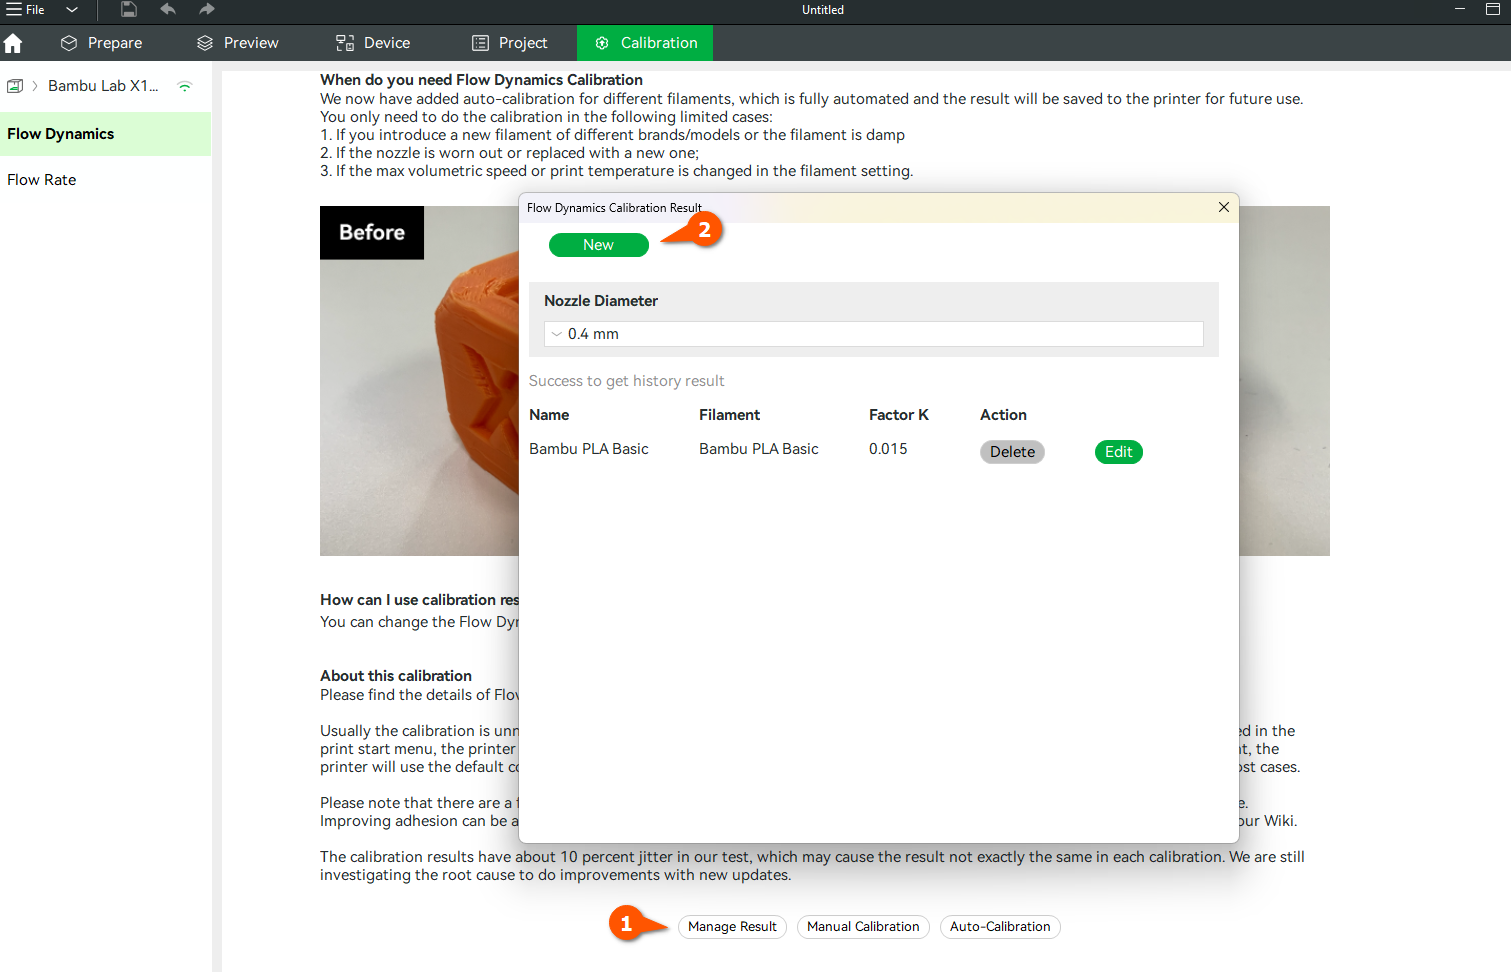
¶ Step 5: Managing and Saving Calibration Results
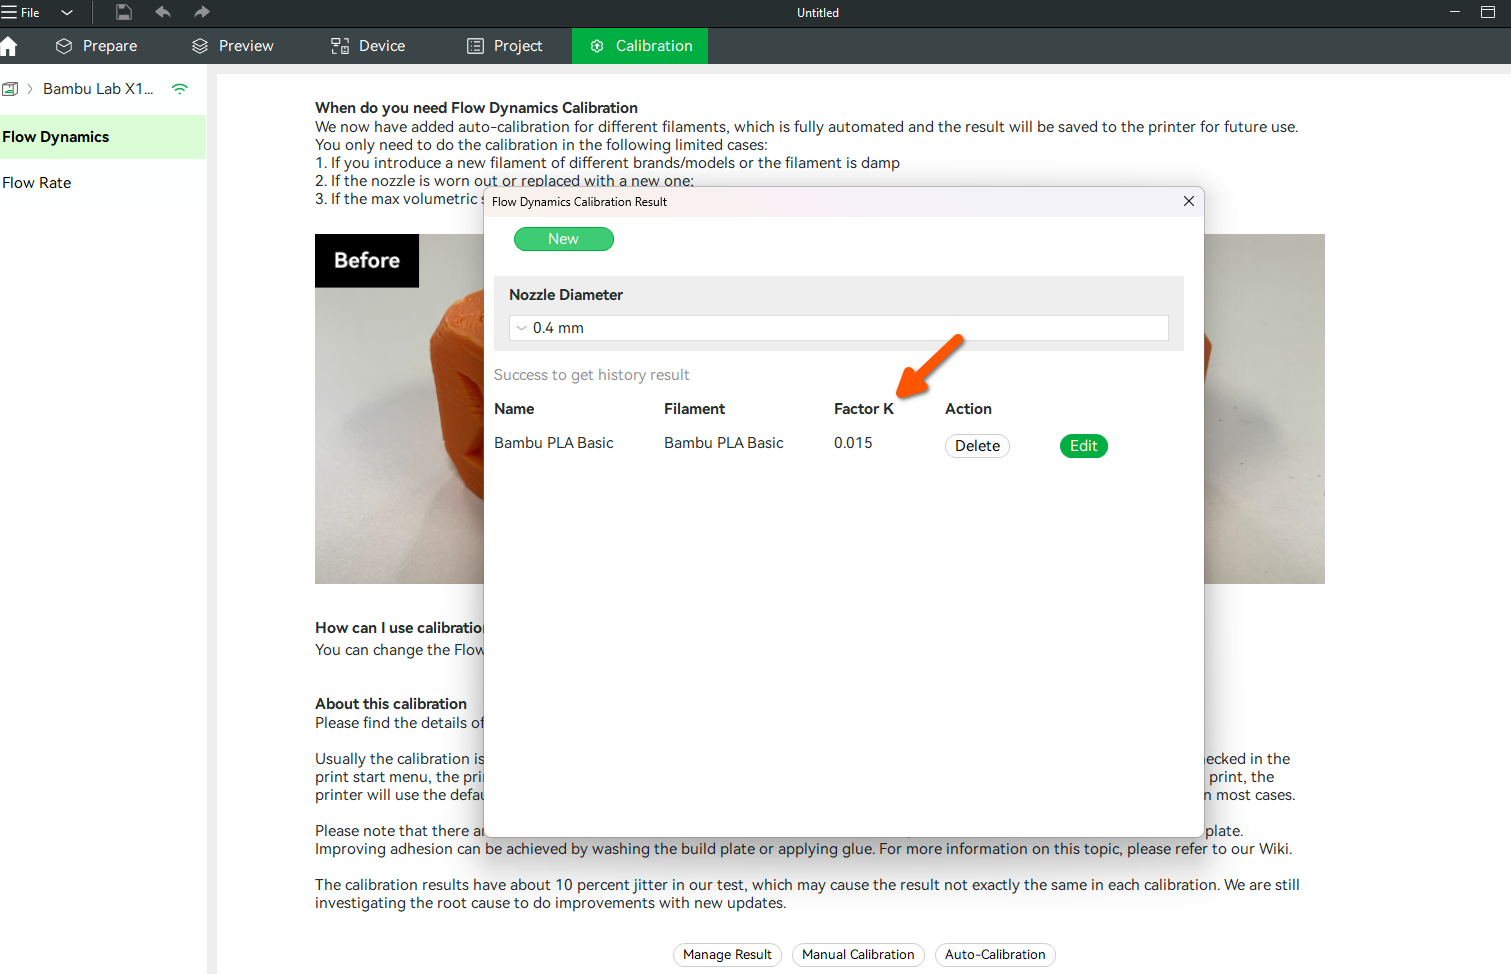
You can also see the results by clicking on Manage Result.
You will see the updated value of Factor K, and you can also edit it.
To prevent corner stacking effects, the Factor K during H2D automatic flow calibration will be set higher than in pattern mode of manual calibration. The automatic calibration of the X1 series uses line drawing and laser radar scanning method, so the K value is smaller than that of the H2D.
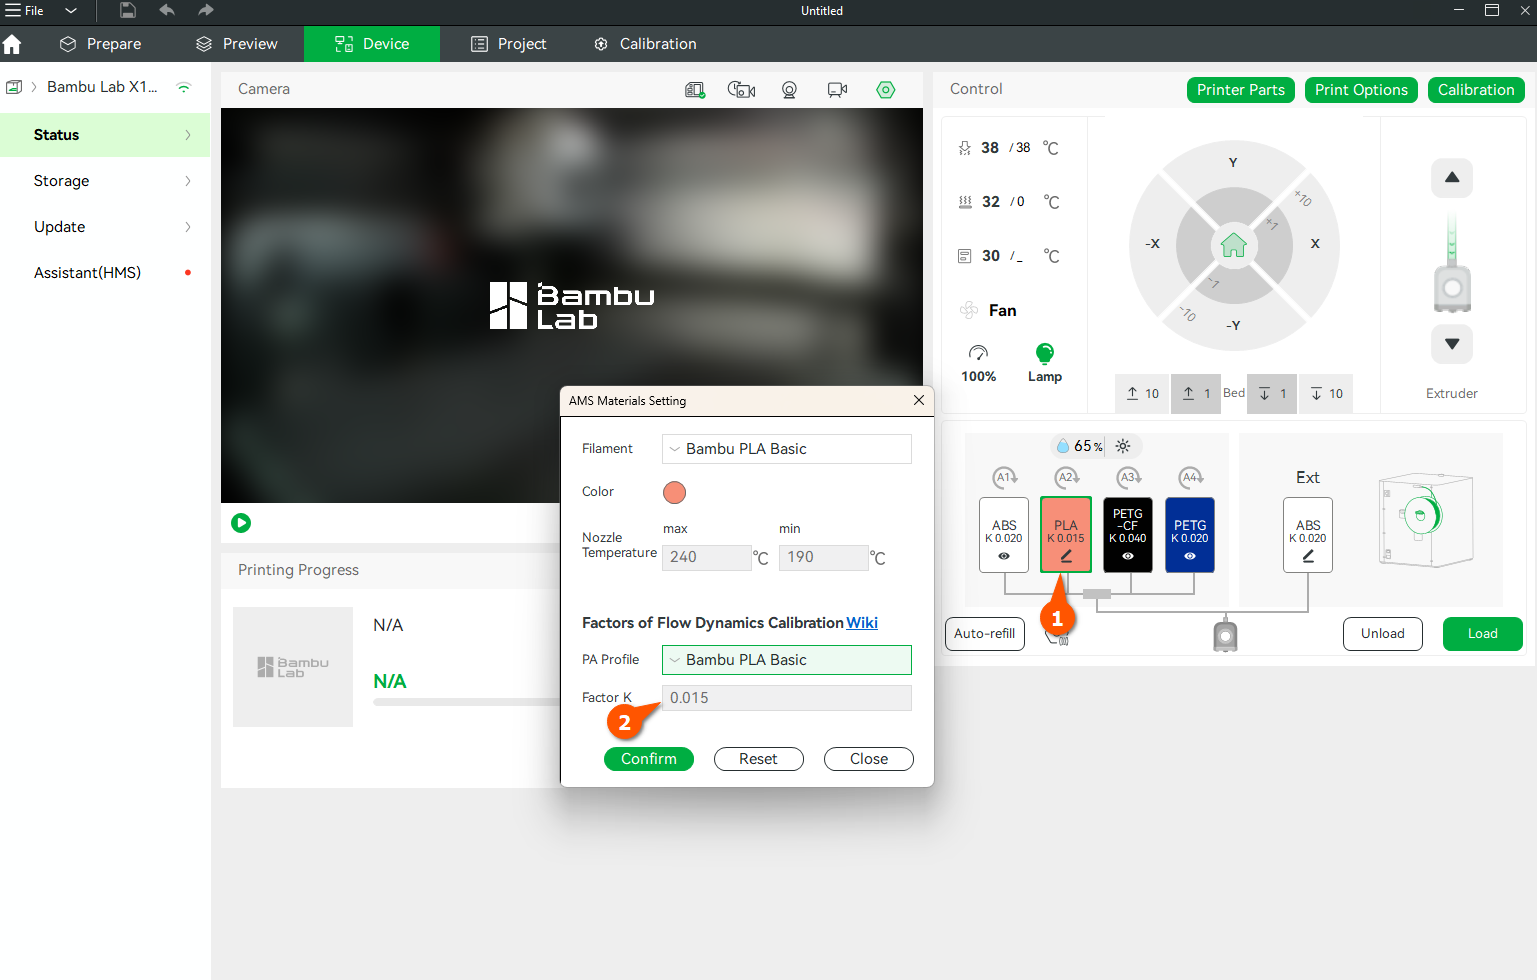
Each set of parameters can record a name, and you can modify this name and you can set the Factor K value you want to use for each slot in the material dialog on the device page.
Note: After our testing, all series of printers using 0.2mm hotend have a high probability of causing inaccurate automatic flow calibration results or calibration failure, so we recommend that you refer to the manual calibration steps below when using 0.2mm hotend to obtain more accurate dynamic flow calibration results.
¶ Manual Mode
Before you start, make sure your plate is installed on the printer and has been thoroughly cleaned to ensure good adhesion. It's recommended to perform this calibration procedure on a smooth plate, such as the Smooth PEI plate; however, it can also be done on the Textured PEI plate.
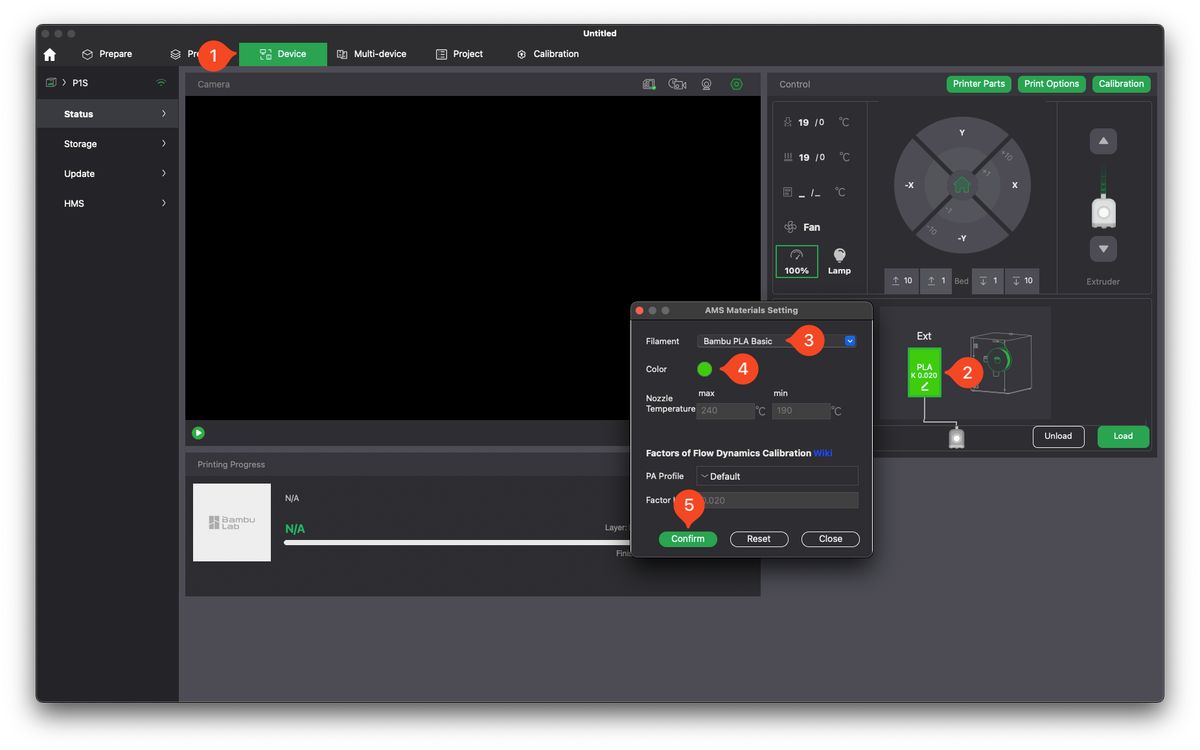
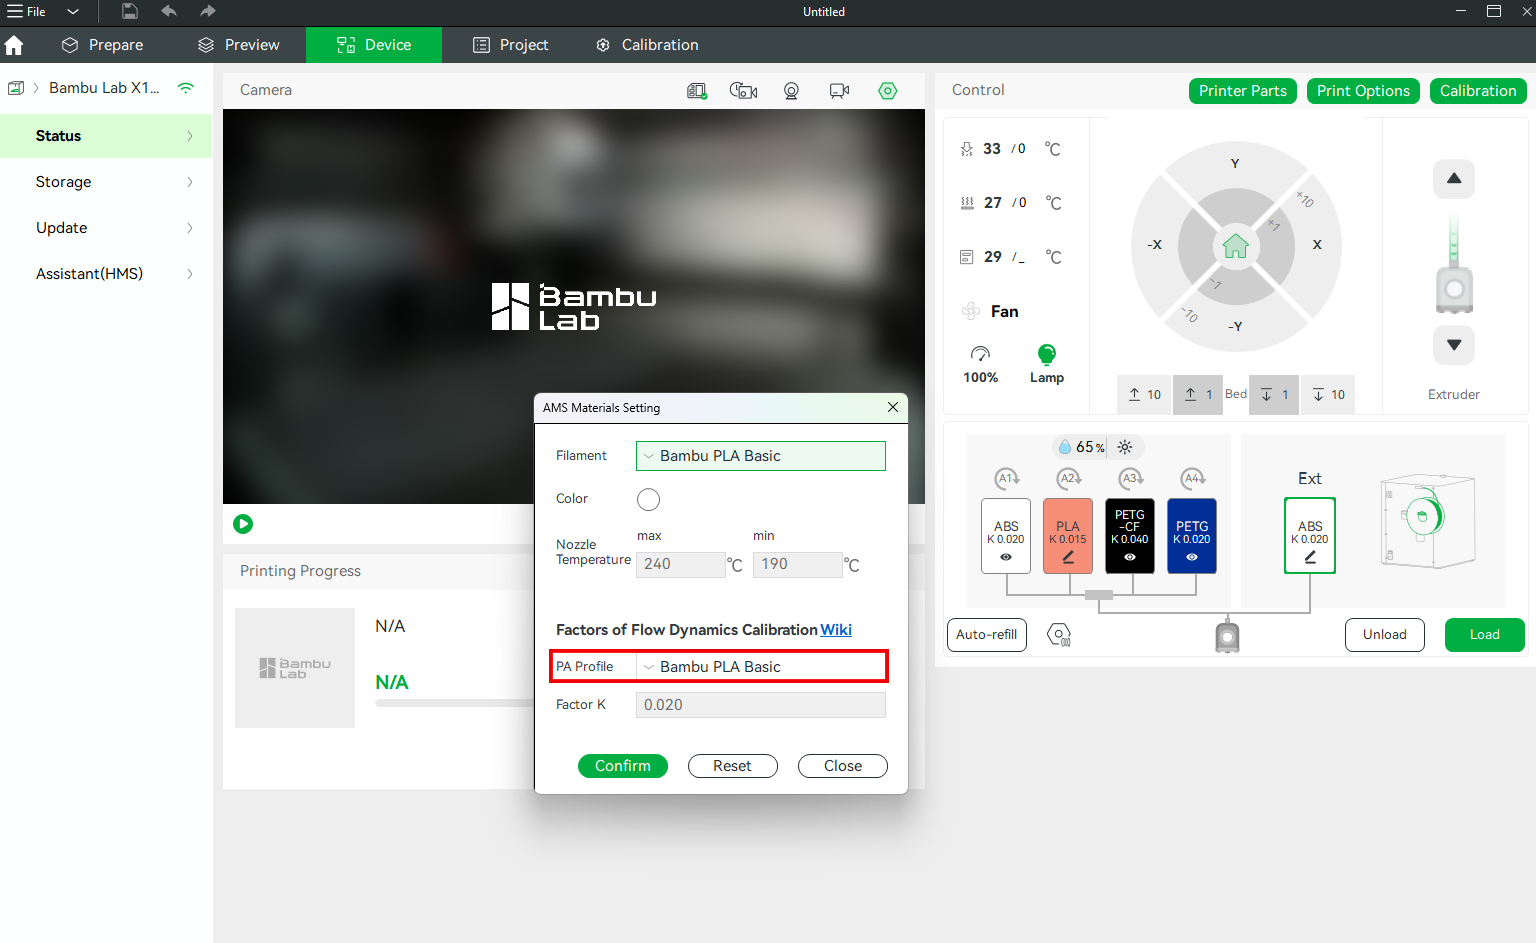
¶ Step 1: Correctly Configure Filament
Ensure the filament is correctly configured in the settings. To do this, go to the Device tab, select the type and color of the filament, and then confirm your selection. In this case, we will use Green Bambu Lab PLA Basic for demonstration purposes. If you haven't already, load the filament into the printer. The loading process will also allow you to select the type of filament.
¶ Step 2: Select the “Manual Calibration”
Next, navigate to the Calibration tab, select Flow Dynamics, then click on Manual Calibration.

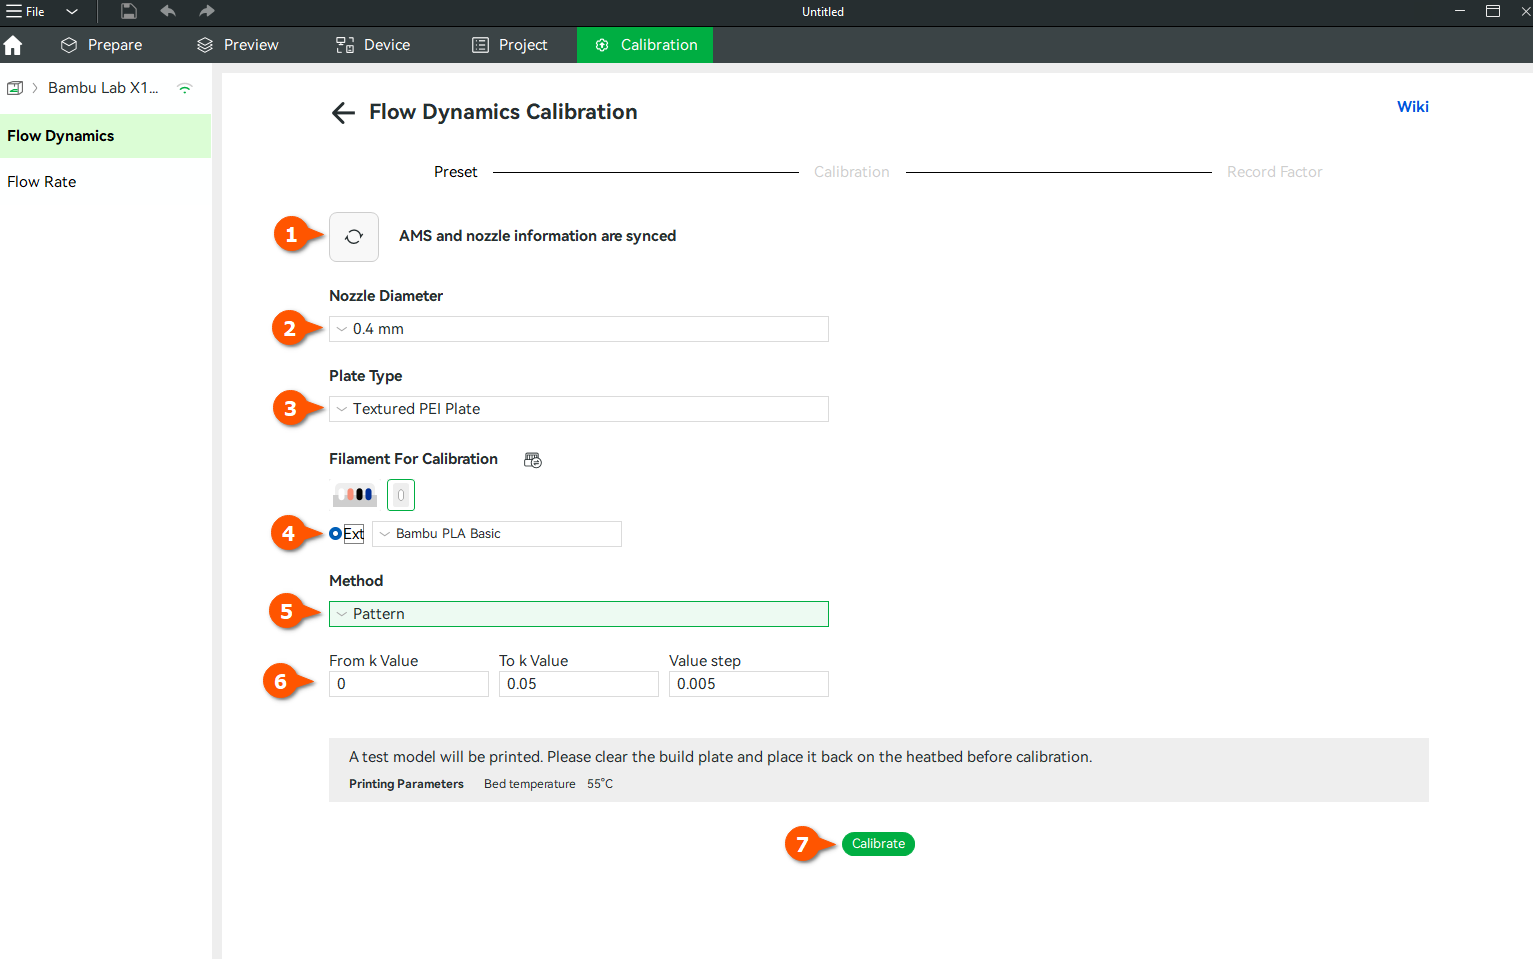
¶ Step 3: Apply the Settings and Initiate Calibration
The next step in the calibration process will ask for the following steps:
- Click the Sync button to synchronize the printer's information.
- Select the Nozzle Diameter installed on the printer, in our case, 0.4mm. If you are using H2D, two nozzles will be displayed. You select the option you would like to calibrate.
- Select the Plate Type, in our case, the Smooth PEI Plate.
- Select the Filament For Calibration. It should be automatically detected based on the configuration done in the previous step.
- Select the Pattern Method, which will help visually determine the correct value.
- Select the Interval for the test. It is recommended to use the value step of 0.002 as it will create more calibration lines to have a finer gradient of results to choose from.
- Click Calibrate.
Once you click Calibrate, the test file will be sent to the printer. Below is the structure of the design when the Pattern Method is selected.
If you selected Line, it will look like the one below.
Straight-line in manual flow calibration are less accurate because they don't clearly show extrusion issues like corner patterns do. As a result, they may lead to a lower and less reliable K value.
In this wiki, we are using Pattern for demonstration.
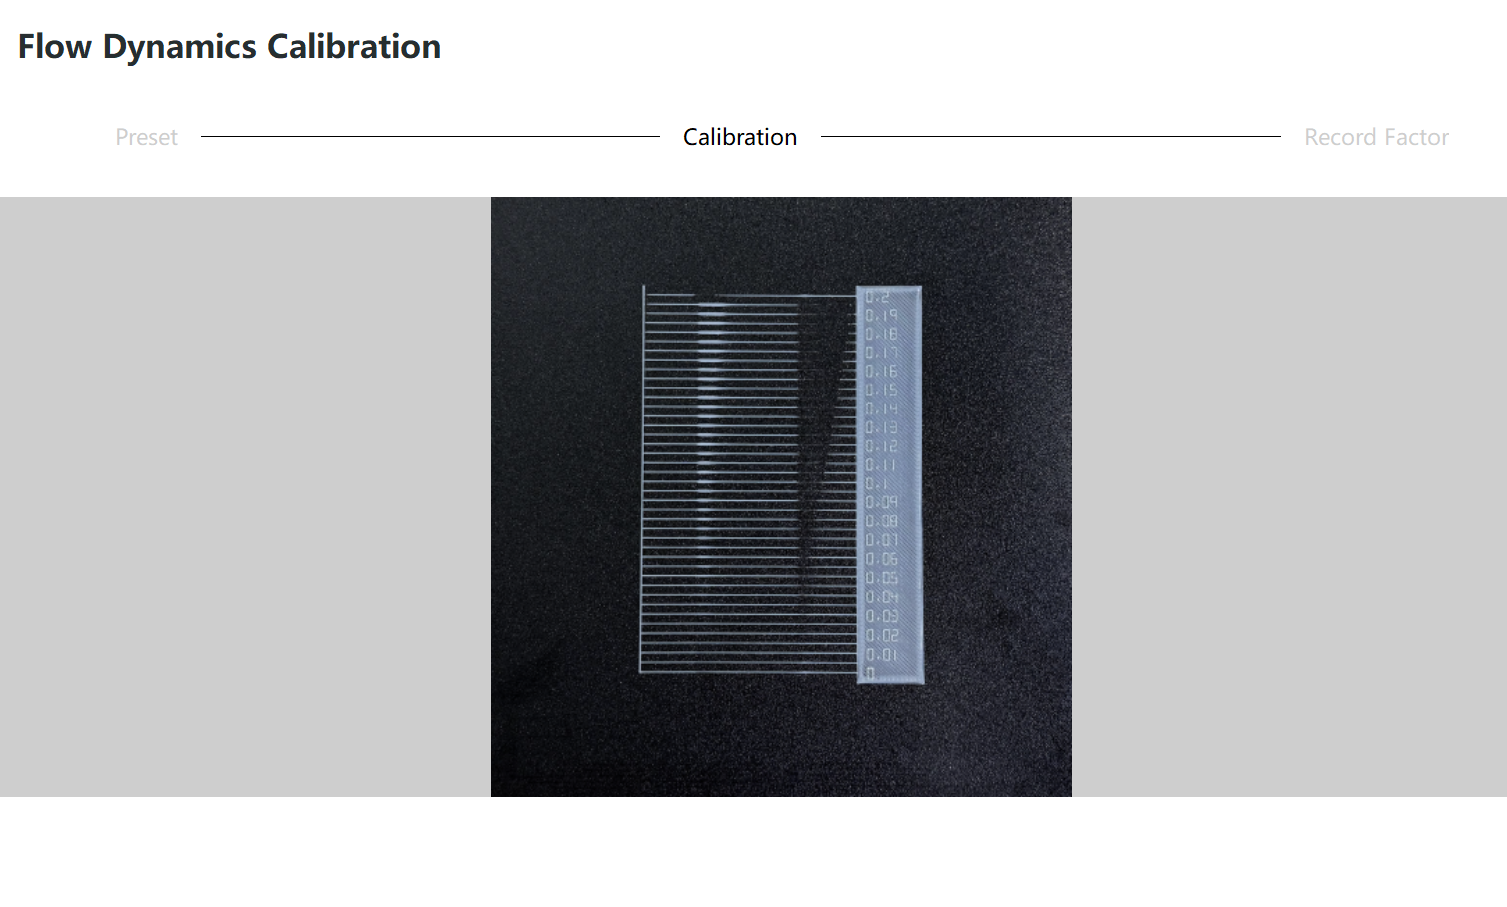
¶ Step 4: Visually Inspect the Printed Pattern
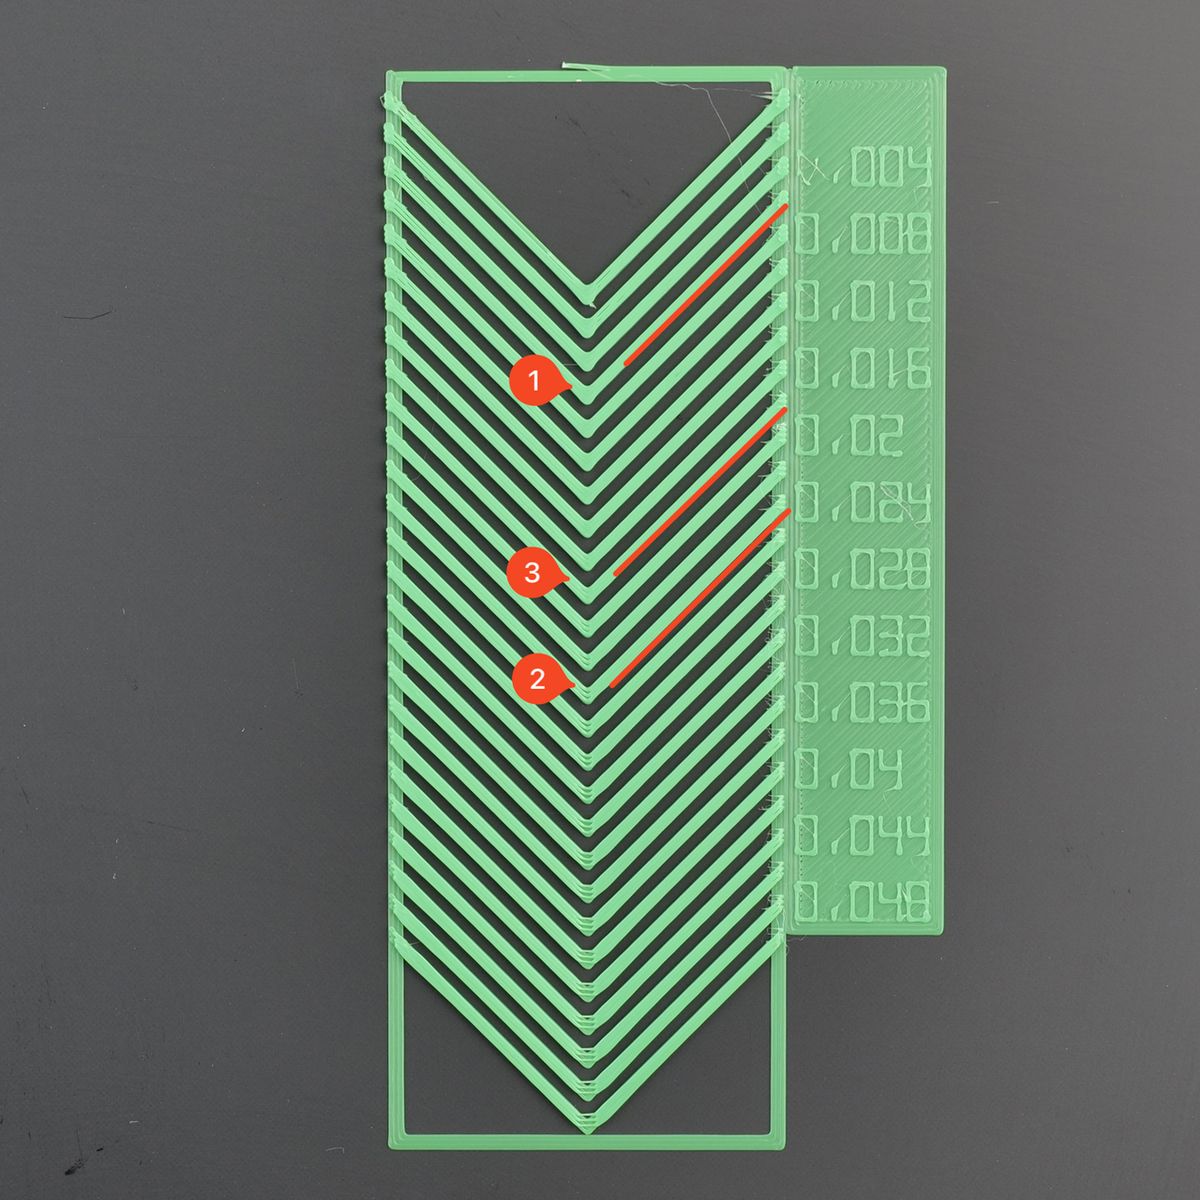
Once the pattern is successfully printed, you will need to visually determine which of the printed values has the cleanest printed corner. The corner should be as sharp as possible, without any signs of under-extrusion.
Looking carefully at the test results, a K factor value of 0.006 (represented with 1) would be too low, as the corner is bulging and it's round. On the other hand, starting from the 0.024 K value (represented by 2), we obtain underextrusion in the corner.
Based on this test and the filament used, the best result is a K value of 0.018 (represented with 3), which is between 0.016 and 0.02.
Once you have determined the correct value, in Bambu Studio, click Next.
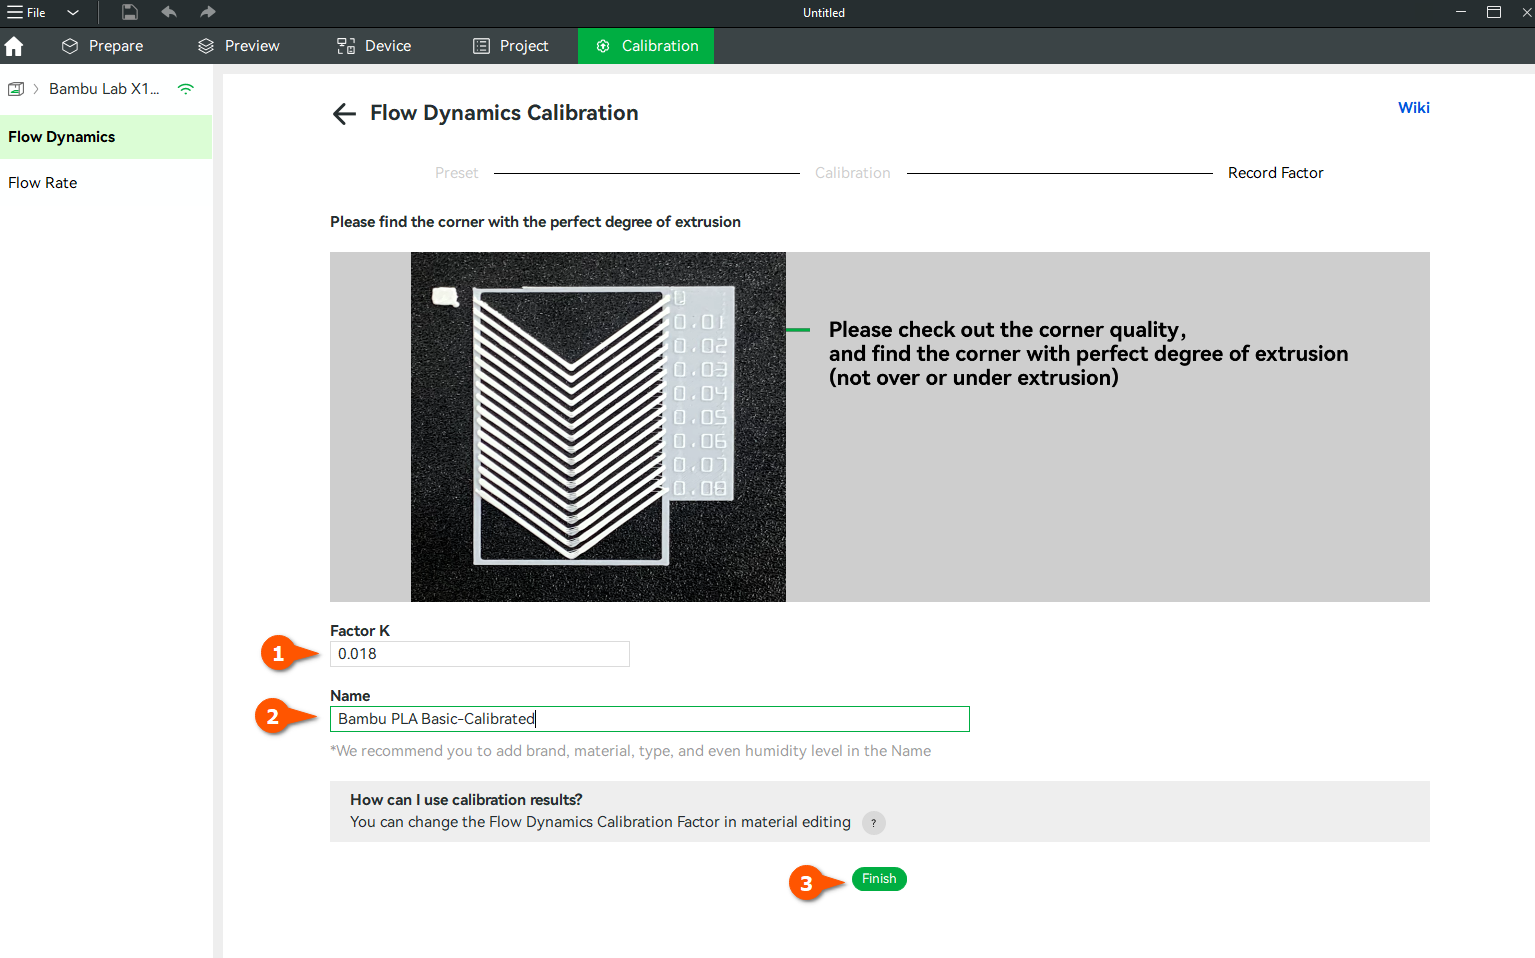
¶ Step 5: Input the Correct Value in the K Section and Assign the Name
Enter the value obtained under the Factor K section, assign a new name to the filament profile, and then click Finish to complete the calibration.
Note: A1 series and H2D printers use eddy current sensors with a dedicated algorithm for dynamic flow calibration. The automatic calibration value (K value) of the algorithm may sometimes be significantly higher than the manual calibration value, which is normal. This design is intended to avoid filament pile-up problems at the corners of the model by slightly increasing the K value, thereby better ensuring the assembly accuracy between models.
¶ Flow Dynamics Calibration Before Printing
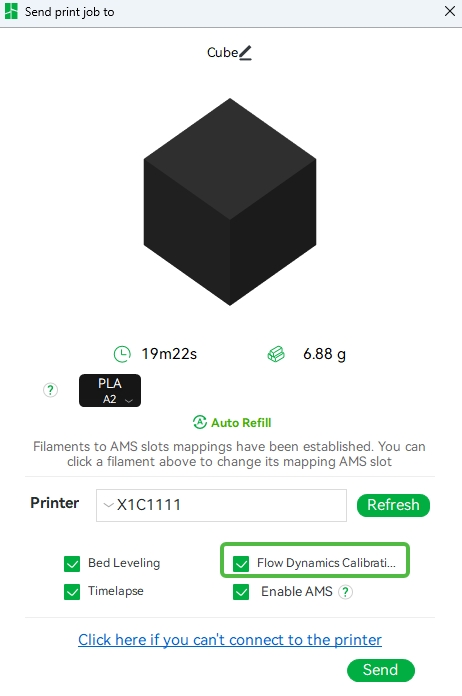
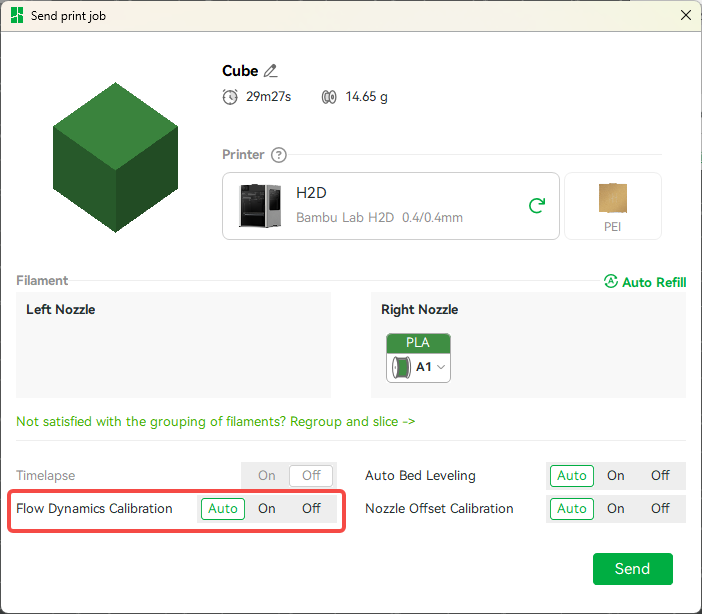
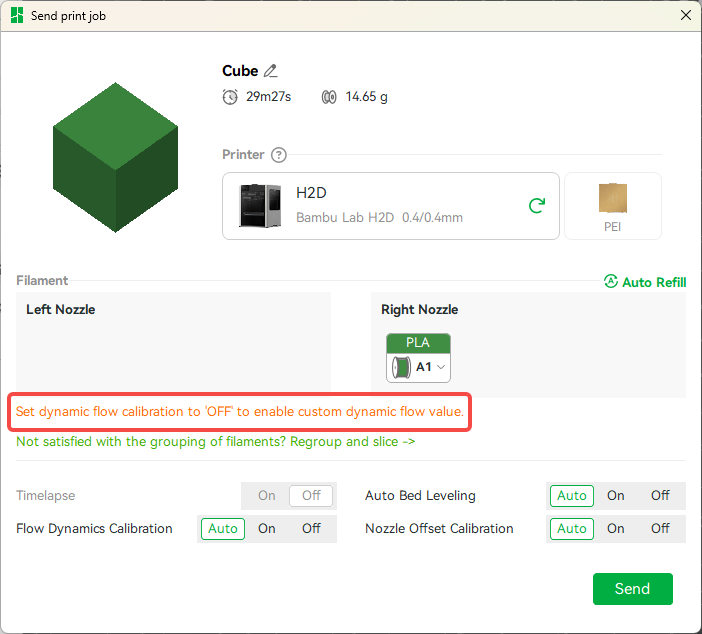
If you check "Flow Dynamics Calibration" before initiating each printing, the printer will calibrate the flow rate during the printing preparation stage, and this printing task will use the calibrated K value instead of the manually set K value.
Note: P1 series printers do not have this option as they do not support automatic calibration.
¶ X1 Series
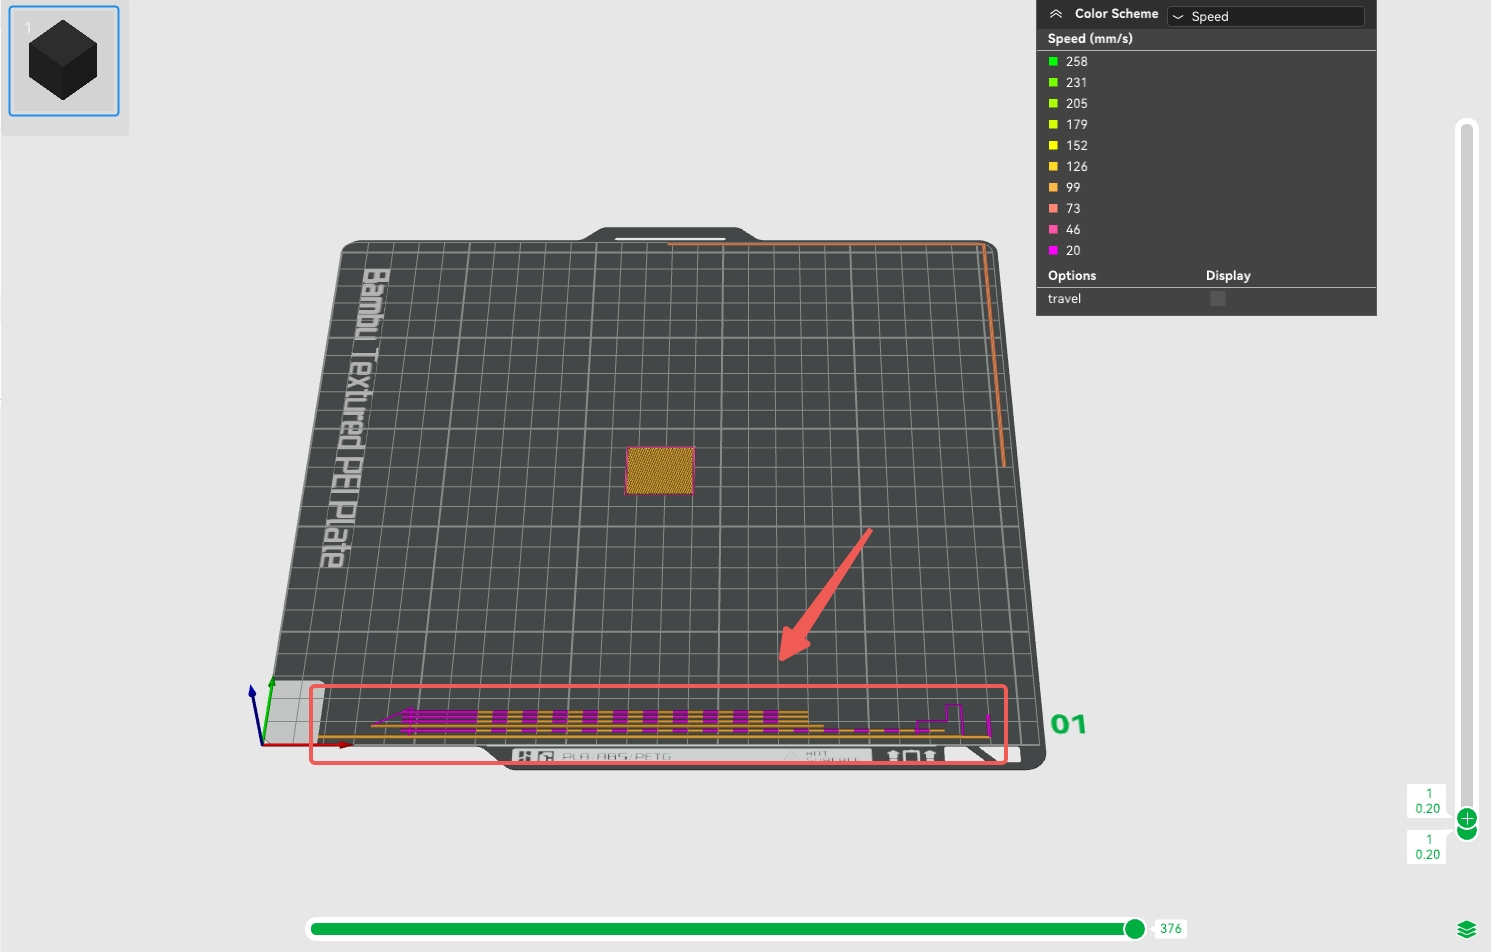
For the X1 series printer, if "Flow Dynamics Calibration" is checked in the window that sends prints, it will print a calibration line on the build board during the print preparation stage to calibrate the first filament used in this print job. If multiple filaments are used in this printing task, other materials will utilize the K value you manually set**. If the K value of materials in other slots has not been manually configured, the default compensation value will be used.** This calibration method will occupy a certain area of the print plate, as shown in the figure below.
¶ A1 Series
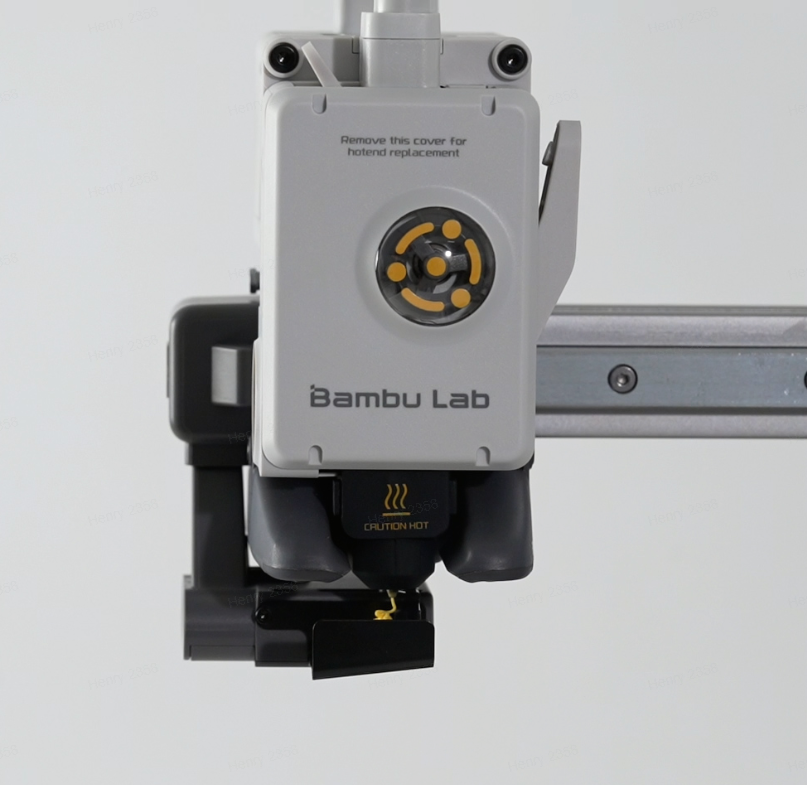
For the A1 series printers, the flow dynamics calibration process involves discharging material at the position of the discharge assembly during the printing preparation stage and calculating the suitable K value for the material based on the pressure changes detected by the eddy current sensor above the hotend. If "Flow Dynamics Calibration" is checked before printing, a flow calibration will be performed when each filament of this printing task is replaced for the first time, so all materials used in this printing task will be calibrated by flow (supported since version 01.03.00.00).
This calibration method is greatly affected by the hotend. Please ensure that you are using the official Bambu hotend. If you use a third-party hotend, the calibration value may be inaccurate.
.webp) |
 |
¶ H2D Printer
Similar to the calibration principle of the A1 series printers, the H2D printer also spits out the filament at the purge wiper, and then uses the eddy current sensor inside the toolhead for dynamic flow calibration. For H2D printers, there are three gear options for dynamic flow calibration before initiating a print task, which are explained as follows:
Automatic: The system will determine whether the filament (and the nozzle used) for this print has been calibrated in the recent period, and whether the hotend has been replaced. If the filament and nozzle have not changed, the last calibration value will be used directly and no longer calibrated; if there is a change, a dynamic flow calibration will be performed again before printing.
Open: Dynamic flow calibration will be performed before each print starts, and the calibration value is only applicable to this print task.
Off: The system will use the K value (PA profile) you set manually. If there is no profile for the filament in this slot, the system default value (default) will be used.
Note: The calibration results of the open and automatic gears will be recorded inside the machine for subsequent judgment when initiating printing.
¶ What Happens if You Don’t Calibrate the Flow?
1. If you are on the filament configuration page and have not selected any PA profile for the supplied filament in this slot, and ‘Flow Dynamics Calibration’ is not checked before printing begins, the printer will use the default extrusion compensation parameters. In most cases, it is possible to achieve good printing results with the default parameters
2. If you are familiar with the characteristics of a particular filament, you can manually create a PA profile for the consumable filament directly from the Flow Dynamics Calibration Management Result page in Studio. This allows you to configure an extrusion compensation parameter for the filament without calibration, but this feature is supported by Bambu Studio version 1.9.1 and above.
Note: H2D printers use a more sophisticated flow calibration algorithm. The compensation value depends not only on the K value but also dynamically adjusts based on the printer model, nozzle, and filament type to ensure good printing results even with default parameters. Therefore, if the PA profile is set to 'Default', the system will no longer display the specific K value.
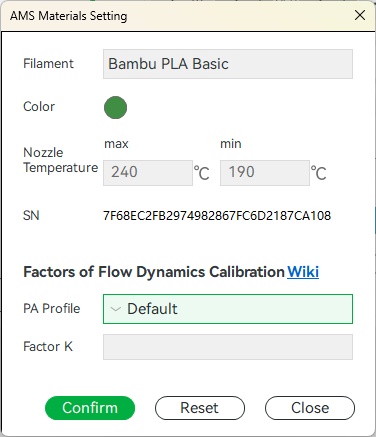
If a saved PA profile is selected, the K value will still be displayed, but will only be effective in the 'Off' position.
¶ Important Notes
When considering the Flow Dynamics calibration, it’s critical to pay close attention to the following details to achieve optimal results:
- When considering the Flow Dynamics calibration, it’s critical to pay close attention to the following details to achieve optimal results:
- Dry the filament both before and after calibration to prevent print inconsistencies caused by moisture.
- Make sure the hotend is clean. If print quality drops, do cold pulls or change the nozzle to clear clogs.
- Clean the extruder to remove dust or residue. Poor extrusion often comes from dirty gears, not calibration.
- Avoid calibrating with a clogged nozzle or dirty extruder to prevent inaccurate results.
- Wash the build plate to ensure good first-layer adhesion during calibration.
¶ End Notes
We hope our guide was helpful. If you have any questions or concerns about the process, please contact our customer service team. We're here to assist you.
Click here to open a new ticket in our Support Page.
We will do our best to respond promptly and provide you with the assistance you need.