¶ 1. Problems for Custom Filament
There are currently two issues with the creation of Custom Filament in Studio version 1.8.2.56.
¶ 1.1 LAN mode not supported
Currently, Studio and printer only support cloud mode for the newly created custom Filament feature.
So if you want to apply this feature, please switch the printer to cloud mode connection and ensure that Studio's cloud synchronization is enabled.
If you want to use this feature in LAN mode, you can first use cloud connection to create a custom Filament, and then go to the printer screen to select the Filament. At this point, the printer will retrieve the Filament stored in the cloud. (At present, the operation of the printer to obtain cloud data is automatic, and it is obtained once when logging in and entering the Filment settings page.)
¶ 1.2 After creating a custom Filament, directly select it from the device page in Studio and return to "?"
There are two workflows that will lead to this phenomenon.
¶ 1.2.1 There was no synchronization on the printer screen after creating the Filament.
After creating a custom Filament, setting it directly on AMS in Studio will cause the printer to return a "?".
This is because the preset you created was only uploaded to the cloud, and the printer currently does not have the data for the Filament you created. You need to set it up on the printer screen first. When you enter the Filament settings interface of the printer, the Filament data is saved locally to the printer. At this time, if you set the Filament from the Studio end, no more "?" will be returned.
¶ 1.2.2 Incorrect creation process
On version 1.8.2.56 and earlier versions of Studio, there was an issue with the workflow for creating Filaments. Below is a detailed introduction to the workflow:
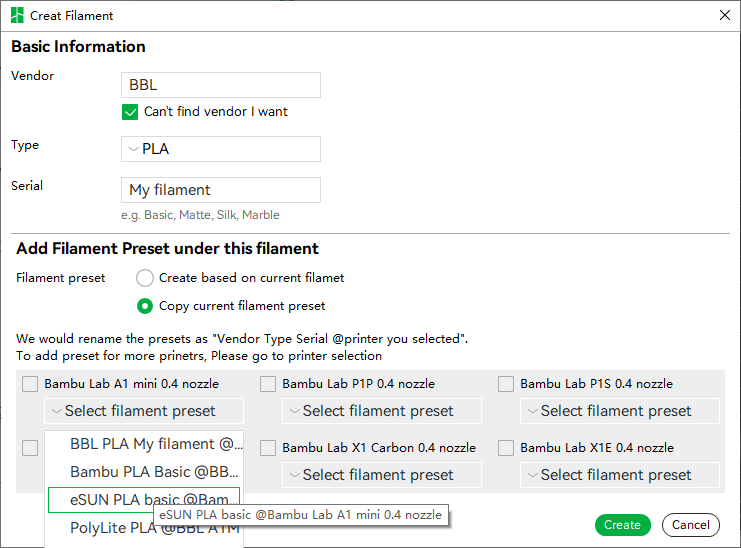
- Select "Copy Current Filament preset" as the creation method.
- The selected preset is a user preset. As shown in the figure below.

This will result in the printer not being able to obtain the Filament, even if you enter through the Filament settings portal of the printer.
¶ 2. Solutions for Custom Filament
Firstly, the issue of 1.2.2 will be resolved in the new version.
The next step is to handle existing Filaments that cannot be used by the printer.
¶ 2.1 Manually delete existing Filament presets
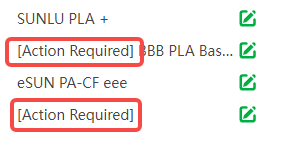
According to the situation, Studio will remind the Filament on the Custom Filament page by adding "[Action Required] ..." before the name of the Filament you created, and by adding "[Action Required] at the end of the list. The problematic presets in these two items will be introduced one by one below.

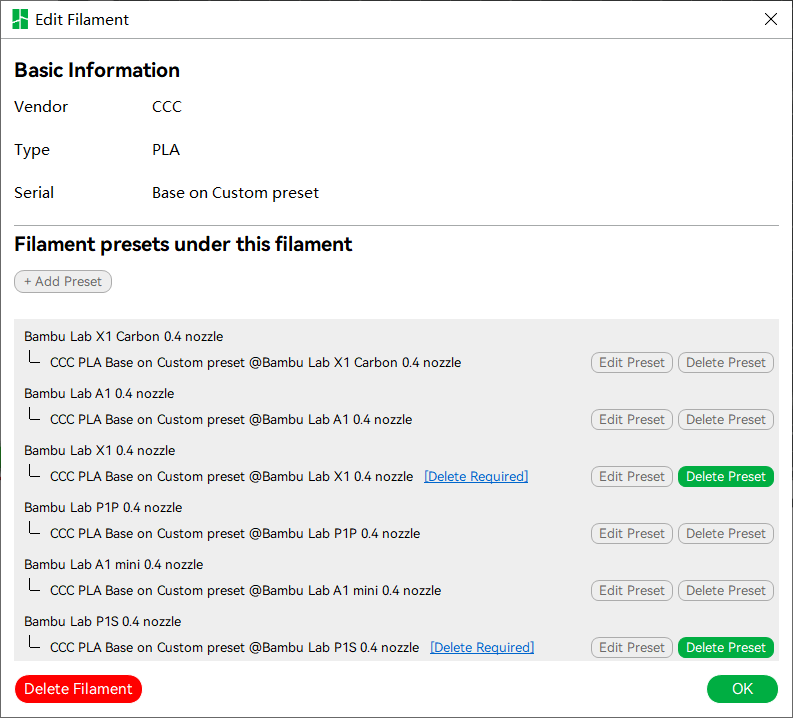
Click "[Action Required] ..." to enter the Edit Filament page of the Filament, where the "Delete preset" button for the problematic parent preset will be highlighted, such as "CCC PLA Base on Custom preset @ Bambu Lab X1C 0.4 nozzle" in the figure. At this point, simply delete each highlighted preset and recreate the Filament.

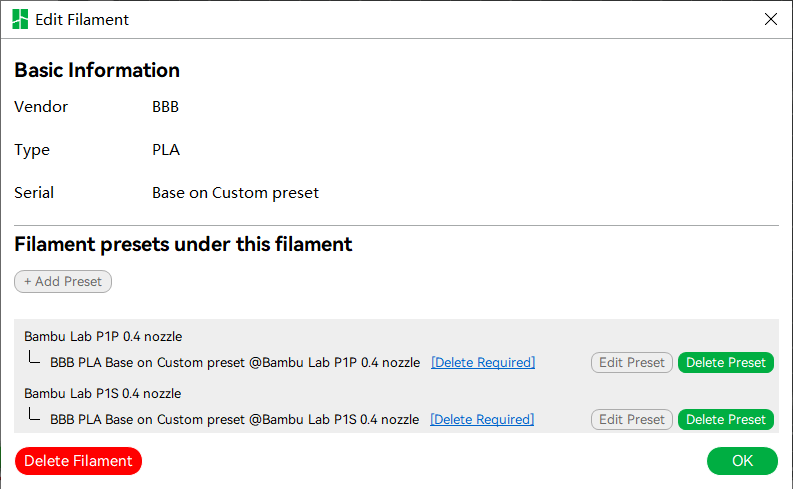
Click on "[Action Required]" to enter the Edit Filament page, where all presets are problematic presets. You can click the "Delete Filament" button in the bottom left corner to delete all presets. Note that there may be different Filament presets on this page, and the Vendor Type Serial may not be as accurate, but that's okay.

¶ 3. Summarize
Note: If the same Filament as the problematic Filament is created to overwrite it before completely deleting the problematic project. The prompts "[Action Required] ...", "Filament Without ID", and "Delete Preset" will become inaccurate. In this case, the approach is to ensure that your cloud synchronization is enabled, then delete the "%appdata%\BambuStudio\user \user_id\username" folder, and log in to your own account. After cloud synchronization, these prompts will become accurate again.
As long as the two items in 2.1 are not visible in the Custom Filing list, it indicates that all of your Filings can be received by the printer from the cloud. Don't worry about using it.
"Create Custom Filament" is one of the important features of v1.8 Studio. It's great that everyone can use it and ask your questions. Sorry for the inconvenience caused by this bug in this feature. But I believe Studio will continue to improve and provide you with a better experience.