Multimaterial prints tend to be very costly both in time and materials. This article will provide an understanding of what causes waste during such prints as well as specific suggestions for how to manage and reduce this waste.
¶ The Filament Change Procedure
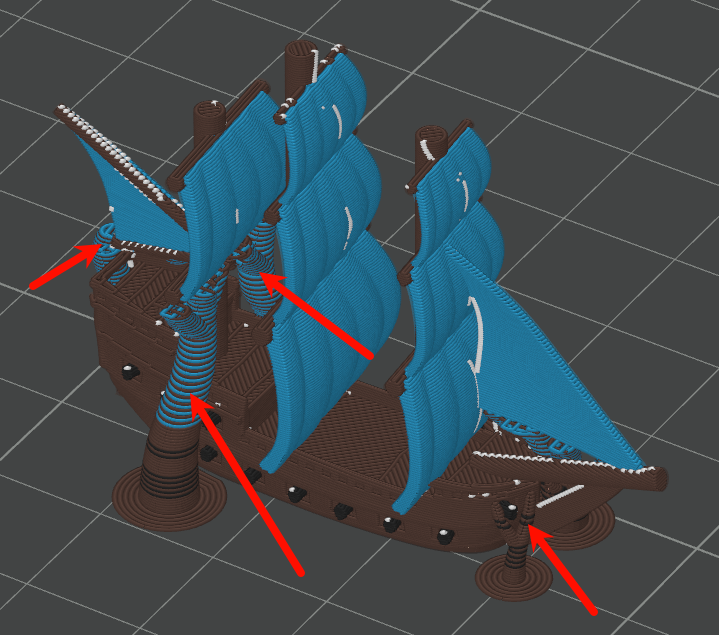
By definition, multimaterial prints (also known as multicolor) use multiple filaments to complete a single print. Especially on single nozzle printers, this is accomplished with the Filament Change Procedure, which is broken down into a few key stages.
¶ Flushing (also known as purging)
Each time a nozzle must change from one filament to another, a small amount of filament is left in the extruder and nozzle, below where the filament cutter makes its cut. Once an AMS retracts the old filament and feeds in the new filament, the extruder pushes or "Flushes" the old filament through the nozzle until the filament being extruded is purely the new filament.
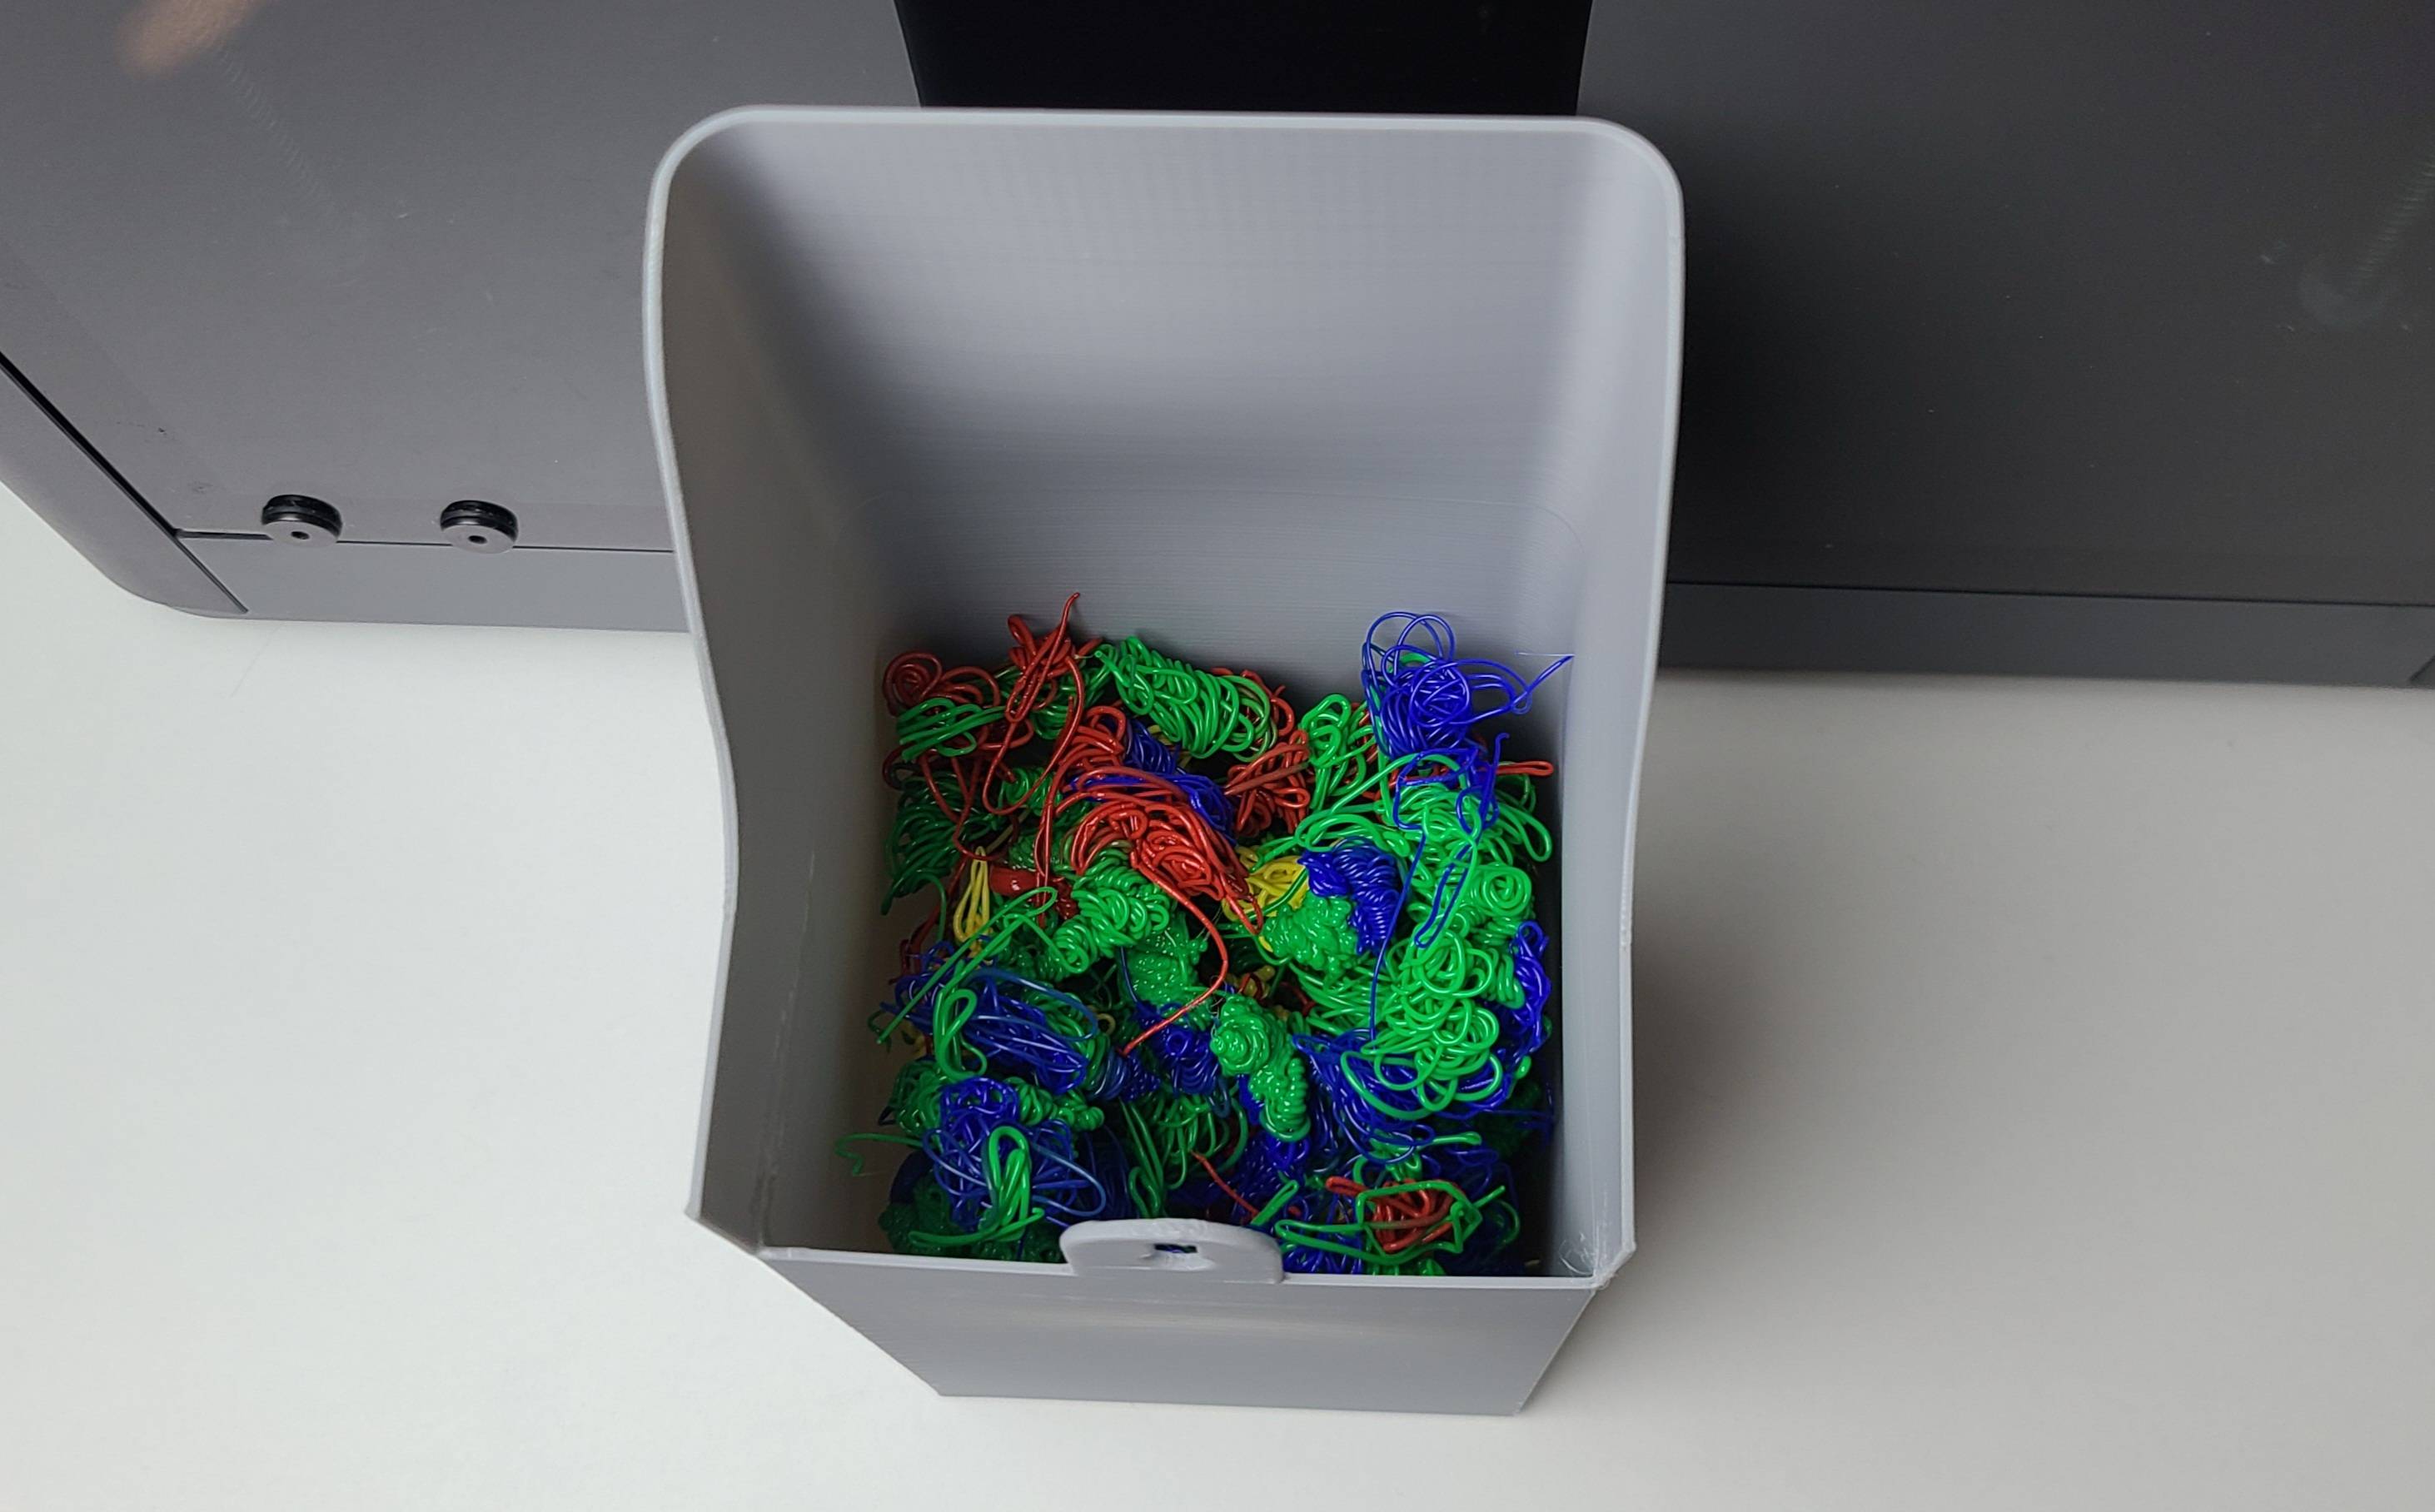
This purged filament is extruded in an area next to the build plate and the material is then detached from the nozzle and directed away from the print area.
Note: This filament is extruded as quickly as possible (at what is called the Max Volumetric Speed) since this step can be performed many times during a multimaterial print. Max Volumetric Speed depends on several factors, primarily a filament’s ability to flow when melted, with nozzle size being one of the most significant.
As a result, a 0.2 mm nozzle may take significantly longer to complete the Flushing step than a standard 0.4 mm nozzle (since it cannot extrude the filament as quickly), noticeably increasing filament change time and overall multimaterial print duration.
¶ Flushing Volume
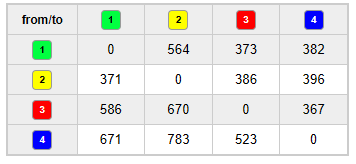
The color of the extruded filament is the main factor that determines the volume of material that must be extruded during a flush, because even a small amount of old filament may leave a mark in the form of noticeably discolored layers. This Flushing Volume is different depending on the relationship between the 'From' filament and the 'to' filament. Darker colors need a higher volume flush to switch to lighter colors, and lighter colors need less to switch to darker colors.
The image below shows the table in Bambu Studio which displays these calculated Flushing Volumes for each possible color change in a project. We will go over how to view and manage these values in the Managing Flushing Volumes section.
Aside from color, material properties are also considered. In the example of support filaments, which are designed to easily remove from a specific filament, flushing volumes are calculated to prevent contamination which would cause sticking between a support filament and the filament it supports.
¶ Wiping
Directly after the filament is purged, the nozzle moves back and forth over the filament wiper to make sure the purged filament was released from the nozzle. This also is a first attempt to clean the tip of the nozzle to avoid contamination of the print with bits of the old filament.
¶ Priming
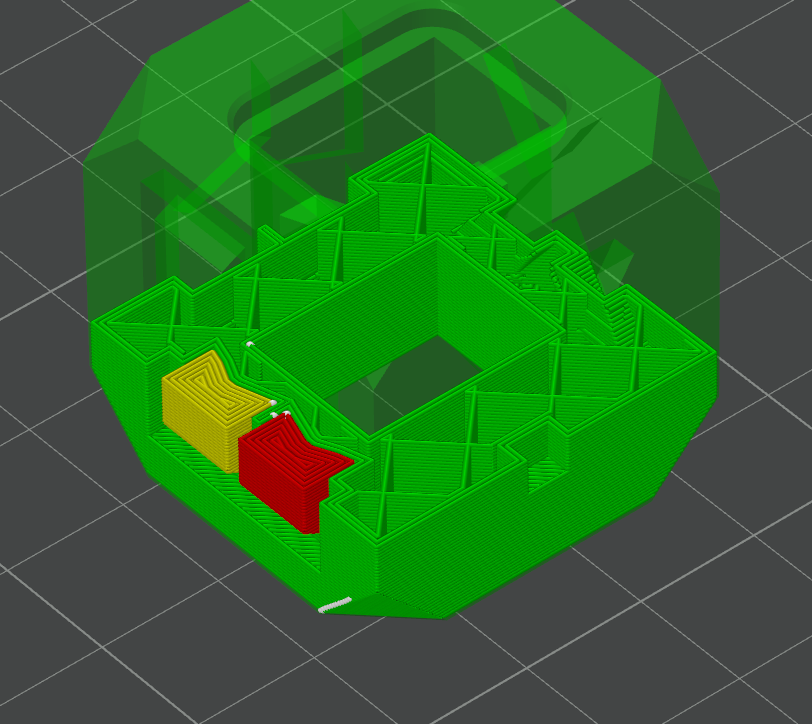
After the filament is wiped, by default, the nozzle extrudes filament into the Prime Tower, which is a sacrificial piece printed before returning to the actual printed models.
The prime tower serves a very similar purpose to the "nozzle load line" which prints at the front of the bed before a print starts, which is to knock off any final pieces of stuck filament and ensure consistent flow of filament through the nozzle. This ensures that the printed lines of the part are as consistent as possible from the start of each printed line.
The main difference between the filament load line and the prime tower is that the prime tower may be needed throughout the print, and so must be exactly as high as the tallest layer in the print where there is a filament change.
The prime tower tends to use less filament than filament flushes since it is printed efficiently in a similar manner to support.
Note: Since the Prime Tower must reach the highest layer with a filament change, prints with changes only near the top waste clean filament to provide the tower's foundation up until it is needed. Conversely, if changes occur only near the bottom, the tower stops early once it's no longer needed.
In the image below, notice that the prime tower uses 14.76g of material.
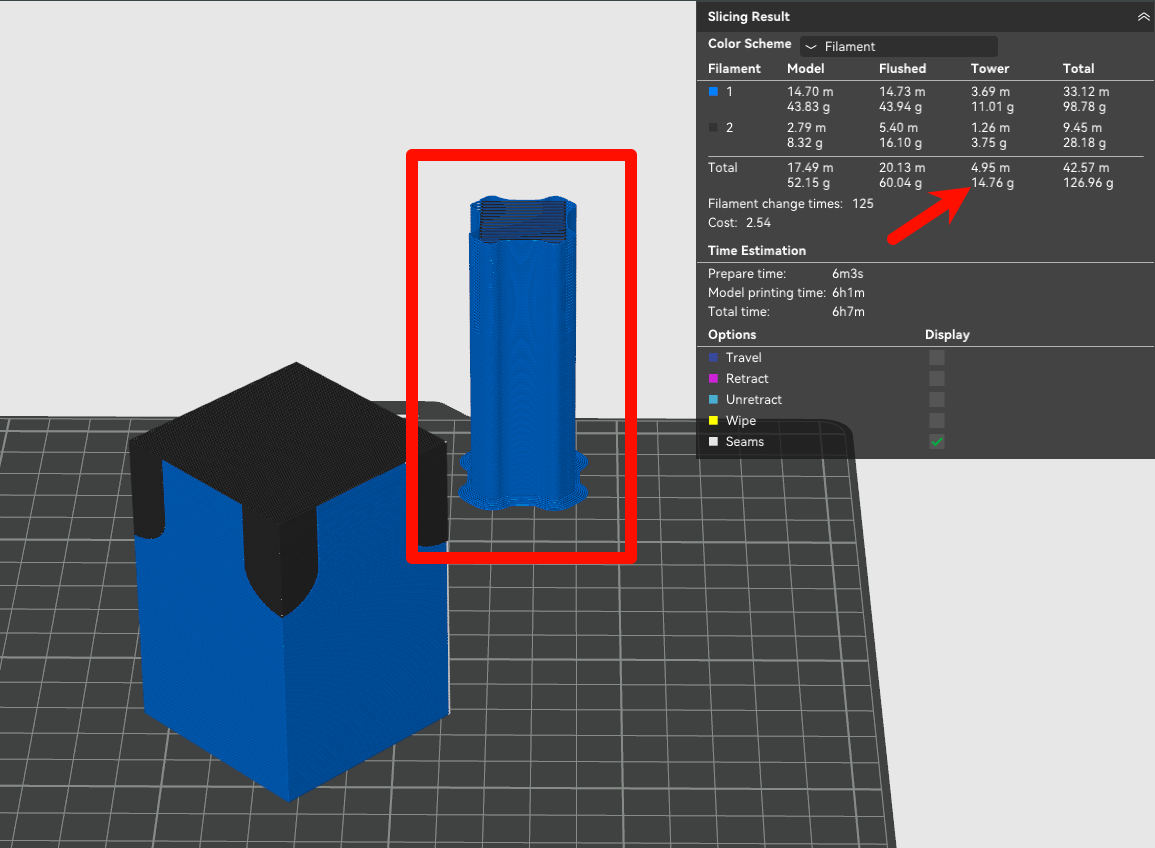
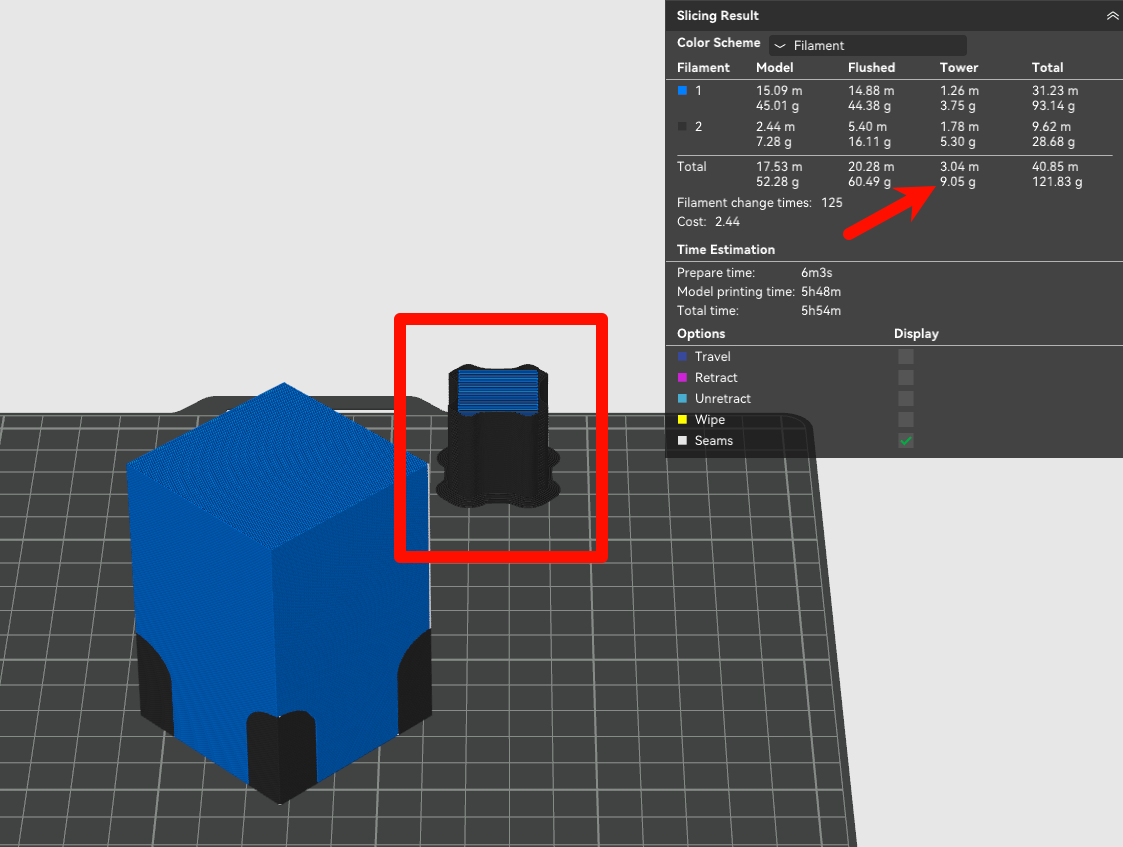
In this next image, we simply rotated the same part upside down so that the filament changes were all on the bottom. This reduced the prime tower material to 9.05g (about 40% less material) because now the tower can be much smaller.
¶ Preventing Waste Filament
There are a few methods to reduce wasted filament without directly changing the resulting printed parts. These methods have different strengths, weaknesses, and constraints for use as outlined below.
¶ Managing Flushing Volumes
Bambu Studio uses an algorithm to auto-calculate the required flushing volume during a filament change. As mentioned above, color and material properties are the main factors used to calculate the default volumes.
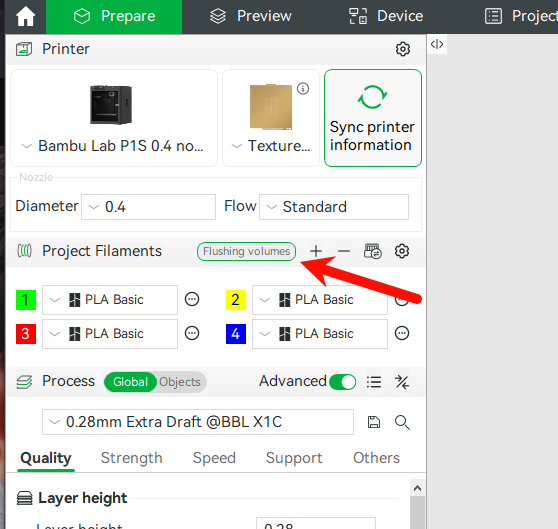
To view and manage the flushing volumes for a project, press the Flushing Volumes button in the Project Filaments Section.
The flushing volumes for a project can be modified globally with the Multiplier field. As the name implies, a multiplier of 1.00 is the default, with 0.90 being 10% less flushing volume for every filament change pair.
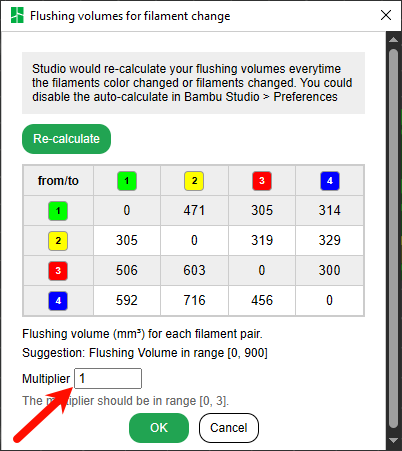
Experimenting with a lower Multiplier can save filament waste since the default values tend to be slightly higher than necessary in order to err on the side of print quality. A Multiplier of 0.8 or 0.9 could be a quick way to save filament, but it is important to run test prints to ensure the color (or physical) qualities are not affected.
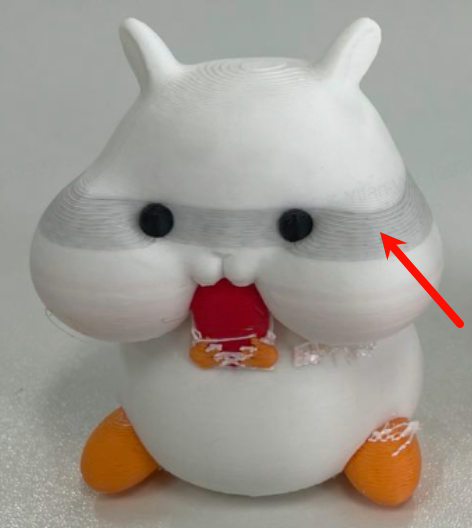
A multiplier or specific flushing volume which is too low will show as discolored layers as shown in the picture below.
Fine tuning is possible by editing the individual values for a from/to pair in the table. If any individual values are manually edited, the Re-calculate button will return all pairs back to the auto-calculated values.
¶ Flush into objects' infill
The infill of a model is almost always covered by the part's outer shell. Accordingly, in many cases, we can use the Flush into objects' infill setting to redirect filament that would normally be flushed to be used to print infill that will not be visible.
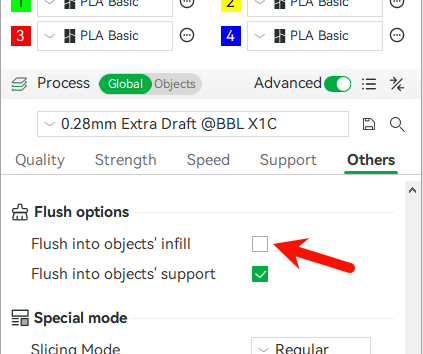
This setting must be used cautiously, as some filaments (lighter colors and transparent colors) will allow the oddly colored infill printed with this enabled to show through and affect the appearance of the part from the outside. Similarly, the smaller the number of wall loops and shell layers that a part has, the more likely it is for odd infill coloring to show.
In the example pictured below, notice that with even a relatively dark green (with only 1 wall perimeter) the infill color shows through very slightly where it attaches to the perimeter.

¶ Flush into objects' support (enabled by default)
Since the support part of a model will be removed after printing, it can be printed with flush extrusions. For models with large area supports, enabling this option can reduce a lot of material waste and shorten the printing time.
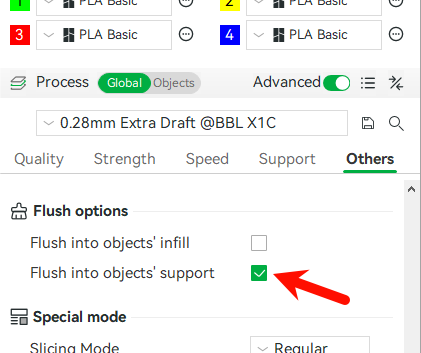
The main drawback to this approach is that there is often not enough support in a print to make a large difference. Since there are no real negatives, it is enabled by default.
In rare cases when using materials with different properties, this setting may have undesirable effects in the strength of the support. However, these effects are usually not noticeable since support does not often have high strength demands.
Note: this setting will not take effect unless the Prime Tower is enabled.
¶ Flush into this object
The Flush into this object setting is only accessible while selecting at least one object in the Process > Objects tab. This is because it must be applied to at least one object when there is an additional object which is multimaterial and has filament changes which cause flushing.
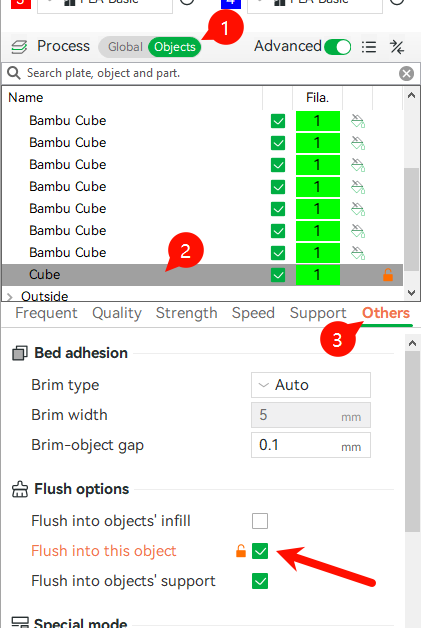
Objects which have this enabled will be printed with flushing filament with transition colors. This will result in an interesting but inconsistent appearance. It is recommended for objects where a consistent color is not important, such as objects which are purely used for function, or objects which will be painted.

To take full advantage of this, many objects can have this setting enabled on a build plate, until all of the flushed filament is used fully or until the plate runs out of room. As we will discuss below, adding many identical multimaterial parts to a single print bed is advantageous, so it is a great idea to experiment with different ratios of multimaterial parts and flush parts if efficiency and reducing waste is a goal.
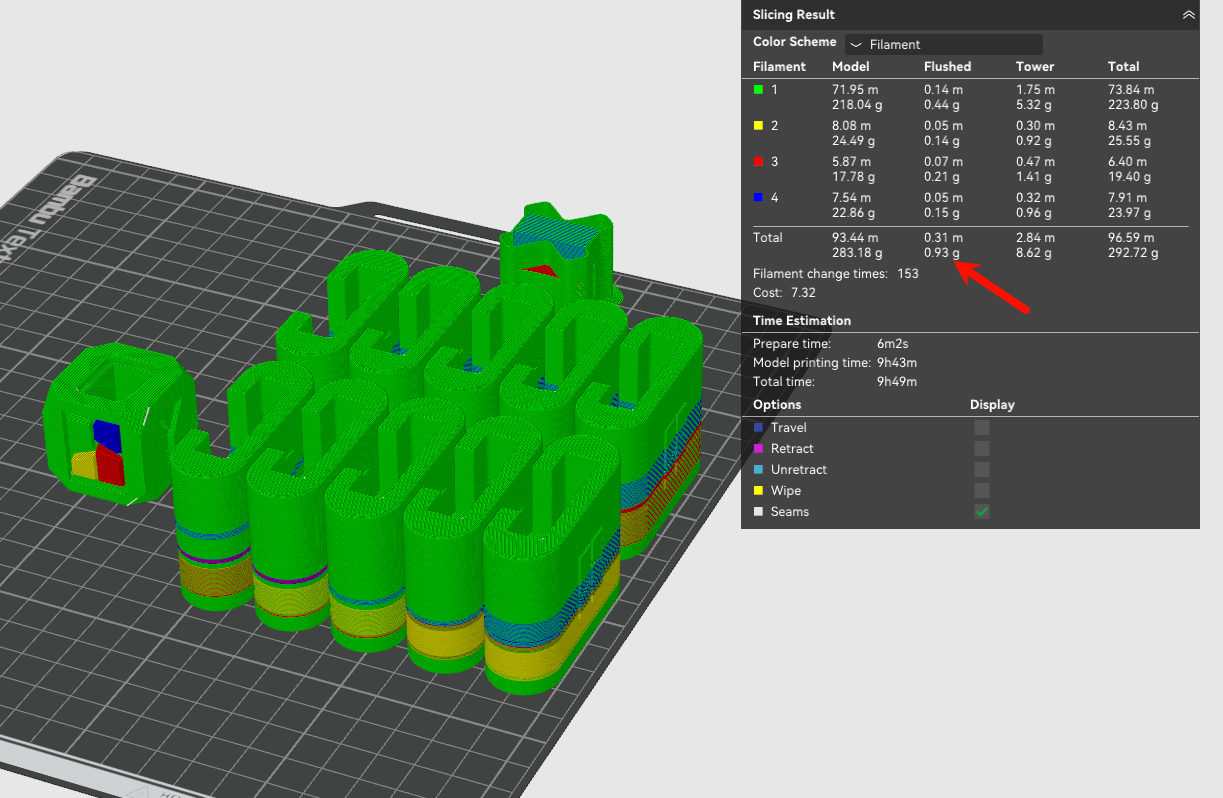
In the image below, there is a single, colored Bambu Cube and a bunch of parts next to it with **'**Flush into this object' enabled. The Bambu Cube would normally require about 70g of flushed filament, but since we are instead using that filament for the flush objects, the flushed filament is instead less than a gram.
Also consider that flush parts which are taller than the multimaterial parts will use new filament to print the rest of their height, so flush parts which are a similar height to the multimaterial parts are ideal.
¶ Reducing Filament Change Times
As discussed above, the "wasted" filament in a print is what is extruded during both the flushing and purging steps in each Filament Change procedure. Accordingly, the total wasted filament is directly tied to the total Filament Change Times (each time a Filament Change procedure is performed) for a given print.
¶ Filament Changes Per Layer
Within a single print, each layer can have a different number of filament changes depending on the amount of filaments making up that specific layer.
In almost all cases, the number of filament changes on a single layer is one less than the number of filaments on that layer. This is because the last filament on a given layer is printed first on the next layer to avoid one unnecessary filament change. The minimum number of possible filament changes on a layer is, of course, zero. This is when a layer is composed entirely of only one filament.
Let's preview the print sequence of the layer pictured above which has 3 different colored filaments: red, green, and yellow.
Notice that this layer starts on red, performs one filament change (when the nozzle momentarily disappears) to green, then performs a second filament change to red. Then, it finishes the layer, moves up to the next layer, and continues with the red for that layer without another filament change.
¶ Total Layers
Since the number of layers directly affects the number of filament changes, this means that reducing the number of layers will directly reduce filament waste. The simplest way to do this is to increase the layer height of the print.
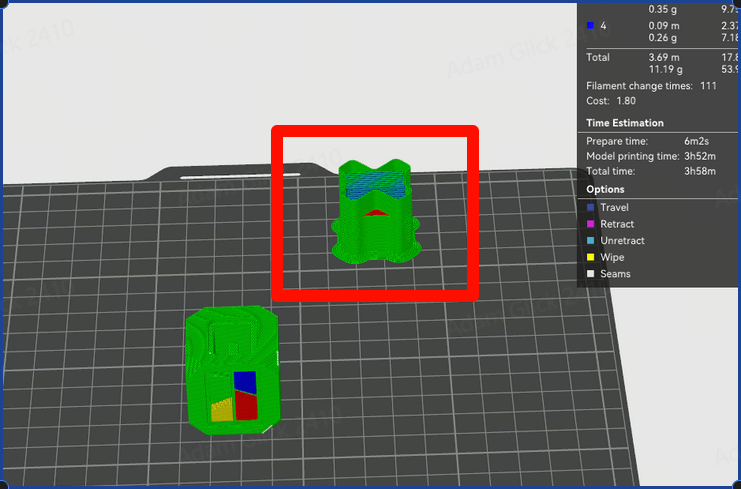
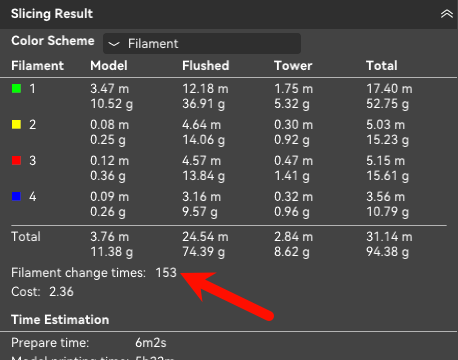
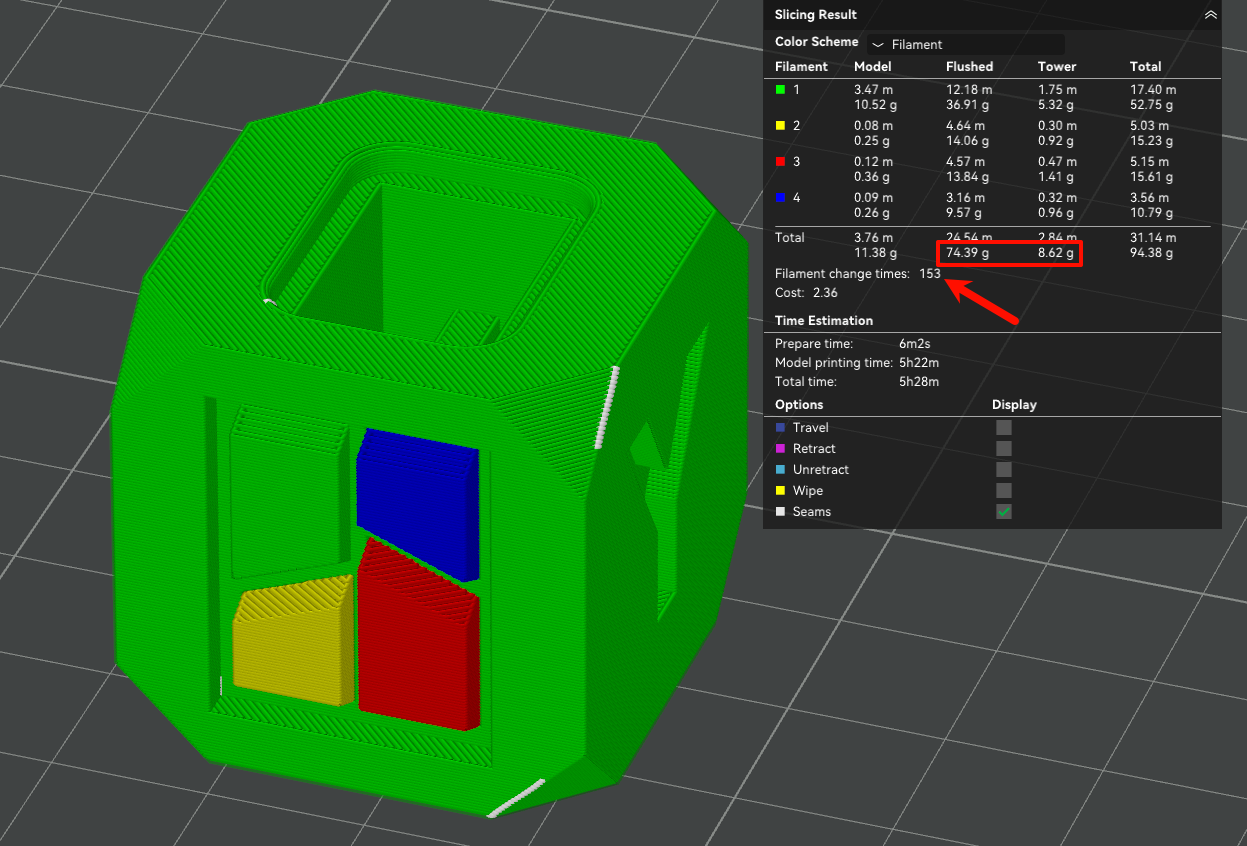
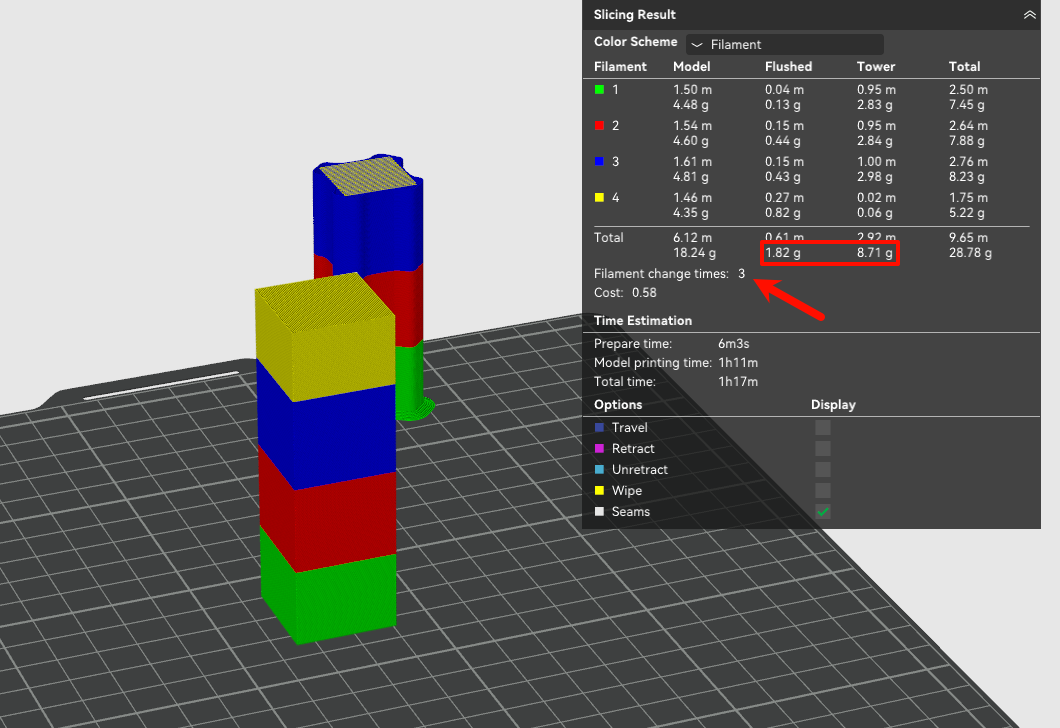
We'll take the earlier example of a colored Bambu cube with 4 total colors. At 0.2mm layer height, we can see that the Filament Change Times shows 153 total changes, corresponding with 83 grams of wasted filament.
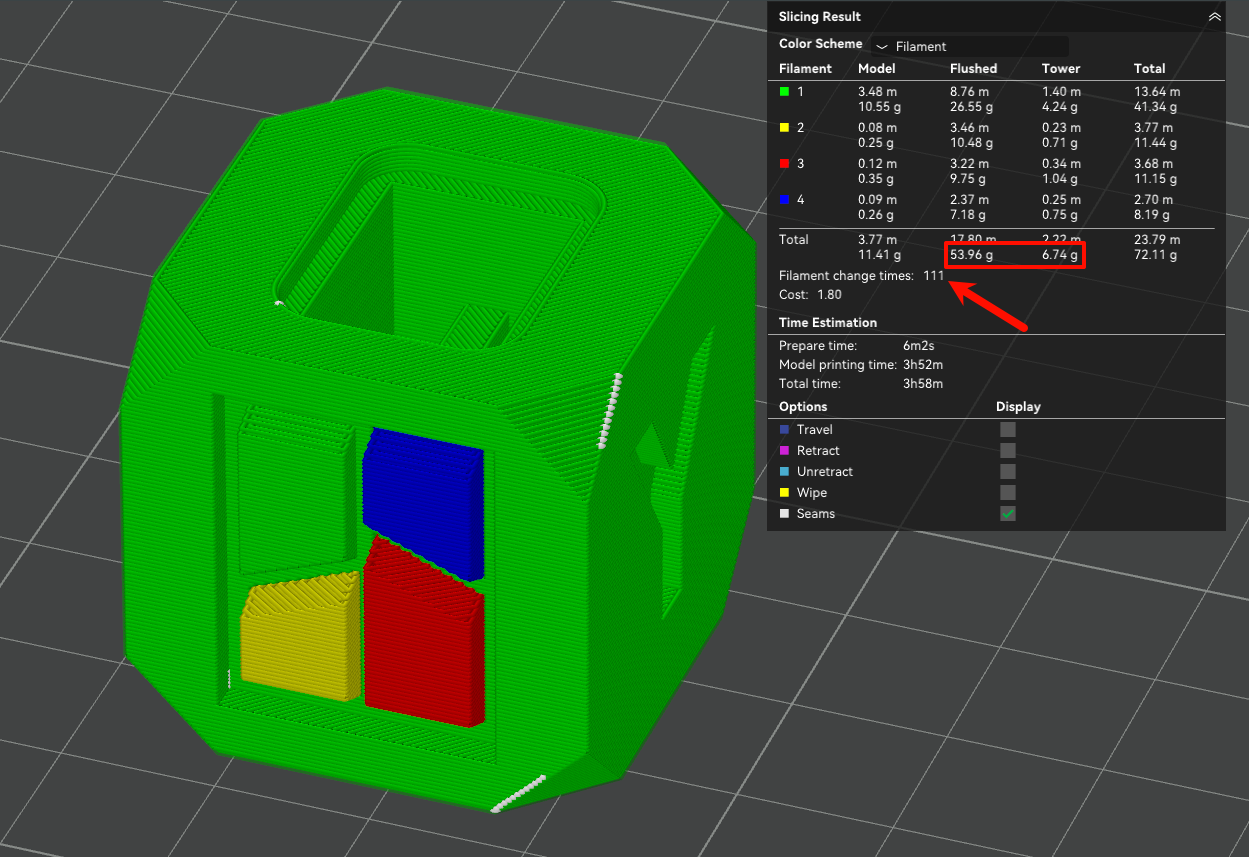
If we increase the layer height to 0.28mm, this reduces the filament changes to 111 (27% less) and the wasted filament to 61 grams (26% less). Notice that a reduction in filament changes is correlated directly with a similar reduction in wasted filament.
A less broadly applicable way to reduce filament changes would be to print a tall, thin part on its side instead of standing up straight. The viability of this approach will depend on the part itself, namely the ideal layer orientation of the part either for strength or aesthetics.
In the example pictured below, laying the part flat on its side resulted in almost 80% less filament changes and filament waste and 70% less time. That's 11 hours and almost 180g of filament saved for a ~35g part!
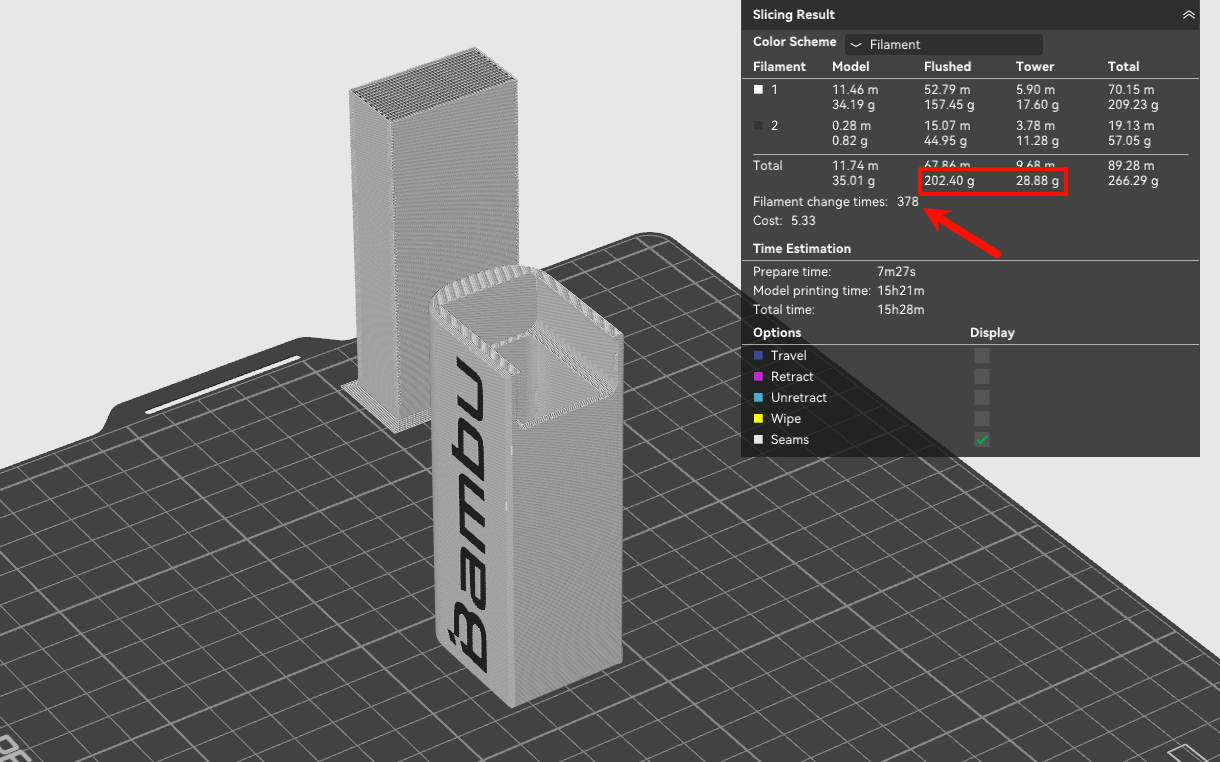
Note: Laying down a tall part may not always result in saving filament. This always depends on the characteristics of the part itself, namely the orientation of its colors/filaments.
Additionally, if the part does not have a nice, flat side face to lay down on the build plate, more support filament would need to be used, which will work against (and possibly outpace) and filament savings related to color changes.
Always test different orientations and approaches in Bambu Studio by slicing and comparing filament use.
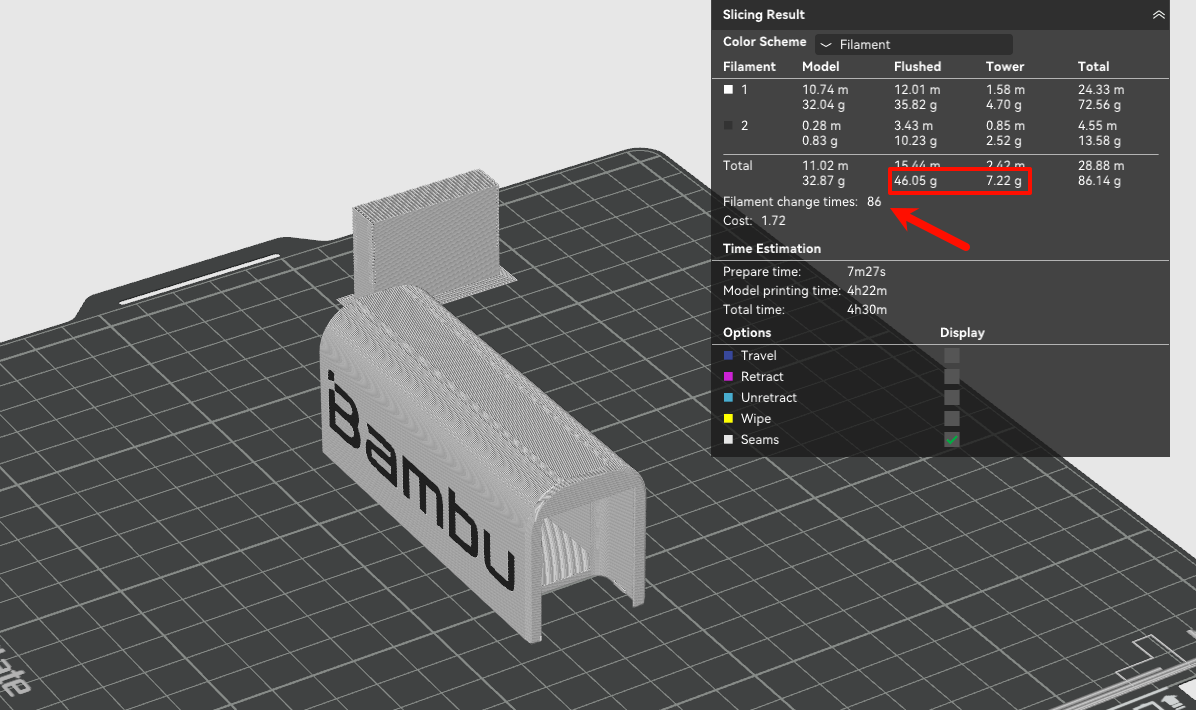
The example pictured below would be a very bad scenario to lay the part down, because the different filaments are already organized horizontally by layer. This means that there are almost no filament changes and very little wasted filament, with 3 changes and 10g of wasted filament.
However, if the part is laid down, now every single layer has four colors, and three filament changes. This results in an explosion of wasted filament (22 times as much!) as well as print time (11 times longer!).
¶ Printing Many Parts at Once
Since filament waste actually does not increase if a given layer has more of the same filaments in it, adding objects to a single print that don’t increase filament changes effectively reduces waste per object. This works because more objects can then "share" the same amount of waste as printing a single object. Printing many identical models in a single print is the simplest way to take advantage of this.
¶ Identical Models with Identical Coloring
In order to take full advantage of the waste caused by the filament changes for a print, place as many identical models in a single print as possible. This is, of course, only applicable when more than one of the same model is desirable.
Recall the earlier example of a single, colored Bambu Cube, printed at 0.2 mm layer height. With 153 filament changes and 83 grams of waste for an 11-gram object, it’s a relatively inefficient print. But if we duplicate the cube to make nine copies in one print, the filament changes and waste remain the same—yet now you get eight additional finished cubes.

¶ Different Models that Share Some Colors
Non identical models that:
- Share at least one material
- Would otherwise be printed alone (and therefore cause a set amount of waste)
may still benefit from being added to the same print bed. These gains can range from being extremely small (or negative) to extremely large. The governing principle is this: the more shared filaments on each layer, the more benefit from sharing a build plate.
¶ Different Parts with the Same Colors
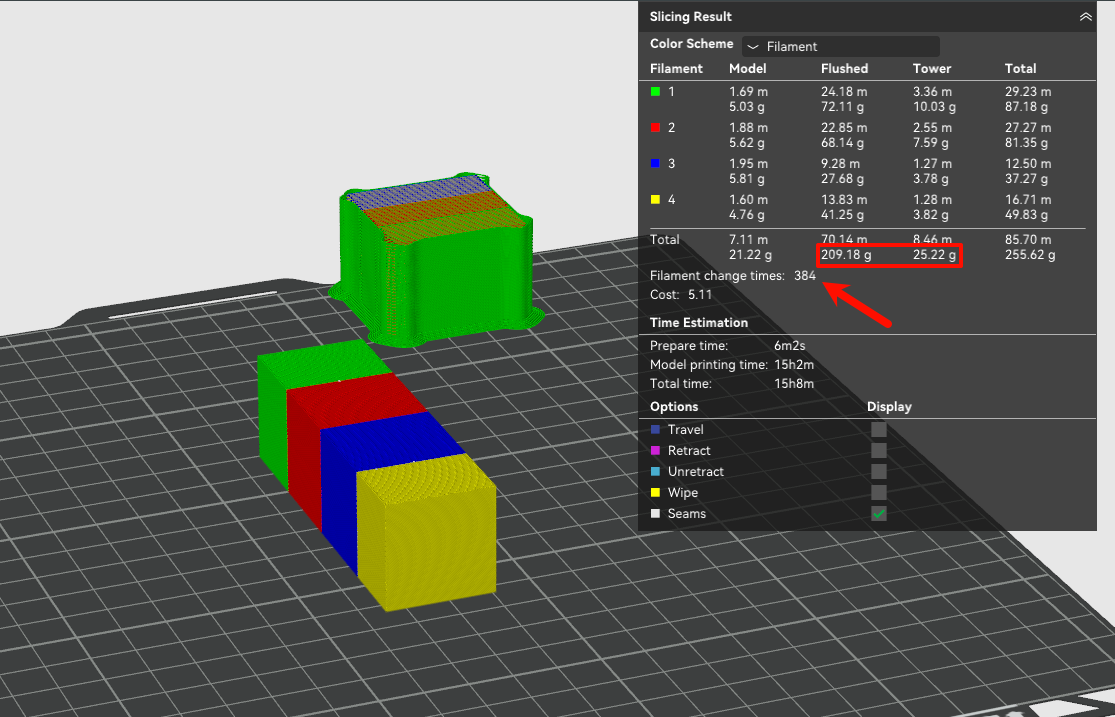
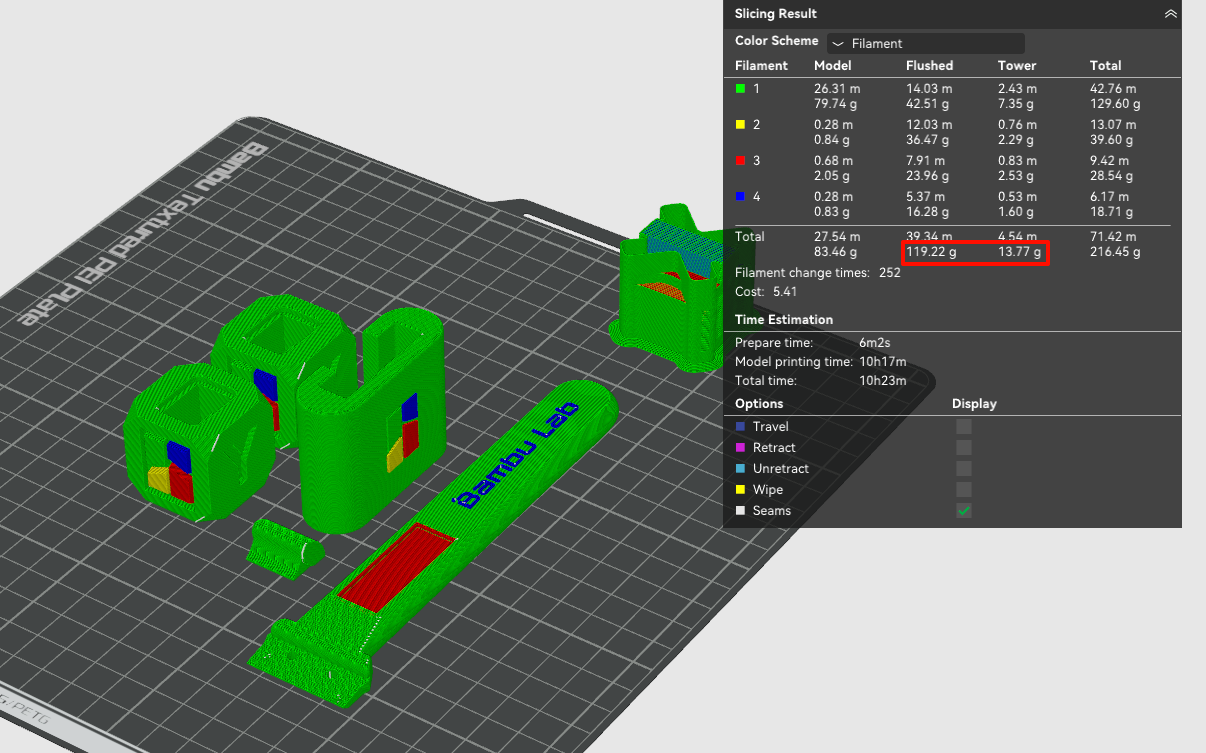
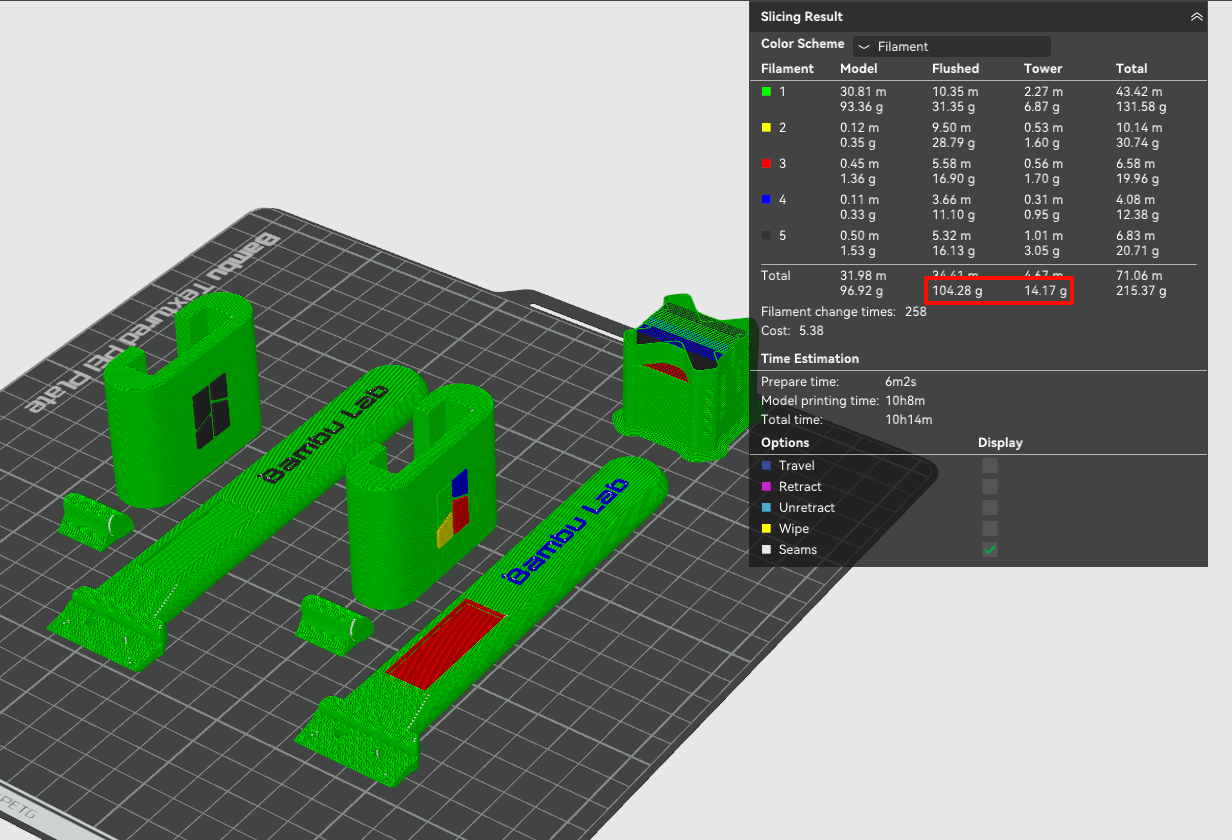
The example pictured below has a number of different parts that all share the same set of colors. Because of this, we can see that printing them all together on one plate does have a noticeable effect on wasted filament when compared with printing these parts separately.
When printed on two separate beds, with the two Bambu Cubes on one bed and the three piece bed plate scraper on the other, the overall total waste comes out to 171 grams. When printed all on one plate, as shown below, the total waste is 23% less at 133g.
¶ Parts with Only One Shared Color
The example pictured below has two sets of parts that share only one color, green. Since green is also used heavily in all these parts as the base color, we would expect decent savings because any given layer is likely to benefit from the shared green.
With the two sets of build plate scrapers printed on two separate beds, the overall total waste comes out to 144 grams. When printed all on one plate, as shown below, the total waste is 18% less at 118 grams.
¶ Parts With The Same Colors but Incompatible Coloring
Given the examples above, it is easy to mistake the lesson as, "more shared filaments means less waste". Unfortunately, reality is more complicated. The real lesson should be, "more shared filaments on each layer means less waste".
To illustrate this, we'll take the example of three different traffic cones. They all use filament from the same set - orange, white, and black - so we might expect that gathering them onto a single build plate would save waste. As it turns out, gathering these cones together actually has the opposite effect and increases waste significantly.
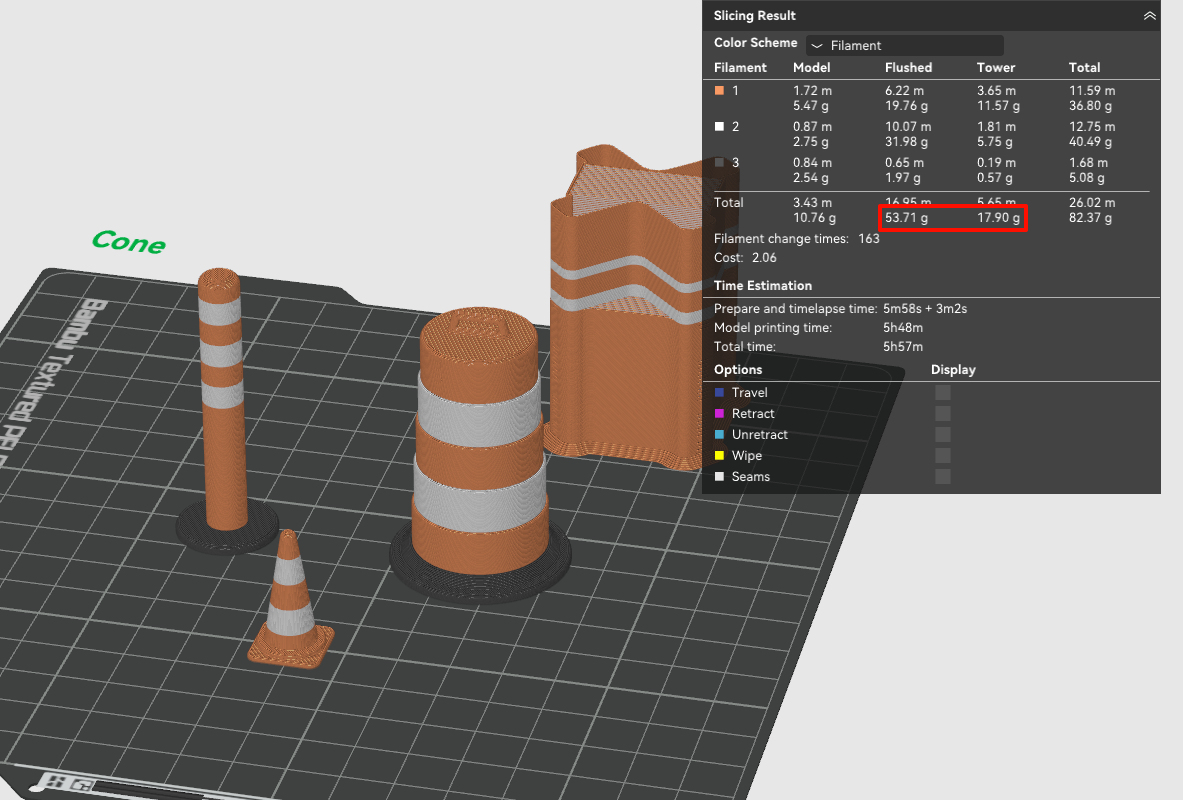
As shown above, these traffic cones have horizontal stripes and are already highly efficient when printed individually. Printing them together adds unnecessary filament changes and waste, since the stripe heights differ between cones.
When printed separately, the total waste is 22 grams across only 16 filament changes. As seen above, printing them together is 72 grams, more than three times more! This illustrates the point that the number of filament changes on each layer is the ultimate determining factor for filament waste, not the number of shared filaments on the objects overall.
Reminder: Considering all of the above, when comparing different arrangements of multimaterial parts, it is always a good idea to slice a plate for each scenario and compare totals.
¶ End Notes
We hope this detailed guide has been helpful and informative.
If this guide does not solve your problem, please submit a support ticket. We will answer your questions and provide assistance.
If you have any suggestions or feedback on this Wiki, please leave a message in the comment area. Thank you for your support and attention!