As mentioned in our blog post, Bambu Lab is introducing a printer control authorization mechanism in a new firmware update to further enhance the security of our products and our customers.
This feature is first being implemented on X-series printers, followed by the P-series and A-series in future firmware updates.
Once this mechanism is in place, certain commands require authorized access in both cloud mode and normal LAN mode (except for developer mode, which has different rules and is described below).
These commands include:
- Binding and unbinding the printer, which is the process of connecting or disconnecting the printer to your Bambu Lab account.
- Upgrading firmware using other software. MicroSD update remains unchanged.
- Accessing remote video feeds generated by the printer's monitoring camera through the network plugin.
- Starting a print job (via LAN or cloud mode) from other software besides Bambu Studio will require Bambu Connect.
- Controlling printer functions such as movement, temperature, fans, AMS settings, and calibration.
However, some functions will not be affected by this authorization system:
- Sending printer status updates, such as MQTT status pushes for tools like Home Assistant.
- Starting prints from an SD card.
- Performing firmware updates using the MicroSD card function.
- Performing general operations that don’t fall under the restricted commands above.
It is important to note that third-party software, like Orca Slicer, can download and integrate the latest version of the network plugin to:
- Initiate firmware updates
- Enable remote video streaming for Live View
- Download files
For this functionality to work, the latest version of the plugin needs to be integrated by the third-party slicer software maintainers.
¶ Developer Mode
Based on community feedback, we have added a Developer Mode which can be run under LAN mode. This mode functions the same as in previous firmware versions and does not require authorization verification.
It is meant to be used by advanced users who wish to have complete control over their printer's functions and security.
With Developer Mode enabled:
- Third-party software will continue to work without any modifications.
- User operations will remain unaffected.
It is important to note that Developer Mode will not allow the printer to be connected to Bambu Cloud, so it is exclusively working in LAN Mode.
¶ What is Bambu Connect?
Bambu Connect is a user-friendly tool designed to seamlessly integrate with Bambu Lab 3D printers. It securely transmits sliced G-code and 3MF files to your printer, ensuring a smooth and reliable printing experience. The integration is lightweight and seamless, activating only when needed to manage printer communication.
With Bambu Connect, users get full visibility into their print progress, including real-time monitoring of temperatures, print status, and other key parameters.
We chose Bambu Connect as the middleware between Bambu Printers and third-party software to preserve compatibility while ensuring that all printer commands pass through secure, verified channels.
This approach allows everyone to remotely interact with the printers without requiring complex verification or certification, while still implementing necessary controls for safety and security.
In short, Bambu Connect ensures that all interactions with the printers are secure, protecting them from unauthorized or malicious access.
¶ How does Bambu Connect work?
The diagram below illustrates how different components of the system interact under the new security framework.
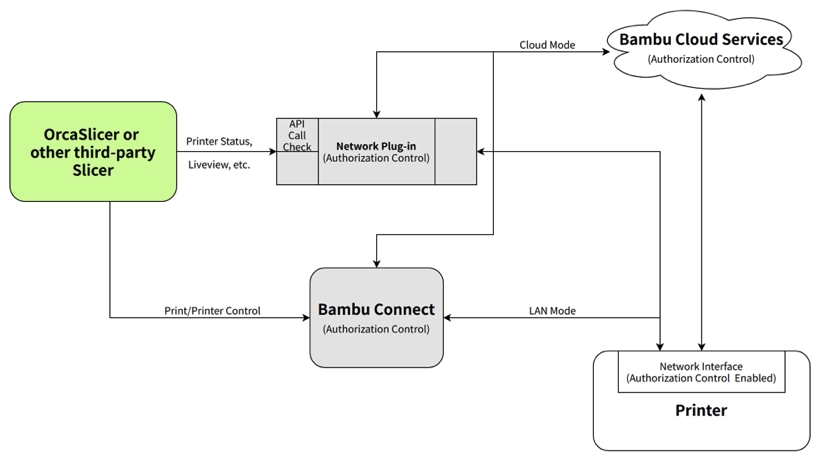
Third-party software, such as OrcaSlicer, can continue to access printer functionality through Bambu Connect and a new network plugin, which provides a secure interface for printer control and monitoring as long as the offered integration is merged into the software.
The access provided is sufficient for third-party slicers to perform the slicing tasks while also accessing the filament mapping information. Once generated, the G-code file can be sent to the printer with Bambu Connect.
For details on using the network plugin, third-party slicers can refer to Bambu Studio, an open-source software available at: Bambu Studio on GitHub
We also provide an integration demo, of how Orca Slicer can be integrated with Bambu Connect.
¶ Core features of Bambu Connect
The current version of Bambu Connect provides the following features:
- Cloud Account Login – Sign in to your Bambu Lab cloud account.
- Printer Management – View and manage printers linked to your account.
- Connectivity – Discover and connect to printers in LAN Mode.
- File Import & Printing – Import Bambu Lab G-code or 3MF files and send them to your printer for a smooth printing experience.
- Basic Printer Controls – Control printer axis movement and other basic functions. (Note: Liveview is not yet supported, but will be available in a future update)
¶ Multi-Platform Support
- Windows – Windows 10 or later (x86_64)
- macOS – macOS 13 or later (arm64 & x86_64)
- Linux – Currently in development
¶ How to integrate with Bambu Connect via URL Scheme?
Third-party applications can initiate file imports into Bambu Connect by invoking a dedicated URL scheme. This allows seamless launching of Bambu Connect with predefined files for printing.
Use the following protocol to trigger file imports:
bambu-connect://import-fileInclude the parameters below in the URL. Ensure proper encoding with encodeURIComponent where specified:
path: The absolute file system path pointing to the 3MF file (e.g., /tmp/cube.gcode.3mf). This value must be encoded using encodeURIComponent.
name: The name of the file (e.g., Cube). This value must also be encoded using encodeURIComponent.
version: A fixed value of 1.0.0, which is used to indicate compatibility for future updates.
Below is a fully constructed URL with encoded parameters:
bambu-connect://import-file?path=%2Ftmp%2Fcube.gcode.3mf&name=Cube&version=1.0.0
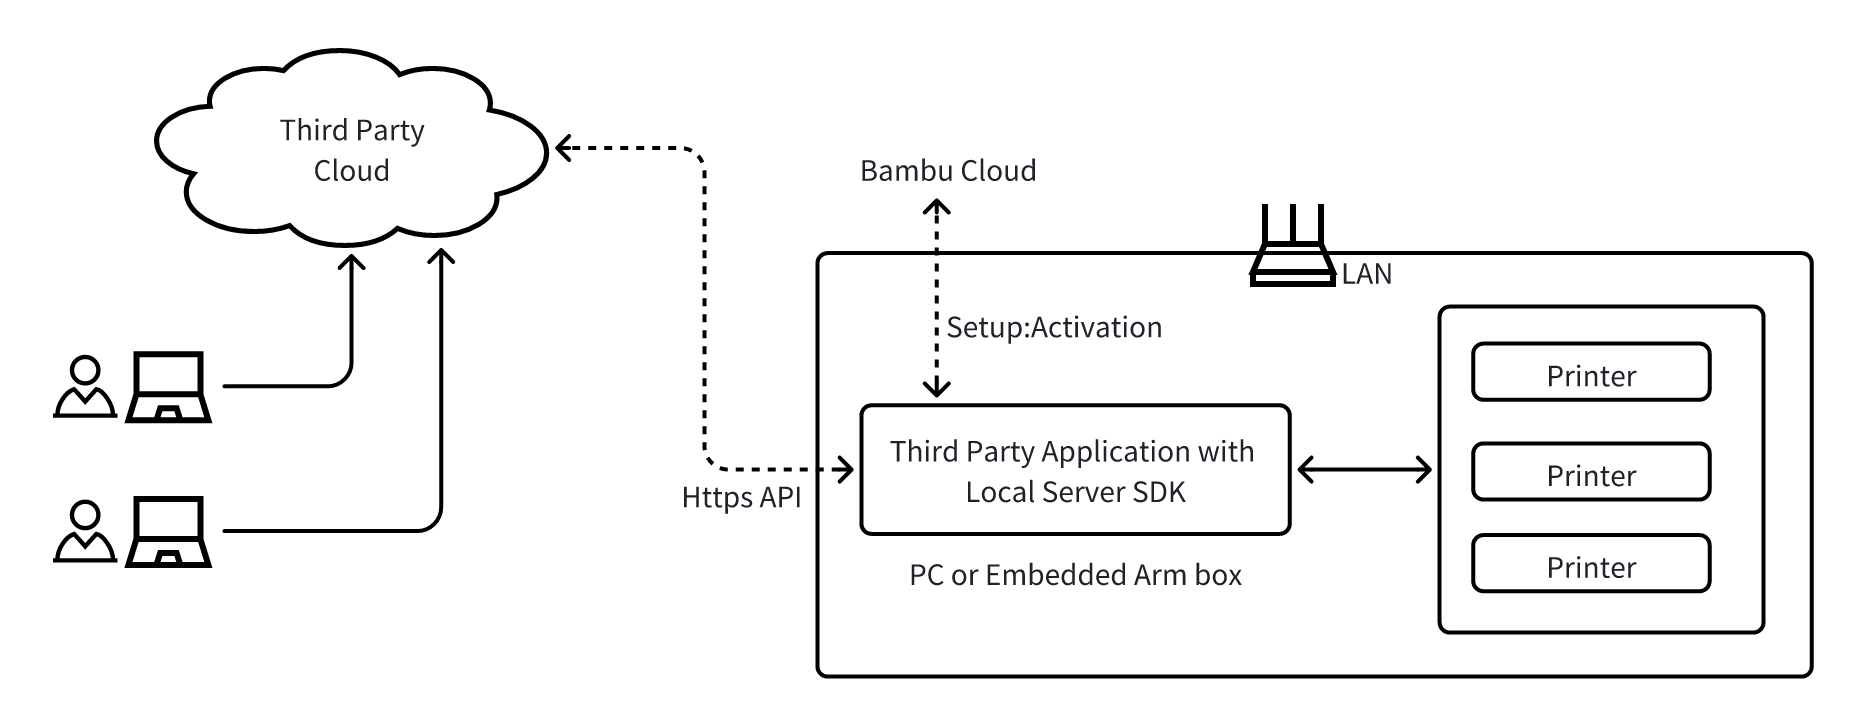
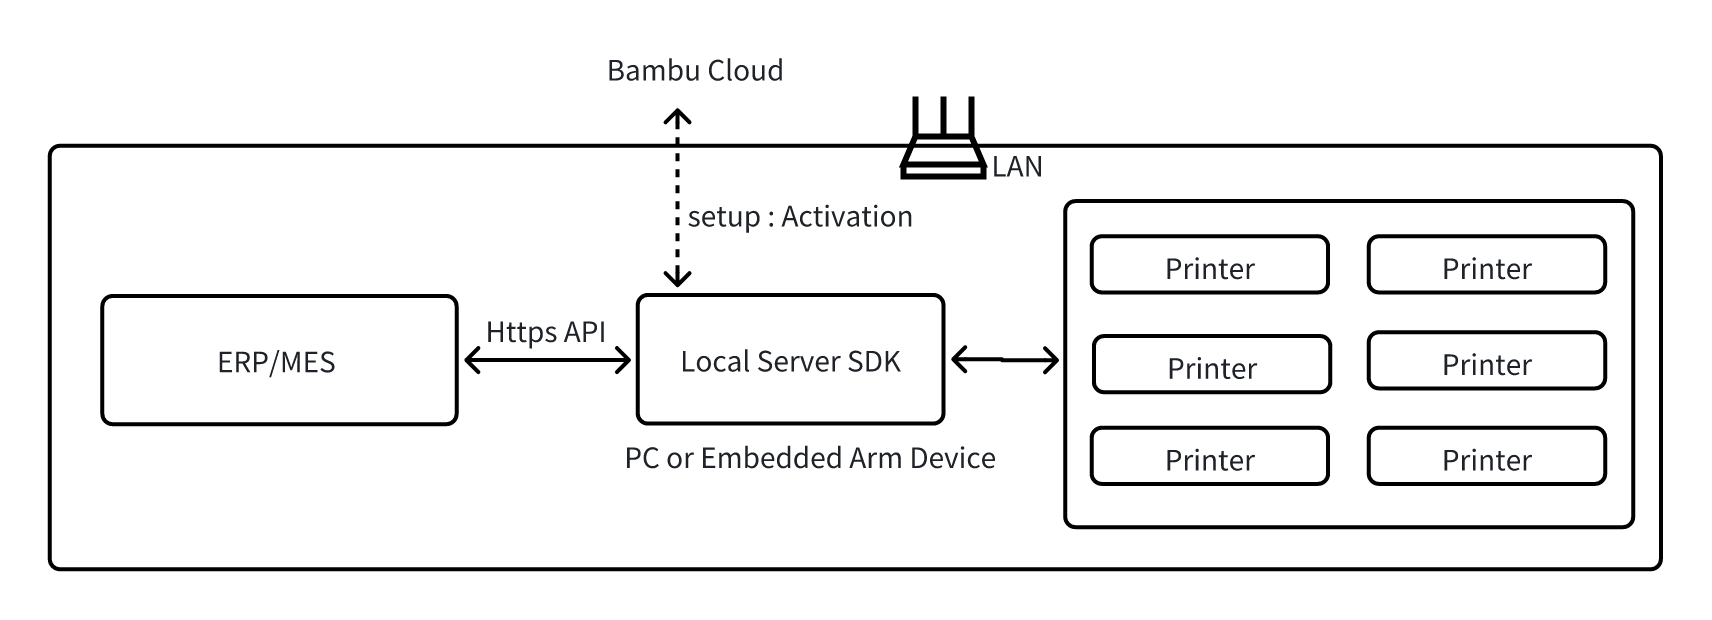
¶ What is Bambu Local Server?
The Bambu Local Server is an HTTP server deployed within your on-premises environment. It acts as a core component, ensuring 24/7 connectivity and control for Bambu printers.
Both the Bambu Local Server Client and third-party partners can build on this foundation to develop software solutions that meet the complex workflow and functionality requirements of enterprise clients and end users.
Additionally, the Bambu Local Server can be integrated with enterprise ERP/MES systems and automation systems, enabling seamless workflow management and automation.
¶ Supported API Functions
The Bambu Local Server currently supports the following API functions, with additional features being added gradually, over time.
Printer Management API
- Discover printers within the local network.
- Allows adding and removing printers.
- Automatically maintains printer connections to ensure maximum availability and operability.
Printer Status Monitoring API
- Printing status
- HMS (Health Management System) alerts
- Printer Error notifications
- Low-frequency camera snapshots for monitoring
- Other diagnostic information
Printer Control API
- Pausing and resuming prints
- Adjusting print speed
- Filament retraction
- Stability settings
- Allows batch control of multiple printers at once.
File Management API
- Supports uploading sliced 3MF files.
- Enables file storage and deletion access.
Print Task API
- Allows initiating print jobs for single or multiple machines.
- Supports AMS (Automatic Material System) integration.
¶ System Requirements
Operating System: Windows 10 or later (Linux support is currently in development to enable multi-platform support).
Processor: 64-bit processor with x86 instruction set (Arm 64-bit support is currently in development).
¶ How to integrate Bambu Local Server into your network?
There are a few ways you can integrate the Bambu Local Server into your network:
¶ Integrate the SDK to your application
Package the Local SDK binary within your application to enable seamless connectivity to your cloud or system.
¶ Deployment of SDK as a Docker Container
This method is suitable for internal use within your organization. The local server can be deployed on either a Docker container or a dedicated device, enabling your ERP/MES system to connect to the local server and manage the printers
¶ How to get access to the Bambu Local Server Server SDK?
1. Check Software Requirements
First, if you are a third-party software provider, you should confirm whether Bambu Connect or Developer Mode meet the requirements for your software’s use case.
2. Apply for SDK Access
If neither solution is suitable for your application, you need to create a Bambu Lab account on our website. Once you have an account, you can apply for getting access to the SDK, by submitting a request through the form.
3. Evaluation and Follow-Up
After receiving your request, the Bambu Lab support team will review the provided information, focusing on the functionality and use cases of your software, and get back to you in order to help find an integration solution.
¶ End Notes
We hope the detailed guide provided has been helpful and informative.
If this guide does not solve your problem, please submit a technical ticket, we will answer your questions and provide assistance.
If you have any suggestions or feedback on this Wiki, please leave a message in the comment area. Thank you for your support and attention!