Idler pulleys are a key component in the motion system of a 3D printer. They play a crucial role in maintaining proper belt tension and ensuring smooth mechanical movement. There are 12 idler pulleys in total. Over time, dust, filament particles, or lubricant residue from the rails can accumulate on these sections, leading to increased resistance, unwanted noise, and even 3D printing issues such as moiré patterns.
Below is a picture of what the idler pulley looks like.

In this wiki, we'll walk you through everything you need to know to clean the idler pulleys effectively. However, before that, let's take a closer look at the position of the idler pulleys.
¶ Idler Pulleys Location in the 3D Printer
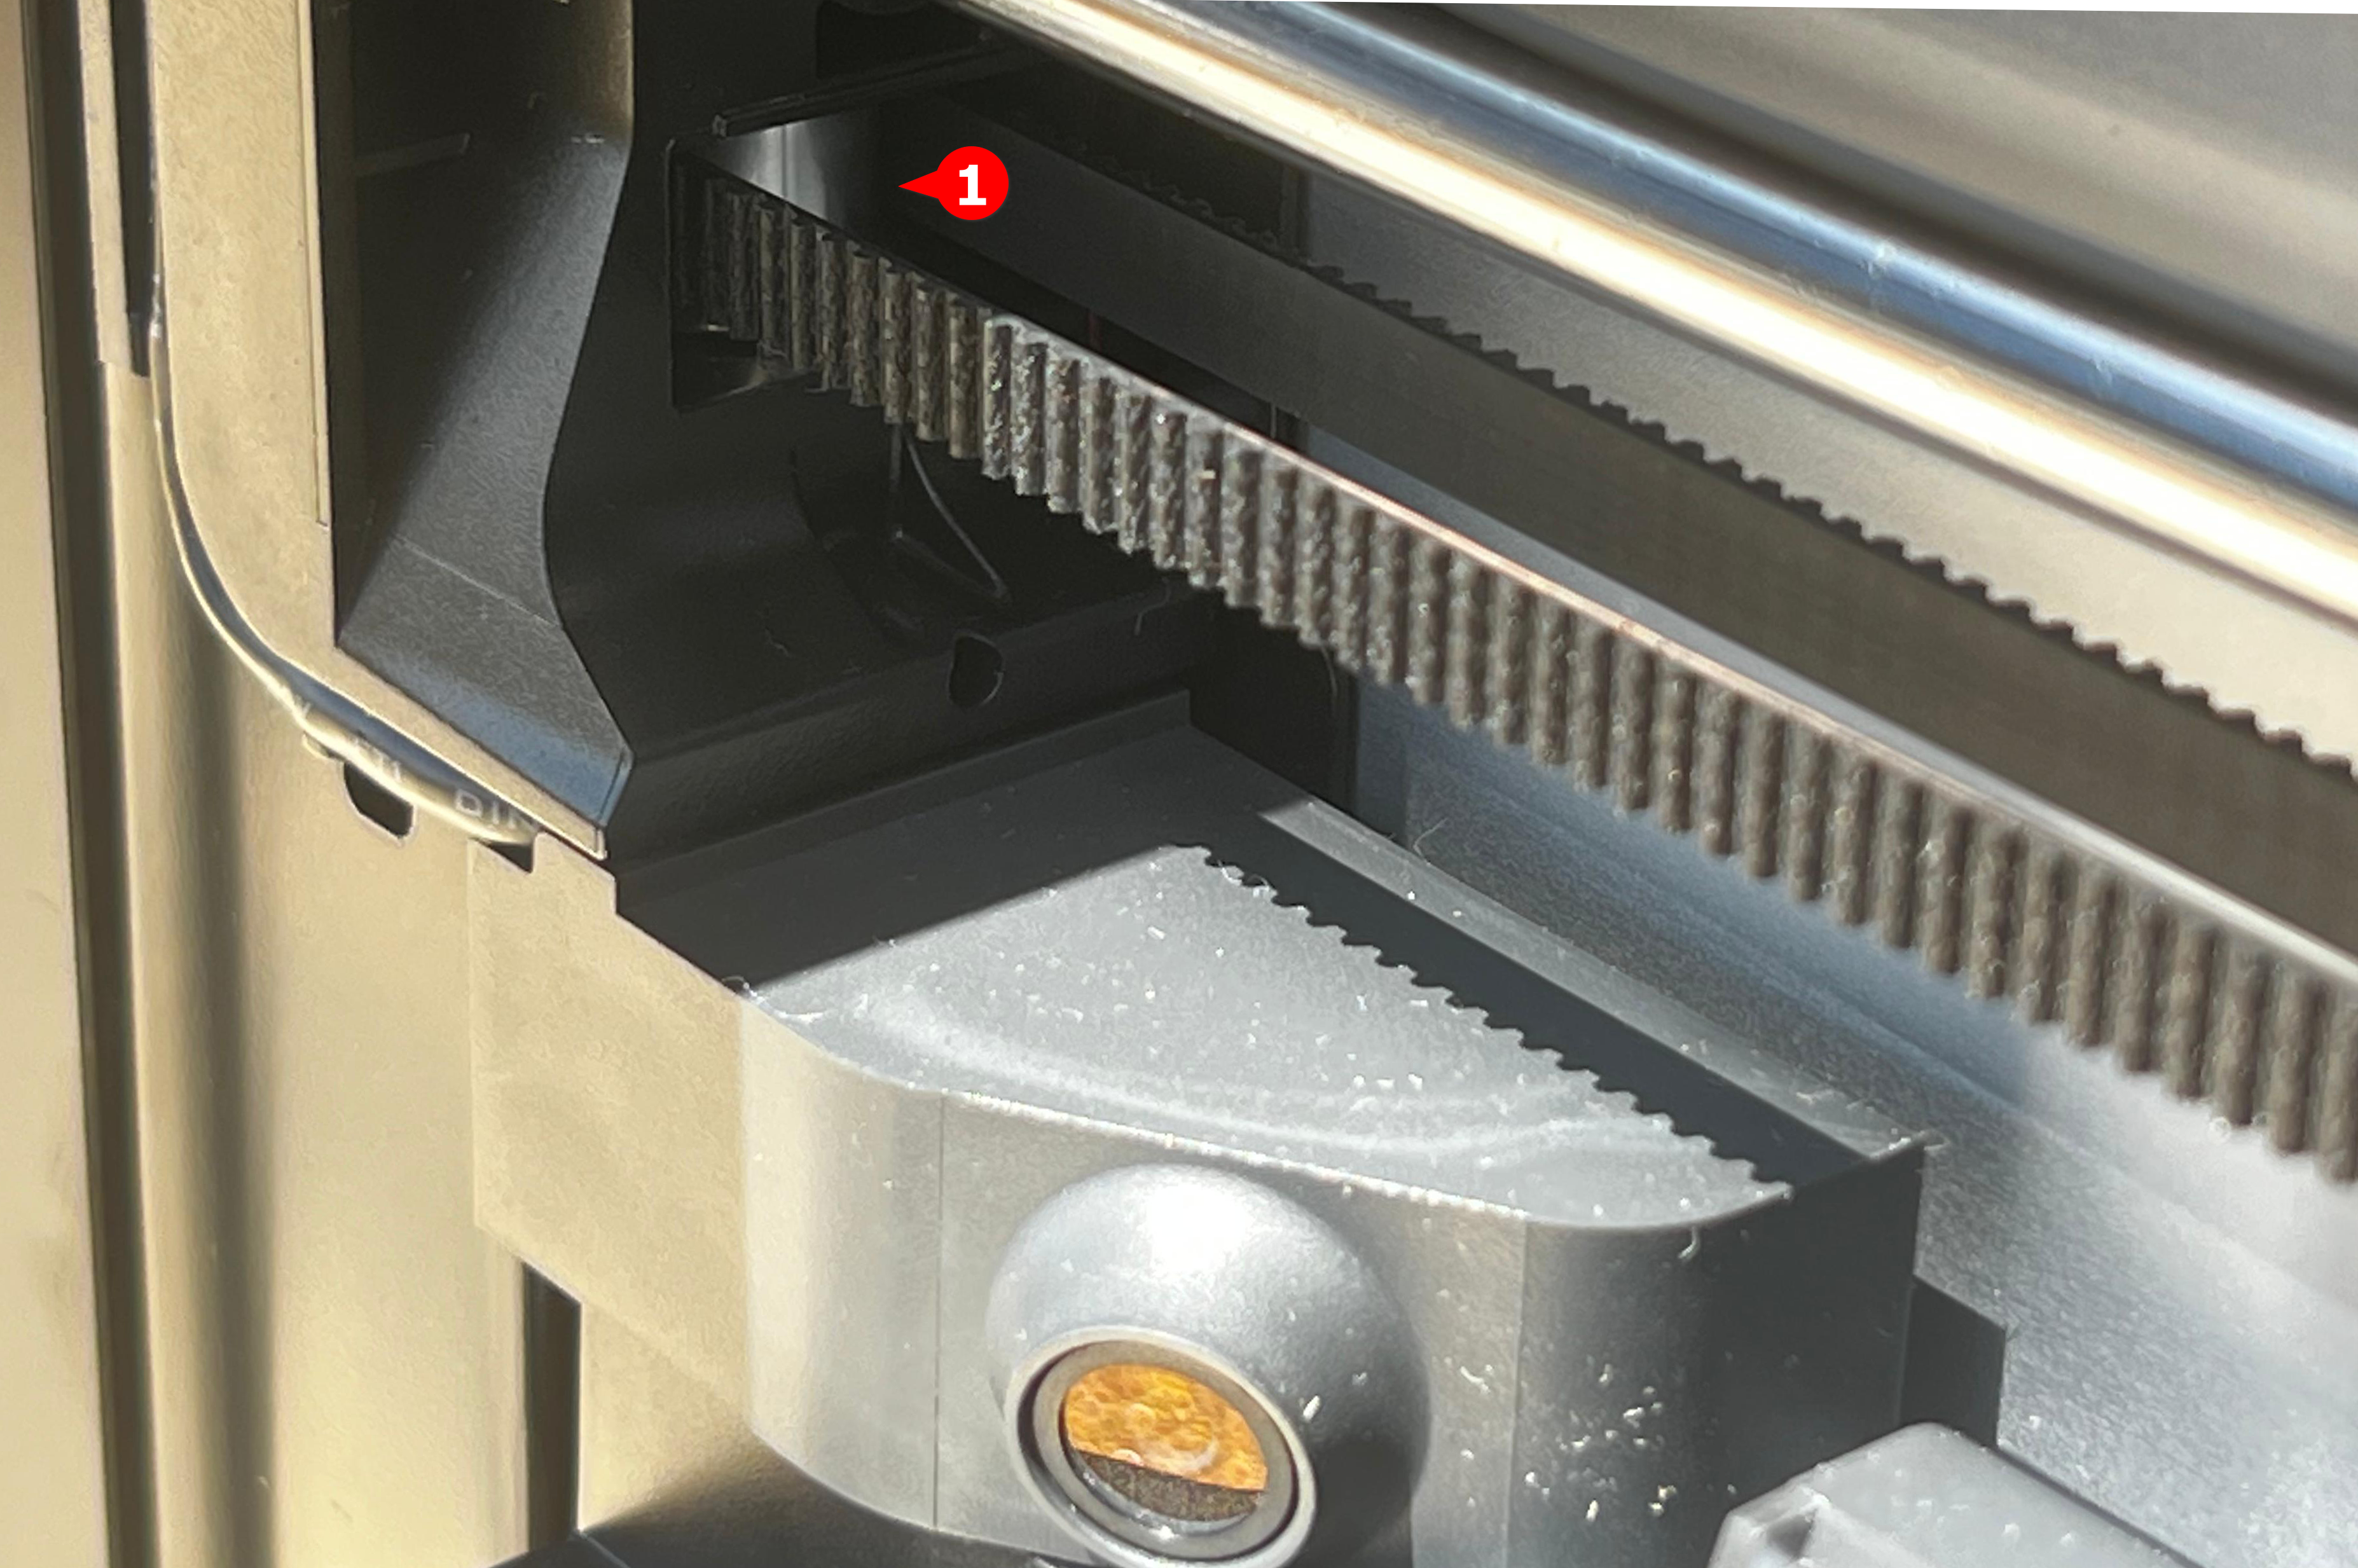
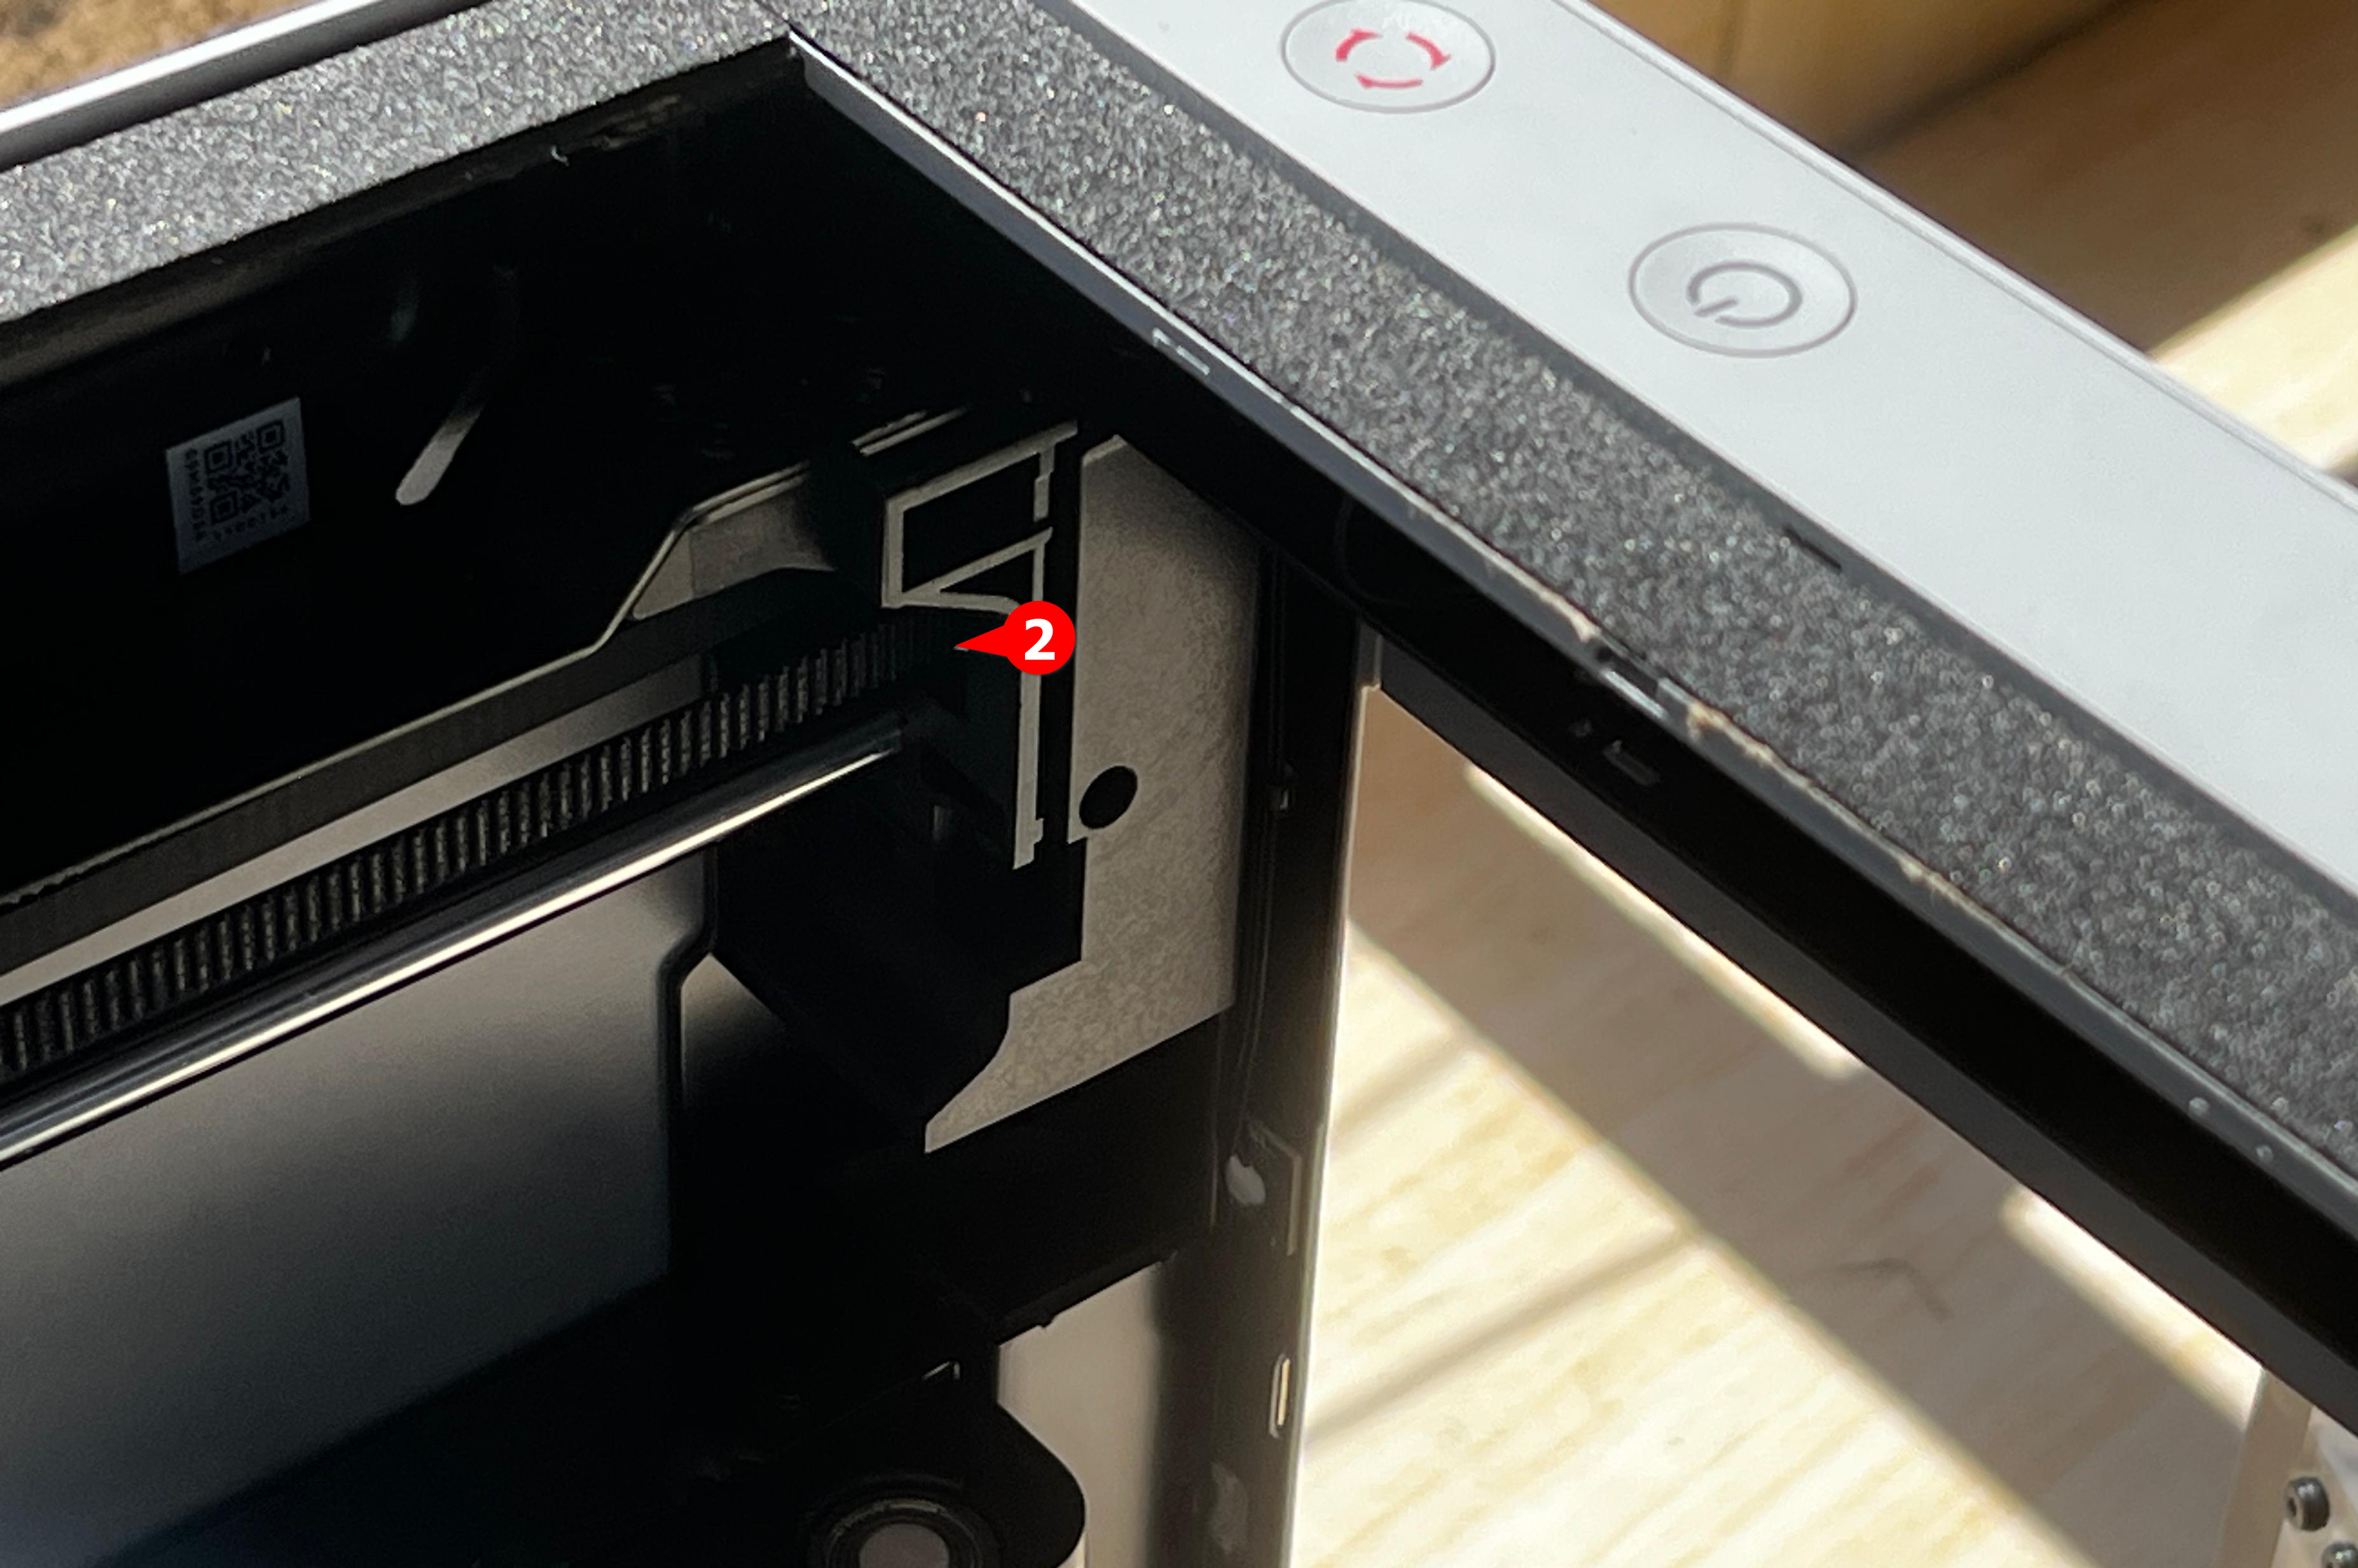
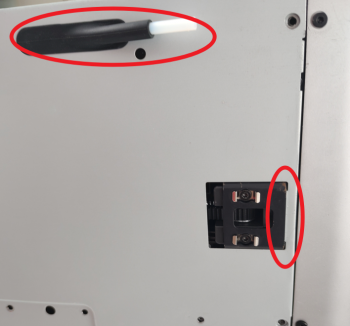
Just at the door of the 3D printer, there are two, each on one side. Below is the one located just above the camera. The second one is on the other corner. You can identify it through the power and refresh buttons.
 |
 |
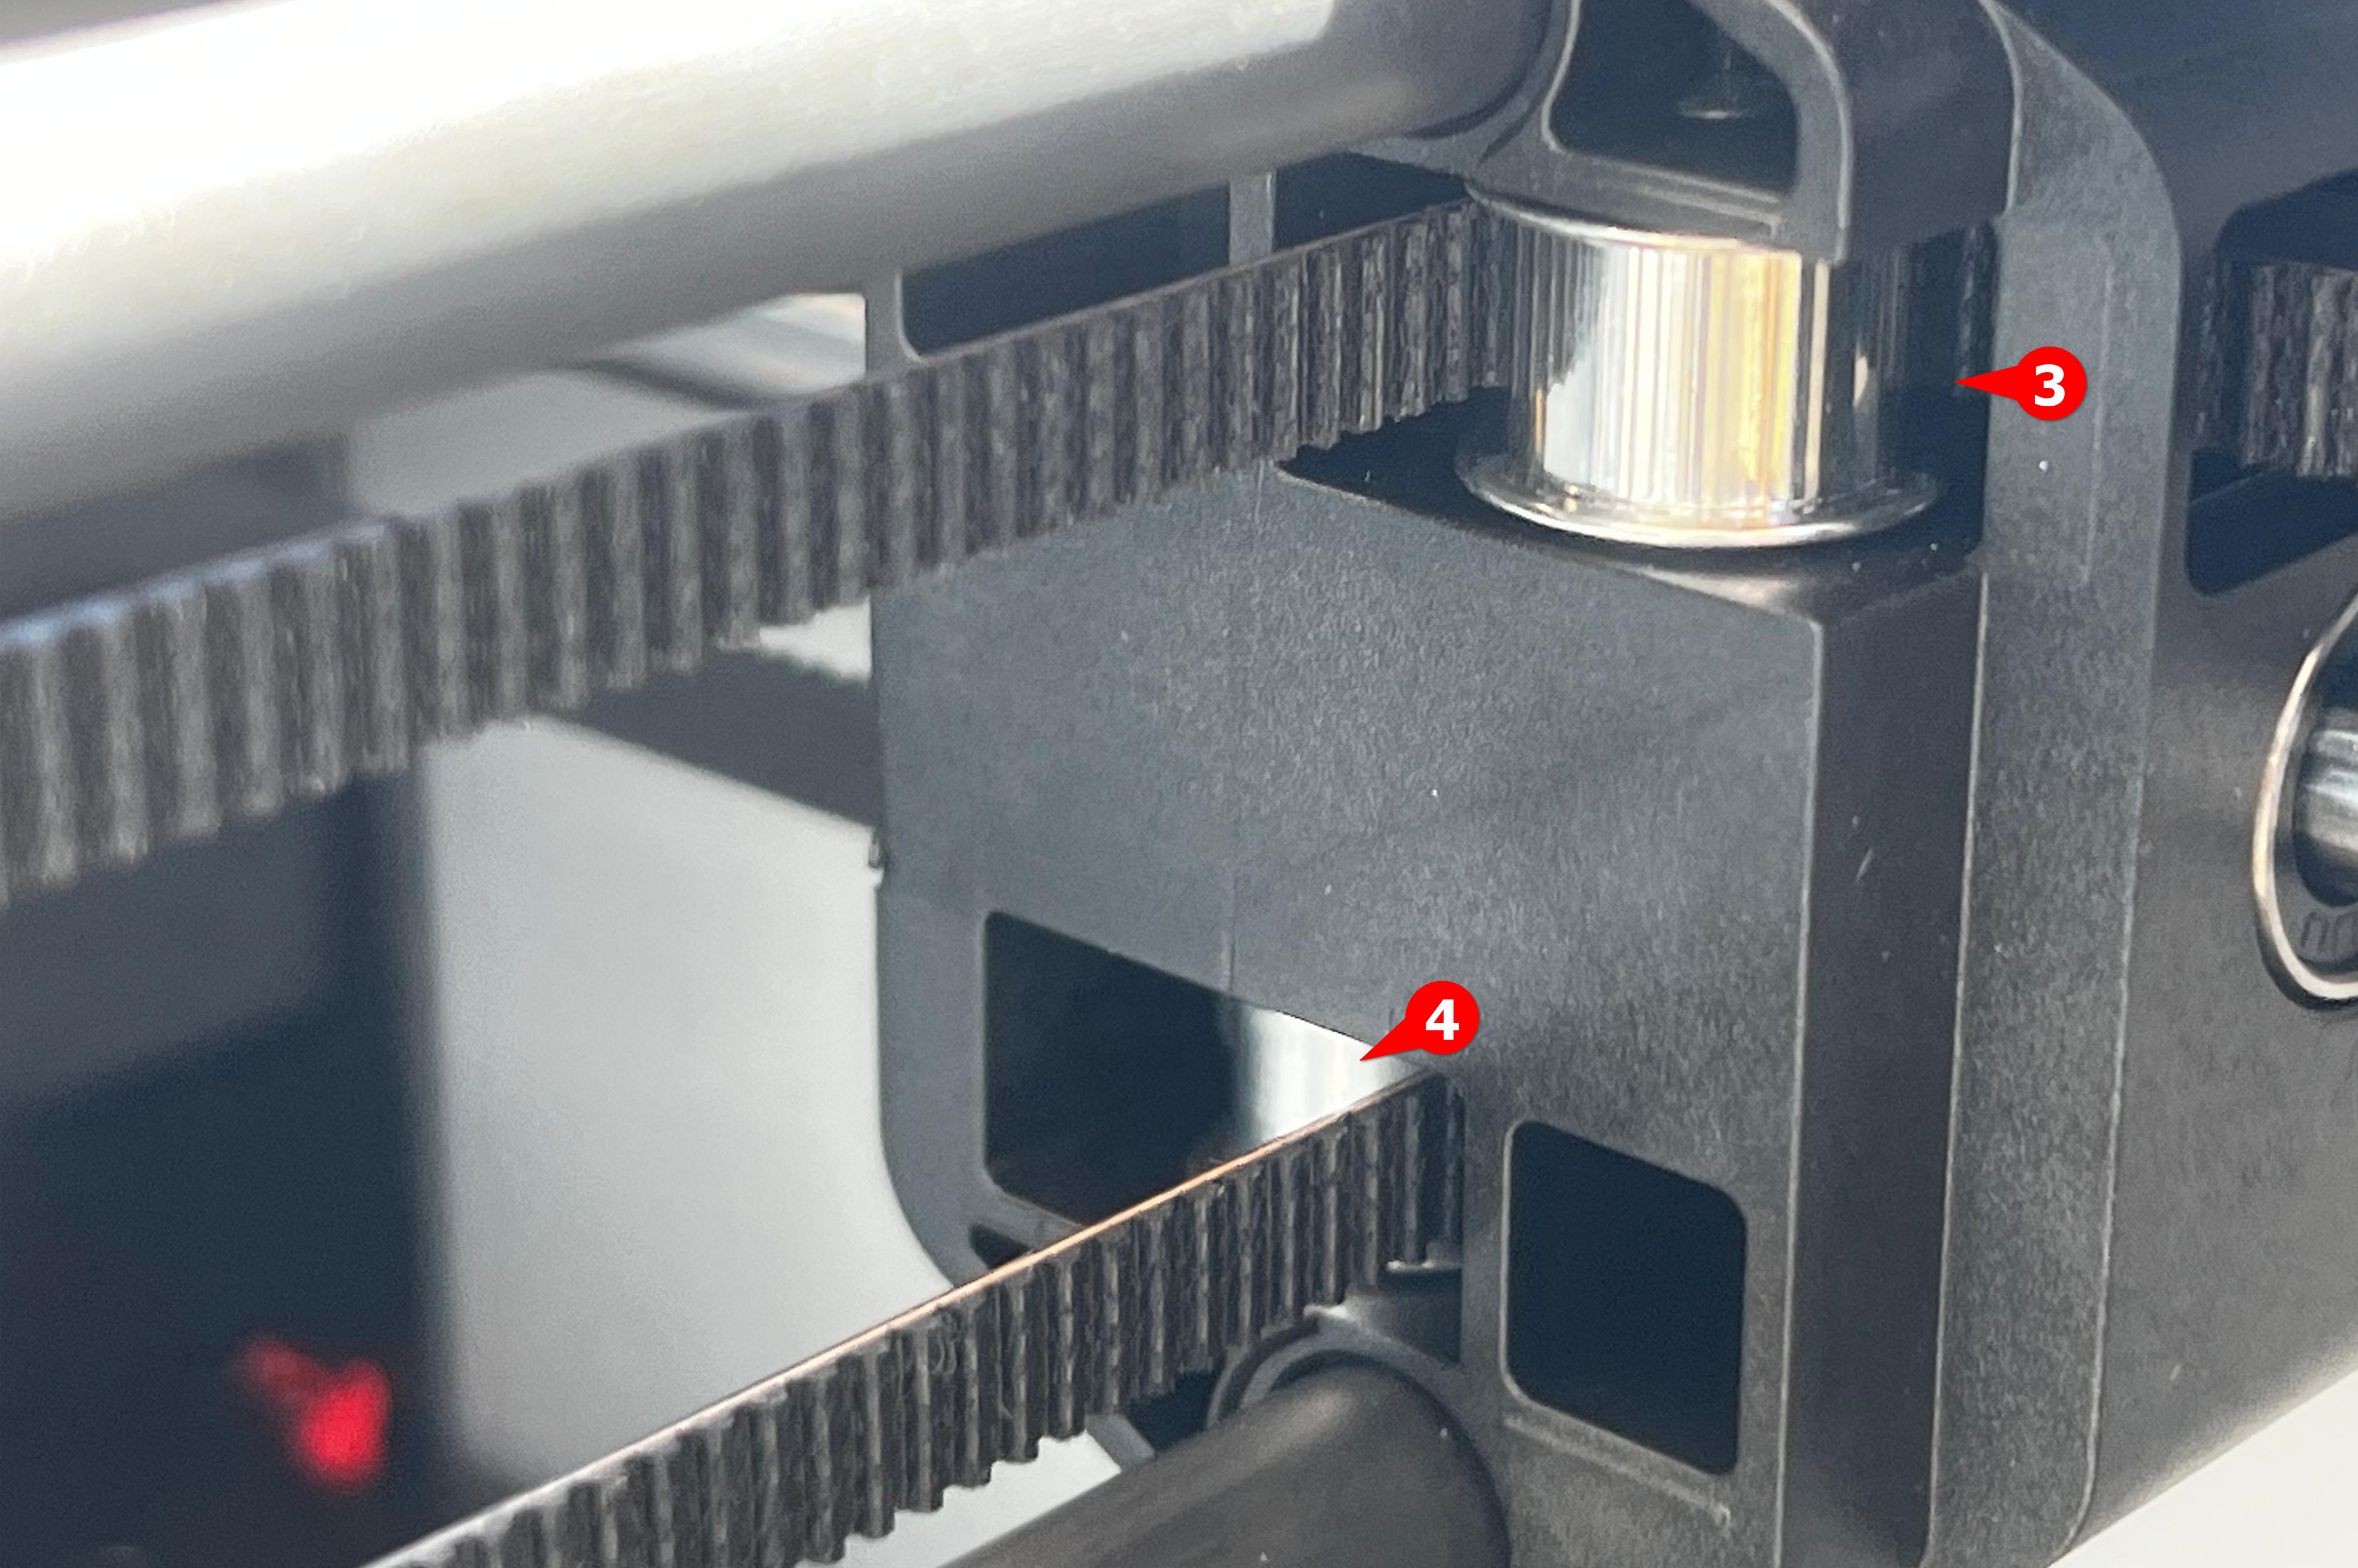
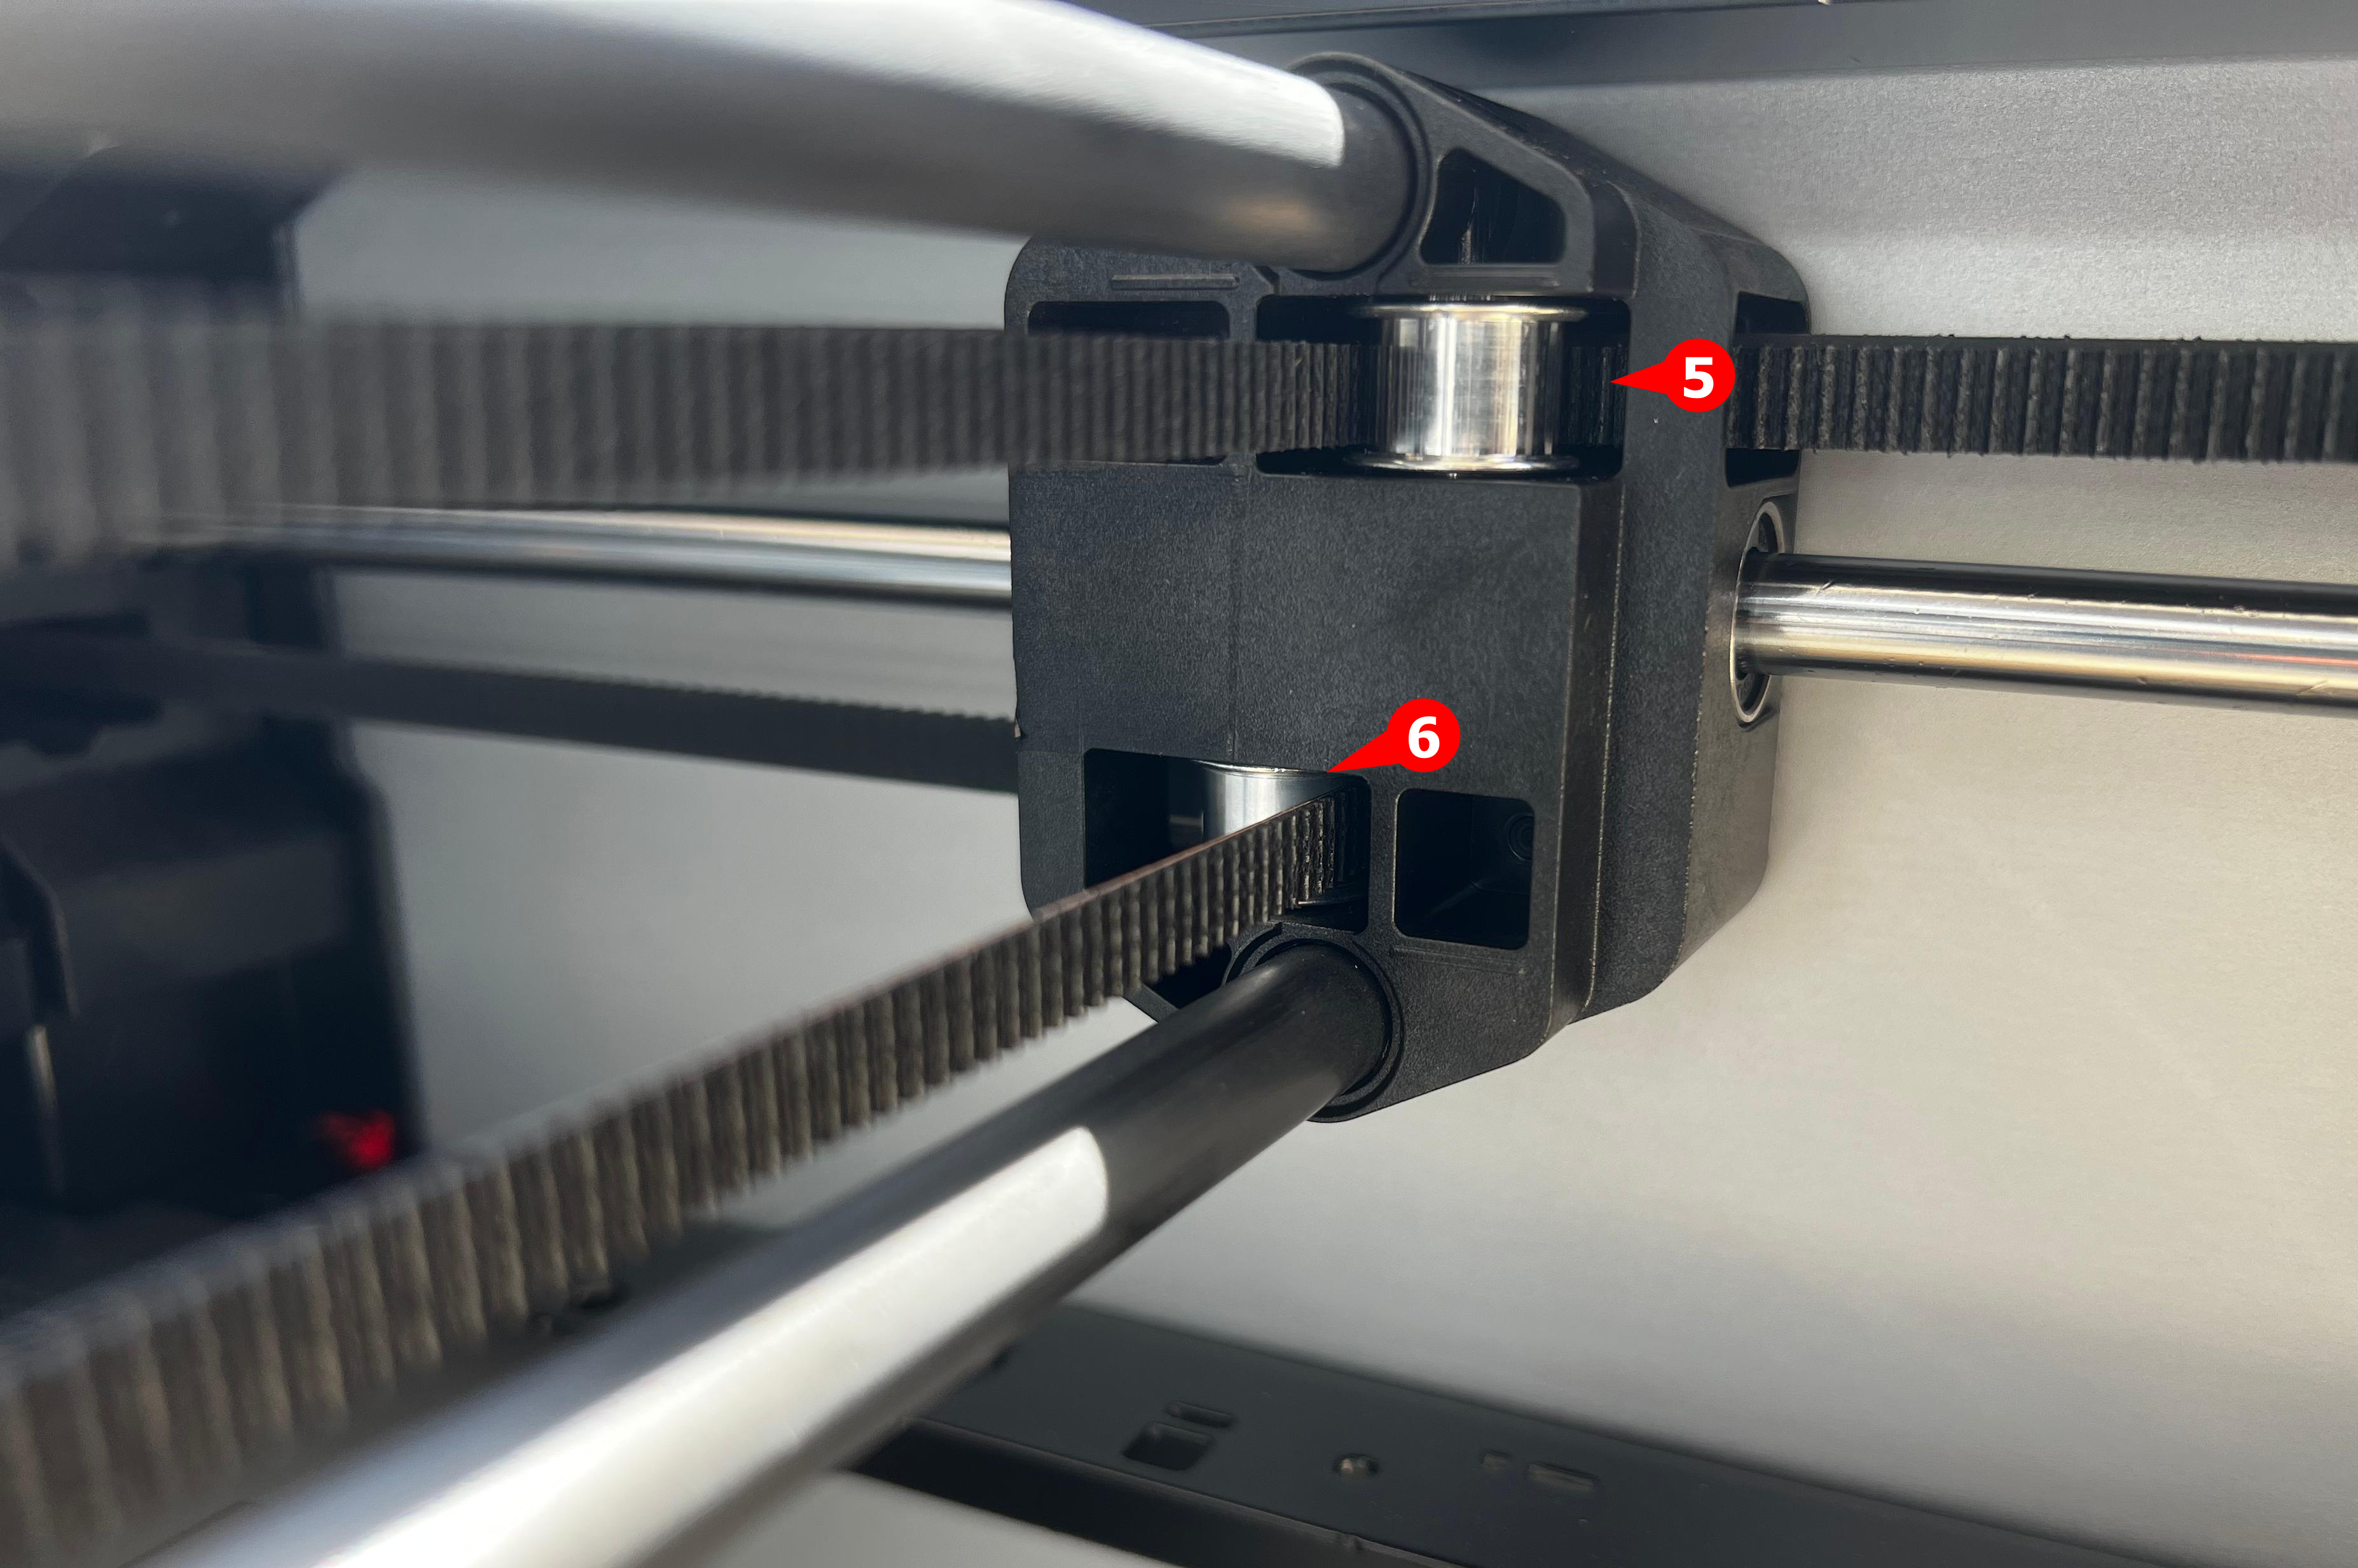
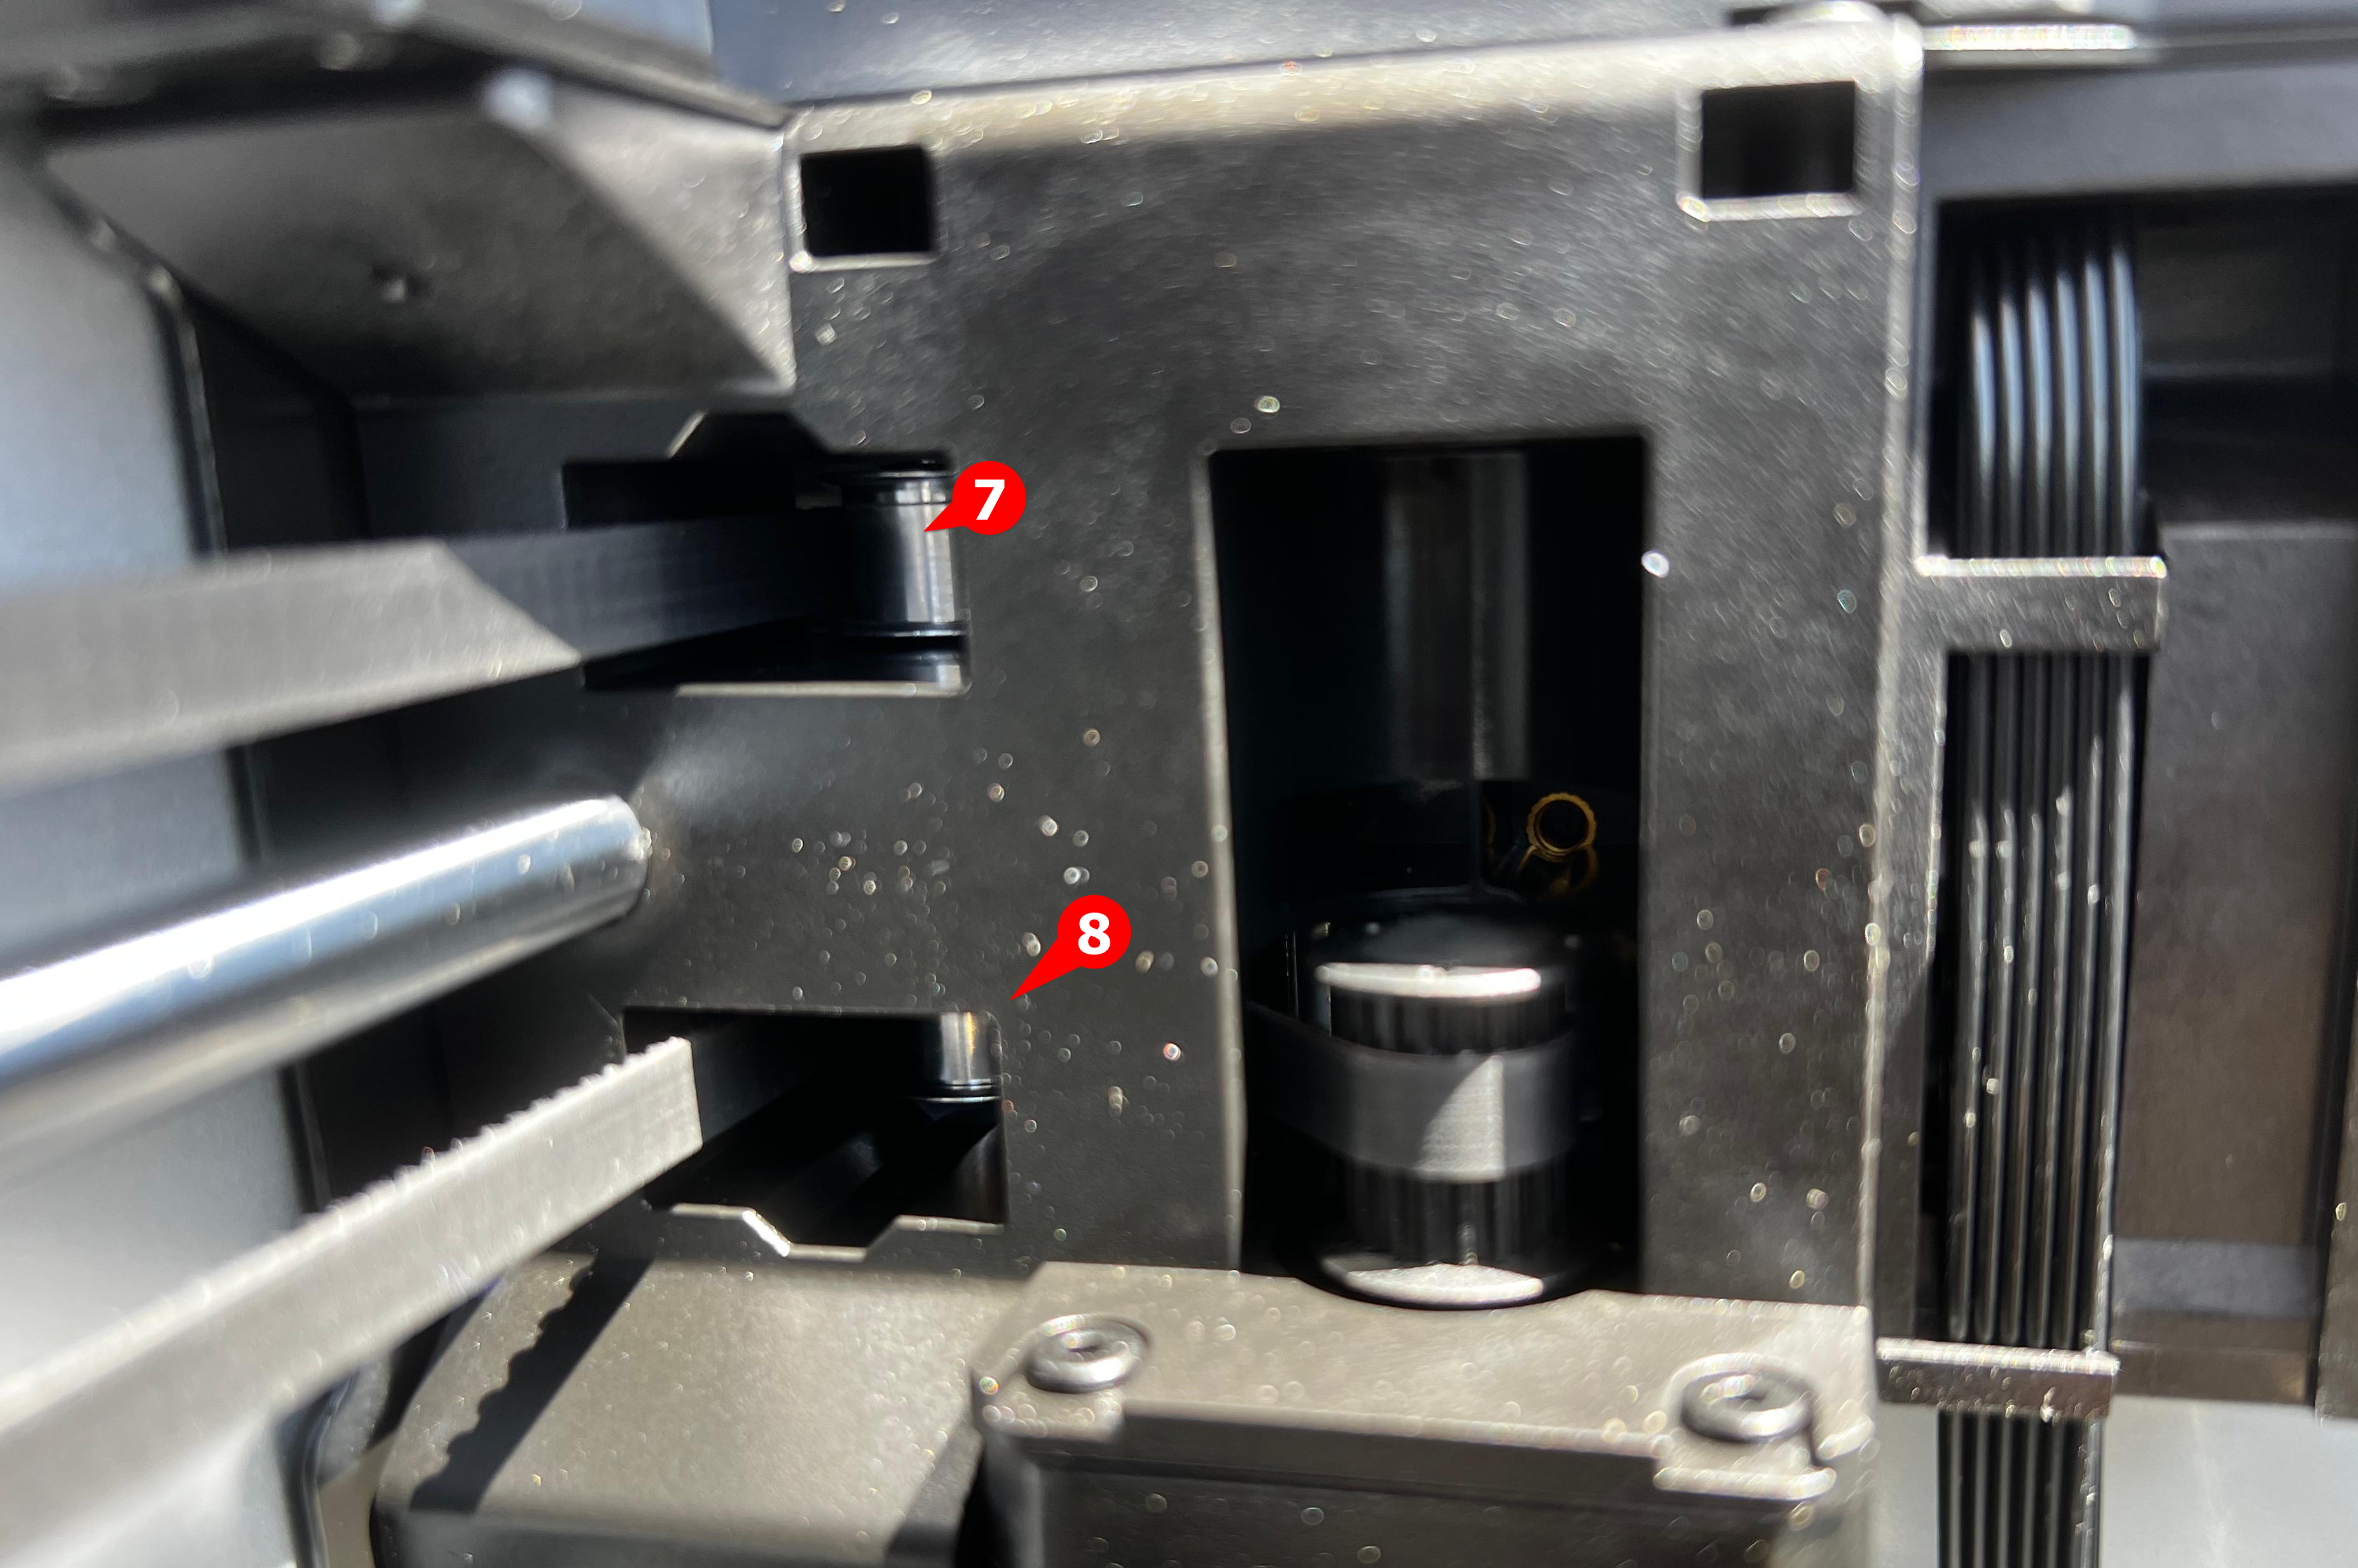
There are four in the middle section. That is, two in each corner.
 |
 |
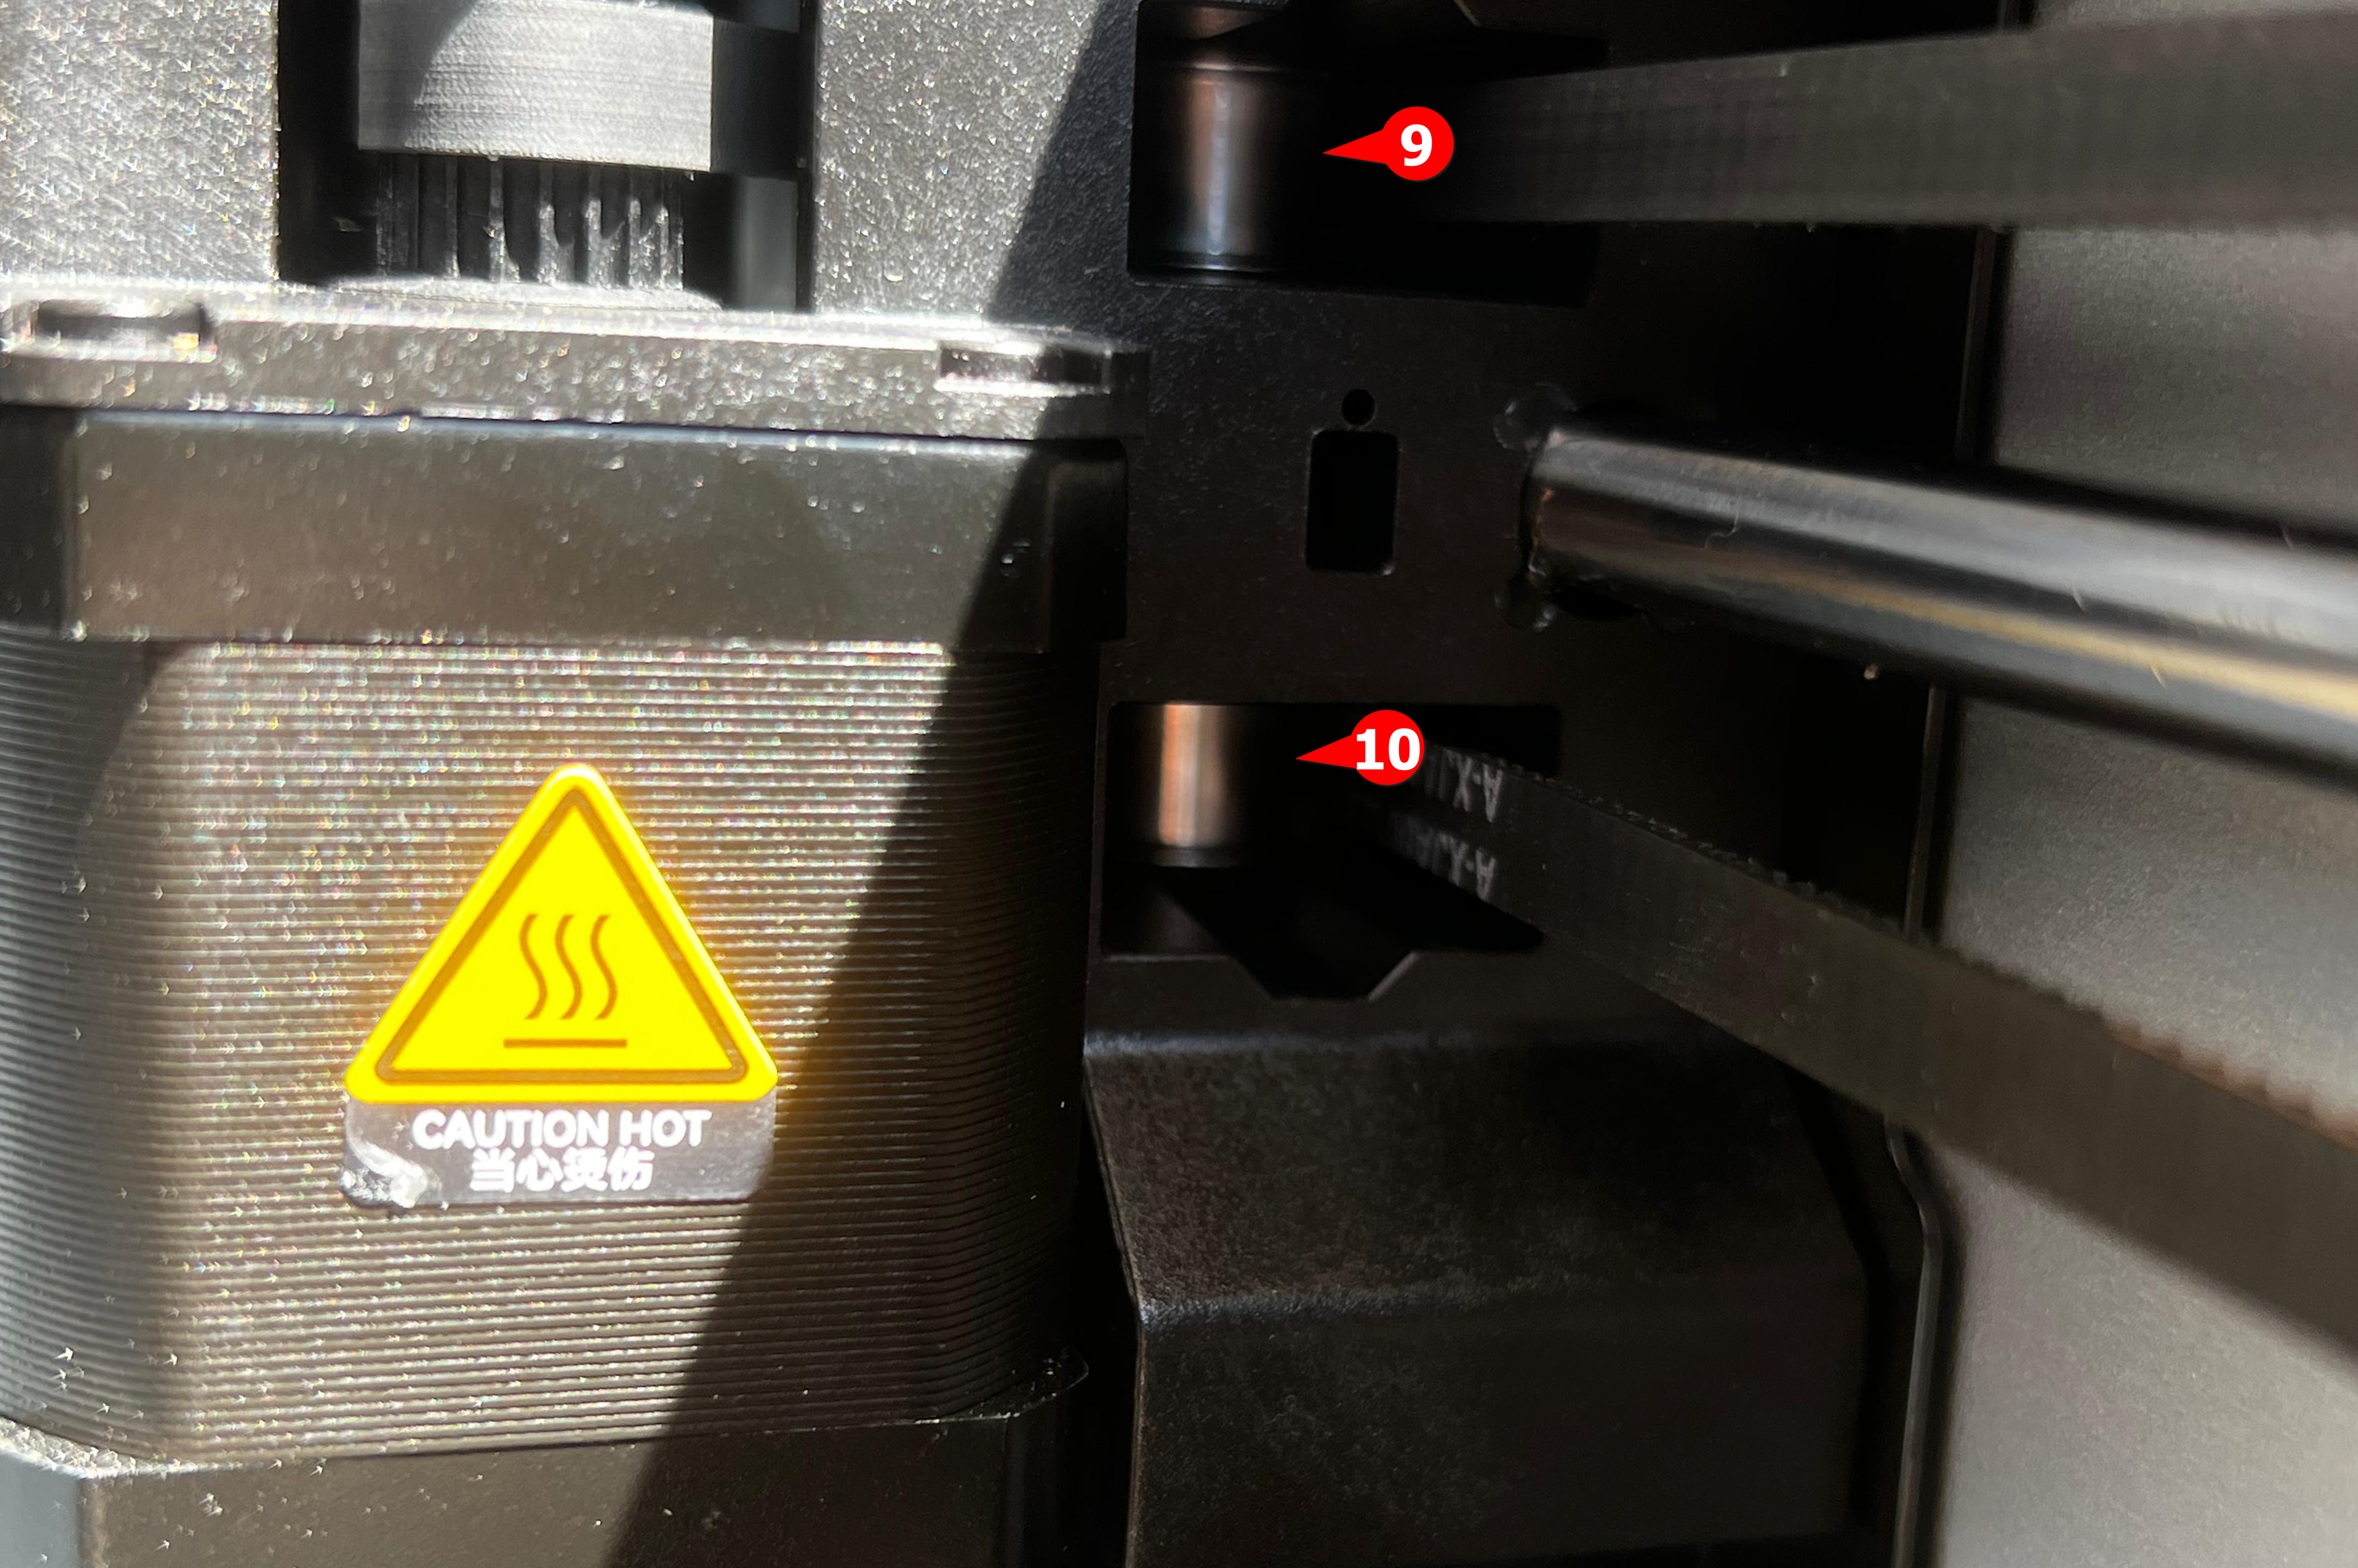
The other four can be found near the motors of the rear end of the 3D printer. Two on one side, and two at the other corner.
 |
 |
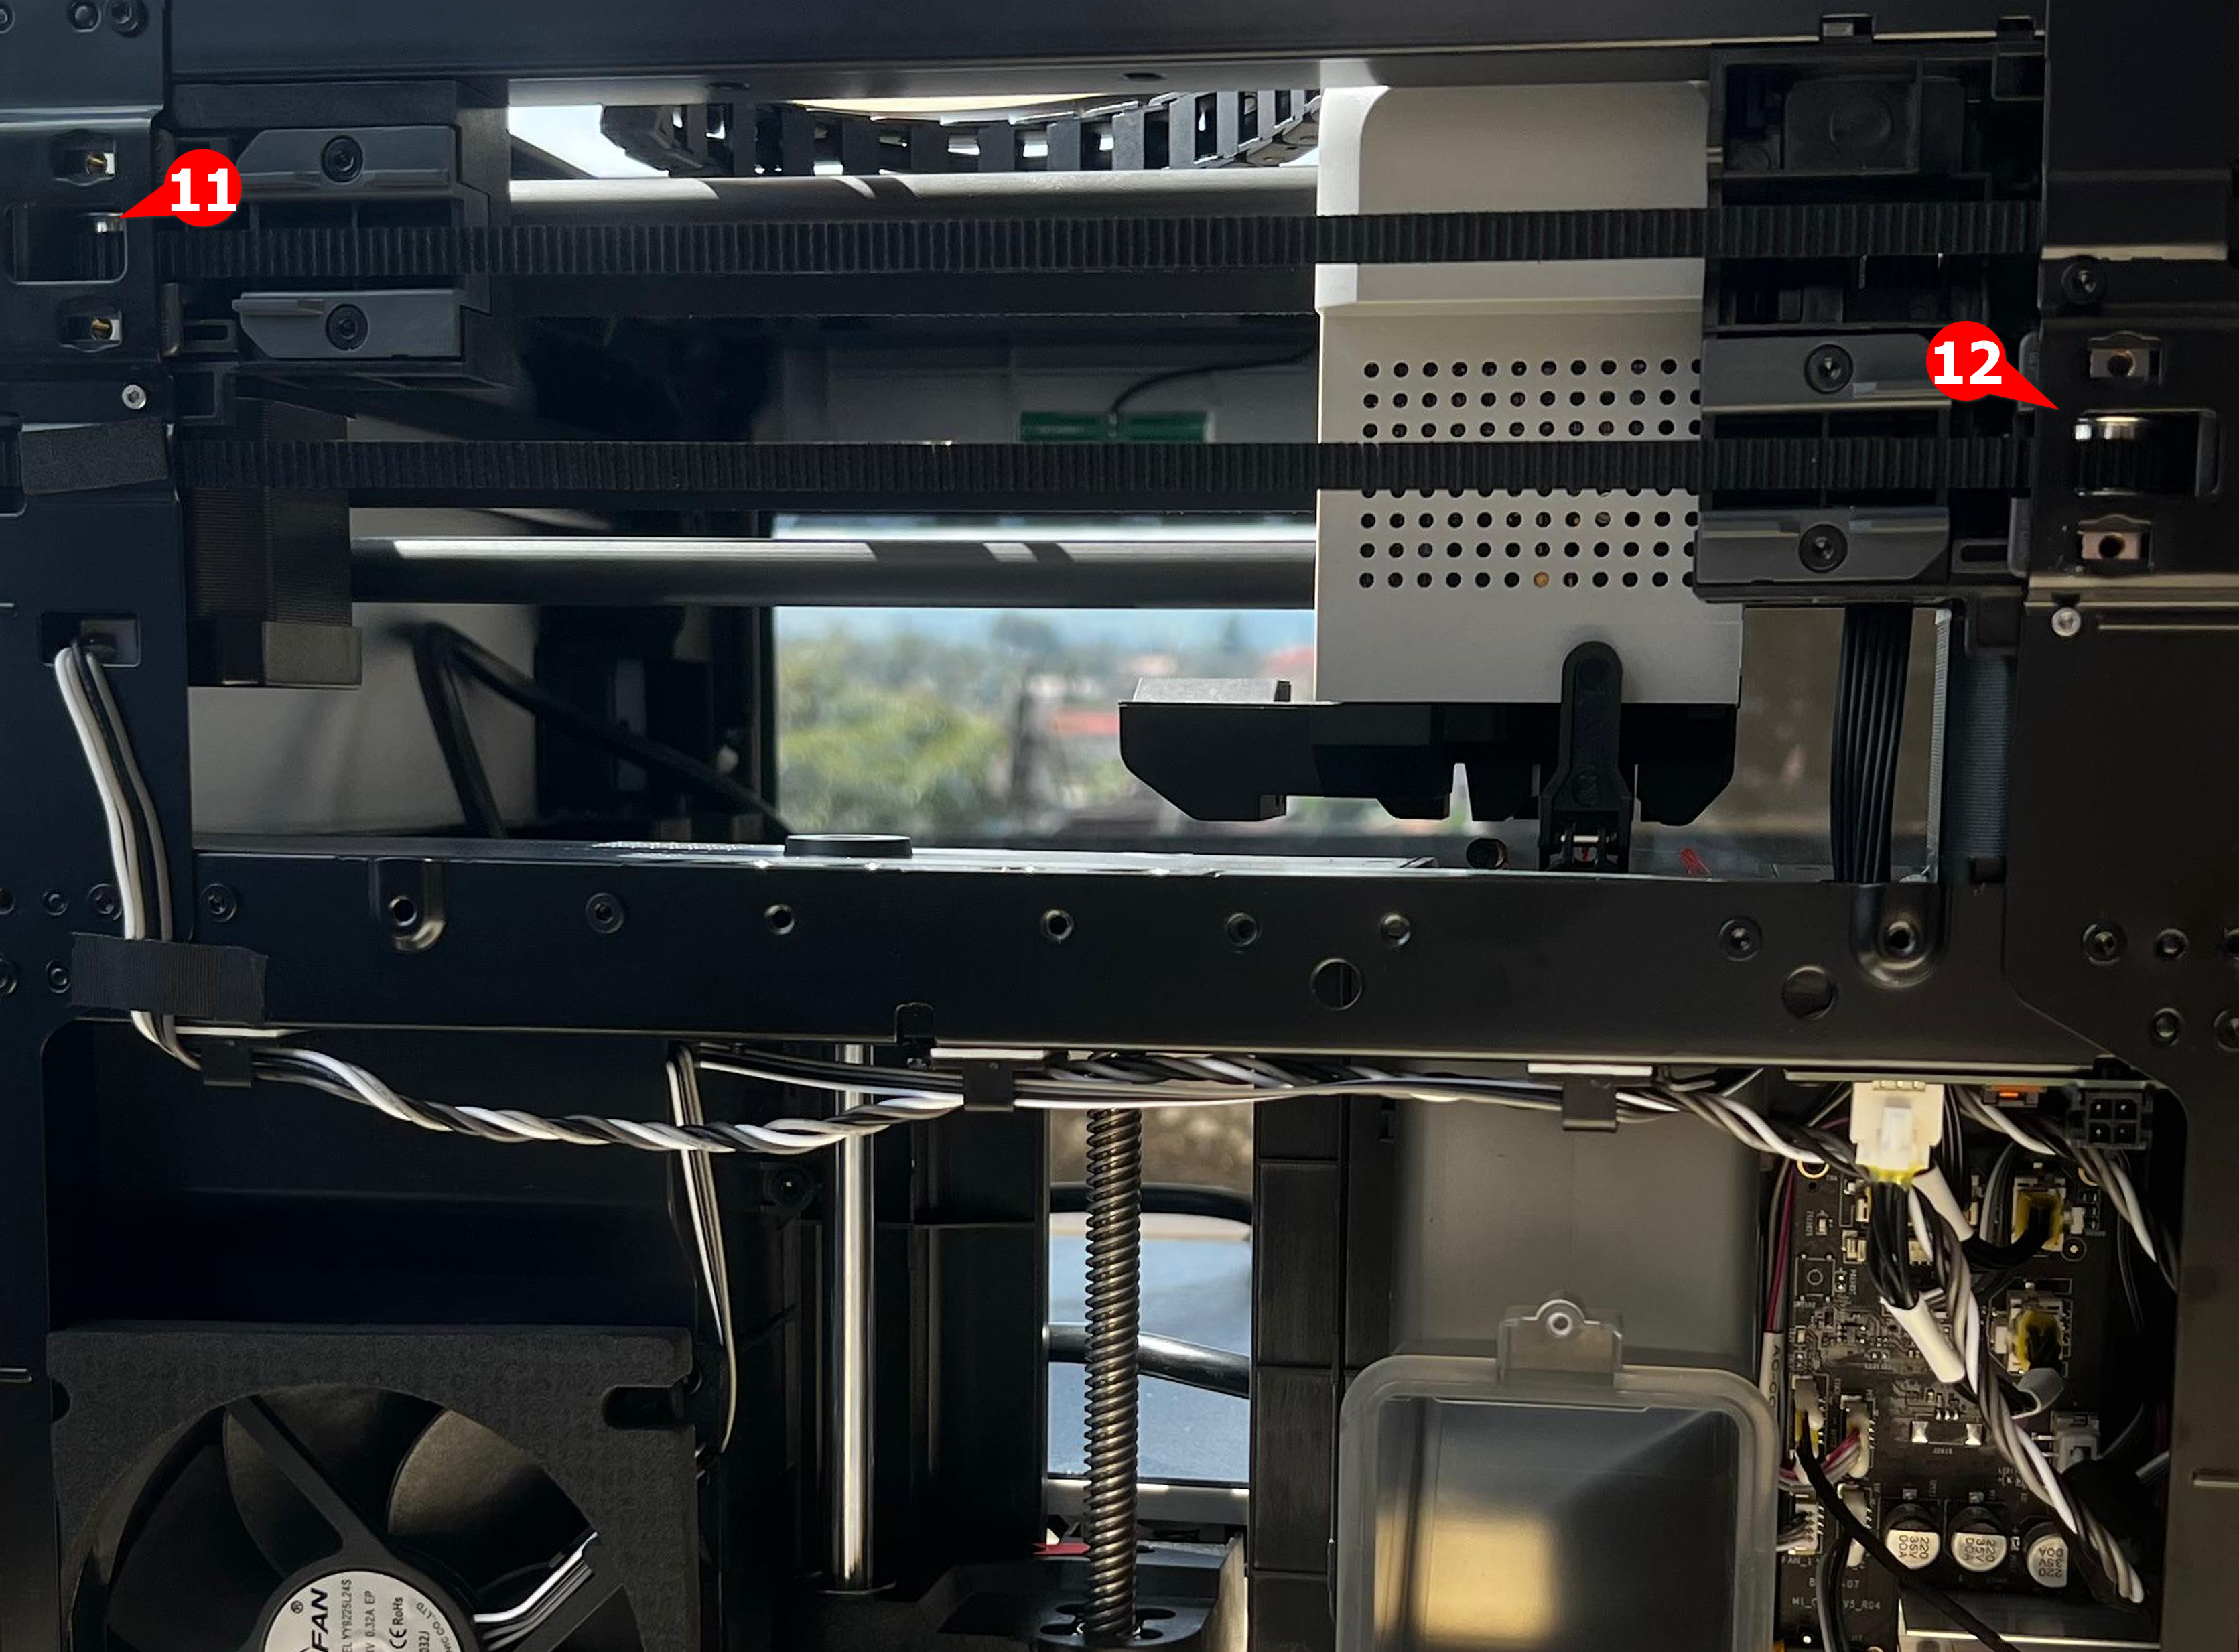
At the back of the 3D printer, there are two.
¶ Tools for Cleaning the Idler Pulleys
Before beginning the cleaning process, it's essential to gather the necessary tools. Some of these items may already be in your 3D printing toolkit, while others may require you to purchase them. These include:
- WD-40 sprayer: Although commonly used as a lubricant, WD-40 is also highly effective for removing dirt, grime, and old grease from metal surfaces, like the pulleys. We will use it to remove any stubborn, dissolved residue without causing corrosion. If you don't have it, you can buy it online.
- Cotton Swabs: This is the material we will use for cleaning. You apply a small amount of WD-40 to the cotton swab and gently wipe the idler pulley surfaces.
- H 2.0 Allen Key: You’ll need it to loosen the components for easier access to the idler pulleys.
- Non-woven cloth: For wiping excess dirt.
¶ Optional Items
- Air gun: A small air blower or compressed air canister is perfect for blasting away dust and fine debris from the pulley area before and after cleaning. This ensures that you're not just wiping the dirt around but actually removing it.
- Gloves: For protecting your hands from lubricant, grime, and sharp metal edges. It also helps you keep the printer parts clean by avoiding fingerprints and skin oils.
- Flashlight or headlamp: To see better inside the printer.
- Spare screws: Tiny screws can easily get lost during disassembly. Having a few extra screws ensures you’re not stuck if one rolls under the desk or disappears.
Note: Of the 12 idler wheels, the first 10 can be cleaned directly, while the rear 2 require disassembly. In general, cleaning the rear wheels is not recommended unless there is visible dirt.
¶ Safety Warning and Machine State Before Starting Operation
WARNING!
It's crucial to power off the printer before performing any maintenance work on the printer and its electronics, including tool head wires, because leaving the printer on while conducting such tasks can cause a short circuit, which can lead to additional electronic damage and safety hazards.
When you perform maintenane or troubleshooting on the printer, you may be required to disassemble some parts, including the hotend. This process can expose wires and electrical components that could potentially short circuit if they come into contact with each other or with other metal or electronic components while the printer is still on. This can damage the electronics of the printer and cause further damage.
Therefore, it's essential to switch off the printer and disconnect it from the power source before doing any maintenance work. This will prevent any short circuits or damage to the printer's electronics. By doing so, you can avoid potential damage to the printer's electronic components and ensure that the maintenance work is performed safely and effectively.
If you have any concerns or questions about following this guide, open a new ticket in our Support Page and we will do our best to respond promptly and provide you with the assistance you need.
¶ Cleaning Steps
¶ Clean the Front Y-Axis Idler Pulleys
There is an idler wheel on each side of the Y-axis near the door frame. Follow the steps below to clean them:
¶ Step 1: Open the Printer Door
Locate the idler pulley near the camera location.
¶ Step 2: Spray WD-40 onto the Cotton Swab
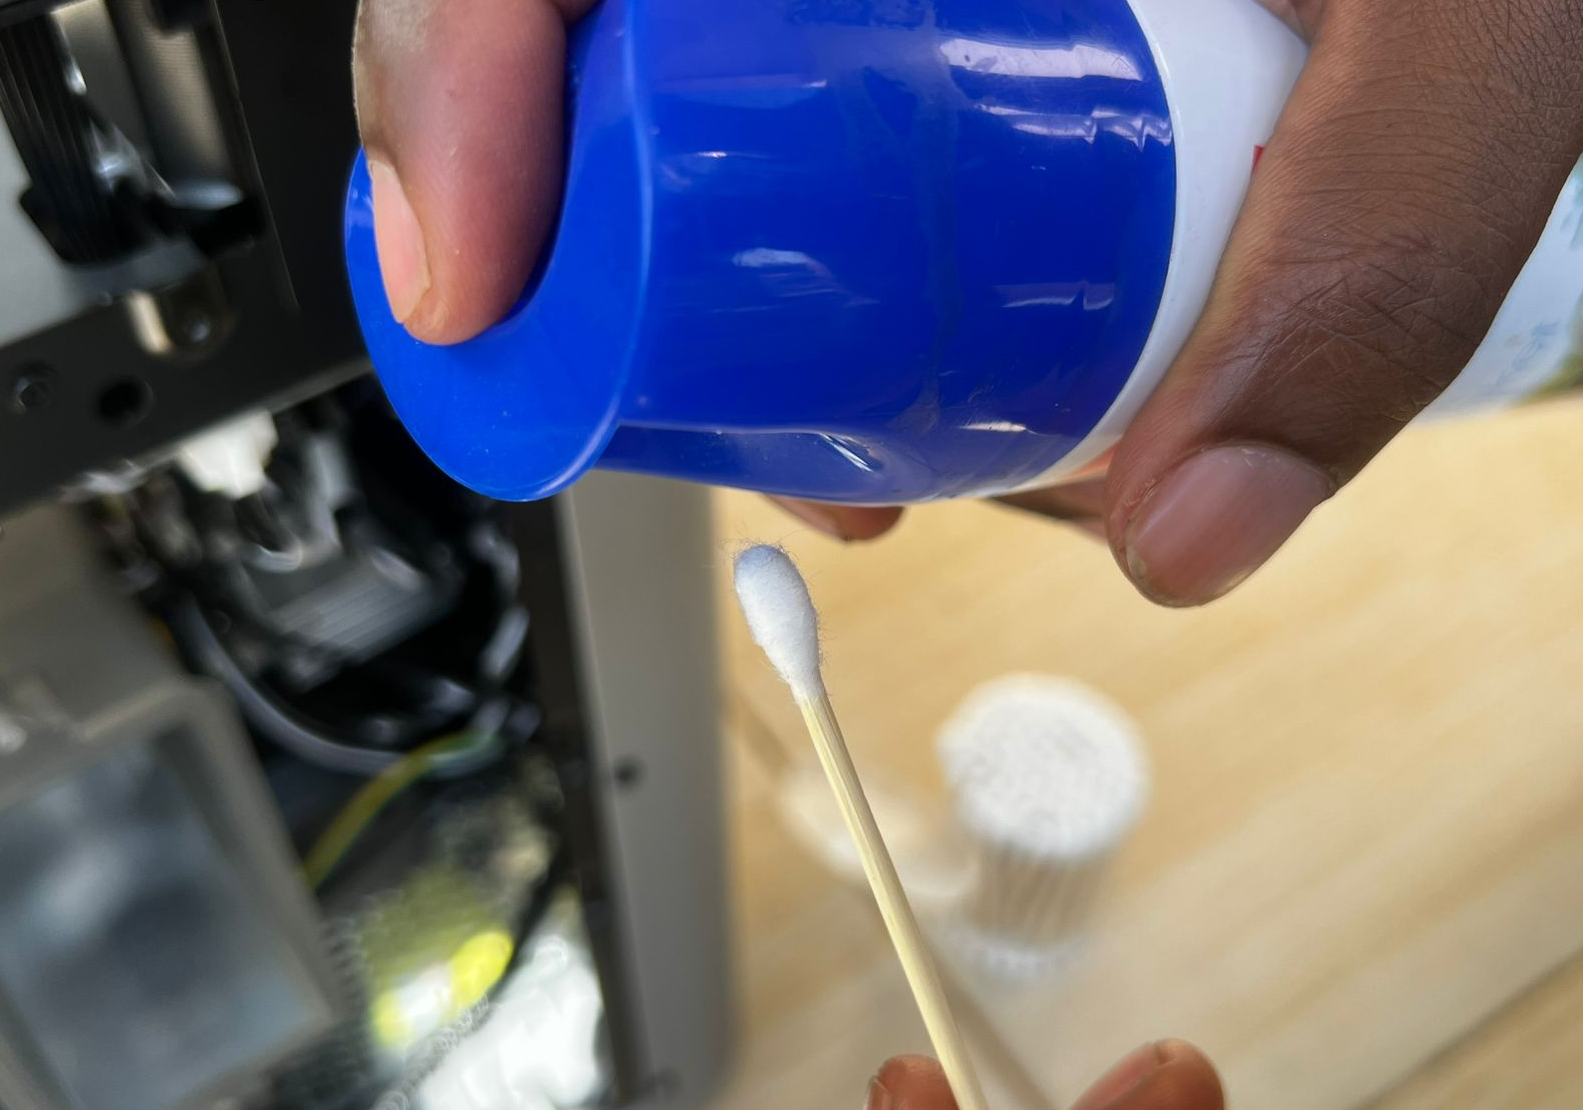
Be careful not to spray onto the hot bed or other parts. If you don't have WD-40, you can use alcohol or Isopropyl Alcohol instead.
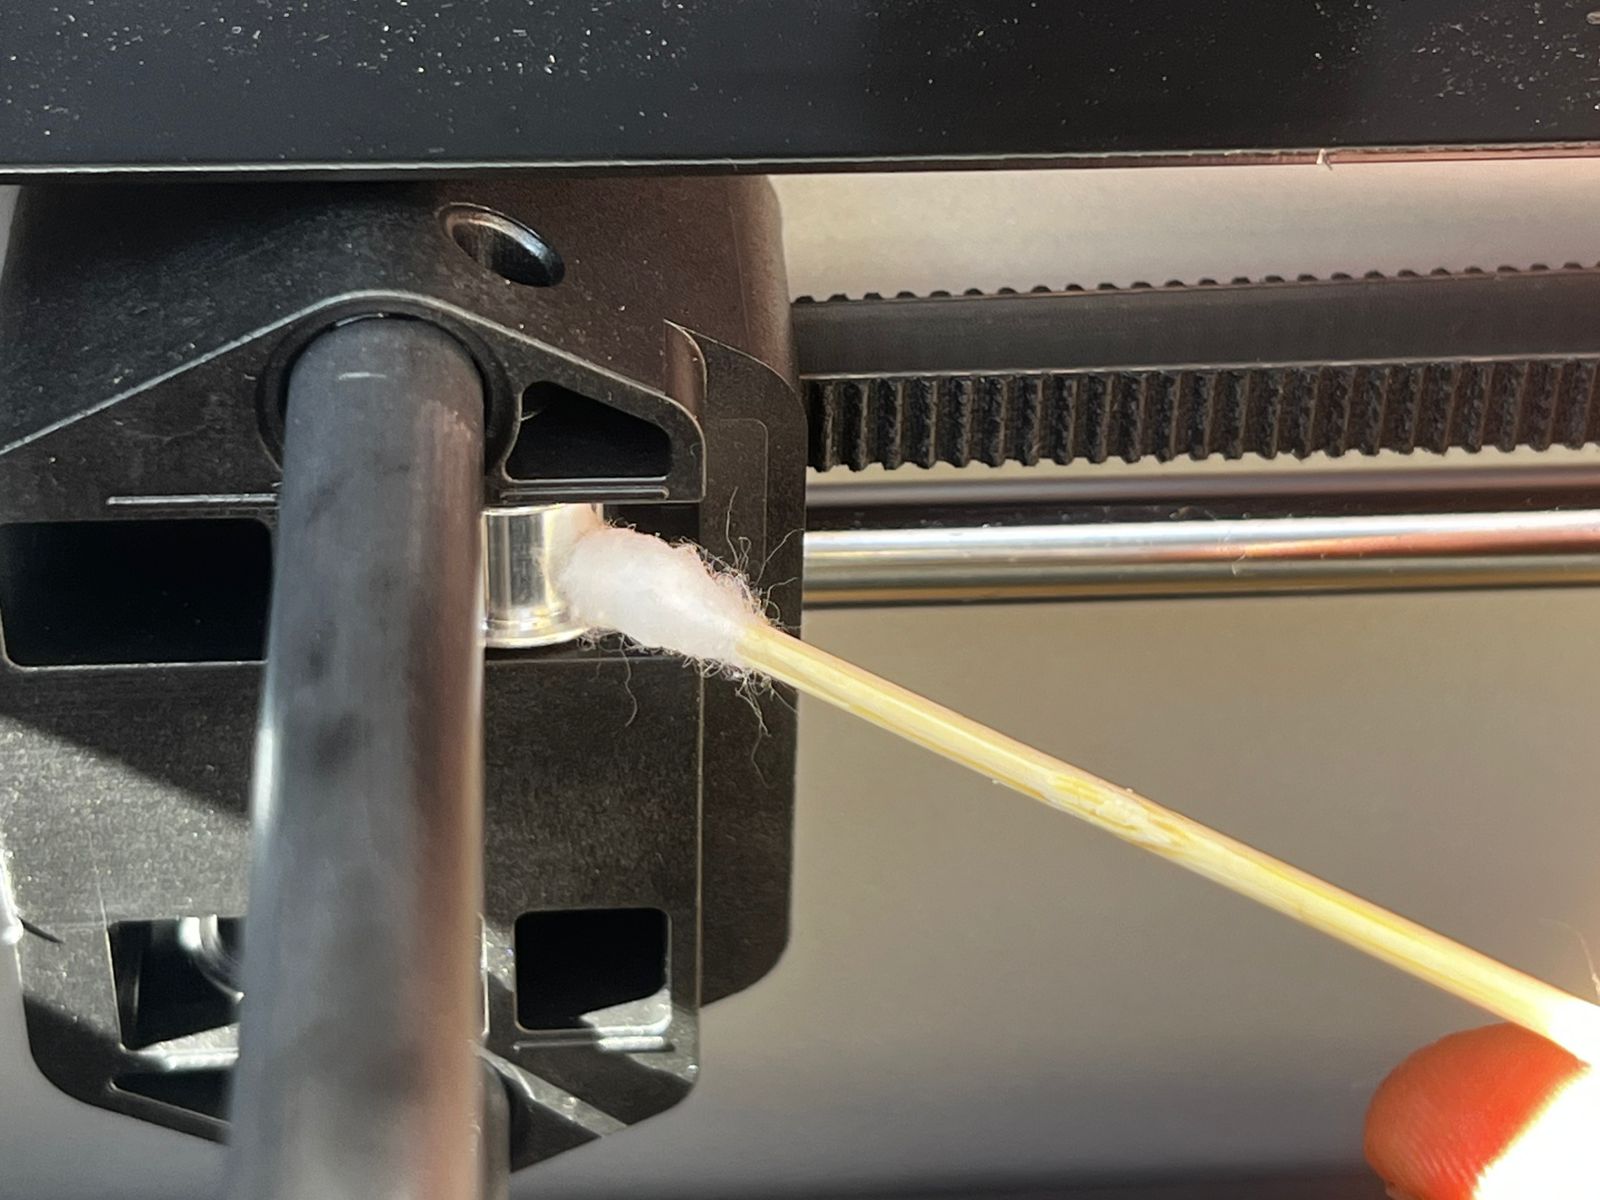
¶ Step 3: Gently Wipe the Rim of the Idler Pulley
As you do so, gently and slowly move the belt back and forth.
¶ Step 4. Clean the Opposite Idler Pulleys
Clean the other idler pulley in the same way.
¶ Clean Idler Pulleys in the X-Axis Gantry Rod
There are 4 idler pulleys, 2 on each side.
¶ Step 1: Move the Tool Head to One Side
Manually slide the tool head to one side to access the pulleys on the opposite side.
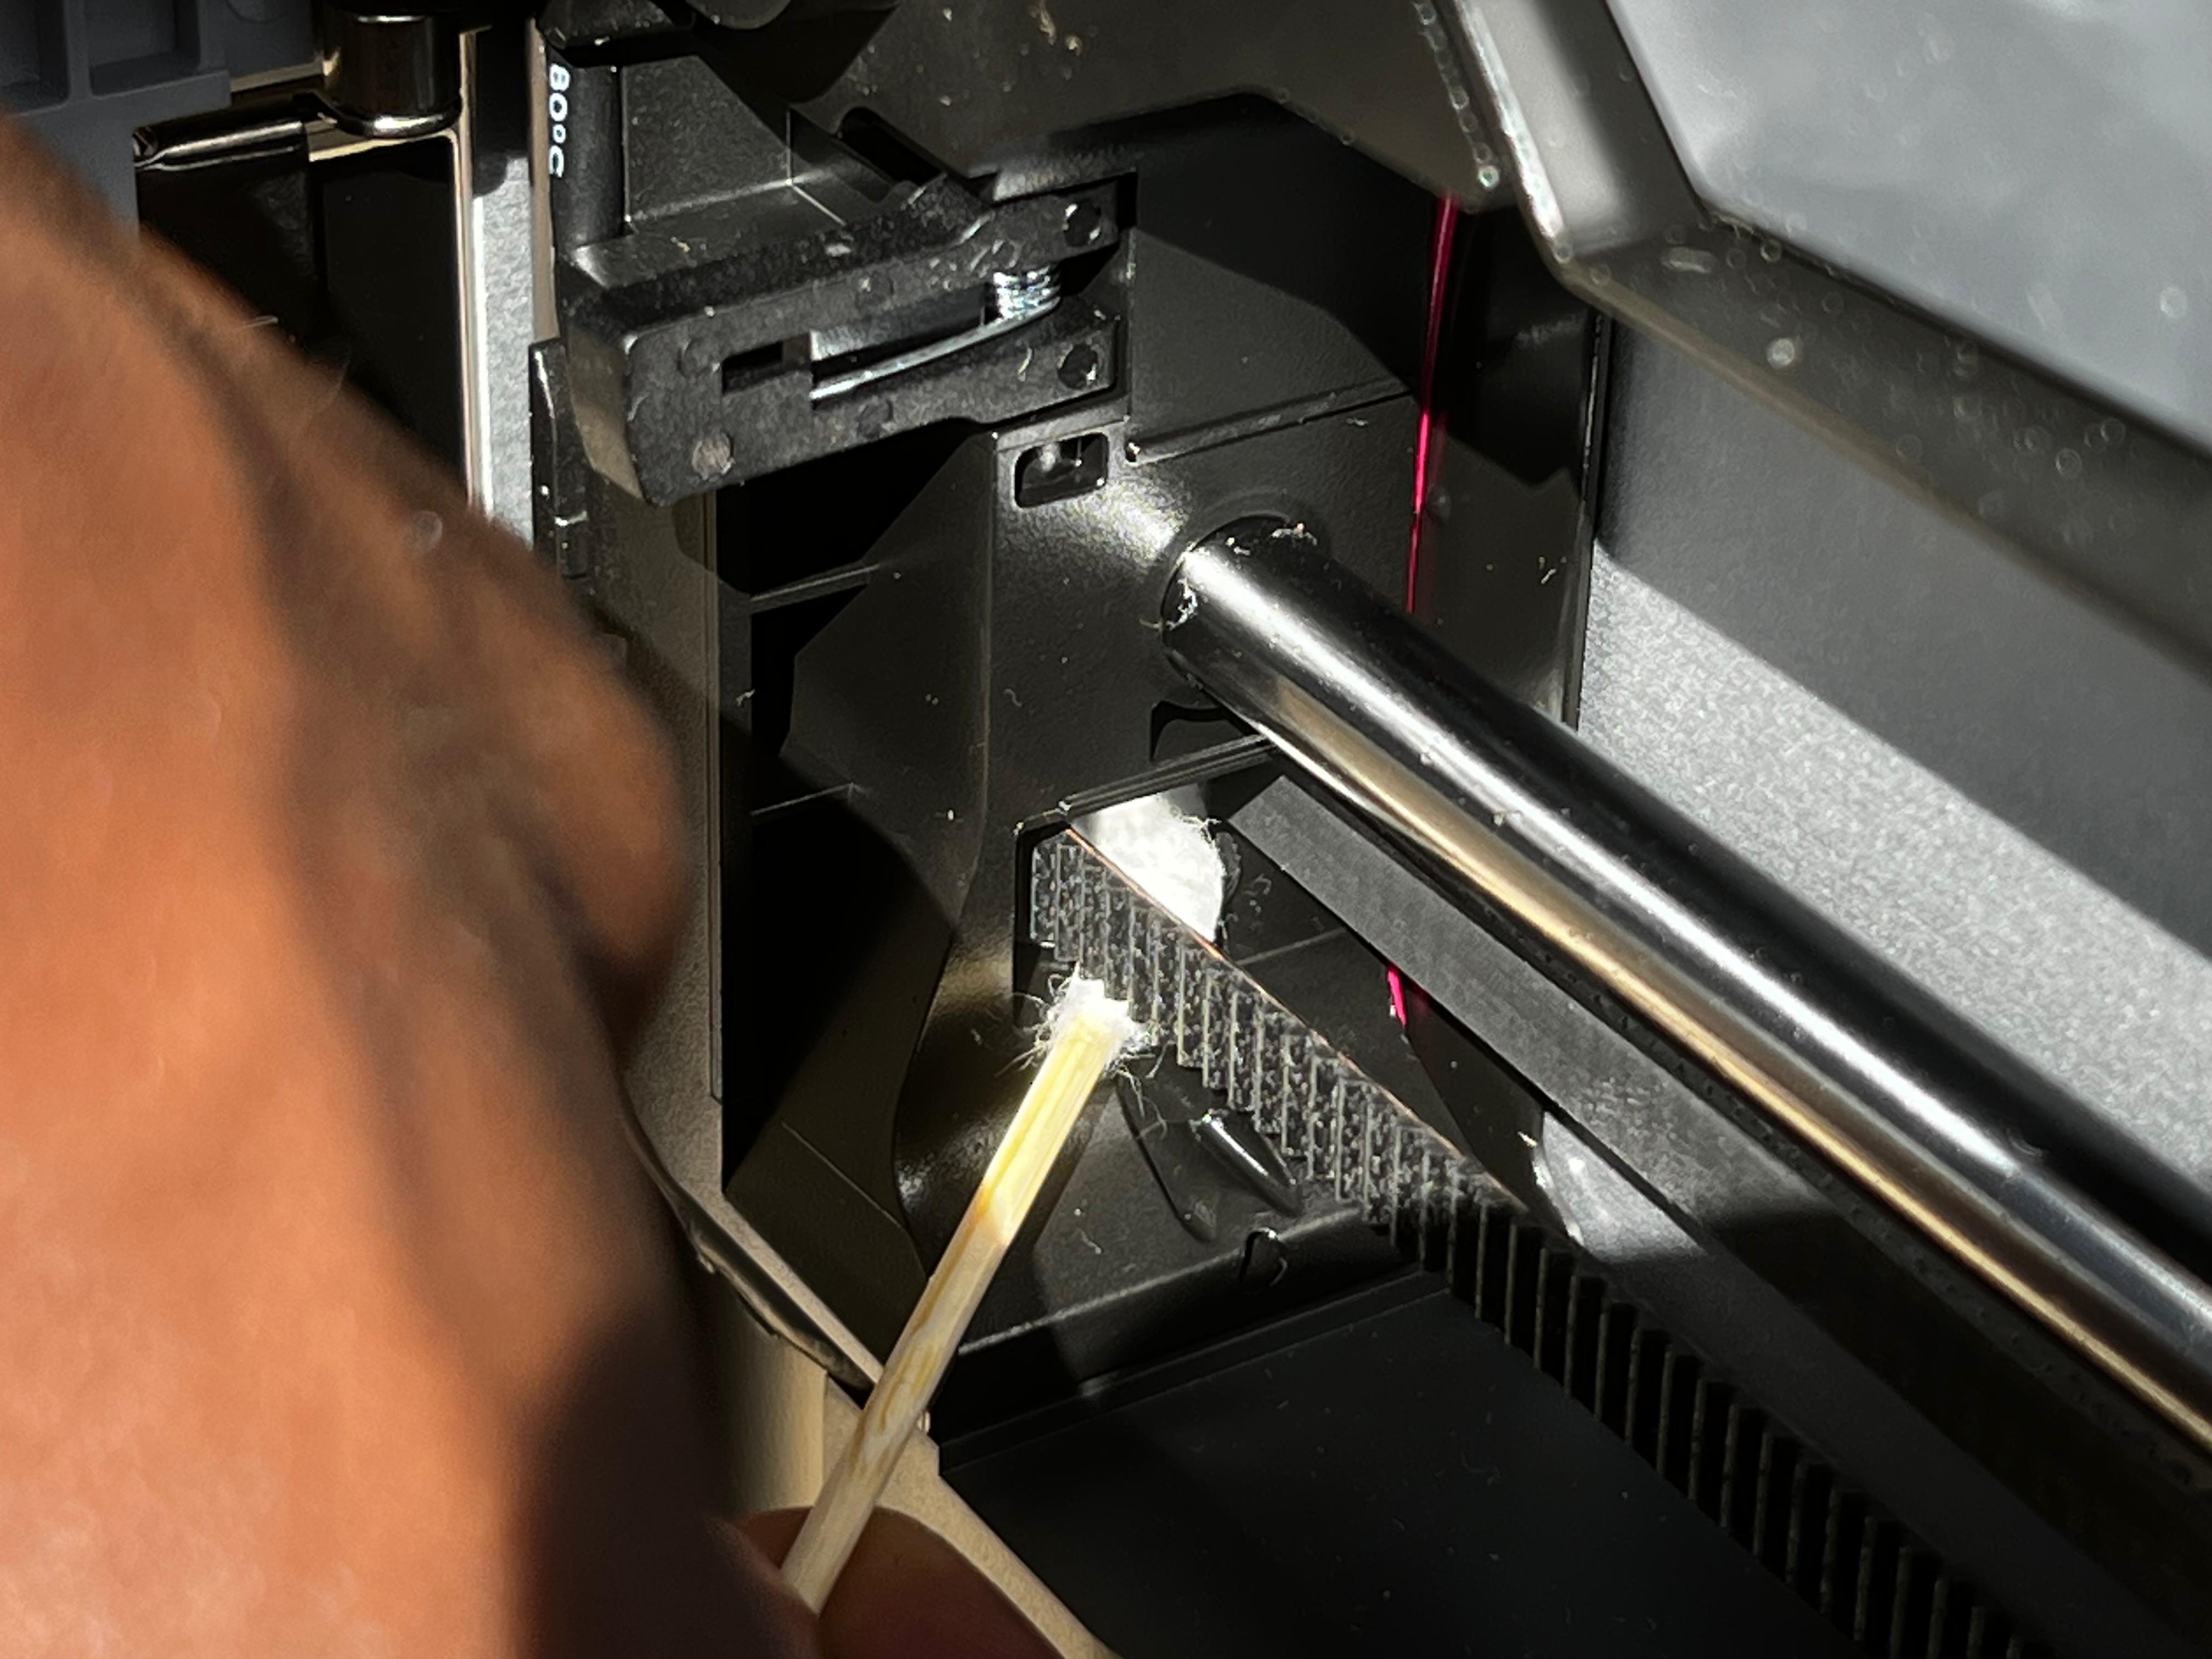
¶ Step 2: Gently Clean the Two Idler Pulleys Using the Cotton Swab Dipped With WD-40
Be careful WD-40 doesn't drip onto the tool head, gantry rod, or any other part. You can also move the print head back and forth to assist in cleaning.

Be careful not to use excessive force when moving the tool head to avoid applying too much pressure on the rod.
Clean the two idler wheels on the other side in the same way. If there is any excess dirt, wipe it with a dry cloth.
¶ Cleaning the Rear Idler Pulleys of the Printer
There are two pulleys on each side, located at the upper rear corners of the frame, used to route and tension the CoreXY belts. If you don't see them clearly, you can use a flashlight to illuminate the area.
¶ Step 1: Move the Tool Head Towards the Front Center
Move the tool head to the front and remove the printer cover to make room for cleaning the rear.
¶ Step 2: Start Cleaning With a Cotton Swab Sprayed With WD-40

Consider the precautions highlighted in the previous steps. As you clean, you can gently move the belt back and forth with your fingers to remove all the dirt from the pulley. As you move the belt, be careful not to stretch it much, as it can affect the tension.
¶ Cleaning the Two Idler Pulleys at the Back (Disassembly Required)
To clean the above two idler pulleys, we will need to disassemble certain components of the 3D printer to access them. These parts include:
- Rear cover
- Tension assembly- Spring and its holder
- Idler shaft
Follow the steps below to learn the entire process:
¶ Step 1: Remove the Rear Cover
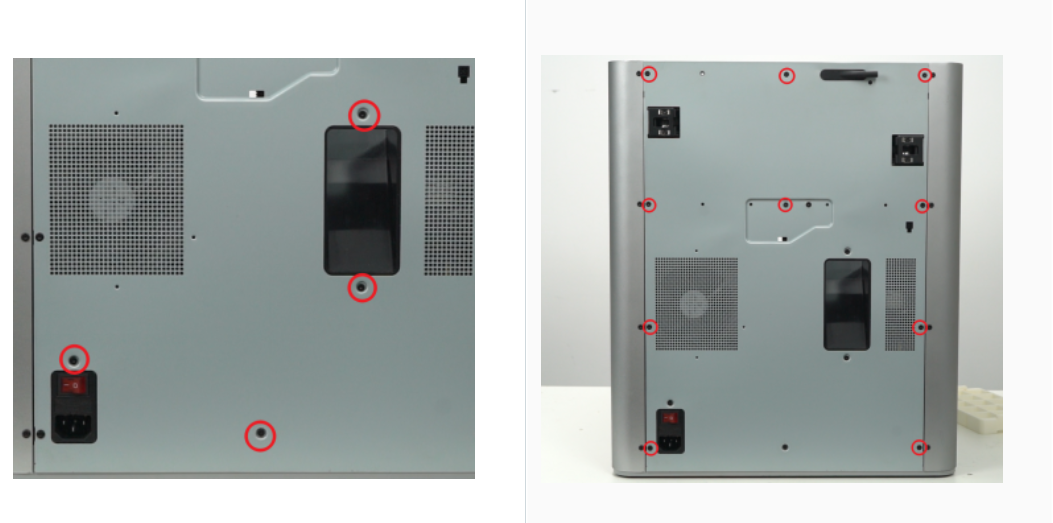
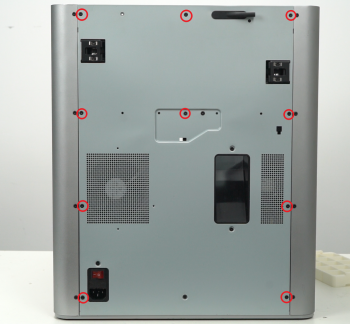
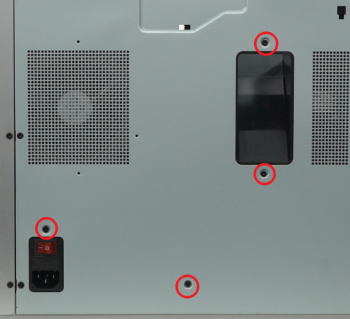
Use a 2.0 mm Allen wrench to remove all the back panel screws. This applies to both the P1 and X1 series. As shown in the picture, there are four identical coarse-thread screws (left) and ten identical fine-thread screws (right). After removal, they should be sorted and stored separately to avoid confusion.
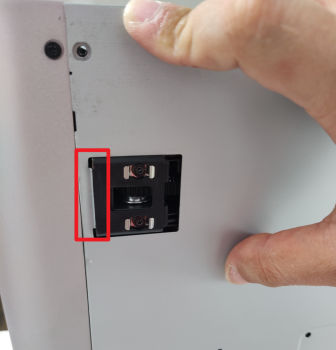
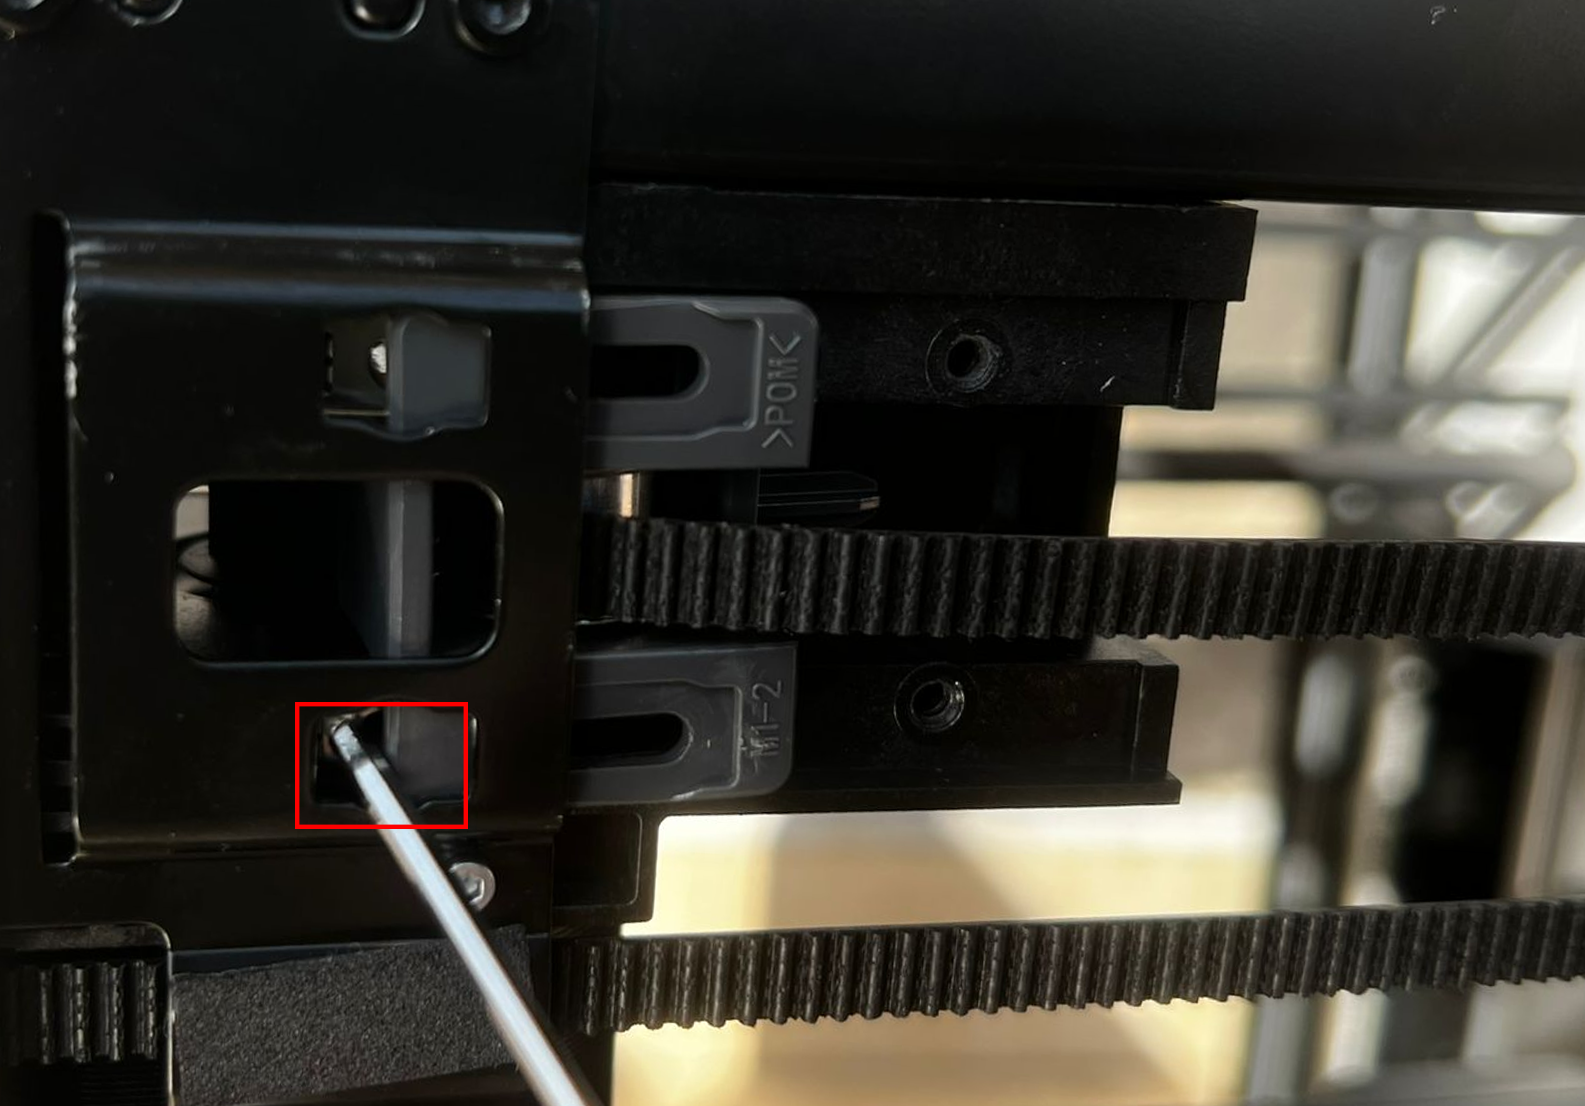
When removing the rear cover, first loosen the left side (facing the rear cover) through the left belt tensioning opening, then loosen the right side through the right belt tensioning opening. This prevents the cover from getting stuck.
 |
 |
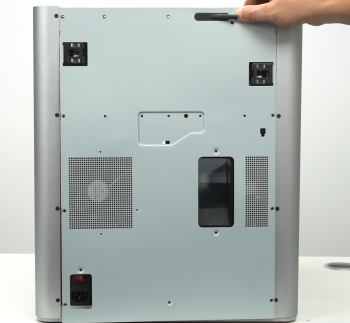
Before cleaning, use a hair dryer to blow away any dust inside the machine. If you need to turn the machine over for easier access, adjust the heated bed to its lowest position in advance and lock it to prevent movement during the process. If necessary, you can also remove the top screen to avoid it being damaged when the machine is placed on its side.
¶ Step 2: Remove the Tension Spring and Its Holder
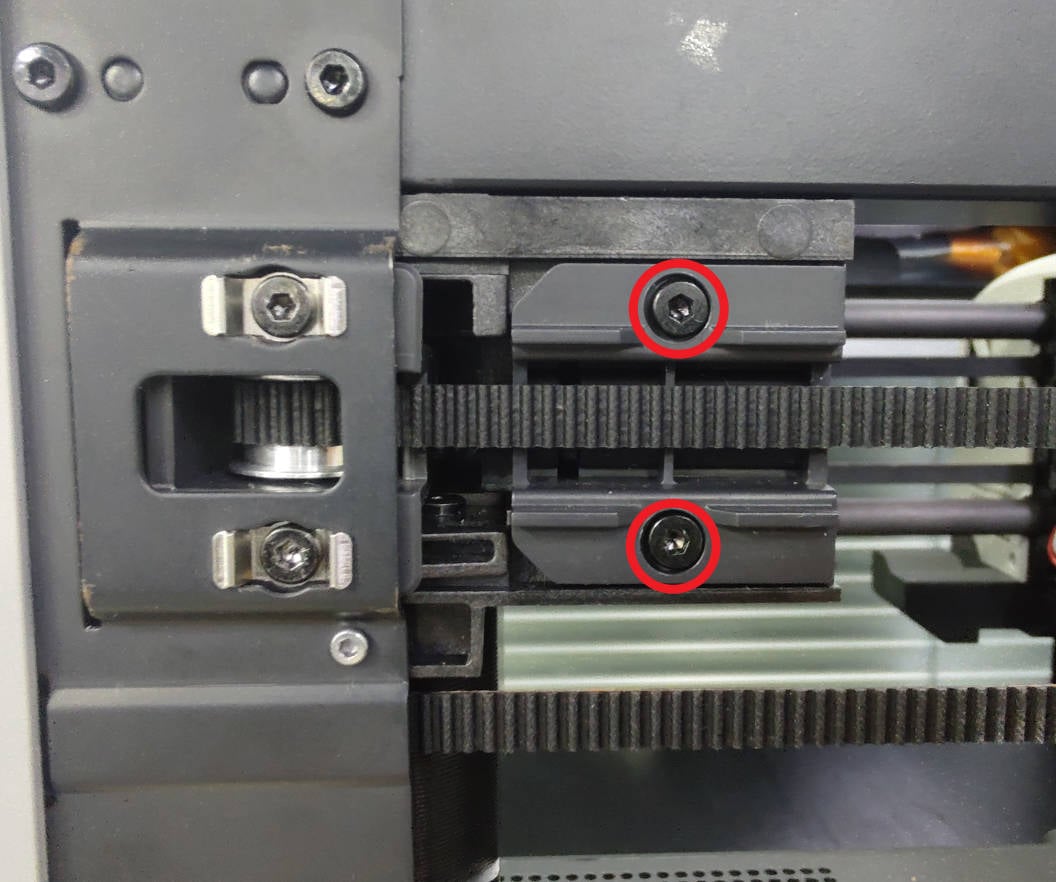
To do this, you will need to remove the screws attached to the tensional as well as the bracket on the side. Starting by unscrewing the two screws.
Then, remove the tension spring and bracket.
The next step will be to loosen the tensioner assembly.
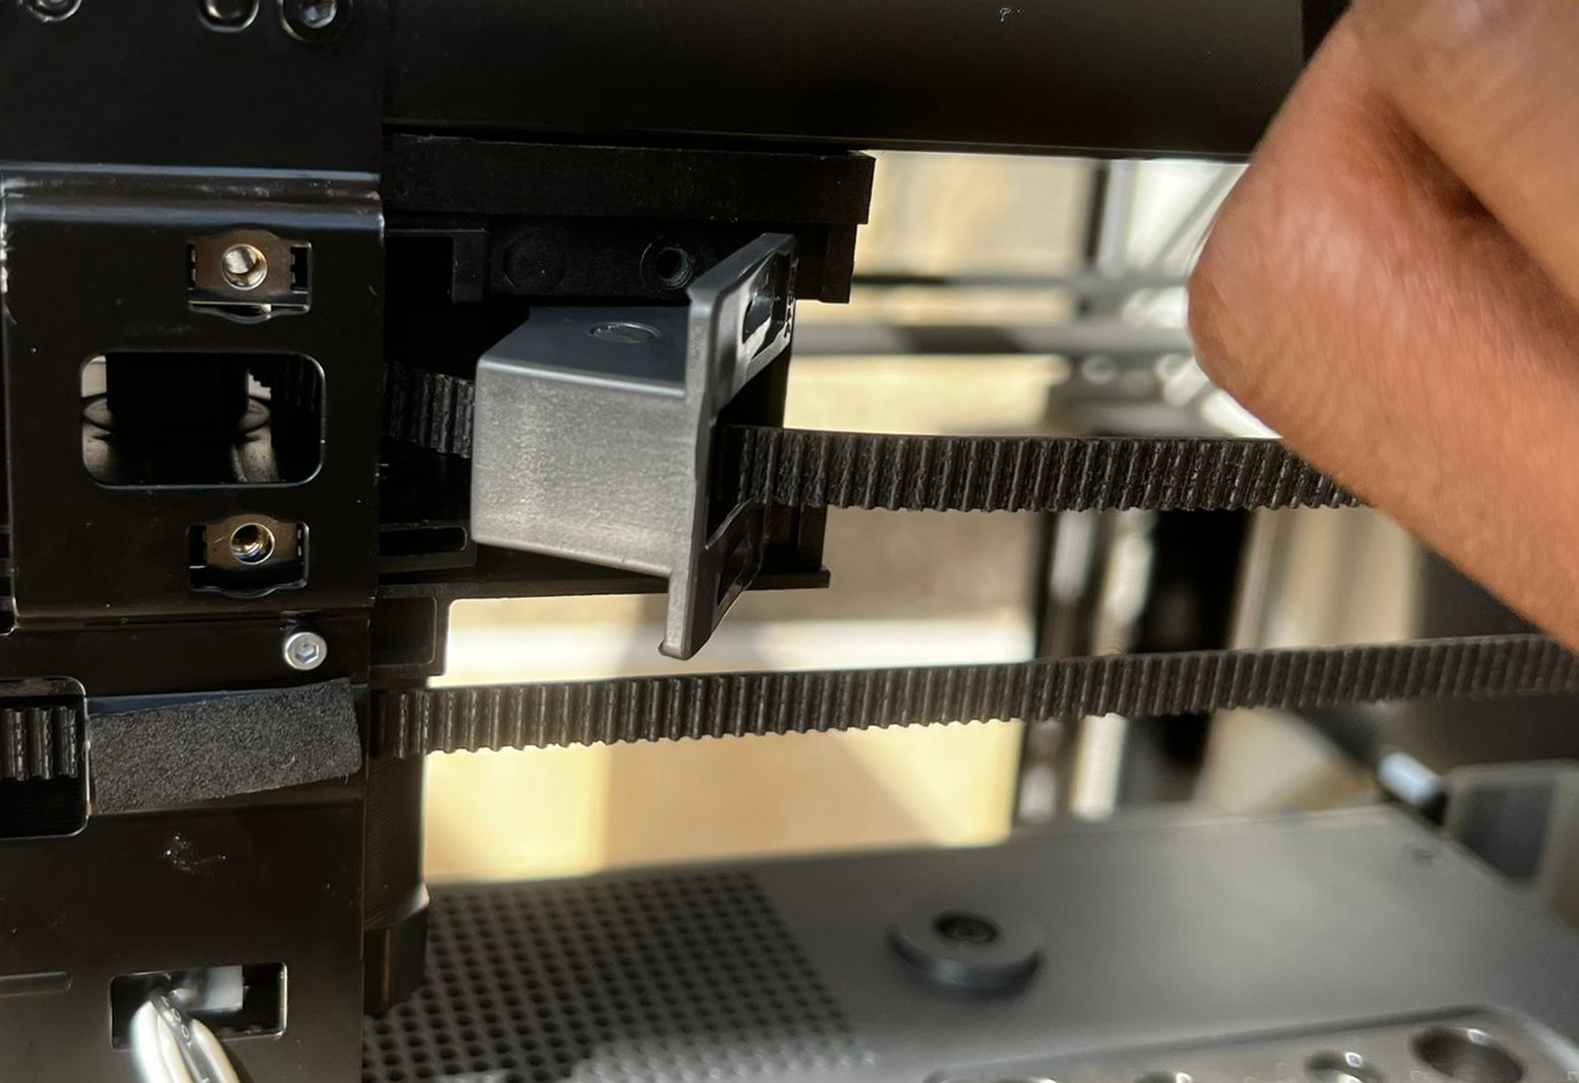
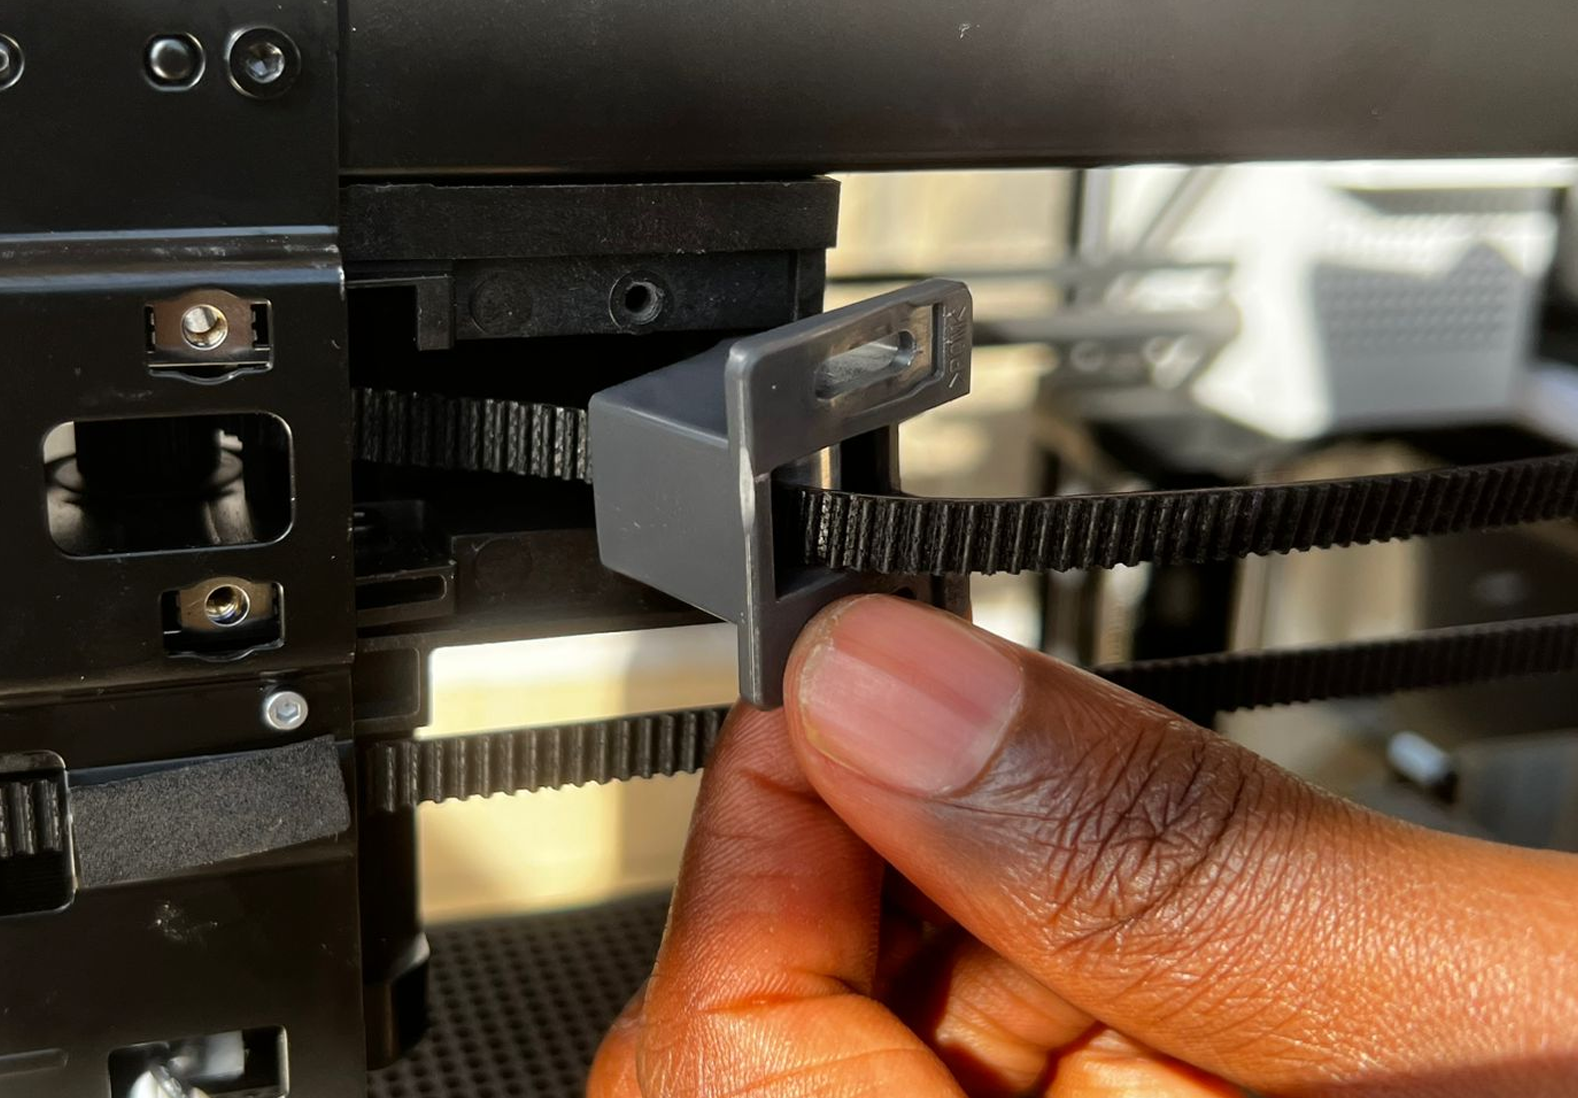
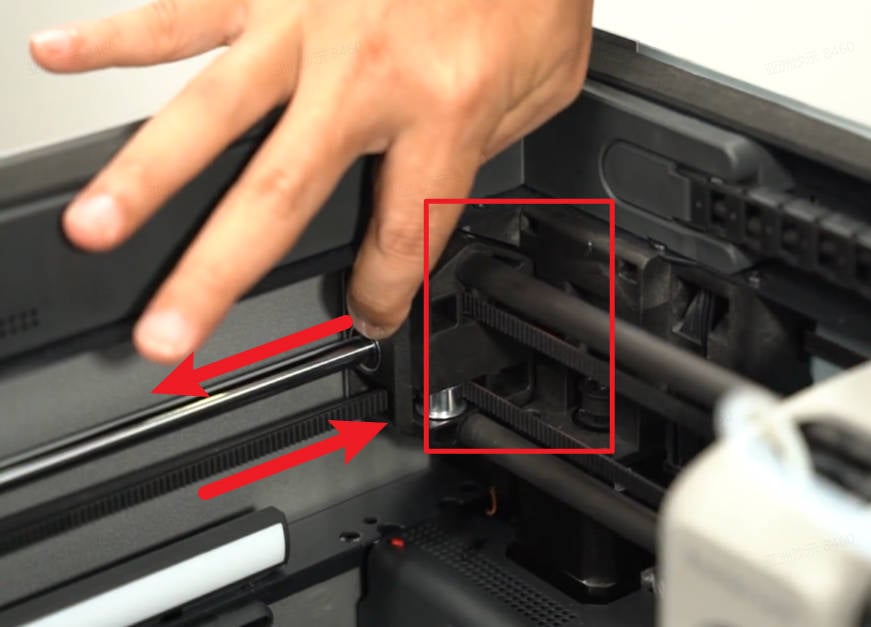
¶ Step 3: Loosen the Tensioner Assembly
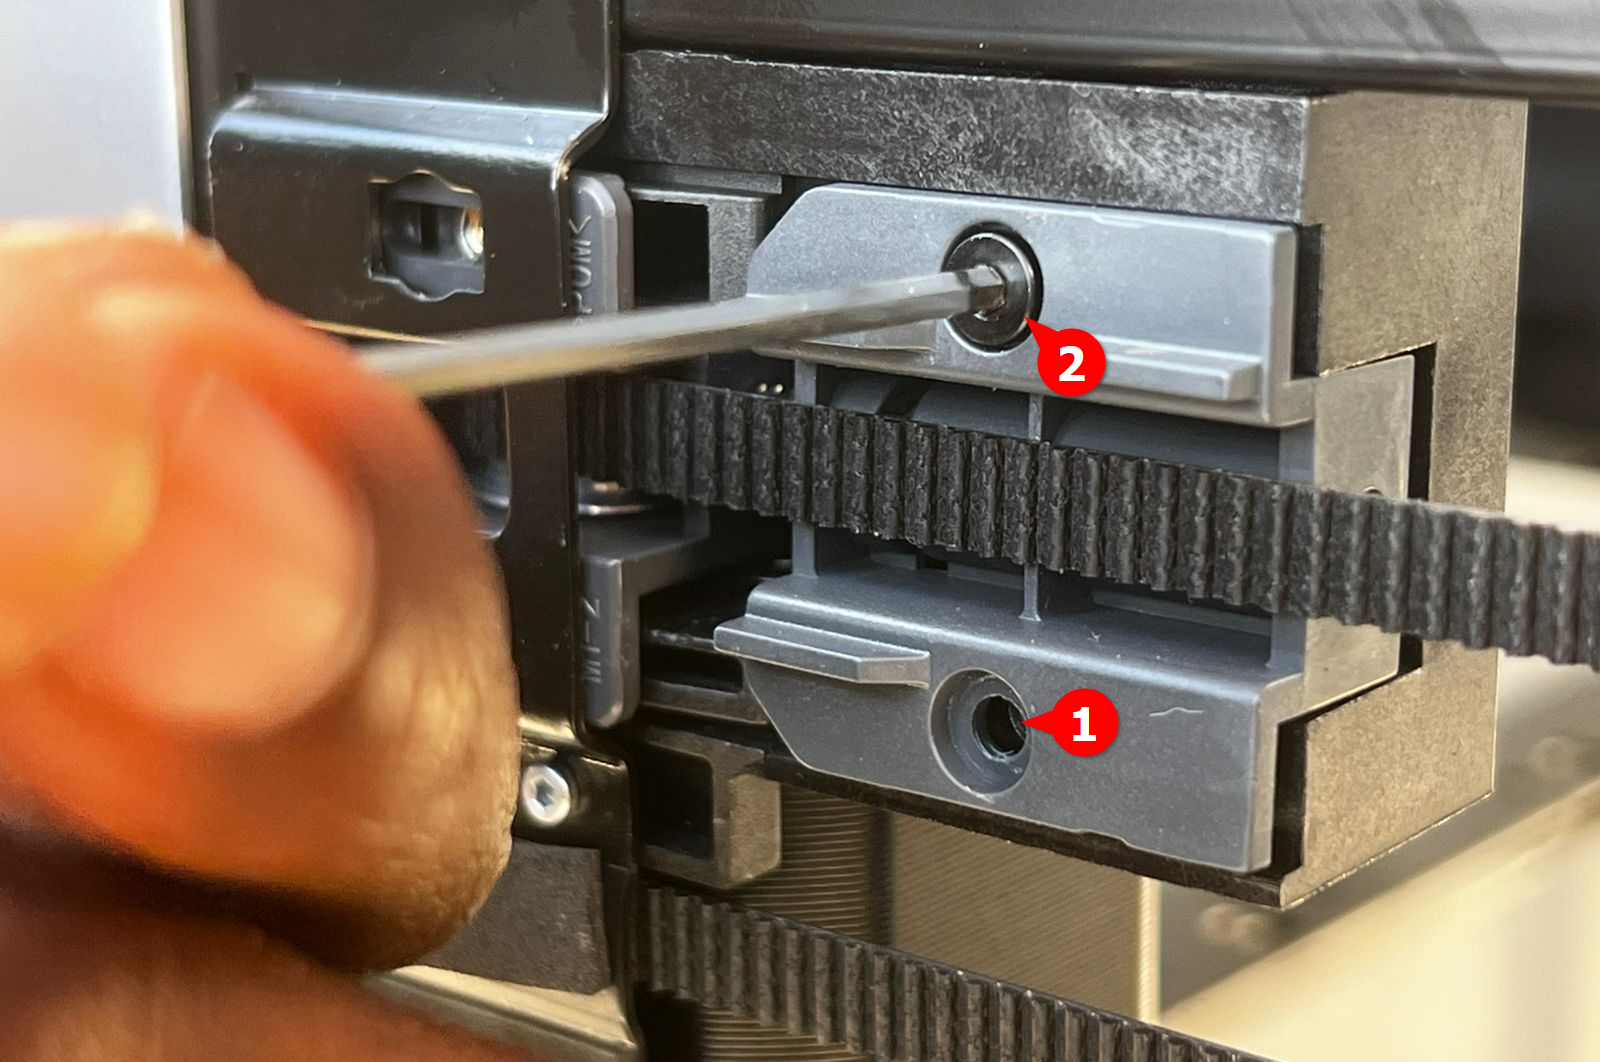
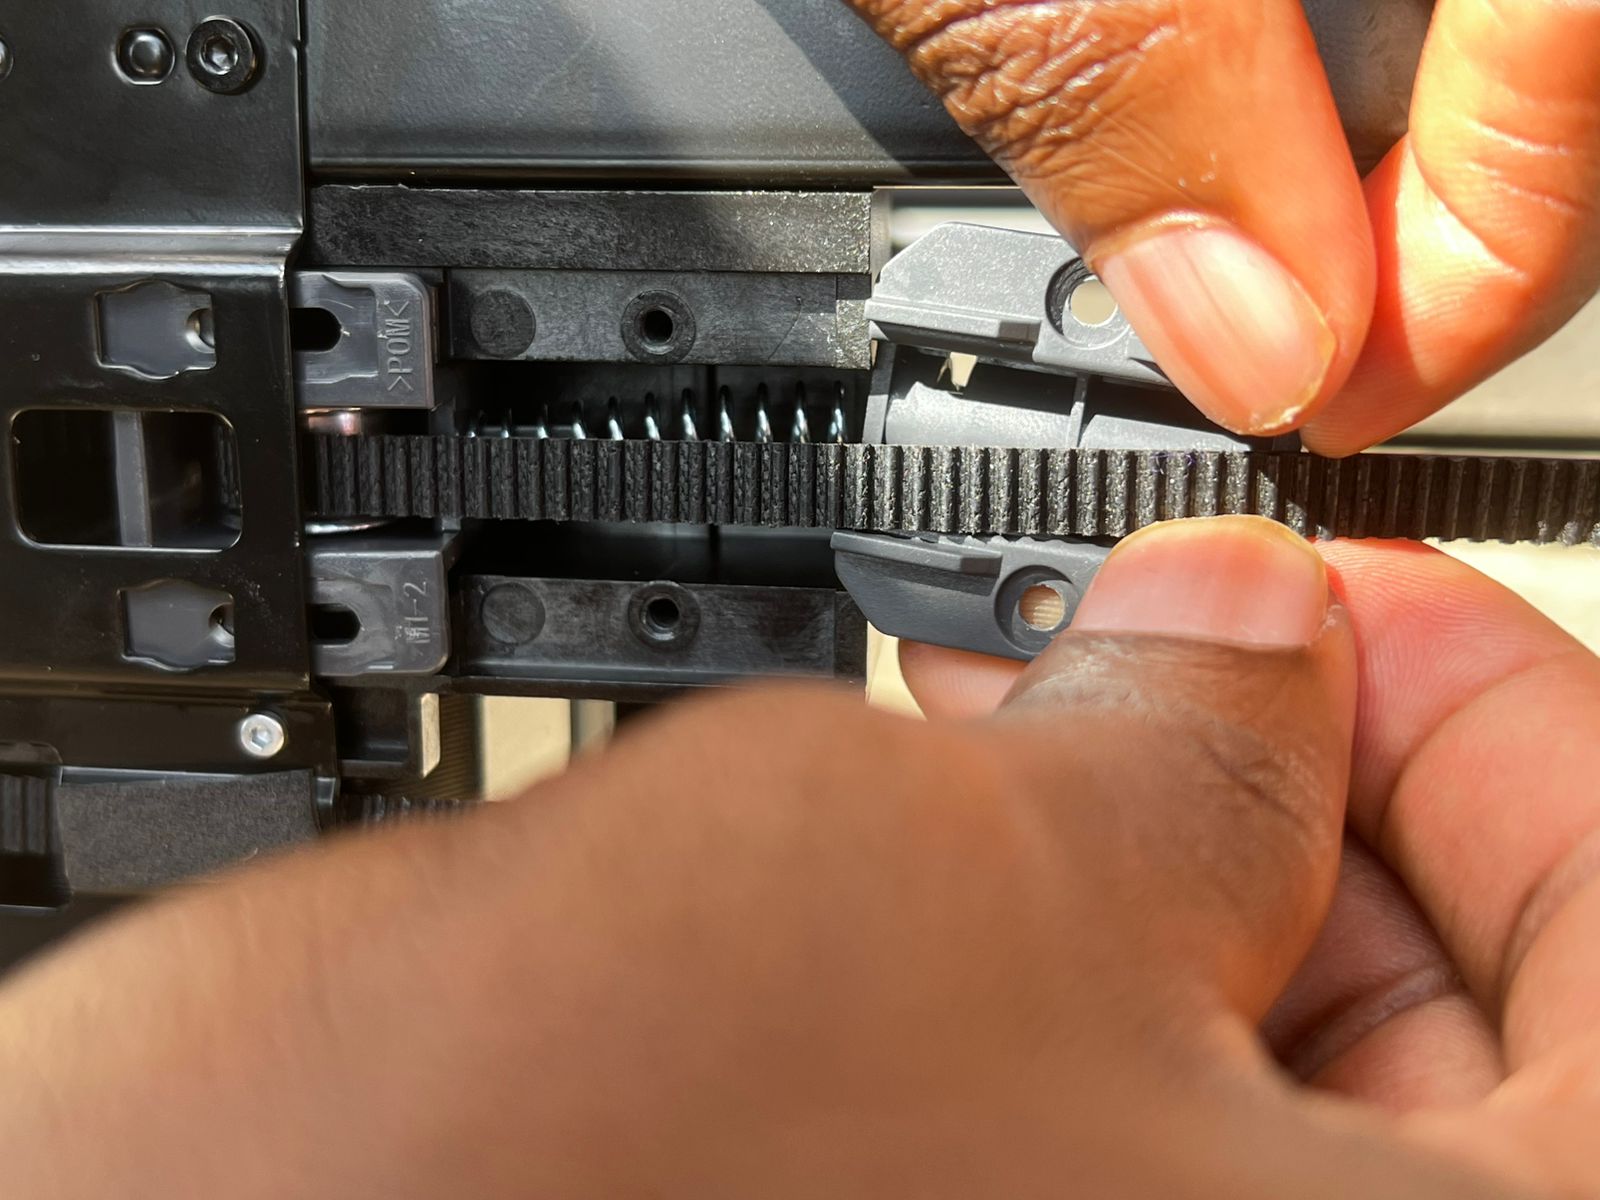
Use an H 2.0 Allen wrench to unscrew the two screws, remove the two metal pieces, and then loosen the tensioner assembly.
 |
 |
 |
¶ Step 4: Cleaning the Idler Pulley
Use a WD-40 cotton swab to clean the surface of the idler pulley.
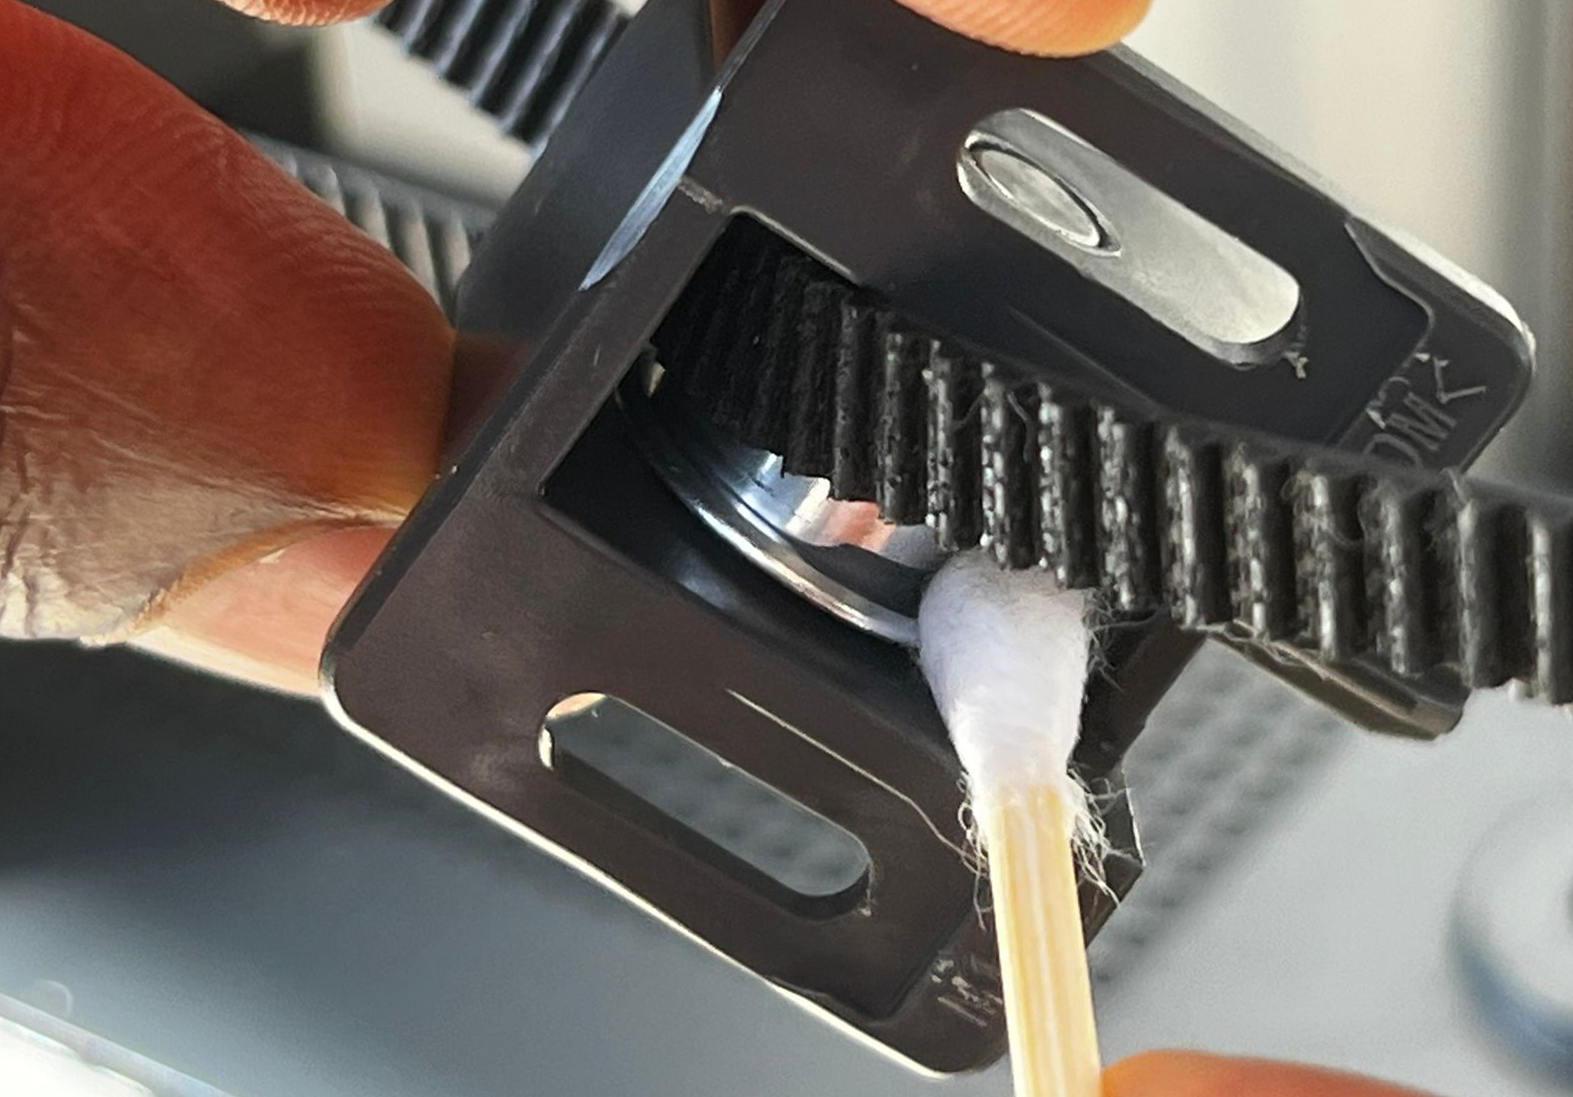
The process is shown below.
¶ Step 5: Post-Cleaning Activities
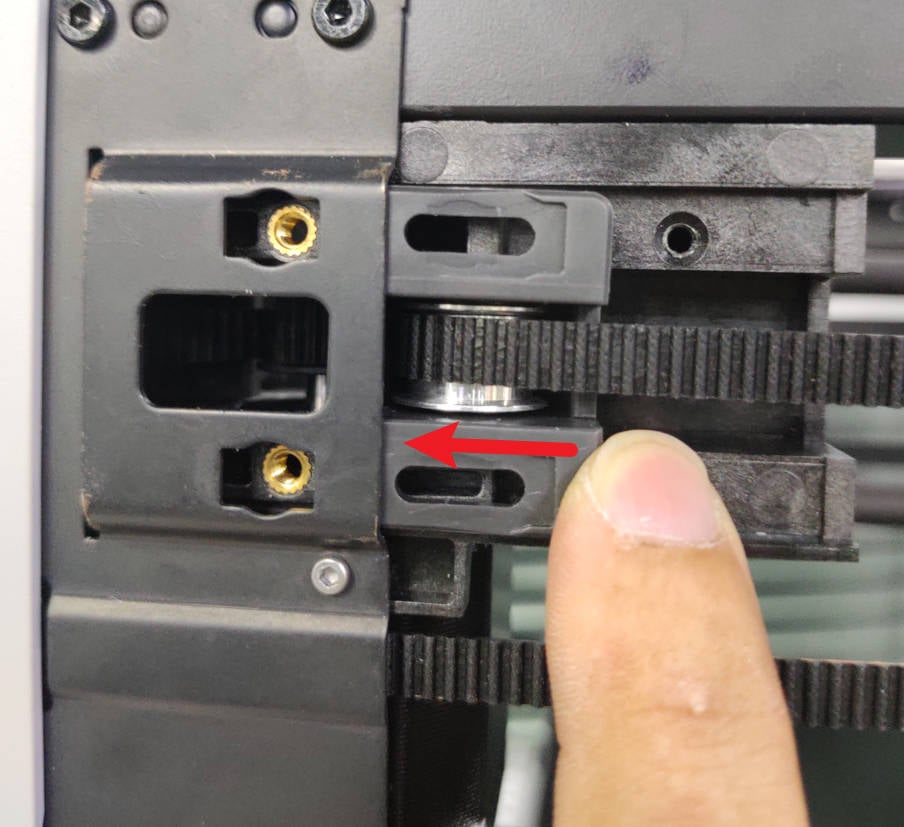
Once cleaned, inspect to ensure that the idler moves freely without any hindrance. Next, reinstall the tensioner pulley assembly.
Slide the tension wheel assembly into place and insert the two screws (with brackets). Do not fully tighten them—leave the screws loose for now.
 |
 |
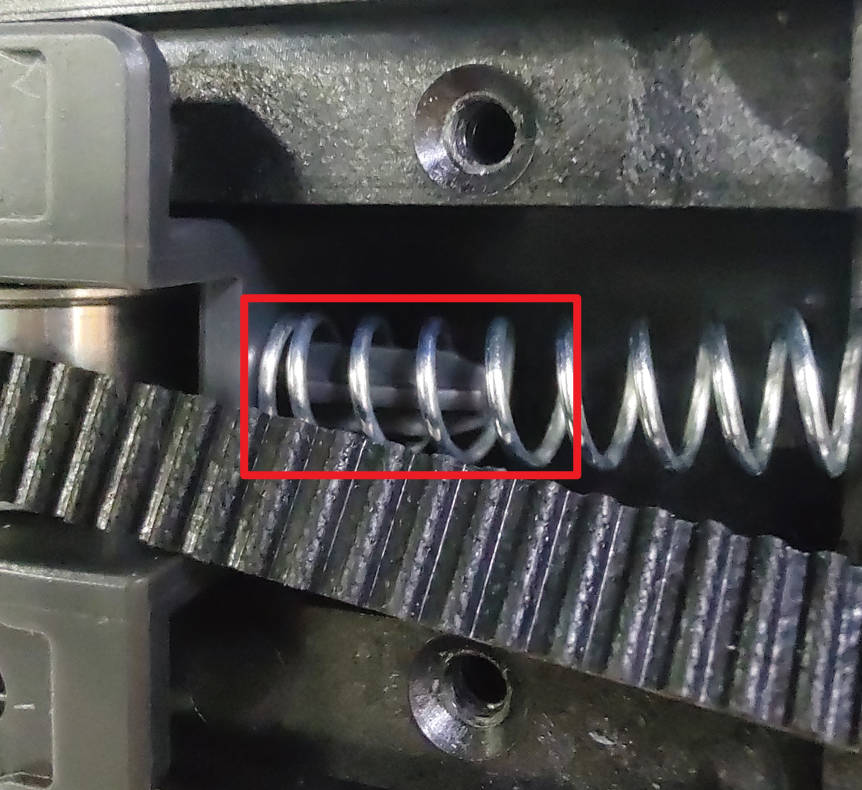
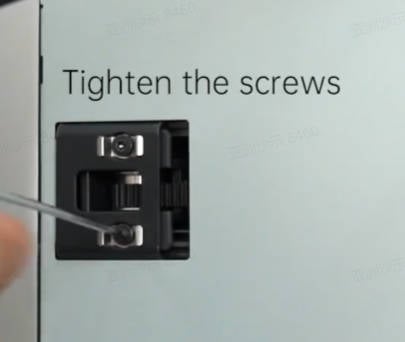
Install the tension spring and bracket, then tighten the two screws to secure them. Make sure the spring and bracket are positioned correctly, as shown below.
 |
 |
After completing this process, repeat the same steps for the idler pulley on the other side
¶ Step 6: Install the Back Cover of the Printer
After cleaning the idler wheels on both sides, reinstall the rear cover. To do this, first, guide the cover through the PTFE tube feed, then latch the belt tensioning port on the right side. After that, latch and align the left side.
|
 |
Then reinstall the back cover. Take note of the different types of screws used—10 fine-thread screws and 4 coarse-thread screws, as shown below.
 |
 |
¶ Step 7: Tighten the Belt
Since the belt tension may be affected during the cleaning process, it is necessary to tighten it. Loosen the two screws on the other tensioning wheel assembly, hold the pulleys at both ends of the tool head, and move the tool head back and forth several times. Finally, position the pulleys toward the rear and tighten the four screws on both tensioning wheel assemblies. For detailed instructions, please refer to the video in belt tensioning wiki.
 |
 |
We have now successfully completed the cleaning of the idler pulleys. Although the procedure is demonstrated using the X1 series printer as an example, it is also applicable to the P1 series printer.
¶ End Notes
We hope the detailed guide provided has been helpful and informative.
To ensure a safe and effective execution, if you have any concerns or questions about the process described in this article, we recommend submitting a technical ticket regarding your issue. Please include a picture or video illustrating the problem, as well as any additional information related to your inquiry.