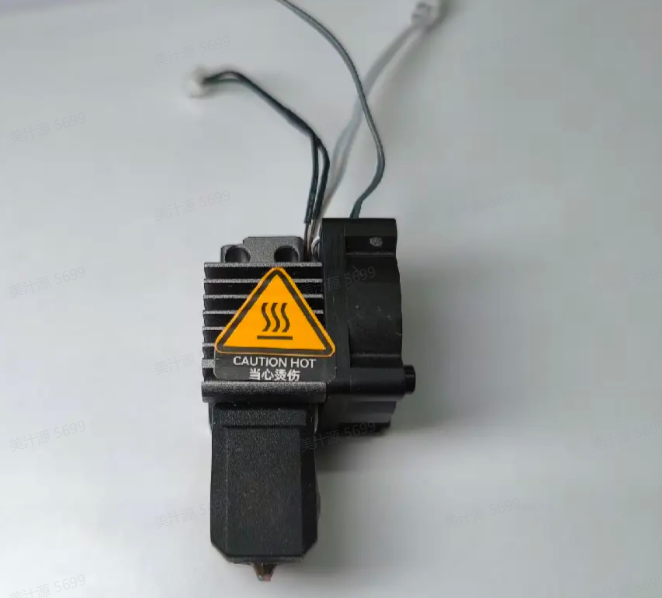
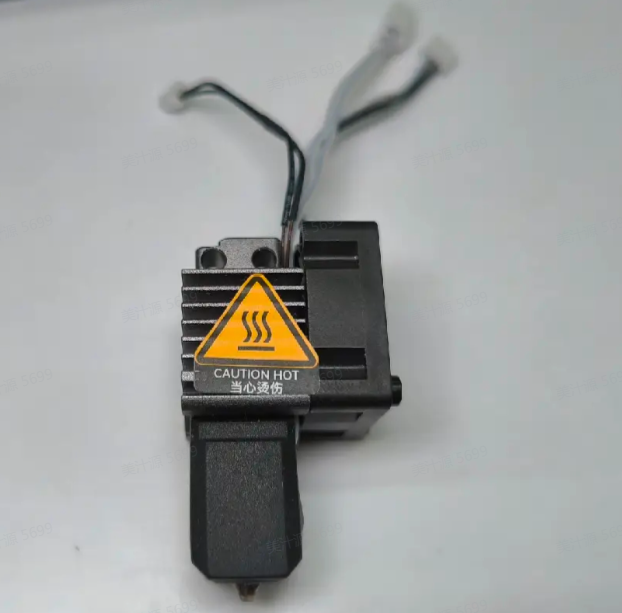
Occasionally, due to various reasons such as severe clogs, wear from abrasive materials, or the need for a different-sized nozzle, you may have to replace your hotend. Unlike other 3D printers, Bambu Lab hotends can be installed when cold, which eliminates the problems associated with filament oozing or leaking between the nozzle and the heat break interface. This is made possible because Bambu Lab hotends are designed as a single unit, incorporating the heatsink, throat, heater block, and nozzle.
Note: If you have replaced the nozzle with one of a different specification, please remember to sync the nozzle information on the device.
We offer two options for purchasing our hotends: Hotend with Nozzle and Complete Hotend Assembly. If you need to change the nozzle, you can either replace the Hotend with Nozzle or the entire Complete Hotend Assembly.
¶ Hotend with Nozzle
It is compatible with both the X1 Series and P1 Series 3D printers. We offer two options for the hotend type: hardened steel and stainless steel. Furthermore, we provide a range of nozzle sizes, such as 0.2mm, 0.4mm, 0.6mm, and 0.8mm. (If you want to know more about the compatibility of different nozzles and filaments, please refer to Filament Guide)
| Hotend Materials | Nozzle Tip | Heatblock | Heatbreak | Heatsink |
| Hardened steel | Heat-treated mold steel HRC 55-60 | Nickel-plated brass | Titanium alloy TC4 (Grade 5) | Aluminum alloy 6063 |
| Stainless steel | 304 stainless steel | Nickel-plated brass | Titanium alloy TC4 (Grade 5) | Aluminum alloy 6063 |
You can purchase it at our store here: Hotend with Nozzle.
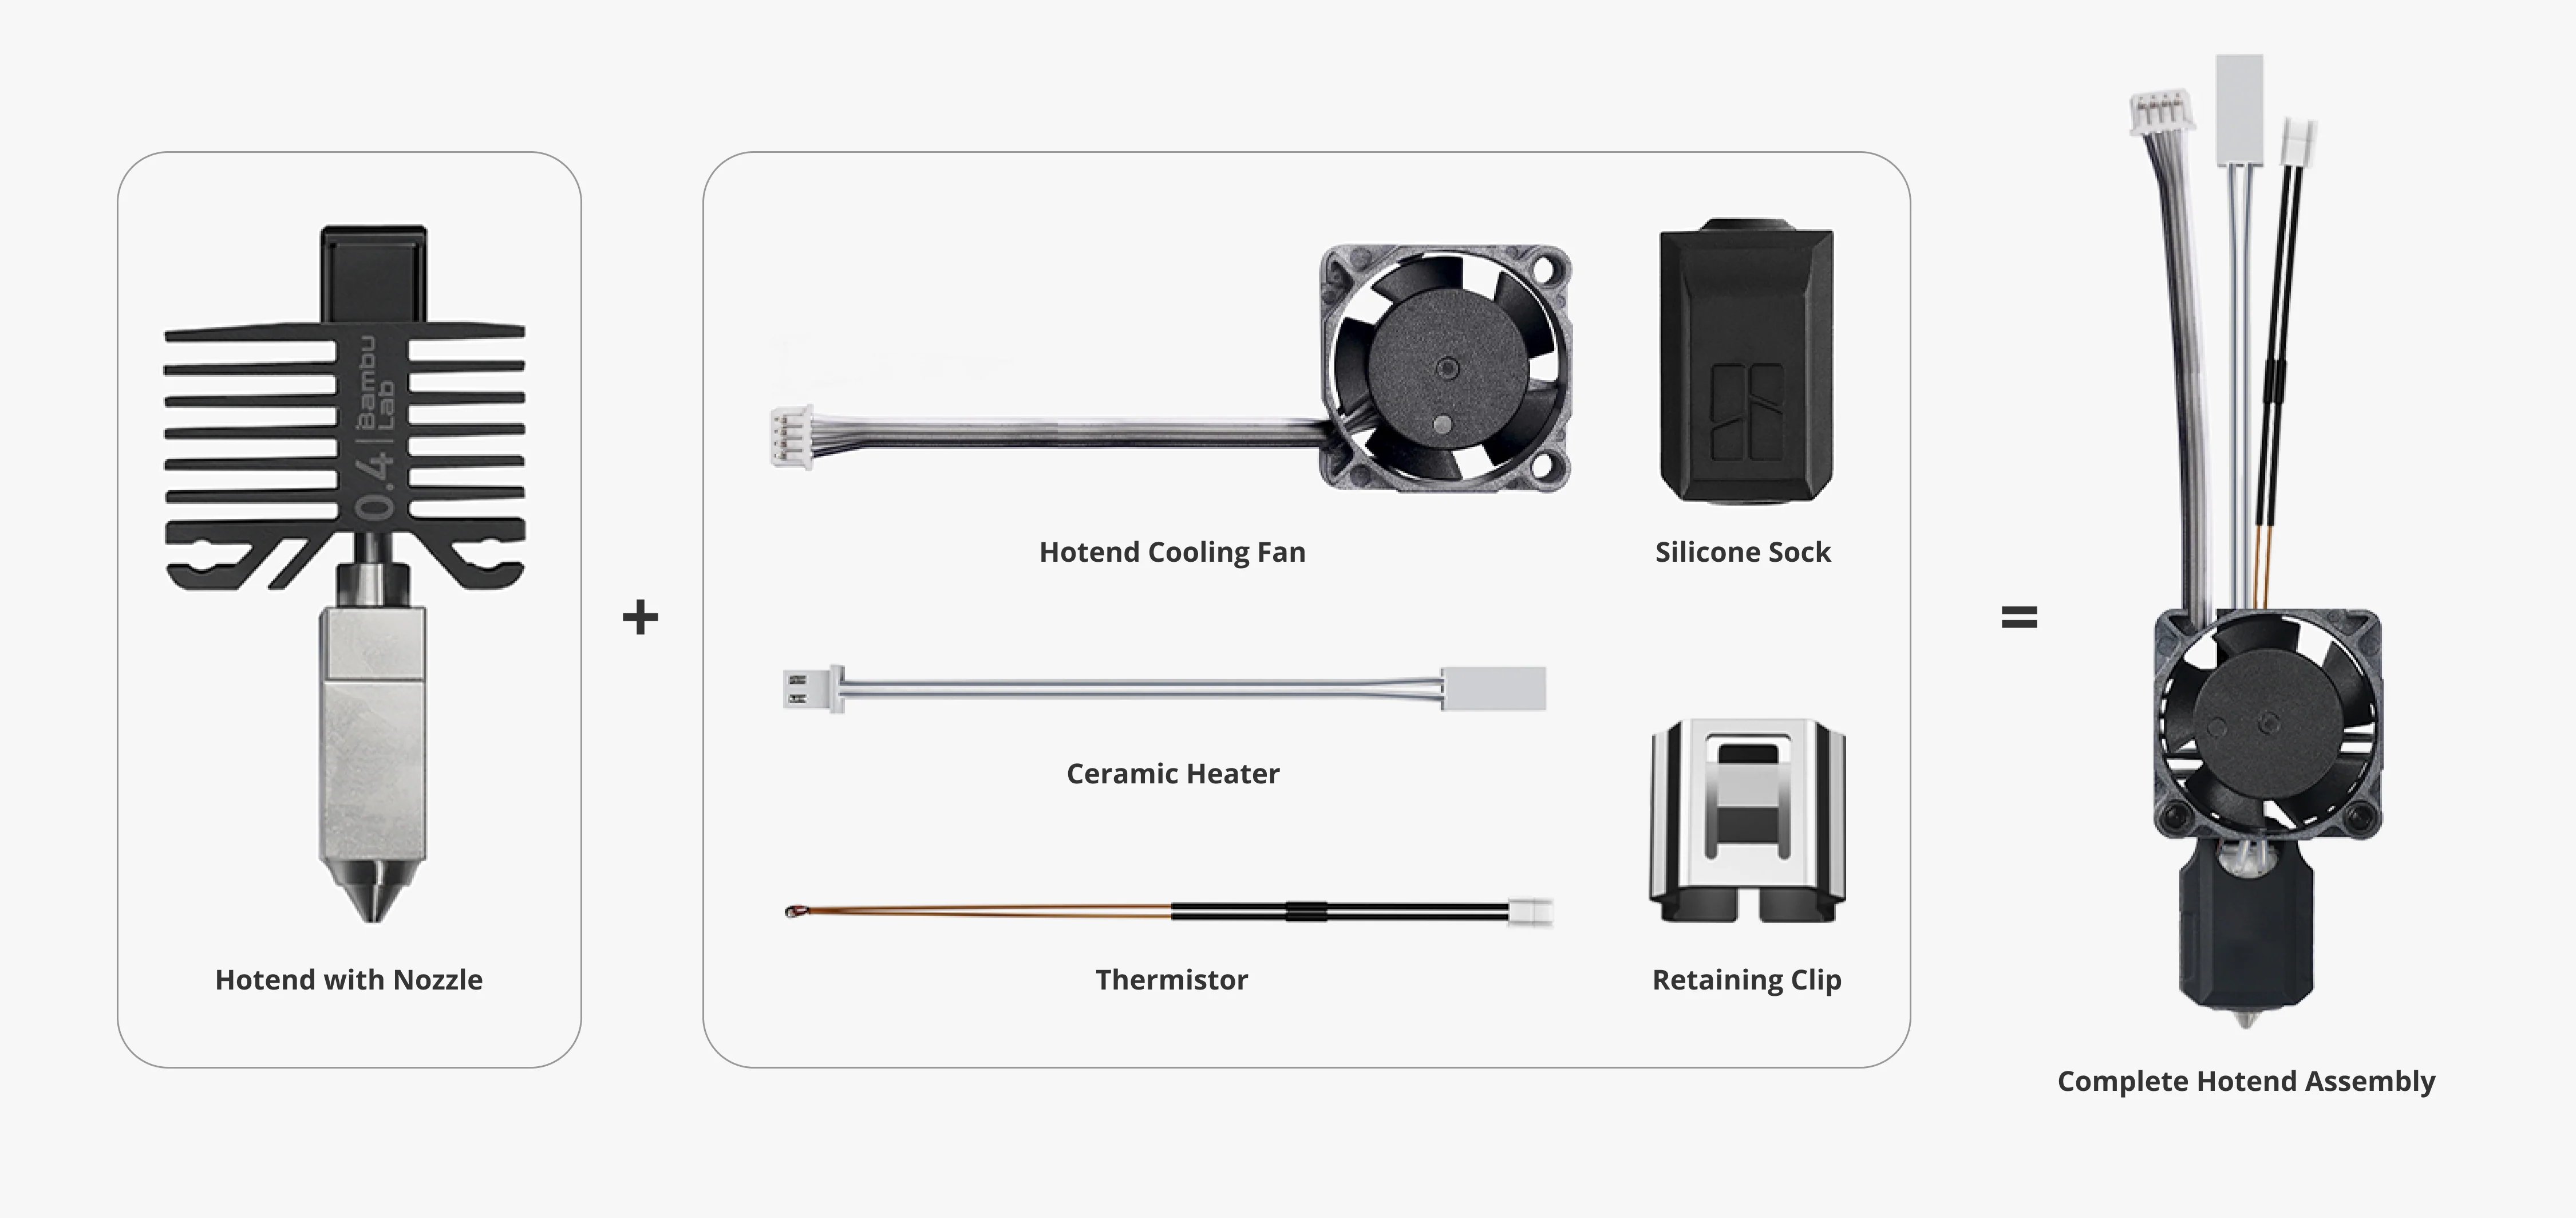
¶ Complete Hotend Assembly
Includes Hotend with Nozzle, Hotend Fan, Ceramic Heater, Thermistor (NTC), Silicone Sock for Hotend, and Retaining Clip, and all components pre-assembled for easy installation and immediate use in the X1 series 3D printer.
Please consider the compatibility of the Complete Hotend Assembly before making a purchase, as there are separate versions available for the X1 Series and P1 Series.
¶ Complete Hotend Assembly - X1 Series
(Note: It is compatible only with X1 and X1C, not with X1E.)
You can purchase it at our store here: Complete Hotend Assembly - X1 Series.
¶ Complete Hotend Assembly - P1 Series
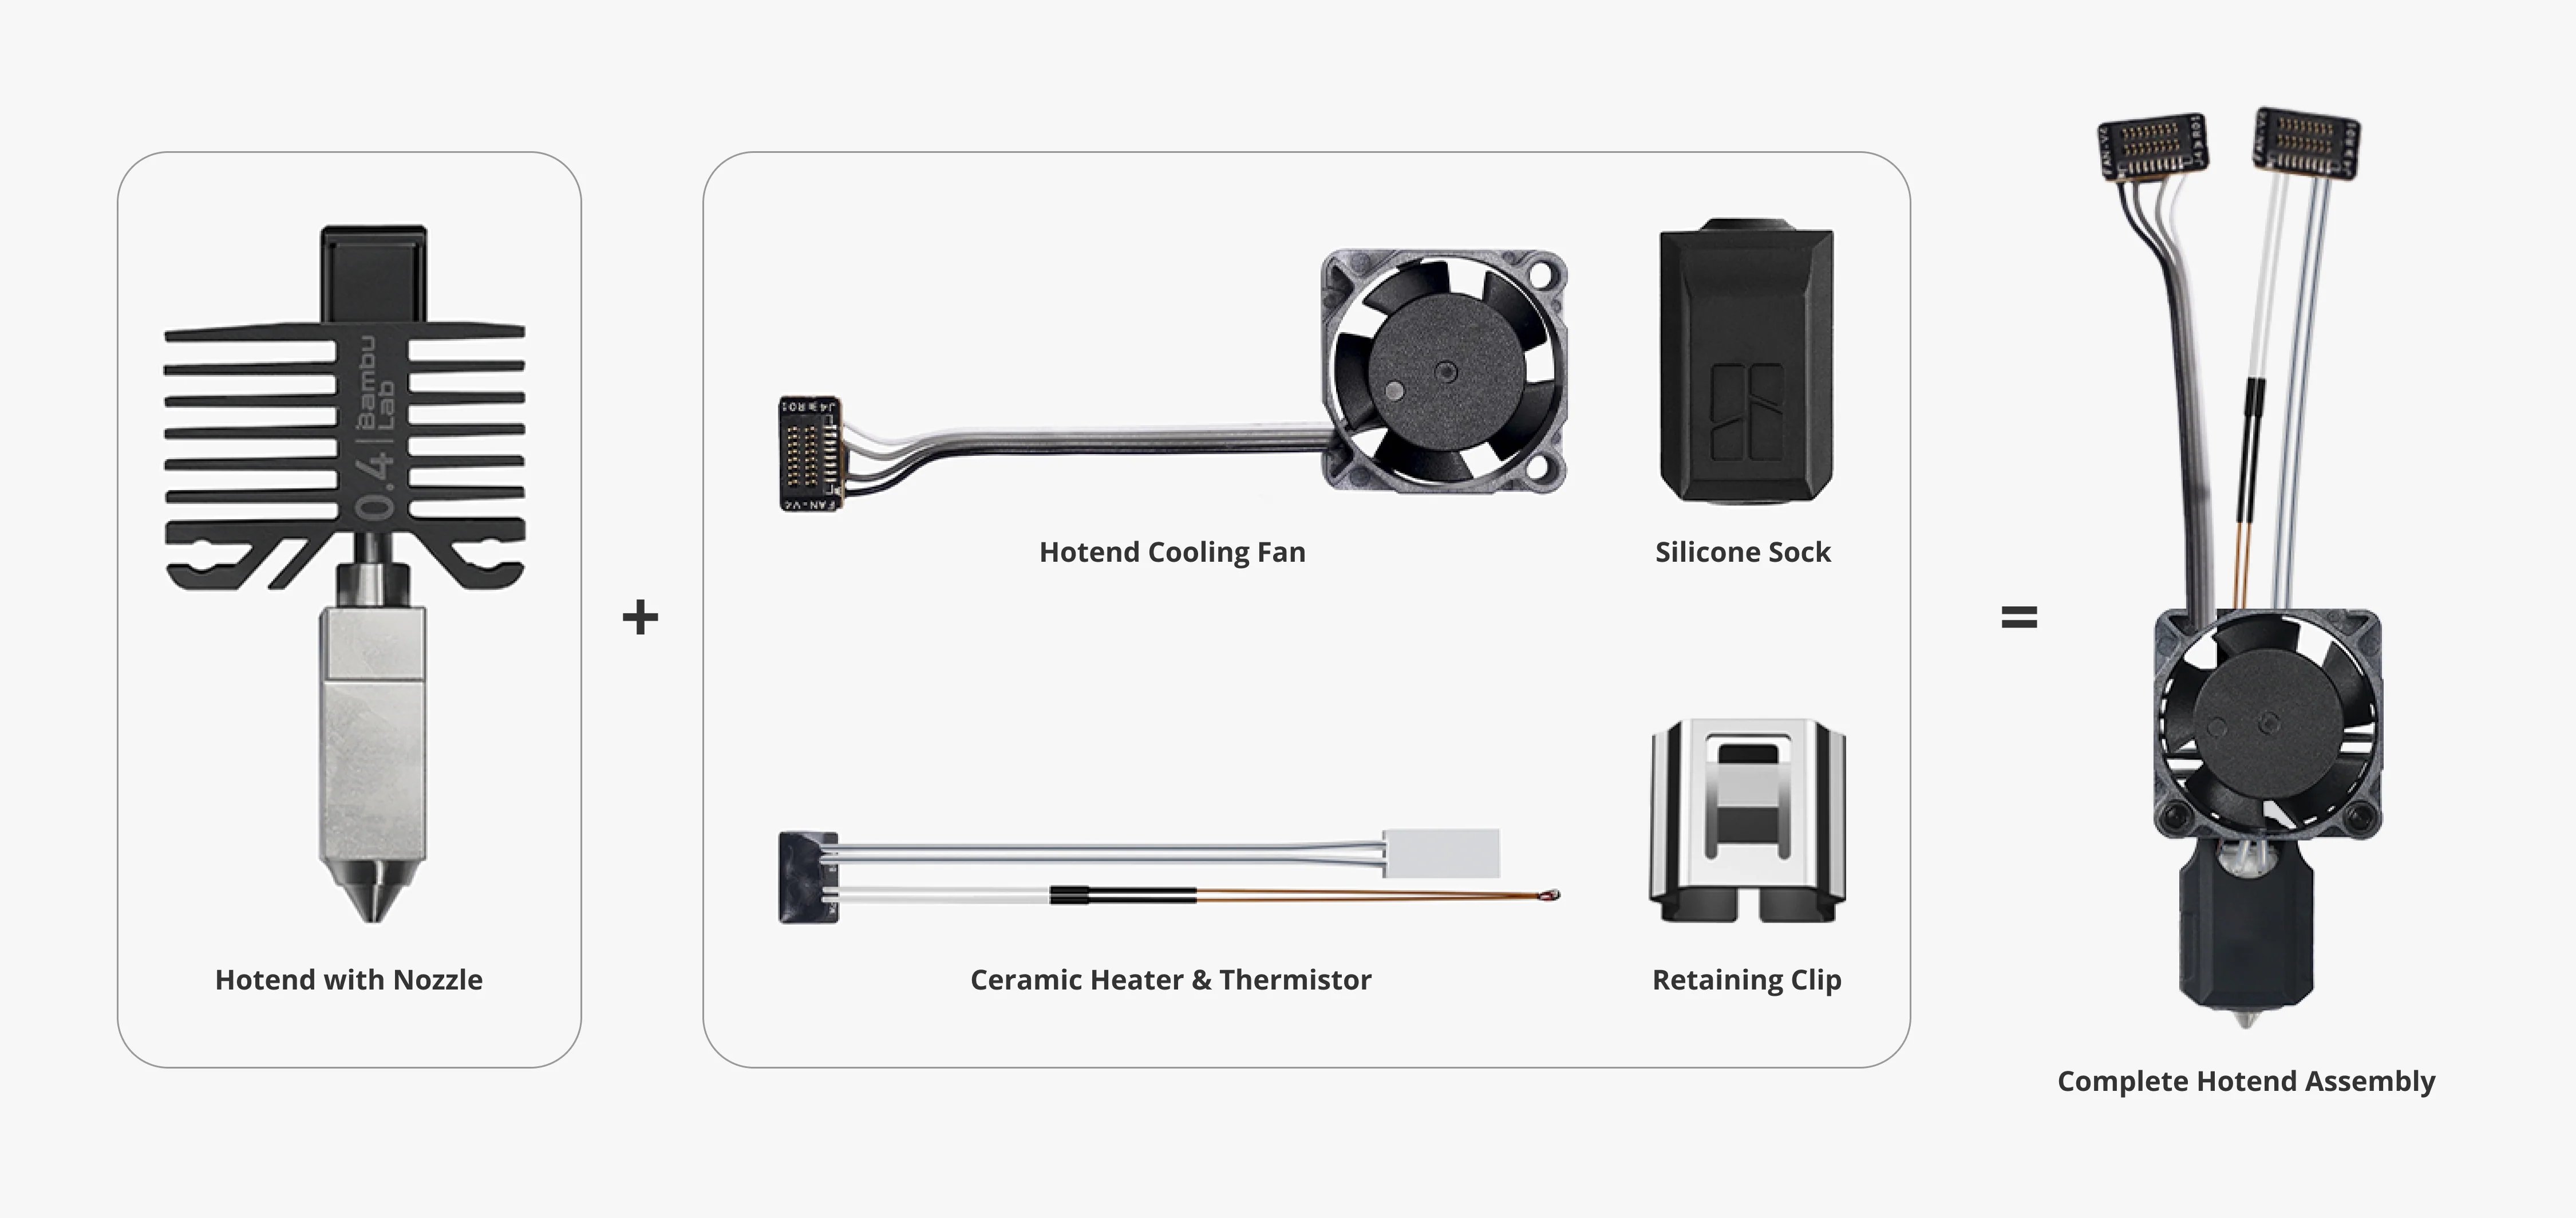
You can purchase it at our store here: Complete Hotend Assembly - P1 Series.
¶ Safety Warning
IMPORTANT!
It's crucial to power off the printer before performing any maintenance work on the printer and its electronics, including tool head wires, because leaving the printer on while conducting such tasks can cause a short circuit, which can lead to additional electrical damage and safety hazards.
When you perform maintenance or troubleshooting on the printer, you may be required to disassemble some parts, including the hotend. This process can expose wires and electrical components that could potentially short circuit if they come into contact with each other or with other metal or electrical components while the printer is still on. This can damage the electronics of the printer and cause further damage.
Therefore, it's essential to power off the printer and disconnect it from the power source before doing any maintenance work. This will prevent any short circuits or damage to the printer's electronics. By doing so, you can avoid potential damage to the printer's electronic components and ensure that the maintenance work is performed safely and effectively.
If you have any concerns or questions about following this guide, open a new ticket in our Support Page and we will do our best to respond promptly and provide you with the assistance you need.
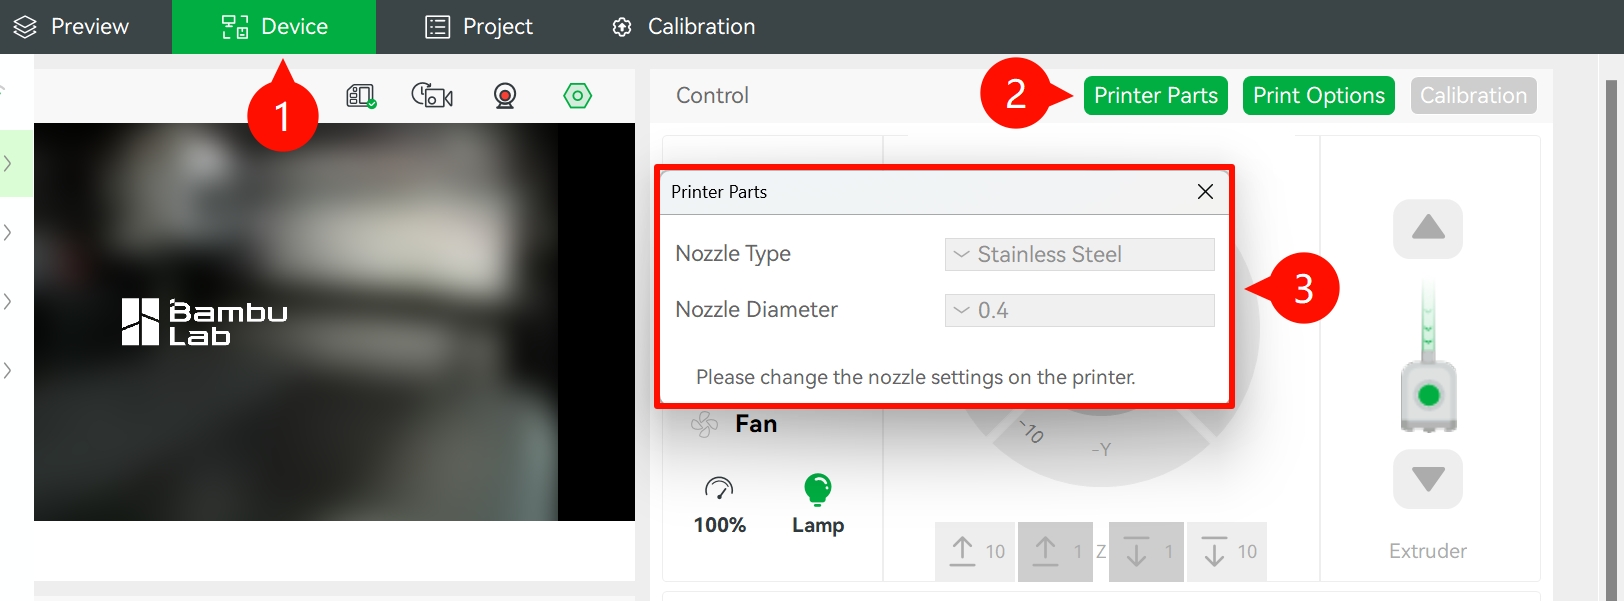
¶ Bambu Studio Software Settings Notice
In the latest version of Bambu Studio (Bambu_Studio_win_public-v02.01.01.52-20250616155614), the option to modify nozzle information under the "Printer Parts" section has been disabled (as shown in the screenshot below) and is now for display purposes only.
Some users may mistakenly consider this a software or hardware issue due to changes from previous versions. However, this adjustment is intended to enhance operational consistency and user safety. Nozzle changes must be performed directly on the printer. Allowing modifications via the software interface could mislead new users into thinking that a physical nozzle replacement is unnecessary before printing.
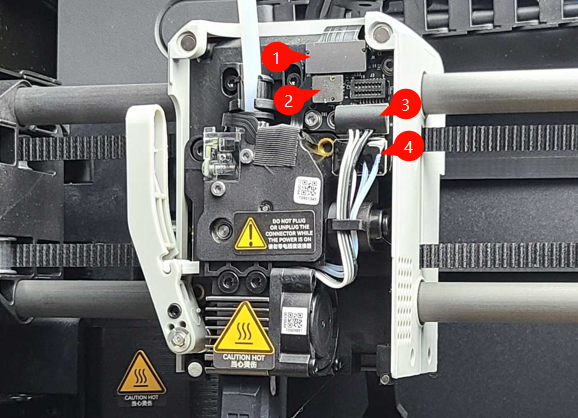
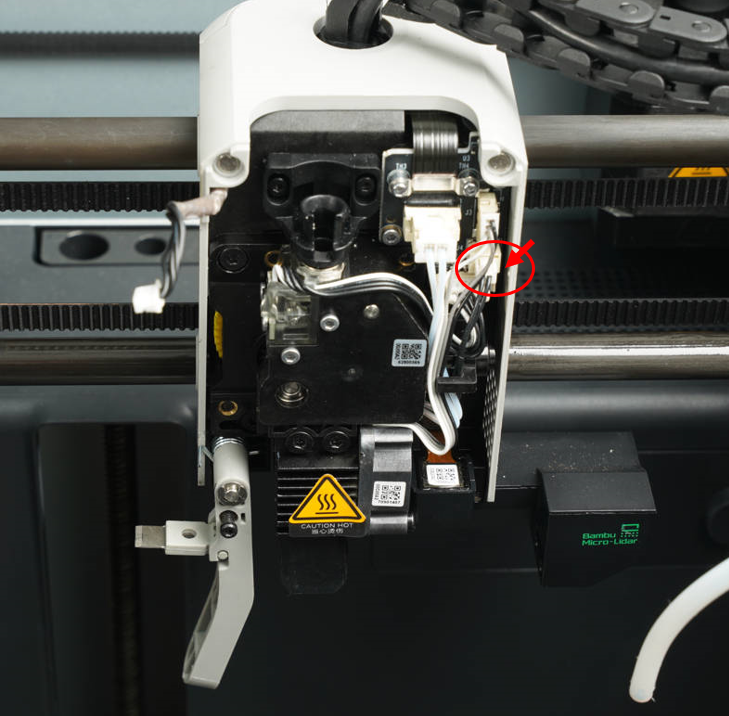
¶ Toolhead Wiring Diagram
The diagram below shows the correct wiring for the toolhead, for your reference.
¶ P1 Series
-
FPC Ribbon Cable
-
Hall Switch Ribbon Cable
-
Hotend Fan Ribbon Cable
-
Hotend Heater Wire
¶ X1 Series
-
Hotend Heater Wire
-
Hotend Fan Ribbon Cable
-
Hotend Thermistor Wire
¶ Video1 - Replacing the Complete Hotend Assembly
¶ Video2 - Replacing the Hotend with Nozzle/Ceramic Heater/Thermistor/Hotend Fan
If the ceramic heater and thermistor cannot be easily removed because the thermal grease is hard, please do not forcibly pull them out to avoid damaging them. First, apply alcohol to the thermal grease and let it sit for about 5 minutes. When the thermal grease is soft, carefully take down the ceramic heater and thermistor.
¶ Required Tools and Parts
- H2.0 Allen key & Q-tip
- Needle nose pliers
- Bambu Lab hotend or complete hotend assembly
Note: If you are replacing only the hotend in your printer's complete hotend assembly, you can reuse the Ceramic Heater, Thermistor, retaining clip, Silicone Sock for Hotend, and Hotend Fan. However, if you are not reusing these components and not installing a complete hotend assembly, you will need to order them from the Bambu Lab Official Store.
Thermal Paste that may be used - only for reference:

¶ Removing the complete hotend assembly (see Video 1)
- Go to the Temperature/Axis settings and ensure that the hotend temperature is set to 50°C or lower. Then, power off the device.
- Open the magnetic cover and set it aside.
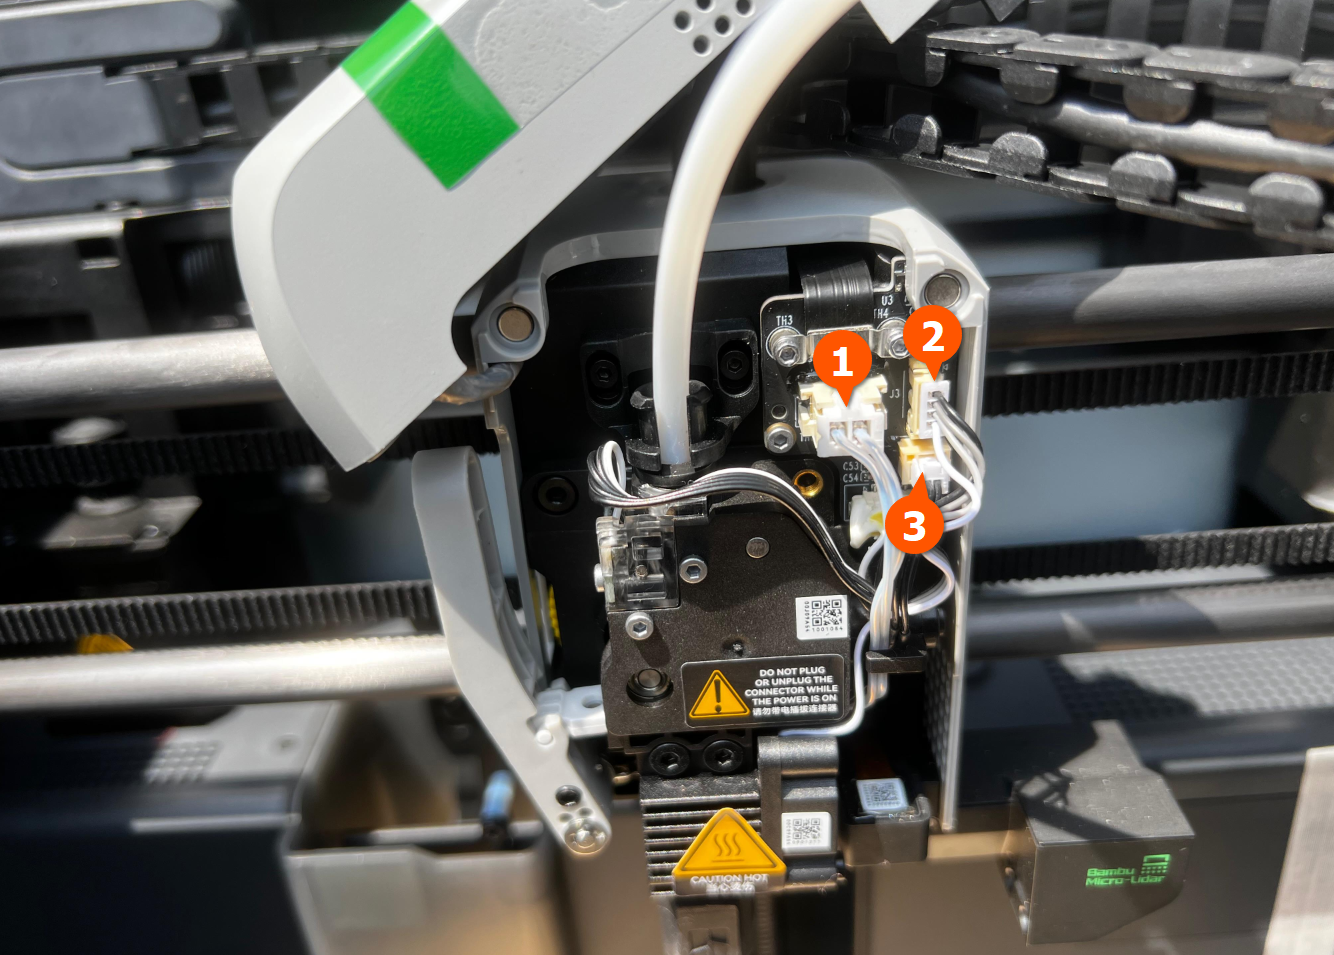
- Gently remove the bigger 2-pin plug of the ceramic heater, the 4-pin plug of the hotend fan, and the very small 2-pin plug of the thermistor.
- Using the H2 Allen key, remove the two screws located near the top of the hotend's heatsink.
- Carefully move the wires out of the plastic wire clip and remove the complete hotend assembly.
NOTE: If you are installing another complete hotend assembly, you should now skip to the section titled “Installing the complete hotend assembly” below. Otherwise, please continue.
¶ Disassembling the complete hotend assembly (see Video 2)
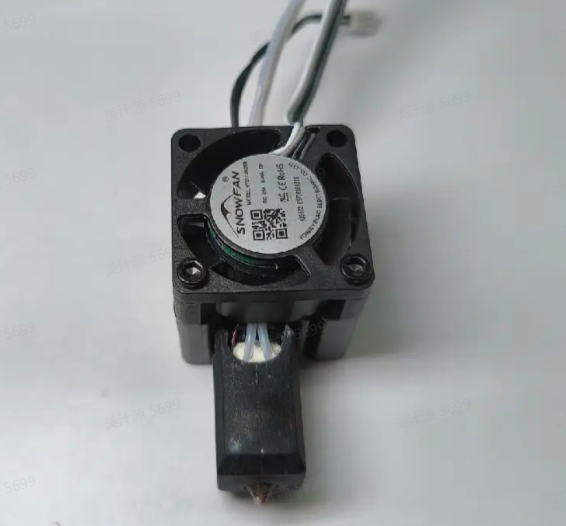
- Remove the 2 screws holding the fan in place.
- Remove the silicone sock, ensuring that the silicone sock wire notch aligns with the heatsink wire channel.
- Carefully pull down and away the retaining clip, which holds both the ceramic heater and thermistor in place.
- Using needle nose pliers, delicately grip the two wires of the ceramic heater and detach them.
- Using needle nose pliers, gently grasp the two wires of the thermistor and remove them.
If the ceramic heater and thermistor cannot be easily removed because the thermal grease is hard, please do not forcibly pull them out to avoid damaging them. First, apply alcohol to the thermal grease and let it sit for about 5 minutes. When the thermal grease is soft, carefully take down the ceramic heater and thermistor.
Replacing the hotend/ceramic heater/thermistor(NTC)/hotend fan can also refer to the above instructions.
¶ Assembling the hotend as a complete hotend assembly (see Video2)
- While holding the brand new hotend, observe the two thin raised tabs on one side of the heater block (the same side as the heatsink wire channel). The ceramic heater will be installed between these two tabs, which are designed to secure its position. Additionally, take note of a small hole on the adjacent side of the heater block. This is where the thermistor will be installed.
- Open the thermal grease package and apply a generous amount to one end of a Q-tip.
- Apply the thermal grease generously on both sides of the ceramic heater and around the small thermistor hole.
- Insert the thermistor into the hole, ensuring that the wires are guided through the heatsink wire channel.
- Carefully position the ceramic heater, making sure that the wires are facing away from the heater block and are routed through the heatsink wire channel (refer to Video2).
- Gradually slide the retaining clip upward, noting that the side of the clip that goes over the thermistor has a bulge.
- Place the silicone sock with the silicone wire notch on the same side as the heatsink wire channel (refer to Video2).
- Attach the hotend fan using the two screws and your H2.0 Allen key.
- Congratulations! You have successfully transformed your spare hotend into a complete hotend assembly, ready to be installed into your 3d printer.
Pay attention to the installation direction of the hotend fan. Reverse installation may cause errors, abnormal hotend fan speed or frequent plugging.
- Correct installation:
- Incorrect installation:

¶ Sync Nozzle Information on the Device
If you have replaced the hotend with one of a different diameter or material, please refer to the animation below to update the nozzle information on the screen:
¶ Installing the complete hotend assembly (see Video1)
- Position the complete hotend assembly in a way that the two screw holes are located behind the bracket.
- Carefully insert the two screws and tighten them evenly, ensuring not to overtighten.
- Connect the very small 2-pin thermistor plug, the 4-pin hotend fan plug, and finally, the larger 2-pin ceramic heater plug.
- Guide all the loose cables through the plastic wire clip.
- Replace the Front Housing… and you are done!!!
¶ Warning:
Before attempting to disconnect the thermistor connector on the X1/X1C, please ensure that you press the buckle/latch to open it. The thermistor plug is equipped with a buckle/latch, which is different from the fan and heater connectors. Neglecting to open the buckle/latch before disconnecting the thermistor connector could result in damage to the thermistor plug and/or the PCB connector.
¶ End Notes
We hope the detailed guide provided has been helpful and informative.
To ensure a safe and effective execution, if you have any concerns or questions about the process described in this article, we recommend submitting a technical ticket regarding your issue. Please include a picture or video illustrating the problem, as well as any additional information related to your inquiry.