¶ AMS Setup
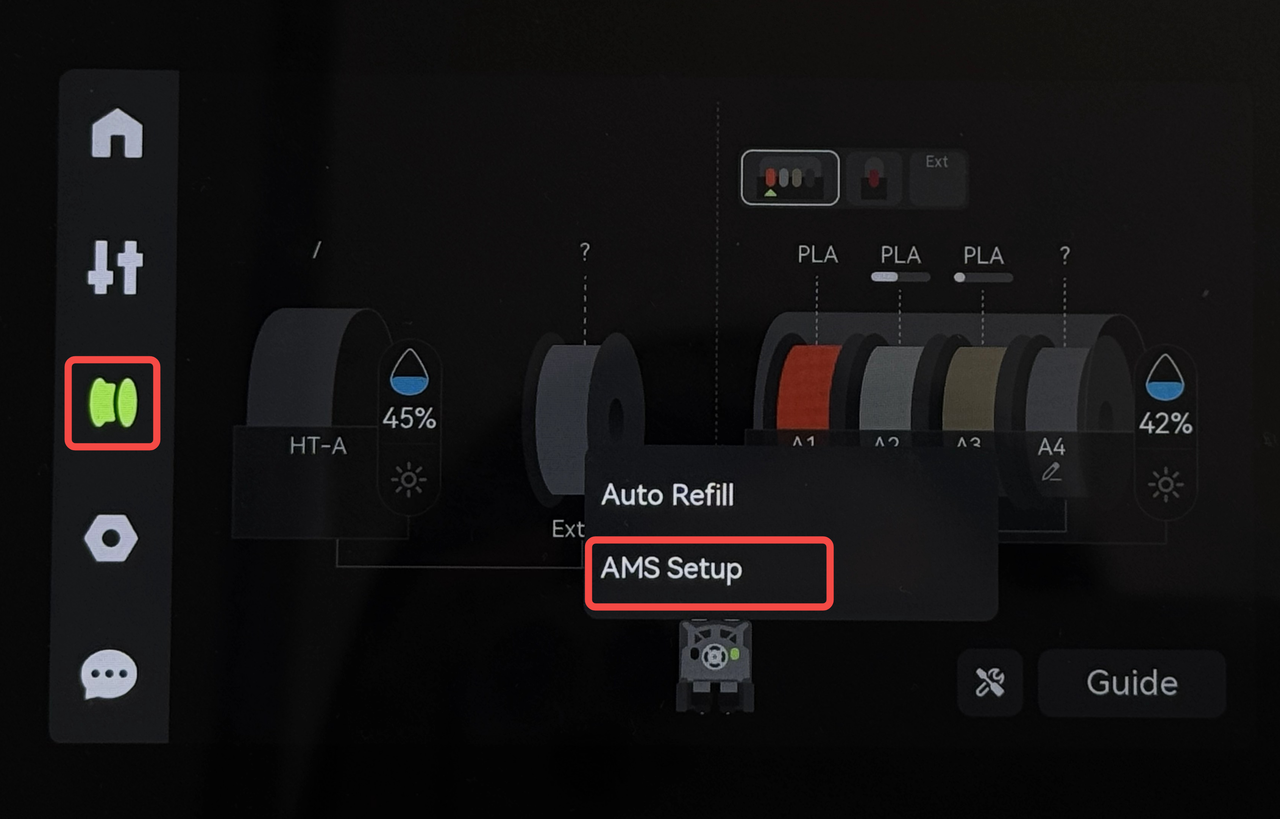
When connecting AMS 2 Pro to an H2D printer for the first time, you need to perform an initialization. Because H2D is equipped with dual extruders, this step aims to detect which side of the extruder AMS is connected to. On the "Filament" Page - "AMS Setup", select "Auto Mode" or "Manual Mode" to start the AMS setup.
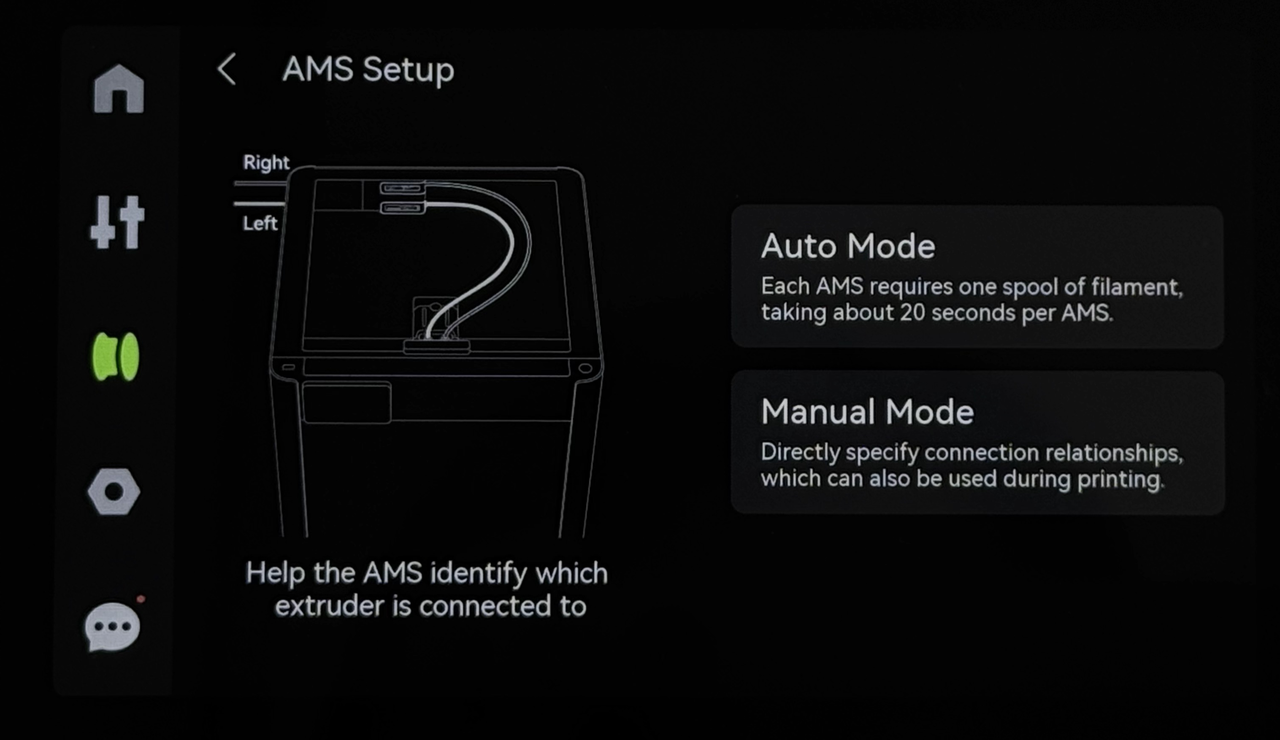
¶ Auto Mode
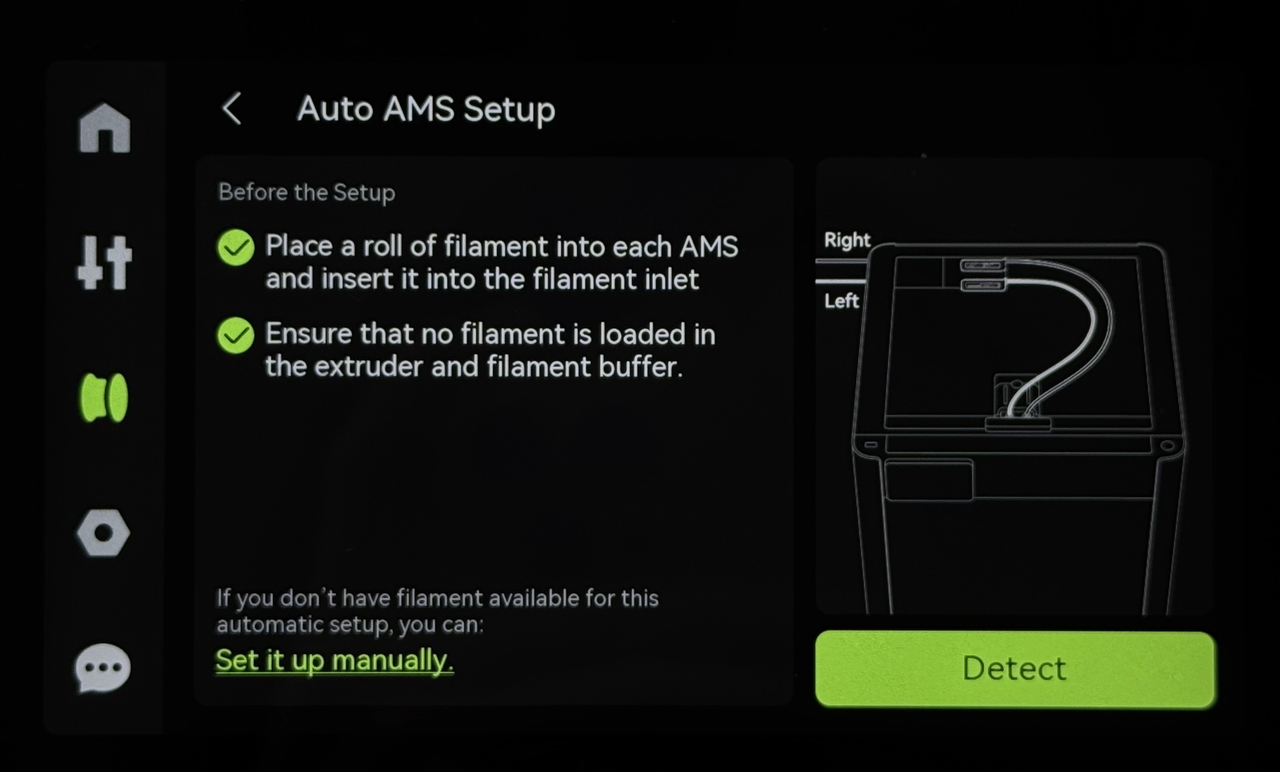
Operation steps:
-
Enter the printer screen "Filament" → "AMS Steup" → "Auto Mode";
-
The system automatically detects the extruder (left/right) to which the AMS is connected.
Note:
-
Ensure that the filament is inserted into AMS 2 Pro (any slot is fine).
-
Any loaded filament must be unloaded in advance.
-
Ensure that no filament is broken in the buffer. Ensure that there is no residual filament inside the filament buffer (to avoid leftover filament inside).
Working principle:
AMS sends the filament to the extruder. Each left and right extruder is equipped with a Hall sensor. The signal triggered by the Hall sensor is used to determine which extruder AMS is paired with.
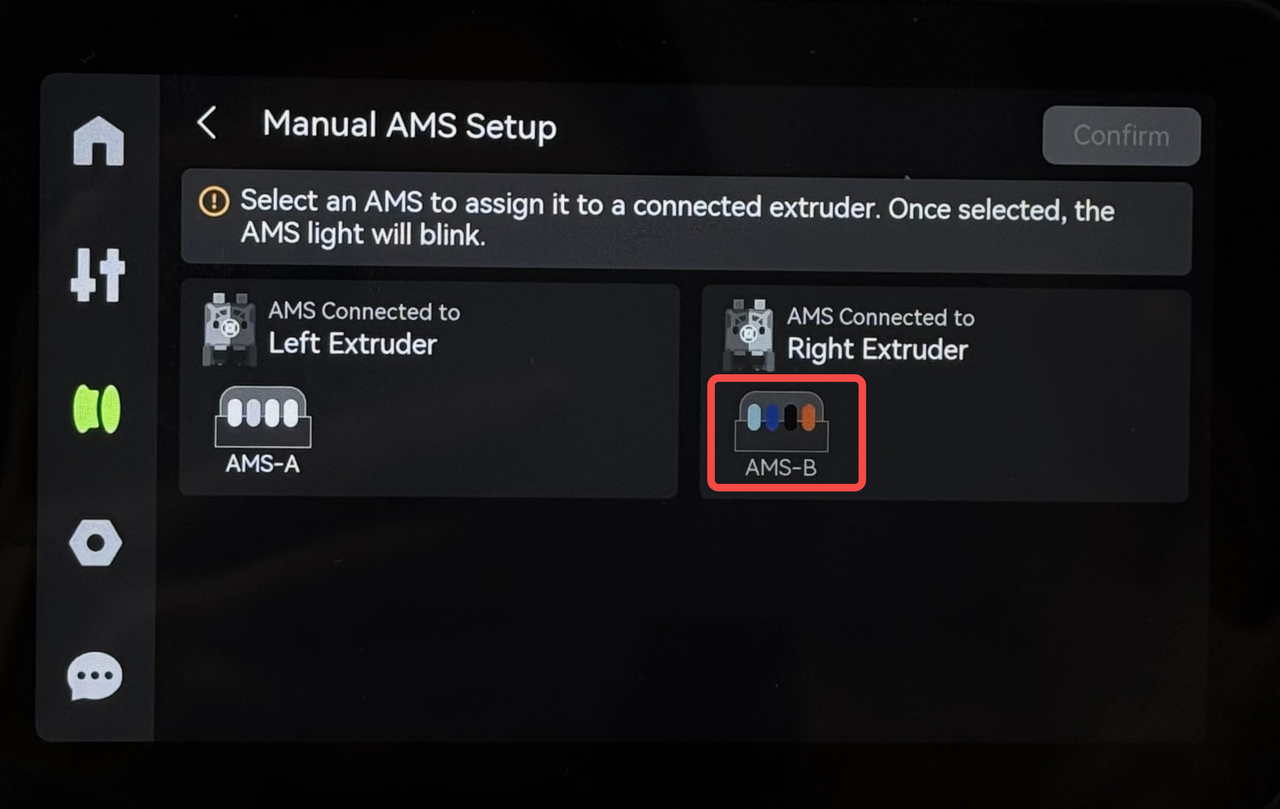
¶ Manual Mode
Applicable scenarios: Manually adjust the pairing relationship between AMS and extruder when there is no filament in AMS.
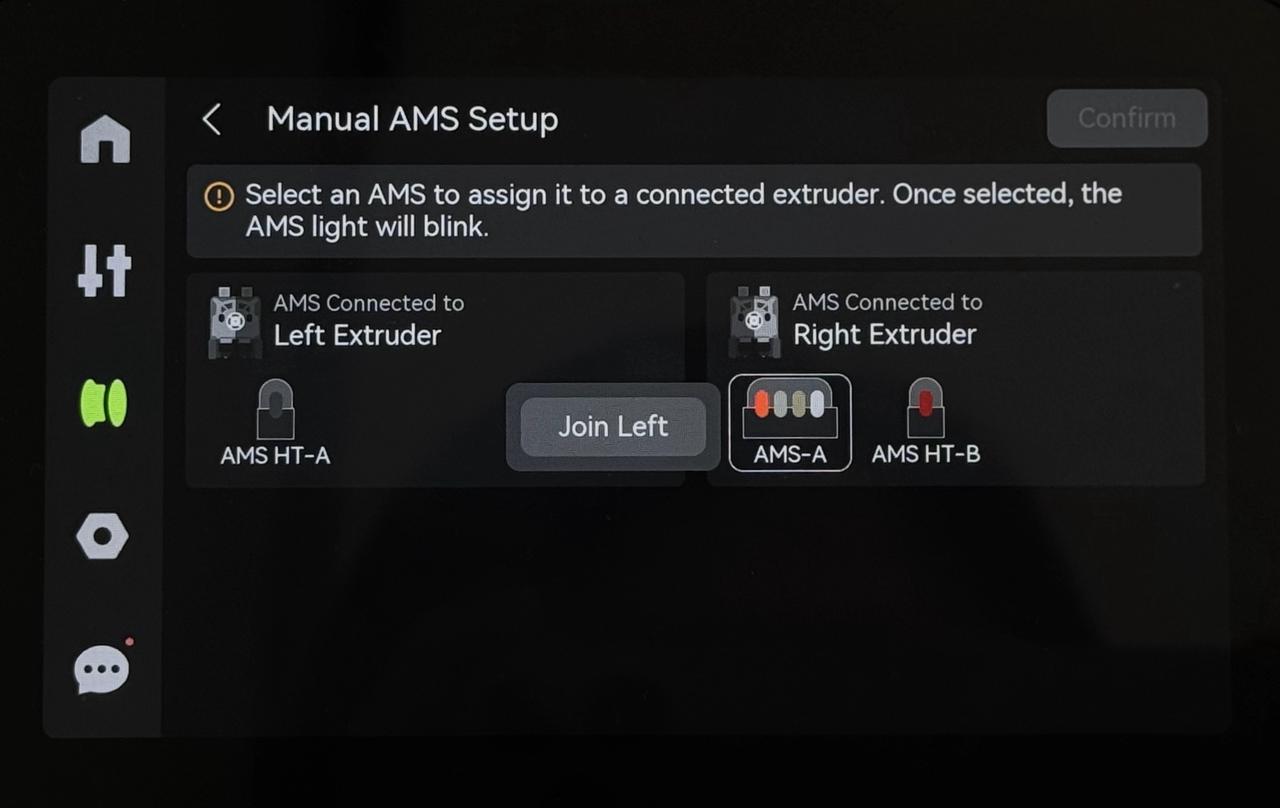
Operation steps:
-
Enter "Filament" → "AMS Setup" → "Manual Mode";
-
Manually specify the extruder side (left/right) to which AMS is connected.
Restrictions:
- When an AMS has sent the filament to the extruder, its icon will be gray and the pairing relationship with the extruder cannot be changed.
¶ AMS Features
¶ Pre-loading
Function: Tighten the filament roll on the spool to ensure that the filament on the spool is not loose, and provide interactive feedback when inserting.
Trigger method: When the AMS 2 Pro is idle, insert the filament into the feeder → automatic pre-loading (the feeder sends the filament to the AMS filament hub and then pulls it back).
Insertion assistance function: Click the empty slot icon → the feeder motor starts to rotate, which can be used to assist in inserting.
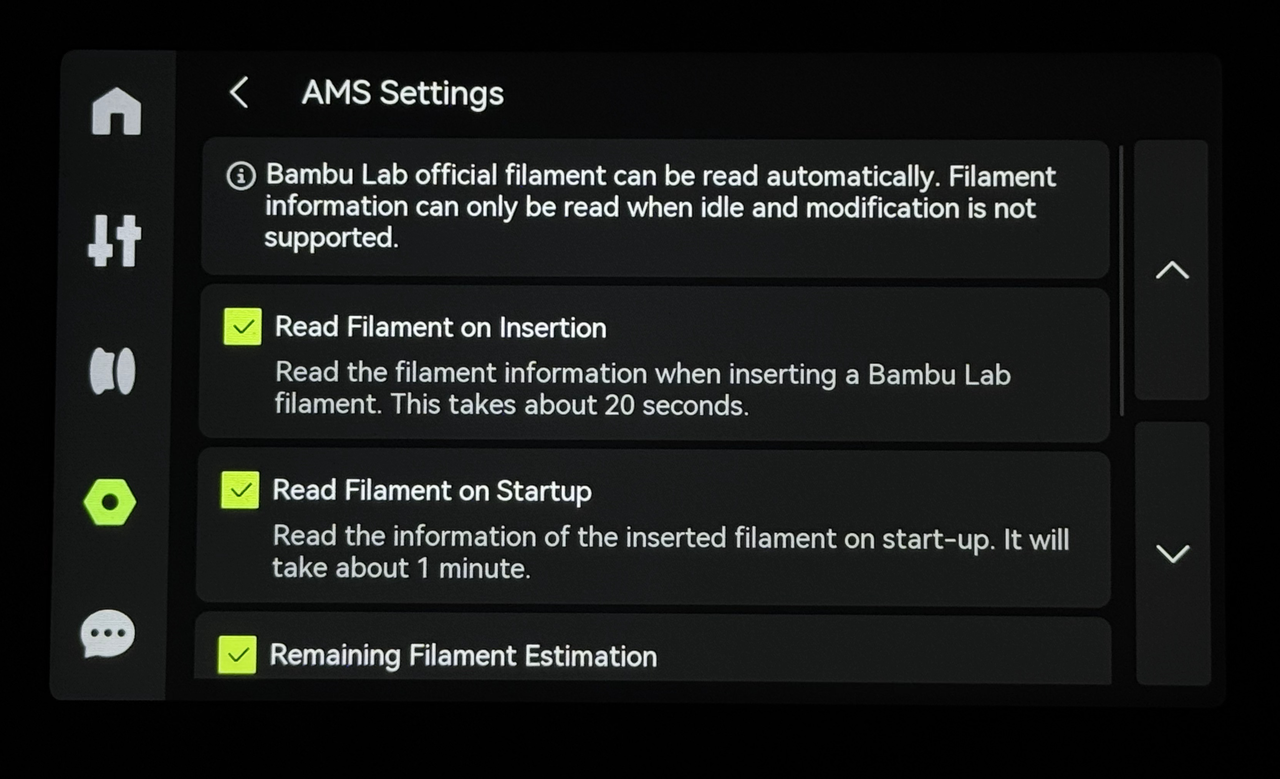
¶ Reading RFID
Mode settings:
You can set the Reading RFID function in the screen "Settings" - "AMS Options".
-
Read Filament on Insertion: automatically read RFID after inserting the filament;
-
Read Filament on Startup: automatically read the RFID information of the inserted filament after restarting AMS;
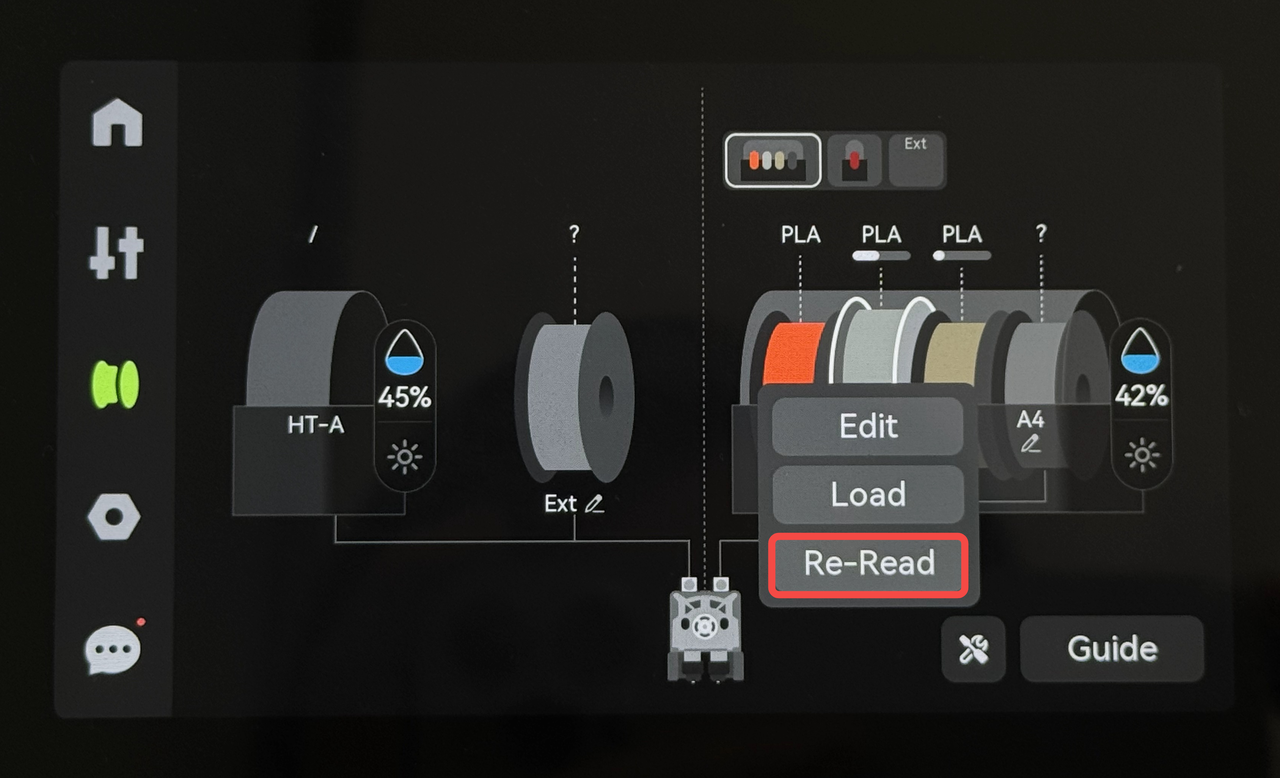
- Manual read: click the corresponding slot → "Re-Read" to re-read the RFID of the slot.
 |
 |
|---|
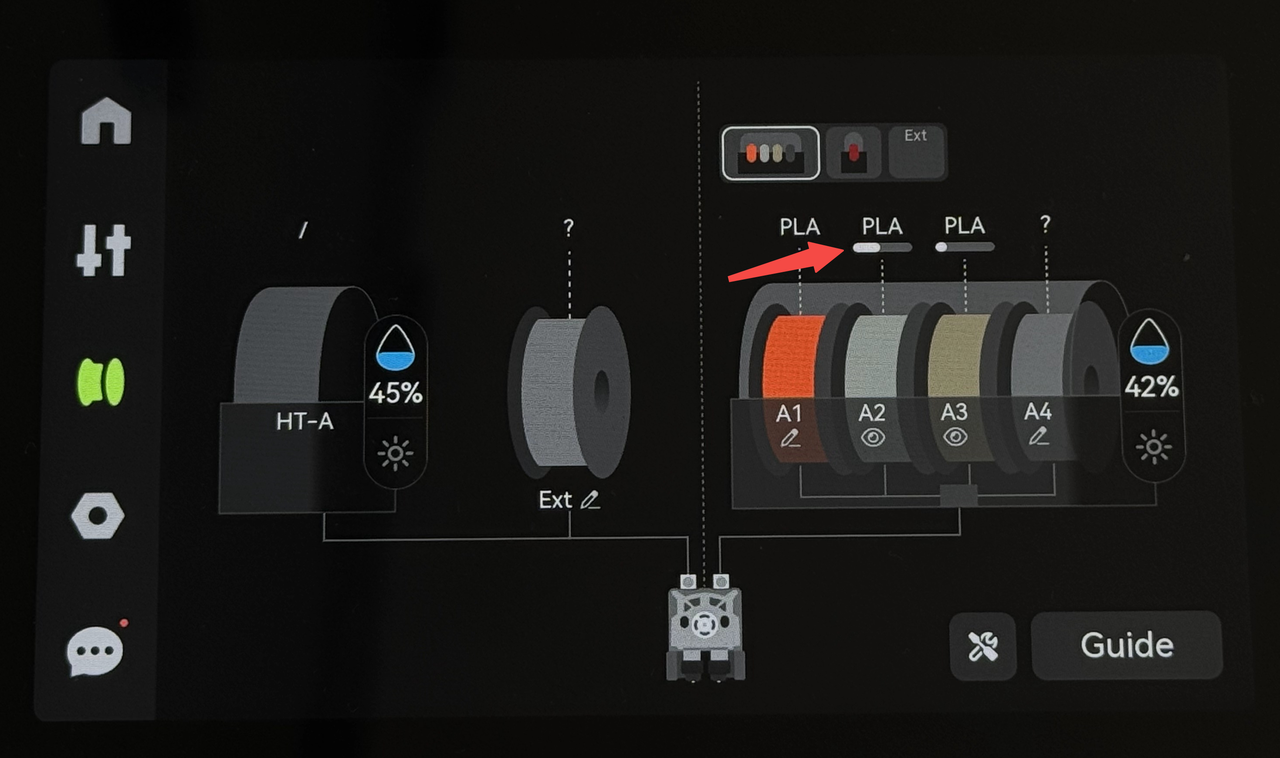
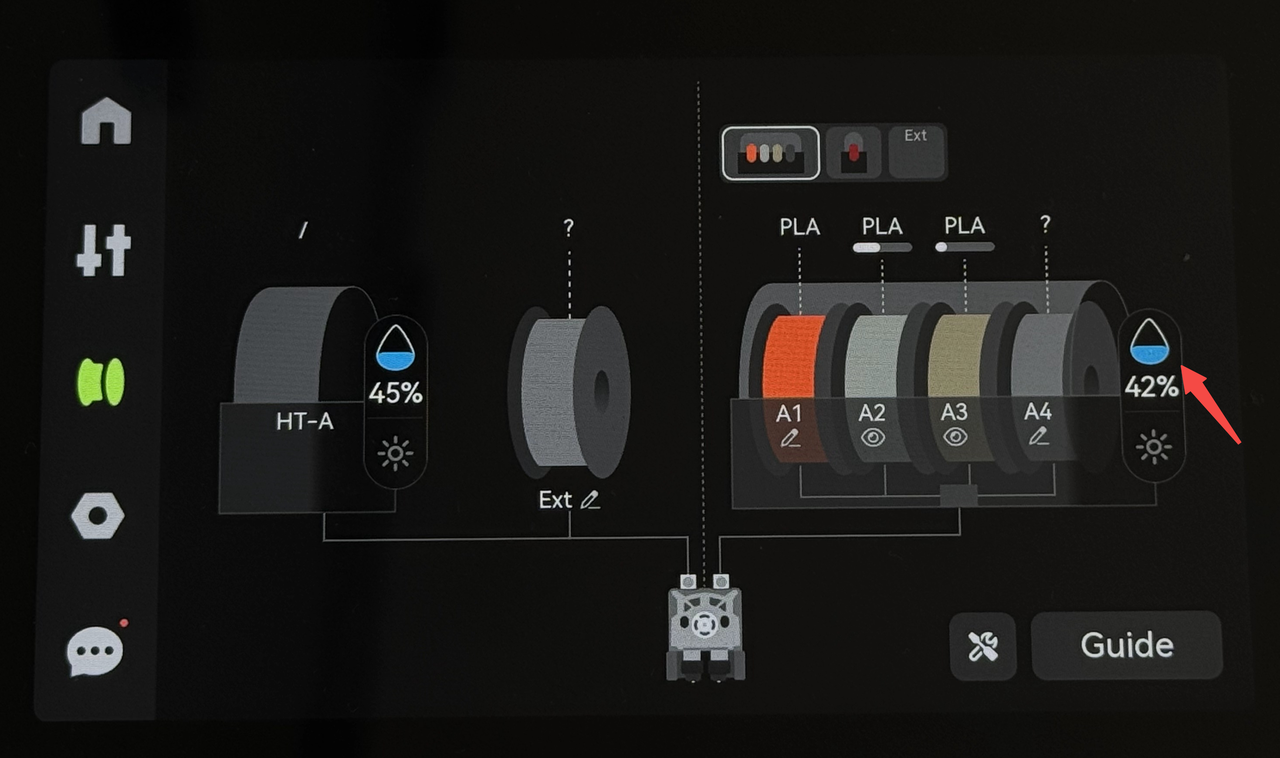
¶ Remaining Filament Estimation
Working principle: The remaining filament is estimated by the length of the filament fed out by the RFID tag after one rotation (the complete 1kg filament roll is 100% capacity by default). If this function is enabled, the RFID reading process will be carried out twice, the first time reading the filament information and the second time estimating the remaining capacity.
Display location: The small horizontal bar below the filament name shows the estimated remaining filaments.
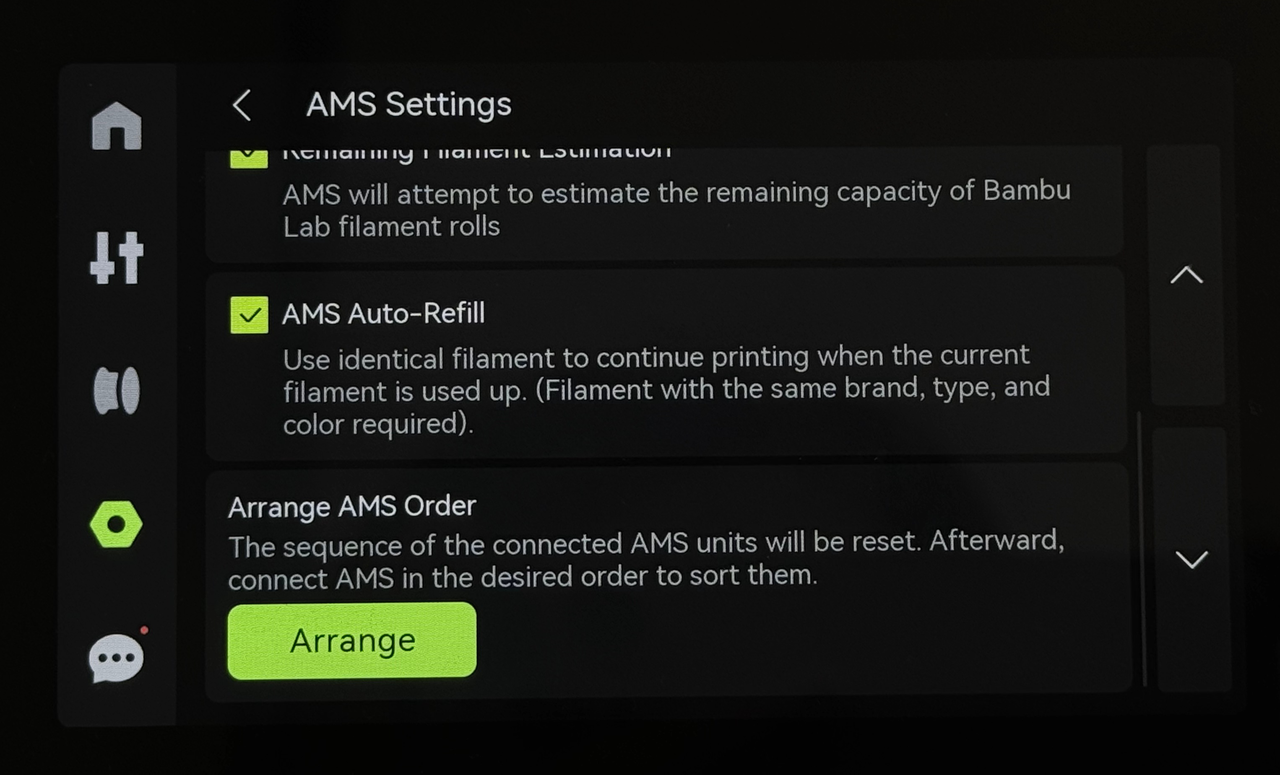
¶ Arrange AMS Order
Default order logic: Each AMS will be assigned an order and displayed on the screen. Directly connected to the printer via a 6-pin cable is AMS A, and the cascaded ones are B, C, and D;
Manual reset: Click "Arrange" → Reconnect AMS as needed.

¶ AMS Auto-Refill
Enable conditions:
-
The filament properties are exactly the same (brand, type and color) to form a refill relationship.
-
The filaments must be located in the AMS connected to the same extruder (left to left, right to right).
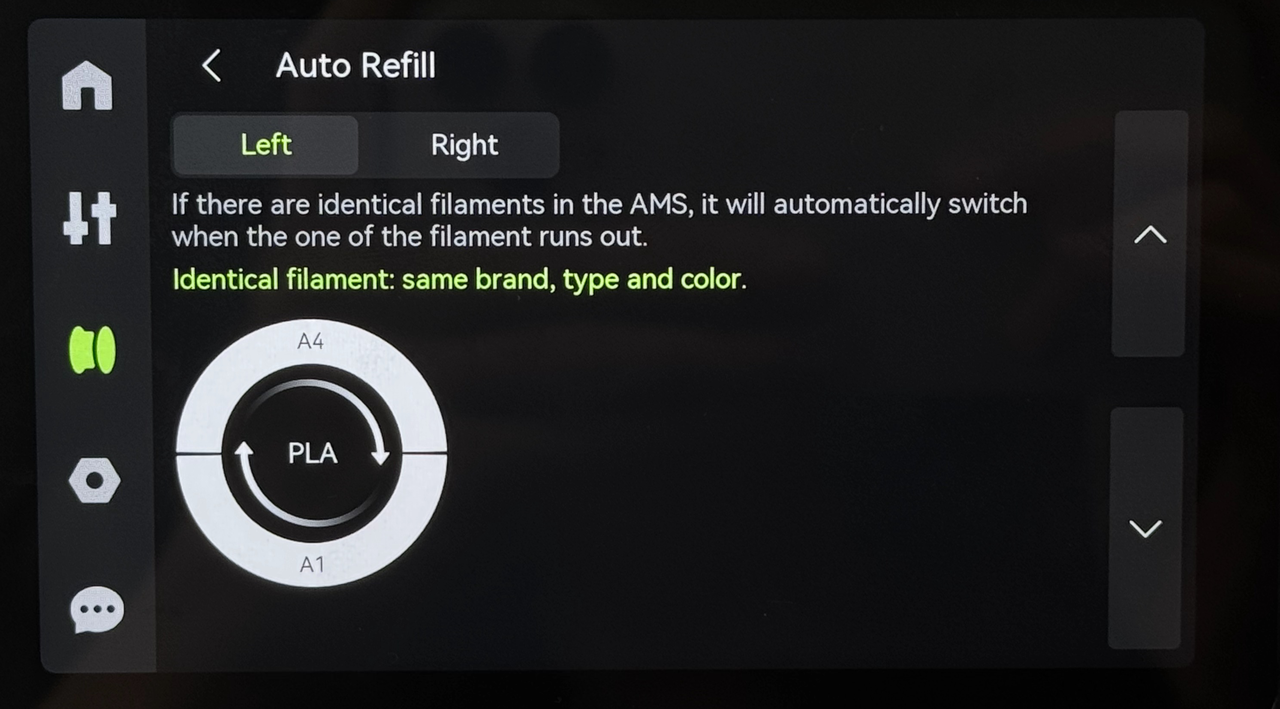
Operation steps:
- "Settings" → "AMS Options" → Select "AMS Auto-Refill" to enable the auto refill function.
-
"Filament" → "Auto Refill" → View the refill relationship on the left and right extruder pages.

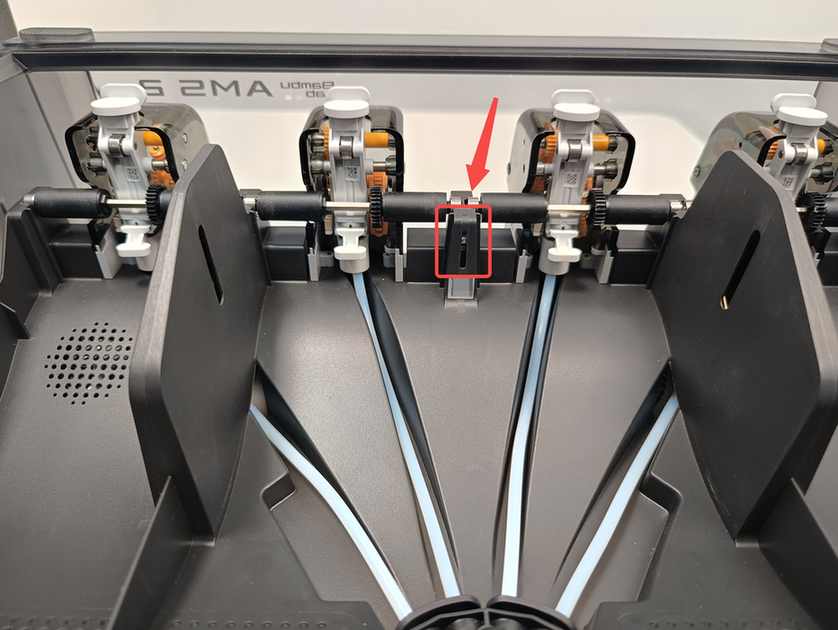
¶ Humidity monitoring
The AMS 2 Pro has a sensor between slot 2 and slot 3 that can be used to detect humidity and temperature inside the AMS.
- View path: "Filament" → Click the AMS humidity icon → Enter the "Drying and Humidity" page;

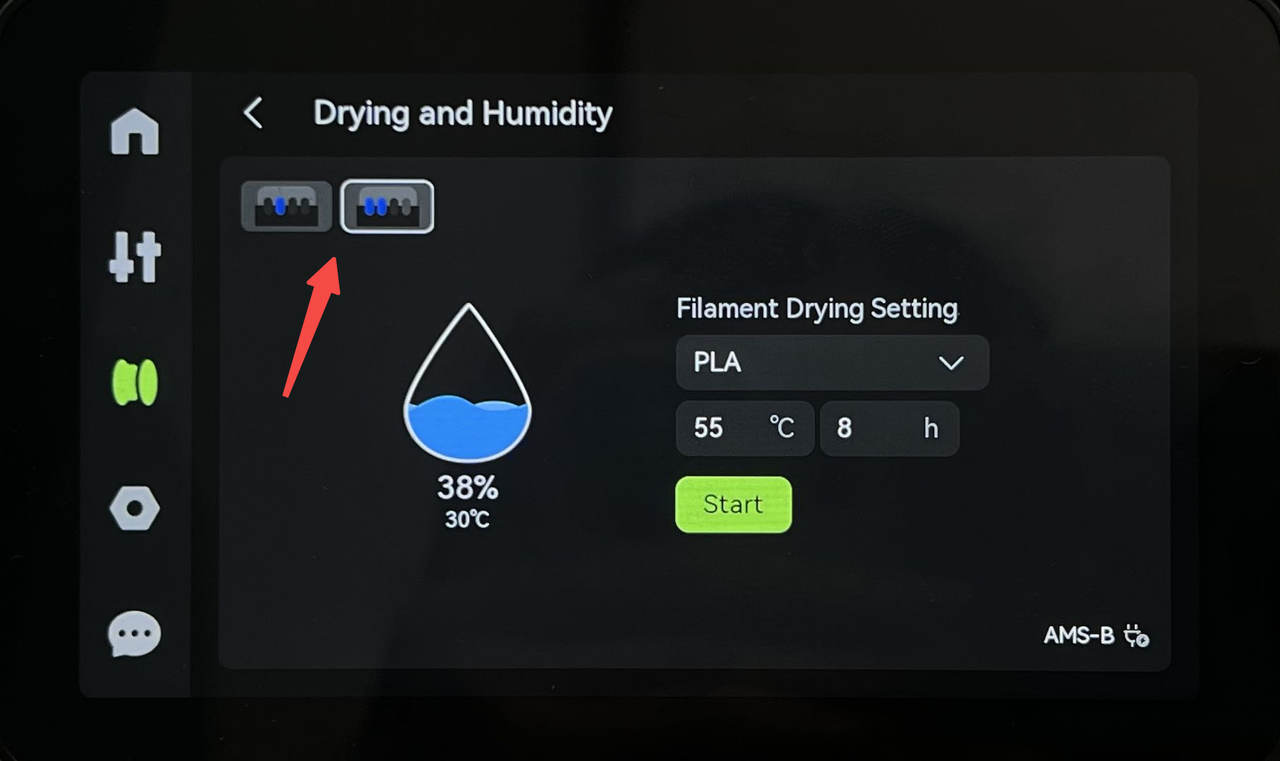
- Display content: Click the icon in the upper left corner to switch between different devices and view the real-time humidity and temperature data of each AMS.

¶ Drying filament
¶ Function Overview
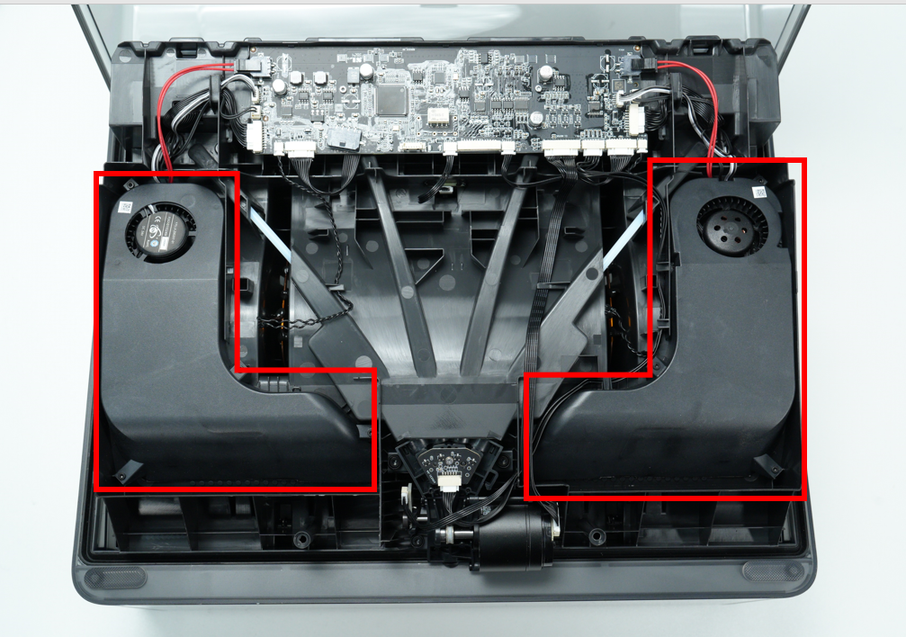
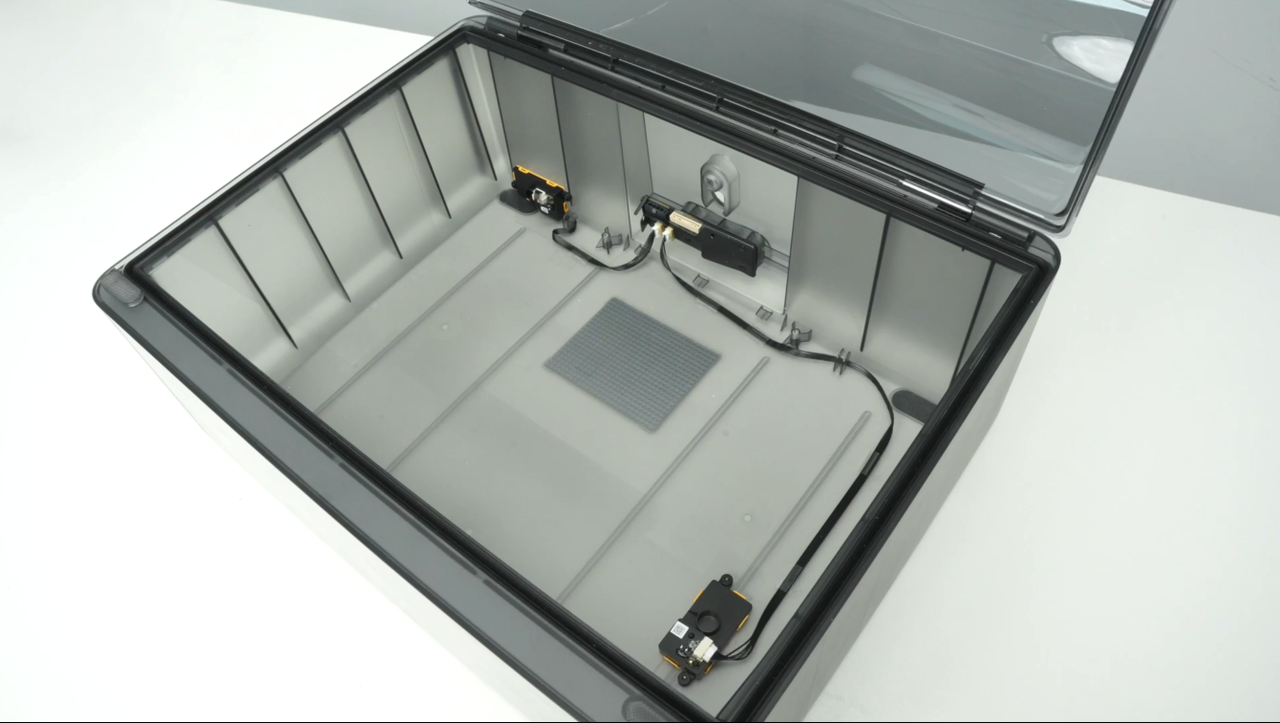
- Hardware configuration: AMS 2 Pro features a built-in heating and drying module (located below the middle frame), with a maximum drying temperature of 65°C;
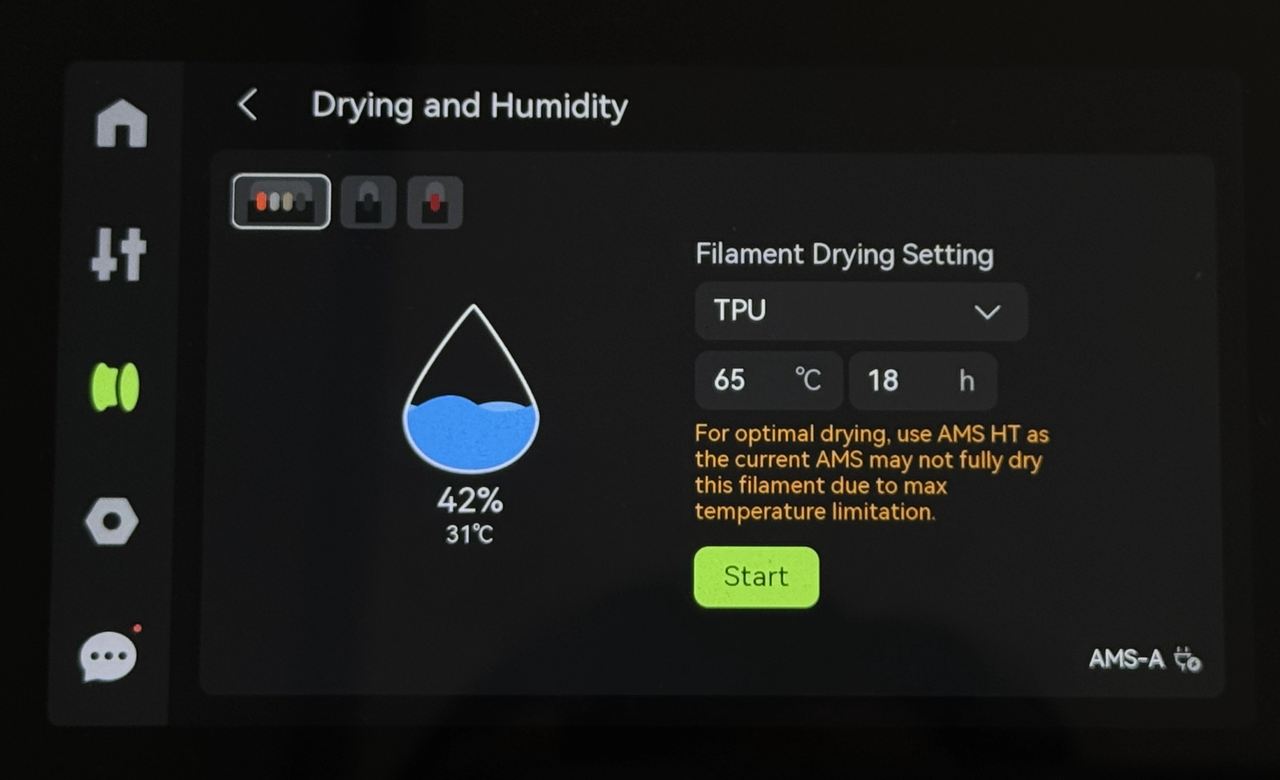
- Applicable scenarios: If the filament is damp, you can use the drying function to dry it. All filaments can be dried using AMS, but some filaments require a drying temperature higher than 65°C and may not be completely dried.
¶ Operation Guide
Drying process:
-
Close the AMS 2 Pro top cover → enter the "Drying and Humidity" page;
-
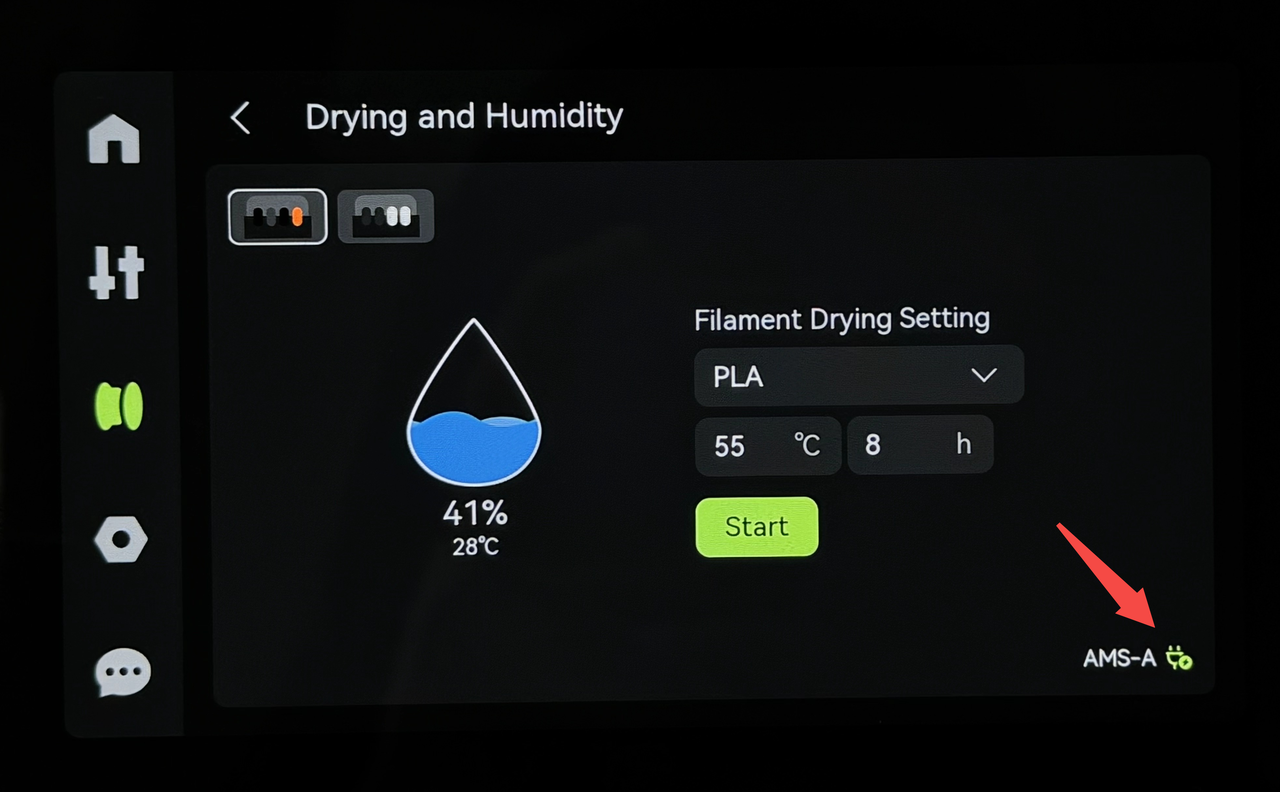
Select the filament to be dried → set the temperature and duration → start drying. When connecting multiple AMS, you can switch devices one by one to start drying through the "Filament" page, or switch AMS in the upper left corner of the drying page.
Go to the "Drying and Humidity" page, select the filament, set the corresponding drying temperature and time, and start drying. Make sure to close the top cover of AMS 2 Pro before drying. All filaments can be selected, but some filaments require a drying temperature higher than 65 ℃, so they cannot be completely dried.
¶ Note
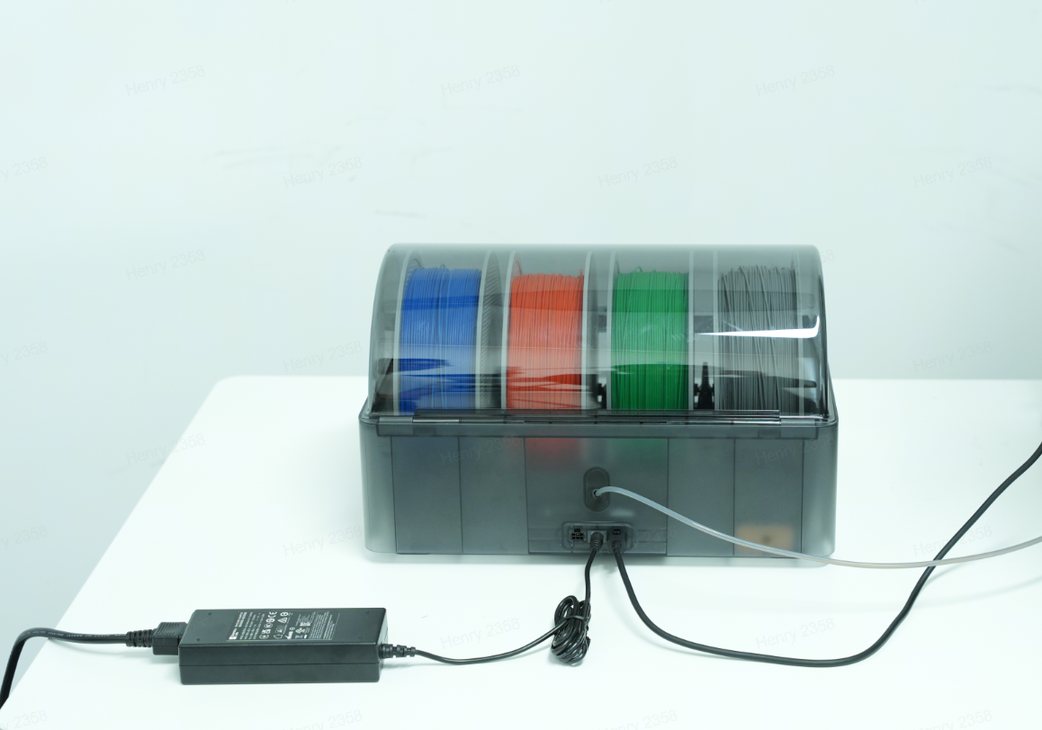
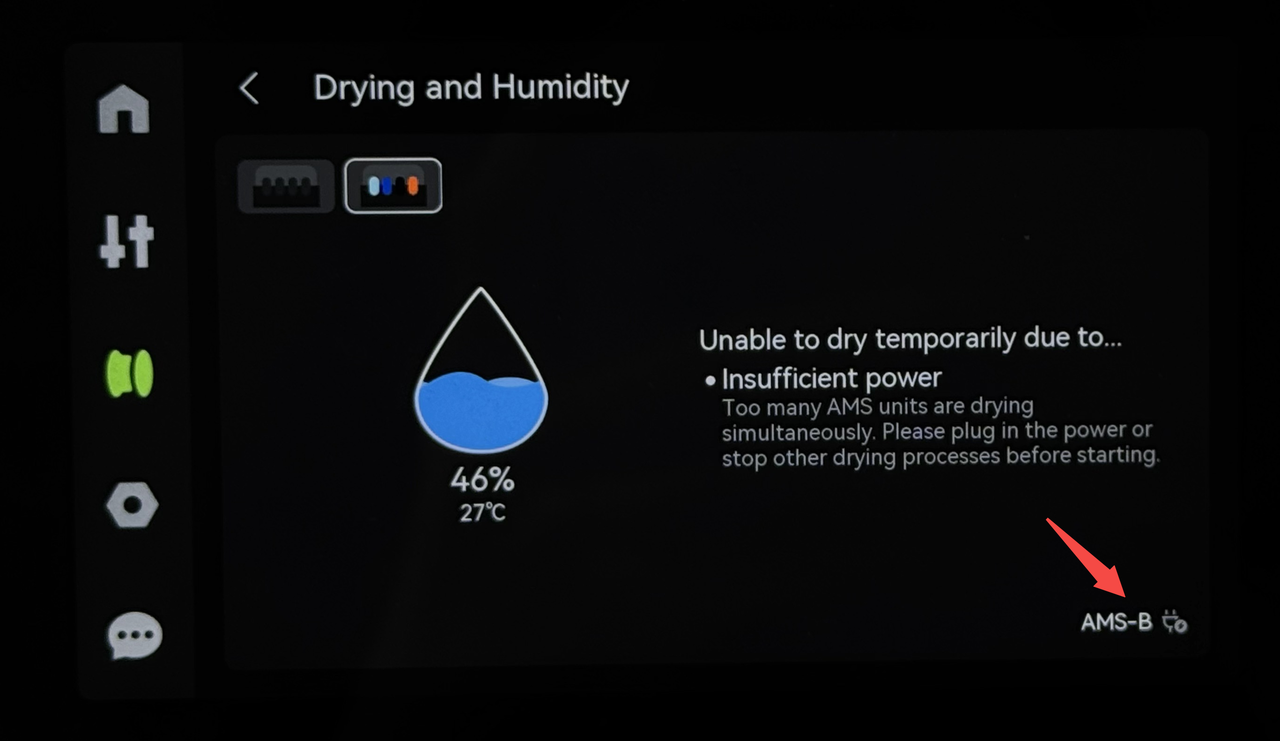
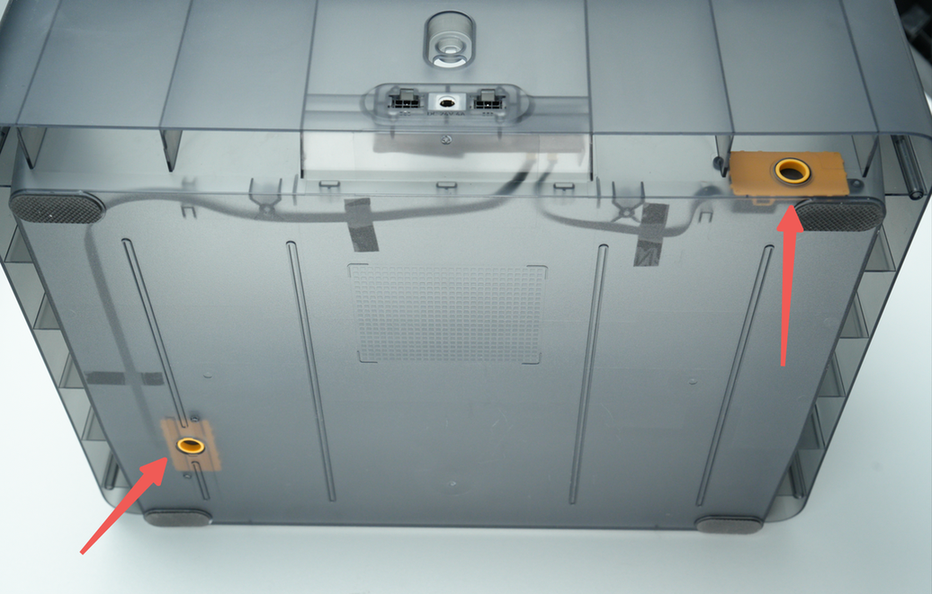
- Power requirements: The H2D printer supports one AMS 2 Pro to take power from the printer to dry the filament. If multiple AMS 2 Pro are required to dry the filament simultaneously, the remaining AMS need to be powered by the power adapter. If AMS 2 Pro is connected to X/P series printers, each one must be powered through a power adapter to use the drying function.
-
Status indication:
-
Not connected to power → The power icon in the lower right corner of the page is grayed out, and only 1 AMS 2 Pro can be powered by the printer for drying;
-
Connected to power → The power icon in the lower right corner of the page turns green.
-
- Drying is not allowed during printing: In order to prevent the filament from being squeezed and deformed by the gears after softening during the drying process, feeding and printing are not allowed. The AMS used in this printing is not allowed to be dried (including the AMS with auto-refill relationship).
¶ Drying mode description
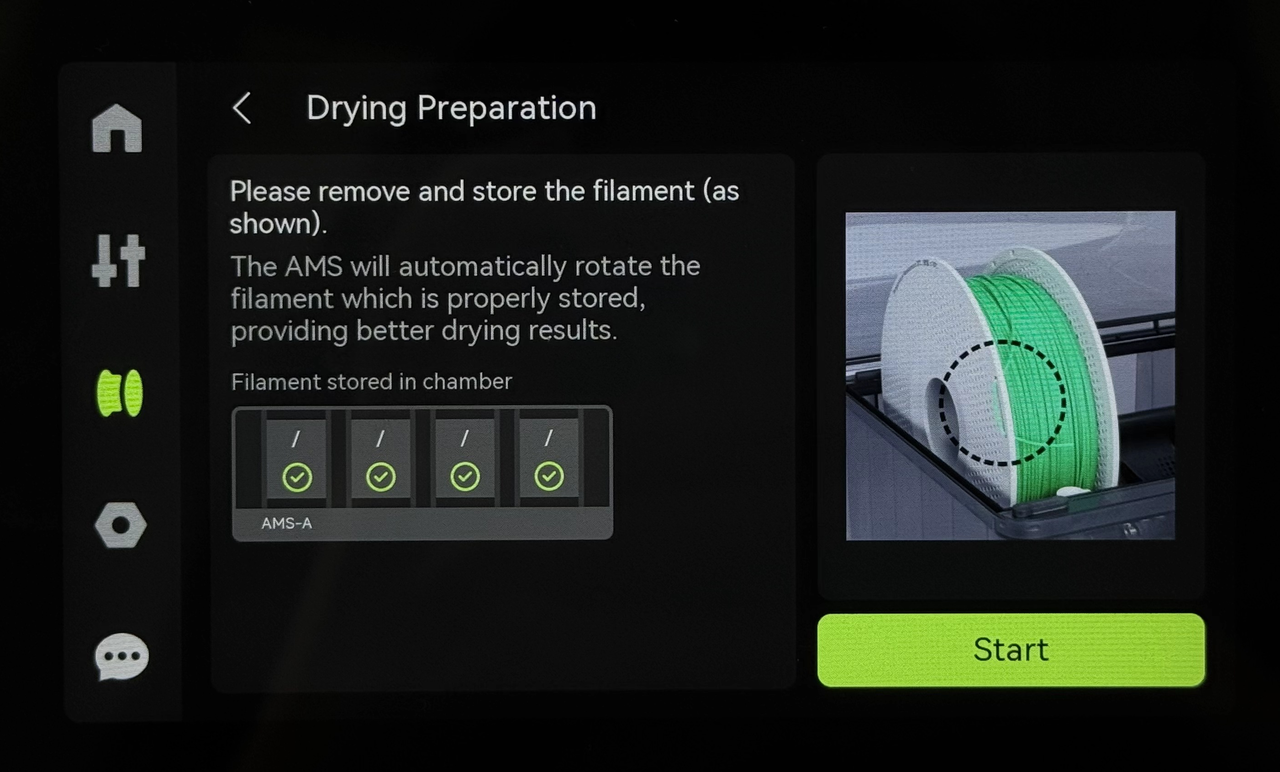
Mode 1: Rotating drying
-
Trigger condition: Start when the filament is pulled out from the feeder and stored in the spool;
-
Rotation rule: Rotate 30° every 5 minutes for uniform drying.
Mode 2: Static drying
-
Not applicable to filaments: filaments with softening temperature < drying temperature (such as PLA, PVA, Support for PLA/PETG and TPU);
-
Trigger condition: Start when the filament is inserted into the feeder;
-
Features: The spool is fixed and only relies on hot air circulation.
¶ Air Intake and vent control
Function:
AMS 2 Pro features active air intake and vent. During drying, AMS will open the air intake and vent to discharge moisture through external circulation.
 |
 |
|---|
Working logic:
Non-drying state: The air intake and vent is closed to prevent humid air from entering;
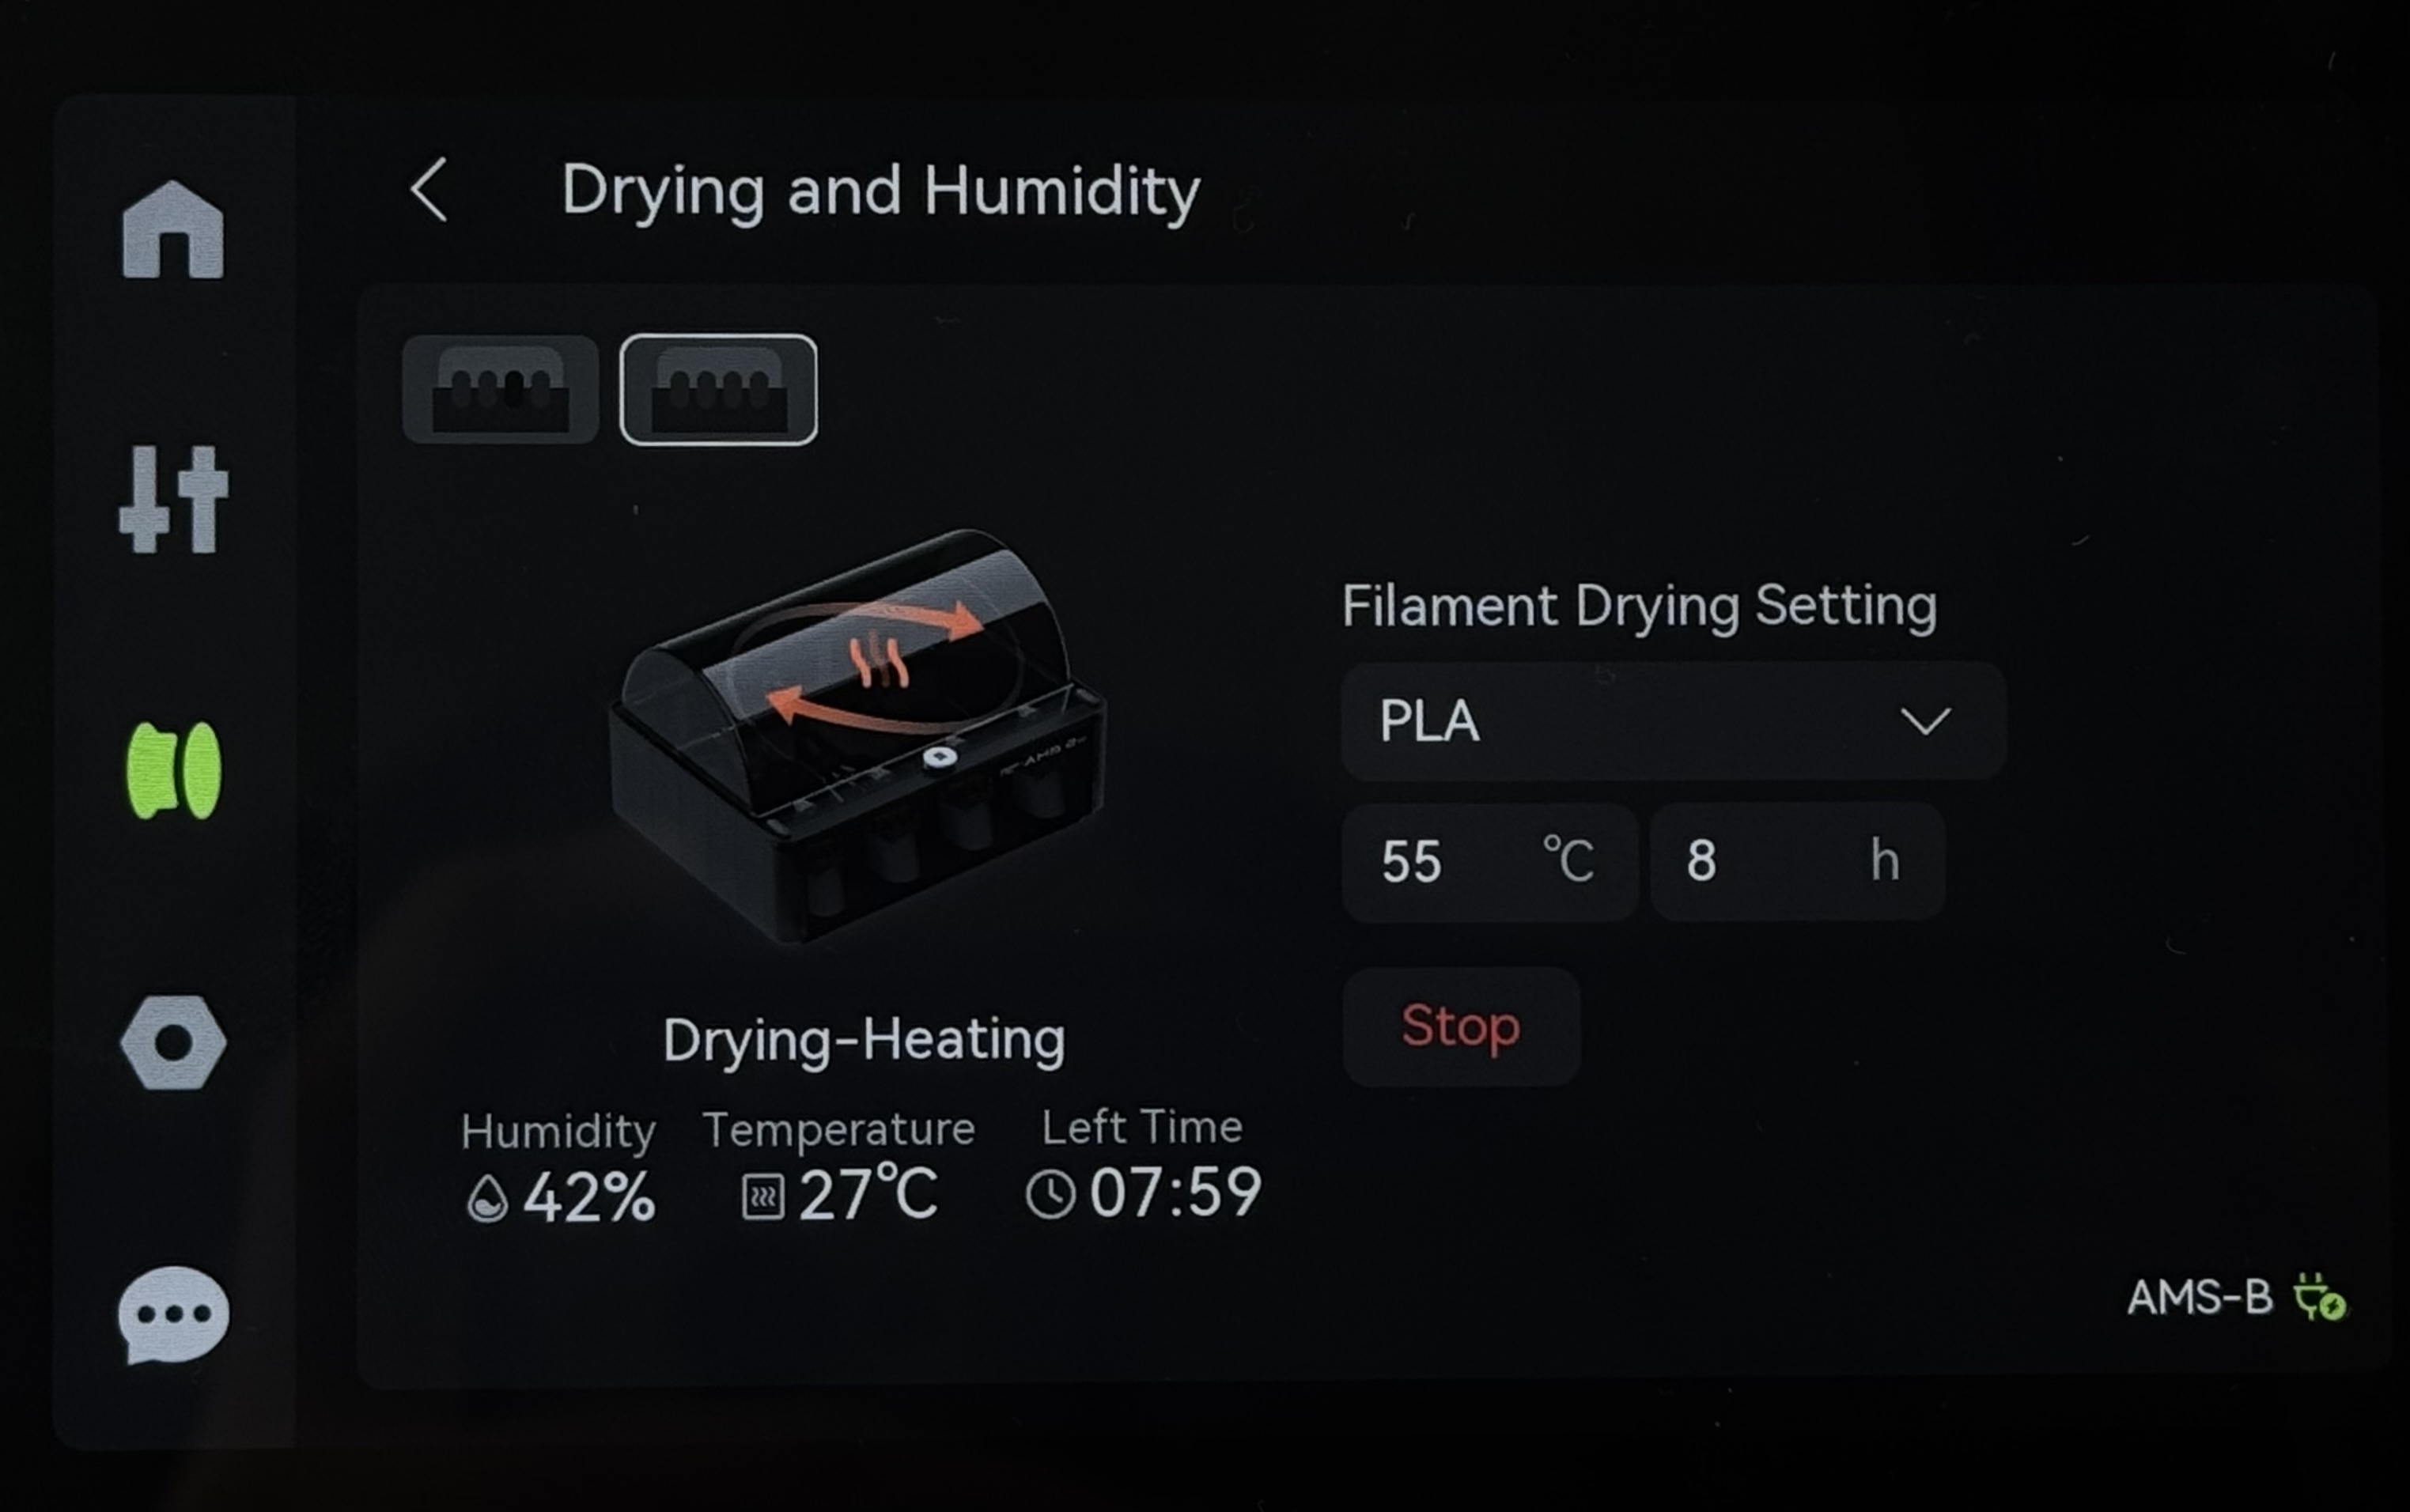
Start drying: The air intake and vent opens and closes once, prompting the user to start drying and performing self-test at the same time;
The chamber temperature is less than the target value during the drying process: The air intake and vent is closed to quickly increase the chamber temperature;
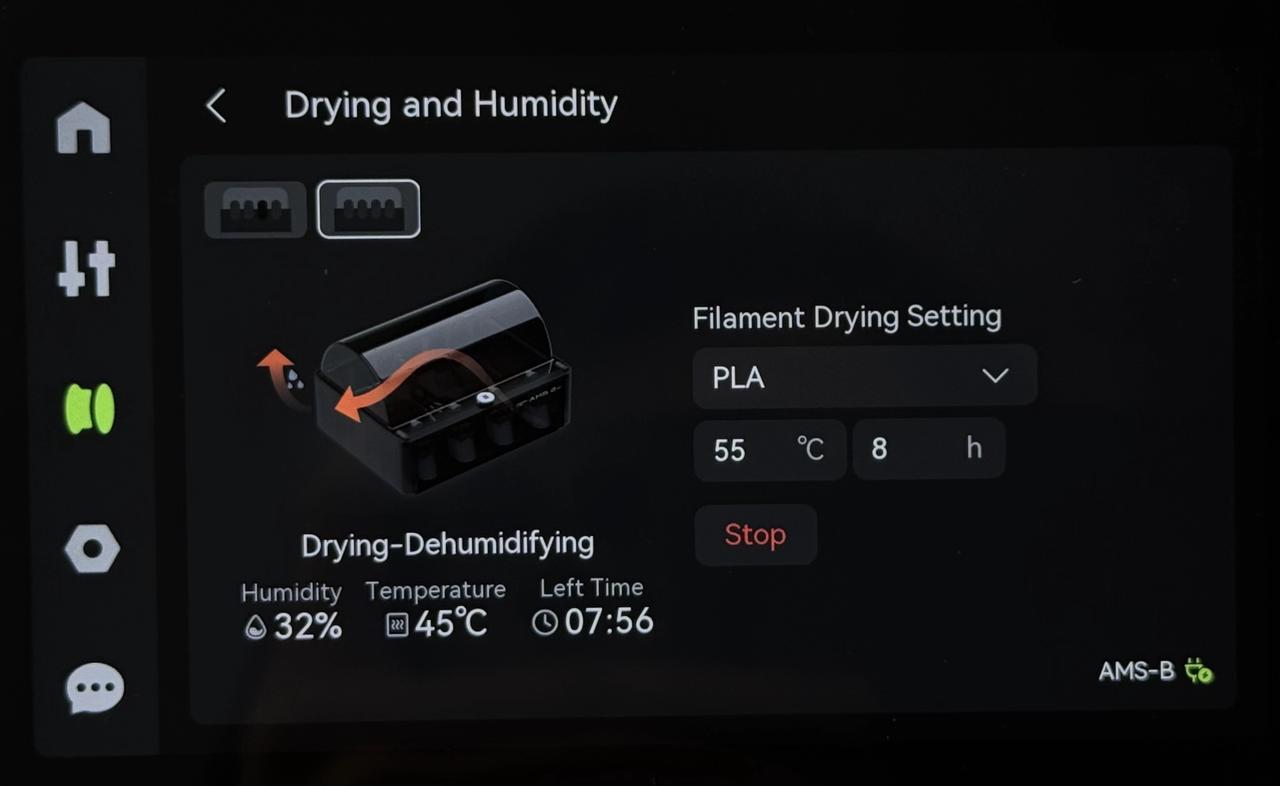
The chamber temperature reaches the target value during the drying process: The air intake and vent opens to exclude the humid air in the chamber;
Inspection before feeding: Before AMS starts feeding, if the chamber temperature is higher than the softening temperature of the filament to be loaded, the fan will be turned on for a period of cooling, and feeding will not start until the chamber temperature drops.
| Drying-Heating | Drying-Dehumidifying |
|---|---|
 |
 |
¶ Auto arrange
When initiating a multi-color printing task, the most efficient dual extruder printing scheme will be automatically assigned. You can also customize the filament selection in the window for sending print tasks. For details, please refer to: Introduction to Filament Grouping Strategy for Dual Nozzle Printers
¶ AMS Workflow
¶ Load/Unload
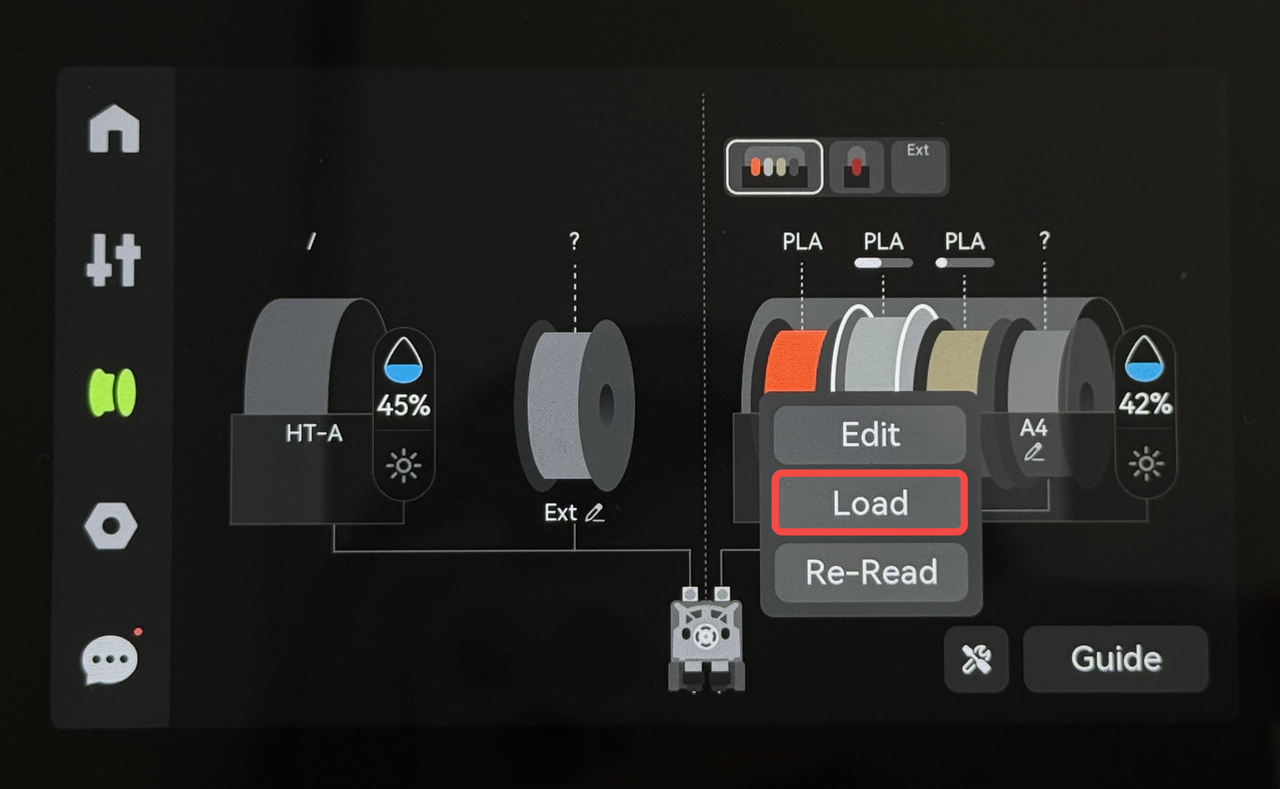
-
Load: Select a slot → click the "Load" button, or send a print task and AMS 2 Pro will load the filament automatically.
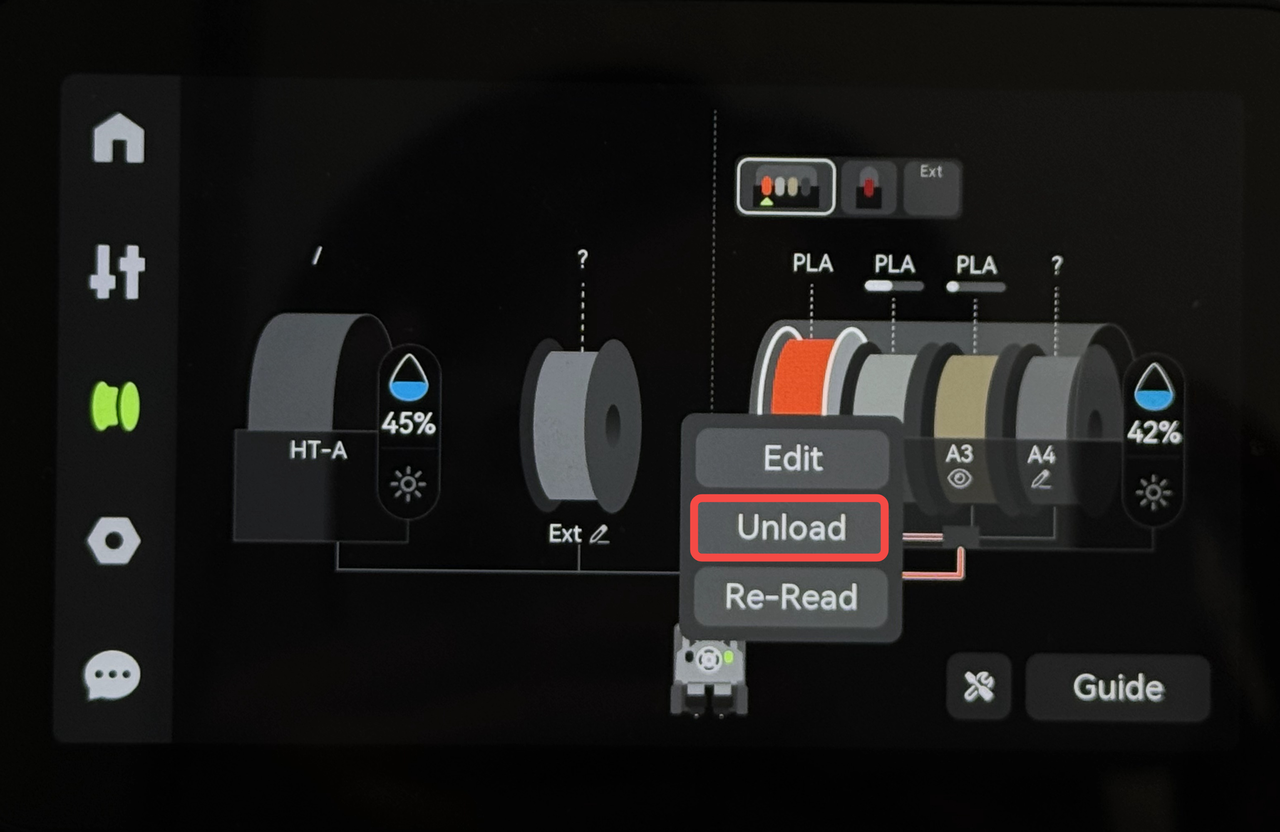
-
Unload: The slot has been loaded→ Click "Unload" to automatically eject the filament. The filament will also be automatically ejected at the end of printing, but it will not be automatically ejected if the print task is manually terminated. During the unloading process, the feeder and filament motor work simultaneously. The feeder is responsible for driving the spool to rotate, and the filament Hub motor pulls back the filament until it returns to the inside of AMS.
¶ Start multi-color printing task
You can refer to the wiki to initiate a multi-color printing task: H2D Combo First Print
¶ Feed Assist Mode
-
When printing, AMS assists feeding or retracting according to the signal from the buffer (slider position feedback resistance status);
-
AMS will switch to feed assist mode after the filament is sent to the extruder and return to the idle mode after restarting. The feed assist mode only determines whether to continue feeding according to the signal feedback of the buffer, regardless of whether it is printing or not.
¶ End Notes
We hope the detailed guide provided has been helpful and informative.
If this guide does not solve your problem, please submit a technical ticket, we will answer your questions and provide assistance.
If you have any suggestions or feedback on this Wiki, please leave a message in the comment area. Thank you for your support and attention!