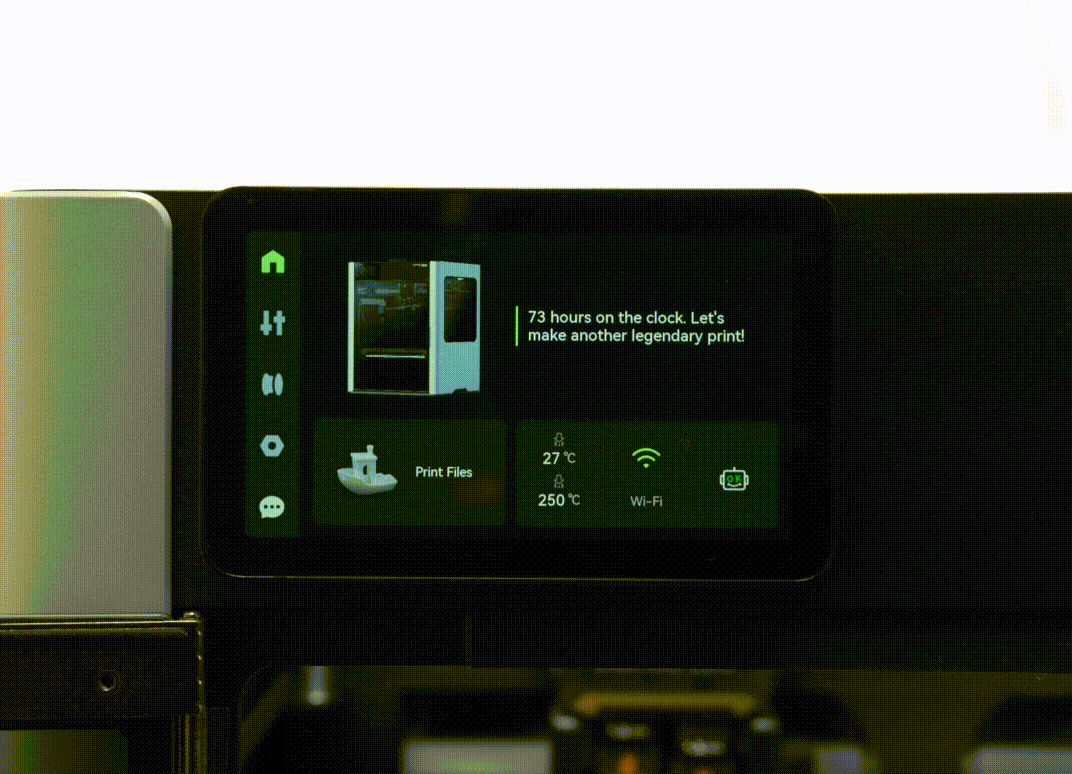
When printing with TPU 85A and 90A on H2S, the feeding method is essentially the same as on H2D. Please use the dedicated filament inlet, or feed directly from the top of the toolhead. Detailed operation images are being updated—please stay tuned.
¶ Preface
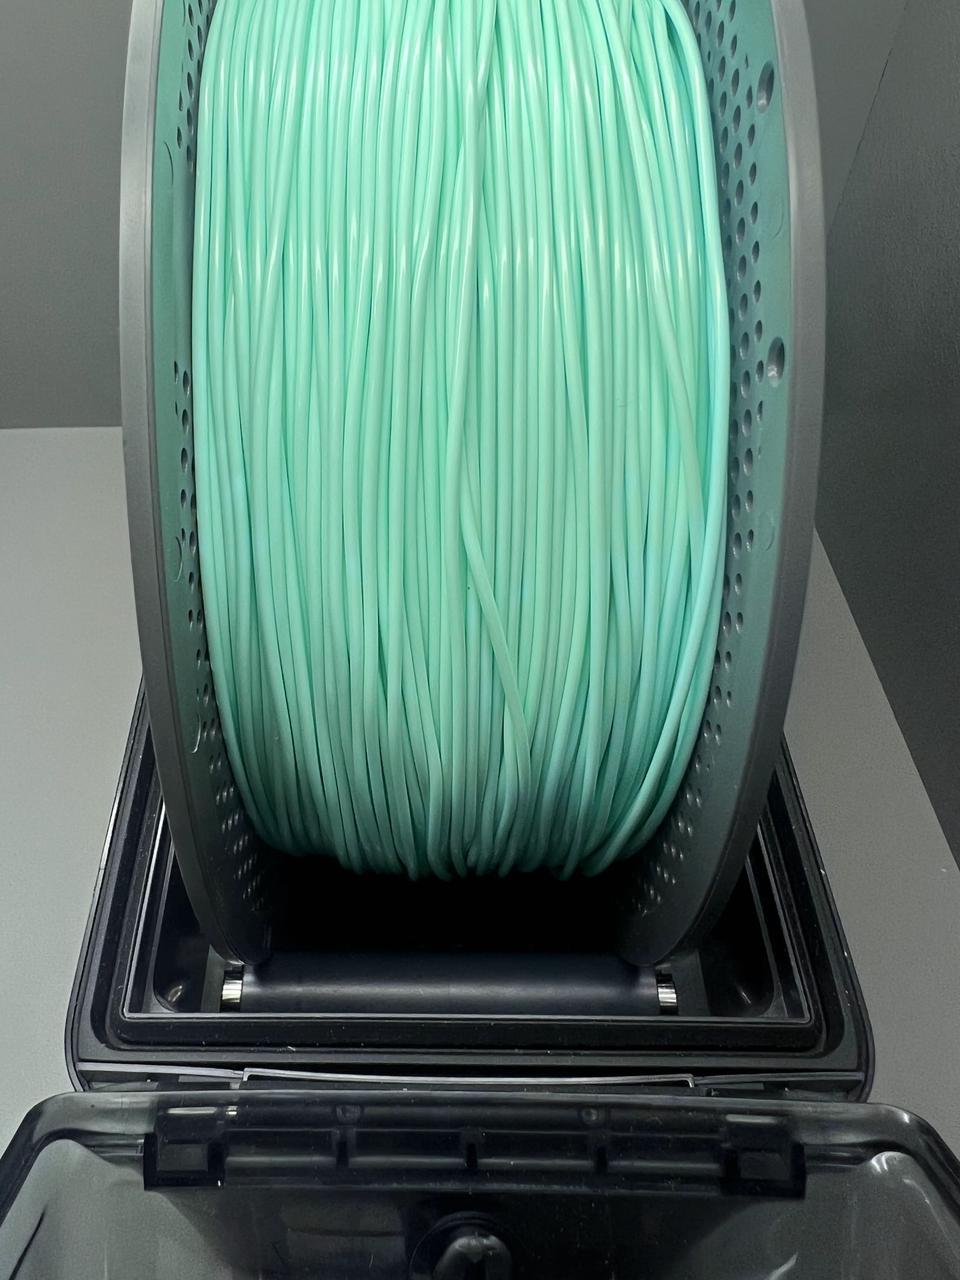
TPU 85A and TPU 90A are two different hardness grades of thermoplastic polyurethane (TPU) materials.
-
Hardness: The hardness of TPU is typically measured using Shore A hardness. 85A and 90A represent the hardness levels of these two materials, with 90A being harder than 85A.
-
Elasticity and Flexibility: These materials can be stretched and bent over a wide range without breaking, exhibiting strong recoverability. This characteristic makes TPU 85A and TPU 90A excel in applications requiring elasticity and flexibility.
-
Abrasion Resistance: TPU materials have good abrasion resistance, maintaining stable performance over long periods of use.
Regarding applications, TPU 85A and TPU 90A can be used to manufacture products that require elasticity and abrasion resistance, such as shoe soles and sports equipment components. They are also suitable for making electronic product accessories like phone cases and smartwatch bands. Overall, these two thermoplastic polyurethane materials have excellent properties and are widely used. Their different hardness levels enable them to meet the needs of various application scenarios.
¶ General Filament Preparation
¶ Filament Storage Environment
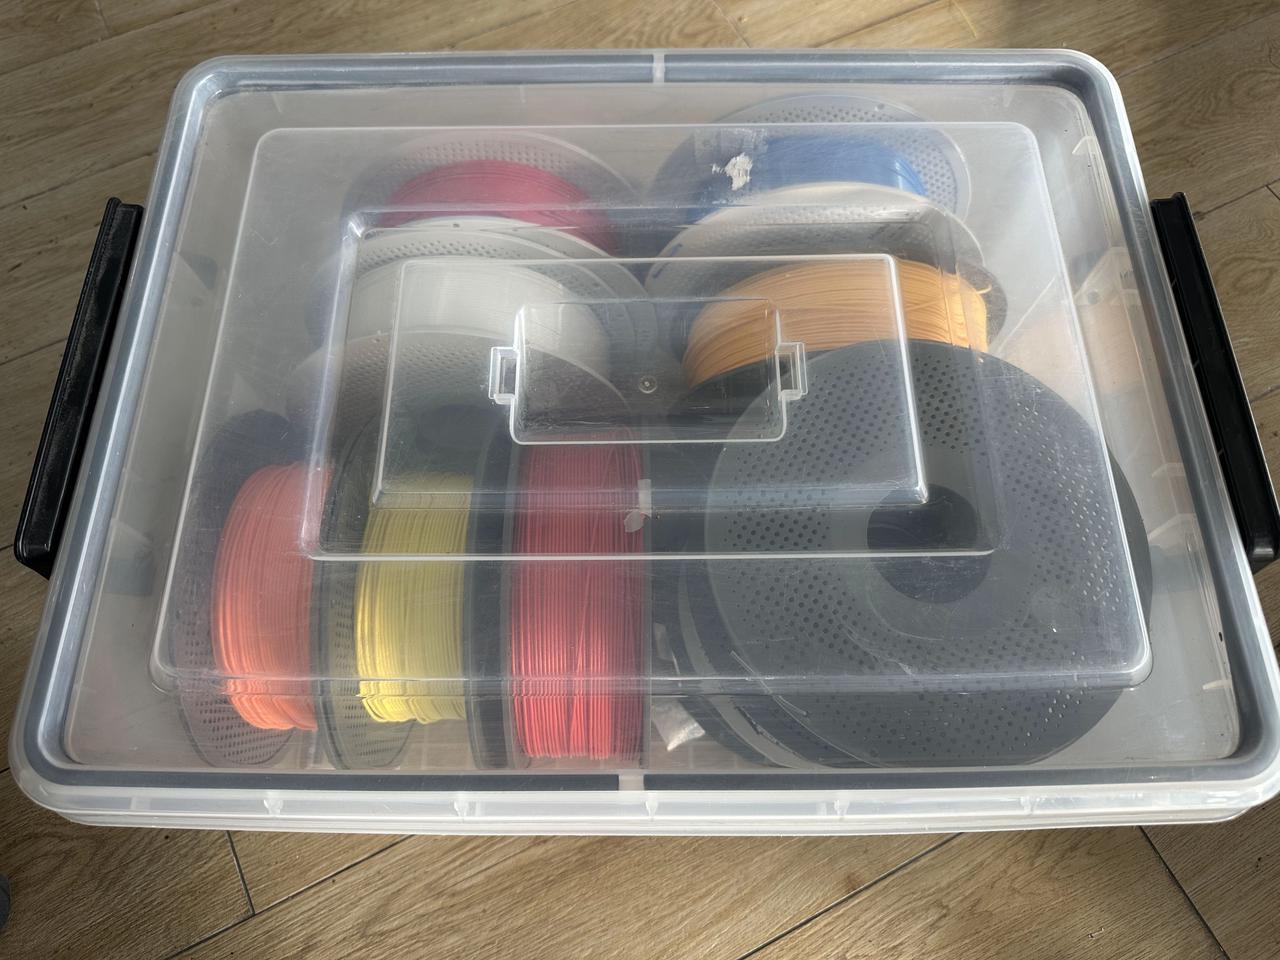
TPU filaments are hygroscopic, and moisture can adversely affect print quality. To prevent this issue, it is recommended to store the filaments in an environment with humidity below 20% RH. Utilize storage boxes and include desiccants inside; ideally, choose desiccants that effectively keep the filaments dry.
¶ Filament Drying
TPU filaments have a strong hygroscopic nature and can easily absorb moisture in natural environments. If moisture-laden TPU is used directly for 3D printing, the heat during the printing process will cause moisture to rapidly vaporize, leading to bubbles and voids in the printed product, significantly affecting print quality and potentially resulting in print failure. Therefore, we recommend using the following equipment and parameters for drying. For more details, please refer to:
https://wiki.bambulab.com/en/filament-acc/filament/dry-filament
| Blast (Forced Air) Drying Oven | Heatbed | AMS HT |
|---|---|---|
| 70 ℃, 8 h | 90 ℃, 16 h | 75 ℃,18 h |
If using a heatbed for drying, flip the filament over after every 4 hours. Place the filament inside its filament packing box or cover it with a PC box lid to protect the filament.
Heatbed drying reference: Filament Drying Recommendations
Please be aware of the following risks during the drying process:
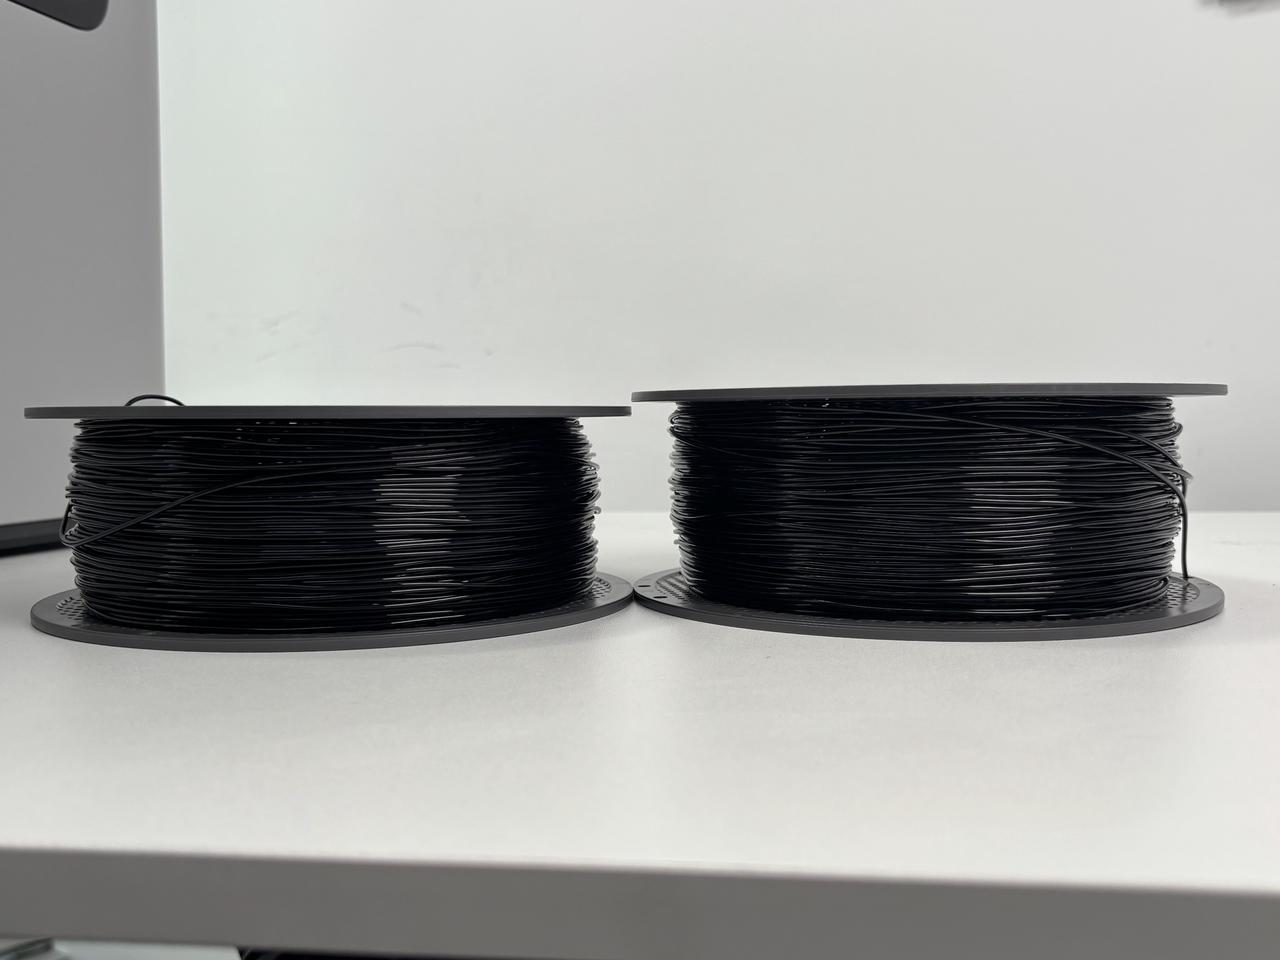
⚠️ Spool Expansion Risk
Before drying, the width of the un-deformed spool edge is approximately 65.4 mm. During drying, the TPU filament will expand due to heat, causing the spool to deform. After drying with the given parameters, the width of the spool edge may expand to approximately 69.4 mm. The 4L sealed box can ensure smooth spool rotation with a maximum width limit of approximately 67.5 mm, while the AMS HT sealed box can ensure smooth spool rotation with a maximum width limit of approximately 74.5 mm. The 5.8L sealed box can ensure smooth spool rotation with a maximum width limit of approximately 108.5 mm, which is sufficient to allow the filament to smoothly rotate and load after expansion.
Therefore, we strongly recommend using a 5.8L sealed box or AMS HT for loading the filament after drying.
 Spool Expansion Before and After Drying |
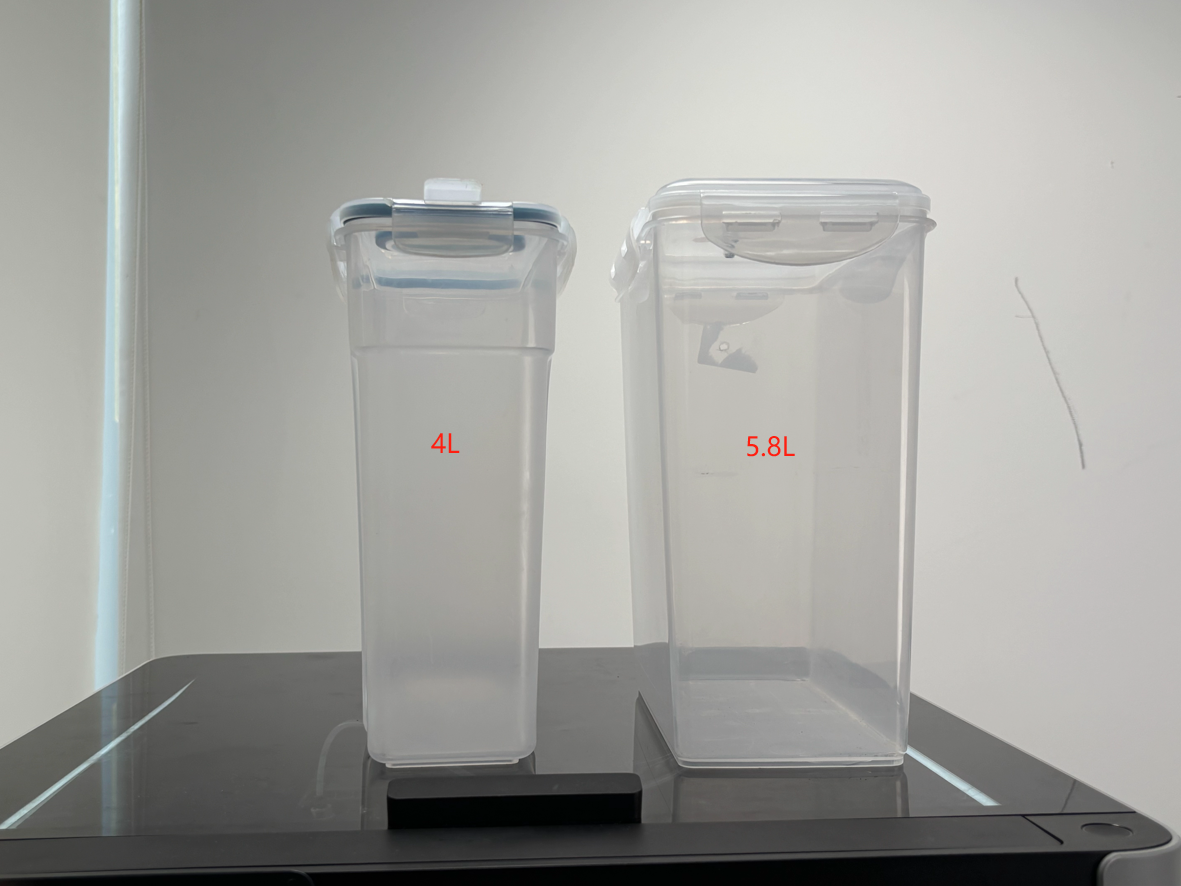 4L and 5.8L Sealed Boxes |
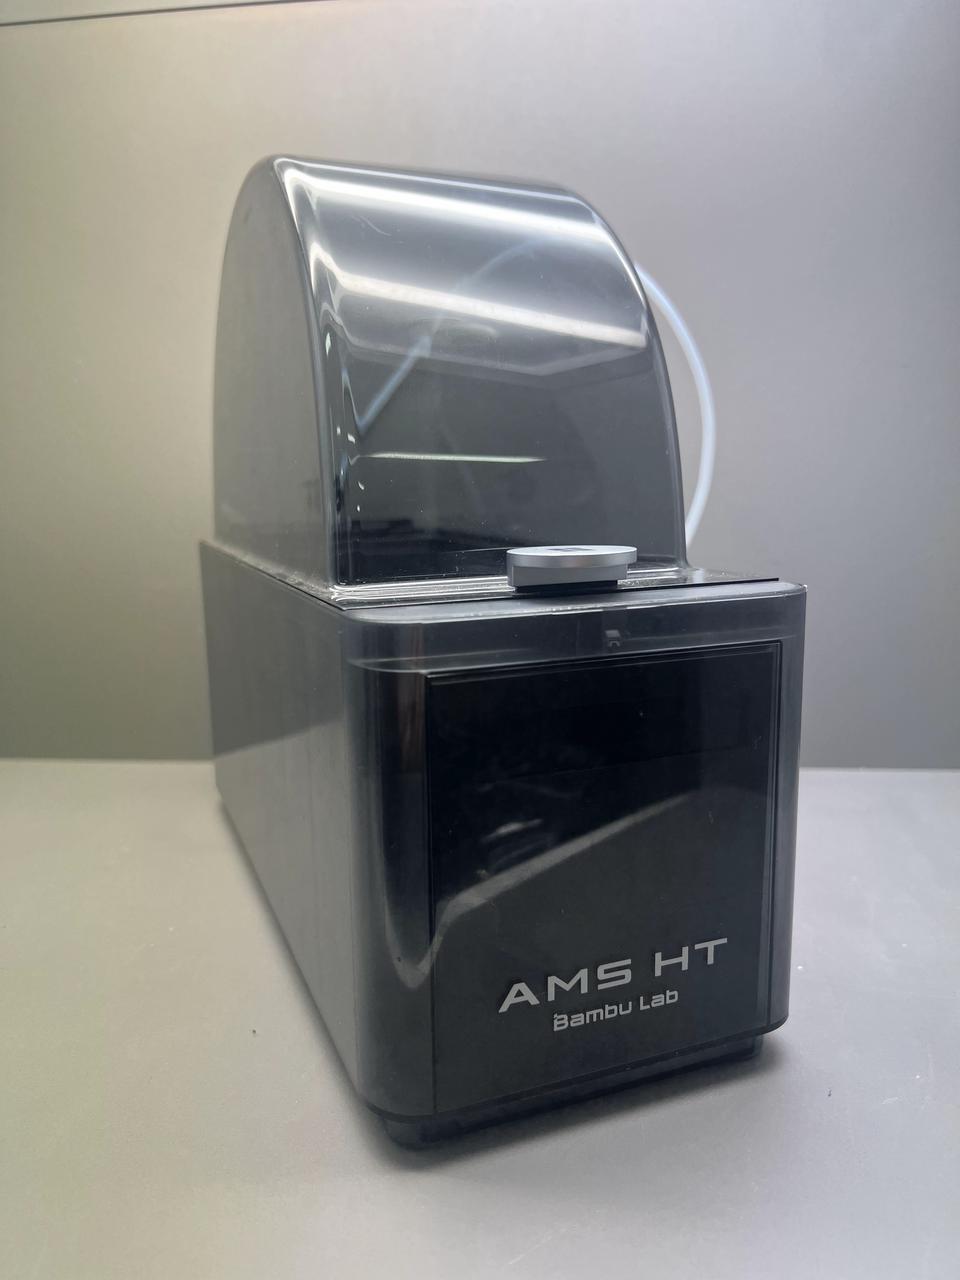 AMS HT |
 The maximum width limit of the 5.8L sealed box is approximately 108.5 mm |
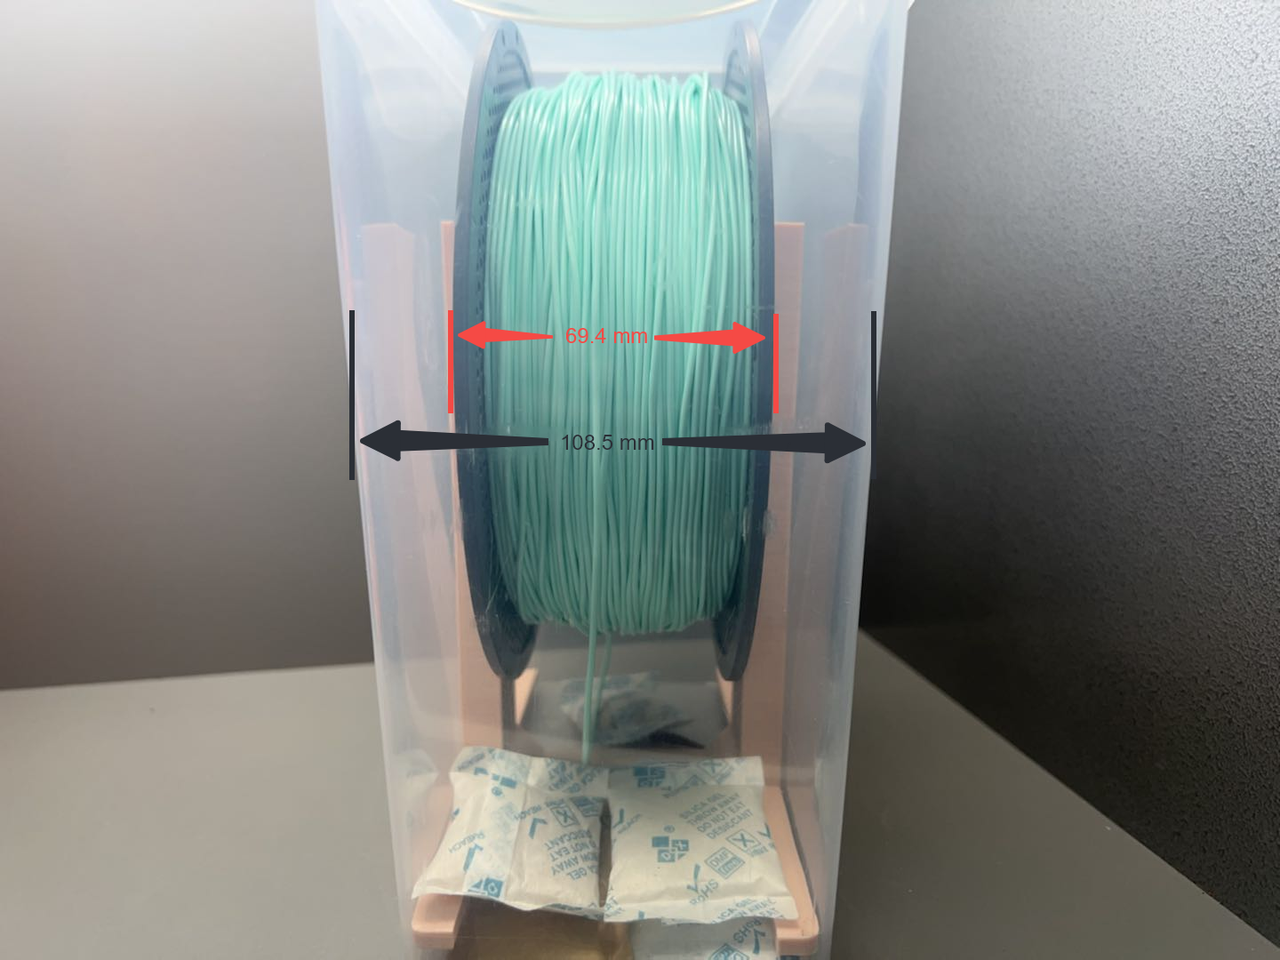 The maximum width limit of the 5.8L sealed box is approximately 108.5 mm |
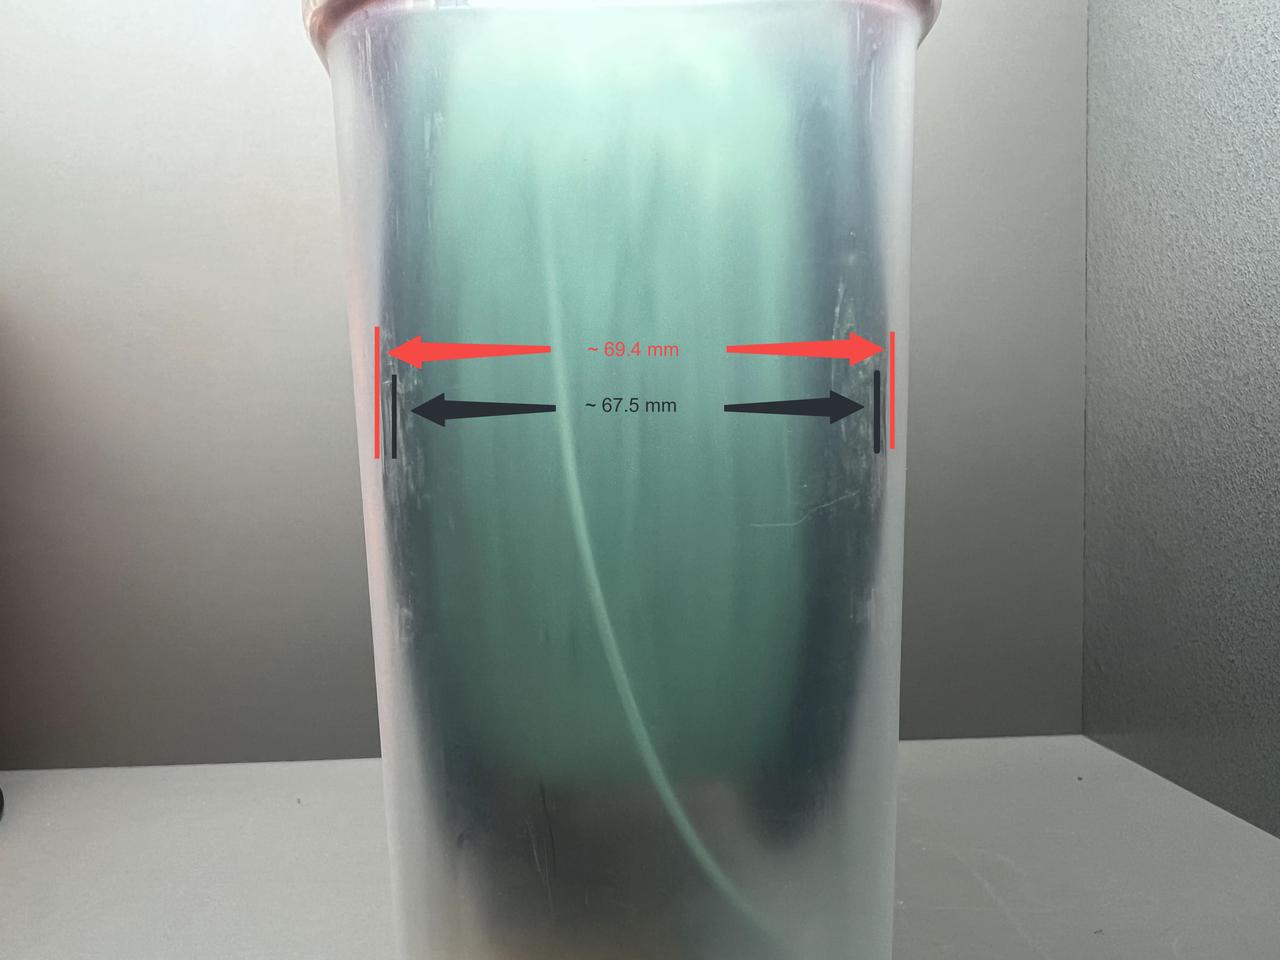 The maximum width limit of the 4L sealed box is approximately 67.5 mm |
Note:
-
When drying, using a heat-resistant heavy object to press down on the TPU spool can help prevent deformation. If the spool does not deform, the filament can be fed using the 4L sealed box or AMS HT.
-
If using a sealed box for loading, be sure to use the spool holder to ensure smooth rotation of the filament. Additionally, to reduce loading resistance, please open the side opening of the sealed box.
 Side opening of the sealed box |
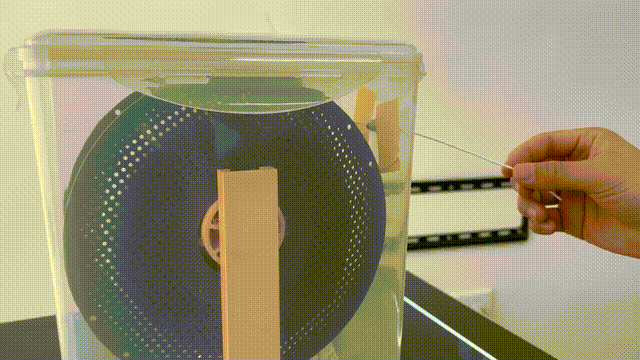 Ensure smooth rotation of the filament |
4L sealed box holder link:https://makerworld.com.cn/zh/models/807064?from=search#profileId-784185
5.8L sealed box holder link:https://makerworld.com.cn/zh/models/437644?from=search#profileId-353897
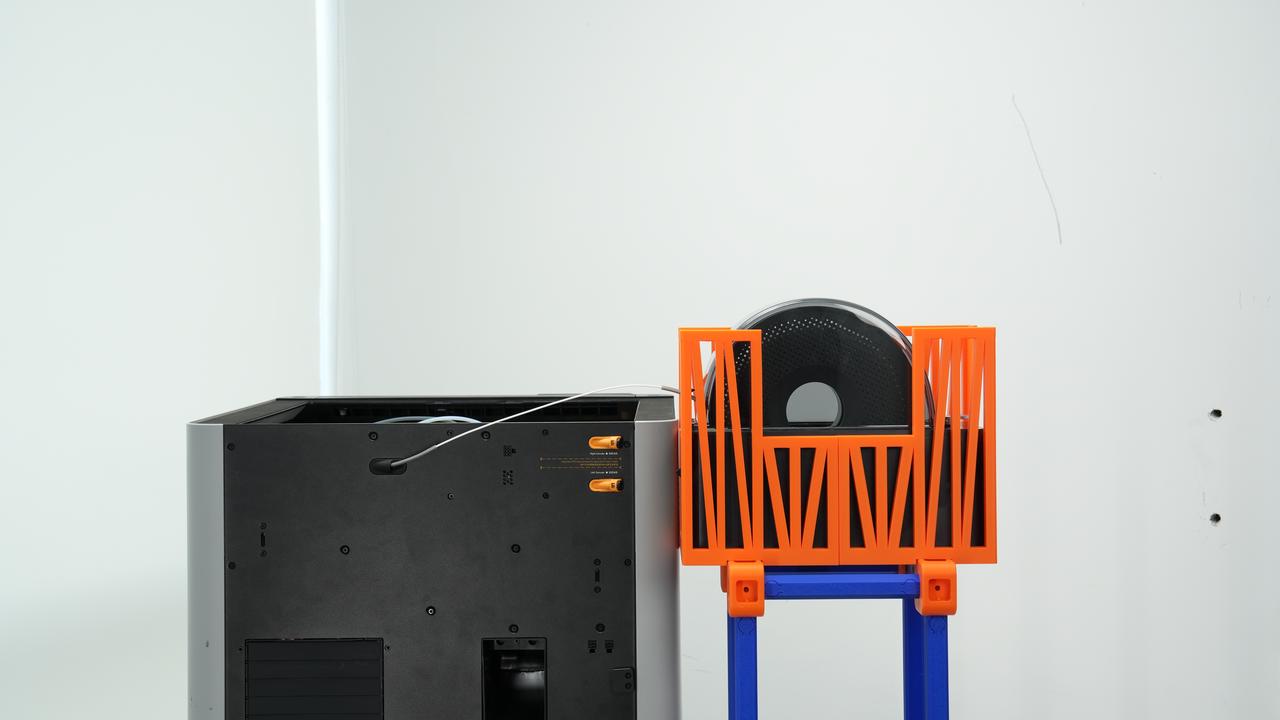
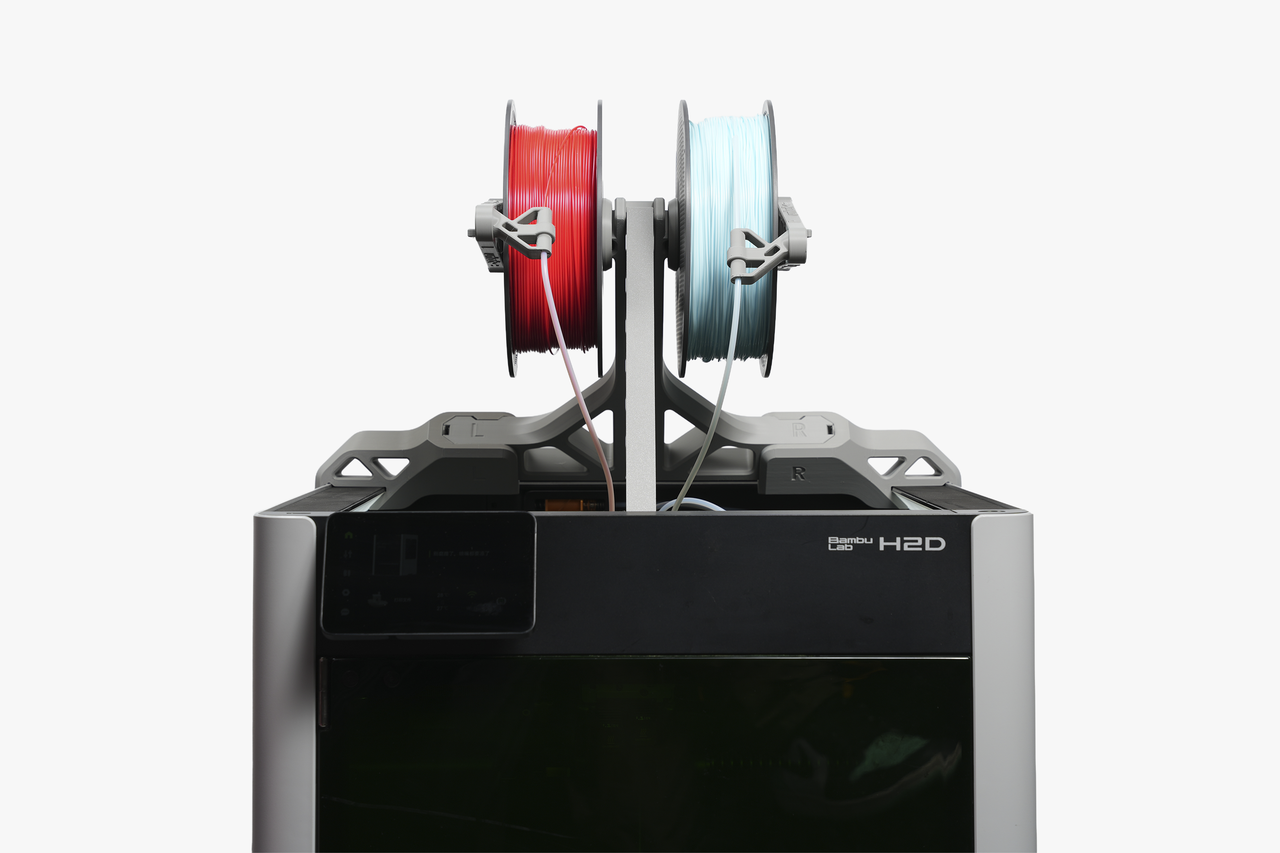
Apart from using a sealed box or the AMS HT as filament feeding methods, we strongly recommend using the Top-feed Rack for printing. The Top-feed Rack setup ensures smooth filament feeding and significantly increases the success rate when printing TPU.
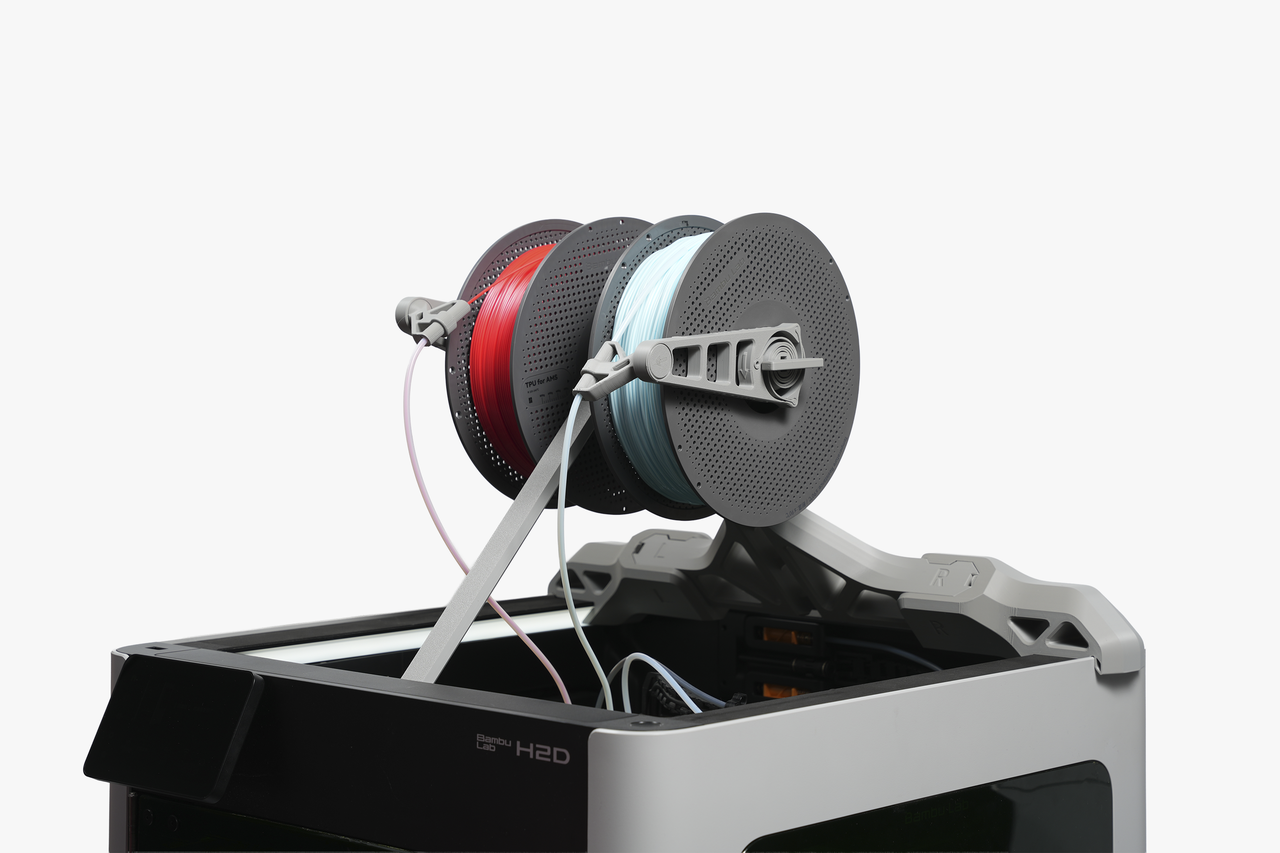
Please refer to the following links for print files and detailed usage instructions: https://makerworld.com/en/models/1421552-h2d-flexible-filament-top-feed-rack#profileId-1477010
¶ General Machine Preparation
¶ Hotend
To ensure the best print quality and results with TPU filament, it is strongly recommended to use a brand-new hotend or a dedicated hotend for printing TPU. The hotend compatibility is as follows:
| Filament | 0.2 mm hotend | 0.4 mm hotend | 0.6 mm hotend | 0.8 mm hotend | Any size high flow hotend |
|---|---|---|---|---|---|
| TPU 85A | Not compatible | Not compatible | Recommended | Recommended | Not compatible |
| TPU 90A | Not compatible | Recommended | Recommended | Recommended | Not compatible |
Please be sure to avoid using a hotend that has previously printed fiber-reinforced filaments (such as carbon fiber or glass fiber-reinforced filaments) to print TPU.
¶ Build Plate
After applying adhesive to a PEI textured plate, TPU filaments may become overly adhesive. Therefore, it is not recommended to use adhesive when printing on a textured bed.
For other types of build plate, adhesive is necessary to prevent issues such as poor first layer quality, inadequate adhesion, or even print failures.
| Filament | Cool plate | Engineering plate | High Temperature/Smooth PEI Plate | Whether to apply adhesive |
|---|---|---|---|---|
| TPU 85A | Recommended | Recommended | Recommended | Yes (except for the textured PEI plate) |
| TPU 90A | Recommended | Recommended | Recommended | Yes (except for the textured PEI plate) |
¶ Printer
Check and maintain the extruder (if there are foreign objects or filament residue, disassemble and wipe it clean). If the extruder gear is worn, it needs to be replaced (otherwise, filament slippage may occur).
It is important to monitor the wear condition of the cutter blade. A worn blade can affect the TPU loading logic and lead to a higher print failure rate. Regularly check the blade for wear and replace it according to the instructions.Replace H2D Filament Cutter Lever and Blade | Bambu Lab Wiki
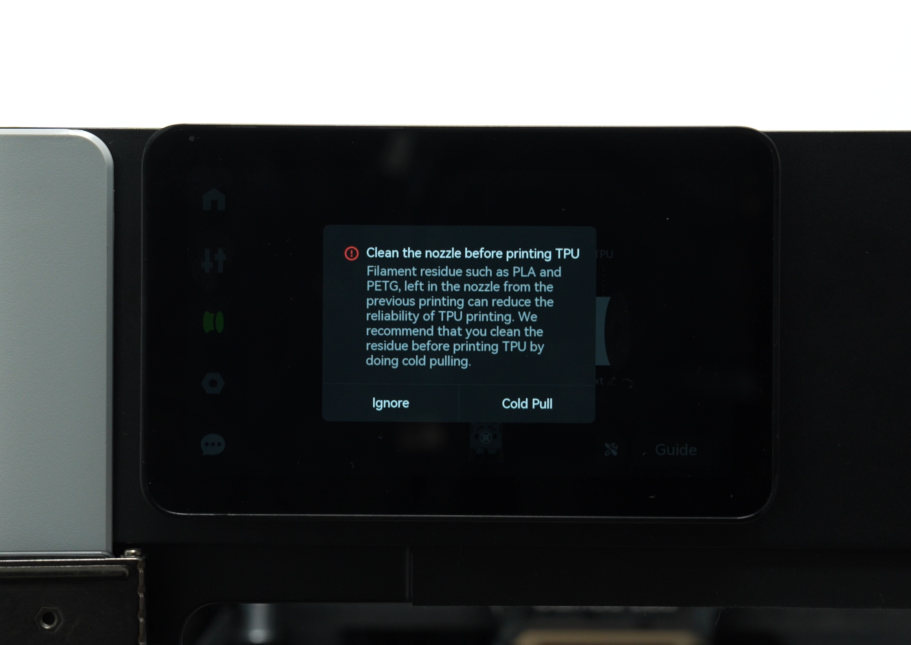
If the hotend is not new, check the hotend condition (whether there is residue; if there is, raise the temperature and perform cold pulling 2-3 times using PLA / PETG filament, but do not use fiber-reinforced filaments for cold pulling).
Cold Pulling Procedure:
After setting up TPU on the screen, you can perform cold pulling according to the on-screen instructions.
 |
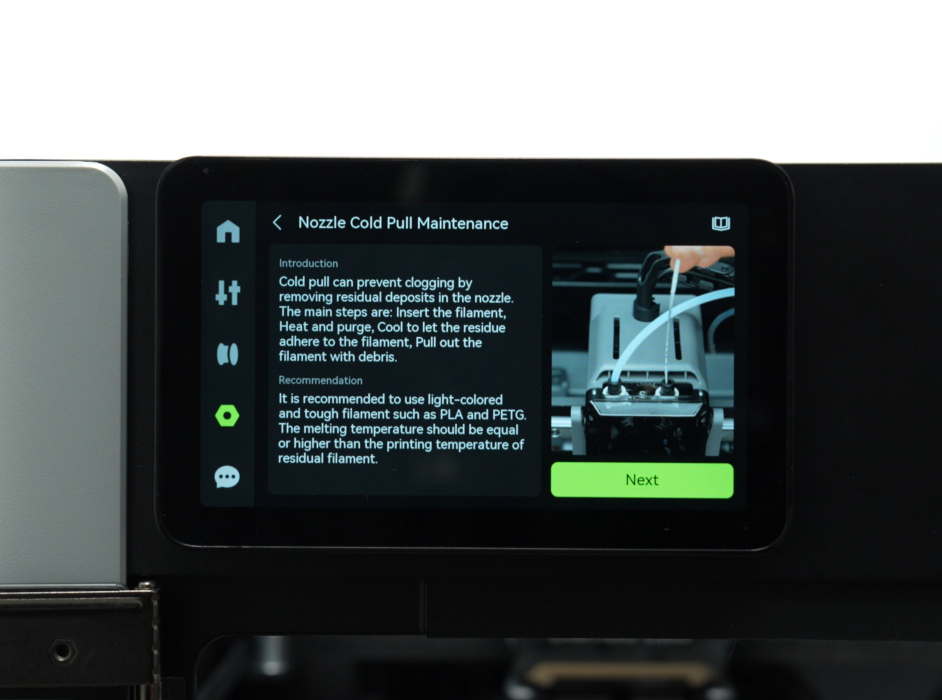 |
For detailed steps on cold pulling, you can refer to this Wiki: H2D Nozzle Cold Pull Maintenance and Cleaning
¶ Filament Loading Preparation
¶ TPU Filament Loading Precautions
-
Before loading, please ensure the filament is dried.
-
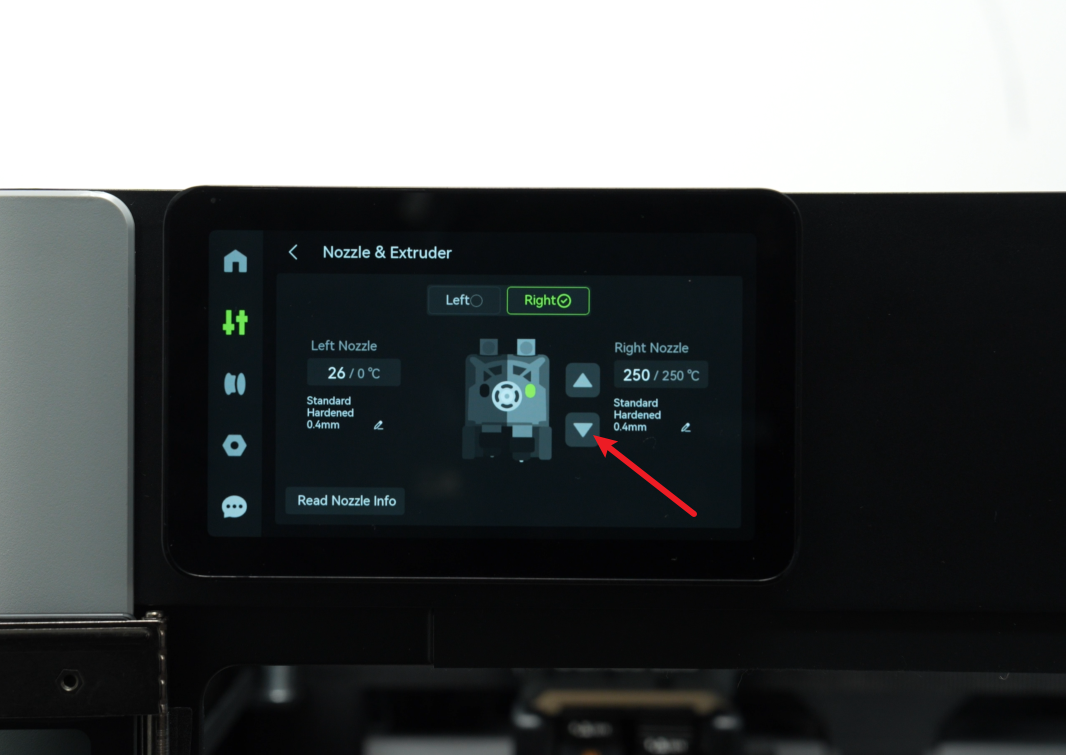
H2D only supports loading TPU 85A & 90A on the right hotend. Do not load the filament onto the left hotend.
-
Both TPU 85A and TPU 90A require manual loading and cannot be loaded automatically using AMS.
-
When loading TPU 85A and TPU 90A filaments, manually set the hotend temperature to 250 ℃ and slowly control the rotation of the extruder (avoid continuous clicking). Do not use the “load” function of external spools. Avoid quickly clicking the extruder's "down arrow" to prevent TPU from getting jammed in the gears. Ensure that the filament is extruding smoothly (with continuous extrusion visible at the hotend) before starting the print.
-
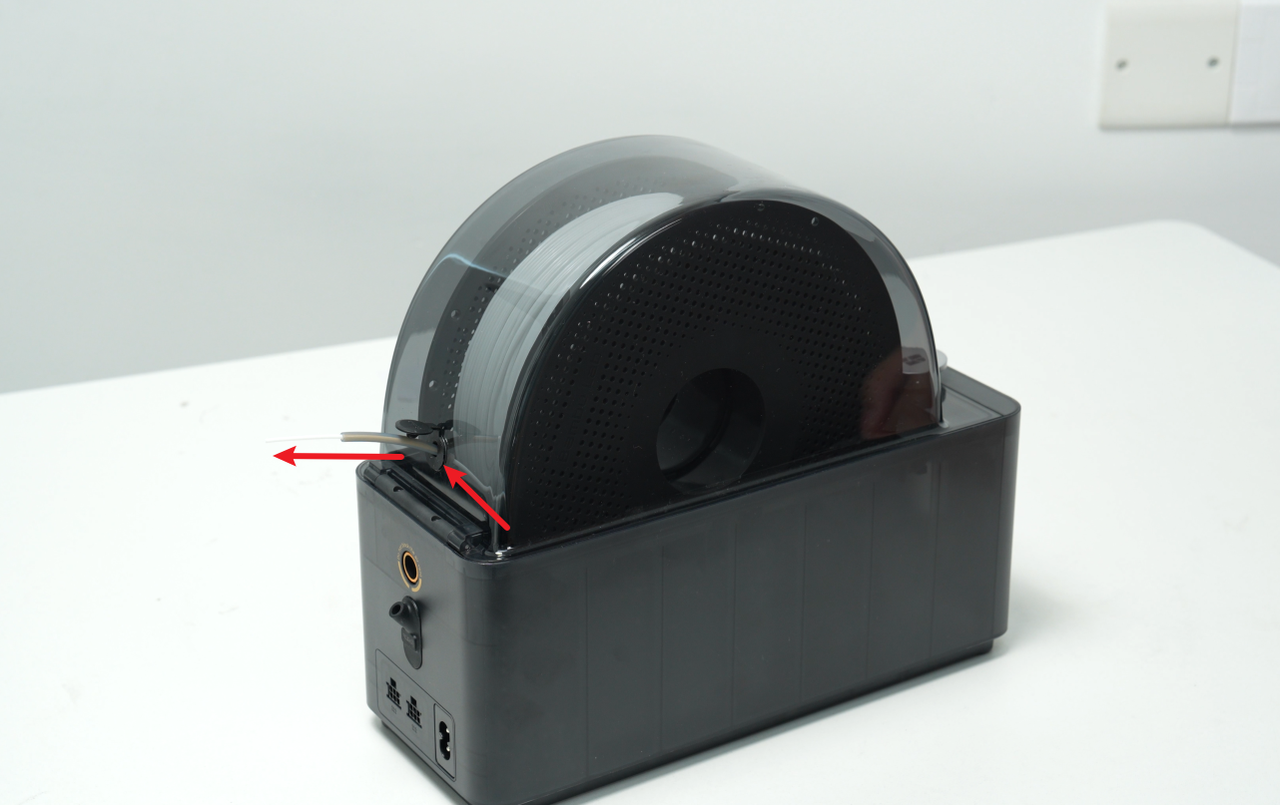
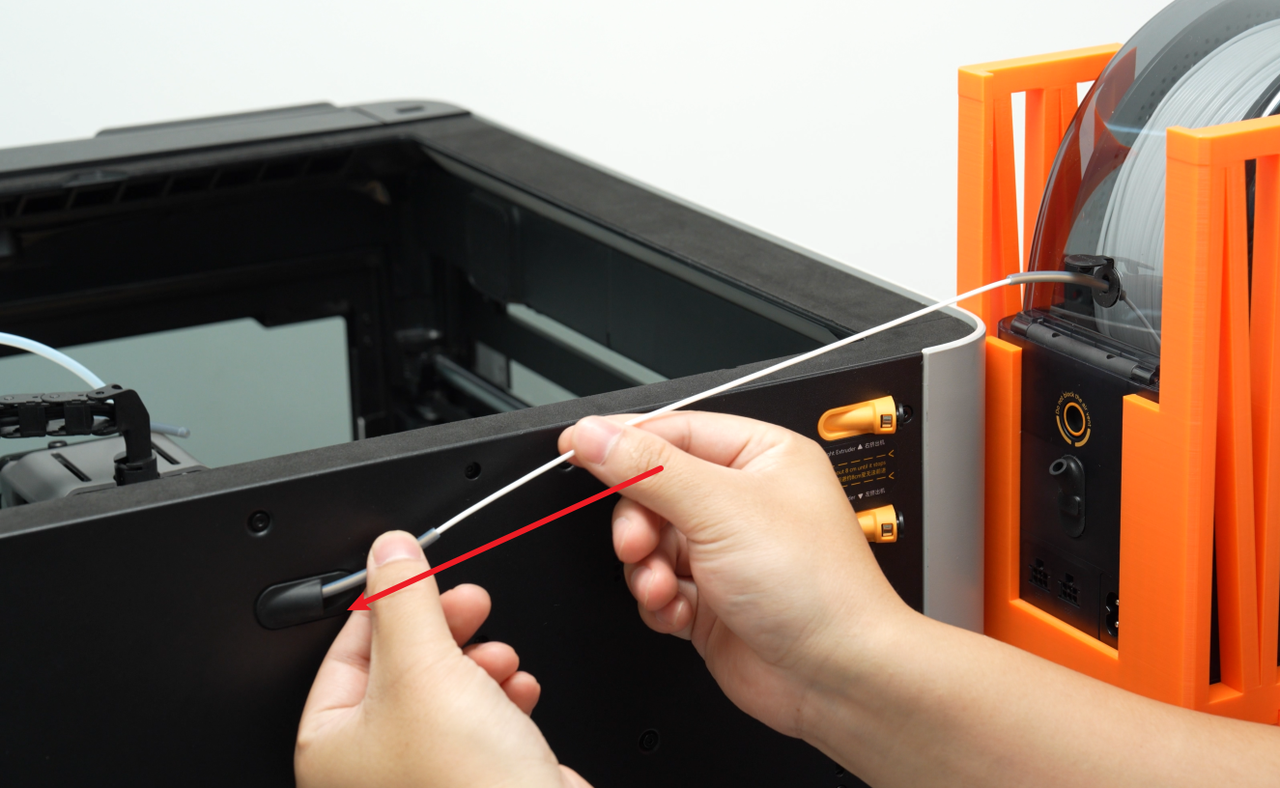
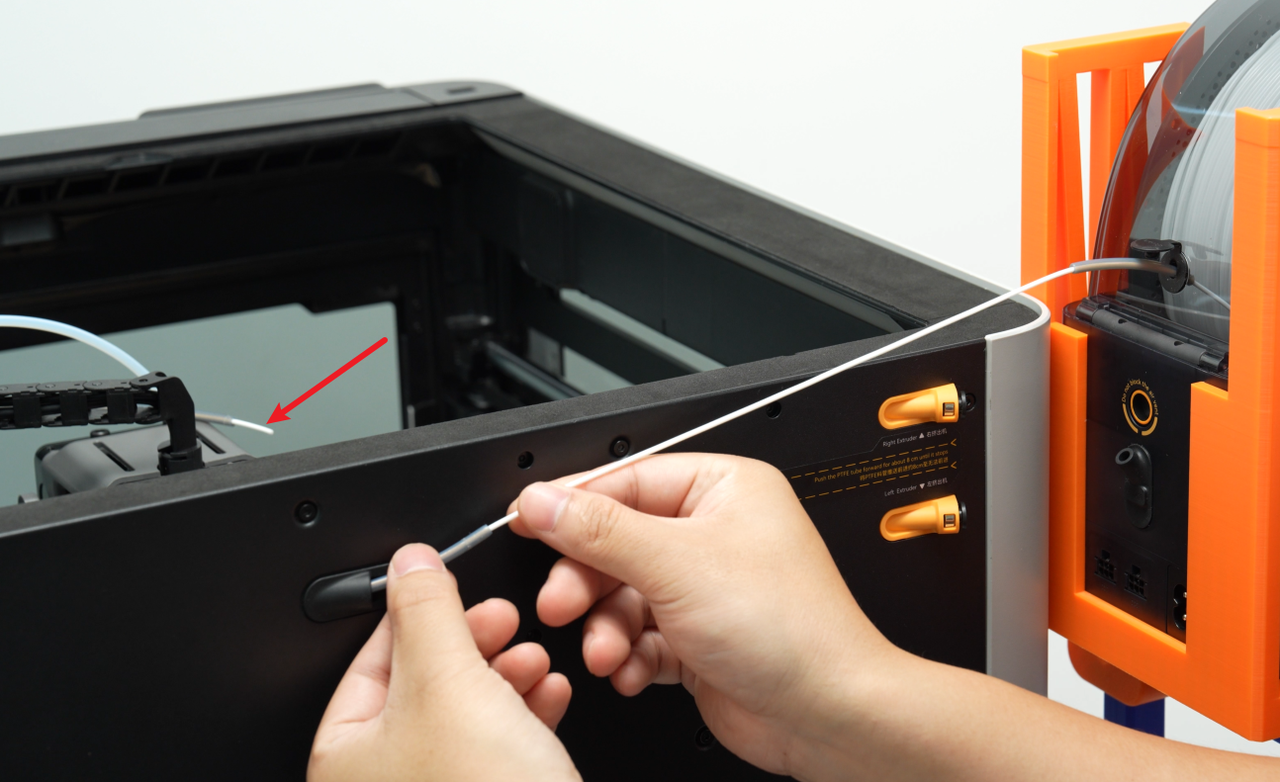
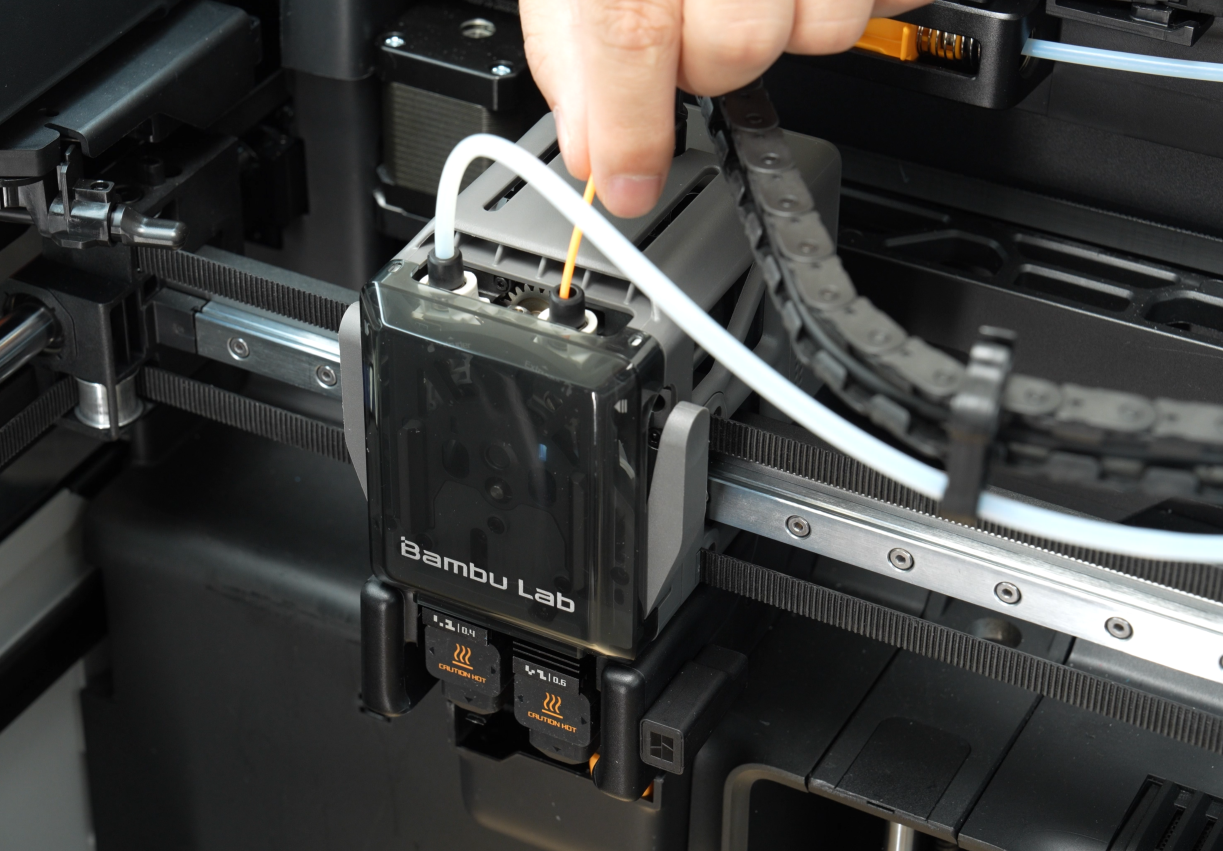
TPU 85A cannot be loaded through a PTFE tube and must be loaded directly into the extruder. TPU 90A can use a PTFE tube, but it should be connected to the dedicated load port at the back of the printer. When loading the TPU 90A filament, first disconnect the PTFE tube above the tool head. Once the extruder is successfully engaged, reconnect the tube.
-
After loading the filament, it is recommended to secure the AMS HT or sealed box to prevent the position of the filament outlet from shifting, which could increase loading resistance and cause print failure.
¶ TPU 90A Loading Procedure and Demonstration
Filament Loading Preparation (for AMS HT or Sealed Box Printing):
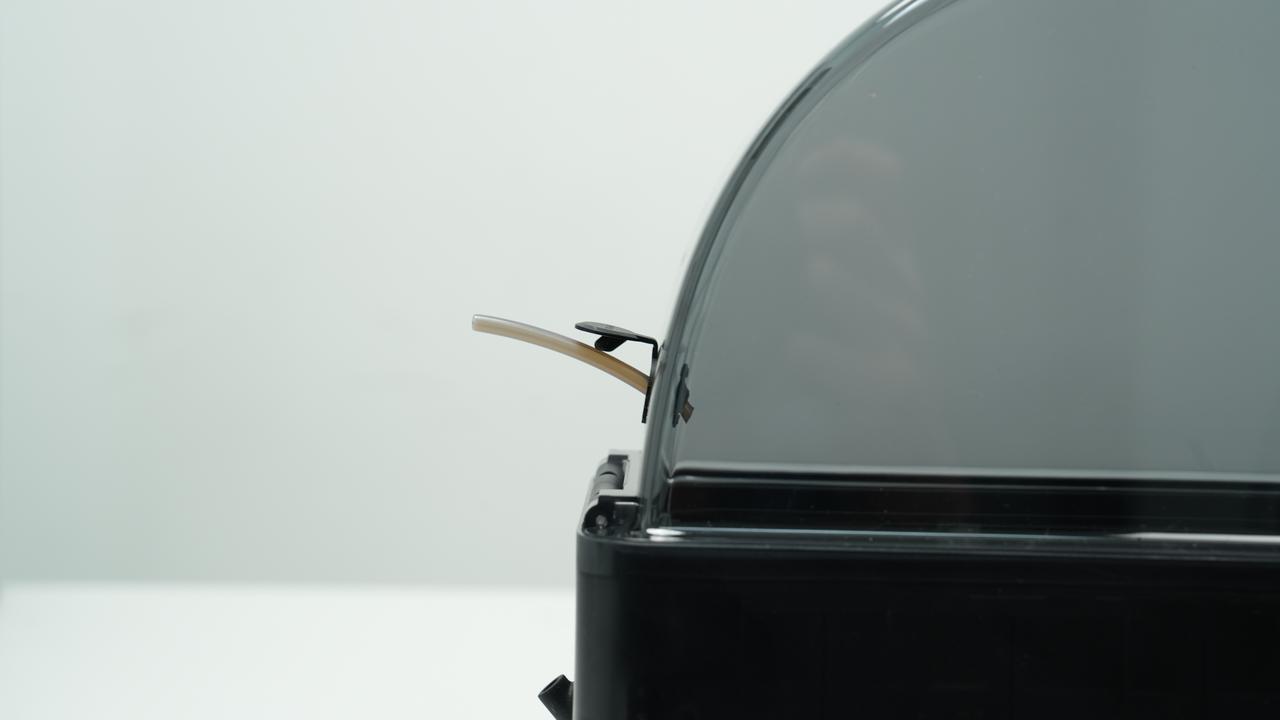
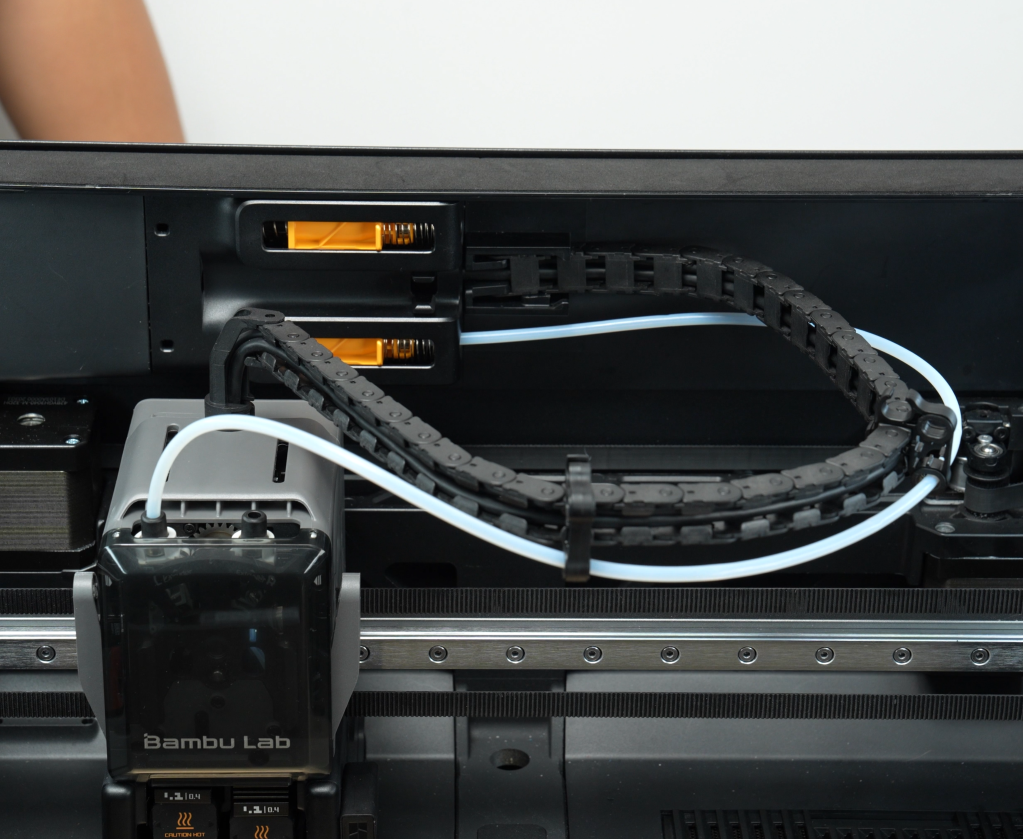
First, ensure that the PTFE tube connected to the right hotend is disconnected from the buffer. Insert the end of the PTFE tube into the TPU-specific loading port located at the rear of the H2D.

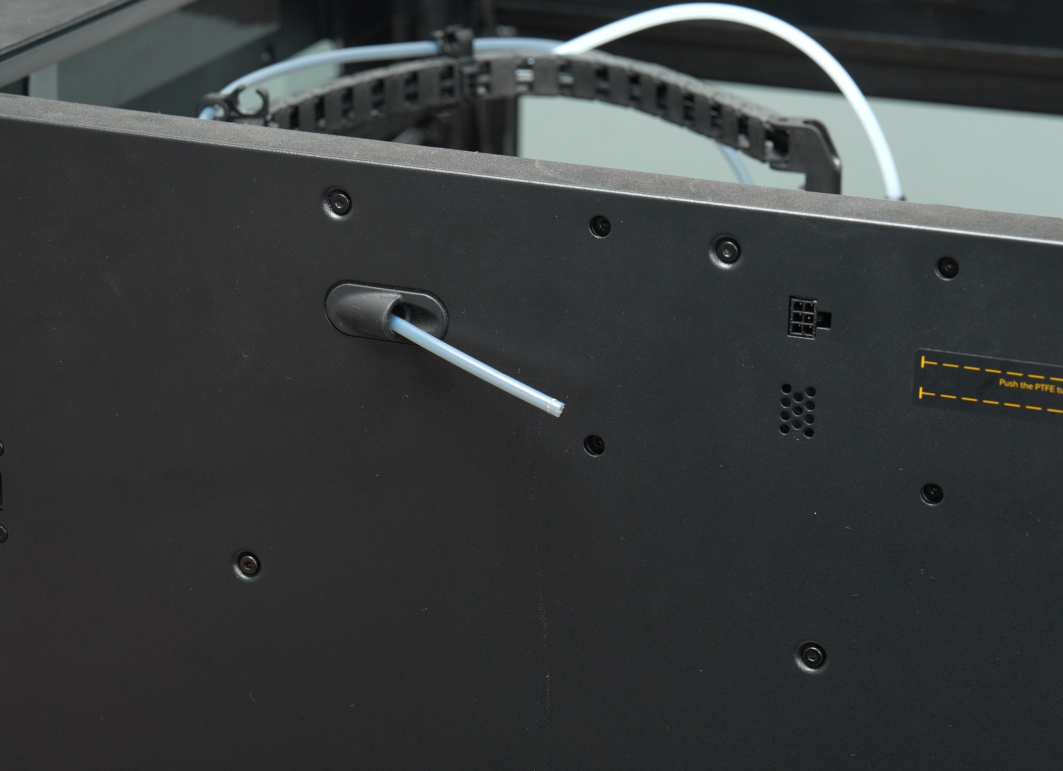
Please ensure that the PTFE tube is not inserted too far into the designated loading port. You can first move the toolhead to the back of the screen, positioning it at the farthest point. If the PTFE tube is inserted too far, pull it back slightly to adjust the length appropriately, then push the toolhead back. Finally, disconnect the PTFE tube from the top of the right hotend.
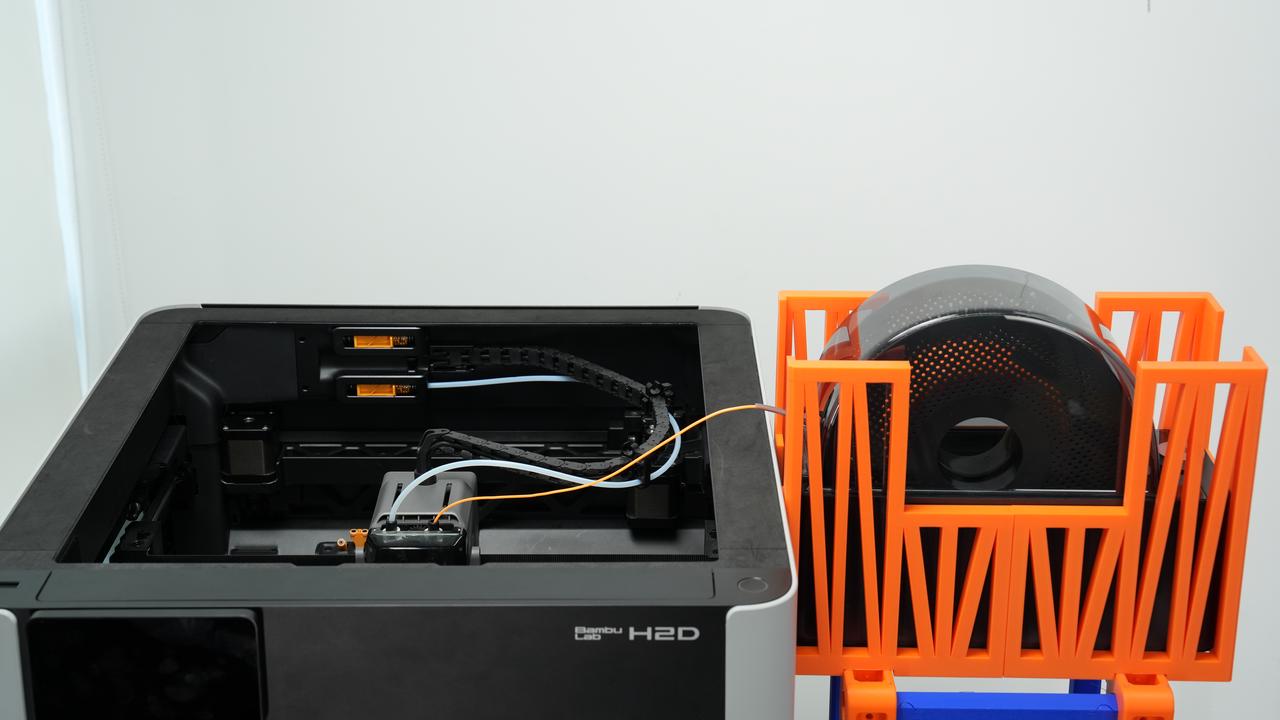
Placement of the TPU 90A Filament Container and PTFE Tube Connection Method:
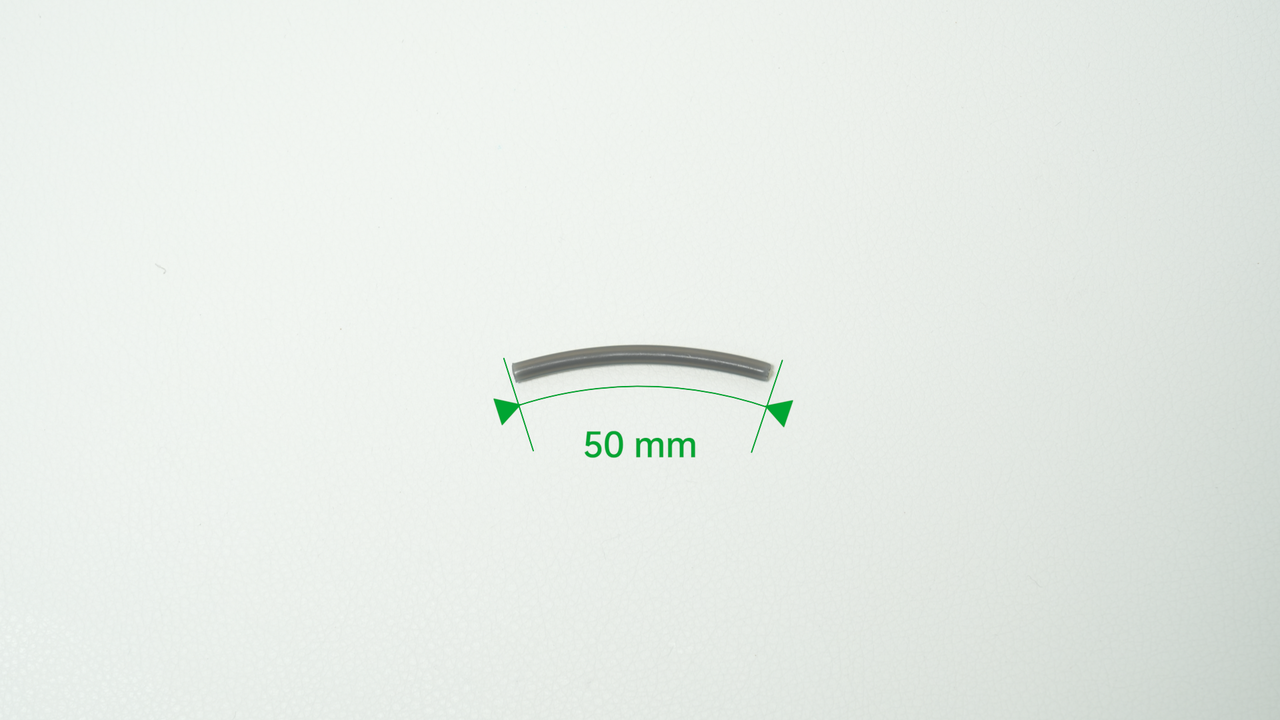
When printing with AMS HT, you can first cut a 5cm-long PTFE tube and slightly bend it to maintain its curve for easier feeding. Then, open the silicone plug at the rear of the AMS HT, position the raised side of the PTFE tube facing upward, and insert it into the small hole of the silicone plug. Ensure that the insertion depth into the AMS HT is 5mm.
Do not insert the PTFE tube too far!
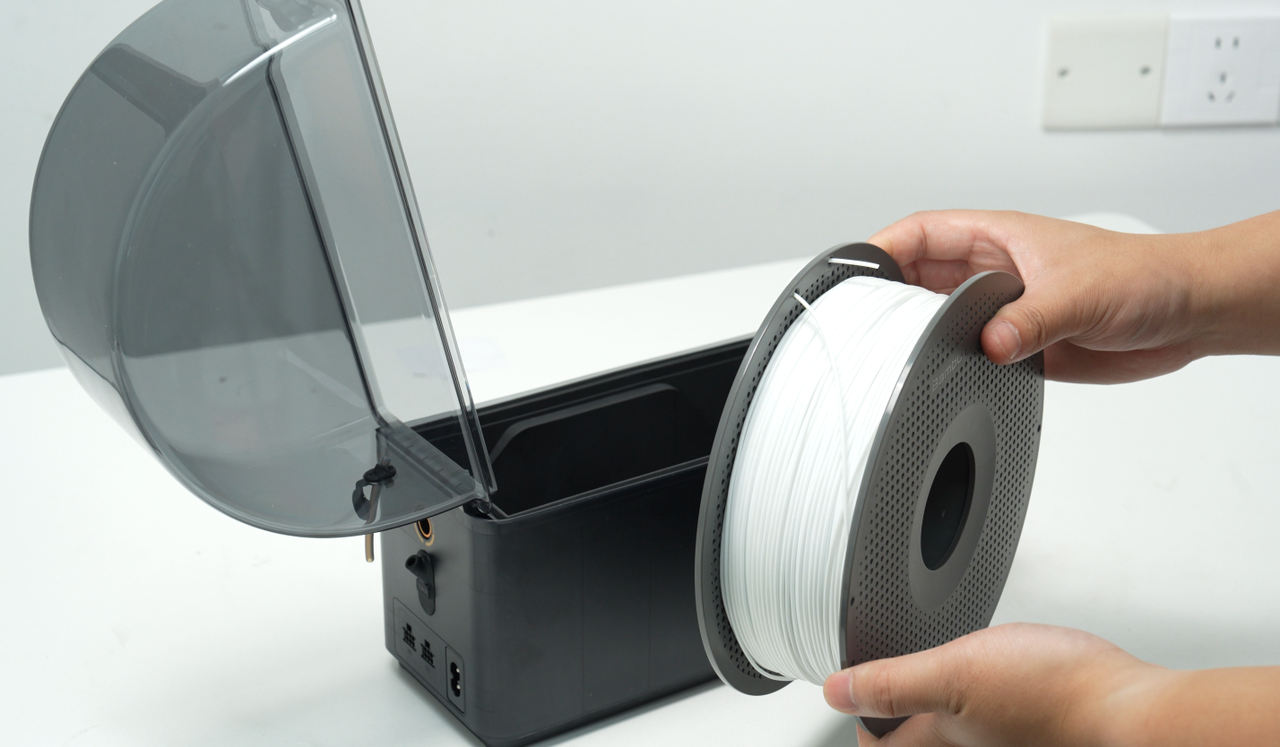
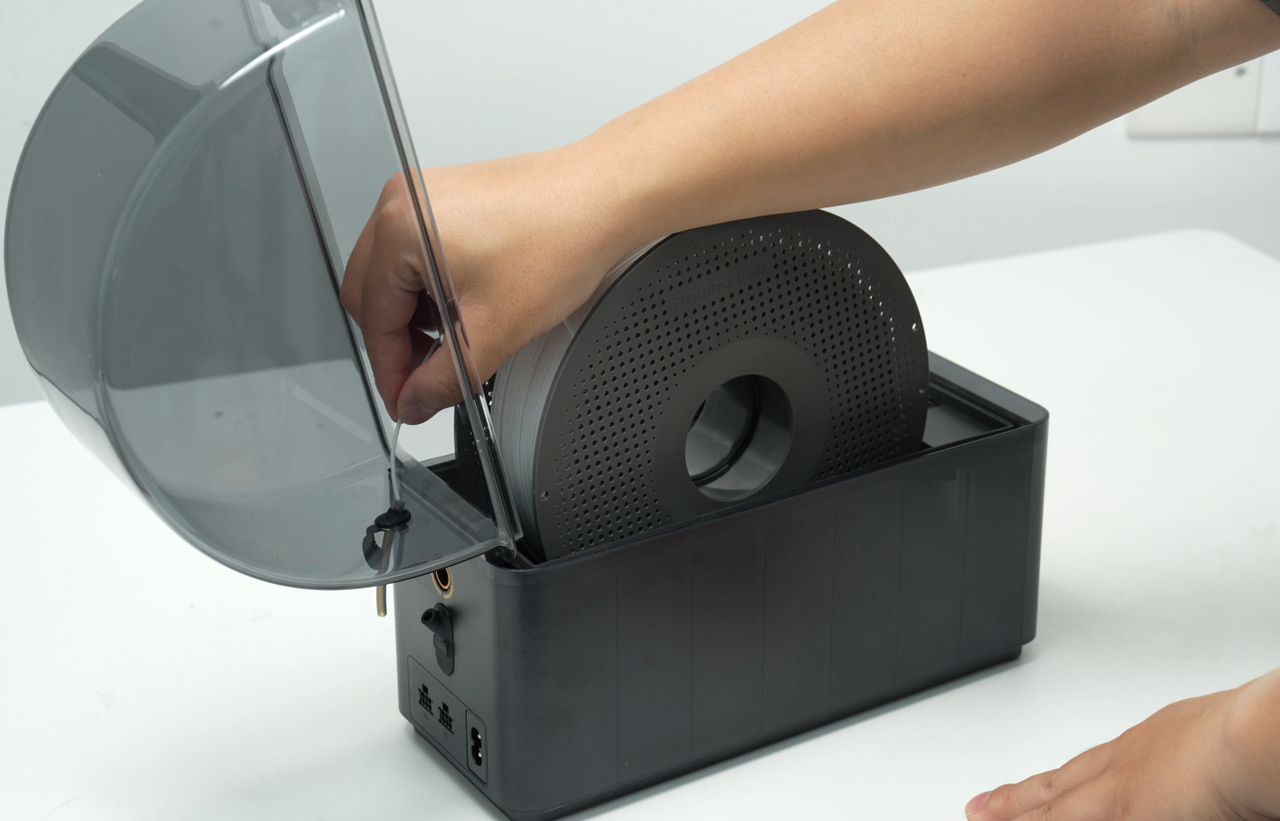
Then, check the orientation of the filament, place it into the AMS HT, feed it through the PTFE tube, and securely close the AMS HT cover.
Elevate the AMS HT to ensure that the TPU-specific outlet of the AMS HT is level with the TPU loading port at the back of the H2D, to minimize loading resistance as much as possible.
You can use printed models to help adjust the height.
Sealed box: The sealed box can be used as a substitute for the AMS HT, with the same placement position and loading mode as the AMS HT.
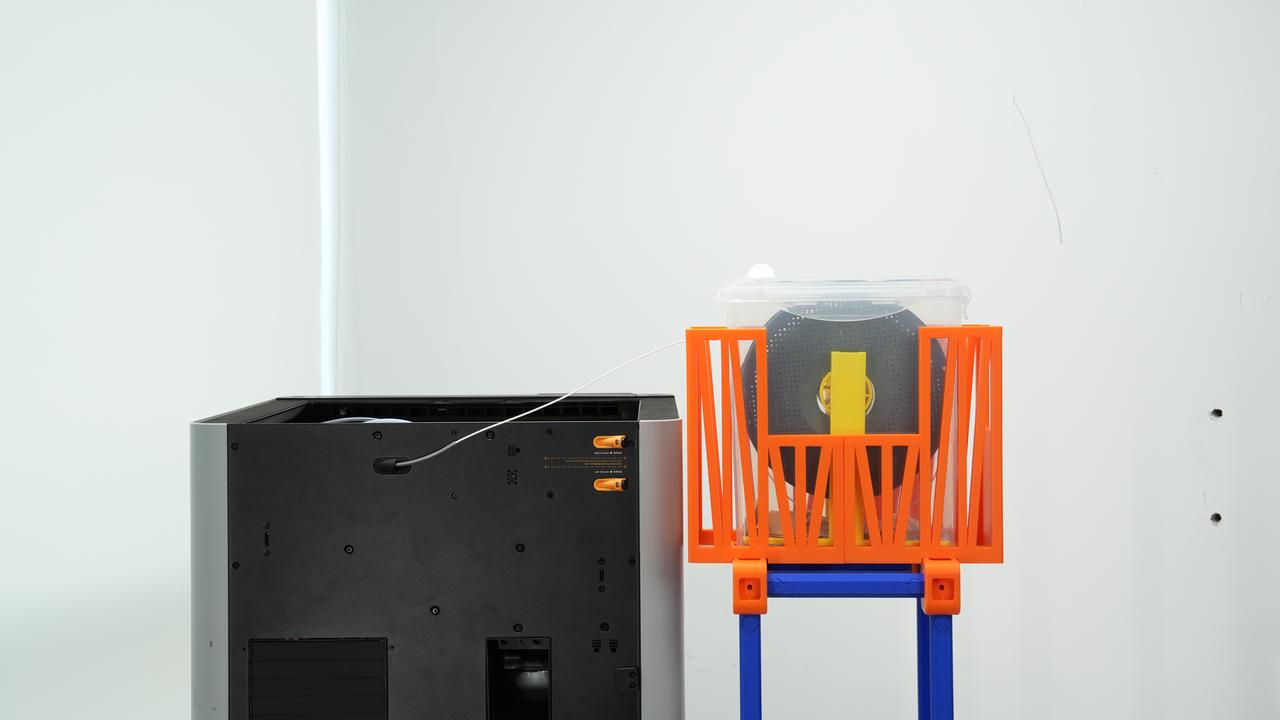
For Top-feed Rack installation and filament preparation
To prepare for Top-feed Rack feeding, open the glass cover plate, remove the original PTFE tube, install the Top-feed Rack, cut a new PTFE tube to the proper length, and install it.

Please refer to the detailed usage instructions and installation guide:https://makerworld.com/zh/models/1421552-h2d-flexible-filament-top-feed-rack#profileId-1477010
- TPU 90A Loading Procedure and Demonstration
Special Notes
When clicking the extrusion button ("down arrow"), do not click continuously to avoid TPU getting jammed in the extruder gears.
Once the extruder gears engage with the TPU filament, click the extrusion button slowly. Confirm that the filament is extruding continuously and evenly from the hotend before starting the print.
This explanation and demonstration use AMS HT as an example. The operation is the same when using a sealed box.
Operation Steps:
-
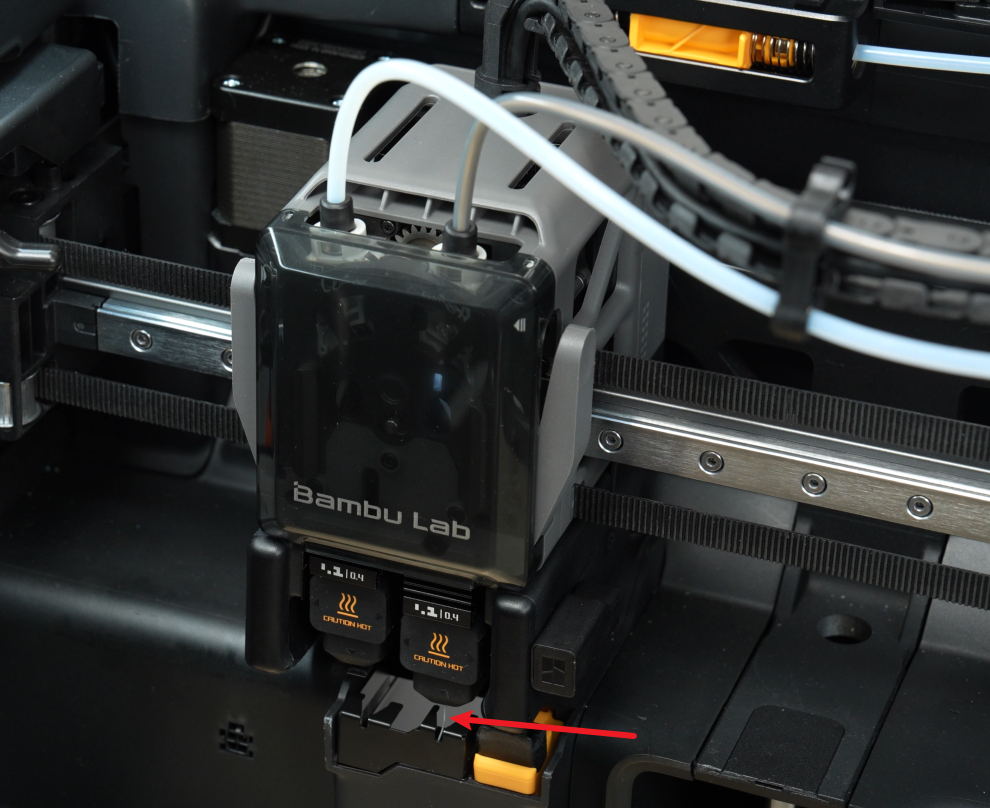
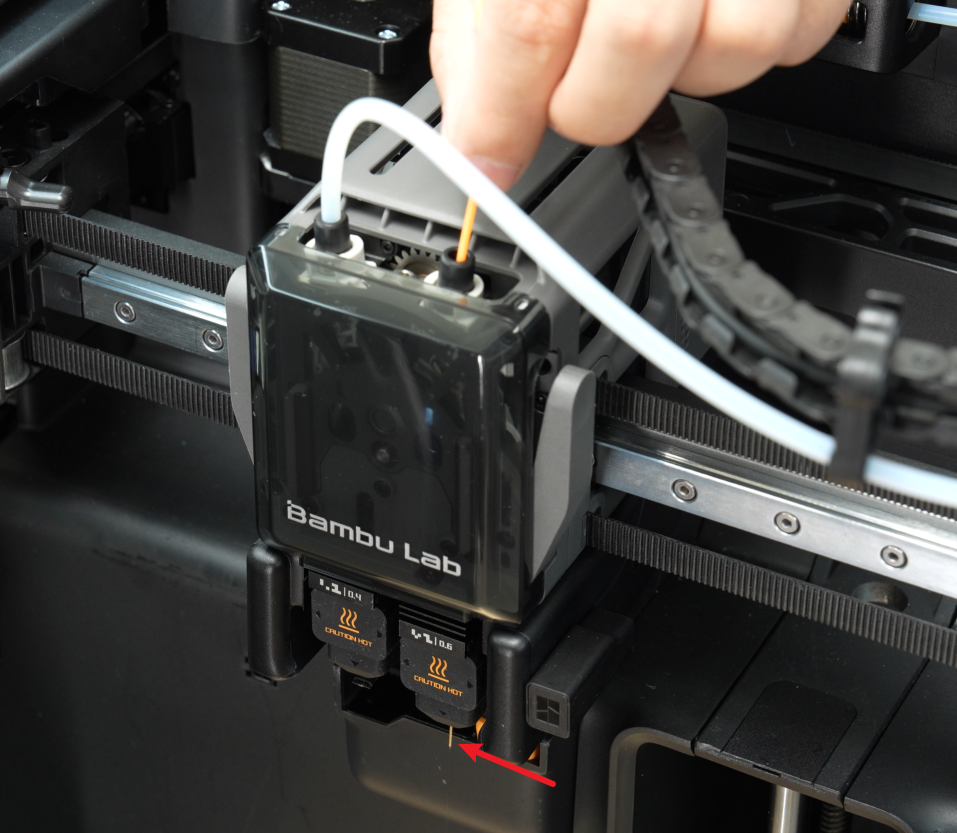
First, disconnect the PTFE tube connected to the extruder right pneumatic connector (This step has already been disconnected during the preparation).
-
Pull the filament from the TPU-specific outlet of the AMS HT and push the filament into the printer's PTFE tube. Once the front end of the filament reaches the PTFE tube exit, gently pinch the front end of the filament and pull it out to a certain length.
When feeding filament using the top spool holder, insert the filament into the feed port on the spool holder. Once the filament tip reaches the end of the PTFE tube, gently pinch the tip and pull out a small length.
- Set the hotend temperature as 250℃.
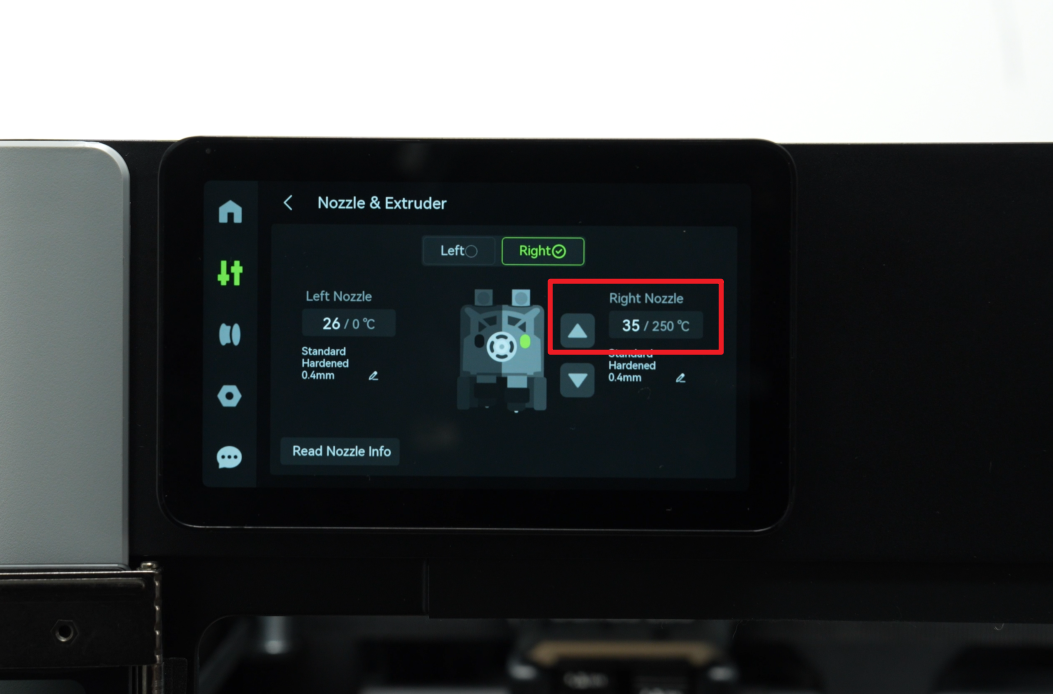
- After the hotend reaches 250 ℃, manually push the front end of the filament into the extruder and click the "down arrow" on the screen to manually control the rotation of the extruder gears. Do not click continuously or quickly to avoid TPU getting jammed in the extruder gears, which could cause a clog.
- Once you confirm that the TPU 90A filament is successfully engaged and extruding smoothly from the extruder (with the filament continuously visible at the hotend), reconnect the PTFE tube to the tool head.
¶ TPU 85A Loading Procedure and Demonstration
Special Notes
TPU 85A filament should not be fed through the PTFE tube, as this can cause excessive loading resistance and prevent smooth extrusion.
When clicking the extrusion button ("down arrow"), do not click continuously to avoid TPU getting jammed in the extruder gears.
Once the extruder gears engage with the TPU filament, click the extrusion button slowly. Confirm that the filament is extruding continuously and evenly from the hotend before starting the print.
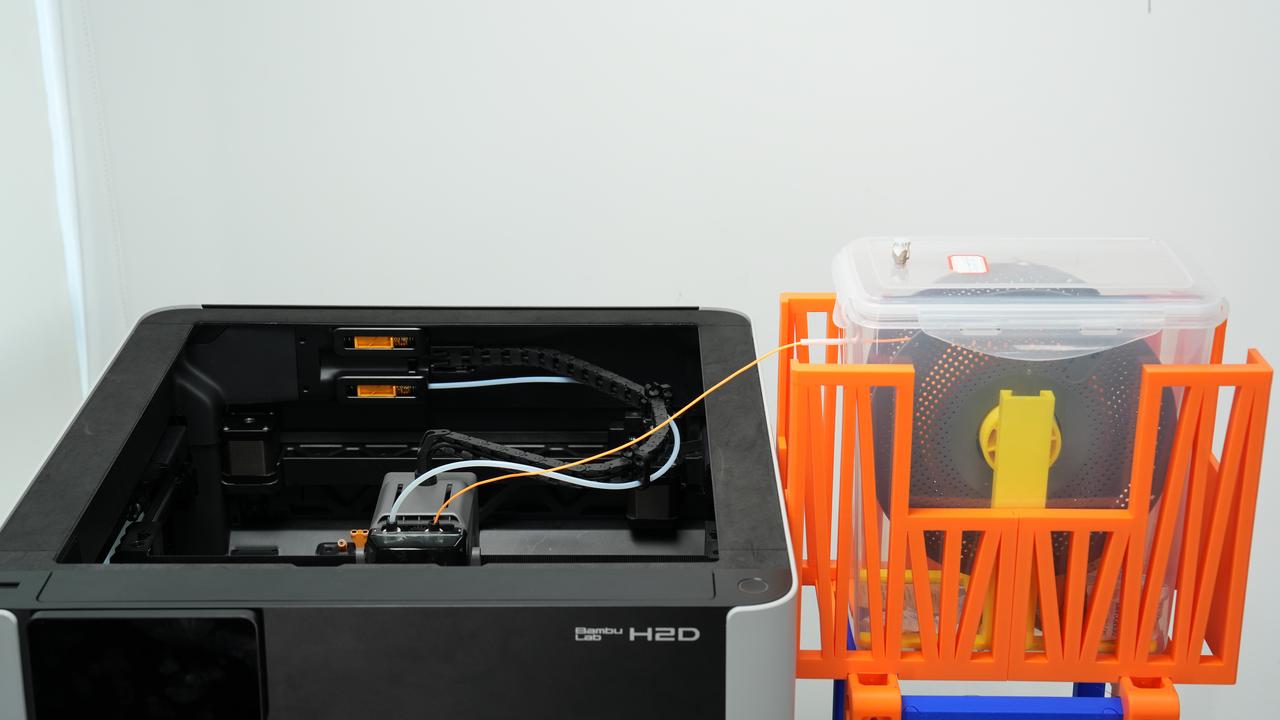
Filament Container Placement Operation:
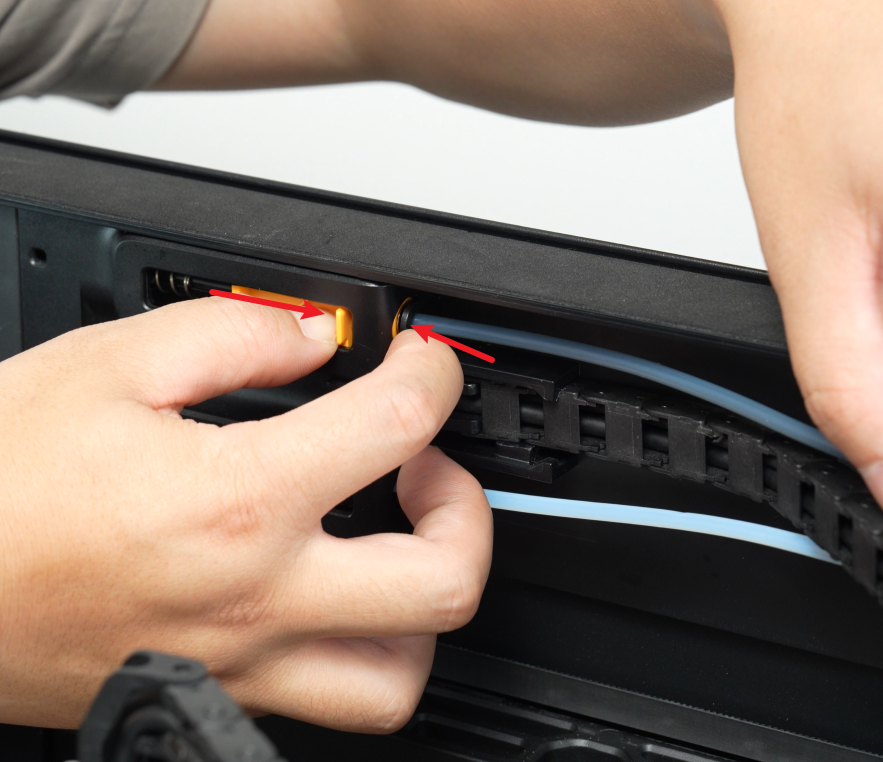
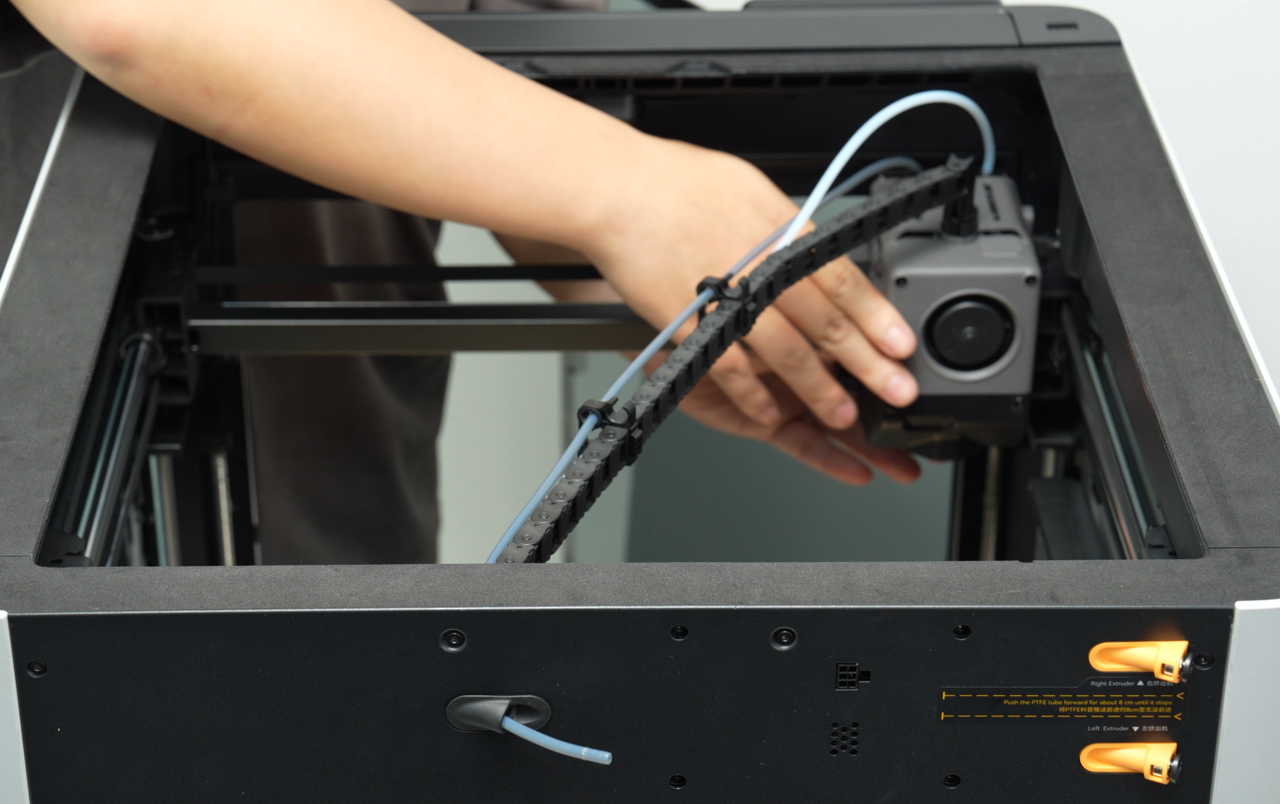
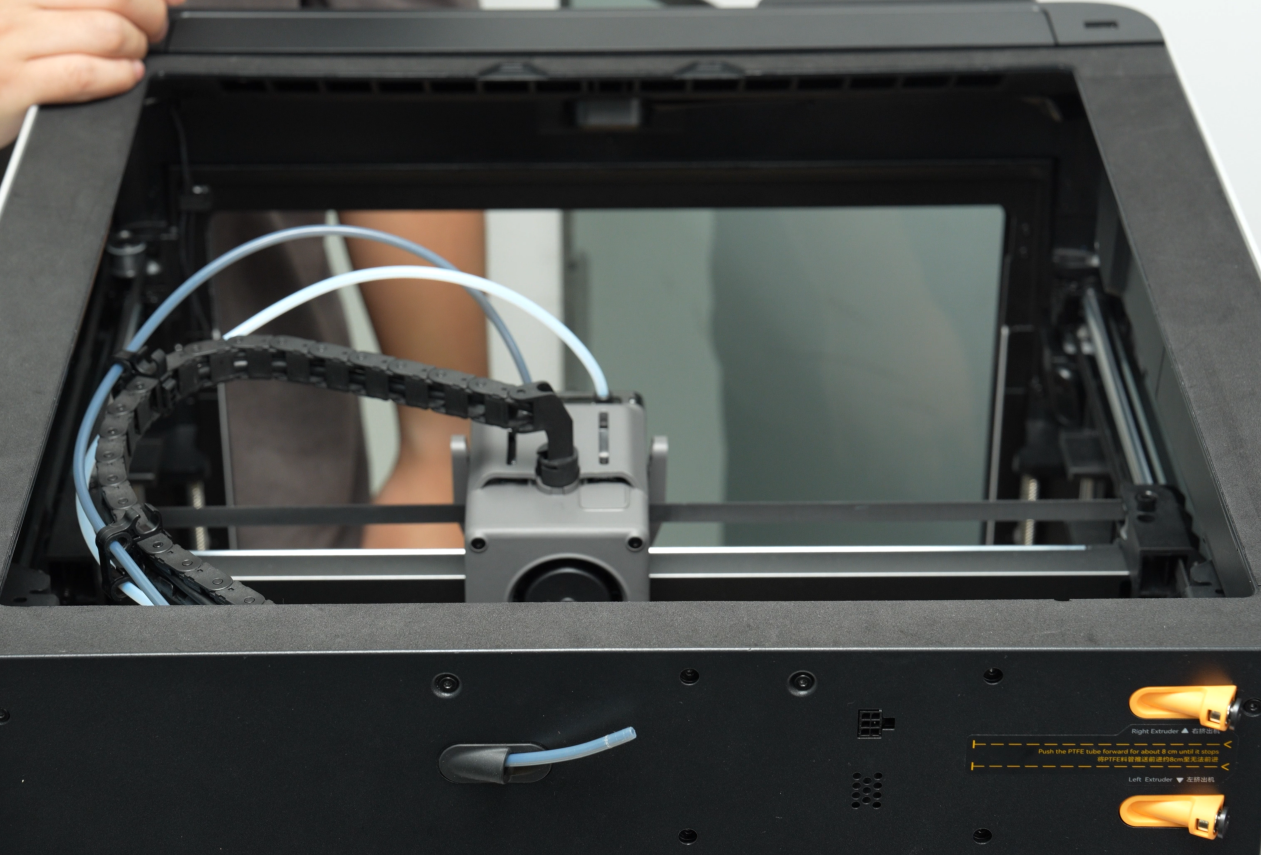
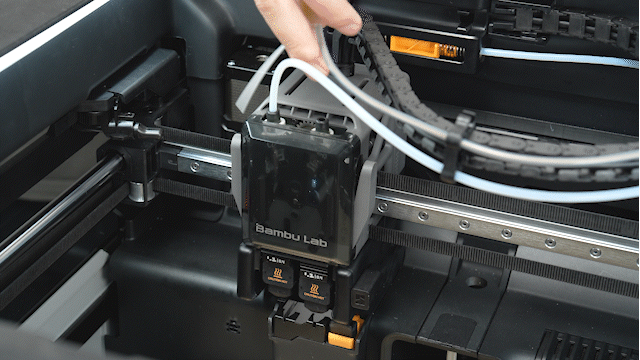
- Press the pneumatic connector to unlock the PTFE tube above the right feed port of the extruder (right hot end) and the upper part of the buffer. Then, pull the PTFE tube out of the machine's cable chain clip.
Disconnect the PTFE tube from the buffer

Disconnect the PTFE tube from the extruder (right hotend)

Remove the PTFE tube
-
Before printing, prepare a 5cm-long PTFE tube in advance and insert it into the silicone hole at the rear of the AMS HT. For detailed steps, please refer to the TPU 90A instructions.
-
Adjust the height of the AMS HT so that the TPU outlet is above the printer body. Pull the filament directly from the TPU-specific outlet of the AMS HT. You can use a printed model to help with the height adjustment.
- Sealed Box Placement: The sealed box can be used as a substitute for the AMS HT, with the same placement position and filament loading mode as the AMS HT.
When using the Top-feed Rack, the PTFE tube on the holder should be removed, and the filament should be fed directly into the toolhead.
TPU 85A Loading Procedure and Demonstration
Operation Steps:
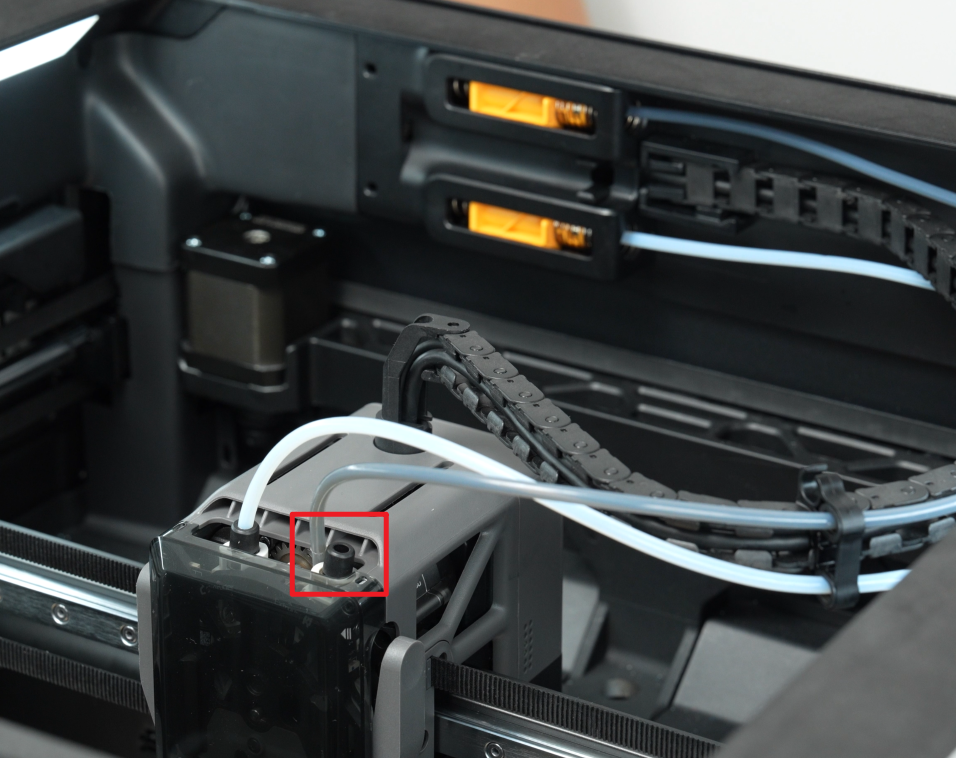
- Set the hotend temperature to 250°C. TPU 85A requires a 0.6mm hotend for printing. Before printing, please replace the hotend with a 0.6mm one in advance and set the hotend size to 0.6mm on the screen.
- After the hotend reaches 250 ℃, insert the filament into the tool head.
- Click the extruder “down arrow” on the screen to manually control the feed and ensure the filament extrudes smoothly (continuous extrusion visible at the hot end). Avoid clicking rapidly and continuously to prevent TPU from rolling into the gears and causing a jam.
¶ TPU Filament Unloading
H2D can unload TPU filament through the unloading UI program.
However, manual unloading is recommended: heat the right extruder to 250 °C, gently tap the unload button, and as the extruder gears begin to turn, carefully pull the filament out by hand.
¶ Print Parameters and Considerations
¶ Parameter Settings
In addition to the preset parameters, specific parameter settings should be adjusted according to the characteristics of the model.
-
The recommended printing temperature for TPU 85A & 90A is 225°C, and the heatbed temperature should be between 30 - 35°C. No chamber heating is required.
-
Please retain the default volume speed limit during printing and do not increase the print speed.
-
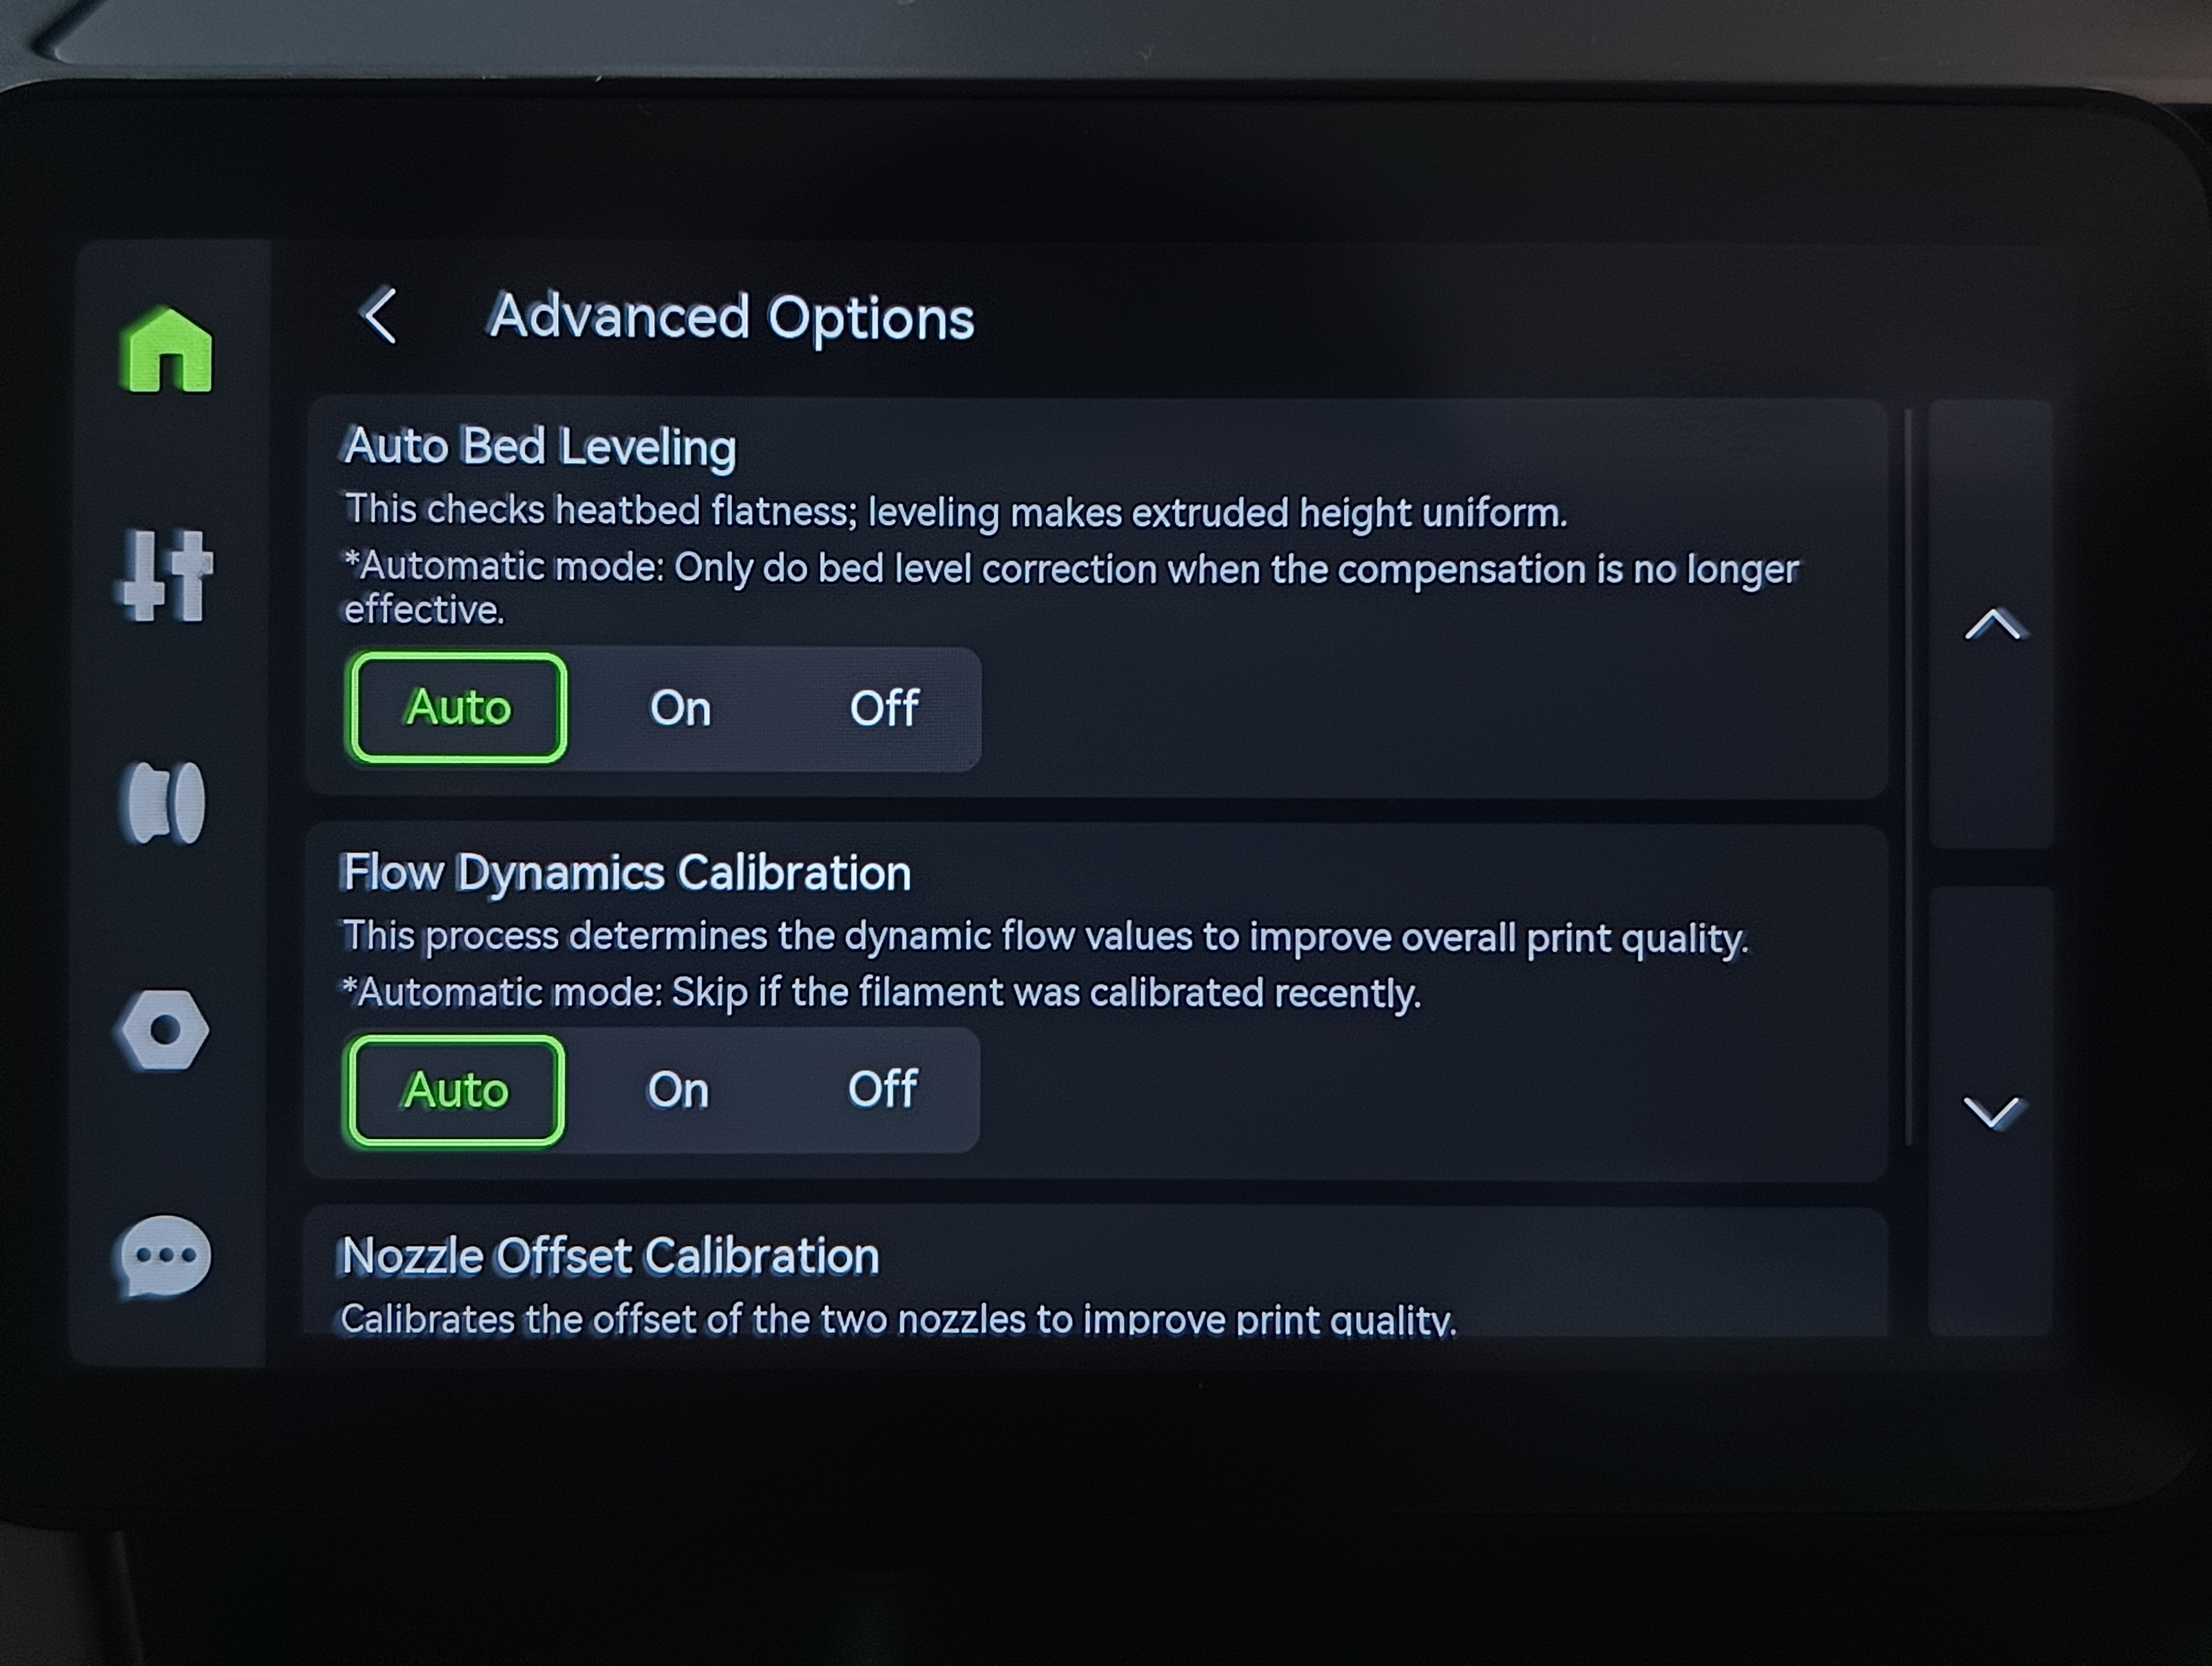
For flow dynamic calibration, select "Automatic" or "Off".
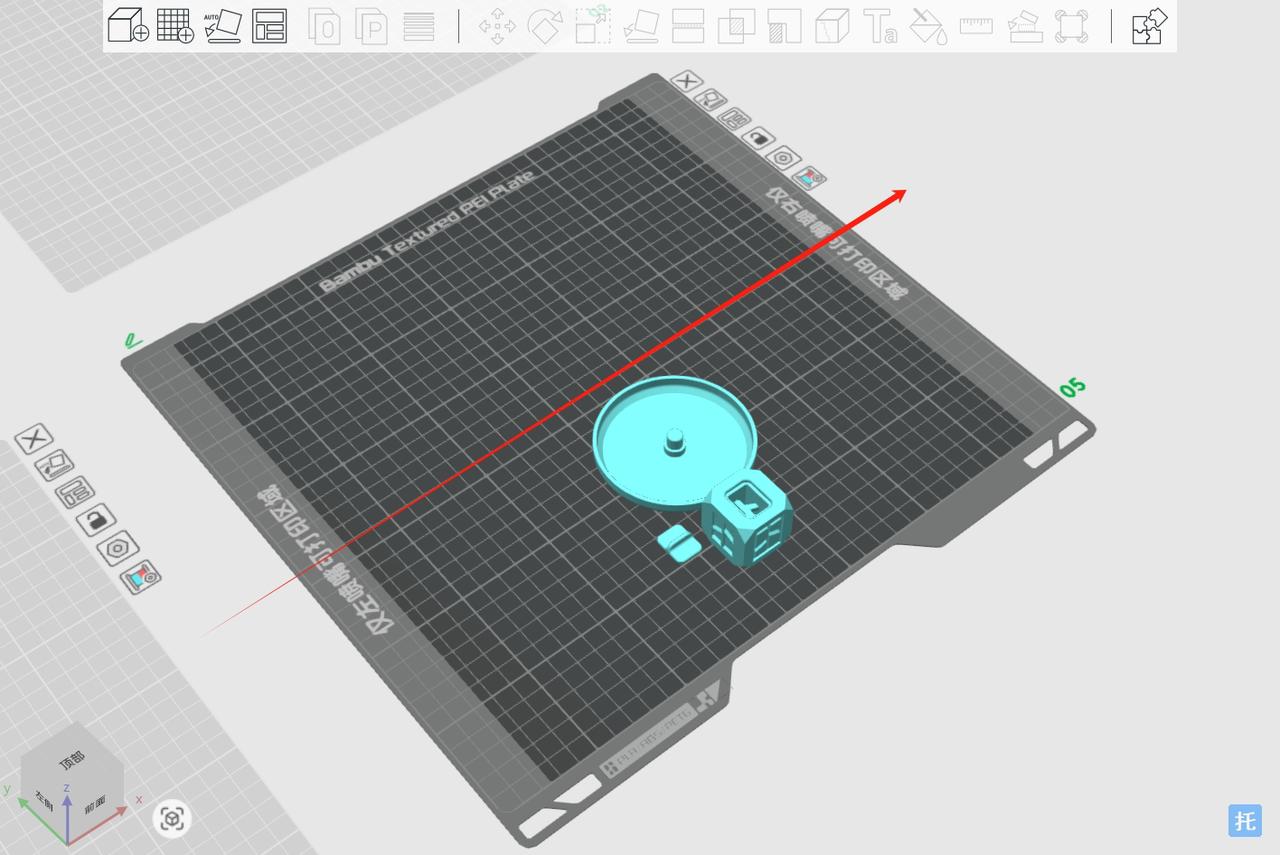
- When printing the model, it is recommended to place the model in the center and towards the front of the build plate to reduce the friction between the filament and the PTFE tube.
¶ Common Printing Issues
TPU filaments may encounter the following issues:
-
Under extrusion (nozzle clogging, loading resistance, filament slipping): For more information about how to clear H2D TPU clogging, please click here
-
Extruder clogging (Filament bending, causing a clog in the extruder gear; disassemble the extruder and remove the clogged filament):H2D extruder unit disassembly and assembly
-
Stringing and oozing: You can use a large-diameter hotend (e.g., 0.6 mm hotend), fine-tune retraction, further dry the filament, or perform post-processing on the model.