¶ When to Use?
Symptom: The screen stays off and the machine appears unresponsive after flipping the rear power switch to the ON (I) position.
¶ Important Notes Before Troubleshooting
When an H2D or H2S unit fails to power on, this wiki provides a structured troubleshooting procedure, beginning with fundamental electrical checks and progressing to component-level diagnostics.
At each troubleshooting step, carefully observe the machine for any signs of activity, such as fan operation, status LEDs, or other indicators. At each step, carefully observe the machine for signs of activity such as fan operation or status LEDs. If any components respond, the issue is likely isolated to another subsystem.
¶ Basic sanity checks
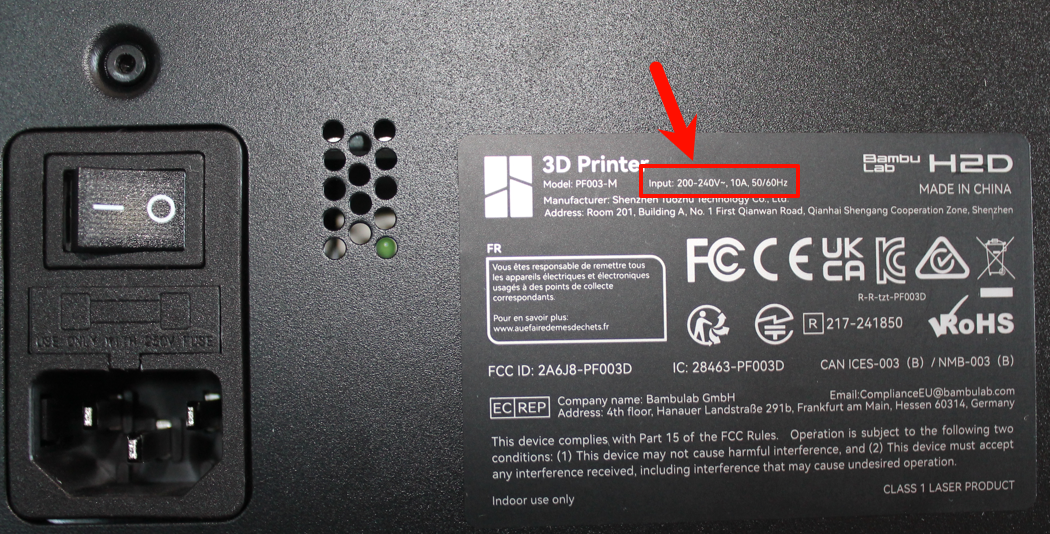
¶ Input Voltage
Confirm that the voltage label near the power port ( 200–240 V or 100–120 V) matches your region. If it doesn’t, stop using the device and correct the supply. Please check the model label next to the power port on the back of the printer to confirm whether the input voltage is 200-240V or 100-120V.
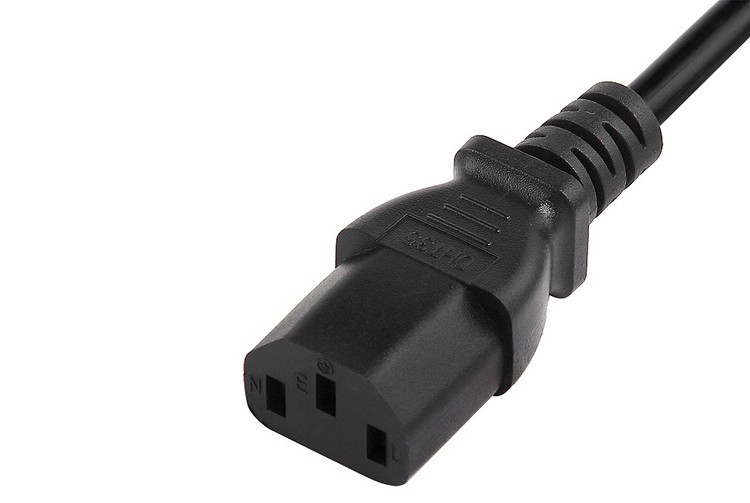
¶ Power cable
Make sure the power cord is fully seated on both the wall socket and the printer’s PSU input. You can use any compatible power cable to check whether the original cable is the source of the problem. The machine consumes little power while idle, which is sufficient for testing functionality. Afterwards, ensure you obtain a proper power cable.
Ensure that the cable is rated for the input power requirements of your region, is compatible with your local wall outlet standard, and has a C13 connector on the opposite end for connection to the machine.
¶ Wall outlet
Test the wall outlet by connecting a known working device, such as a lamp or smartphone charger. Once confirmed functional, connect the printer to that outlet or to a different power strip to rule out issues with the original power source.
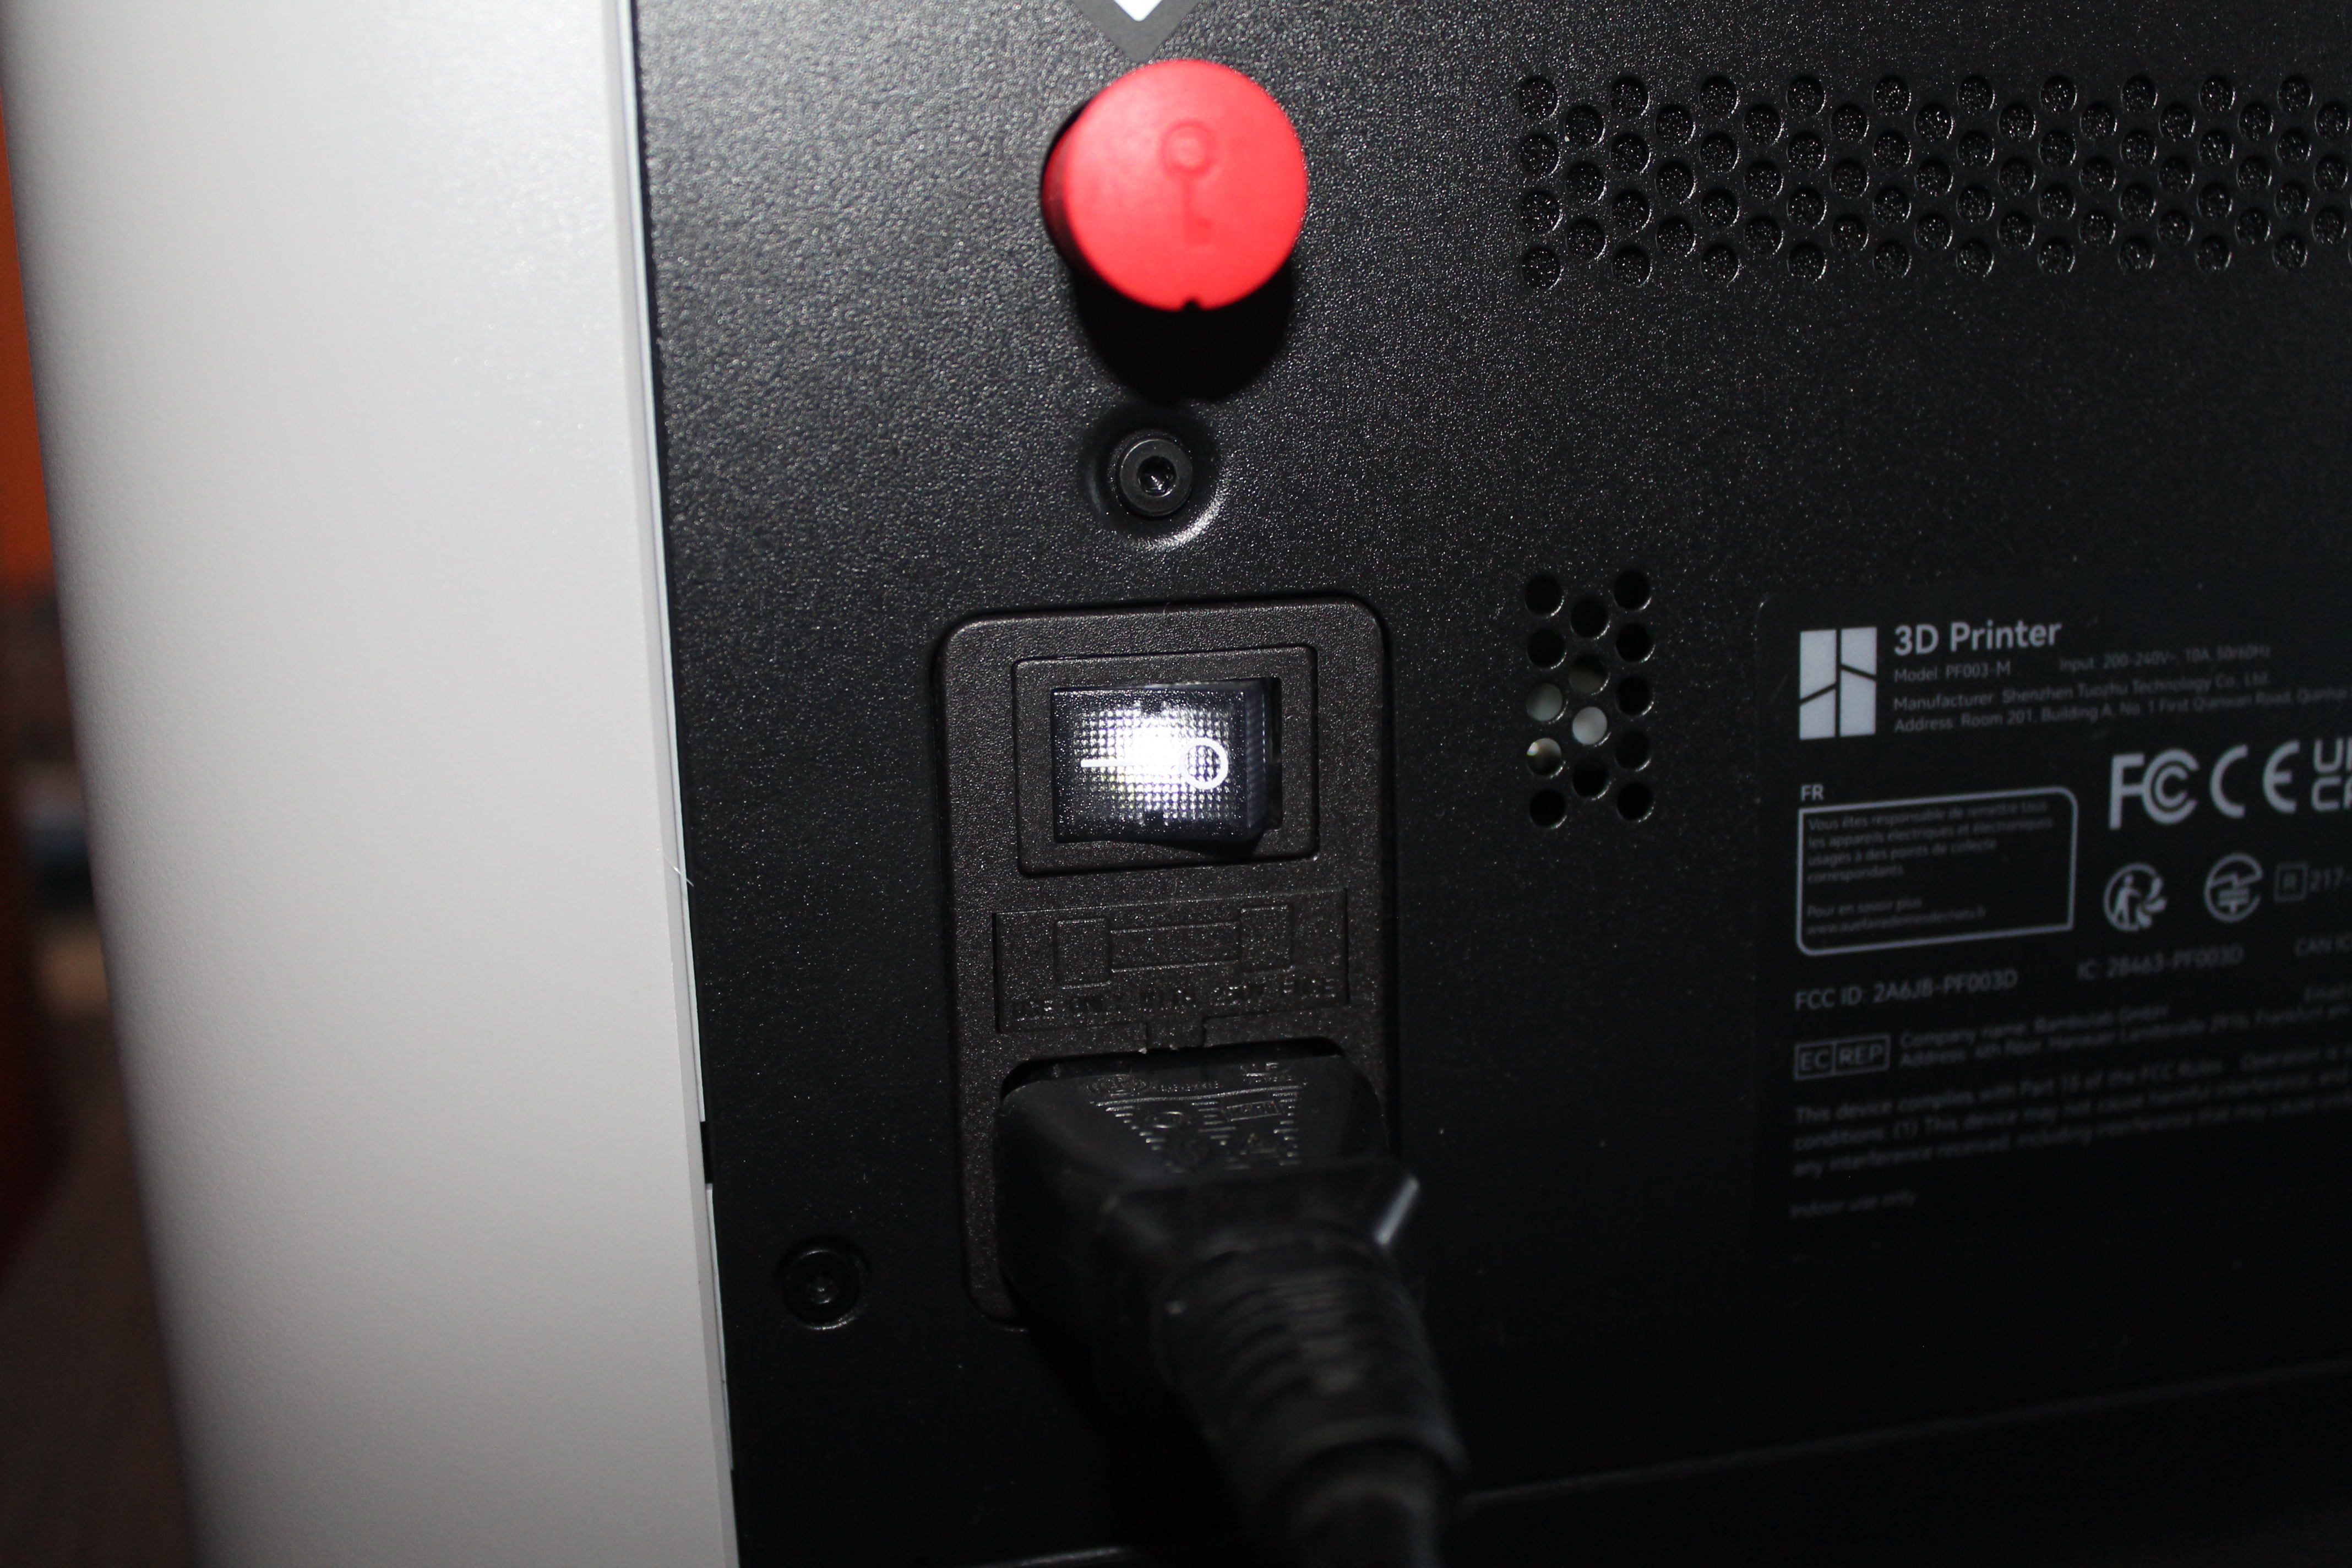
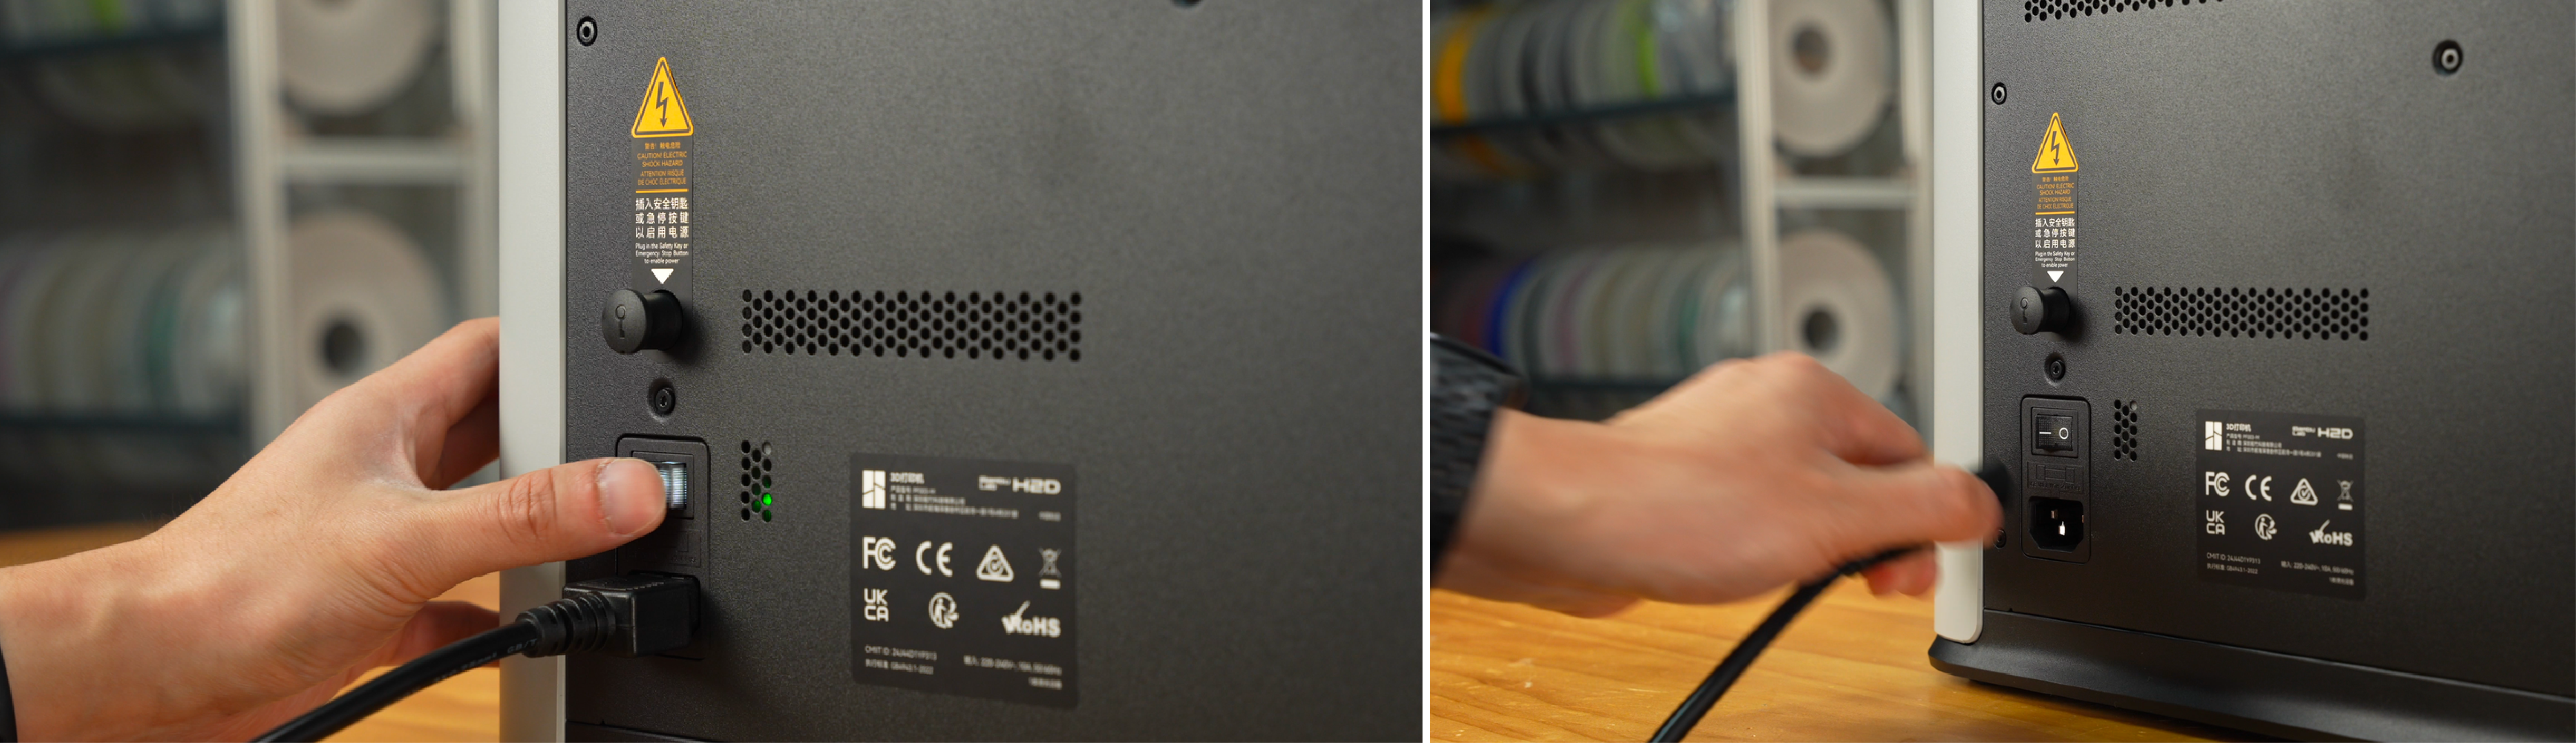
¶ Power switch
Confirm that the rear power switch is firmly in the ON ( | ) position, as illustrated below:
¶ H2 Safety Key
Verify that the safety key is present, correctly oriented, and fully seated in its socket. Inspect the key pins for signs of damage, and closely examine the socket for wear or obstruction.
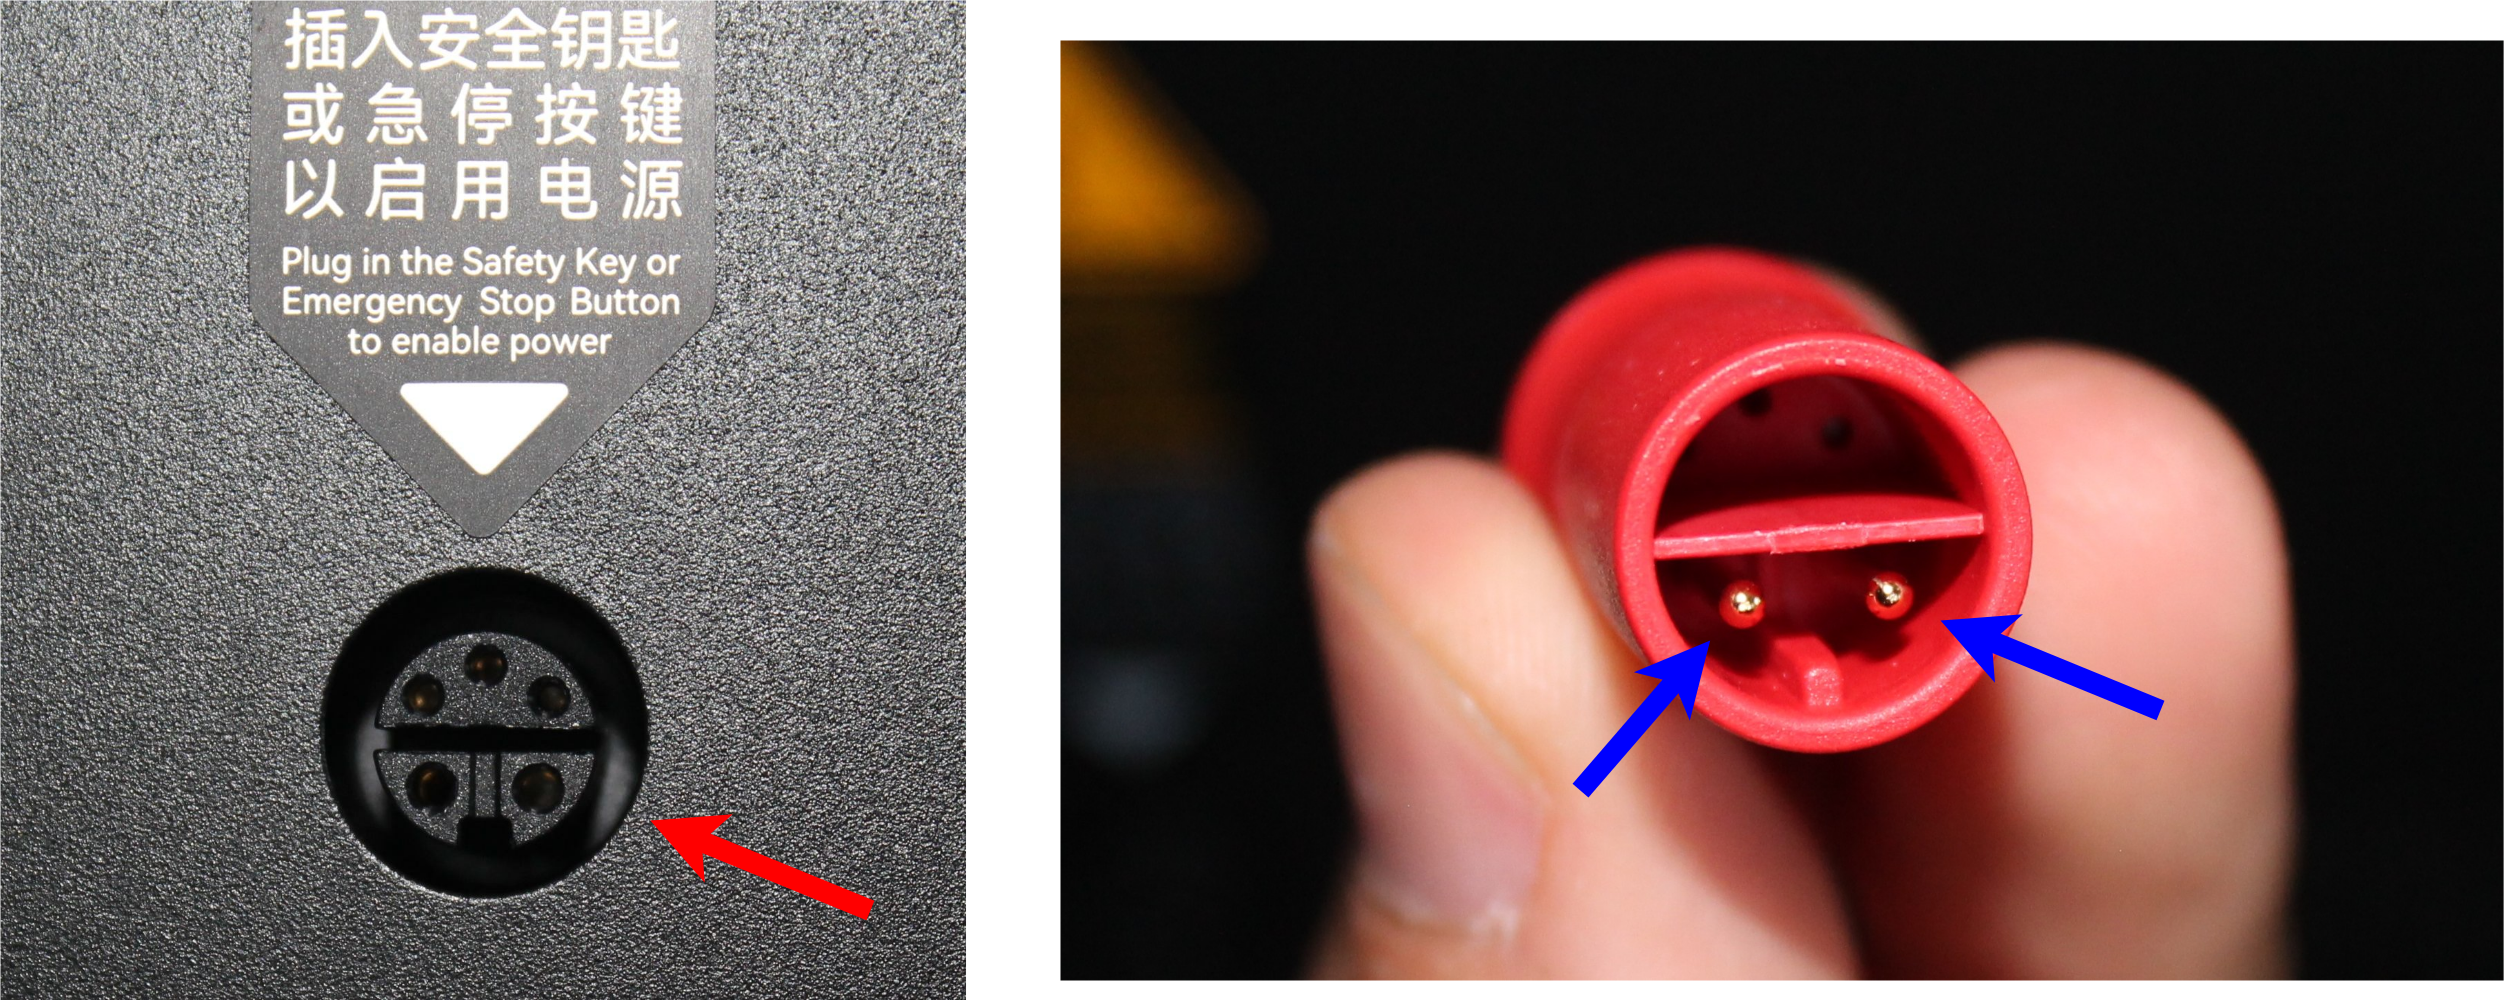
If you use the optional Emergency Stop for laser, make sure it’s not engaged and its Safety Key is inserted; otherwise, the printer will not power.
¶ Remove all accessories
Disconnect the AMS 2 PRO, AMS Hub, AMS HT, and any USB storage devices, then attempt to power on the printer. If it powers on, reconnect each accessory one at a time to identify which device is preventing startup.
¶ Power Socket check
The power switch should illuminate its LED when set to the ON (I) position. If the switch does not light up when connected to the input power and turned ON, the power switch module is likely faulty and must be replaced.
Follow this Wiki page to find more details on how to replace the power socket.
¶ Advanced diagnosis
This section is intended for extreme cases where all checks above have failed to fix the problem.
⚠️ Warranty - If your machine is still covered by warranty, please reach out to customer support. Only follow the rest of this wiki page if instructed by customer support.
⚠️ Safety Warning - Before proceeding, contact your reseller or a certified electrician. Bambu Lab is not responsible for any damage to equipment, property, or personnel resulting from the use of this guide.
Power the machine off, disconnect it from the mains power and remove the safety key before proceeding with any diagnosis steps below.
Follow this wiki page to remove the rear panel.
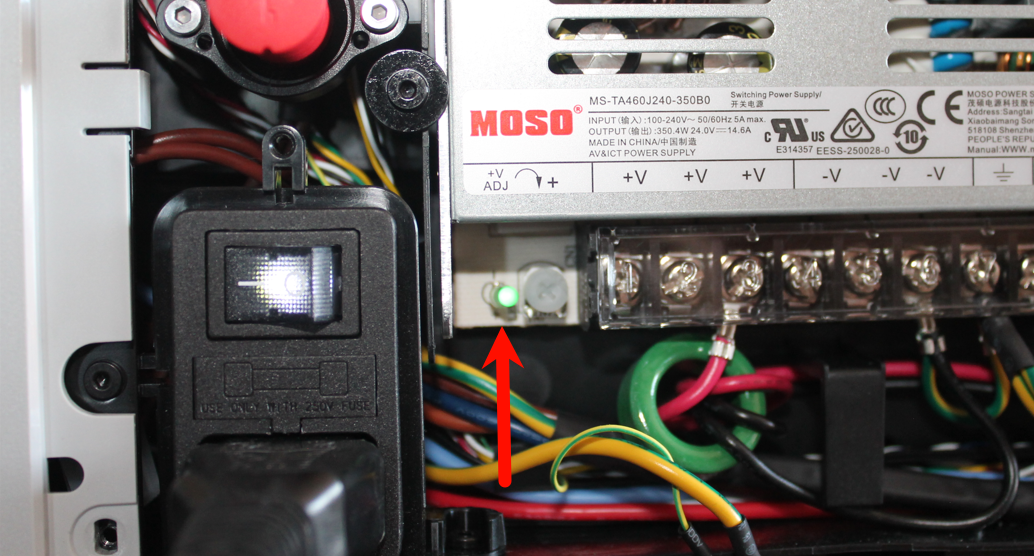
¶ Power supply check
With AC disconnected, remove the service cover per H2 guides and visually inspect the internal power supply for obvious damage (burn marks, smell). If the PSU shows damage, follow the H2 power supply replacement tutorial or contact Support. If the PSU shows no visible damage, verify whether it is operational by inserting the Safety Key, connecting the AC power cord, and setting the rear switch to ON (I). Do not touch the PSU or any wiring. Observe the PSU status LED:
A multimeter is required from now on. If you don't have access to one, contact support.
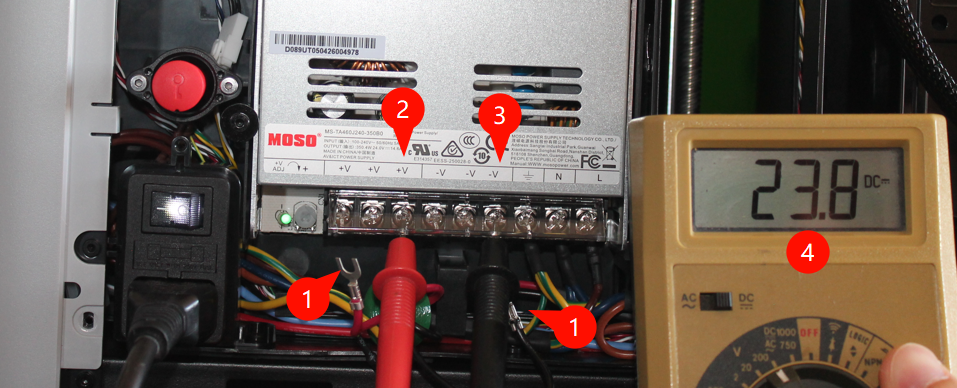
If the status LED is ON, the next step is to verify if it is outputting 24V. Set your multimeter to DC voltage with the appropriate scale for reading 24V, Connect the power cord and turn on the machine. Do not touch the PSU or any wiring! Probe the PSU in the marked locations, respecting the red (1) and black (2) order:
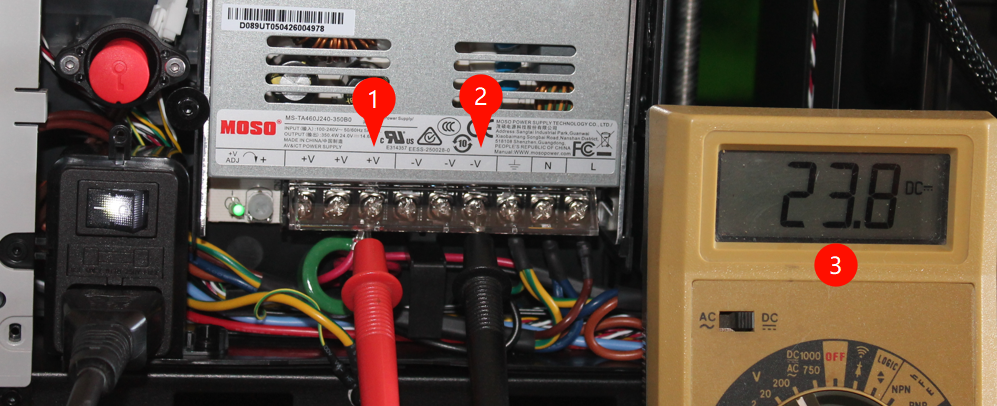
If the multimeter reads 24V, the power supply unit (PSU) is functioning correctly. In this case, the issue likely originates elsewhere, such as within one of the control boards.
If the PSU LED is off, disconnect the machine from the mains power again and gently loosen the marked screws, do not fully remove them. Disconnect the negative (1) and positive wires (2).
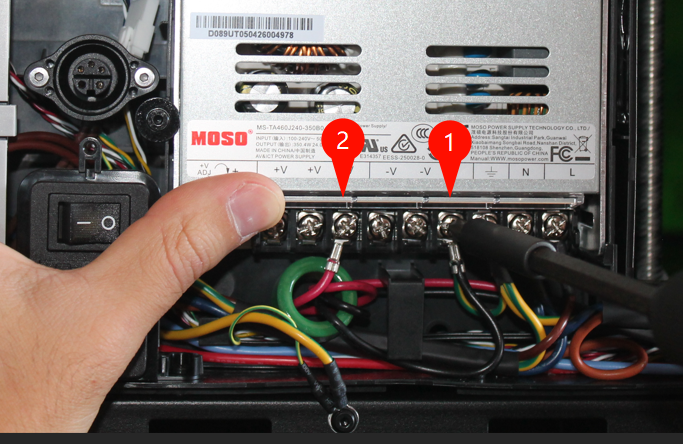
Set your multimeter to DC voltage with the appropriate scale for reading 24V, Connect the power cord and turn on the machine. Do not touch the PSU or any wiring. With the wires removed (1), probe the positive terminal (2) and negative terminal (3) and observe the multimeter reading (4). It should display 24V.
If the multimeter reads 24V, the power supply unit (PSU) is functioning correctly. In this case, the issue likely originates elsewhere, such as within one of the control boards.
If the multimeter does not display 24V, verify whether the unit is receiving 230V or 110V input. To perform this check, set the multimeter to AC mode (1) and select the appropriate voltage range (230V or 110V, depending on your power source). Exercise extreme caution when measuring AC terminals, as direct contact with live terminals can cause serious injury or even be fatal. The multimeter should show the same value as your input voltage (4) when measuring the live (2) and neutral (2) terminals.
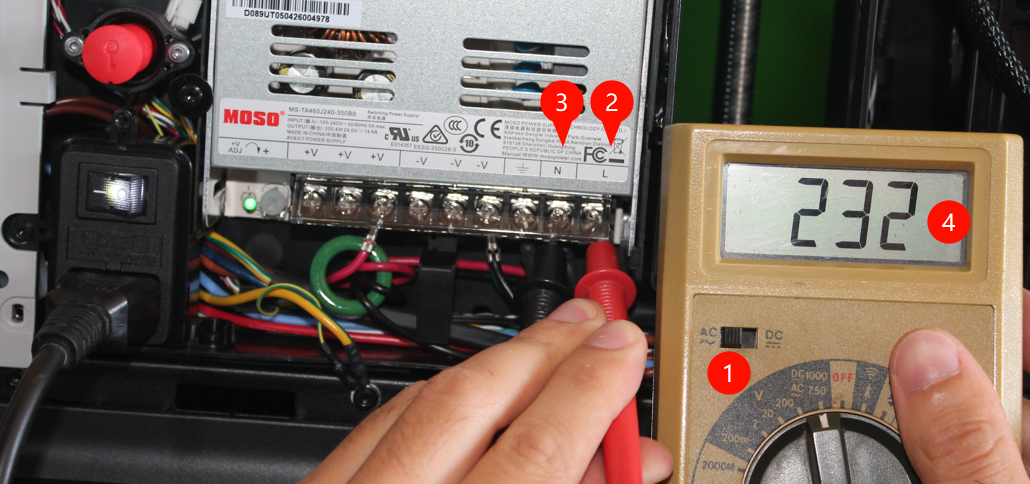
If the multimeter shows the input voltage, the power supply needs to be replaced. Refer to this wiki page.
If the multimeter doesn't show the input voltage and all the steps in this wiki have been validated, the key switch or the power socket needs to be replaced. At this stage, it's a good practice to replace both. Follow the power safety key replacement guide and the power socket replacement guide.
¶ End Notes
We hope the detailed guide provided has been helpful and informative.
If this guide does not solve your problem, please submit a technical ticket, we will answer your questions and provide assistance.
If you have any suggestions or feedback on this Wiki, please leave a message in the comment area. Thank you for your support and attention!