¶ Support Structures
Support structures play an essential role in 3D printing, especially when working with models that have significant overhangs. Bambu Studio offers a wide range of support options to handle these challenges effectively. To get started quickly, check out the basic support settings video below.
There is also an advanced support settings video that you can check out below.
¶ Support Materials
Depending on the parts formed during printing, filaments can be divided into body filaments and support filaments. The body filaments include PLA, PLA-CF, PETG, PETG-CF, ABS, ASA, PC, PA, PA-CF/GF, PA6-CF/GF, PAHT-CF/GF, PET-CF/GF, etc., and the common support filaments include Support W (renamed Support for PLA), Support for PLA/PETG, Support G (renamed Support for PA/PET), PVA, HIPS, etc. In general, there are certain guidelines to keep in mind when using them. These include:
1. Body filaments can be used to print both the body structure and the support structure, although in some cases, the supports may be difficult to remove. Support filaments, on the other hand, are designed specifically for printing supports, and using them for the body structure can result in poor quality and low strength.
2. The best approach is to use body filaments for printing the body structure and the corresponding support filaments for the support structures. The following are some examples:
a) If the body structure is printed with PLA Basic or PLA-CF, the support filament may be one of Support W (renamed Support for PLA), Support for PLA/PETG, and PVA, or other suitable support filaments;
b) If the body structure is printed with PETG Basic or PETG-CF, the support filament may be Support for PLA/PETG or other suitable support filaments, depending on the situation;
c) If the body structure is printed with PA6-CF/GF, PAHT-CF, or PET-CF/GF, the support filament may be Support G (renamed Support for PA/PET) or another suitable support filament.
3. Please do not use support filaments and body filaments that do not match each to print a model the same time, such as use Support for PLA to support ABS, ASA, PC, PAHT-CF or other high temperature filaments, or use Support for PA/PET to support PLA, PETG or other low or middle temperature filament, otherwise extruder clogging or nozzle clogging could occur.
The following is an introduction to Bambu support filaments:
| Types of support filaments | Support W, i.e. Support for PLA |
Support for PLA/PETG | PVA | Support G, i.e. Support for PA/PET |
| Types of body filaments that are compatible | PLA,PLA-CF etc. | PLA,PLA-CF,PETG,PETG-CF etc. | PLA,PLA-CF,PETG,PETG-CF etc. | PA,PA-CF/GF,PA6-CF/GF,PAHT-CF/GF,PET-CF/GF etc. |
| Characteristics |
1. Easy to remove; 2. High surface quality; 3. Insensitive to moisture, and not strict with drying and moisture proofing. |
1. Water-soluble, and suitable for those models that are not convenient to remove with hands and tools; 2. Easy to remove; 3. High surface quality; 4. Has high absorption and requires thorough drying and airtight storage 5. Please refer to this wiki before use: PVA Printing Guide。 |
1.Easy to remove; 2.High surface quality; 3. High moisture absorption, and requires careful drying or sealed storage. |
|
| Recommended settings |
1. In most printing cases, it‘s recommended to print the support interfaces with support filaments, and print the support bases with body filaments. This can significantly reduce 3D printing time; 2. In some special printing cases, it is possible to print both the support interfaces and the support bases (i.e., the entire support structure) with support filaments. However, this may lead to poor print quality, especially with thin and tall support structures that are prone to deformation or falling during printing. |
|||
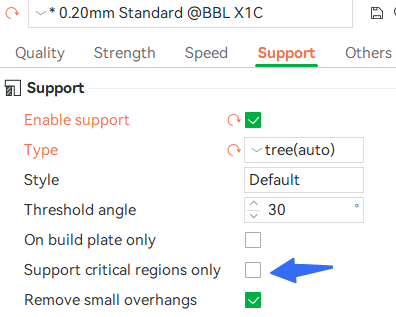
¶ Support Structure settings
Bambu Studio features a full page of support settings, as shown below.
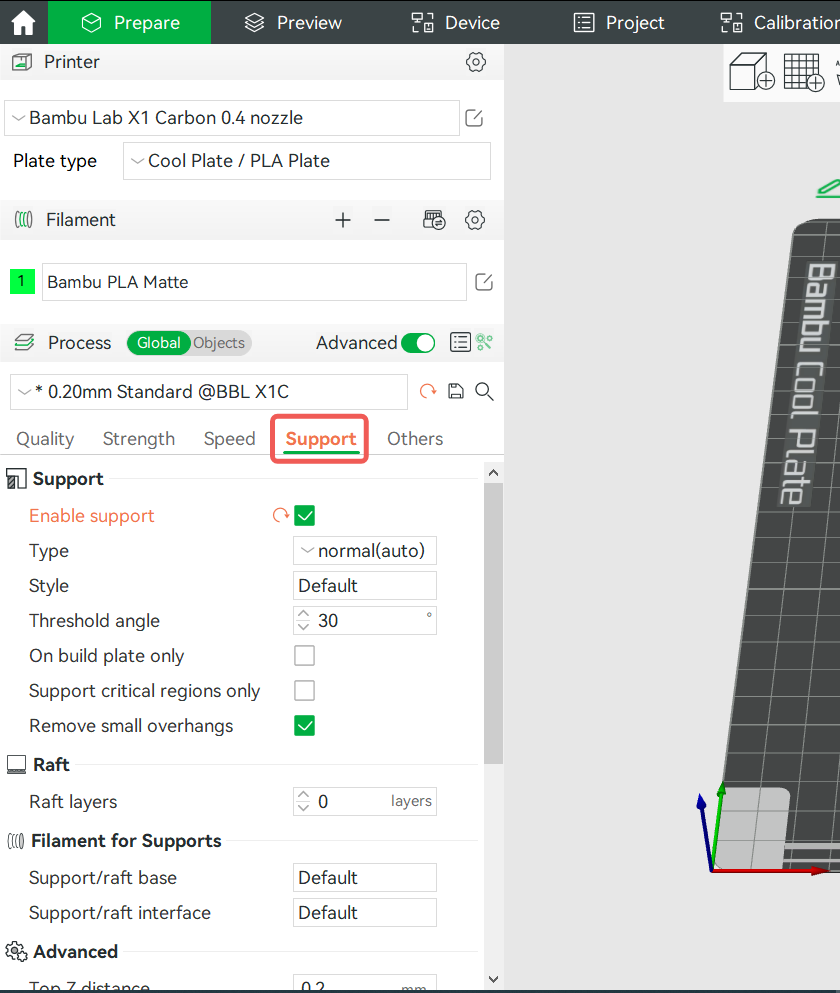
¶ Support types
There are two basic types of support structures: normal and tree. The main differences between them are:
1. Normal supports directly projects the overhangs down to the heat bed, and gets the support body.
2. Tree supports samples the overhangs to get the so-called nodes, each node is represented as a circle. And then the nodes are propagated down to the heat bed. During propagation, the circles may be enlarged to get better strength and may be moved away from the object so the supports are less likely to collide with the object.
On the support page, there are 5 types of supports that you can choose, which are variants or combinations of these two types. These include:
- Normal (auto): Normal supports with automatically detected overhangs.
- Tree (auto): Tree supports with automatically detected overhangs
- Hybrid (auto): A combination of normal (auto) and tree (auto). When the overhang area is large, use normal (auto), otherwise use tree (auto).
After version 1.4.1, we moved hybrid(auto) from type to style. To enable it, please select type=tree(auto) and style=Tree Tybrid.
We made this change because we added a new style (tree slim), and possibly we'll add more styles. It's not appropriate to use support types to do this, or we'll have too many support types. But in fact, tree slim, tree strong, and tree hybrid are only different in some parameters. They are all tree support essentially. - Normal (manual): Generates normal support only on support enforcers. For manual settings, please refer to the Wiki Support Painting Guide.
- Tree (manual): Generate tree supports only on support enforcers. For manual settings, please refer to the Wiki Support Painting Guide.
¶ Support Styles
Both normal and tree supports have different styles to adjust the final support structure further.
Normal support has two styles:
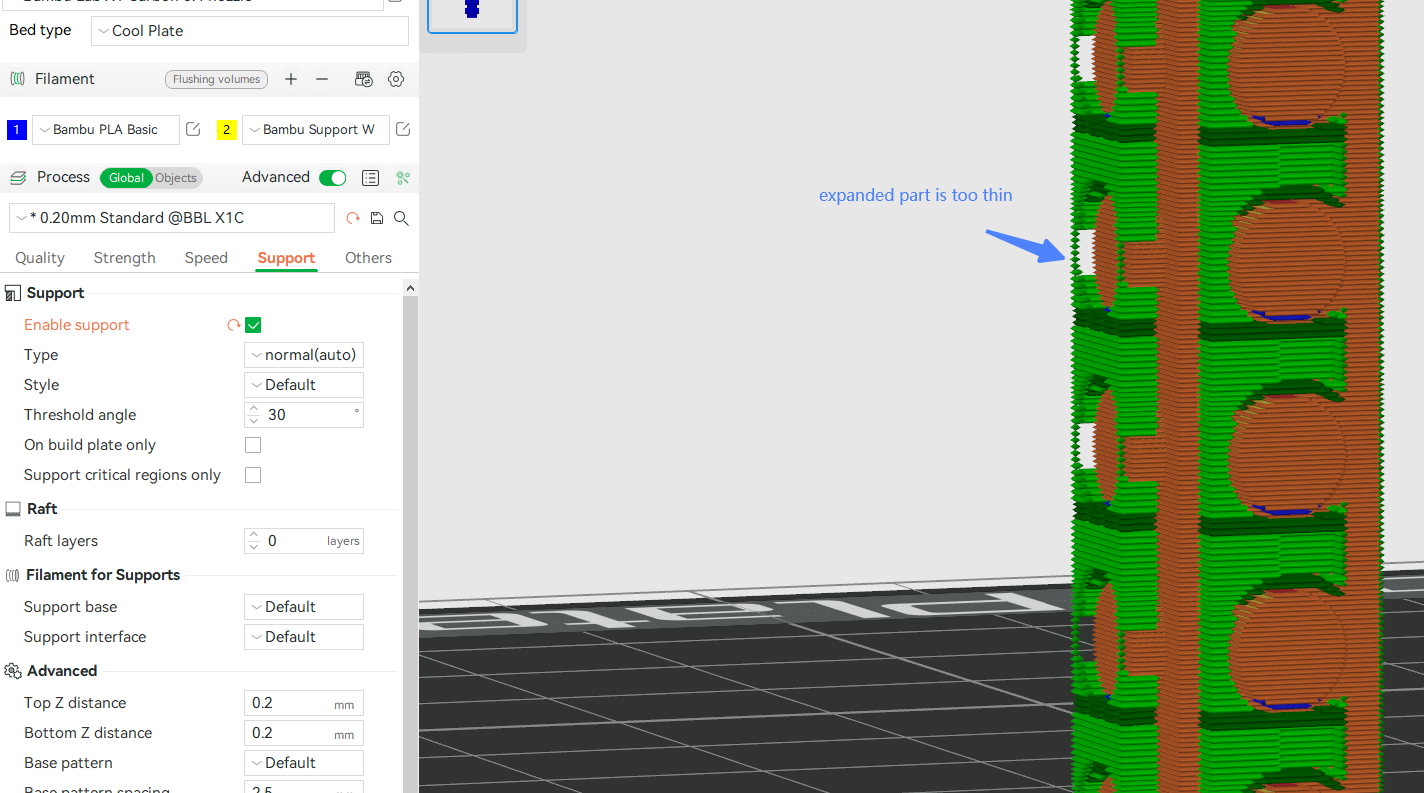
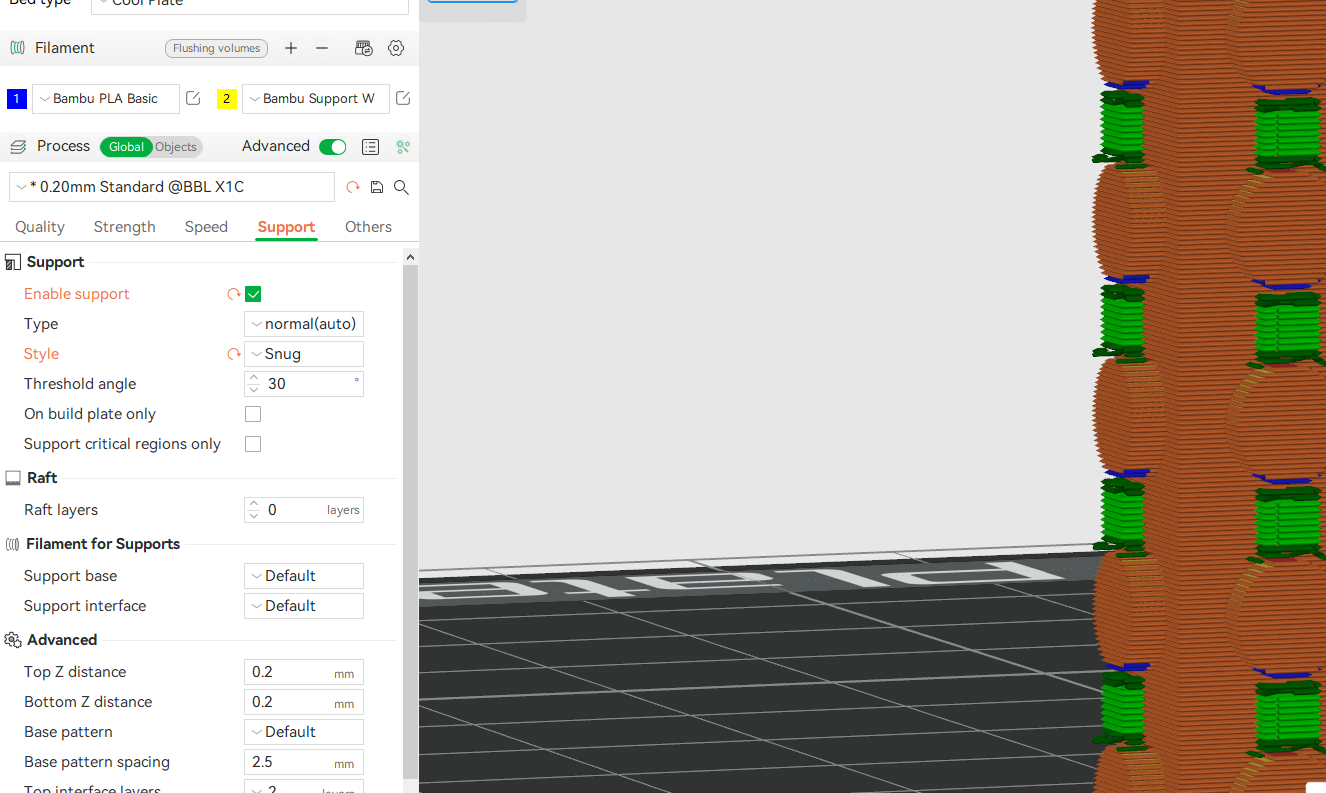
1. Grid: The support region is expanded and normalized to rectangles. This is the default style of normal support.
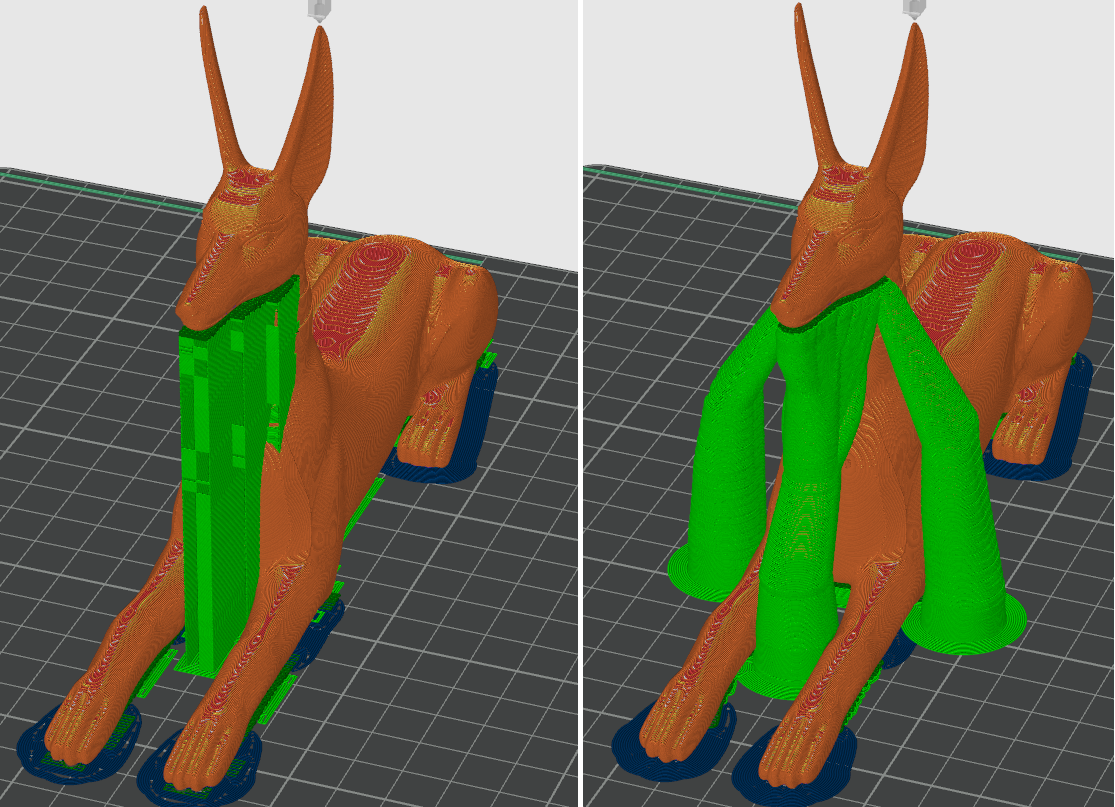
2. Snug: The support region is NOT expanded, but tightly aligned with the overhang areas. This style is useful when the expanded supports have any side effects, such as in the following case.
Tree support has three styles:
1. Tree Slim: This features an aggressive branch-merging strategy. As a result, a much smaller support volume is generated without sacrificing strength (by automatically increasing the wall count and using smoother branches).
2. Tree Strong: It features a relatively conservative branch-merging strategy, resulting in connected strong tree branches that are sometimes difficult to remove.
3. Tree Organic: It features organic-shaped tree branches, and also an aggressive branch-merging strategy. This style was introduced in Cura Slicer, then ported to PrusaSlicer, and later ported by us.
4. Tree Hybrid: The current default style, which is the hybrid of tree strong and normal grid. Below the big flat overhang regions, normal grid supports are generated. Otherwise, it will generate the tree strong supports.
¶ Common options
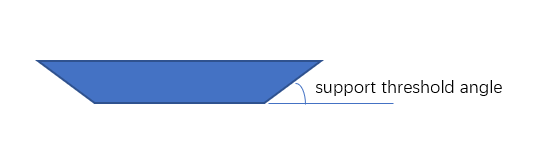
¶ Threshold Angle
The threshold angle is the maximum slope angle that needs support. If a surface's slope angle to the horizon is less than this threshold value, support will be generated when the support type is auto.
The larger this angle is, the more supports will be generated. The default threshold angle is 30 degrees. For most materials, this is a safe angle to print without support.
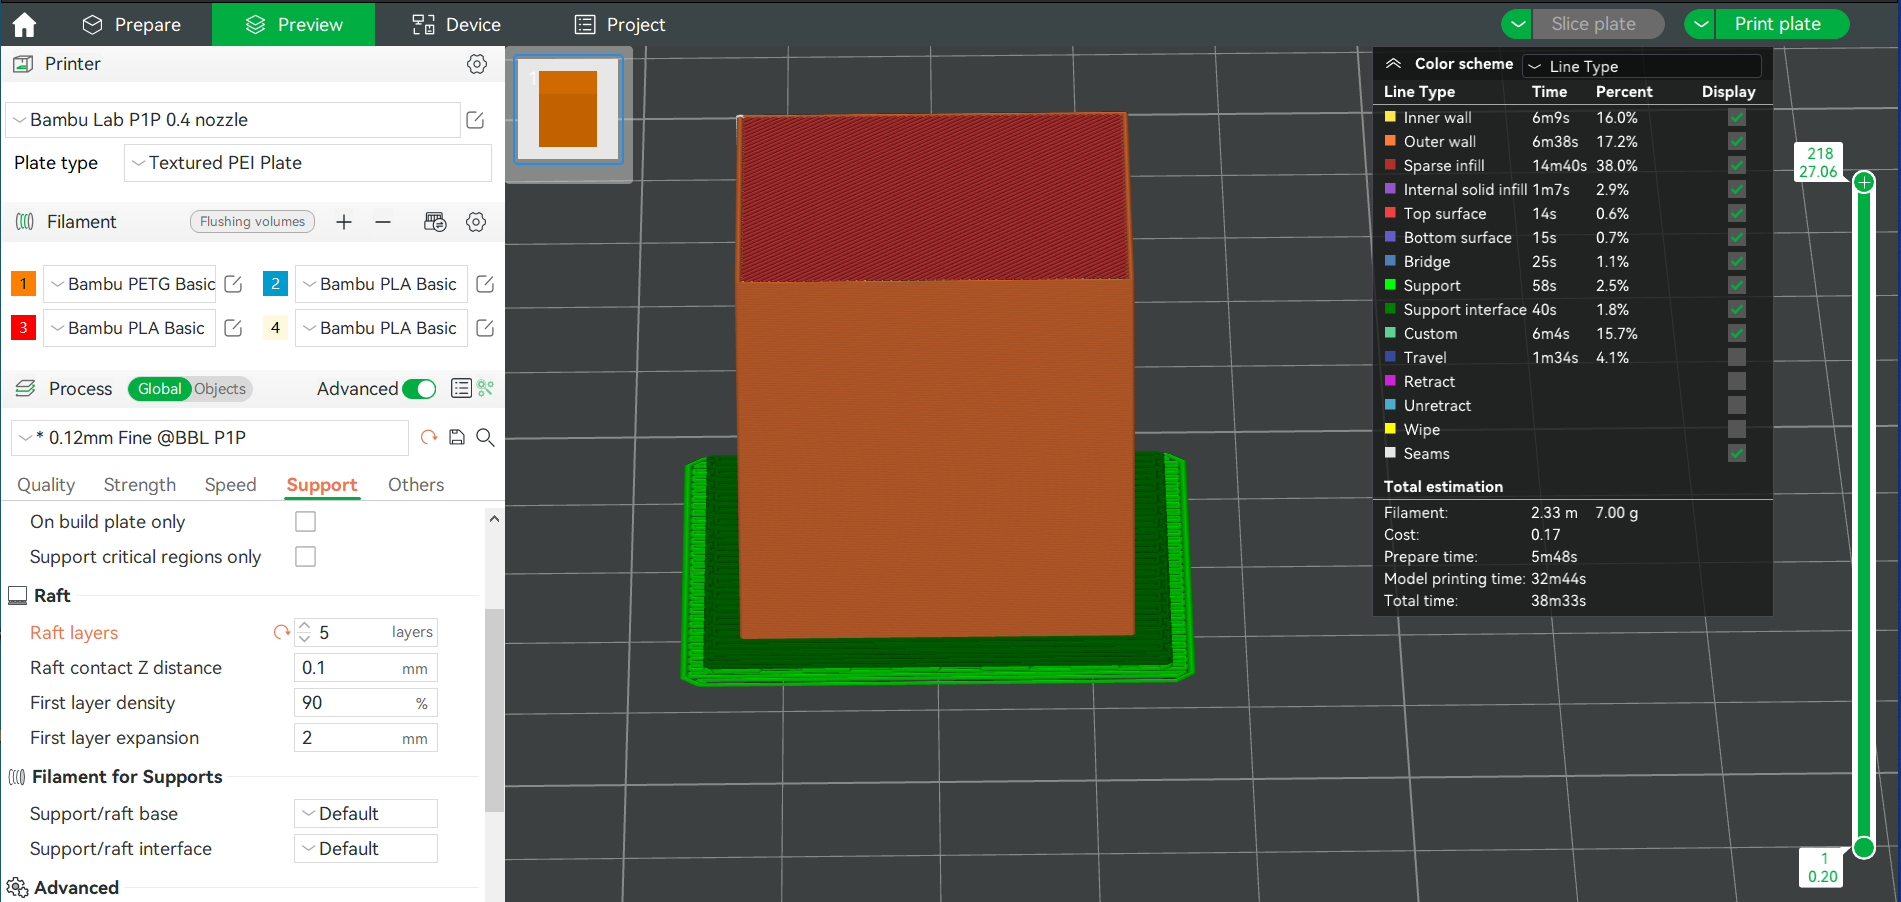
¶ Raft
Raft is a type of support, which is used to generate support at the bottom of the model to lift it up. Usually, when printing materials such as ABS that are prone to warping, then you can enable the raft. Below are the settings that you can find here:
1. The raft contact Z distance: It represents the distance between the top of the raft layer and the model.
2. The first layer density: This refers to the density of the first layer of the raft and the support.
3. The first layer expansion: It can be used to expand the first raft and support layer, improving the bed adhesion.
¶ Support Filament
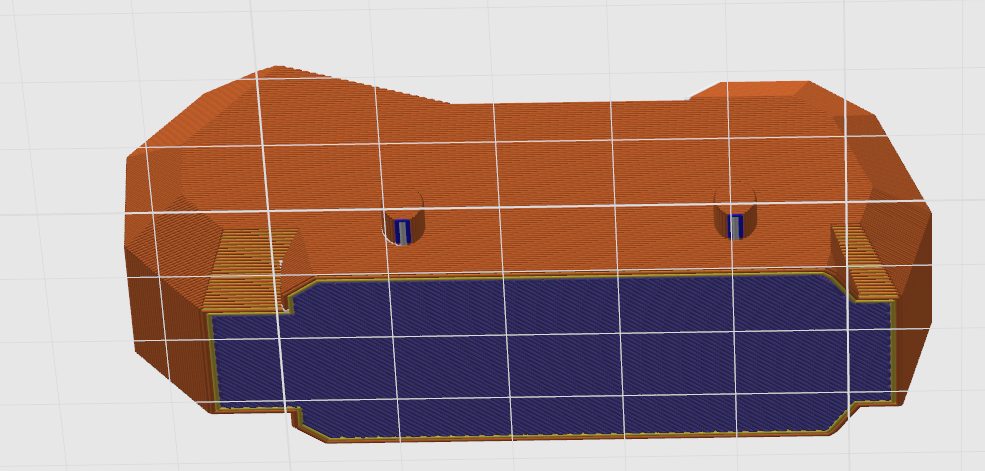
Support is composed of two parts: base and interface. Interface layers are the layers touching the object. The rest of the support body is the base. Both parts can use different filaments than the object. Default means no filament is specified and the filament printed at the current layer is used, so filament switching time is minimized. Usually, we select specialized support materials such as support W as the support surface material.
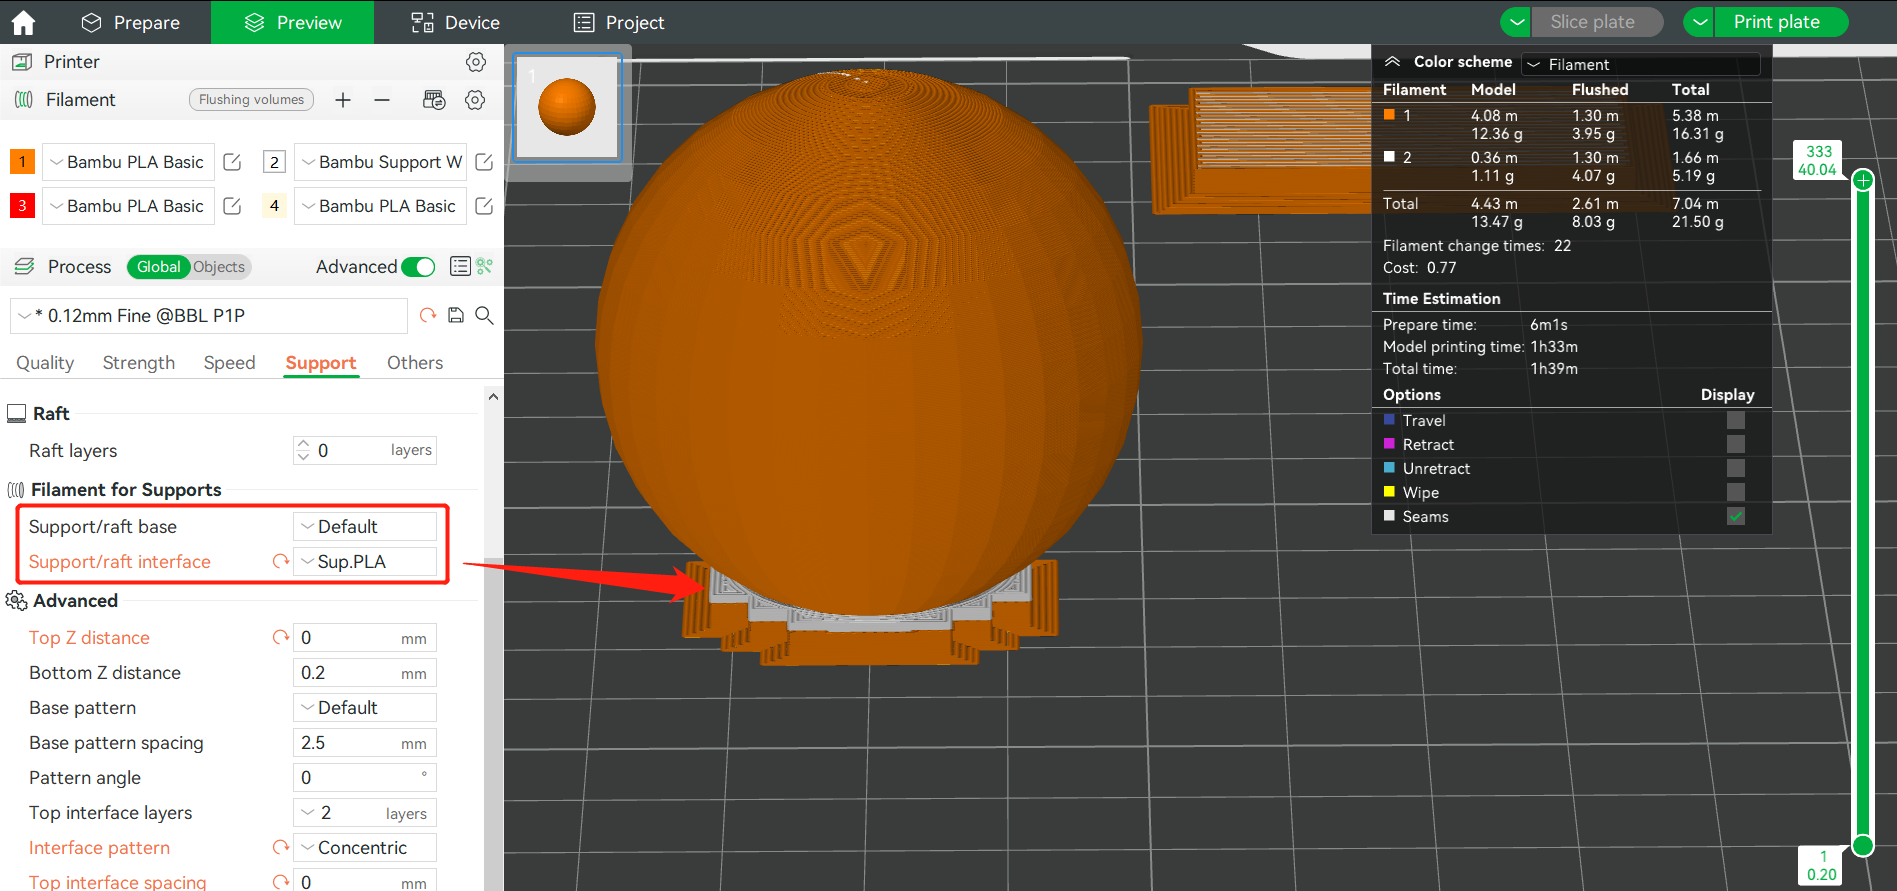
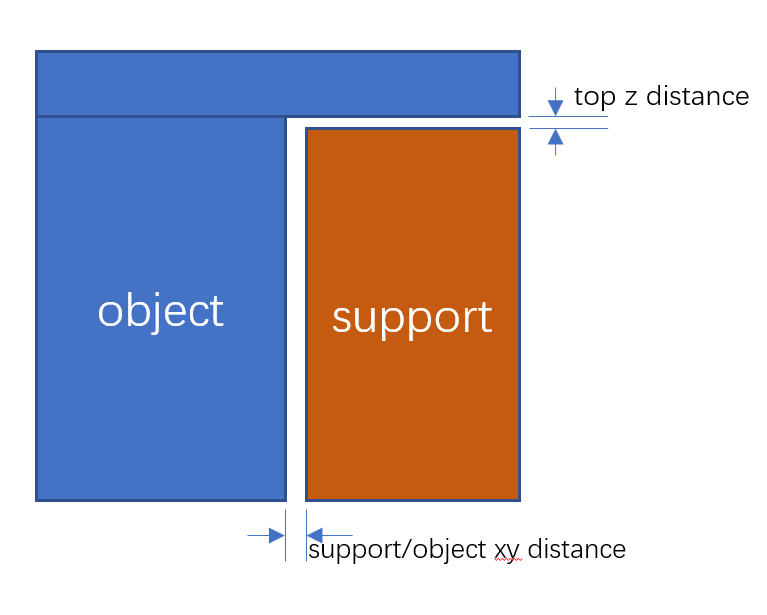
¶ Top Z distance & Support/object XY distance
The XY distance between the support and the object and the top Z distance from the support top to the object are shown below. When setting to 0, the support filament is assumed to be support material, e.g. Bambu Support W.
When the filament of the support interface is a kind of support filaments, such as Bambu Support for PLA, Bambu Support for PLA/PETG, Bambu Support for PA/PET or etc., the top Z distance can be set to be 0. However, when the filament of the support interface is also the body filament, it's not recommended to be set to be 0 but about 0.2, or the support structure will be really hard to remove *. The following are the values of top Z distance and their results:
| Top Z distance value | bigger | smaller |
| Support structure removal | easier | harder |
| Interface quality | lower | higher |
When printing a model with support structure, it is necessary to remove the support structure within 2 hours to prevent it from being difficult to remove or remaining residues on the prints after being damp and softened, especially for body filaments like most kind of Nylon (PA) which includes PA-CF, PA6-CF, PA6-GF and etc., and support filaments like PVA and Support for PA/PET, since then tend to absorb moisture from the air. If it is difficult to remove the support because the prints have been placed for too long, please dry them, let them cool down, and then remove the support in time.
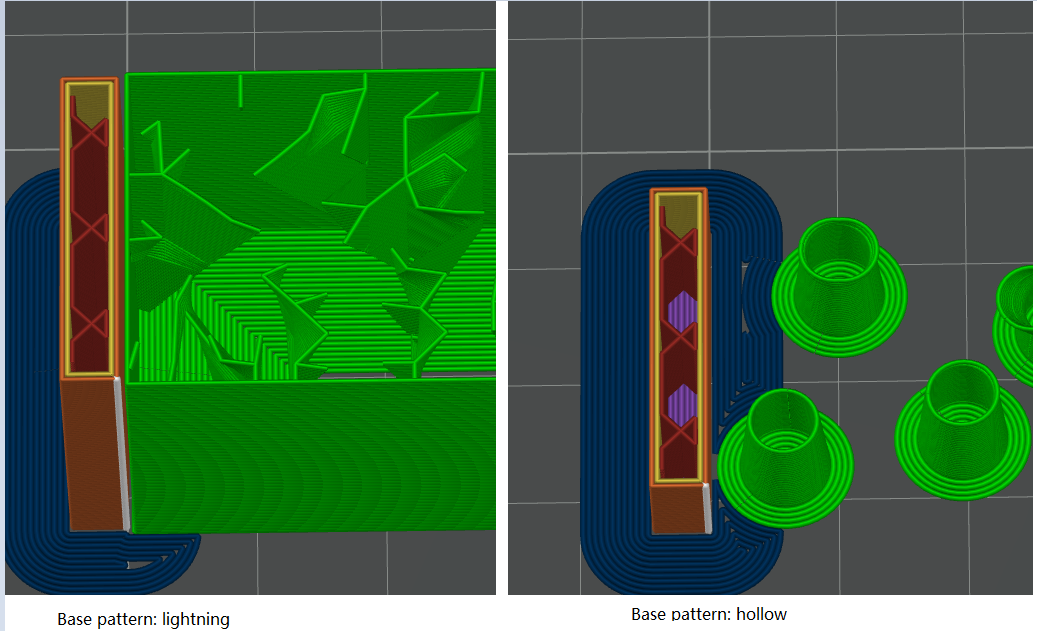
¶ Base & Interface Pattern Settings
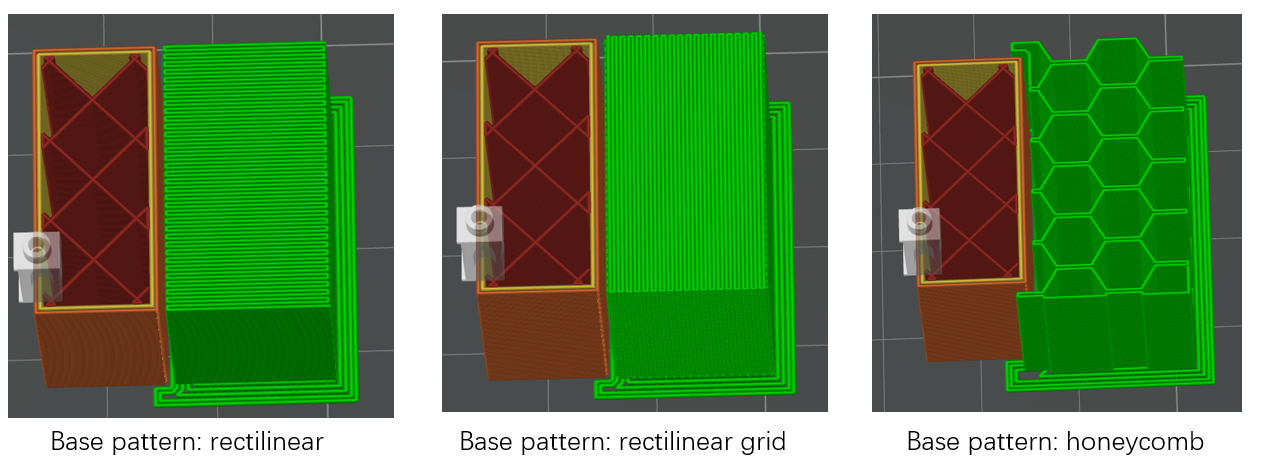
1. Base Pattern:
This is the infill pattern of the support base. There are currently 6 patterns, as shown below.
- Default: Automatically selects the optimal pattern based on the support type and material. Typically rectilinear for normal supports or hollow for tree supports.
- Rectilinear: It is the most commonly used support and default pattern for normal support, which usually goes in two directions (left to right, front to back)
- Rectilinear grid: It is similar to rectilinear, except it alternates the direction of every layer, so its strength is much better but can be harder to remove.
- Honeycomb: It is different than the other two, and is a good balance of strength and stability for taller support structures.
- Lightning: It is an extremely sparse infill pattern for tree support, which can save both material and printing time, but with lower strength.
- Hollow: It is the default pattern for tree support, which means no infill at all.
- Base pattern spacing: For rectilinear and rectilinear grid patterns, this is the spacing between base pattern lines. For the honeycomb pattern, this is the radius of each honeycomb cell. So when this value is set to 0, the honeycomb pattern degenerates to rectilinear.
- Pattern angle: Set the rotation Angle of the support pattern on the horizontal plane.
- Top interface layers: The number of top interface layers. The overhang quality can be improved if we increase this value, at the cost of slightly more material.
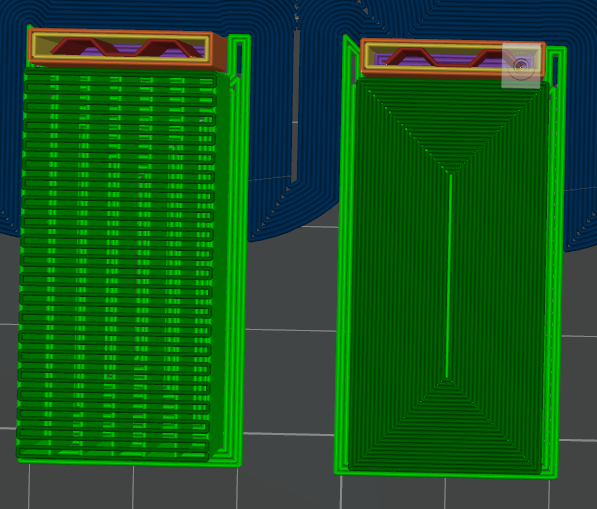
2. Interface pattern:
This is the line pattern of interface layers. There are currently 4 patterns available:
- Default: kind of auto pattern. The default pattern with support material is rectilinear and concentric with other materials. Support materials may be soluble or not.
- Rectilinear: rectilinear pattern, suitable for most cases.
- Concentric: concentric circular pattern, which is stronger on non-planar surfaces and useful with support materials. For best surface quality we can set a very small interface spacing (e.g. 0) when using cocentric pattern and support material.
- Rectilinear interlaced: Offset rectilinear pattern between layers, creating an interlaced effect. Improves adhesion and smoother undersides but may be harder to remove than standard rectilinear.
- Grid: A crisscrossed line pattern that is very strong and stable. Provides excellent support for large flat surfaces but can be more difficult to detach. Best used when high rigidity of the support interface is needed.
- Don't support bridges: For normal support, this option controls whether to remove supports for bridges. For tree support, we replace this option with Max bridge length which will be explained later.
- Thick bridges: If enabled, bridges will be extruded with higher flow, which means bridges are more reliable and can bridge for longer distances. However, the overhang surface quality may be worse because of possible overflow.
¶ Tree Support-Only Options
Tree support has more options.
- Tree support branch distance: The distance between neighboring tree support nodes. A smaller value means higher sampling density on the overhang surface and, therefore better surface quality, at the cost of more removal difficulty.
- Tree support branch diameter: The initial diameter of the tree support node. A larger value means stronger tree supports, also more difficult to remove.
- Tree support branch angle: The angle of tree branches stretching out. Larger values mean that tree support branches can be printed more horizontally, with a higher ability to avoid objects and extend further out.
- Tree support with infill: Infill will be generated in the tree support base if enabled. This makes tree support very strong, so we disable it by default. But if you are using some weak material, e.g. silk PLA, it's suggested to enable this option.
- Max bridge Length: The max allowed bridging length for overhangs. If an overhang is rectangular, it is regarded as a bridge. A short bridge can be printed well enough without support, because the two ends of the extrusion lines are well supported. The max allowed bridging distance may be different for different materials. When a bridge is larger than max bridge length, it's divided into equal segments and only the contacting points are supported.
¶ Suitable Cases for Each Type
¶ Normal is Better
For large planar overhang, Normal supports usually give better surface quality than tree supports. That's why we propose hybrid support. So it's safe to choose hybrid(auto) in general, since for these cases hybrid(auto) will degenrate to normal.

¶ Tree is Better
For objects with complex structures and most of the overhangs are small, non-planar surfaces, tree or hybrid(auto) supports give stronger support structure, less material, and less time cost, while keeping similar surface quality.
¶ Smart Overhang Detection
Detecting the overhangs is the first step for support generation. The usual method is simply taking the difference between the current layer's polygons and the lower layer's polygons. This is far from enough. Some special cases need different strategies.
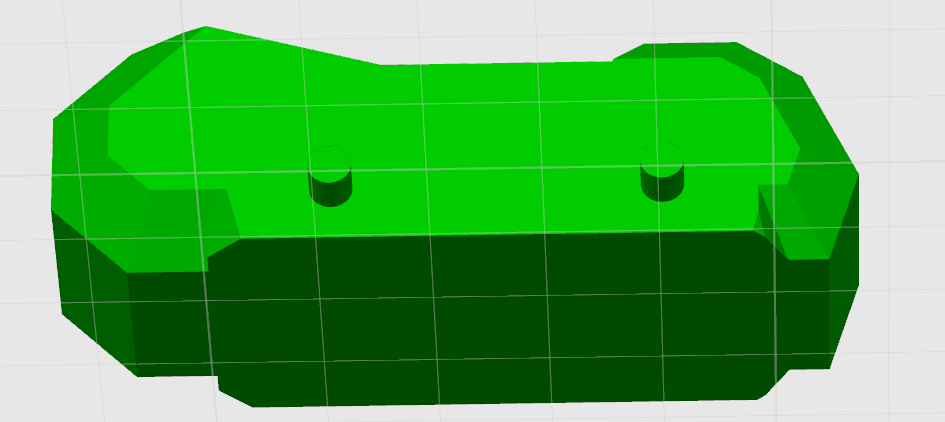
¶ Small Overhangs
The overhang is so small that needs not to be supported at all. Below is an example.
 |
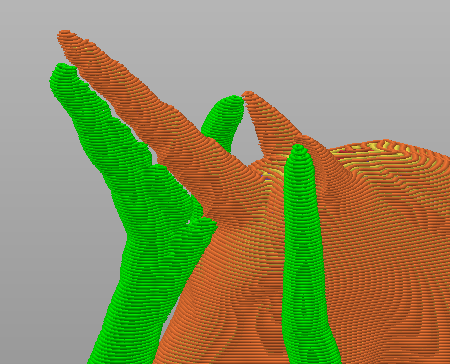 |
¶ Cantilevers
The overhang is only supported by one end, while the other end flies in the air. This type of overhang must be supported, even if it's small.
 |
 |
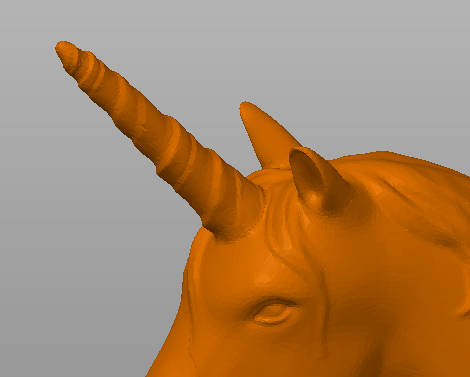
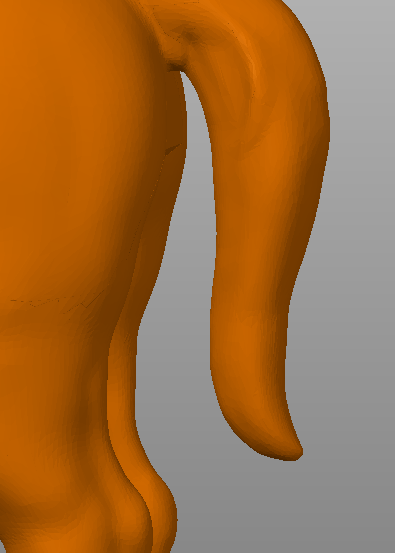
¶ Sharp Tails
The overhang flies in the air and far away from other parts. Only supporting the bottommost tip isn't enough. Instead, the flying part needs to be surrounded for a larger z-span.
 |
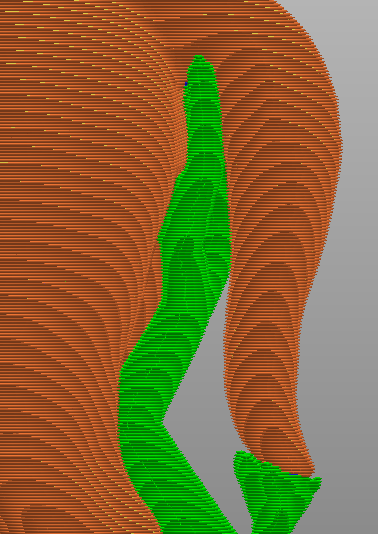 |
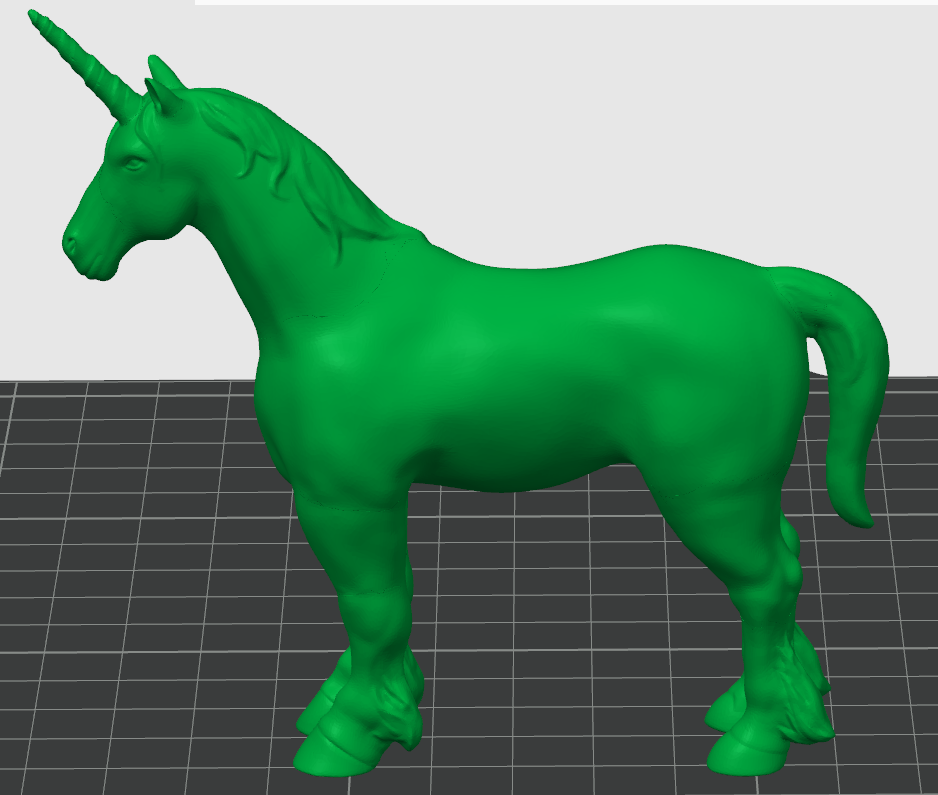
These 3 types of special overhangs are called critical overhangs. Now we can detect them and generate suitable support structures for them. Below is the result of the model “unicorn”.
 |
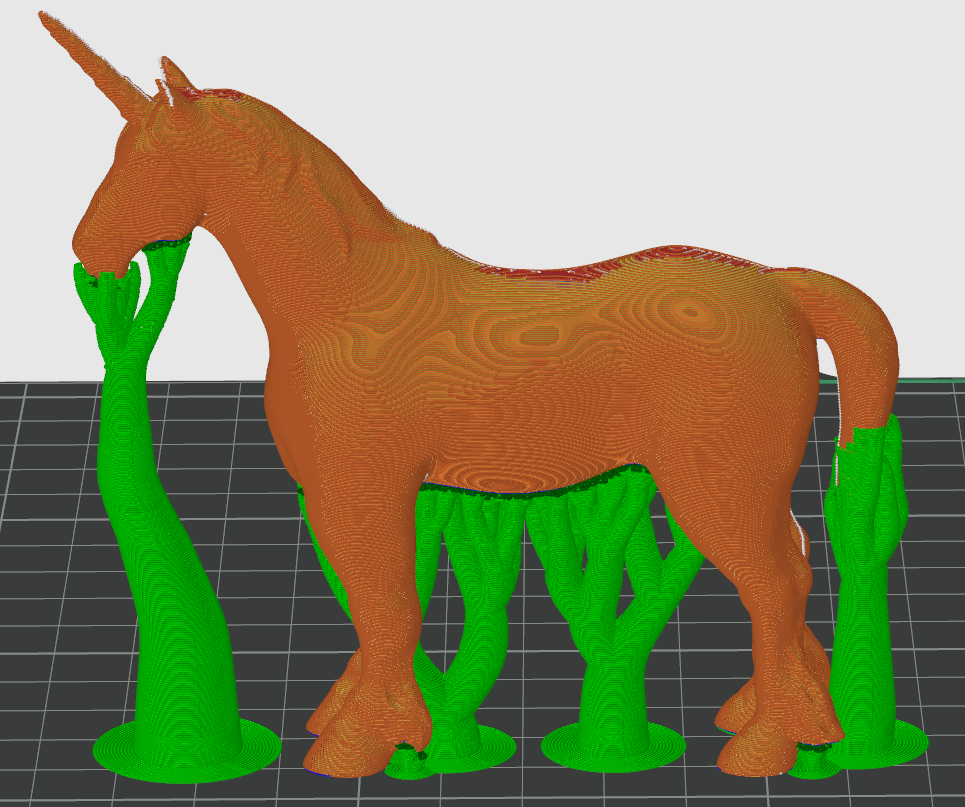 |
We also have an option to support only the critical overhangs.
¶ End Notes
We hope the detailed guide provided has been helpful and informative.
To ensure a safe and effective execution, if you have any concerns or questions about the process described in this article, we recommend submitting a Technical ticket regarding your issue. Please include a picture or video illustrating the problem, as well as any additional information related to your inquiry.