Sometimes, you find the perfect 3D model or prepare one in CAD software, only to realize it's too large for the bed of your Bambu Lab A1, which measures 256×256×256 mm. If you encounter that, don't worry, and you don’t need a bigger printer to bring your large-scale ideas to life. It's possible to split the file in Bambu Studio, 3D print it in different parts, and then assemble them later. This wiki walks you through the process of splitting the file smartly, adding alignment pegs, slicing each part efficiently, 3D printing, and finally assembling them cleanly.
¶ When Should You Split a Model?
As mentioned above, Bambu Lab A1 has a build volume of 256 × 256 × 256 mm, and any object that exceeds even one of these dimensions in width, depth, or height will need to be broken down into smaller parts to fit properly on the build plate. This is important in ensuring that the model is printed successfully without facing errors or failed prints. Besides the file not fitting properly into the bed, there are other reasons why you may need to split your file, which we have discussed below.
¶ 1. When Optimizing Print Orientation or Minimizing Supports
The orientation in which you print your file can significantly impact the surface quality, mechanical strength, and even print time. Some models may have overhangs and intricate geometry that would require you to use a lot of supports if you print them as a single file. Take, for example, the 3D model of VenusDeMilo below, which you can find on Thingiverse.
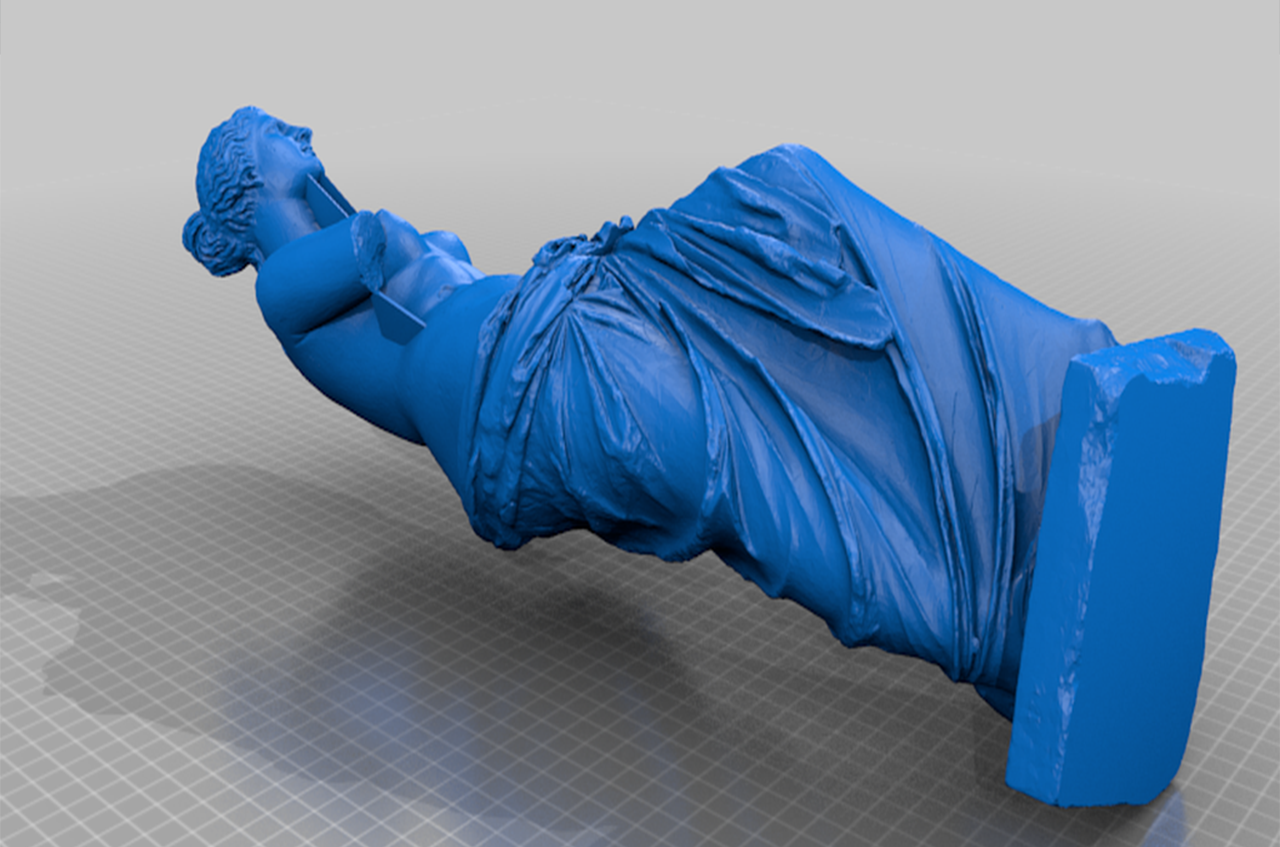
When you download and import the file into Bambu Studio, you’ll notice it stands at a height of approximately 449 mm, which is well beyond the A1’s maximum build height of 256 mm. This means that printing the model in one piece isn't possible without scaling it down, or splitting it into several pieces. Aside from fitting issues, printing the Venus de Milo upright in one piece, even if it somehow fit, would be highly risky due to the model’s tall, slender structure. The higher a print gets, the more vulnerable it becomes to layer shifting, wobble, or even being knocked off the bed. Once printed, you can then assemble the parts cleanly using connectors and glue, preserving the statue’s iconic appearance while maintaining its structural integrity.
¶ 2. When You Want Easier Transport or Storage After Printing
For large files, you can split them into several parts, and each section can be packed more securely without the risk of breaking the delicate parts. It's also easier to fit the components into a standard storage box or transport case. As you split them, ensure each cut part lies flat and can be cushioned without stressing thin and delicate parts.
¶ Tools You’ll Need
Below are the key tools you need to have when 3D printing large files in Bambu Lab A1:
- Bambu Studio: Free official slicing software for Bambu Lab 3D printers, including the A1. In addition to being useful for slicing, we will also use it to split the file into several parts. Check out the Bambu Studio Quick Start guide to learn how to use it. This is also the place where we shall assemble the various parts together.
- Superglue or 3D print adhesives: Once you have split and 3D printed the parts, you will need an adhesive or glue to assemble them together. You can find them in your local store or buy them online.
- Epoxy adhesive: To offer extra bonds on the jointed sections and fill small gaps.
- Sandpaper: You need this to polish the printed model and make it smoother after 3D printing. This is also helpful in hiding joints after rejoining the split models.
- Filler putty: This is used to hide any seam lines between the parts, if they are present.
¶ Step-by-Step Process of Preparing a Large Model for Bambu A1
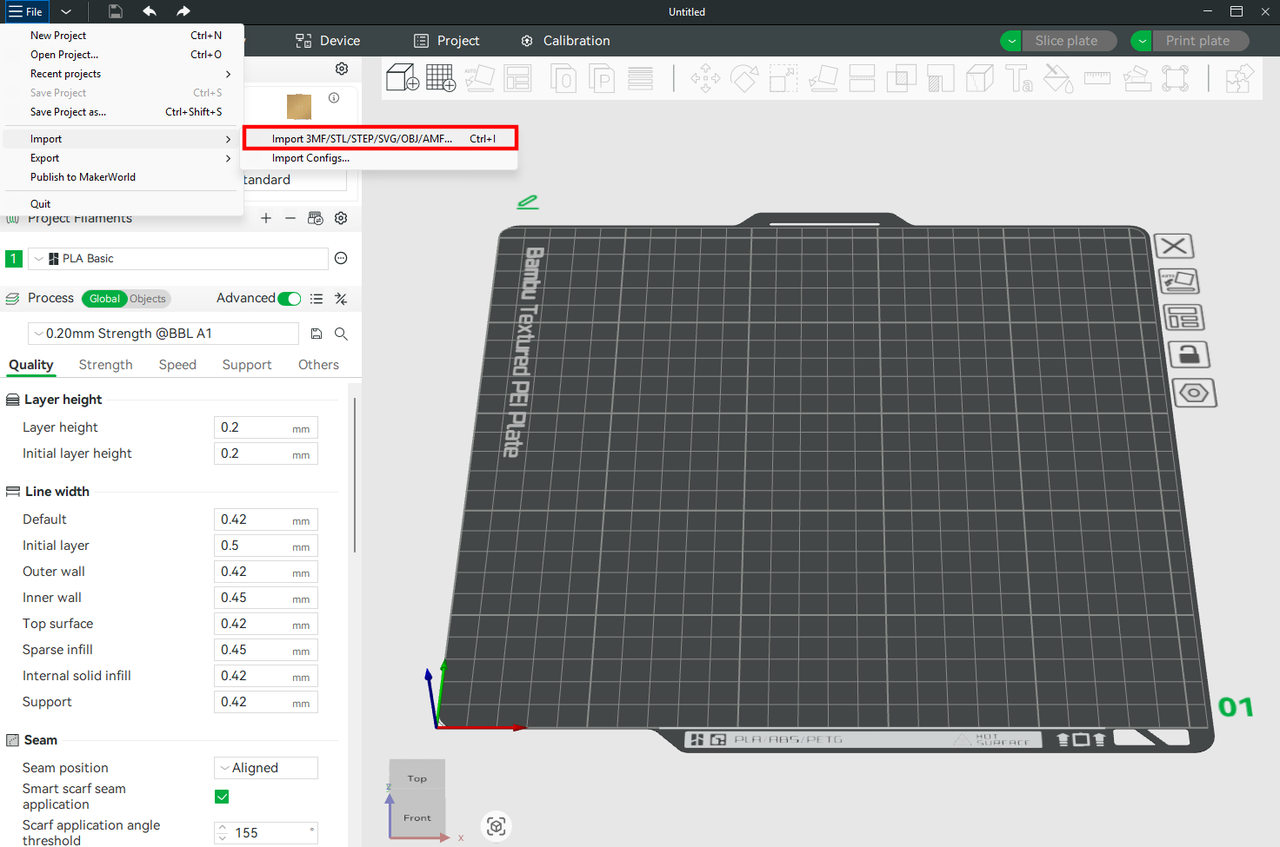
¶ Import the Model in Bambu Studio
Start by launching Bambu Studio and importing your file. You can drag and drop the file directly into the workspace or use File > Import, then locate and load the model.
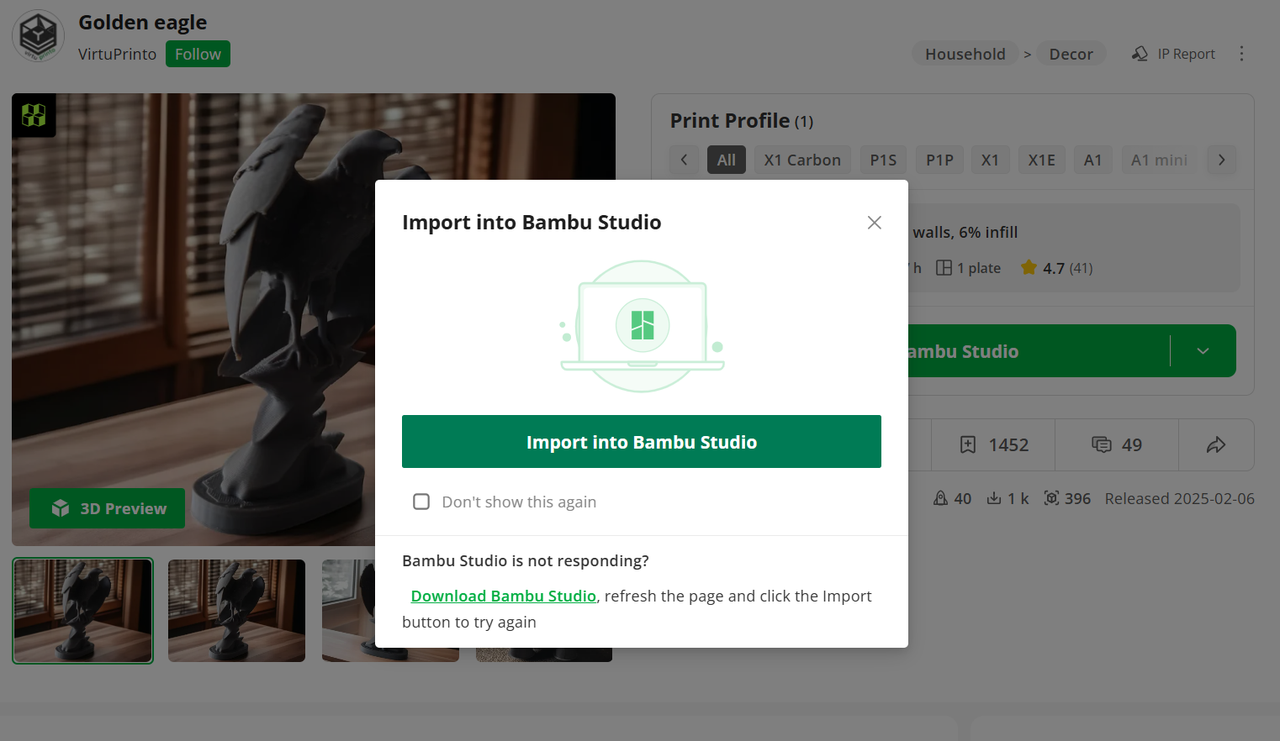
If the file is located in MakerWorld, select and click Import into Bambu Studio.
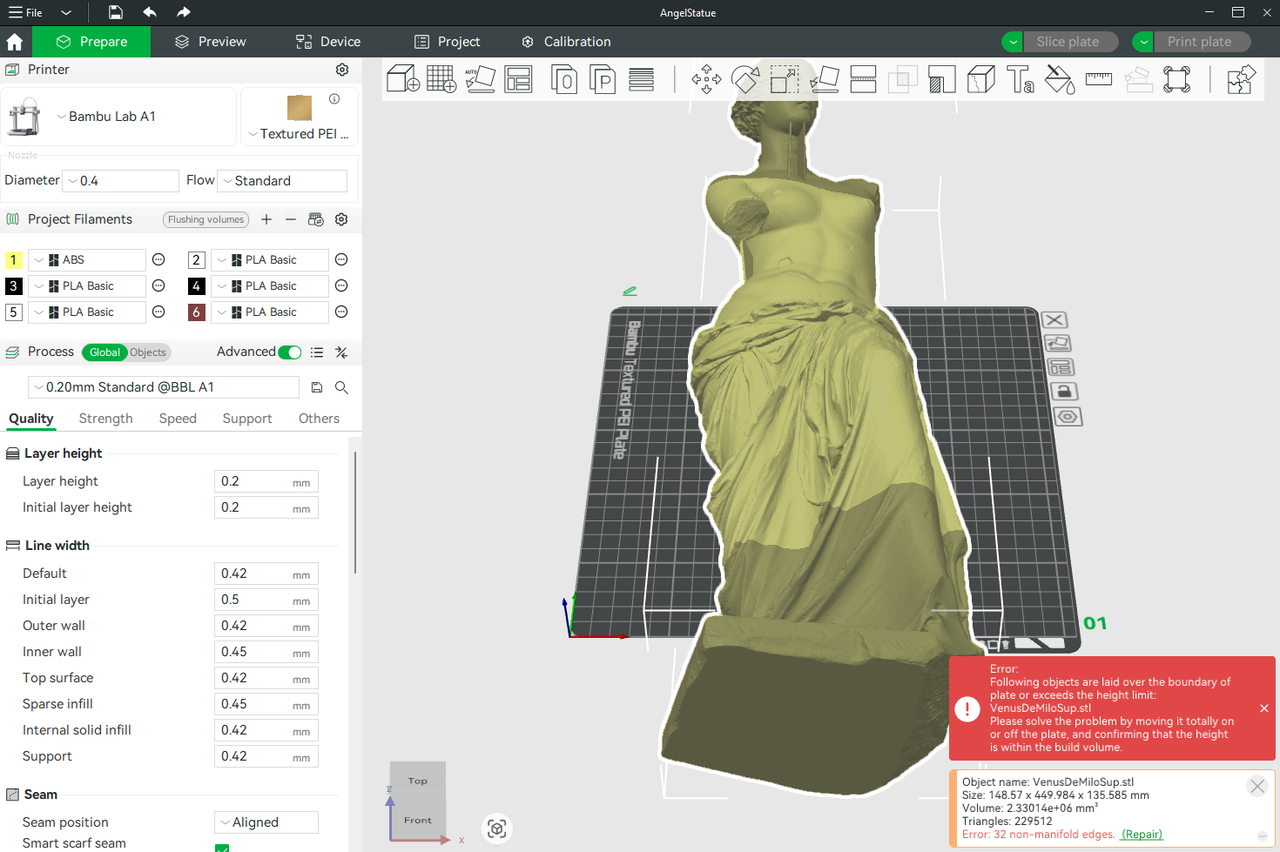
Once the model loads, ensure that you have selected the correct printer, specifically Bambu Lab A1, from the printer dropdown. Set the material and nozzle diameter to reflect your actual print setup. Take a moment to rotate, zoom, and pan around the model to gain a better understanding of its geometry. Think ahead: which parts might overhang? Which segments can be laid flat to achieve a better surface finish or for easier gluing? It's also an opportunity to check the file size to see if it will fit in the bed. To do this, look to the right-hand panel where you’ll see the object dimensions listed.
Pay attention to the X, Y, and Z values. If any of these exceed 256mm, the model needs to be split. For our part, you can see the height is too tall, that is 449.984mm, and the software also shows there is an error in how the object is laid.
You can also use the Measurement tool (located in the top toolbar) to measure specific sections of the model.
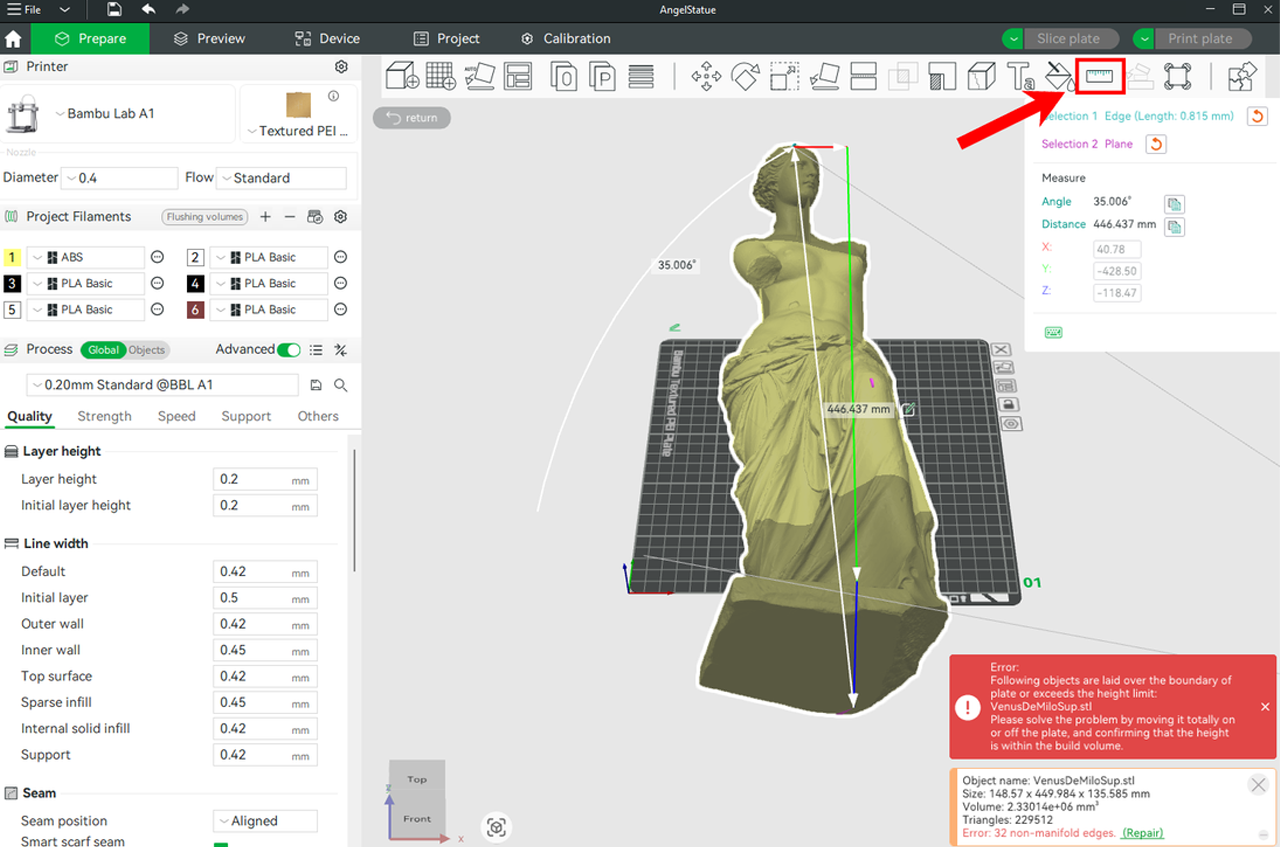
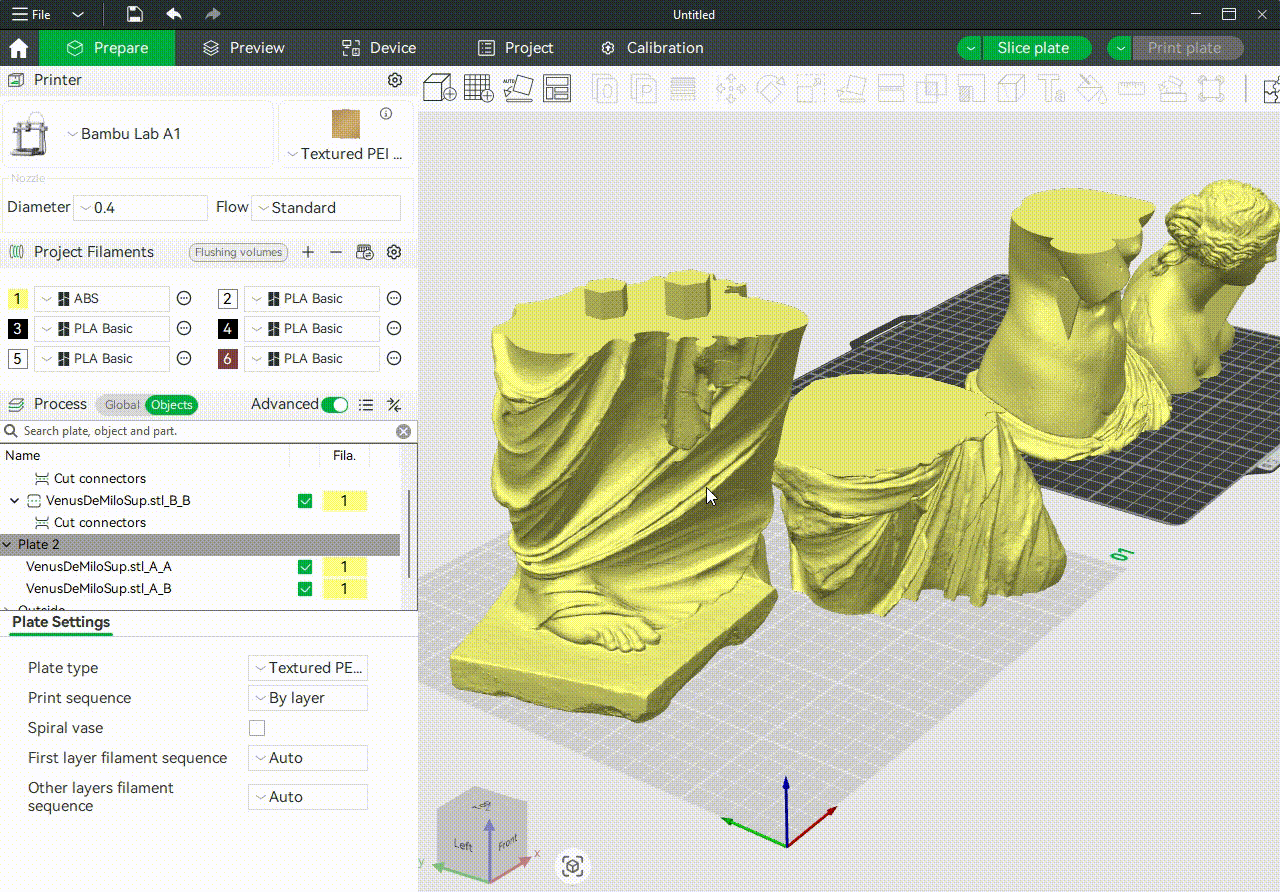
Analyzing these measurements is critical. Cutting blindly without understanding the layout could lead to weak joins or poor reassembly. Based on the analysis above, we will need to split the model into two pieces horizontally. That is, cut it from the midsection (torso), assign plates to each of them, and finally orient and arrange them before slicing.
¶ Splitting the File into Several Parts
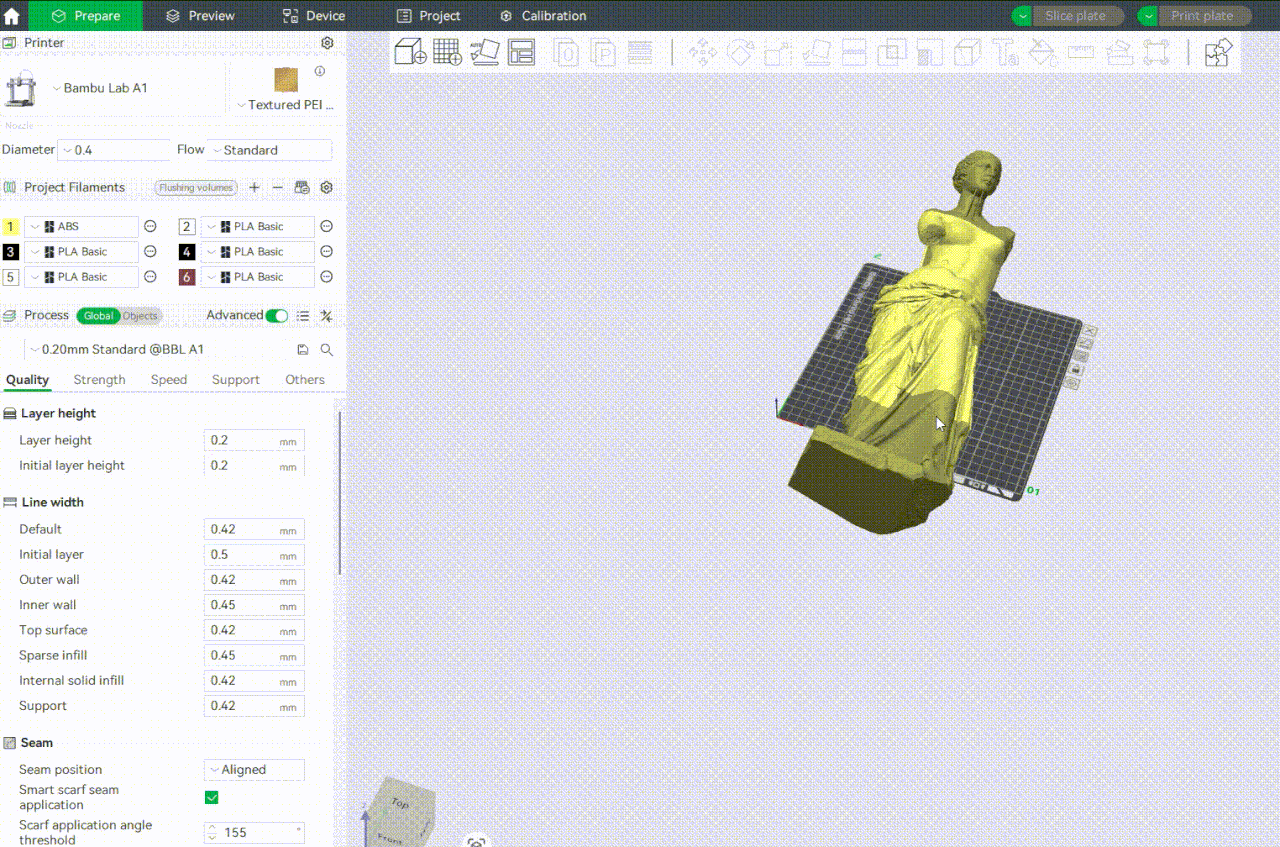
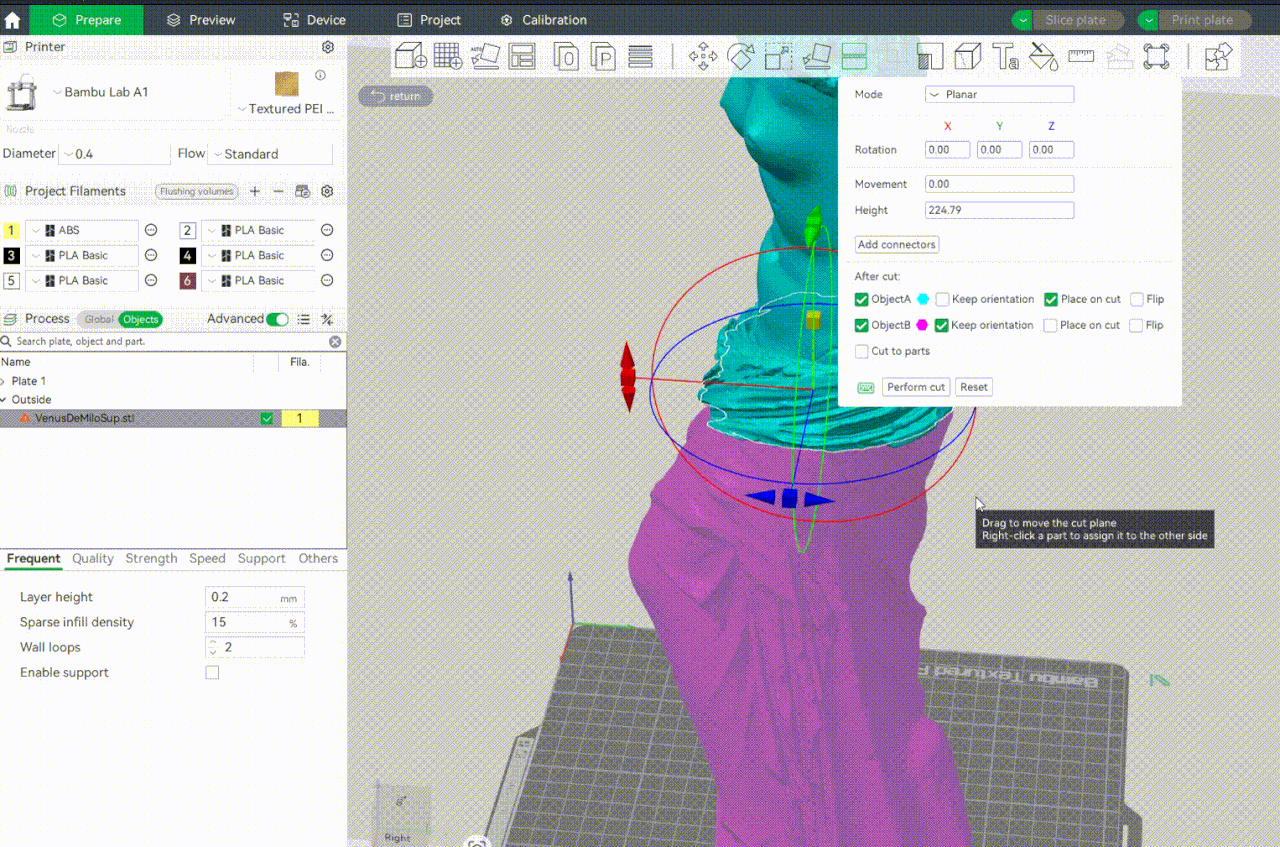
Before we begin to split the file, we need to ensure it is properly aligned. To do this, click the Auto Orient tool in the menu bar, and the software will automatically stand up right, as shown below.
Click on the Cut tool from the menu bar.
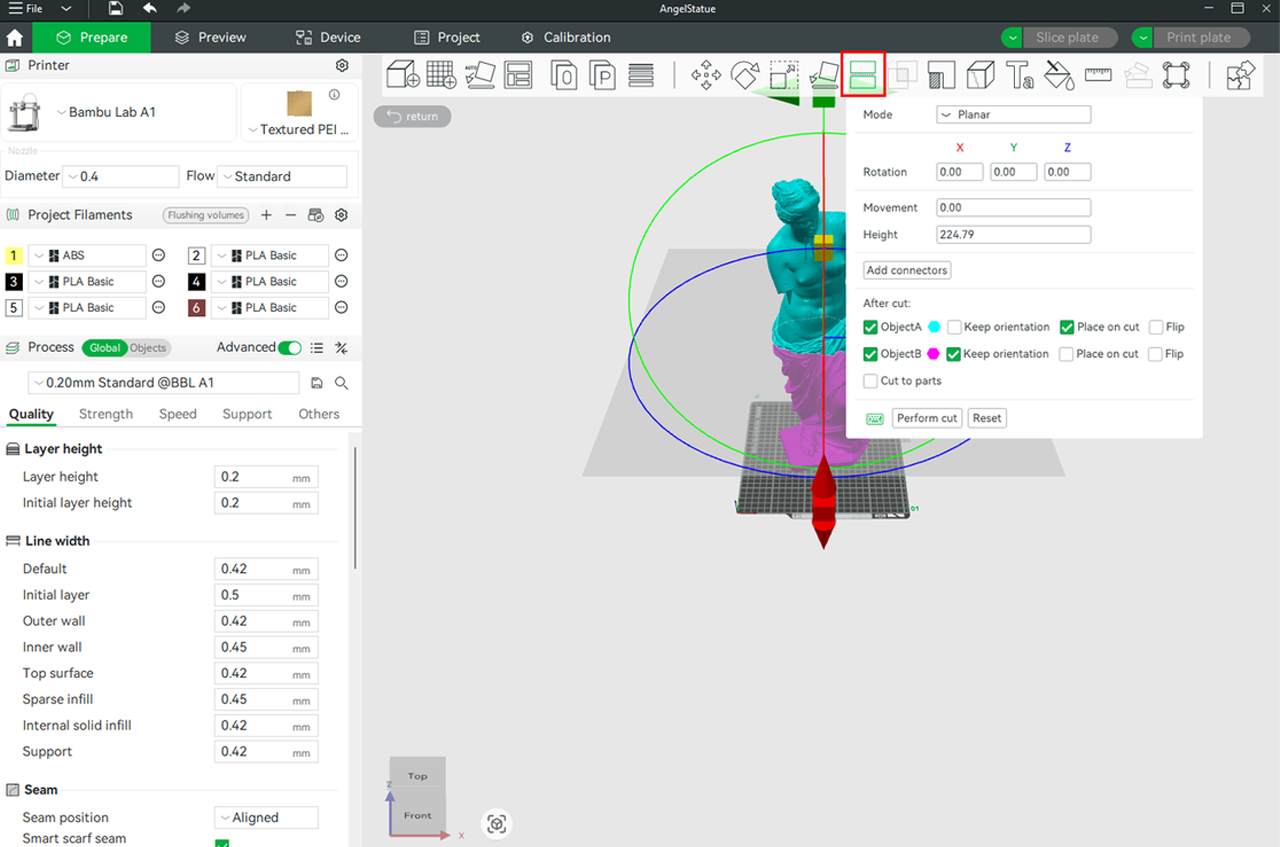
Choose Planar in the Mode section, then drag the mouse to define the plane of the cut.
You can also choose which part to keep or remove. By default, all the parts are kept.
Click the "Add connectors" option to add alignment or joining features, such as pegs and socket connectors, along the cut line. When enabled, Bambu Studio generates a set of male-female connectors, which are usually cylindrical pegs on one side and corresponding holes on the other. There are three options: Plug, Dowel, and Snap. Plug is the default option.
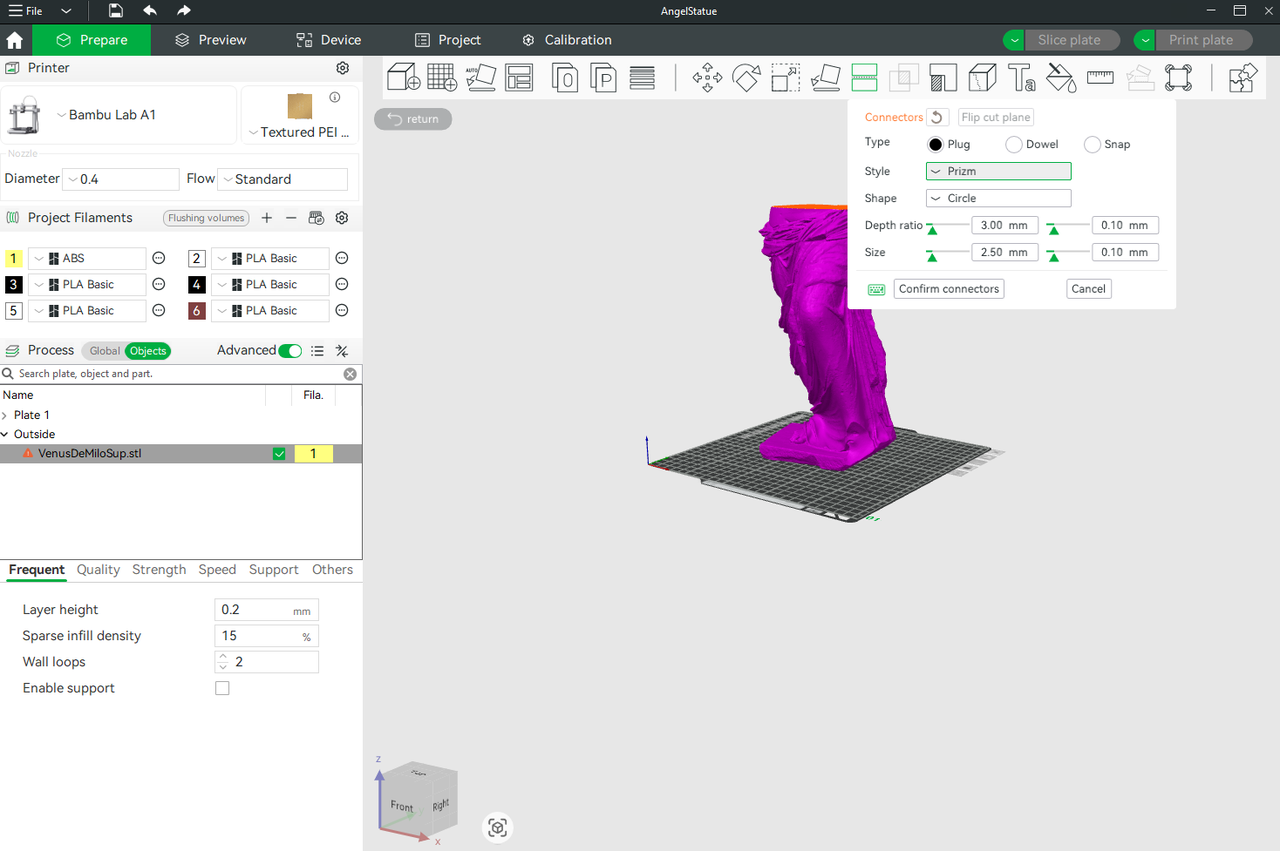
You can customize settings such as style, shape, depth ratio, and size according to the assembly requirements. For demonstration, I have chosen Plug in the type section, Prizm in style, and Hexagon in the shape section, then clicked on one of the cut pieces at the top and adjusted a few settings. We will then confirm the settings by clicking 'Confirm connectors'. Thereafter, click Perform cut. If there are non-manifold issues in your design, a pop-up window will appear, prompting you to resolve them. Click "Yes," and the file repair process will start.
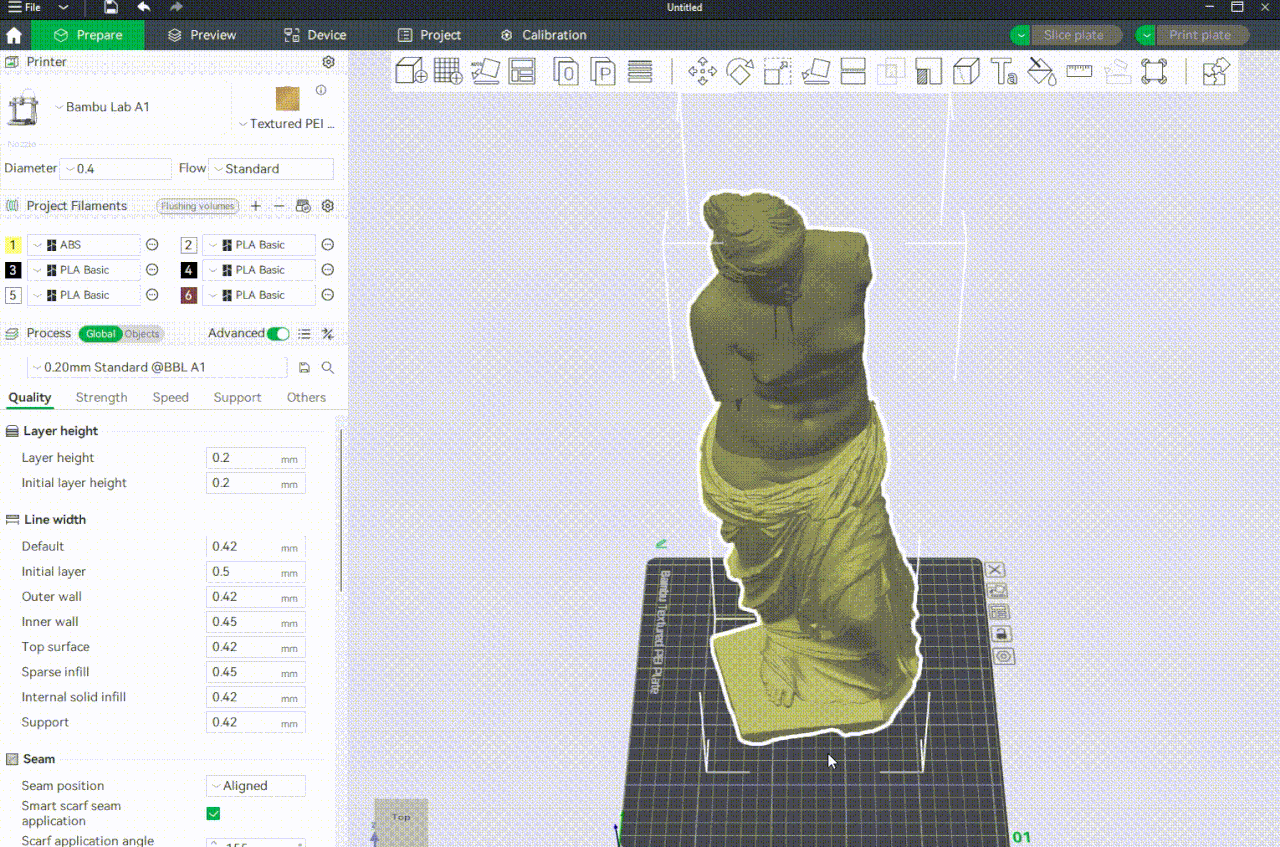
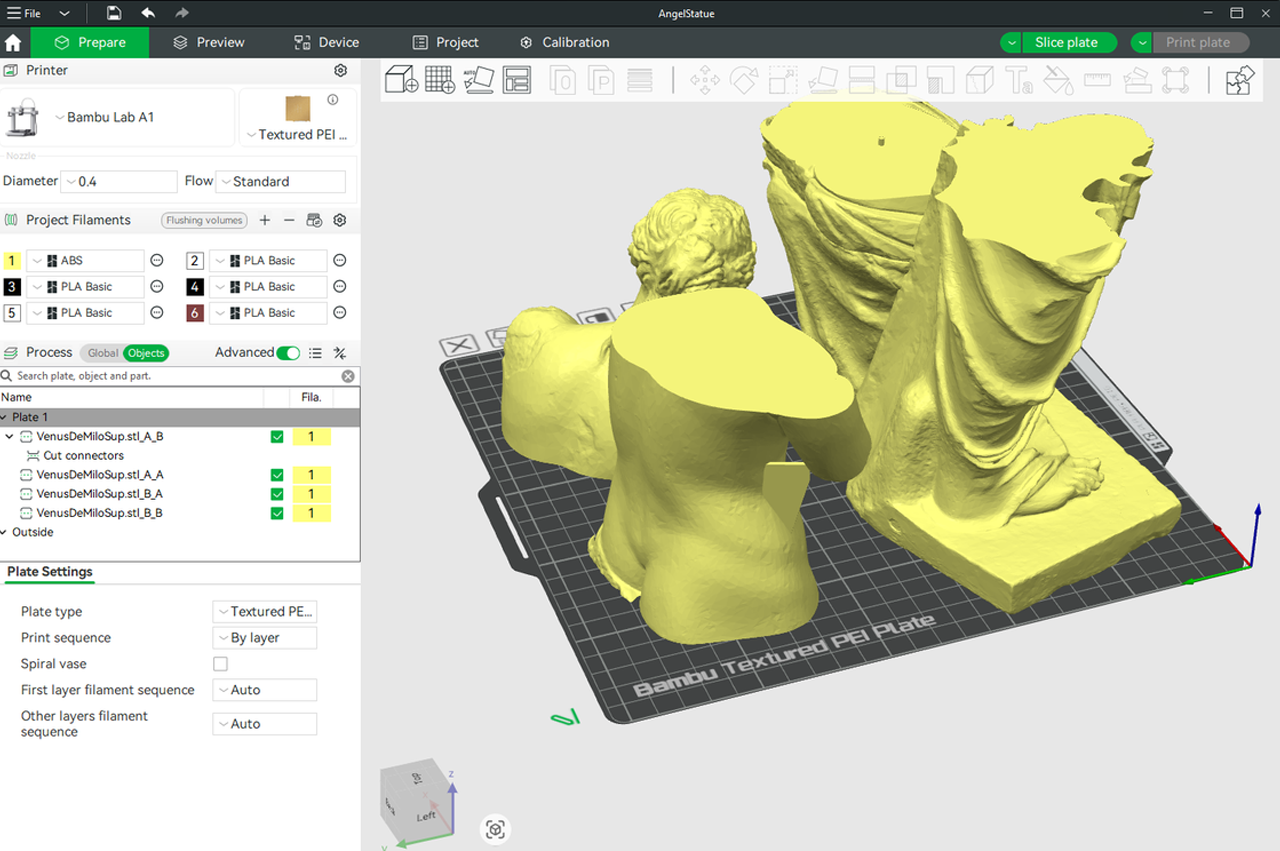
After the file has been repaired, the software will split the object into separate components. We now have two objects. When you inspect the top and bottom of each, you will see the connectors that we just added.
We can also cut each of the parts further by selecting them, going to the Cut tool again, and repeating the process.
Check out the wiki on the cut tool to learn more details on how to cut objects in Bambu Studio.
¶ Optimizing and aligning each part before slicing
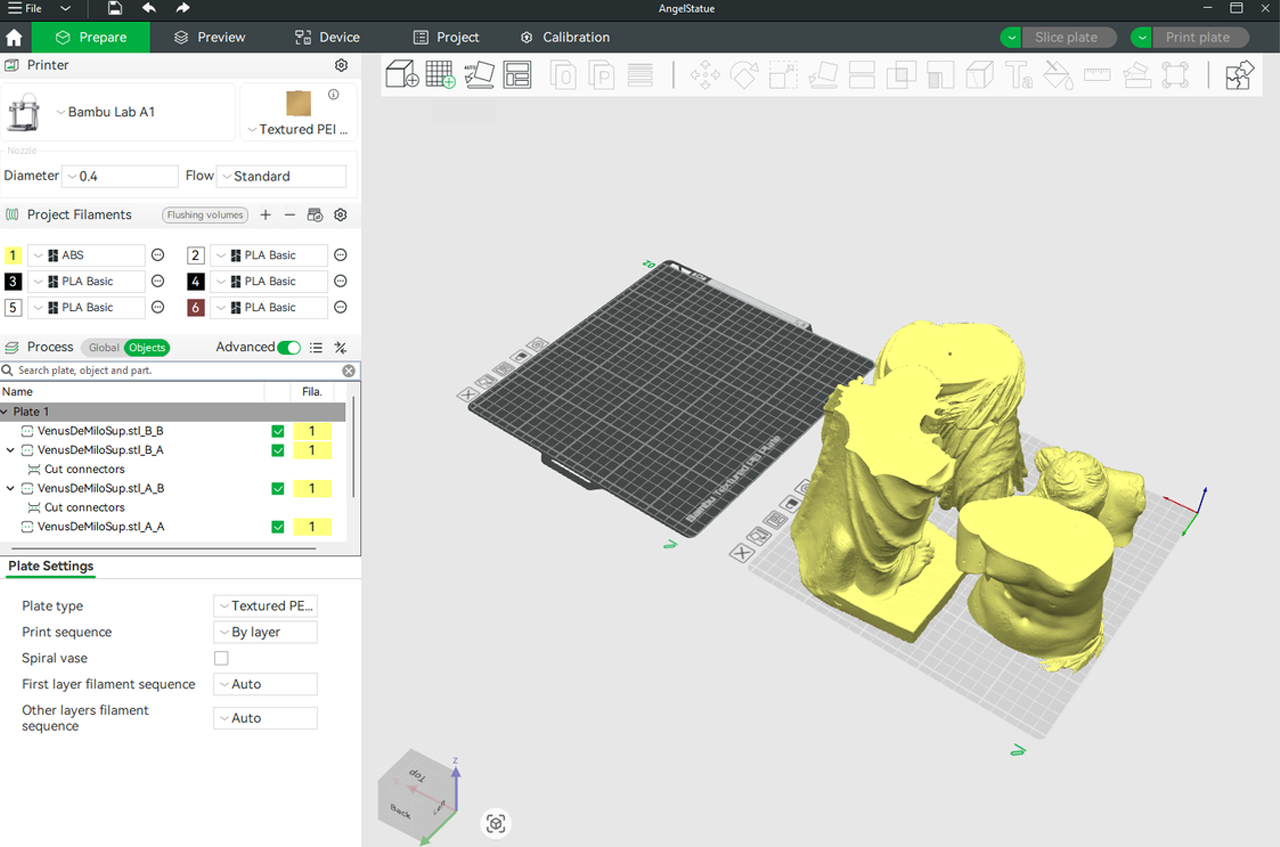
To align all the parts appropriately on the bed, we will need to use the Arrange all objects tool found in the menu bar.
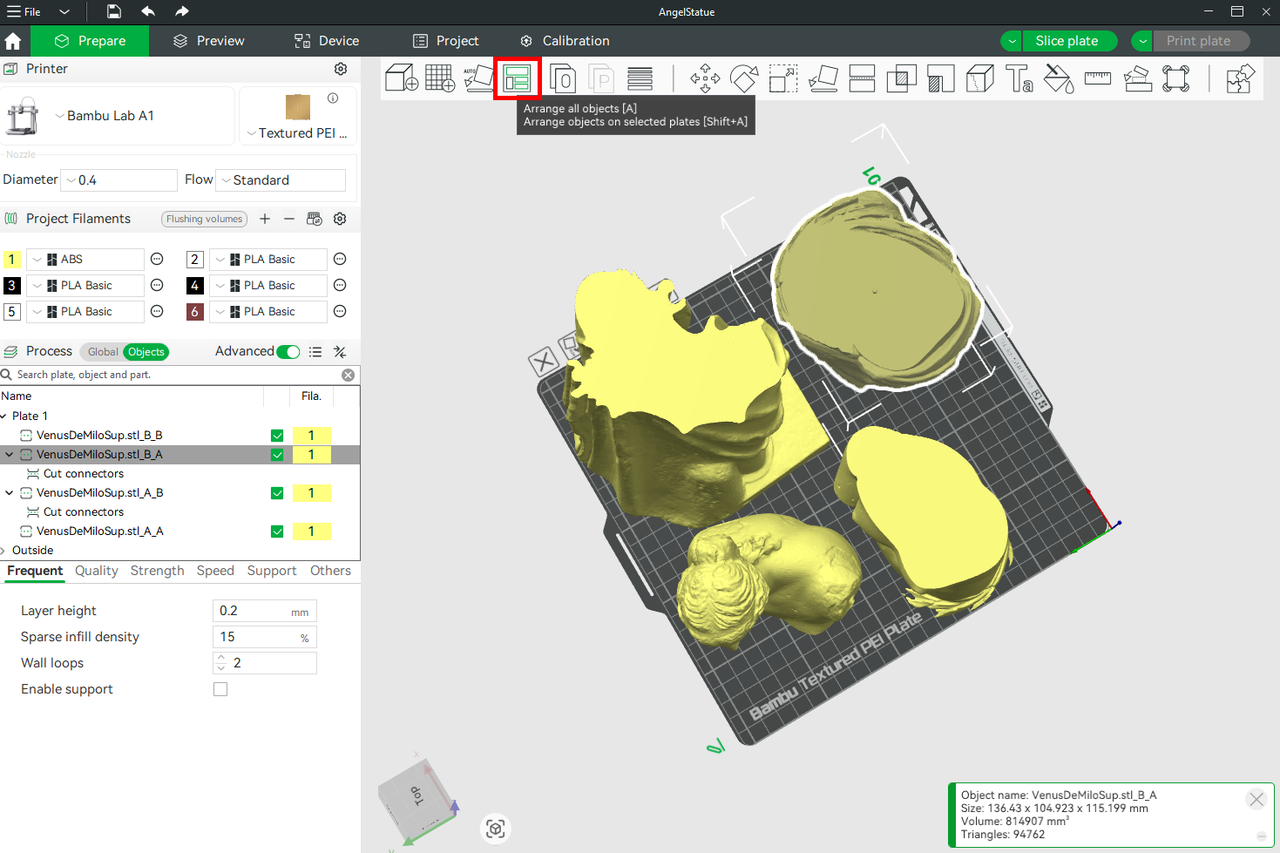
After clicking on it, select Arrange, and the files will be properly arranged.
However, if you find that even after using the Arrange tool, the parts still don't fit well, or if there are tall parts next to wide ones that can result in other 3D printing issues, it's beneficial to use different plates, allowing for an organized workflow and a cleaner design. It's like having separate print jobs within one project file. Follow the steps below to achieve these:
Go to the Add Plate tool in the menu bar and click it.
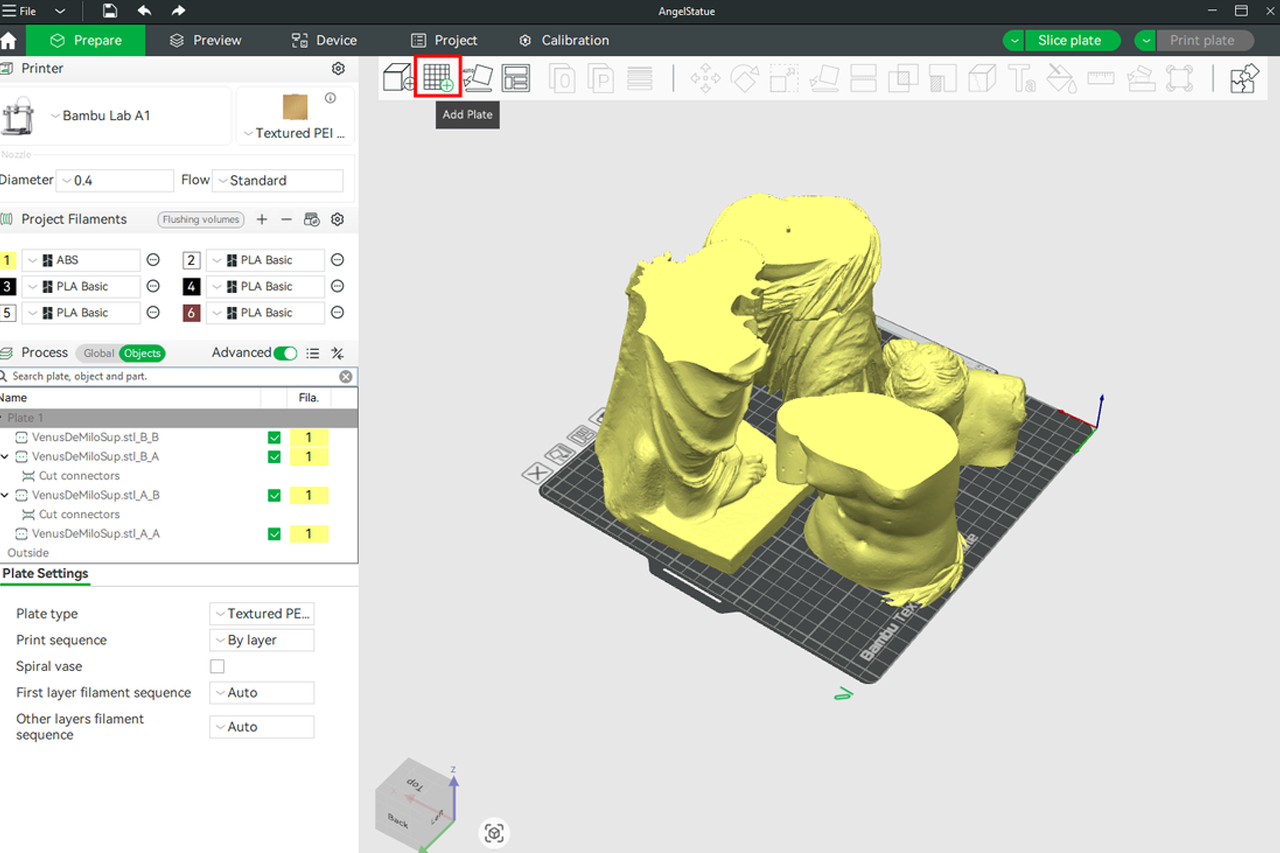
You will see a new plate form, and you can repeat the process to add more, if desired, up to a maximum of 36 plates.
You can rename the plates using your specified name.
To move the objects to the newly created plate, hold, drag, and drop them.
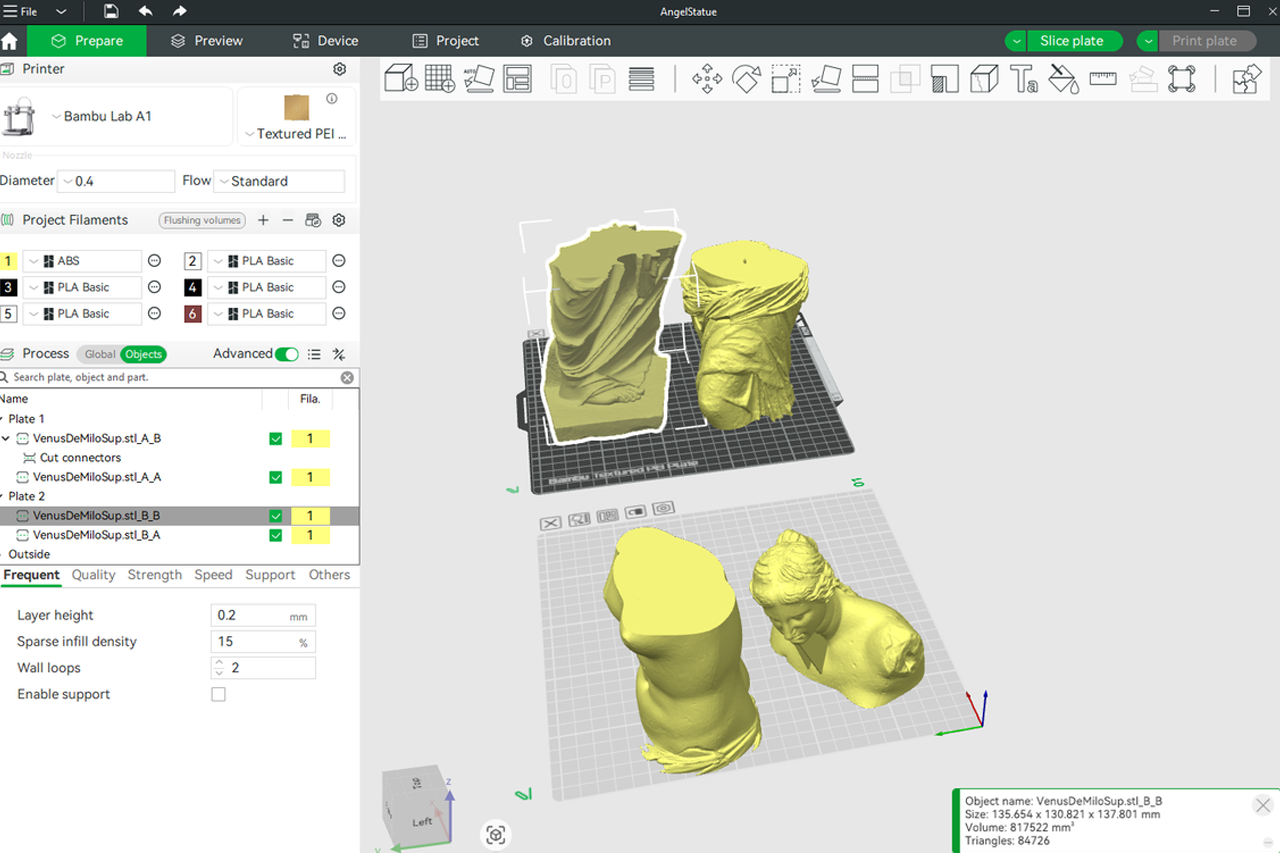
Continue to orient the files until they all sit well in the bed.
¶ 3D Slicing and Printing Process
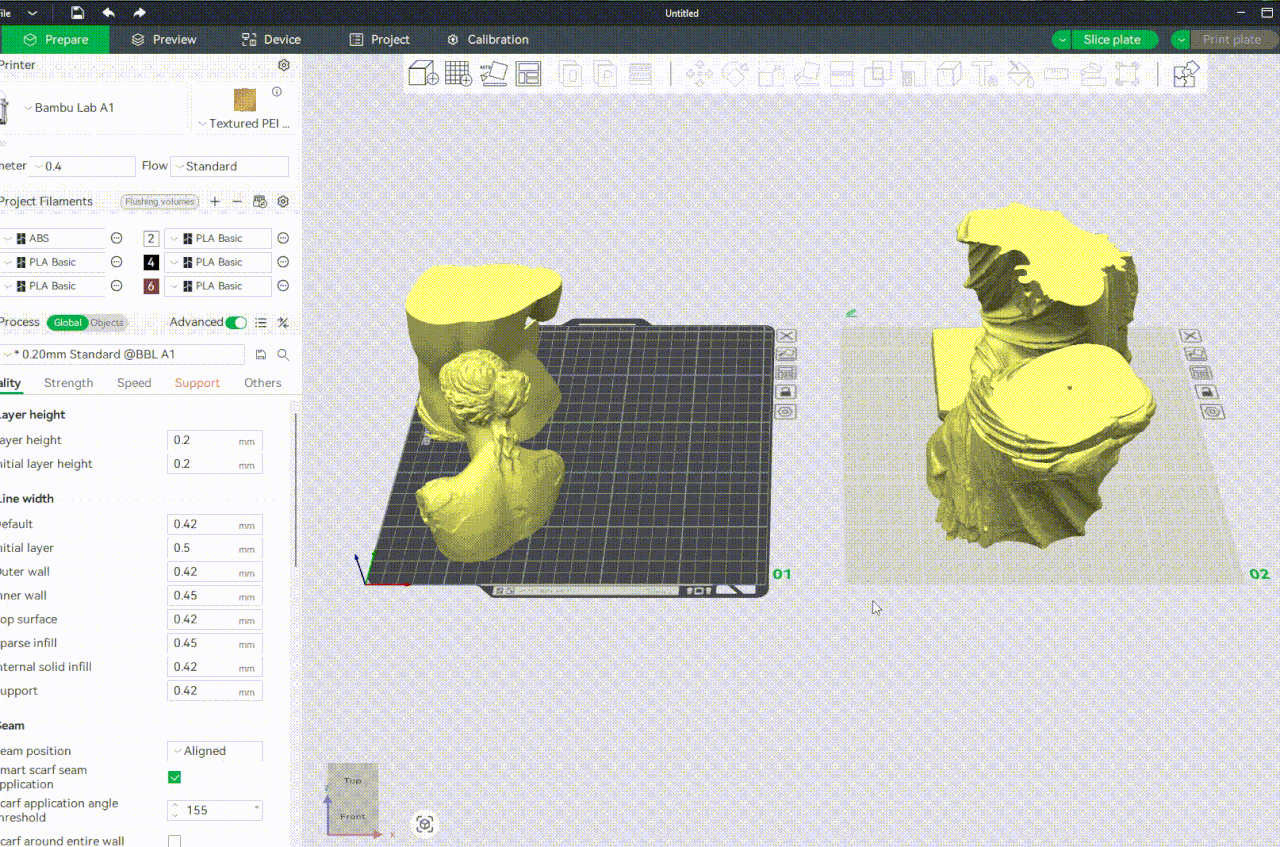
To slice all the plates, go to the Slice Plate section and select "Slice all" from the drop-down menu.
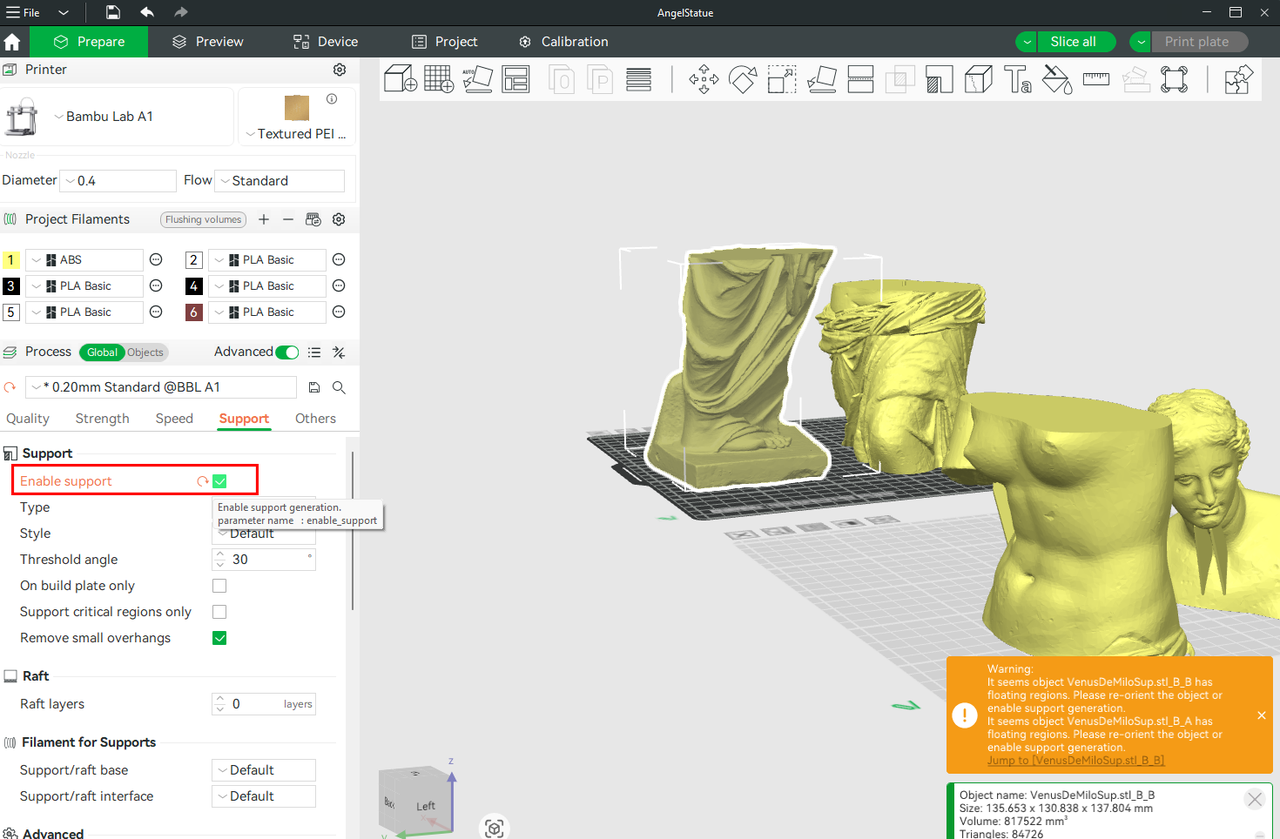
The slicing process will begin, and if any issues arise with the file, they will be displayed in the bottom left section of the workspace. For example, in our case, the software has detected an object with floating regions.
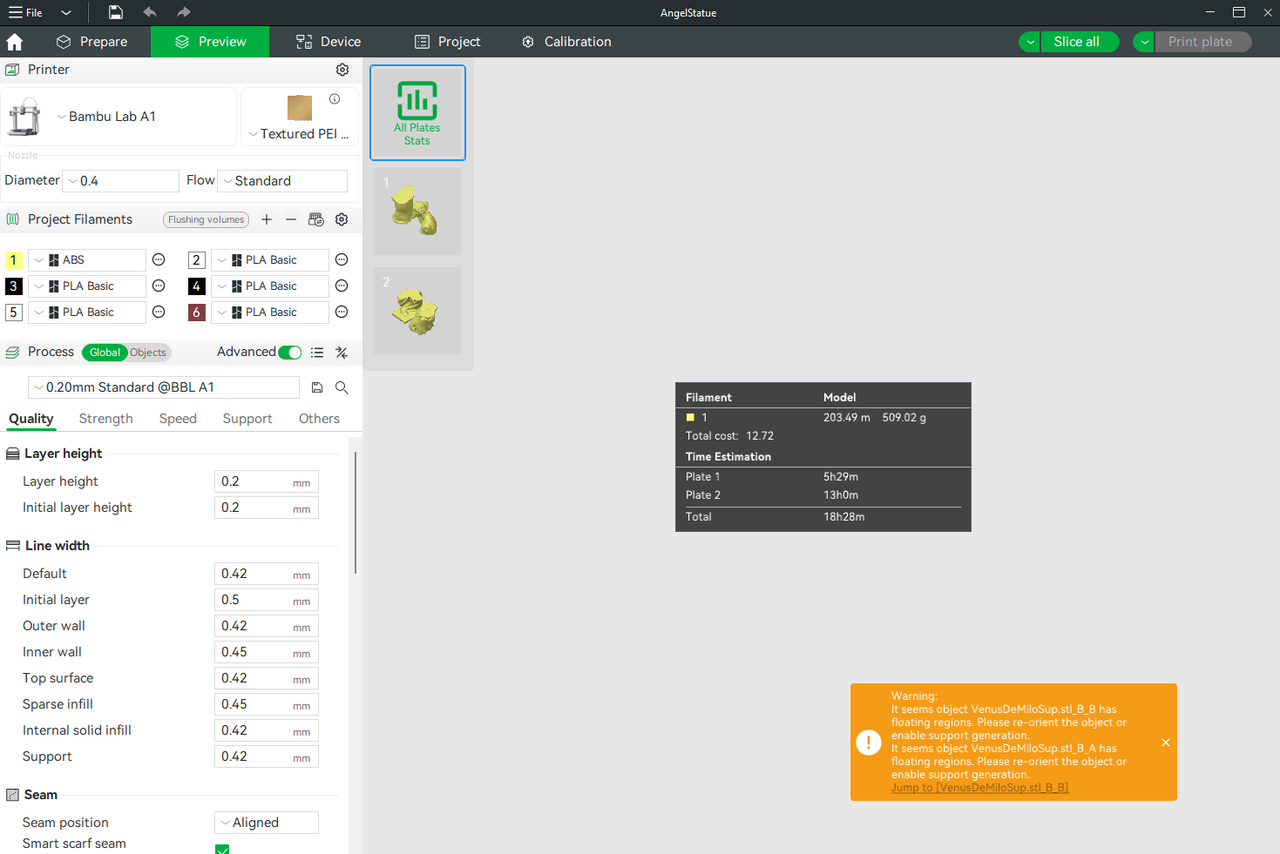
So we have to go back and fix it, then reslice. It's also important to always name your files appropriately so you can easily identify which file is which, especially when you encounter an issue. To resolve the issue of some regions floating, we will go to the Support section and ensure the 'Enable support' box is checked.
Go back again, and select Slice all, and the file was successfully sliced.
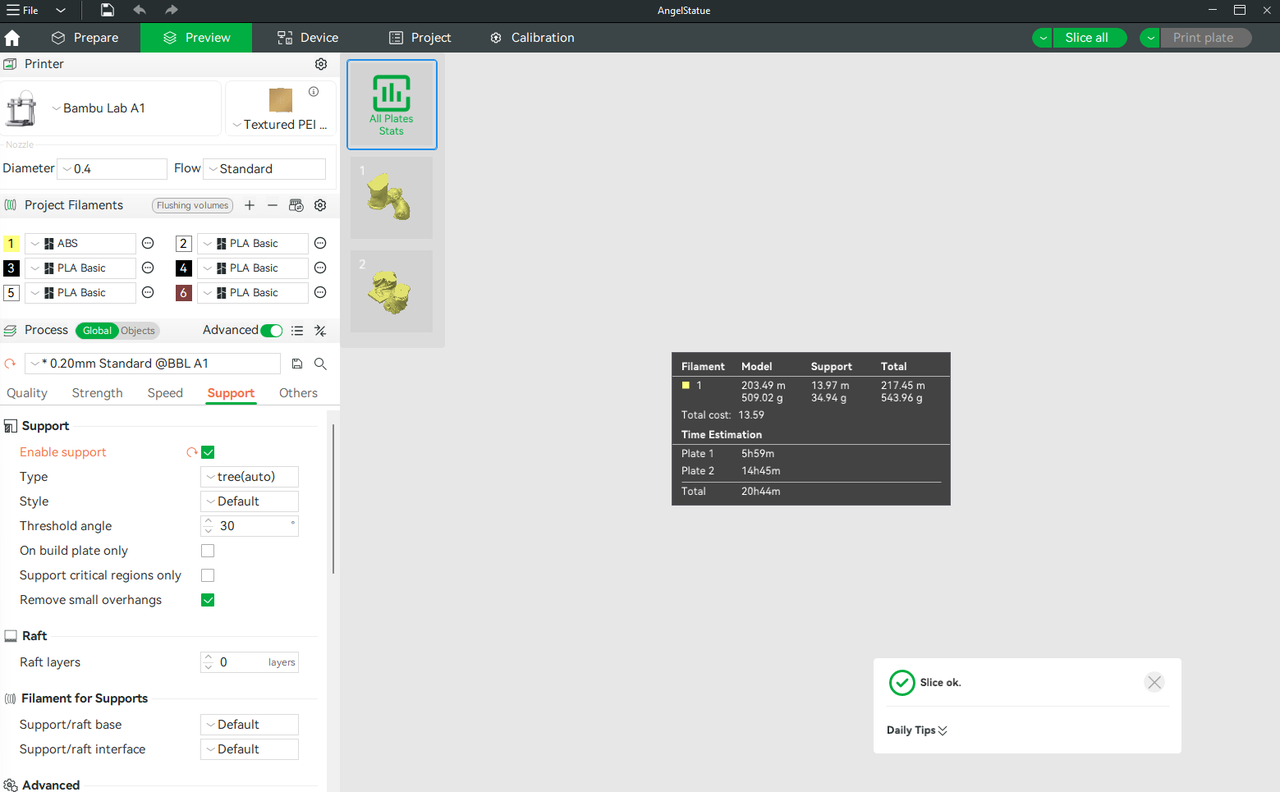
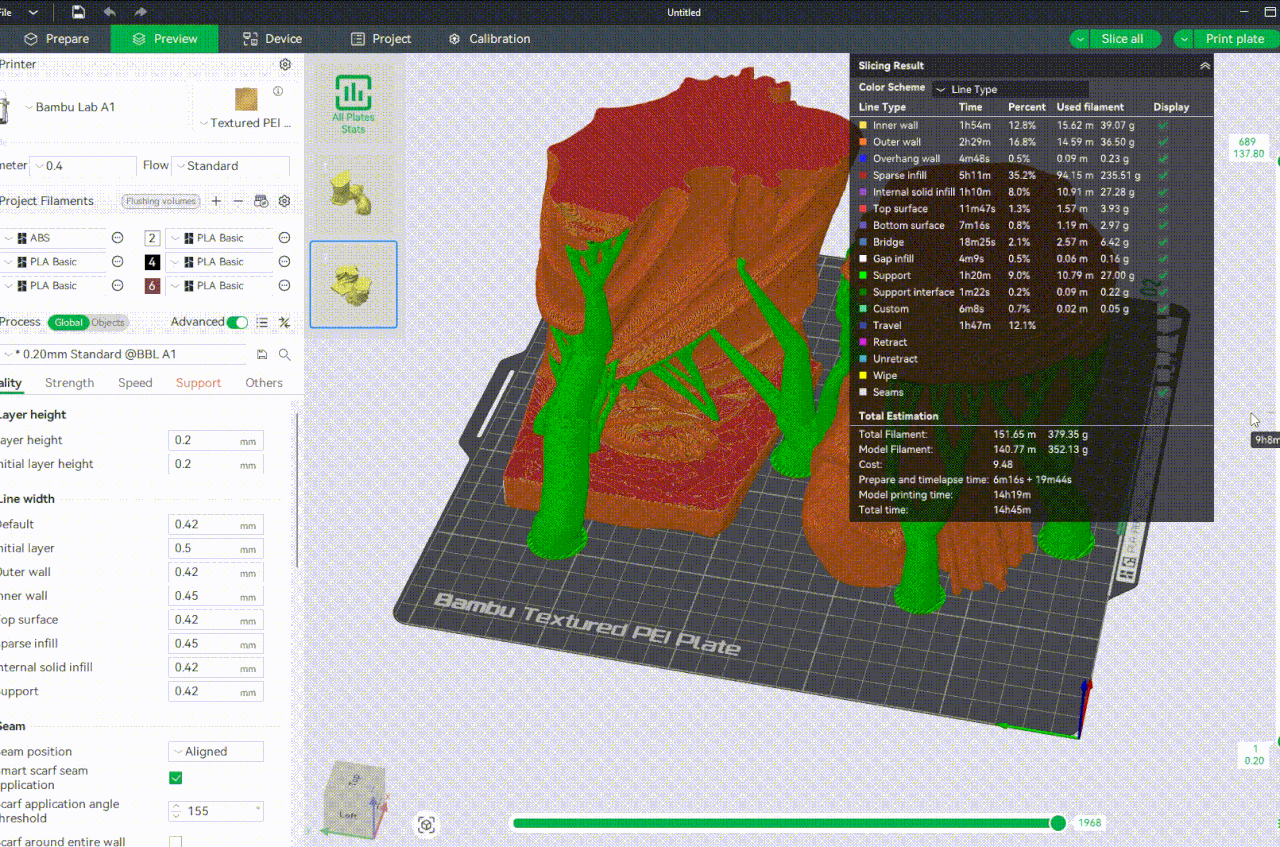
You will also be able to see the estimated time it will take to 3D print the file, as well as the size of the material you will use. Click each plate to view the individual details of the files within it and see how supports have been added. You can also preview the 3D printing process by dragging the bar at the right up and down.
You can 3D print directly from Bambu Studio by clicking Print plate. You can choose to print one plate or all of them. Alternatively, you can export the sliced files by going to the drop-down menu of the Print plate and choosing either Export plate sliced file or Export all sliced file. After exporting, transfer to an SD card and insert it into the 3D printer.
¶ Best Practices for 3D Printing Split Files
To ensure successful results when 3D printing split parts, it's important to follow various best practices for efficient 3D printing and assembly. These include:
¶ 1. Add Connectors
Before splitting the model, ensure that you enable the Add Connectors option so that it generates peg-and-socket joints to make printing the assembly easier.
¶ 2. Place Them on Different Plates or Properly Arrange Them on the Bed
Either place the split files on separate plates or arrange them properly on the bed, depending on the model's size and complexity. Using different plates is helpful in applying unique orientations or managing different material types. Each plate functions as an independent print job within the same project, helping you maintain an organized workflow while reducing the risk of print failure caused by overcrowding or uneven cooling. Additionally, if you prefer to print all parts together, take the time to arrange them properly on the build plate. Use the Arrange Tool to automatically space out the pieces with enough margin for airflow and good adhesion. Make sure parts with tall or fragile features are placed in stable positions and avoid tight clustering, as this can lead to warping or nozzle collisions.
¶ 3. Consider Print Orientation
Orient each piece in a way that minimizes supports, maximizes strength, and improves surface quality. Flat sides on the bed generally produce the cleanest finishes.
¶ 4. Use Identical Print Settings for All Parts
Because the parts will be joined or displayed together, they need to have a uniform surface texture, and there should be no visible differences once they are assembled, except for the colors, if you want them to be different. Ensure that the various settings, such as layer height, print speed, cooling, and material type, are consistent.
¶ 5. Name Your Parts
Rename parts to keep your project organized and avoid assembly confusion later. Additionally, if you encounter an error, you can easily identify which one is causing the issue. To do this, right-click on one model and select Edit in Parameter Table. You can then double-click on the name and start typing.
¶ 6. Preview before 3D printing
Use the preview to check how the printing process will take place, as well as the arrangement of the supports.
¶ Assembly Guidelines
After 3D printing the pieces, it's time to assemble them. Before applying any adhesive, try to fit all the pieces using the connectors added during the splitting process. Slide the connector surfaces together to check for alignment and tightness. If parts don’t fit smoothly:
- Lightly sand the pegs or holes using a file or sandpaper (start with 220 grit).
- Avoid forcing parts together. It may cause cracking or stress marks.
- Use glue to hold the parts together. Depending on the type of filament you are using, select a glue that bonds well. For PLA, super glue is an ideal choice. For PETG or ABS, use a two-part epoxy for stronger adhesion.
Once glued, press the parts together firmly and hold them in place for 30–60 seconds, or clamp them if possible, to ensure the bond cures fully. After gluing, inspect for visible seams or gaps. Then, use plastic putty, super glue, or a similar adhesive to fill them. Finally, use sandpaper to smooth the surface. If you would like to paint it, apply a primer to highlight any remaining imperfections, then sand again for a smooth finish, and proceed with the painting process.
¶ Troubleshooting
Splitting large 3D models for printing on the Bambu Lab A1 allows you to 3D print parts that are larger than the machine's build plate, but it may also introduce potential challenges during both the printing and assembly stages. But the good news is that most of these issues can be avoided with proper planning, careful slicing, and smart post-processing techniques. Below are the main issues and their solutions that you can encounter.
¶ 1. Misaligned Parts After Printing
When you try to assemble the parts, you might find out they don't line up properly. It can be due to inaccurate cut placement or warping during printing. To fix this, ensure you use the Add Connectors option when cutting to ensure alignment. You can also 3D print with brims if warping is the issue.
¶ 2. Poor Surface Matching at the Seam
When assembling, you may notice ridges or joints; this is due to Z-axis shifts or inconsistent orientation. To solve this, ensure that all parts have the same orientation and layer height. You can also apply sanding or filler primer to blend the seams.
¶ 3. Model Shifts or Resets During Cutting
After using the cutting tool, pieces can sometimes shift slightly in Bambu Studio. This can be due to accidental rotation or repositioning after cutting. Ensure you double-check the position before slicing.
¶ 4. Overuse of Supports on Cut Faces
Supports form directly on connector areas or mating surfaces, ruining fit due to automatic support generation over flat cut faces. To fix this, use Support Painting Tool to control where the supports go. Check out the video below to learn how to use the Support Painting Tool.
You can also orient cut faces flat on the build plate when possible to avoid supports altogether.
¶ 5. Connectors Don’t Fit Together
Pegs or sockets can be too tight or too loose, due to clearance or inconsistent extrusion. To fix it, ensure you adjust the cut tolerance to 0.15–0.3 mm. Also, recalibrate the flow rate on your A1. Sand tight pegs, or reprint with corrected tolerances.
¶ 6. Connectors Breaking During Assembly
Pegs can sometimes snap or sockets crack while pushing the parts together due to their thin nature. To fix, print them with extra wall thickness.
¶ 7. Parts Shift on Bed When Printing Together
Objects can sometimes collide or drift mid-print due to insufficient spacing between the pieces. To fix this, ensure you properly space them together or add the files to different plates.
¶ 8. Uneven Surface Texture or Color
Sometimes, after assembling the files, they might look mismatched due to inconsistent print settings or materials. To prevent this, try to use the same print profiles and settings for every piece as much as possible. You can also consider priming and painting for a uniform look.
¶ 9. Glue Doesn’t Hold Well
Pieces can sometimes fail to stay together after gluing, and this can be due to using the wrong adhesive or dirty surfaces. Always use the appropriate glue, such as super glue for PLA, and sand and clean the joint surfaces before bonding.
We recommend checking the Common Print Quality Problems and Solutions article to learn more about what to keep in mind when slicing and preparing a multi-part model for best chances of success.
¶ End Notes
We hope the detailed guide provided has been helpful and informative.
To ensure a safe and effective execution, if you have any concerns or questions about the process described in this article, we recommend submitting a technical ticket regarding your issue. Please include a picture or video illustrating the problem, as well as any additional information related to your inquiry.