¶ Product specifications related
¶ Q: Can H2D be upgraded to H2D Laser Edition?
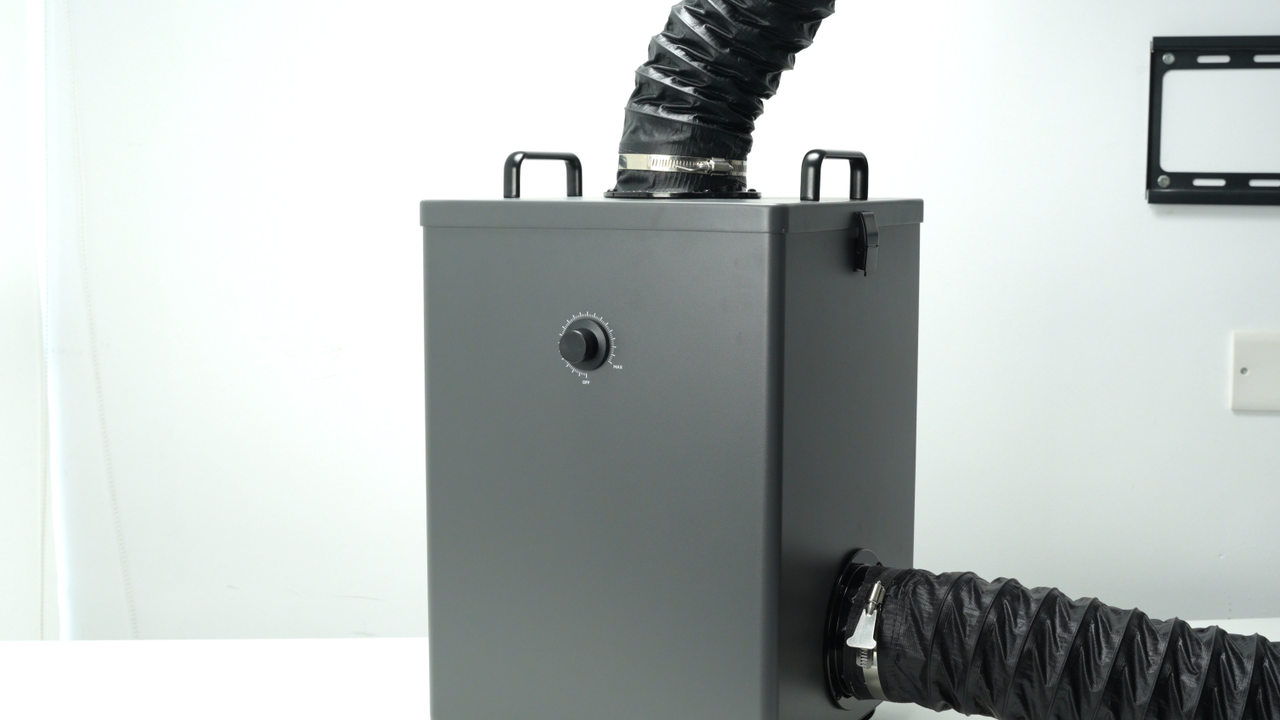
The H2D laser full combo has a built-in air pump and air pipe on the back of the printer, and is pre-installed with a BirdsEye camera. The front door, left and right side Laser Protective Windows, and top cover are all designed with laser protection. The packaging list includes a laser module, a cutting module, a smoke exhaust pipe and its adapter, as well as an emergency stop button.
We plan to launch a laser upgrade kit for the non-laser version of H2D. The upgrade kit is expected to be released in June (temporarily delayed) and will also provide installation instructional videos to help users complete the upgrade smoothly.
It is important to note that the air pump in the upgrade kit is an external air pump, which has a different installation structure from the built-in air pump in the full set. When using it, it can only be installed externally and connected to the machine through an air tube. The upgraded version will have the same functions and processing performance as the original laser version.
¶ Q: Are the left and right hotends exactly the same?
Yes, the left and right hotends have identical structures and materials, and can be used interchangeably.
¶ Q: Can I use the A1 series Hotend on the H2D? Conversely, can H2D hotends be used on A1 series printers?
Although the hotend of the H2D series is similar to the A1 hotend in structure , it is not exactly the same.
The H2D hotends are specifically designed for the H2D printer, offering optimized compatibility. For example, they support a larger maximum volumetric flow rate, lower clogging risk, more precise nozzle offset calibration between the left and right hotends, and automatic hotend type recognition via the live camera. Therefore, to ensure optimal print quality, it is strongly recommended not to use A1 hotends on the H2D printer.
Therefore , to ensure you get the best print quality, we strongly recommend that you do not use the A1 hotend for H2D printers.
Purchasing additional H2D hotends for use on A1 printers is feasible. However, you will also need to use the H2D hotend silicone sock.
¶ Q: Can dual nozzle printing support the simultaneous use of different-sized hotends for printing tasks?
Currently, simultaneous use of different-sized nozzles is not supported. If this feature is added in the future, we will provide information through a firmware update.
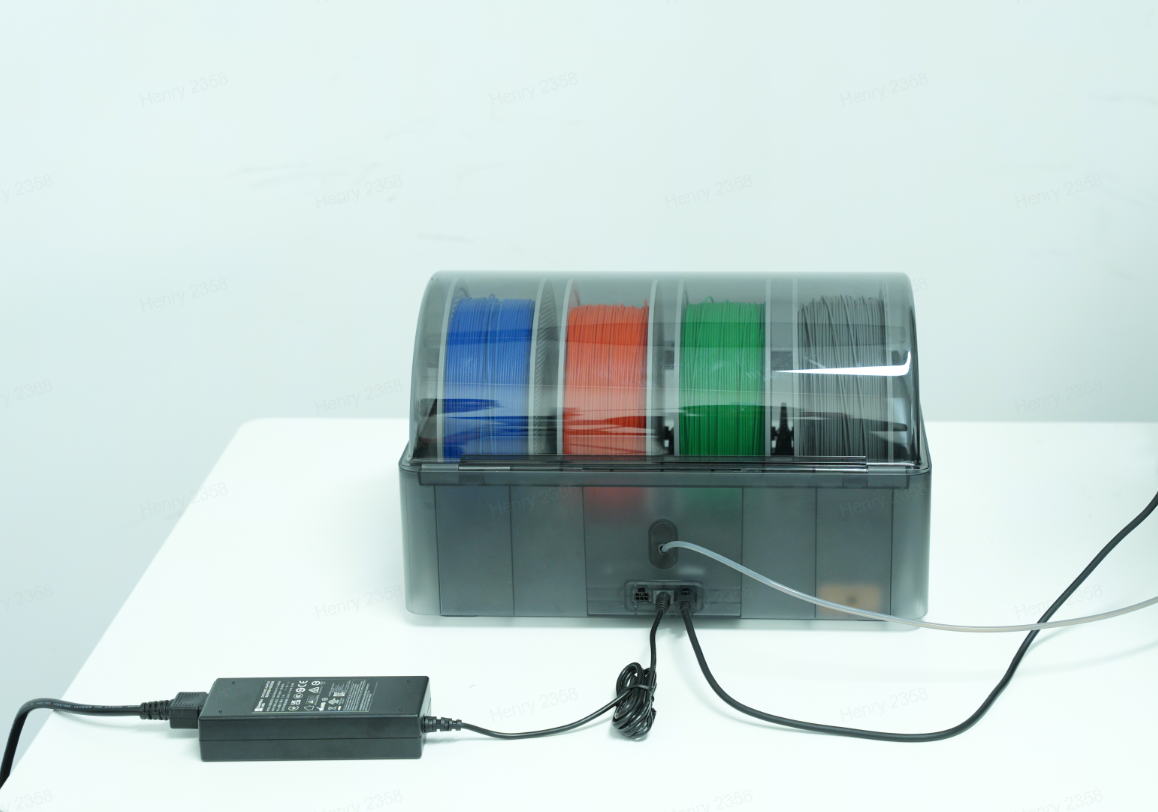
¶ Q: Is H2D compatible with first generation AMS?
The first-generation AMS has been confirmed to have full plug-and-play compatibility and can be used with the H2D for multi-color printing, but it does not support the AMS drying function.
Due to the fundamental differences in the feeding mechanism and buffering structure, the H2D does not support the AMS lite.
¶ Q: What is the maximum number of AMS 2 Pro and AMS HT units that the H2D supports? How many colors can it print at most?
The H2D supports a maximum of 4 AMS 2 Pro and 8 AMS HT connected simultaneously, a total of 12 units with 24 slots.
Because H2D is a dual-hotend printer, and in the most extreme scenario, all AMS can be connected to one hotend while the other hotend uses an external spool holder, it can support up to 25 colors.
¶ Q: Is a USB included as standard? What functions are affected without a USB?
The package does not include a standard USB flash drive. You can still initiate printing normally without a USB, as the printer has built-in storage space to run print files.
However, without a USB inserted, the following functions will be affected:
The recording and time-lapse photography functions can't be turned on;
Printing cannot be initiated through the LAN;
Print files cannot be sent to the machine for storage through the studio;
Log files cannot be exported;
USB device requirements: USB2.0 protocol or above (actual minimum write speed needs to be greater than 10M/s), supported file formats are FAT32 and exFAT. And the printer only supports mounting one USB, and cannot connect multiple USB via a USB hub.
¶ Q: Are there any special safety precautions I need to take when using the laser function?
Because laser processing involves using high-energy lasers on potentially flammable materials, we strongly advise users not to leave the machine unattended during laser operations. Please maintain constant vigilance over the machine's operational status and ensure that there are no flammable or explosive materials in the machine's surroundings.
For more information please refer to: Laser Safety Document
¶ Q: Will the smoke and dust generated by laser operations affect my printer's precision and lifespan?
H2D is equipped with an efficient exhaust system that effectively removes smoke and dust generated by laser operations, significantly reducing contamination. During R&D, we conducted rigorous testing to ensure that with regular machine cleaning, the impact of smoke and dust on performance and precision is negligible.
For detailed cleaning instructions, please refer to: H2D Regular cleaning and maintenance recommendations
¶ Q: What are the wavelengths of the 10W laser module and the 40W laser module, and what type of lasers are they?
The wavelengths of both the 10W and 40W laser modules are 450 nm blue light, and they belong to semiconductor/diode lasers.
¶ Q: What are the differences between the 10W and 40W laser modules? How should I choose?
Both the 10W and 40W laser modules are blue light lasers that support processing a variety of materials, including wood, rubber, metal sheets, leather, dark acrylic, and stone. However, due to differences in power and size, there are the following distinctions:
- Maximum cutting thickness(For Basswood Plywood):
10W laser module: 5mm;
40W laser module: 15mm;
- Maximum engraving speed(For Basswood Plywood):
10W laser module: 400mm/s ;
40W laser module: 1000mm/s ;
- Processable Area:
10W laser module: Maximum processing area X310mm * Y270mm
40W laser module: Maximum processing area X310mm * Y250mm
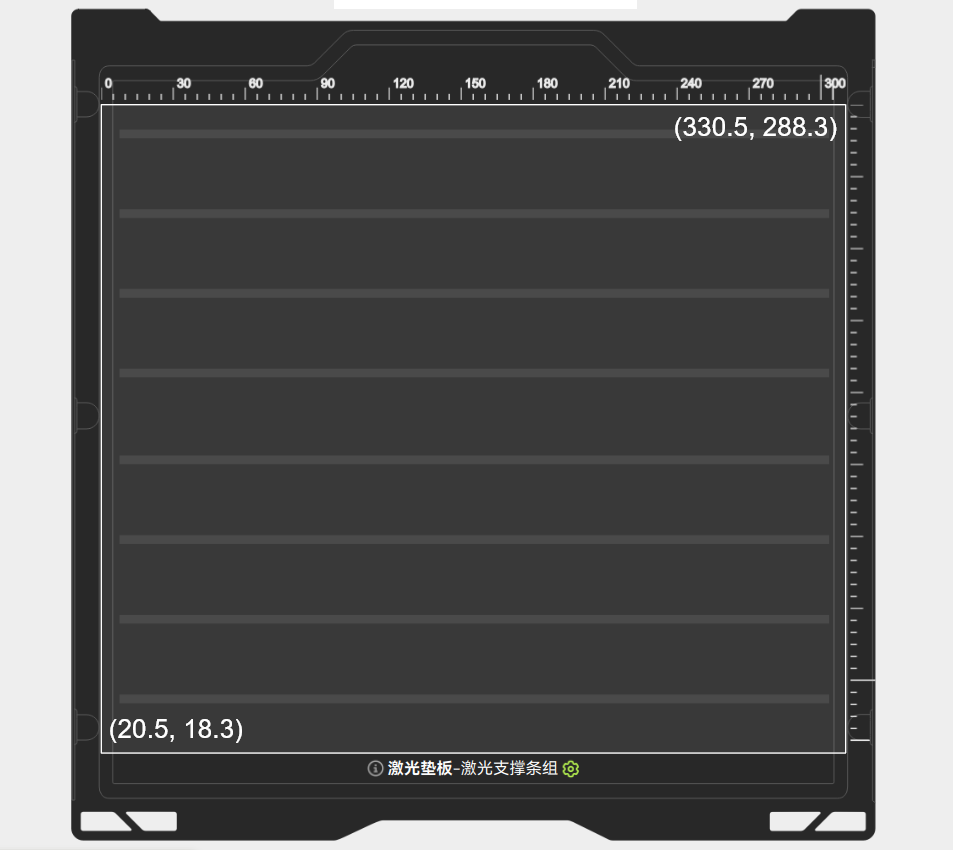 Processing range of 10W laser module |
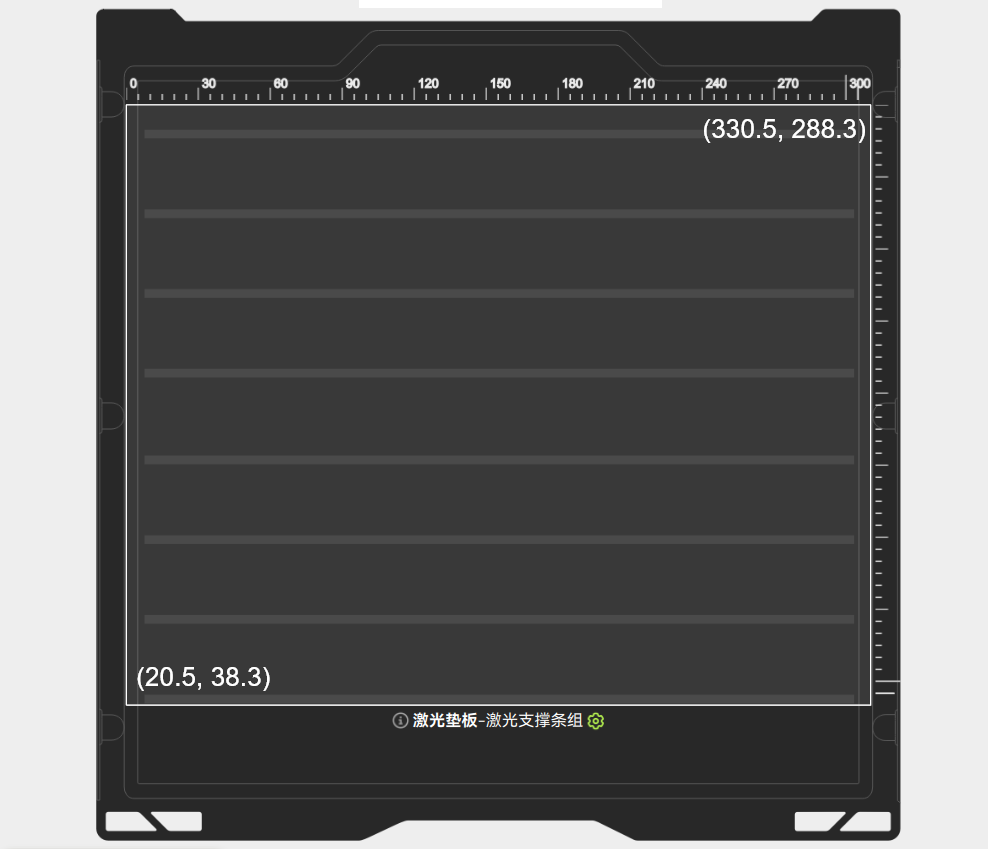 Processing range of 40W laser module |
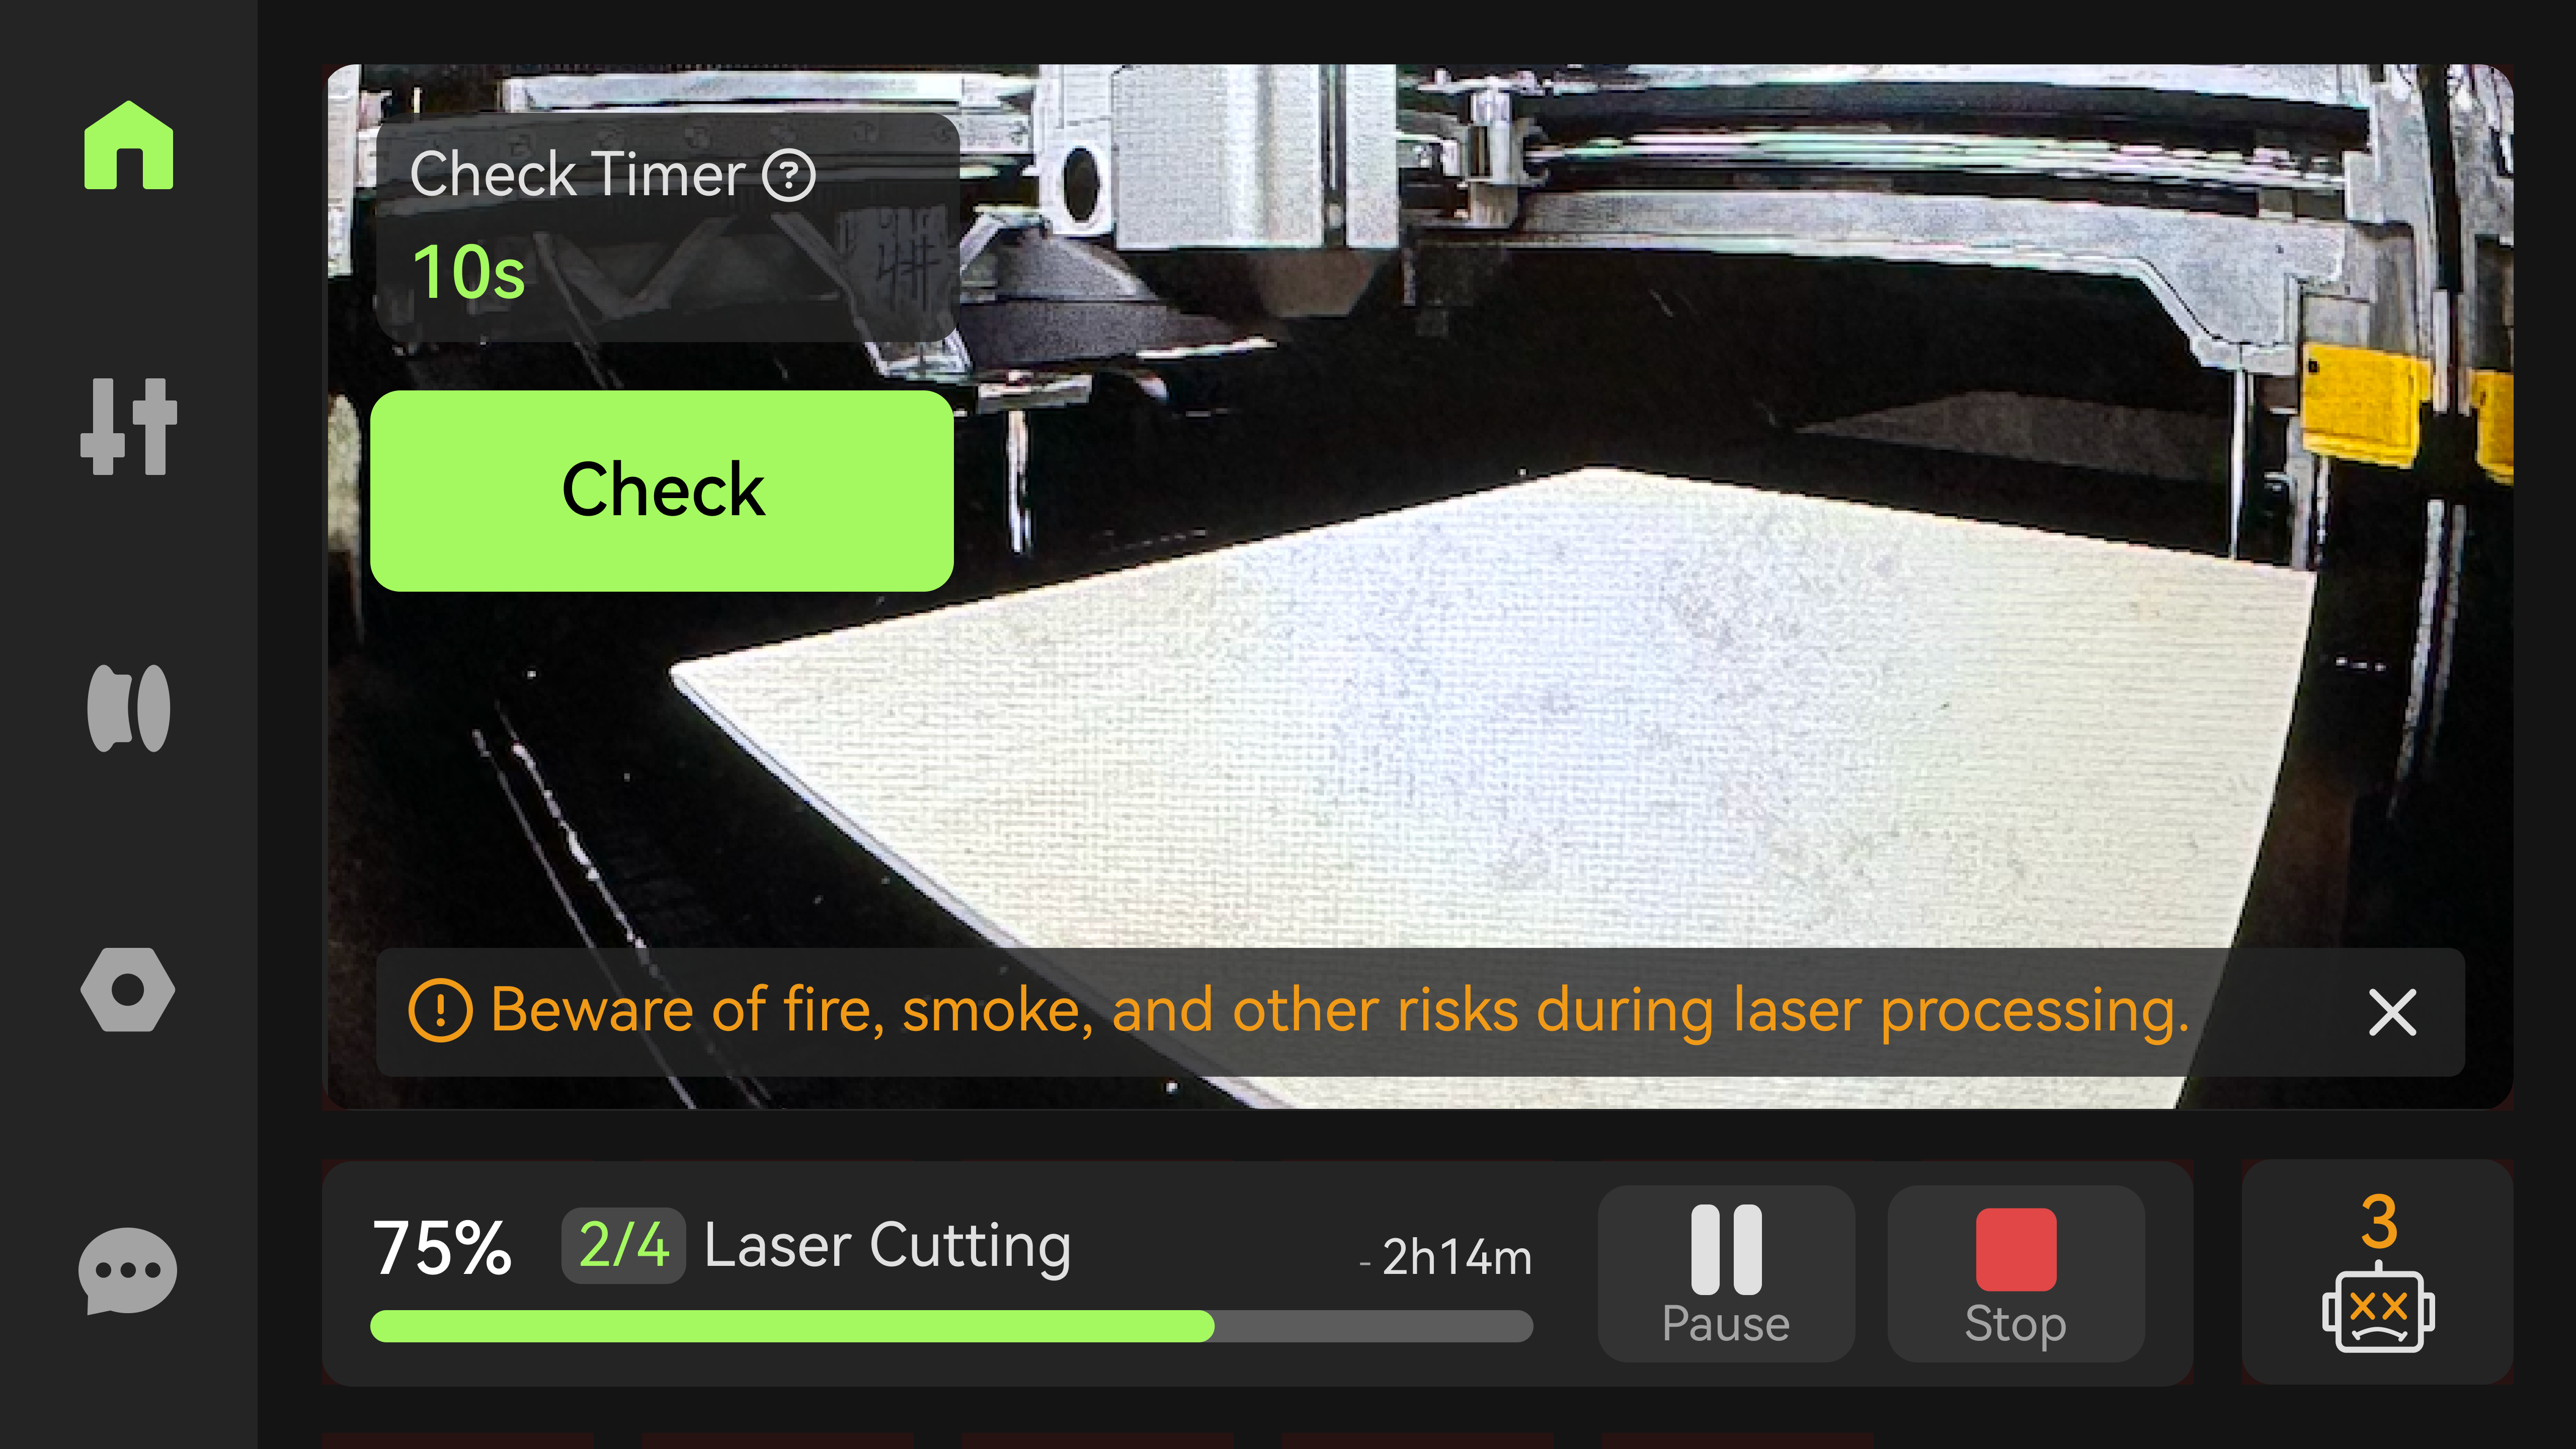
¶ Q: What does "Check" mean when it appears on the screen in Laser Mode?
When using the 40W laser module for cutting tasks, the system evaluates the material and processing duration. If the task runs for an extended period under high-power and low-speed conditions (power/speed ≥ 10), the dynamic Check mechanism will be triggered.
In this case, the user must "Check" on the screen at intervals (automatically calculated based on the material and processing time) to confirm their presence and ensure safe laser operation.
¶ Q: How can I improve the success rate and quality of TPU printing?
Due to the flexible nature of TPU filaments, there are some operational issues that can arise during feeding and printing. To facilitate TPU printing, we have created a dedicated Wiki guide. Simply follow the instructions in the Wiki to successfully print with TPU filaments: TPU 85A&90A printing guide for H2D
¶ Q: Why is the bed temperature uneven, and does it affect adhesion?
The bed has two heating elements. The high-power heating element operates during the heating phase to ensure a fast heating rate. It has a high heating power, resulting in a larger temperature difference. After reaching the target temperature, the smaller heating element takes over. As the high-power element turns off, the temperature becomes more uniform.
According to our tests, the maximum temperature difference after stabilization is about 4°C at a 65°C bed temperature and approximately 7°C at a 100°C bed temperature. Based on our printing tests, this temperature difference does not significantly affect adhesion performance.
¶ Product usage related
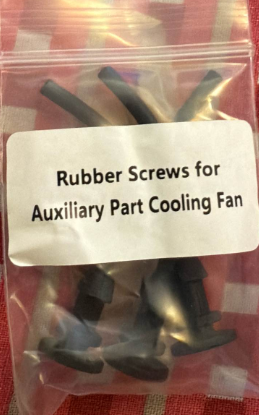
¶ Q:I found a pack of Rubber Screws for the Auxiliary Part Cooling Fan when unboxing. I can’t find any information in the manual or the videos. can you tell me what these parts are?
These are used to secure the Auxiliary parts cooling fan and are given just in case you ever need to remove the fan and the existing mounts break;
In some batches, the rubber screw on the Auxiliary Part Cooling Fan was cut too short after installation. While this enhanced aesthetics, we realized it could cause inconvenience for users when maintaining the cooling fan in the future. Therefore, we have included a pack of rubber screws with the printers from these batches.
 |
 |
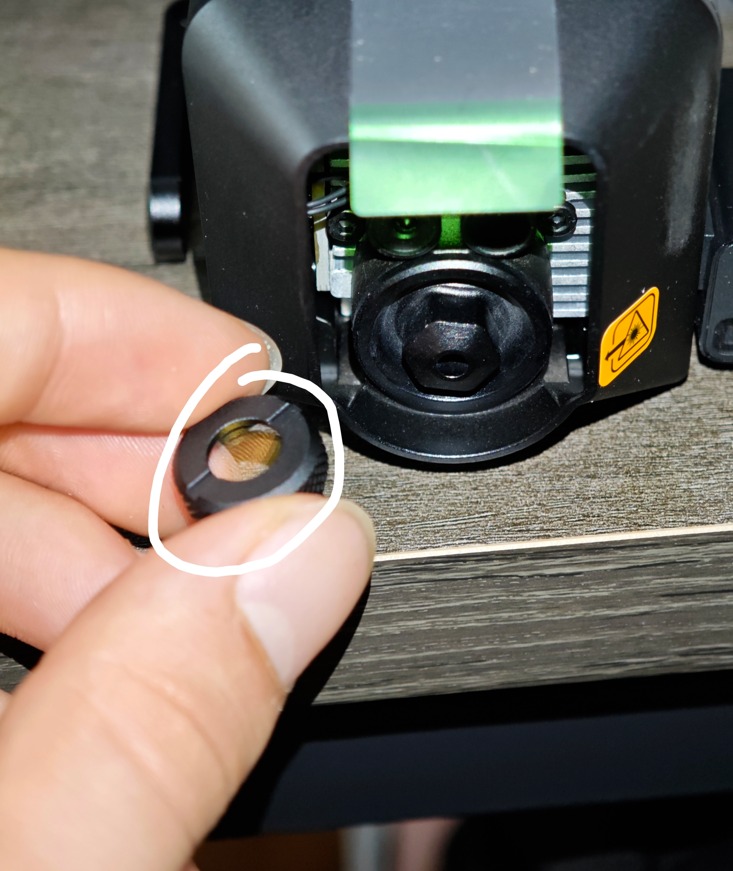
¶ Q: When unboxing the laser module, there is a lens inside the packaging. What is its purpose, and do I need to install it?
This spare lens is included in the box. It is not needed for use right now, but in the future, if the current lens gets dirty and cannot be cleaned, you can replace it. We will upload the replacement method to our wiki or YouTube soon.
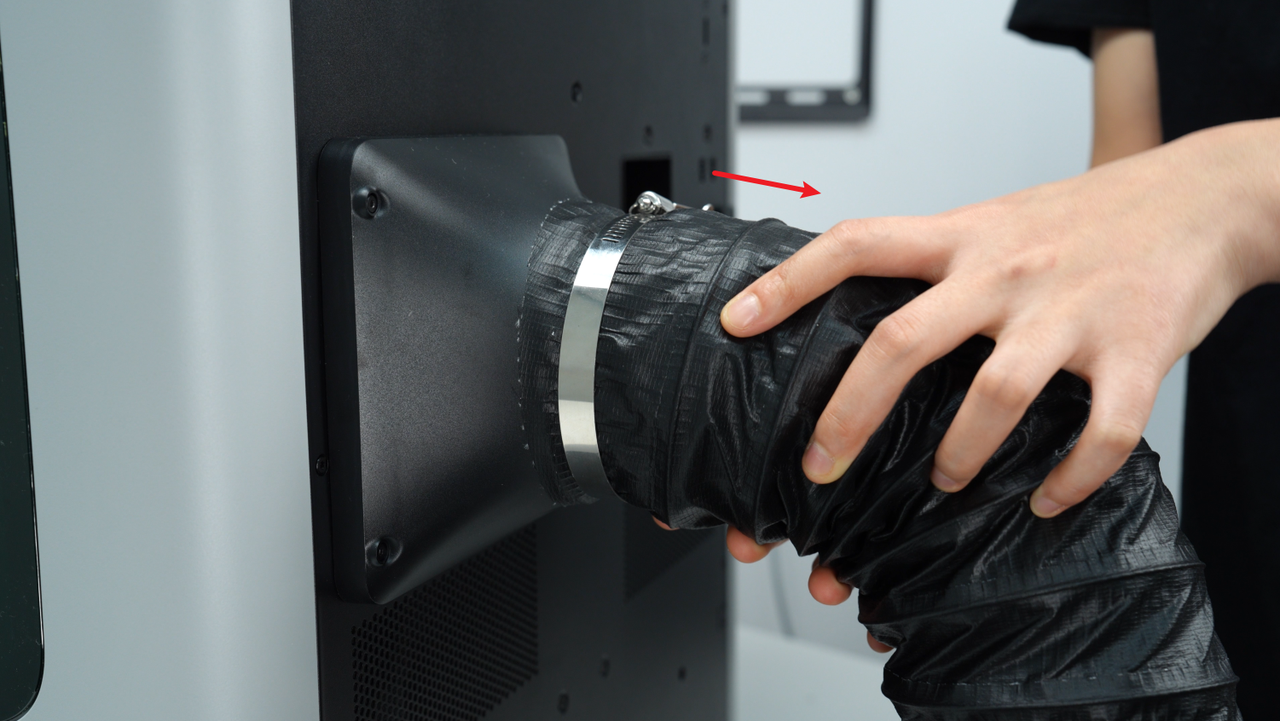
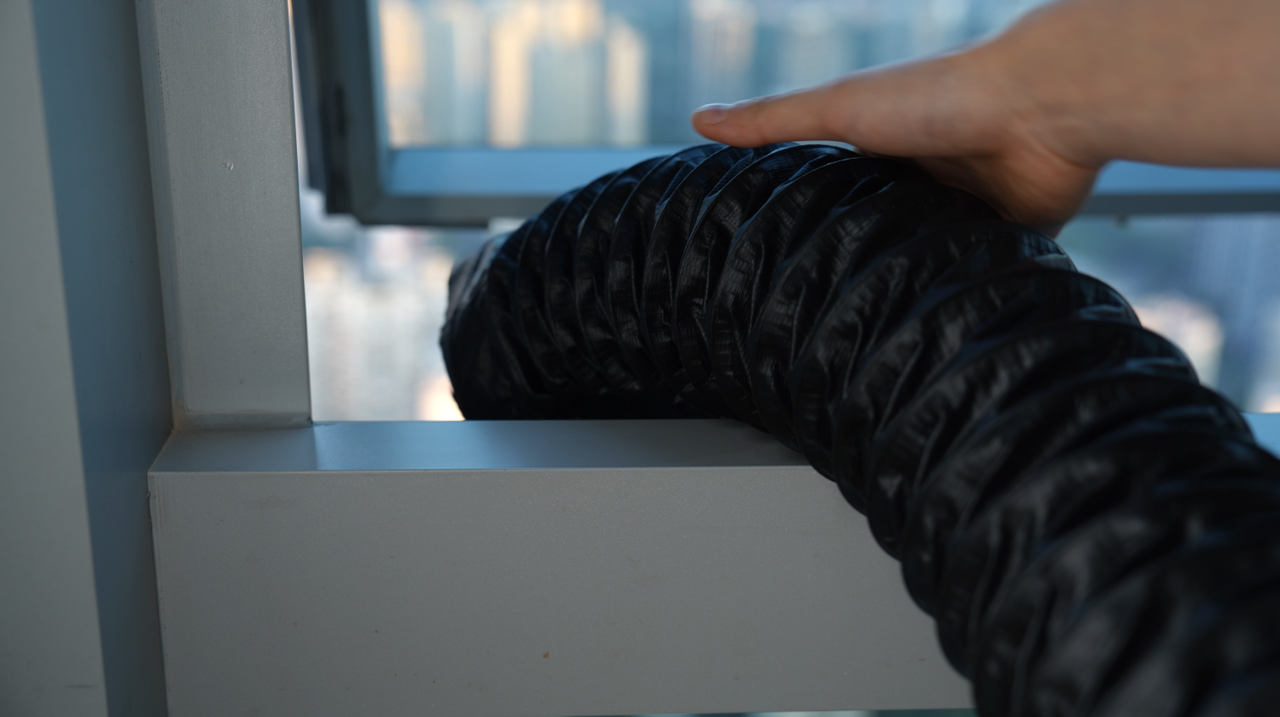
¶ When I switch from 2D laser processing to 3D printing, do I need to remove the exhaust pipe from the back of the printer and the exhaust pipe of the air purifier (optional)?
Based on our tests, the air purifier causes significant air blockage, while the airflow resistance of the exhaust pipe is within an acceptable range. Therefore, we recommend the following when printing with low-temperature materials (PLA, TPU, etc.):
If both the exhaust pipe and air purifier are installed, we recommend (1) directly removing the section connecting the printer to the exhaust pipe; or (2) only disconnecting the connection between the exhaust pipe and the air purifier, keeping the connection between the exhaust pipe and the printer, but ensuring that the exhaust pipe does not have excessive bends or blockages.
If only the exhaust pipe is installed, we recommend (1) directly removing the section connecting the printer to the exhaust pipe; or (2) keeping the connection between the exhaust pipe and the printer, but ensuring that the pipe does not have excessive bends or blockages.
In cases where the laser will not be used for an extended period, we recommend prioritizing the disconnection of the exhaust pipe at the back of the machine to avoid causing the chamber temperature to not meet the expected requirements for the print task.
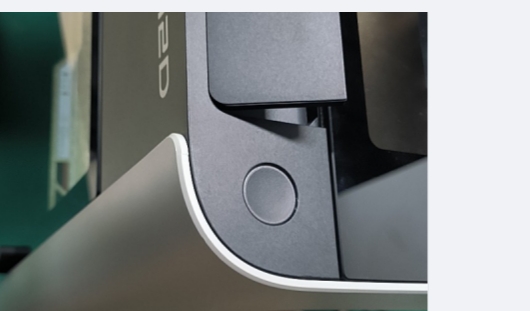
¶ Q: There is a button on the top right side of the printer's front cover. What is its function?
This is a confirmation button for processing safety. You must press this button to confirm manual supervision when initiating a laser or cutting task.
For 3D printing tasks, this button does not participate in starting or pausing tasks. If you need to pause or restart a printing task, you need to click the button on the screen.
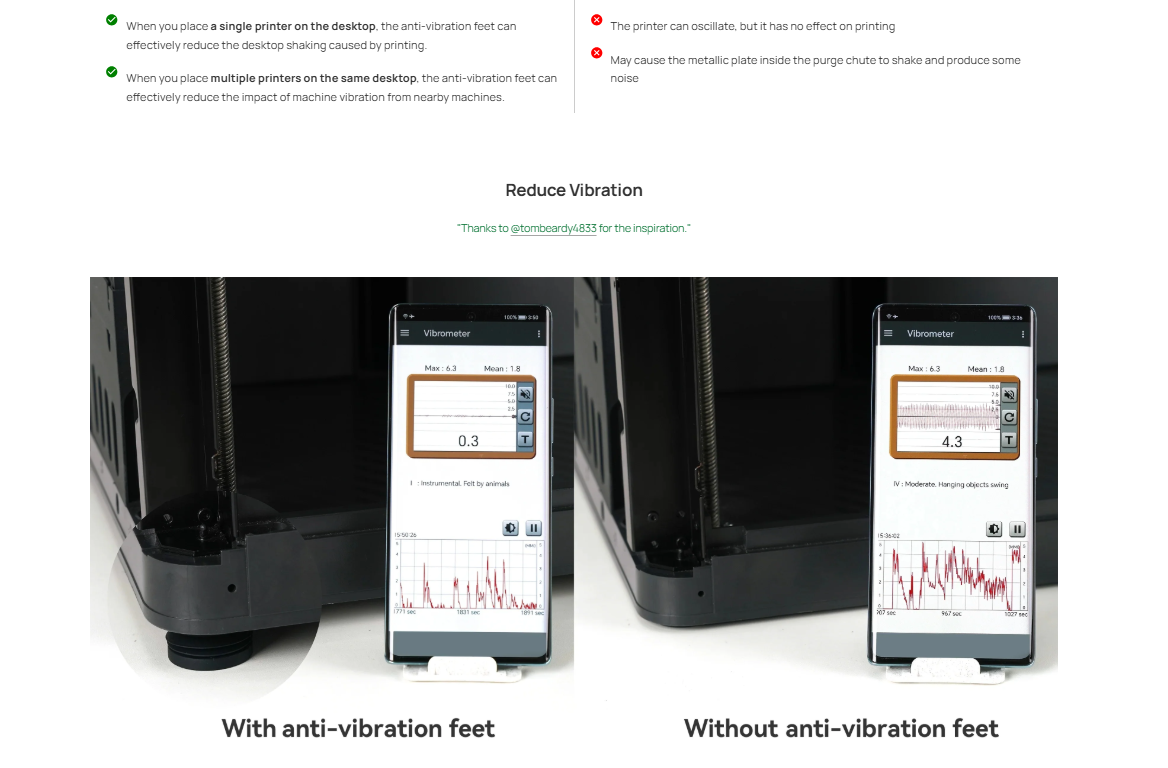
¶ Q: Why does the printer shake during the H2D printing process? Is this a normal phenomenon? Will it affect print quality?
This is normal. The H2D uses soft pads with better vibration isolation properties, which can effectively block external vibrations. Even when multiple machines are used simultaneously, they won't be affected. Additionally, these soft pads help reduce the vibrations transmitted from the printer to the desktop, minimizing any shaking of the surface. Furthermore, the all-metal frame ensures that the machine has sufficient rigidity, so even if the body shakes, there is almost no relative displacement between the nozzle and the heatbed, thus not affecting print quality. More principles of these pads can be referenced in the detailed introduction on the X1 series anti-vibration feet page, as shown in the image below:
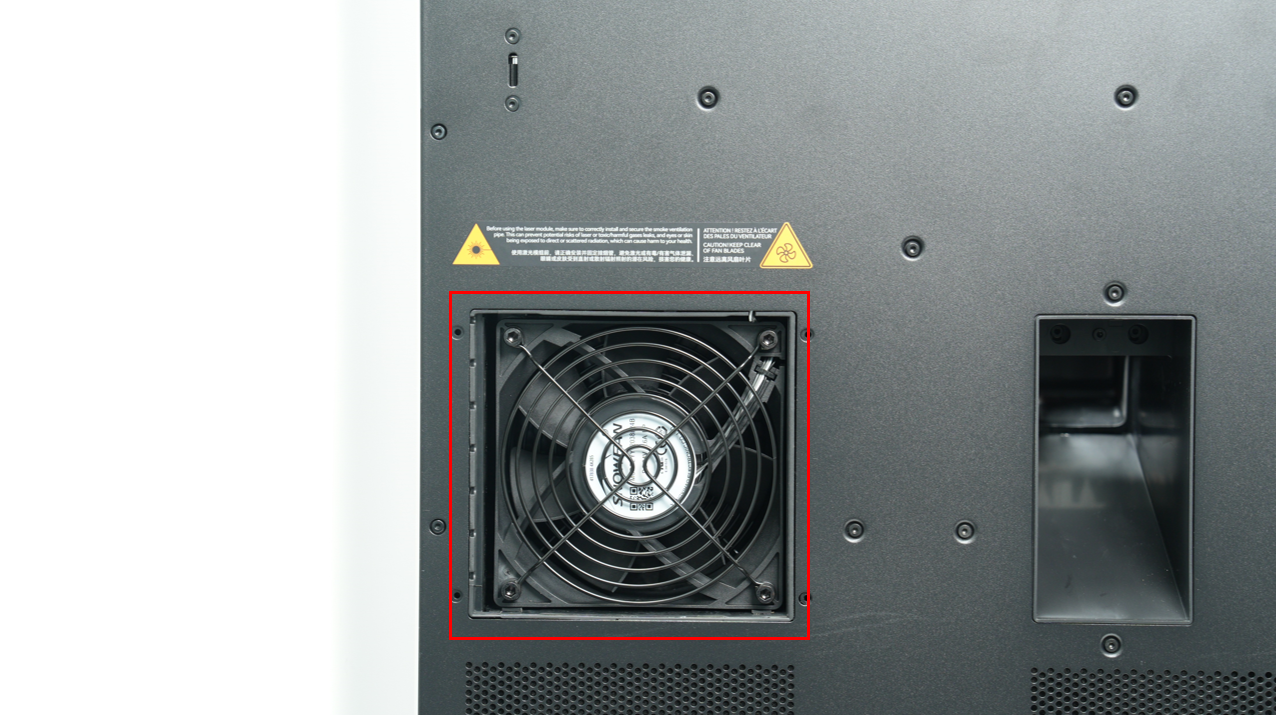
¶ Q: What is the function of the soft pins for the cavity exhaust fan and the soft pins for the auxiliary component cooling fan, and is installation required upon unboxing?
You do not need to use these two packs of screws during the unboxing process. These two packs of screws are provided for your convenience in future maintenance or repairs. For information on how to use the soft pins, please refer to the relevant wiki (link to be updated).
¶ Q: There is a note on the back of the printer to remove the air pump screw, but I did not find this step in the printer's quick start guide. What is the reason for this?
Some batches of the printer's quick start guide do not include the step to remove the air pump screw. You can find the relevant steps for removing the air pump screw in the quick start guide for the laser module.
¶ Q: After removing the laser air pump screw, do I need to reinstall them to use the printing function?
No need to reinstall them. Please keep the air pump screws in a safe place. However, if you need to repackage the printer for transportation in the future, you will need to reinstall these screws before repackaging the printer.
¶ Q: When the printing task requires multiple nozzle switching, will the idle nozzle remain heated while one of the nozzles is printing?
When the nozzle is switched, the time interval between the two material changes is estimated, and the required temperature reduction and temperature increase are calculated by the algorithm based on the time interval. If the interval between two uses is less than 30s, no cooling operation is performed.
The H2D printer uses this logic to cool down the idle nozzle and heat it up in advance, avoiding the idle nozzle from maintaining high temperature for a long time, causing material leakage and power waste, and also avoiding waiting for the nozzle to heat up, which leads to the extension of the entire printing task.
¶ Q: Why can't I choose any hotend to print (such as the left hotend) for the built-in files of the printer?
The built-in model is set to print with the right hotend when slicing. Since the built-in files are G-code, the hotend cannot be changed on the screen. However, when you slice the file in Bambu Studio and send it for printing, you can freely choose the left hotend or the right hotend.
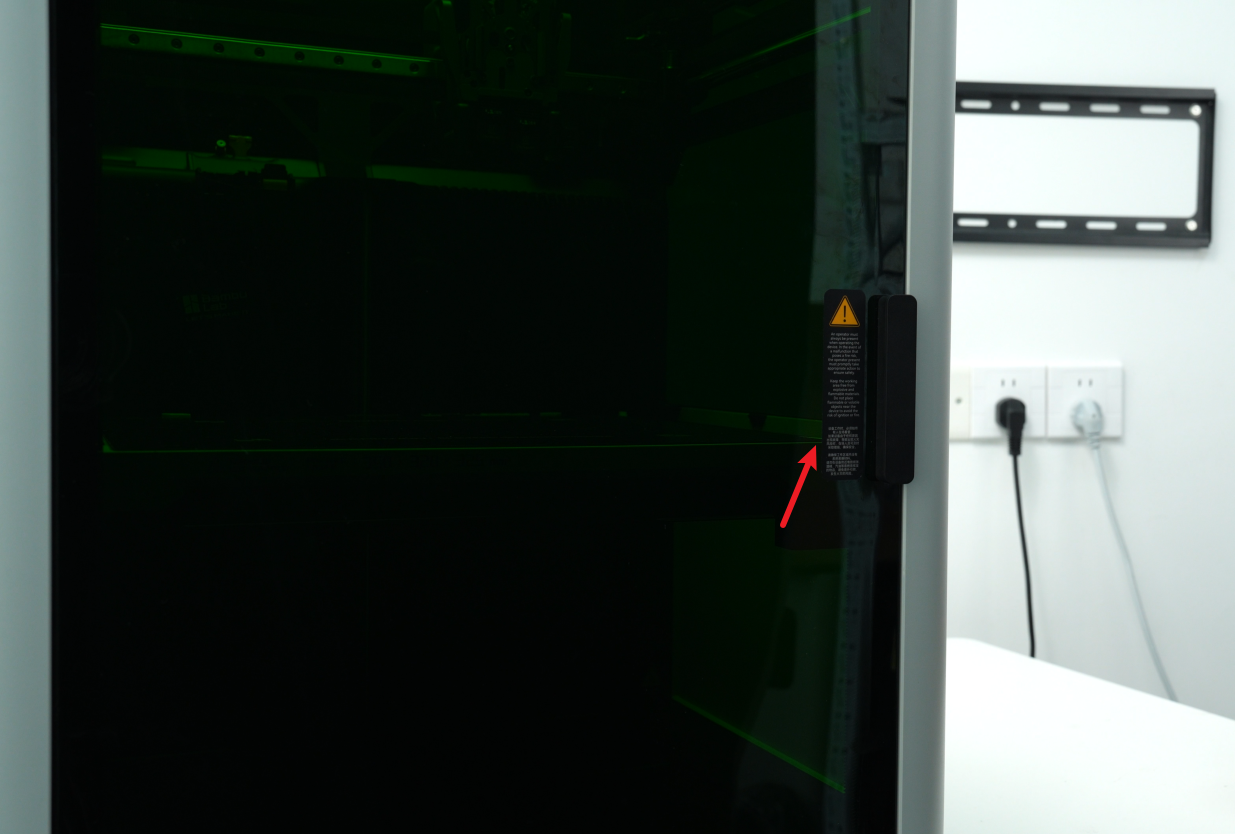
¶ Q: There are many stickers on the printer body, as shown in the picture below. Can I tear them off?
It is strongly recommended that you do not tear off these stickers because they are used to remind you of safe operation. In addition, the adhesive backing of these stickers has not been specially treated. If they are not removed properly, residual adhesive may be left, affecting the appearance.
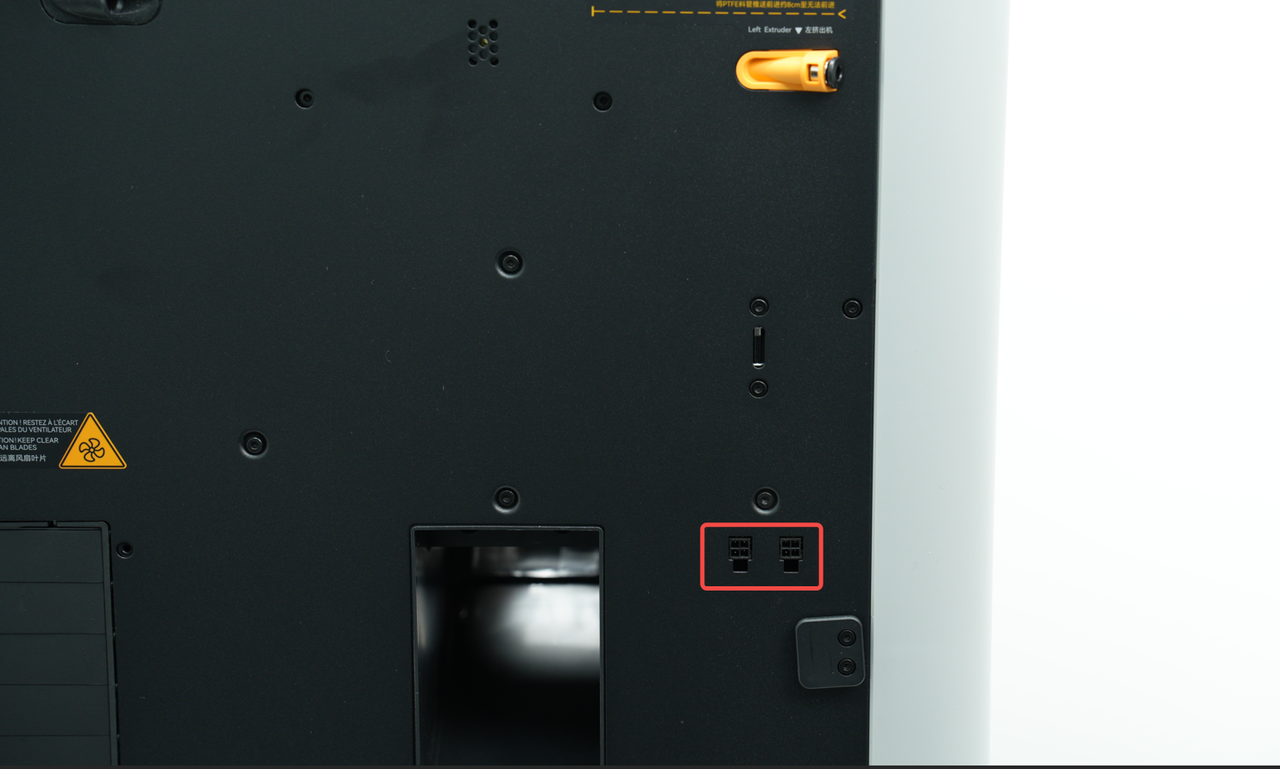
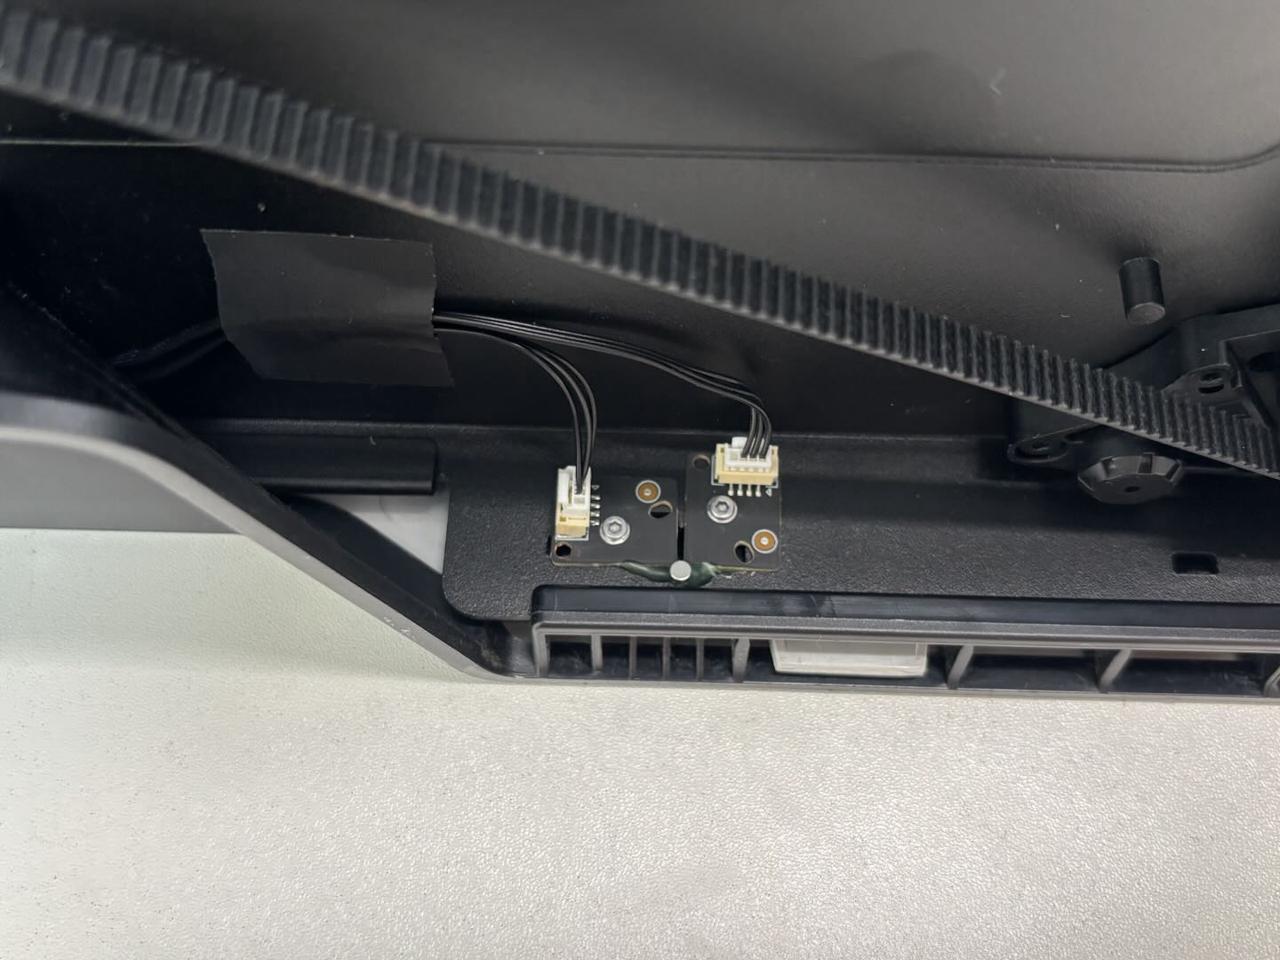
¶ Q: AMS 2 Pro is directly connected to the printer via a 6-pin interface, so what are the 2 remaining 4-pin interfaces on the back of the printer used for?
These two free 4-pin ports are reserved for possible future expansion accessories. For example, if a non-laser version of the printer is to be upgraded to a laser version, one of the ports can be used to connect an external air pump.
¶ Q: After connecting the laser module, the automatic top vent near the screen opens, but when the printer is turned off, the automatic vent is not closed. How should I close the top automatic vent?
You can select the "Heating mode" on the screen, Bambu Handy or Bambu Studio, so that the automatic top vent will automatically close. Please note that if you select the "Heating mode" but do not set the chamber temperature, the chamber temperature heater will not start heating.
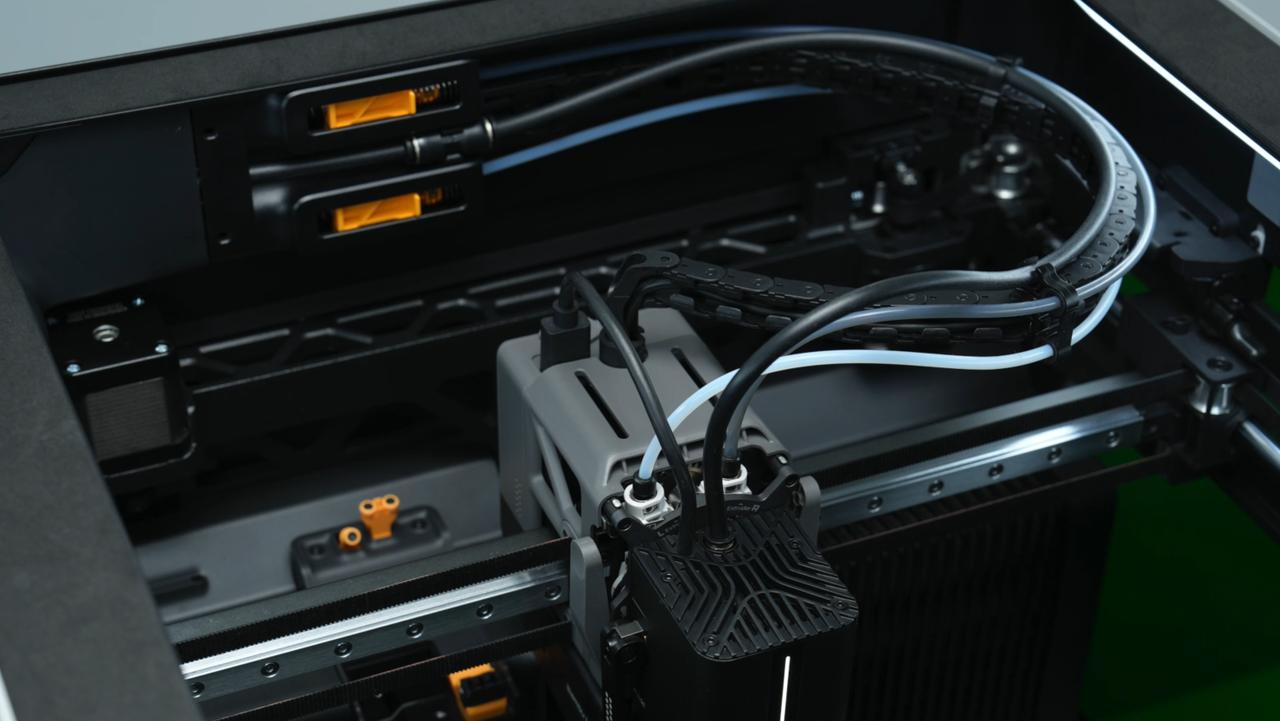
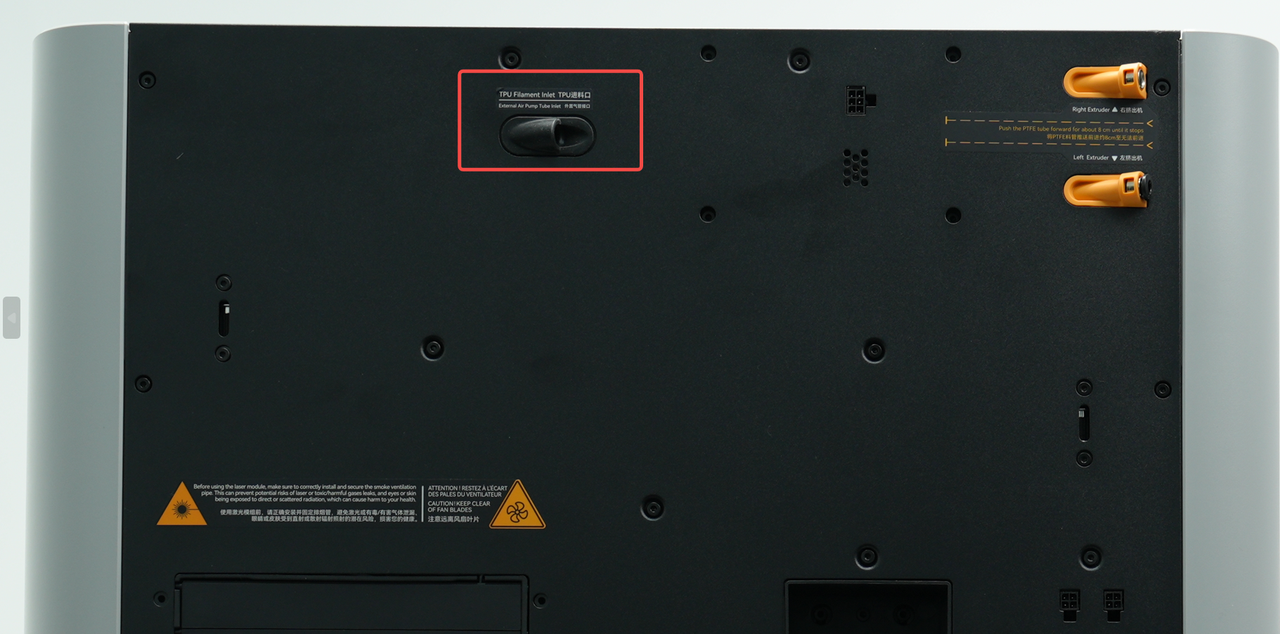
¶ Q: When unpacking the H2DL, there is a black PU air assist tube in the box. What is its function?
This black PU air assist tube is used to connect the air pump and the laser module. To facilitate the disassembly and assembly of the tube, a laser air assist tube connector is designed at the buffer.
 |
 |
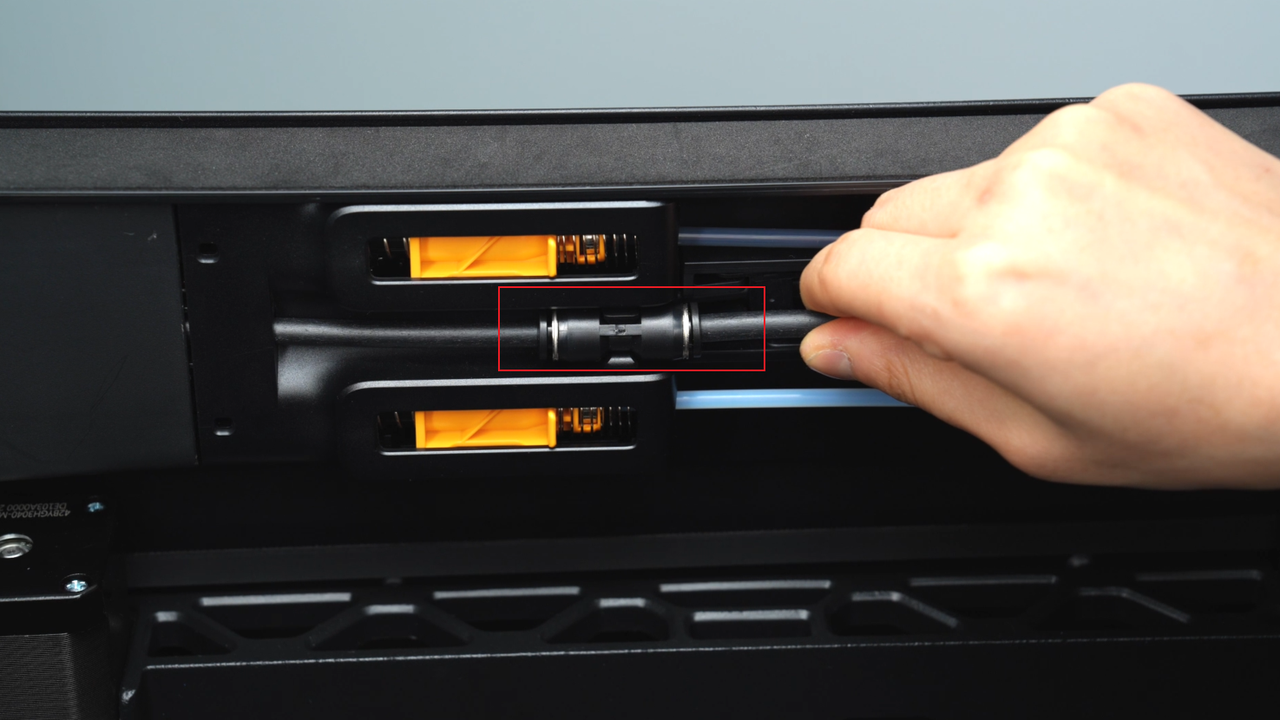 |
Connecting this tube is one of the steps to install the laser module. The printer is not pre-installed with this tube when it leaves the factory, because we do not recommend installing this tube when the laser function (such as printing and cutting) is not in use, so as not to affect the movement of the toolhead.
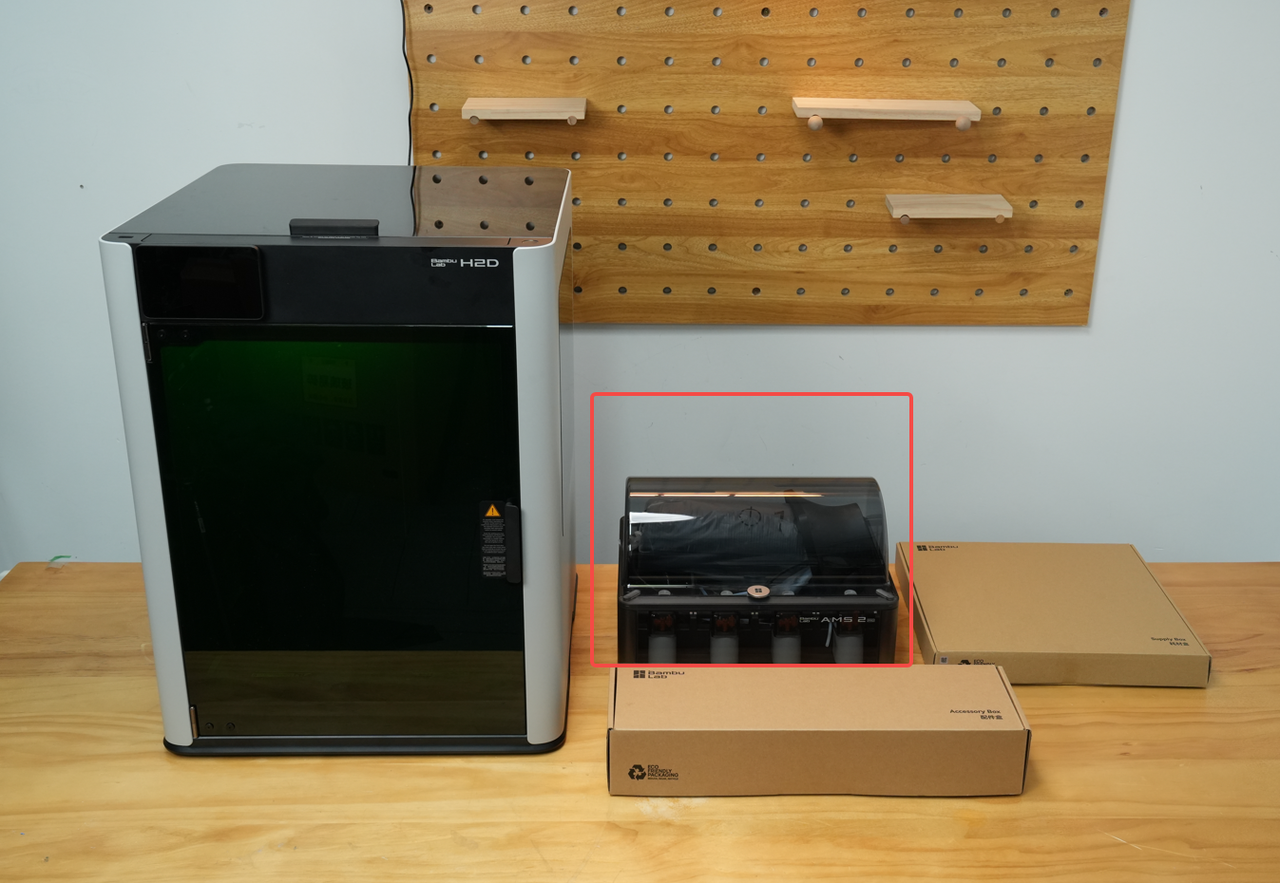
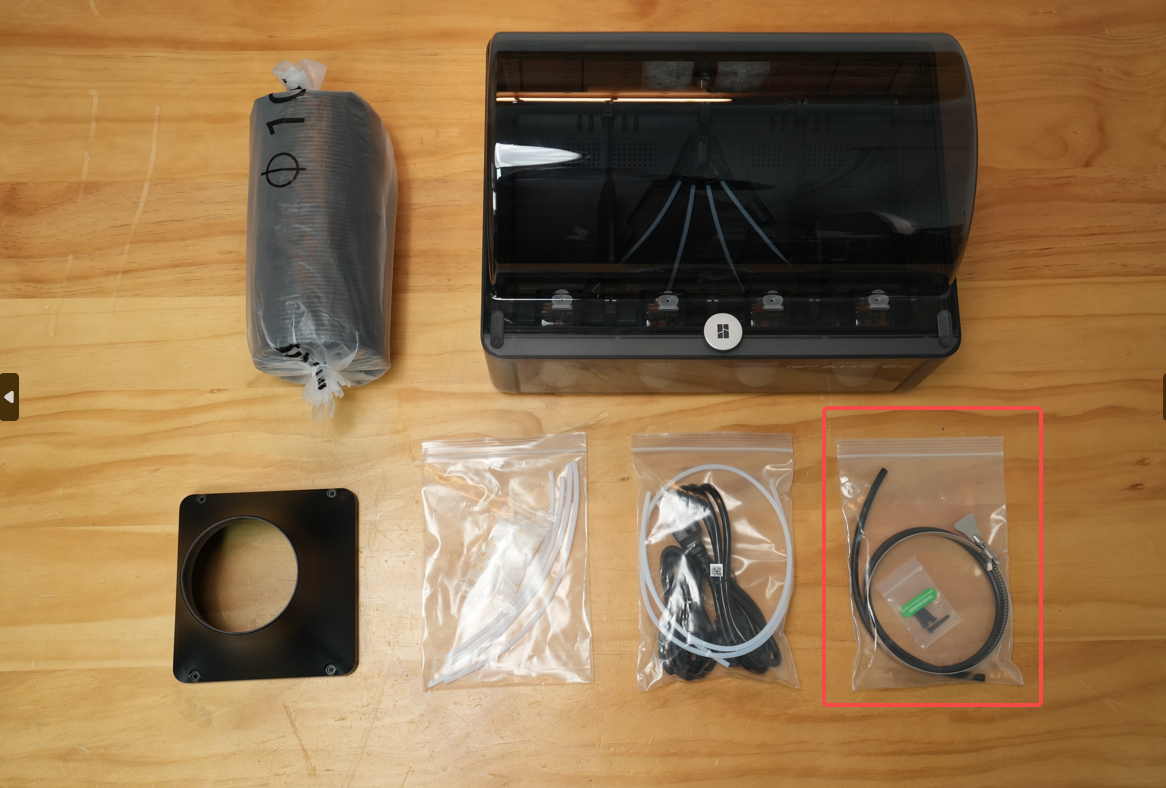
¶ Q: I purchased the H2D laser version, but I did not see the installation screws for the exhaust pipe adapter in the accessory box. Where are they
The four screws are placed in a small self-sealing bag, along with the clamp and air pump tube, which are then packed together in a larger self-sealing bag inside the AMS packaging box. Since the installation of the exhaust pipe requires the use of the adapter, screws, and clamps, the screws and clamps have been placed in the same self-sealing bag.
 |
 |
¶ Q: How to connect the air assist tube and air pump?
The laser air pump is divided into built-in version and external version. When the product was first released, we only launched the laser version H2D with built-in laser air pump. If you purchase the non-laser version of H2D, you can wait until we release the H2D laser upgrade kit before purchasing (time to be determined, expected to be a short time after the product is first released). At that time, we will also provide the operation guide and connection method of the upgrade kit.
 |
 |
¶ Q: What is the function of the laser air pump?
The laser air pump provides high-pressure airflow during laser cutting to blow away the smoke generated during the cutting process, prevent the cutting edge of the material from being blackened, prevent fire, and protect the laser head lens from being polluted by smoke. When used in conjunction with the automatic top vent, filter switch flap, chamber exhaust fan, active chamber exhaust, ventilation pipe adapter and smoke ventilation pipe, the smoke generated by laser cutting will be discharged out of the chamber through the printer's chamber exhaust fan. For more exhaust pipe installation instructions, please refer to: Install Smoke Ventilation Pipe.
 |
 |
 |
 |
 |
 |
It should be noted that since smoke and dust cannot be completely discharged from the chamber, these substances will gradually accumulate inside the chamber as the cutting time increases. Therefore, regular maintenance is important, otherwise, it may seriously affect the performance of printing and laser cutting. In severe cases, it may even cause equipment failure and malfunction. Please refer to the relevant documents for specific maintenance suggestions:
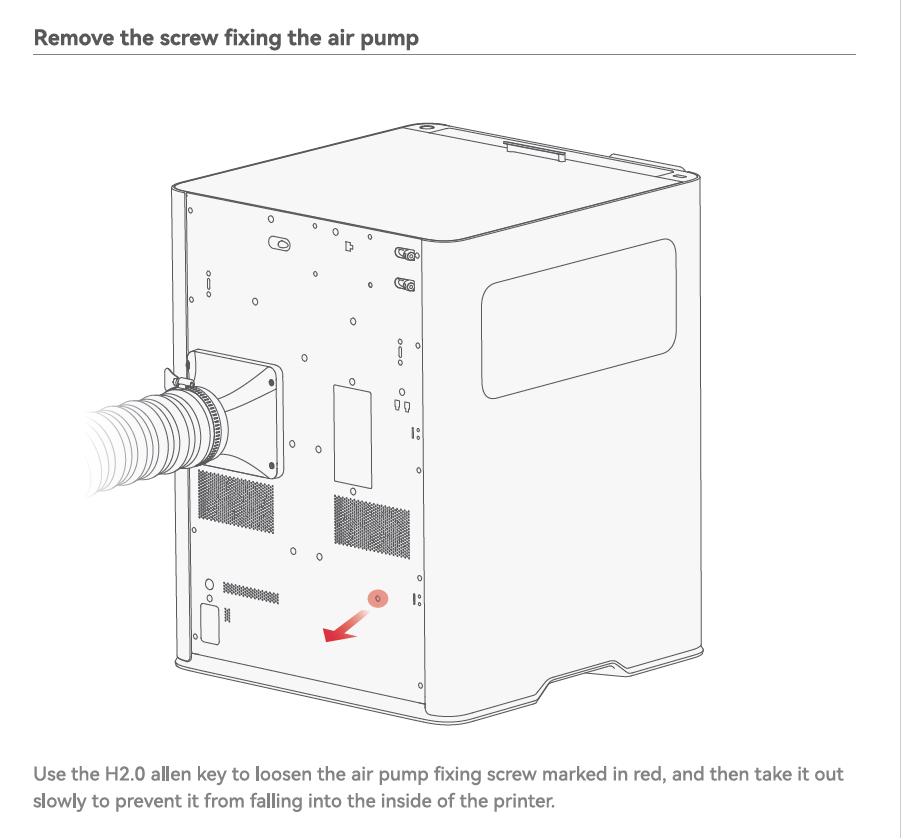
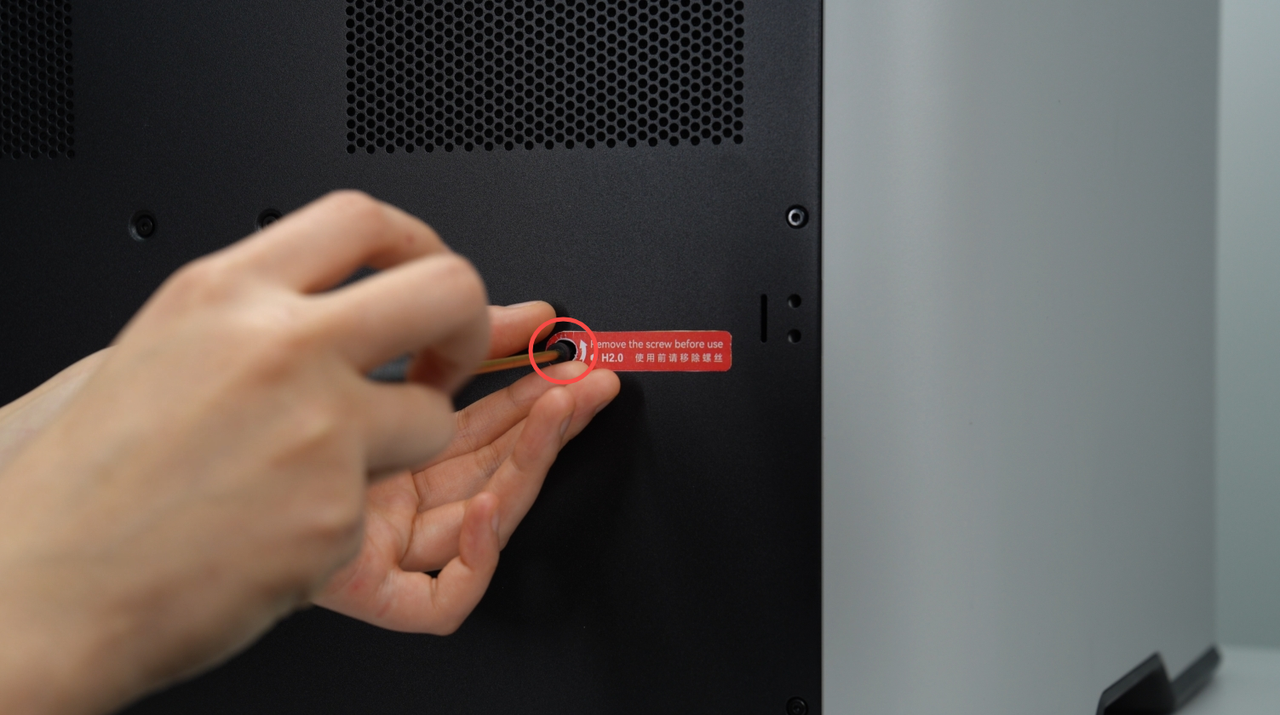
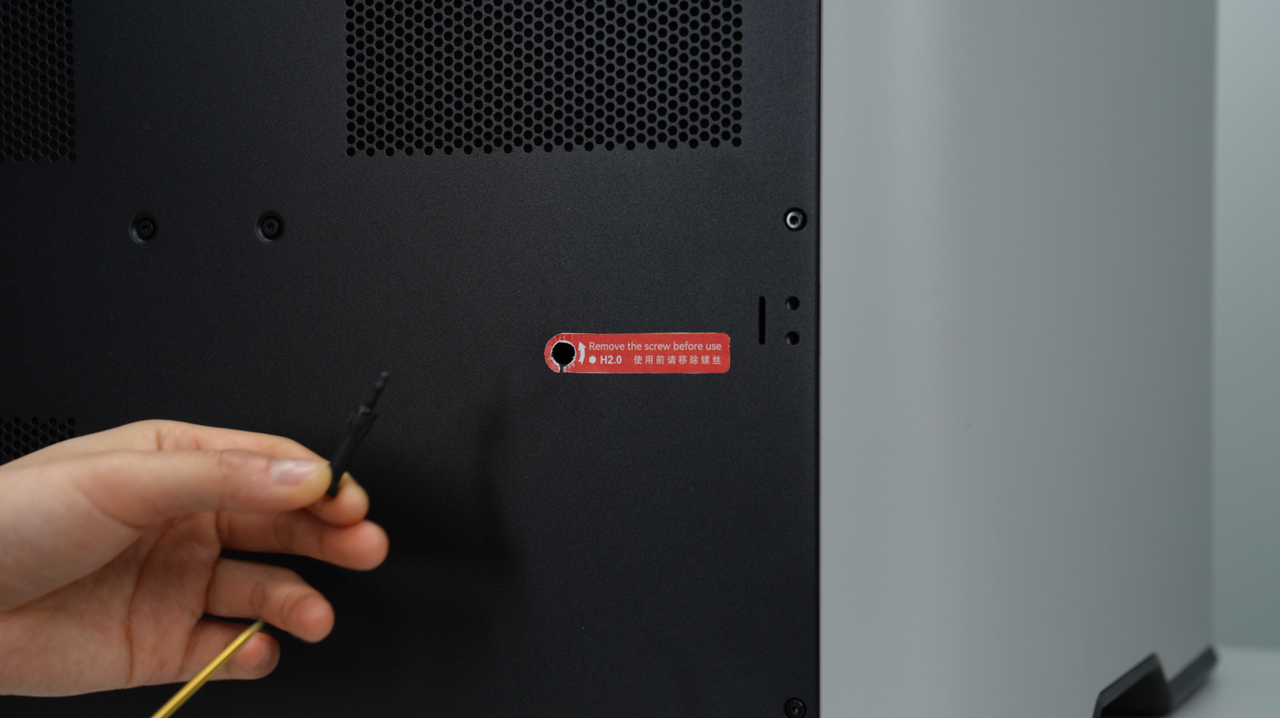
Note: For transportation purposes, the air pump is fixed with a screw. When unpacking, please unscrew the air pump fixing screw. The operation method is to use an H2.0 Allen key to unscrew the air pump fixing screw marked in red. After seeing the screw head, catch the screw with your hand and slowly remove the screw to avoid dropping it into the printer.
 |
 |
¶ Q: I see there is a separate power port on the AMS (in addition to the 6-pin), but did not receive a power cable. Is this necessary for any functionality? If so, how do I get a power cable?
When H2D is used with one AMS 2 Pro, all functions including automatic feeding and drying are used without an external power supply.
When H2D is used with more than one AMS 2 Pro, if the second and other AMS 2 Pro are dried at the same time, external power supply is required, but the automatic feeding function is still completed by the 6-pin cable.
Because the power of H2D can only provide power for drying function of one AMS 2 Pro.
If you use only the automatic feeding function when X1/P1 is used with one AMS 2 Pro, only 6pin cable is needed, and no external power adapter is needed. But if you need to use the drying function, you need to connect an external power supply to AMS 2 Pro.
Because the power of X1/P1 does not support the power supply for drying function of AMS 2 Pro.
You can buy power adapter at the Bambu Lab official store.
¶ Is it normal when the Y-axis to homing, Y carriage collides with the cutter lever stopper? Why is there a collision sound during the homing?
This action and the collision sound are regular. To ensure the heatbed has a complete printing area, the cutter stopper of the H2D is designed to be hidden. When cutting filament is needed, the Y carriage automatically triggers the cutter lever stopper to extend and complete the cutting. When the tool head homing, the Y carriage will pass the trigger position of the cutter lever stopper, causing it to be activated, which is a normal occurrence. During normal printing, if there is no filament change involved, the cutter lever stopper will not be triggered.
¶ Product features related
¶ Q: Why is a prime tower needed for dual-hot-end dual-color printing?
During the movement of the tool head or when switching between dual hotend, the nozzle may still have some residual filament. Enabling a prime tower helps clean the residue on the nozzle and stabilizes the internal chamber pressure. This way, when printing continues, surface defects on the printed model can be avoided.
¶ Q: Can I turn off the chamber LED while printing?
You can turn off the chamber LED while printing, but please note that doing so may lead to false detections by the AI function. In particular, turning off the chamber LED after the printing has started may affect exposure, as the external lighting environment has changed significantly. We will continue to optimize our AI detection capabilities.
¶ Q: There are several types of heatbed leveling for printers. What are the differences between them?
¶ Auto bed leveling on the Print calibration page
- Heat the nozzle to 140°C;
- With the bed at room temperature, perform an 8×8 point leveling using the right nozzle;
- Heat the bed to 55°C, then perform another 8×8 point leveling with the right nozzle;
- Continue with a 22×22 point leveling using the right nozzle;
- Finally, switch to the left nozzle and perform an 8×8 point leveling.
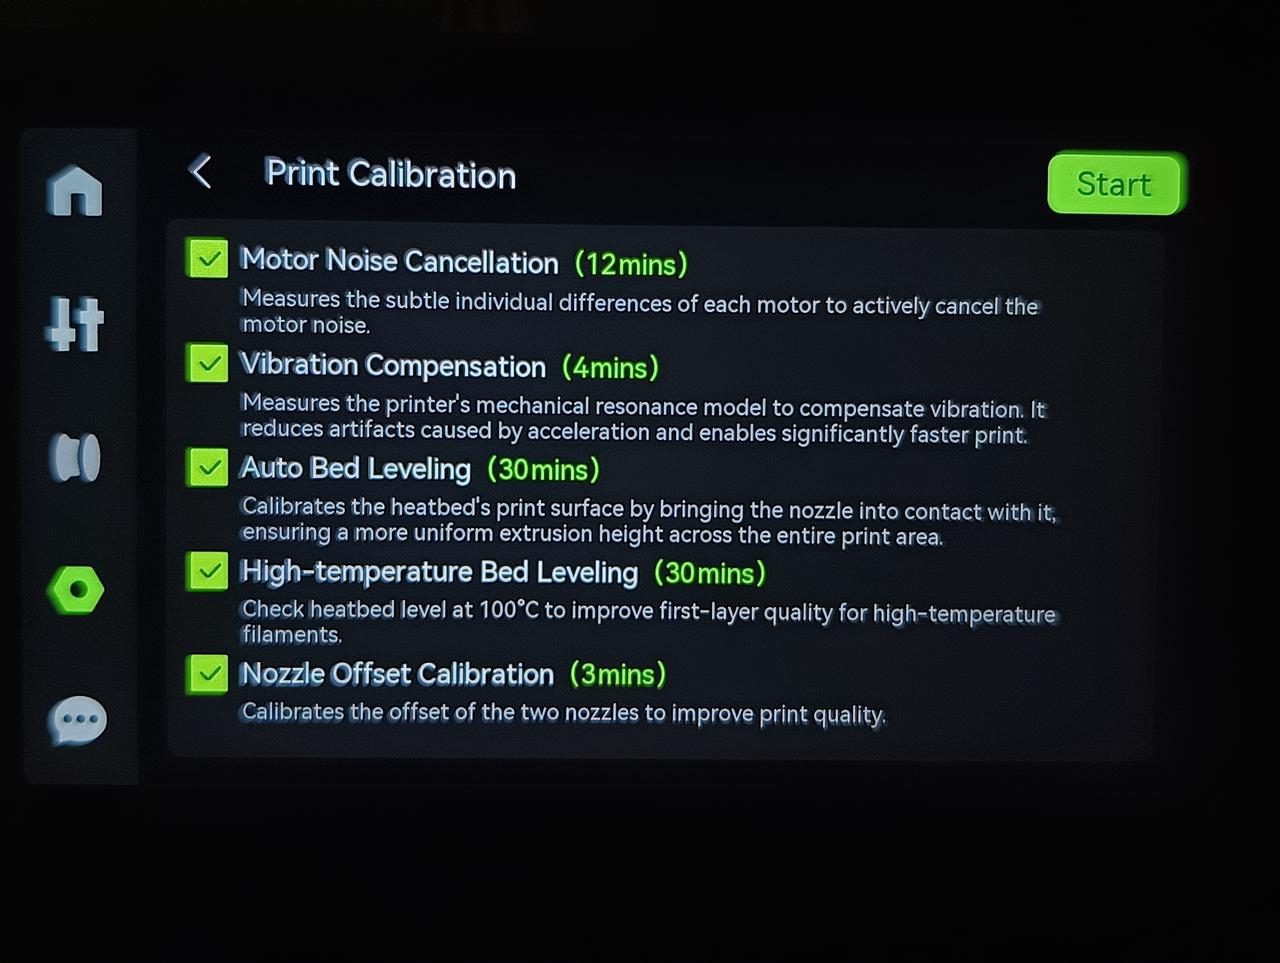
¶ High-temperature bed leveling on the Print calibration page
1. Heat the bed to 100°C while heating the nozzle to 140°C;
2. Use the right nozzle to perform the following leveling steps:
- 8×8 point leveling
- 22×22 point leveling
Note: The high-temperature bed leveling data will be automatically applied when the bed temperature during the print job is ≥ 80°C. Suppose you have replaced, disassembled, or manually leveled the bed. In that case, it is recommended to run both Auto Bed Leveling and High-Temperature Bed Leveling again on the Print Calibration page to ensure the machine obtains accurate bed plane data.
¶ Auto Bed leveling before printing
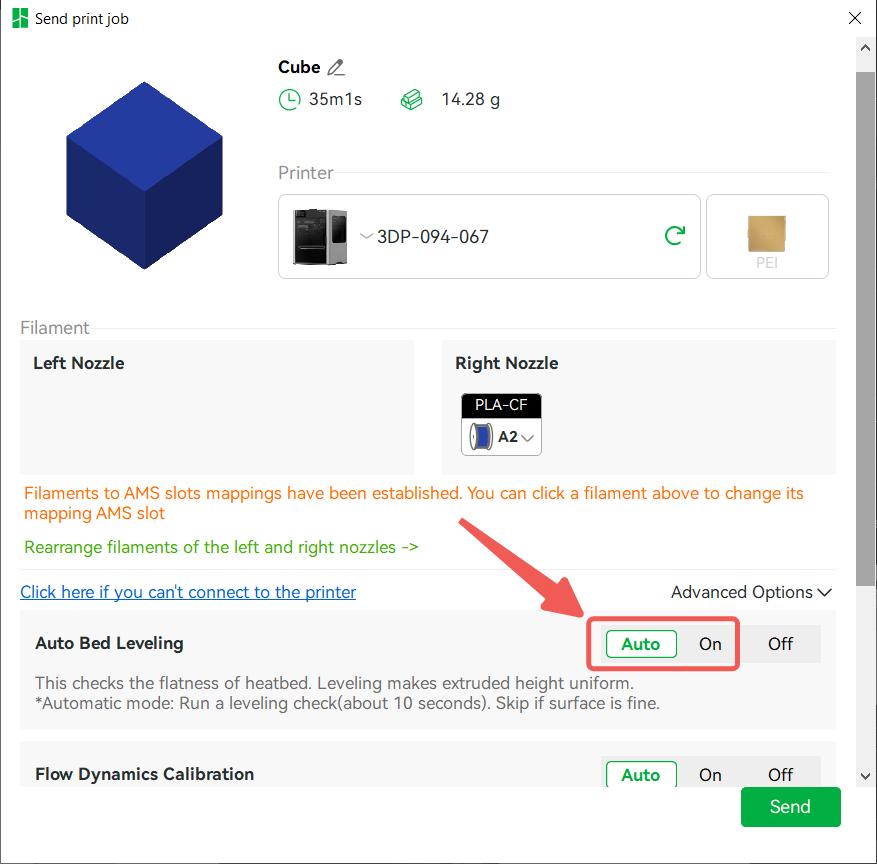
When "Auto" mode is selected:
Before printing, a 5-point touch test will be performed on the corresponding areas of the model contour to determine whether partial leveling is needed.
- If partial leveling is required, use the 8×8 leveling points that cover the model's projection contour on the bed for leveling.
- If not required, skip the partial leveling step.
When "On" mode is selected:
- Directly perform partial leveling on the model contour area on the print bed.
Note: The partial leveling data and calibration leveling data (including Auto Bed Leveling and High-Temperature Bed Leveling) will be stored in the printer. During printing, the system will automatically combine and apply both sets of leveling data. This data remains effective until a new corresponding leveling task is performed to update it.
- Auto Bed Leveling during the unboxing process
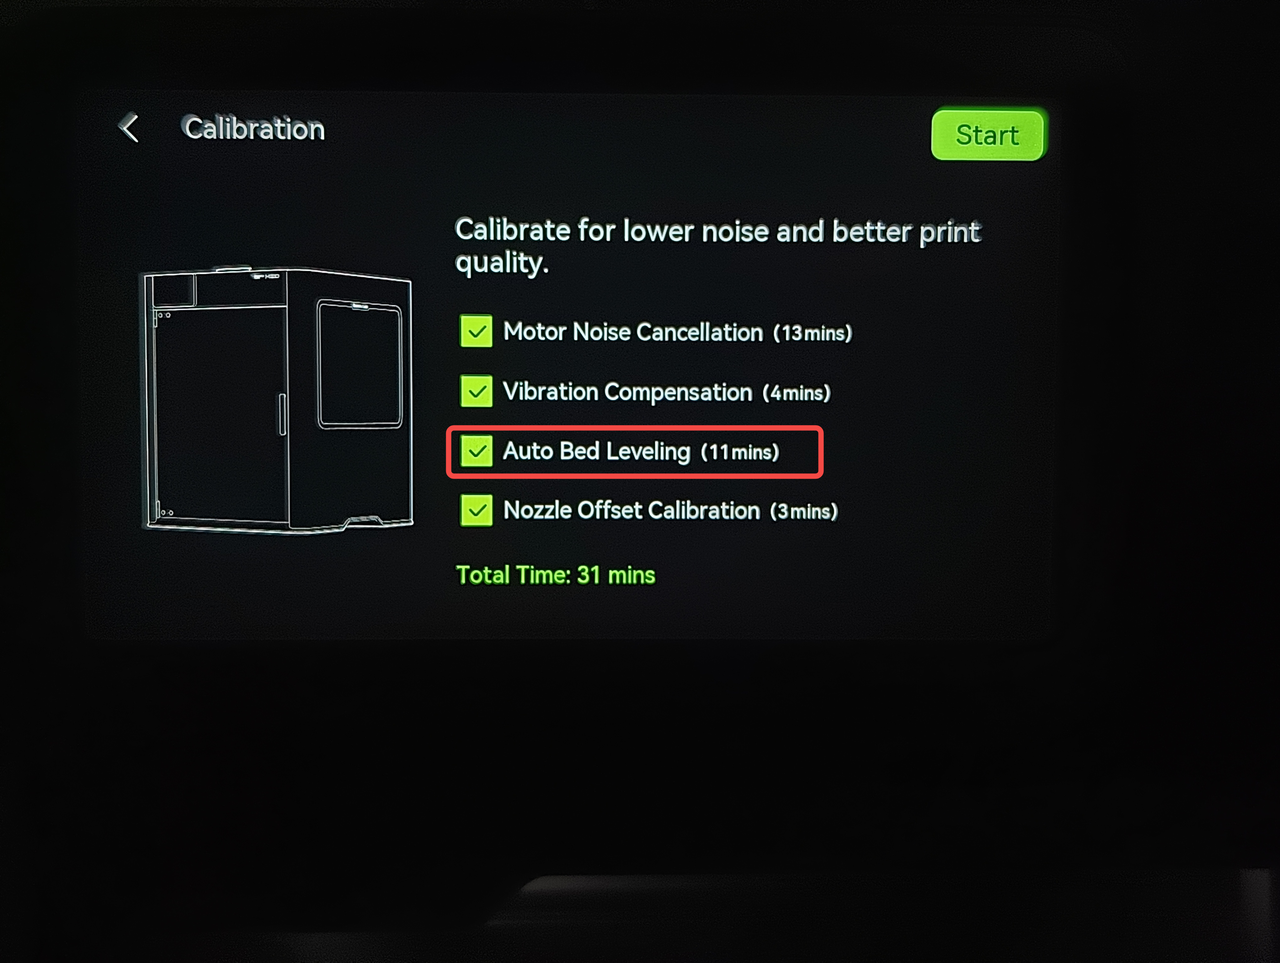
1. Initial Leveling:
- Heat the nozzle to 140°C;
- With the bed at room temperature, perform an 8×8 point leveling using the right nozzle.
2. Post-Heating Leveling:
- Heat the bed to 55°C;
- Perform another 8×8 point leveling using the right nozzle.
3. Nozzle-Switching Leveling:
- Switch to the left nozzle and perform an 8×8 point leveling again.
¶ Q: Why does the high-precision nozzle offset calibration not include the Z direction? Is it more risky than the normal calibration?
The high-precision nozzle offset calibration uses the toolhead camera visual recognition solution, which scans the printed pattern on the XY plane to identify and calibrate the offset, so it is impossible to calibrate the offset in the Z direction. However, the ordinary nozzle offset calibration (eddy current coil calibration solution) already includes the offset calibration in the Z direction, so as long as the ordinary nozzle offset calibration is performed, the offset data in the Z direction can continue to be used without any additional risks.
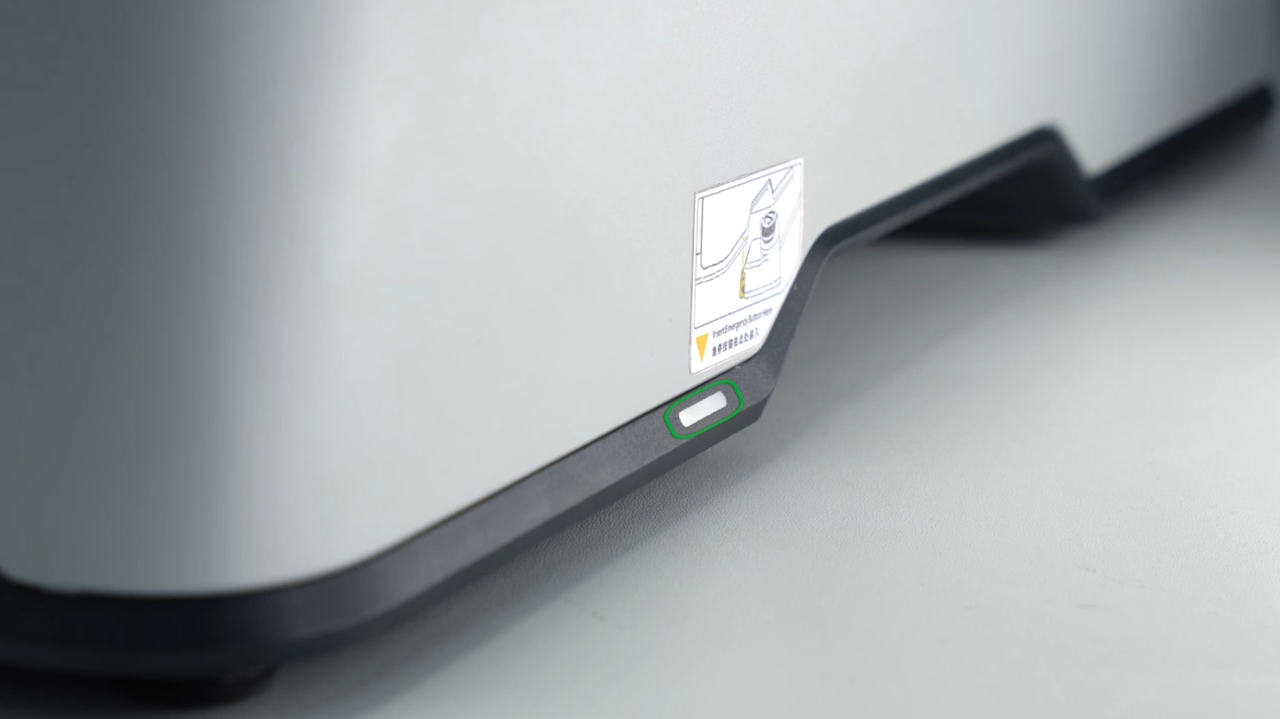
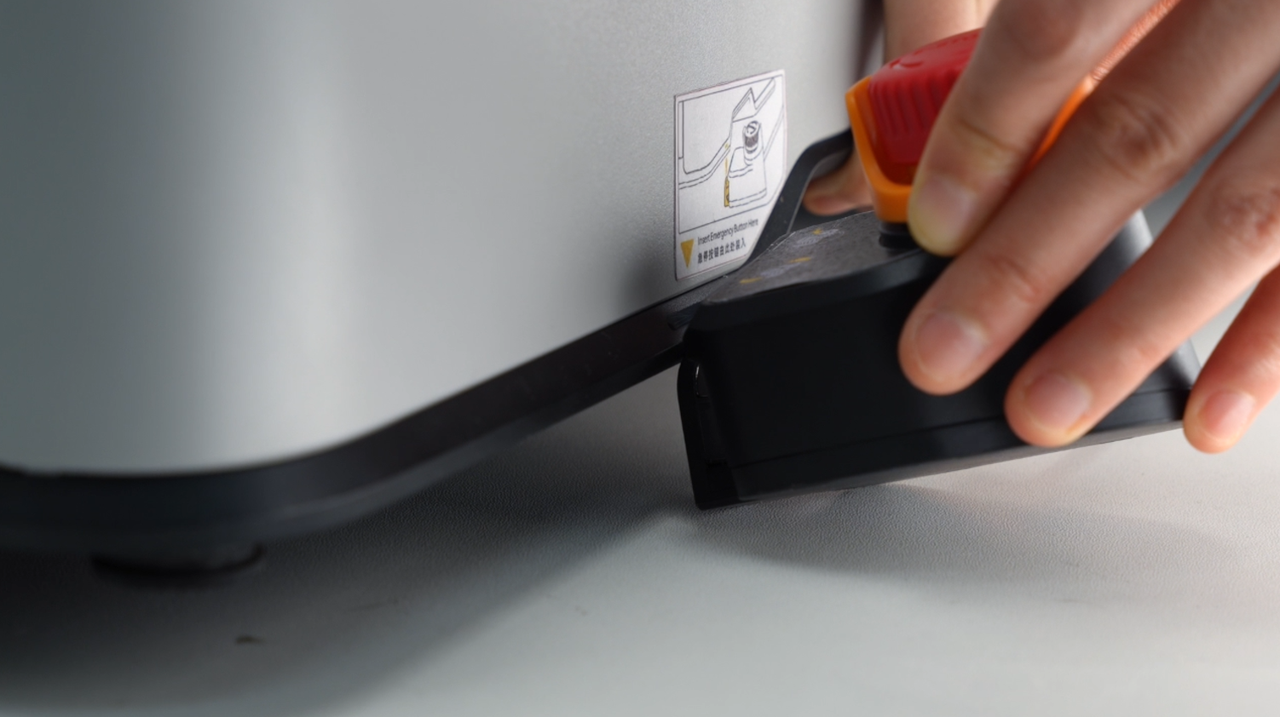
¶ Q: Can I change the installation position of the emergency stop button?
Due to safety regulations, the emergency stop button for the laser function can only be installed in a specific location. The printer has a Hall effect sensor installed at the corresponding position for the emergency stop button. If you install it in another location, the system will think that the emergency stop button is installed incorrectly or is not installed at all .
If you are only using the printing or blade cutting functions, you do not need to install the emergency stop button.
 |
 |
¶ Appendix
H2S and H2D share the same printer framework, and apart from the toolhead, the other components are very similar. Therefore, you can also refer to the H2S FAQ for more information on parts other than the toolhead.
¶ End Notes
We hope the detailed guide provided has been helpful and informative.
If this guide does not solve your problem, please submit a technical ticket, we will answer your questions and provide assistance.
If you have any suggestions or feedback on this Wiki, please leave a message in the comment area. Thank you for your support and attention!