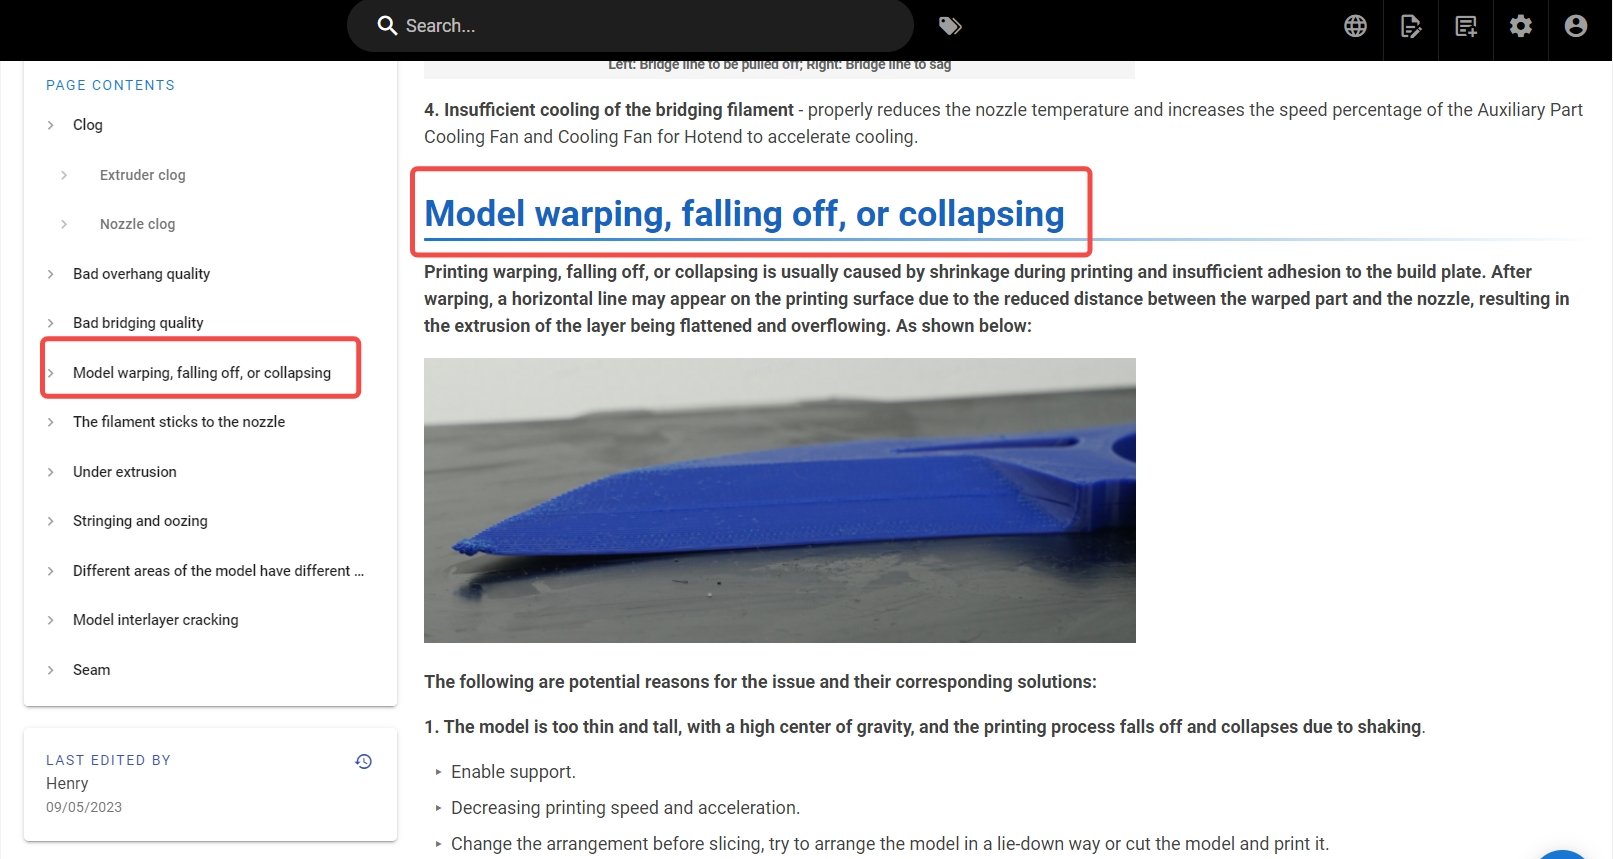
¶ Common Problems
Printing with engineering materials like ABS, ABS-GF, ASA, PC, PA, PA-CF, PA6-CF,PVA,TPU, PA6-GF, PAHT-CF, PET-CF, PPA-CF, PPS-CF etc. can commonly encounter these issues:
- Most of these materials are prone to moisture, resulting in poor print quality (rough surface, oozing, elephant foot effect).
- It can easily cause nozzle clogging when printing these kinds of materials, especially those contain carbon fiber (CF) or glass fiber (GF).
- Potential for weak bonding between layers during the printing.
¶ Solutions and Suggestions
¶ Dry the filament
- Check if the package of the filament is intact. If not, please dry it before printing. Please visit this wiki to learn more: Filament Drying Recommendations.
- Dry the filament before printing as long as you are not sure if the filament is damp.
- Drying condition for Bambu PA6-CF、PA6-GF、PAHT-CF and other engineering materials: 80℃, at least 8 hours. To know more about filament drying, please refer to: Filament Drying Recommendations.
- If you use the printer's heat bed for drying, it needs at least 10 hours at 90 ℃ (you need to turn the filament roll over halfway, please refer to Procedure and 3mf file for drying filament with the X1C printer | Bambu Lab Wiki ). A comparison of the print quality before and after drying:
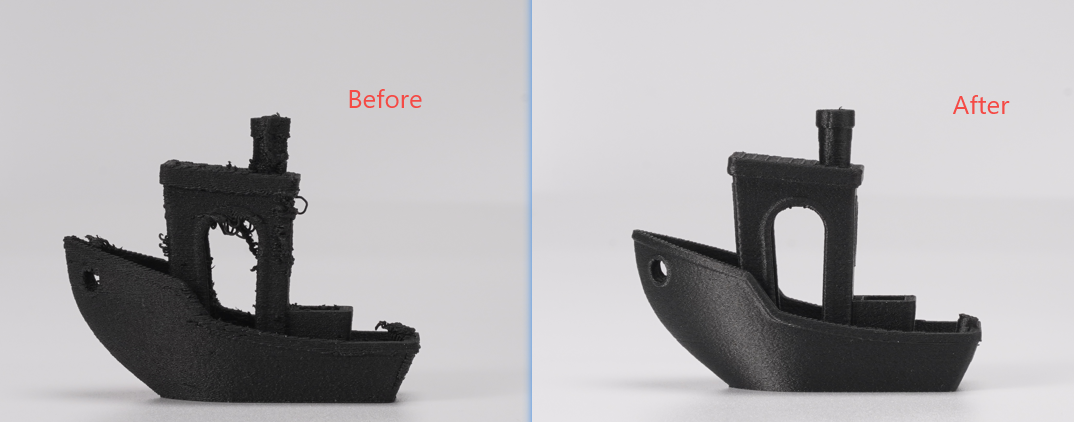
Wet PAHT-CF (Left) VS Dry (Right) PAHT-CF
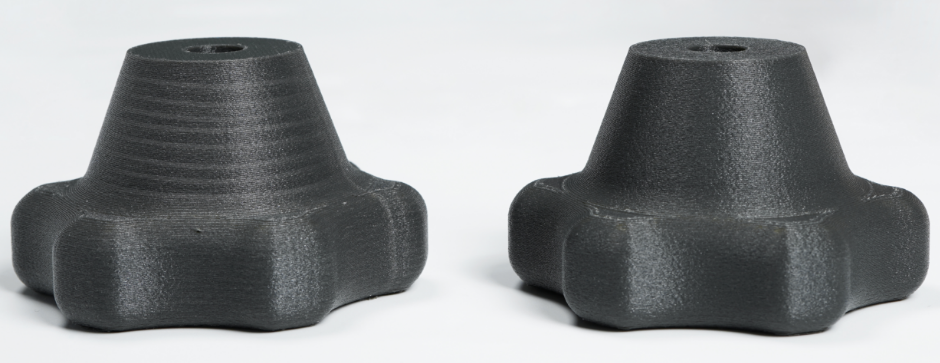
Wet PA6-GF (Left) VS Dry (Right) PA6-GF
¶ Drying Recommendations
The recommended drying parameters for each type of filament are listed as follows:
| Filament | Drying Requirement before Use | Requirement of Protecting Filament with Desiccant during Use | Blast (Forced Air) Drying Oven | Bambulab X1/X1C/P1S Printer | ||||
|---|---|---|---|---|---|---|---|---|
| Temperature / ℃ | Time / h | Bed Temperature / ℃ | Time / h | Turning-over Time / h | Cover | |||
| --- | --- | --- | --- | --- | --- | --- | --- | --- |
| PLA, PLA-CF/GF | Recommended | Optional | 50 - 60 | 8 | 65 - 75 | 12 | Every 6 | Filament package box or PC Box |
| PLA Wood | Required | Required | 55 - 65 | 8 | 70 - 75 | 12 | ||
| Support for PLA、Support for PLA/PETG | Recommended | Optional | 50 - 60 | 8 | 65 - 75 | 12 | ||
| PETG, PETG-CF | Recommended | Optional | 60 - 70 | 8 | 75 - 85 | 12 | ||
| ABS, ASA | Recommended | Optional | 75 - 85 | 8 | 90 - 100 | 12 | ||
| TPU | Required | Required | 65 - 75 | 8 | 80 - 90 | 12 | ||
| PC | Required | Required | 75 - 85 | 8 | 90 - 100 | 12 | ||
| PVA, BVOH | Required | Required | 75 - 85 | 8 - 12 | 90 - 100 | 12 | ||
| Support for PA/PET | Required | Required | 75 - 85 | 8 - 12 | 90 - 100 | 12 | ||
| PA, PA-CF/GF, PAHT-CF/GF, PET-CF, etc. | Required | Required | 75 - 85 | 8 - 12 | 90 - 100 | 12 | ||
| PPA-CF/GF | Required | Required | 100 - 130 | 8 - 12 | 110 - 120 (the maximum) Less drier than using an blast drying oven |
12 | ||
| PPS, PPS-CF/GF | Required | Required | 110 - 140 | 8 - 12 | 110 - 120 (the maximum) Less drier than using an blast drying oven |
12 | ||
| Support for ABS | Optional | Optional | 80 | 4 | 85 - 95 | 6 | Every 3 |
¶ Keep the filament dry
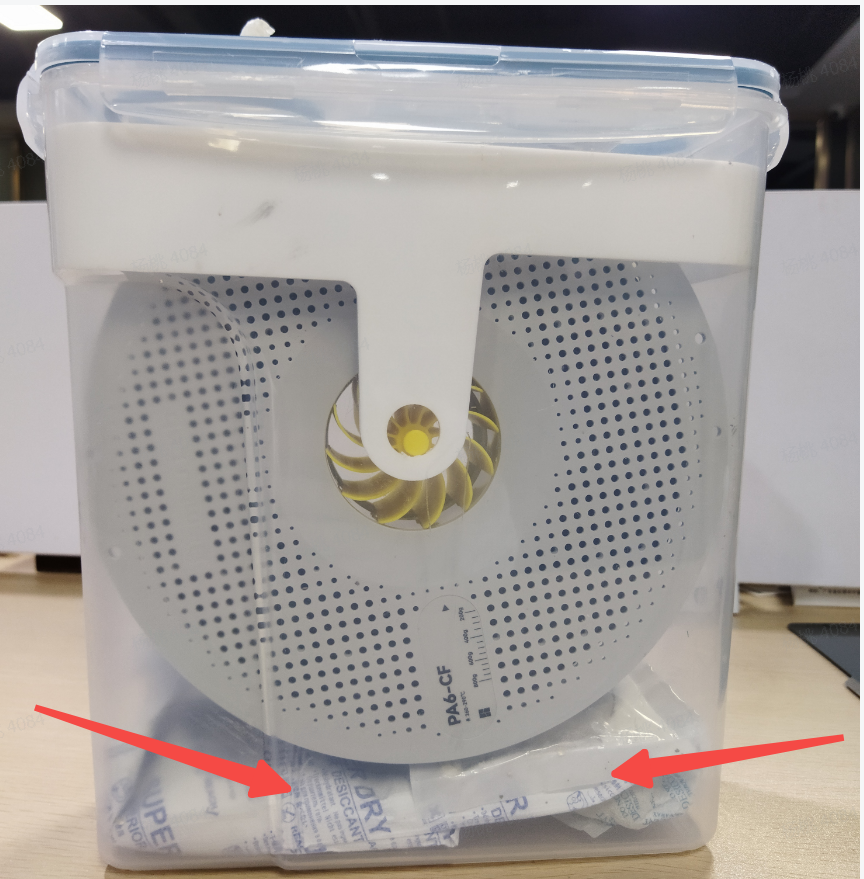
- After drying the filament, please store it in an airtight container/bag with effective desiccant. This will help keep the filament dry for about 1 to 2 weeks. If using AMS for storage, ensure the desiccant's effectiveness and securely fasten the AMS. Should the desiccant show signs of ineffectiveness (changing from powdery to lumpy or pasty), replace it and dry the filament before the next print.
- We recommend using a sealed container like the one shown in the image below. This can keep the filament dry when not in use.
The state of AMS desiccant:
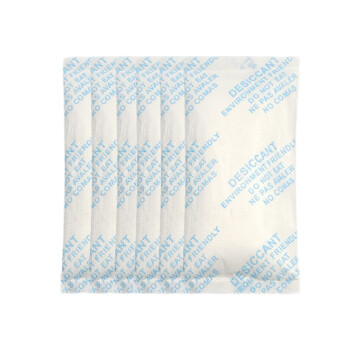
Packaging of Desiccant
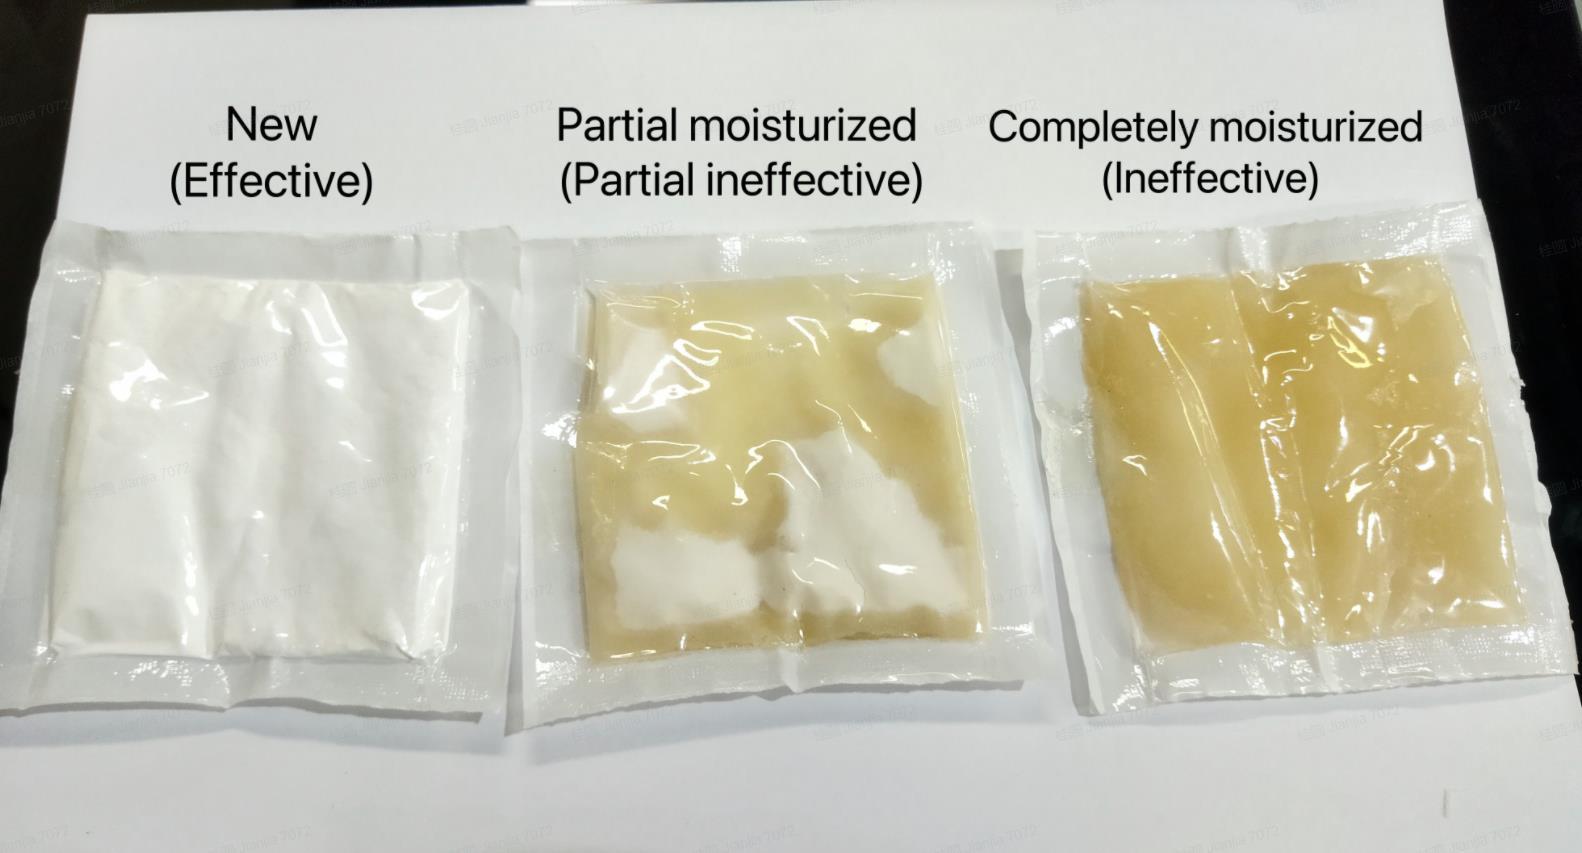
Different States of Desiccant
¶ How to be successful when printing?
¶ Use Larger Nozzles
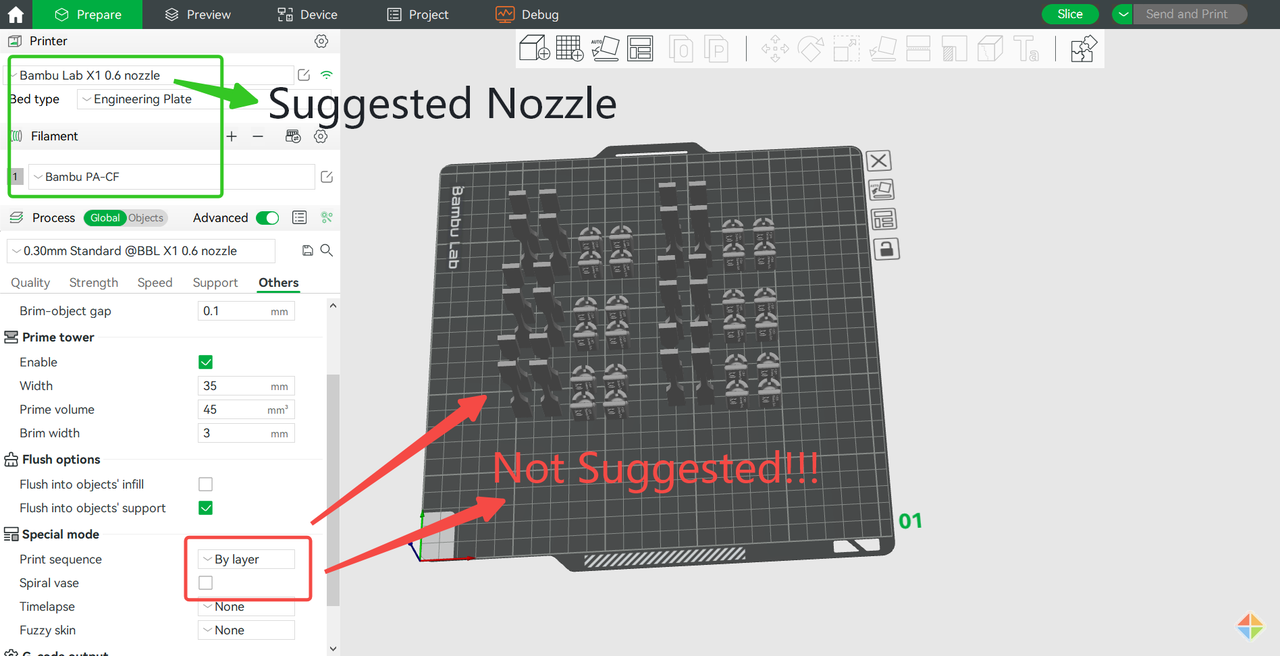
When printing carbon fiber or glass fiber-reinforced engineering materials like PA-CF/GF, PAHT-CF/GF and PET-CF/GF, avoid using a 0.2 mm nozzle to minimize the risk of clogging. Increasing nozzle diameter from 0.4 mm to 0.6 mm and then to 0.8 mm sequentially reduces printing precision, but it also decreases the possibility of clogging. Therefore, the recommended nozzle sizes are 0.6 mm as the primary choice and 0.4 mm as the secondary choice (with a suggested layer height between 0.15 and 0.3 mm, and a maximum printing speed of approximately 100 mm/s). Before using these materials, set the nozzle temperature to 280 °C, and clean the nozzle interior using an Allen key and needle to reduce the risk of clogging during printing.
Do the same if the nozzle gets clogged during printing, and make sure the inside of the nozzle is clean before the next printing. If the nozzle is clogged, please refer to Nozzle clogs | Bambu Lab Wiki to clean it.
¶ Group models
When the time of printing each layer is too long, these materials' Z direction bonding will get weak and the small models will be no longer strong(the previous layer has been over-cooled). So, when you need to print many small models, you should assemble them into different groups and print by object(default setting is by layer), and maybe on different plates, rather than put them on the same plate and print by layer.

Hold down Ctrl, select several models with the left mouse button and then right-click to select "Assemble" to assemble several models into one group
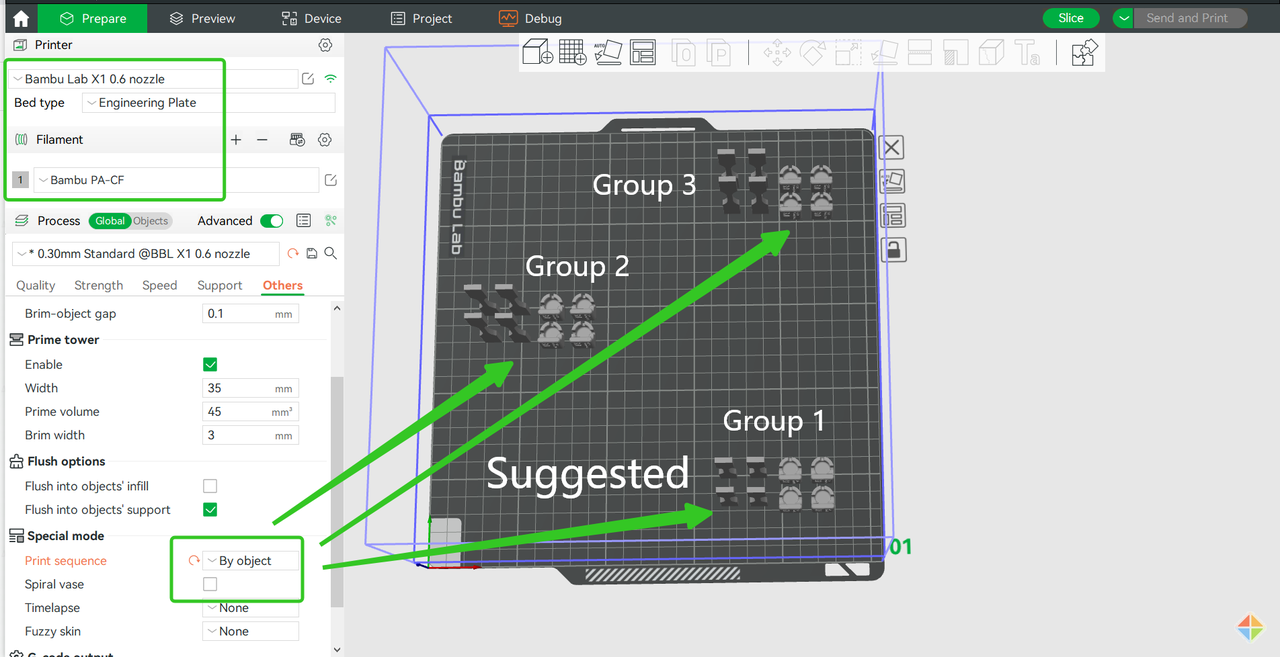
It is recommended to select "By object" in the "Print sequence".
Printing by layer is not recommended
4. To strengthen your models printed with PA-CF or other CF or GF reinforced engineering filaments, you'd better get them annealed at about 80 °C for 8 hours after printing. And the best annealing temperature of Bambu PA-CF, PET-CF, and PAHT-CF is 120 to 130 ℃ (5 - 8 hours). After that, the comprehensive mechanical properties can be improved by about 10% to 20%: the annealing effect depends on the annealing temperature and time, the size and structure of the model itself, the filling density, the wall loops and other printing settings; please note that some models may shrink and warp after annealing. To know more about annealing, please refer to: Work after Printing Finished.
5. When printing a model with support structure, it is necessary to remove the support structure within 2 hours to prevent it from being difficult to remove or remaining residues on the prints after being damp and softened, especially for body filaments like most kind of Nylon (PA) which includes PA-CF, PA6-CF, PA6-GF and etc., and support filaments like PVA and Support for PA/PET, since then tend to absorb moisture from the air. If it is difficult to remove the support because the prints have been placed for too long, please dry them, let them cool down, and then remove the support in time.
6. PA, PA-CF, PAHT-CF, PA-GF, and other PA (Nylon) materials have relatively strong water absorption capacity, and after being used in humid air or water for a period of time, their strength and stiffness may decrease to varying degrees due to absorbing water—become soft, especially for thin, slender and long prints; so, if the using scenario of the prints requires very high strength and stiffness, please avoid them. At the same time, these materials usually become tougher and more resistant to impacts, drops, and collisions when they get damp; so, if the scenario of the prints requires only moderate and not very high strength and stiffness, you can make the prints get dampened and softened before use. In addition, fully impregnating the surface of these materials‘ products with paint, wax, and other water-proof coatings can inhibit them from absorbing water and getting soft.
7. Note that when drying filaments and annealing printed models, it is recommended to use devices that can provide uniform temperatures, such as a Blast drying oven, and do not use microwave ovens or household ovens. Avoid too strong force or uneven heating (away from the oven's heating area)****, to avoid damage to the filament, spool, or model due to local overload and or overheating. To know more about the filament dry, please refer to Filament preparation -- Dry.
¶ Suggested settings
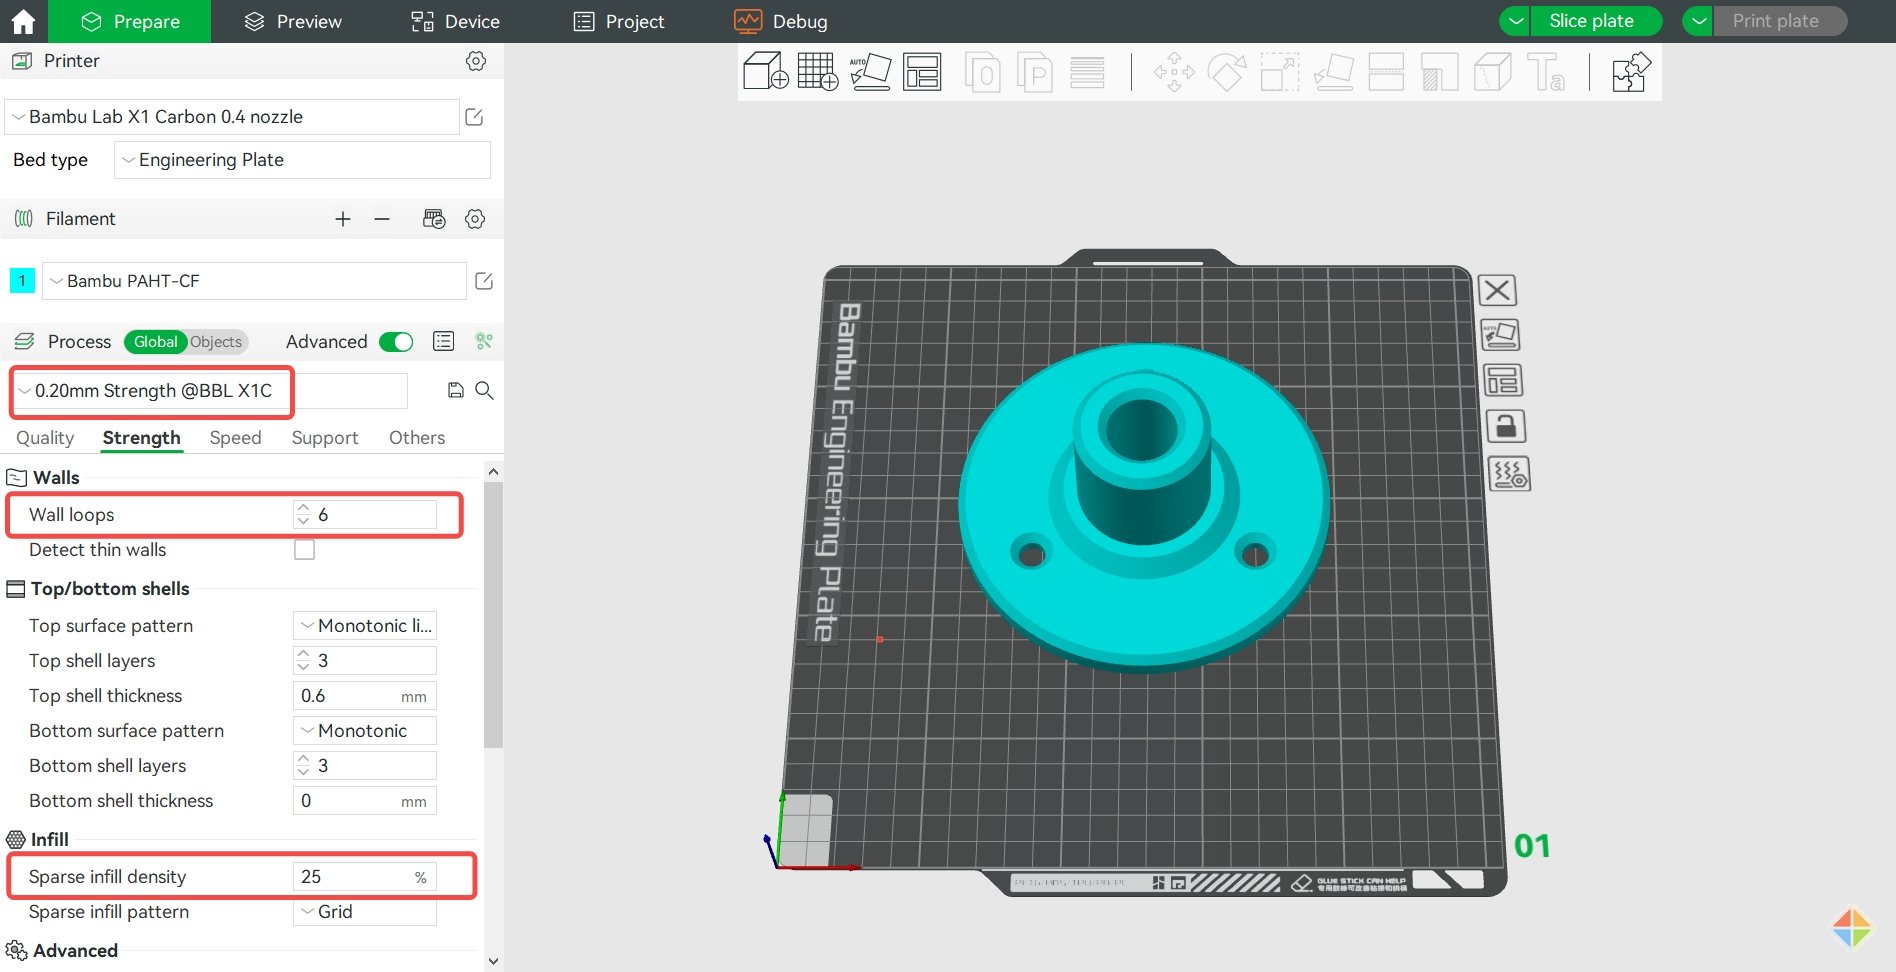
1. Generally, the higher the infill density is, the greater the strength and material consumption will be. To keep a balance between strength and material consumption, the Strength Presetting(6 Wall loops and 25% infill density) is highly suggested when printing big models that are expected to withstand high loads. Of course, if you can accept more material consumption, you can manually set a higher infill density for greater strength.
2. In general, ABS, ASA, PC and PA are prone to warp due to their own properties., so some measures need to be taken to minimize the warping. If the model size is large and the infill rate is set high, e.g. 60% (default is 15%), and warping occurs at the bottom of the model, you can adjust the infill rate appropriately. In addition, the infill pattern with more straight lines is more likely to cause shrinkage, you can change the infill pattern to spiral to reduce the risk of shrinkage. For some structural parts with high strength requirements, you can set 5 loops of walls and 25% infill rate, and try to avoid using more than 50% infill rate to reduce the tendency of shrinkage; for most non-structural parts with low strength requirements, you can directly choose the default 2 loops of walls and 15% infill rate. To get more details, you may refer to Common print quality problems and solutions.
¶ Steps for Switching Between High-Temperature and Low-Temperature Filaments
After printing with high-temperature filaments such as PAHT-CF, PET-CF, PPA-CF, PPA-GF, PPS, PPS-CF, if you want to continue printing with low-temperature filaments such as PLA, TPU, PETG, it is recommended to manually remove residual high-temperature material by adjusting the nozzle temperature. Follow the steps below:
Note: After printing, the machine will automatically retract the filament. Before switching to low-temperature filaments, make sure the high-temperature filament has been fully retracted.
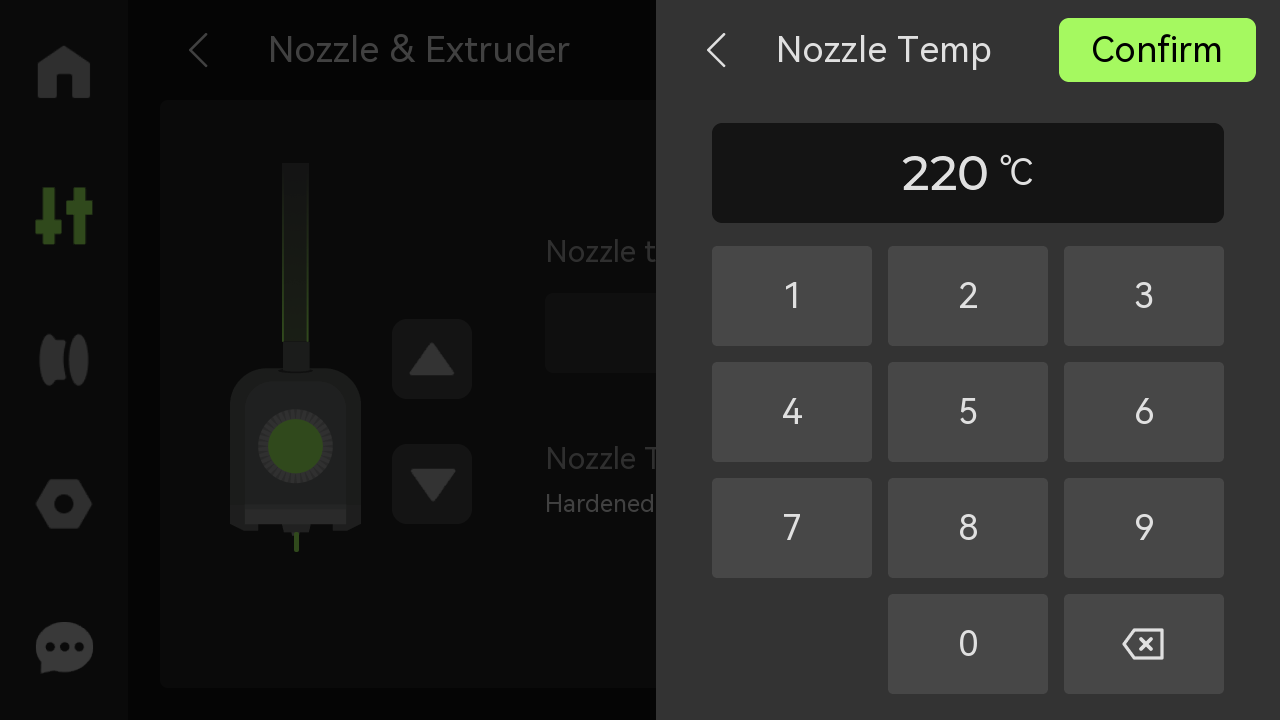
¶ Step 1
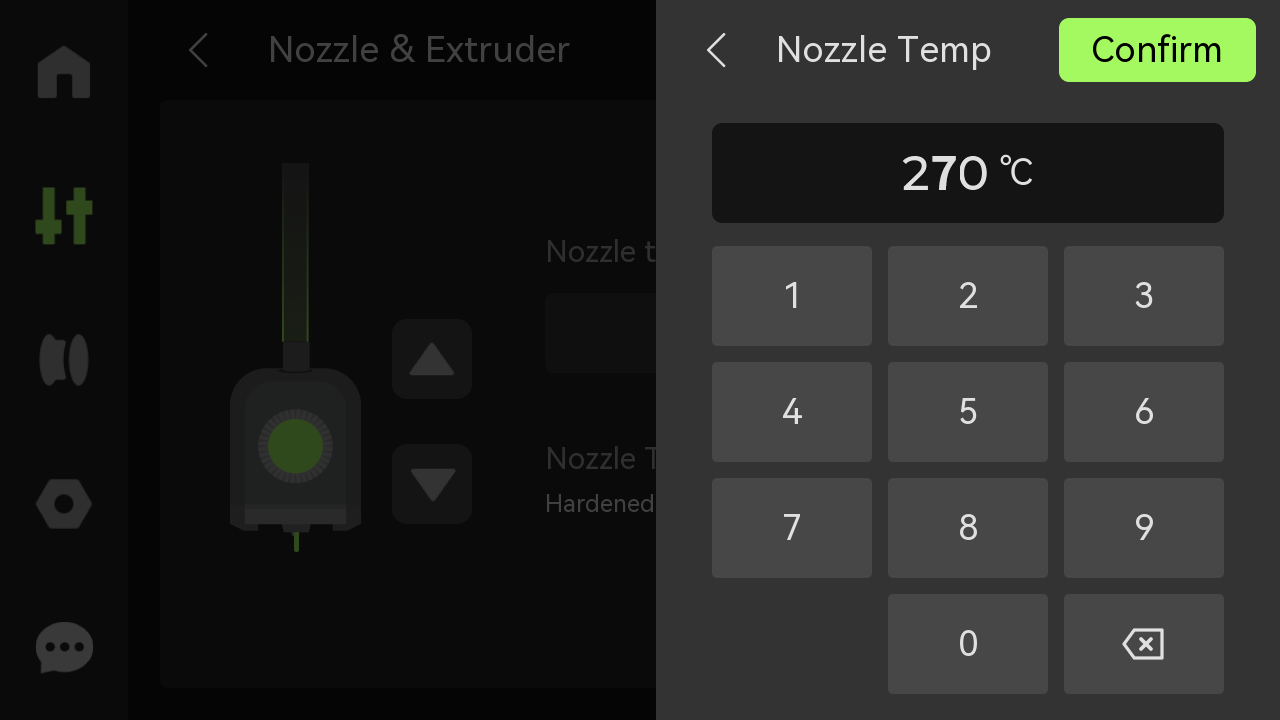
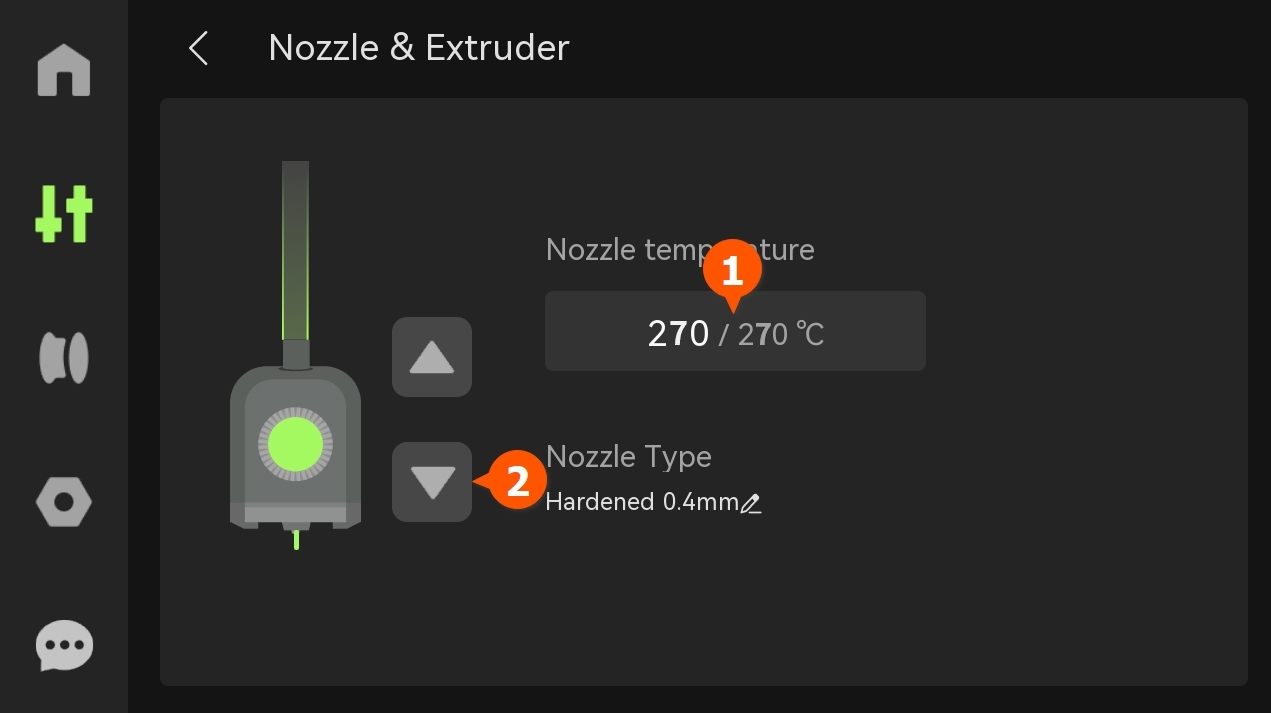
Set the nozzle temperature to 250–300 °C.
¶ Step 2
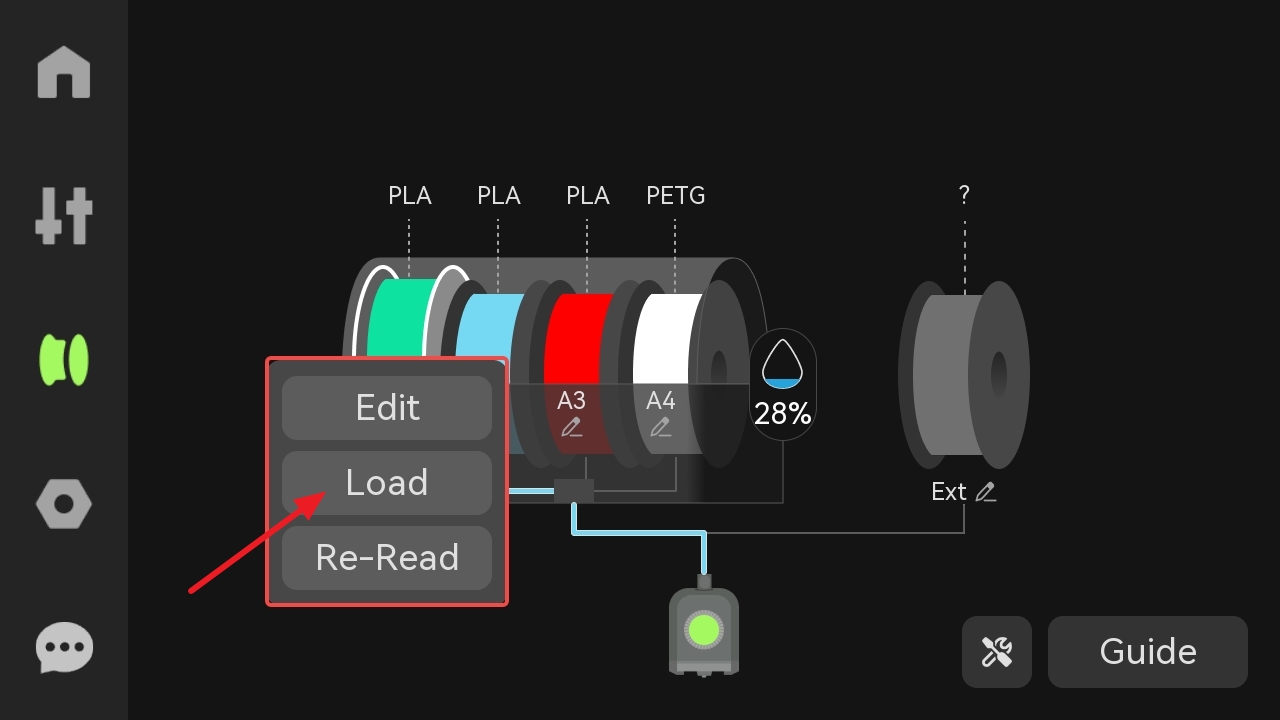
Insert the low-temperature filament you want to print and press the Load button. Then click downward arrow(2) to ensure that both residual high-temperature filament and the new low-temperature filament have been fully extruded.
¶ Step 3
Adjust the nozzle temperature to 220–240 °C. Continue extruding while the temperature decreases. Once the temperature stabilizes, make sure the low-temperature filament can flow smoothly through the nozzle.
¶ Step 4
If extrusion fails during flushing, try increasing the nozzle temperature and use a needle to clear the nozzle.
¶ End Notes
We hope that the detailed guide we shared with you was helpful and informative.
We want to ensure that you can perform it safely and effectively. If you have any concerns or questions regarding the process described in this article, we encourage you to reach out to our friendly customer service team before starting the operation. Our team is always ready to help you and answer any questions you may have.
Click here to open a new ticket in our Support Page.
We will do our best to respond promptly and provide you with the assistance you need.