In this wiki article, we will show some common print issues, and potential solutions.
This is a general article that can be used for most Bambu Lab 3D printers and don't necessarly apply to a single model.
¶ Overheated layers, droopy prints
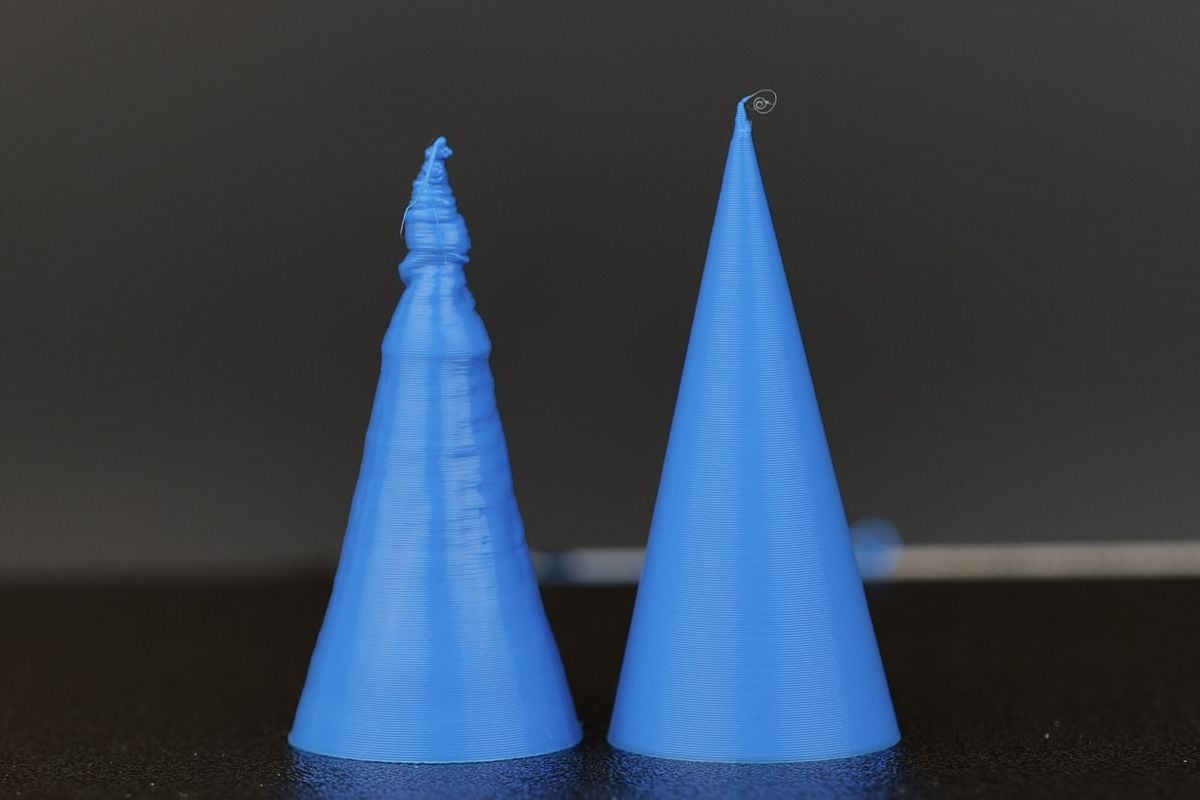
In the example below, the cone on the left was printed fast with the part cooling fan not working, while the second cone was printed with the stock print settings with the part cooling fan turned on.
¶ Part cooling fan not working
The most common reason for overheated layers and droopy prints like in the example above is the part cooling fan.
If not enough cooling is applied to the print, the printed layers don't have enough time to cool and solidify as expected.
To this problem, we first recommend trying to turn on the part cooling fan using the Bambu Studio controls under Device → Part cooling fan section.
Turn the part cooling fan to 100% and confirm if the fan is spinning.
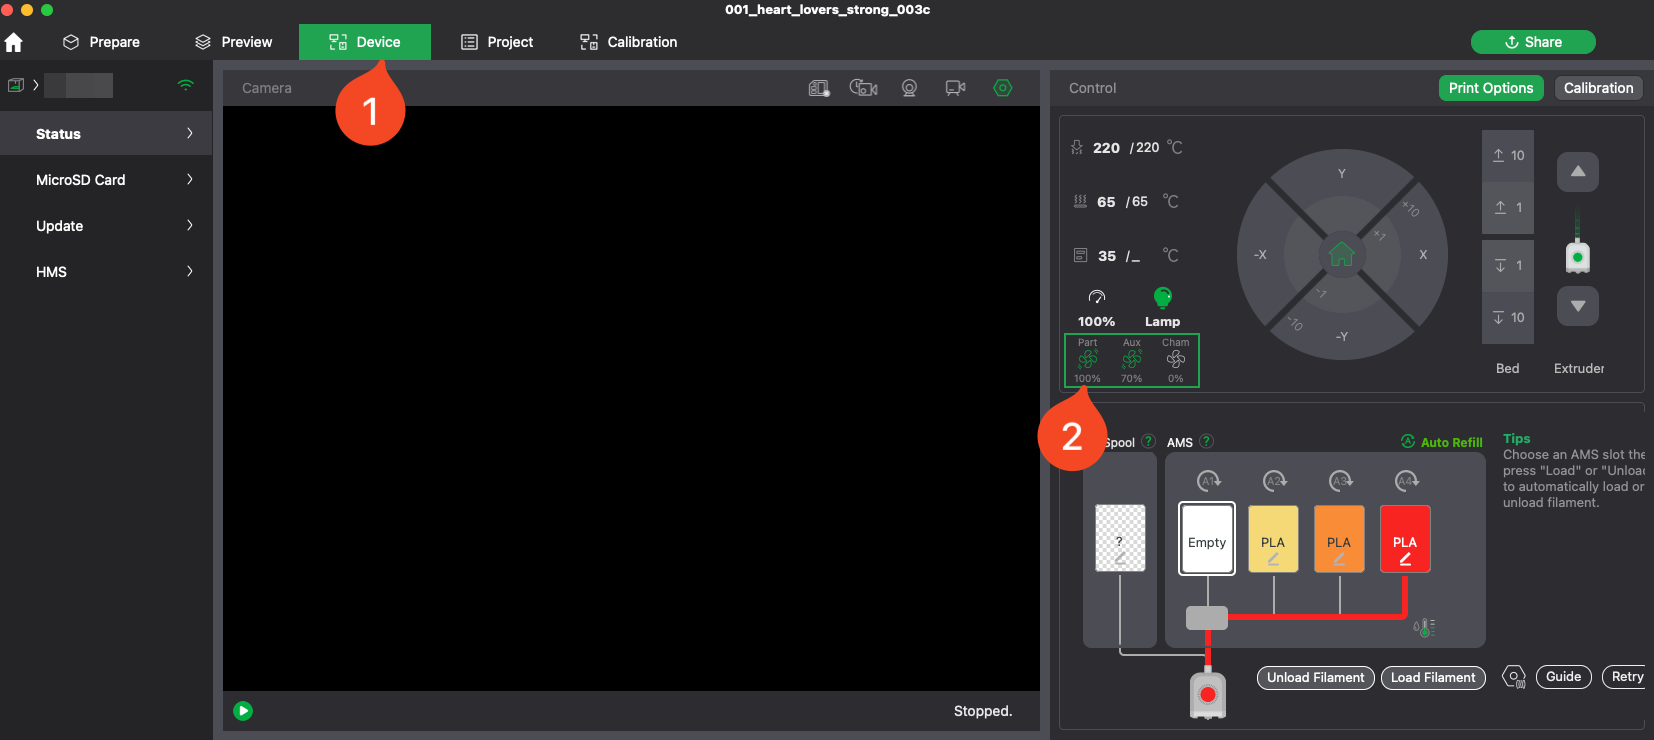
If the fan is spinning correctly, the issue is related to the printing profile and settings you have selected for your print.
If the fan is not spinning as expected, then the issue can be related to a faulty Part Cooling Fan, bad wire connection to the part cooling fan, or something related to the Tool Head board.
¶ Printing speed is too fast
Another reason for bad quality prints where the layers overheat and look bad is if you are printing too fast. Setting the print speed higher with Sport and Ludicrous on small models doesn't increase the part cooling performance.
When the print speed is increased using these options, more cooling is required.
For best results, we recommend adjusting the print speed settings in the slicer, instead of adjusting them from the screen options.
¶ Filament temperature set too high
If the filament temperature is set too high, the filament can overheat in the hotend and can cause bad quality prints.
The filament temperature should be directly adjusted in accordance to the print speed used.
As an example, the PLA filament temperature configured in Bambu Studio is 220C which should work best for the default print speed settings in the profile.
If you decide to print with the Silent print speed configuration, you might want to set the hotend temperature to 210C as the print speed is lowered to 50%, which doesn't require as much heat for efficient extrusion.
¶ Minimum Layer Time too small
One way to limit the print speed according to cooling capabilities, is by setting the Minimum Layer Time in the Filament Settings.
As an example, this setting ensures that the printer will take at least 4 seconds to complete a layer before moving to the next one.
If the layer takes more than 4 seconds, the print speed will be slowed down to ensure adequate cooling.
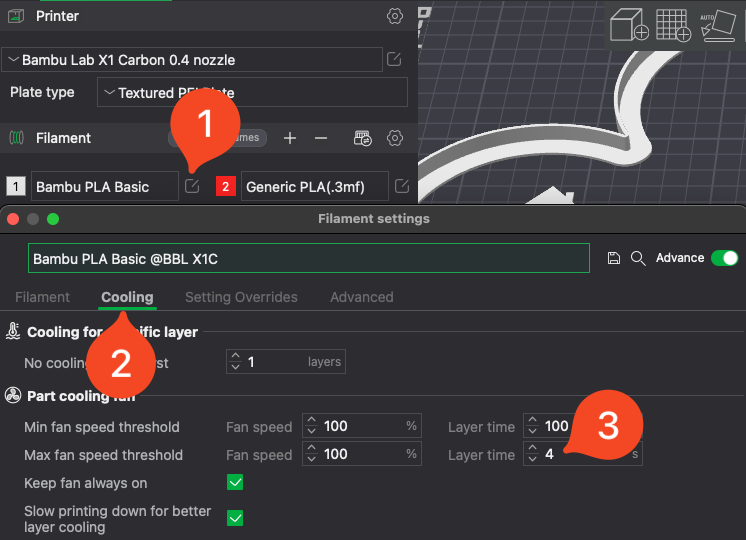
The Filament settings are fine tuned according to each filament requirements. PLA usually needs as much cooling as possible, while other filaments like ABS and ASA need less cooling.
If you have problems with overheating layers, it's best to increase the Layer Time with a few extra seconds which will give the model enough time to cool before the next layer is printed over it.
Please note: This is commonly a problem when printing very small objects. Larger models are not usually affected by this, as it takes longer to print a layer and there's enough time for it to cool down.
¶ Even gaps in the top layer (Under extrusion)
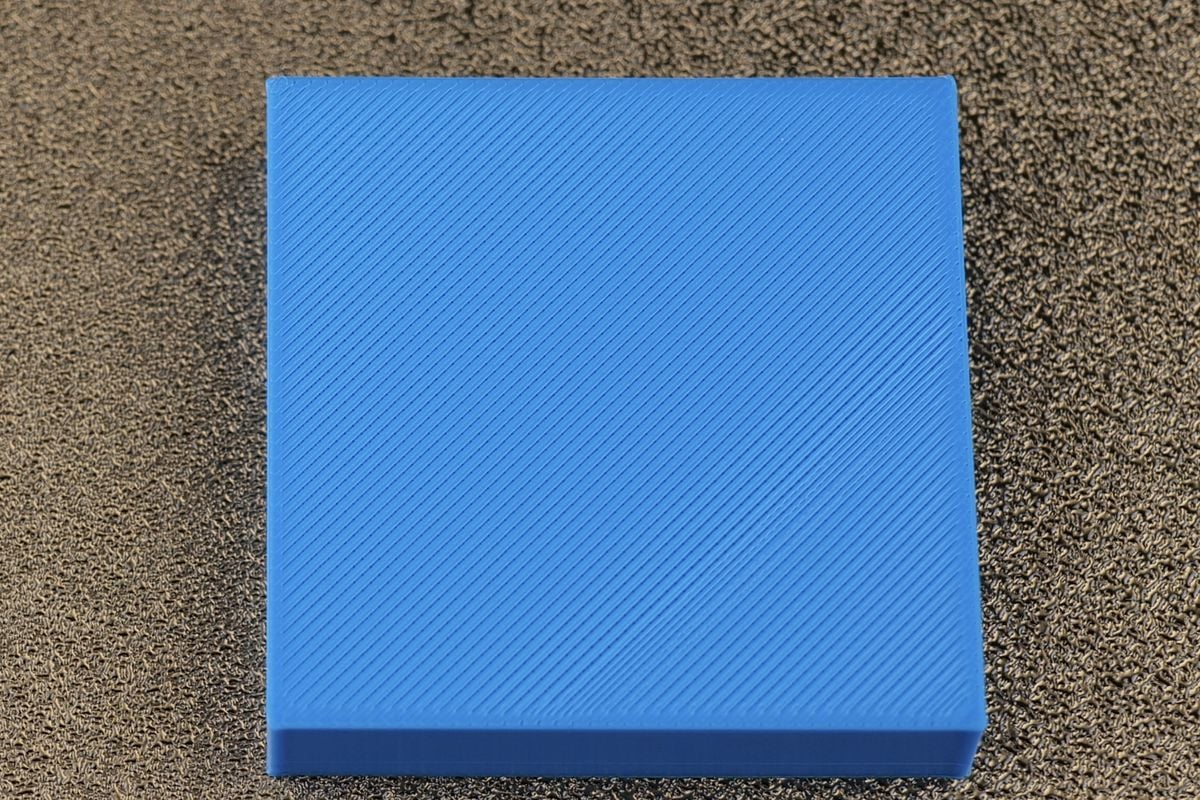
In the example below, the top layer on a print has even gaps between the printed lines
¶ Flow rate issues
The most common reason for this problem is related to the Flow Ratio value in the Filament Settings page being a bit too low.
In the example below, the value is set to 0.98 which is considered normal for PLA filament with X1C. To solve this issue, increasing the flow rate to 1.00 should solve the problem and give you better results.
The best way to solve this problem is to follow the calibration process available in Bambu Studio, under the Calibration tab.
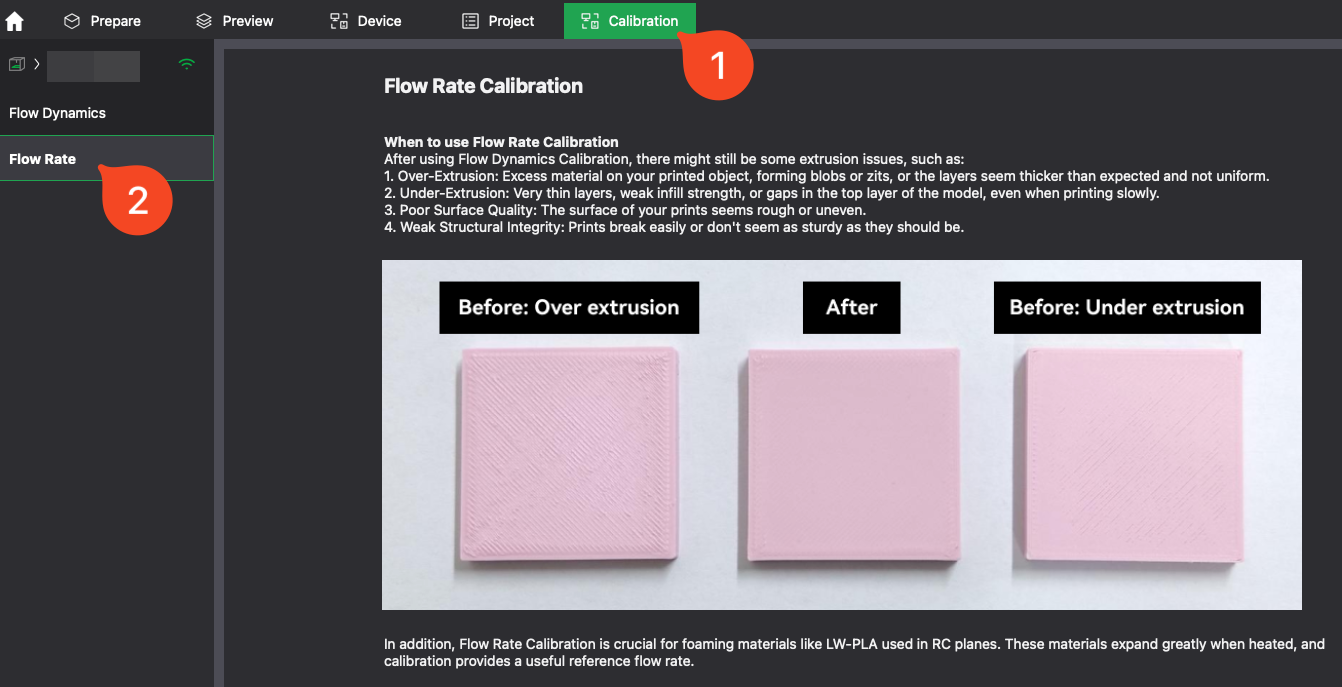
IMPORTANT: The Flow Rate can be impacted by a partially clogged nozzle, debris inside the extruder and the filament path adding extra drag on the filament
We strongly recommend performing the Flow Rate Calibration only after checking the items listed above. Otherwise, the results will be incorrect.
¶ Extruder issues
Another reason for under-extrusion can be related to the extruder. If the extruder maintenance hasn't been done in a while, the gears of the extruder will not spin as smoothly.
Filament debris can also be deposited on the extruder gears, leading to under extrusion due to less grip on the filament.
We strongly recommend cleaning the extruder if under-extrusion is present on your print, before performing any calibration. (Procedure described in this wiki article)
¶ Partial clog in the nozzle
A partial clog in the nozzle can lead to under-extrusion or inconsistent extrusion.
Different types of filament, or burnt filament can be deposited inside the hotend which changes the nozzle performance.
The solution to this is to perform a few cold pulls to ensure the nozzle is free from any debris. (Procedure described in this wiki article)
We strongly recommend cleaning the hotend if under-extrusion is present on your print, before performing any calibration.
¶ Inconsistent gaps in top layer
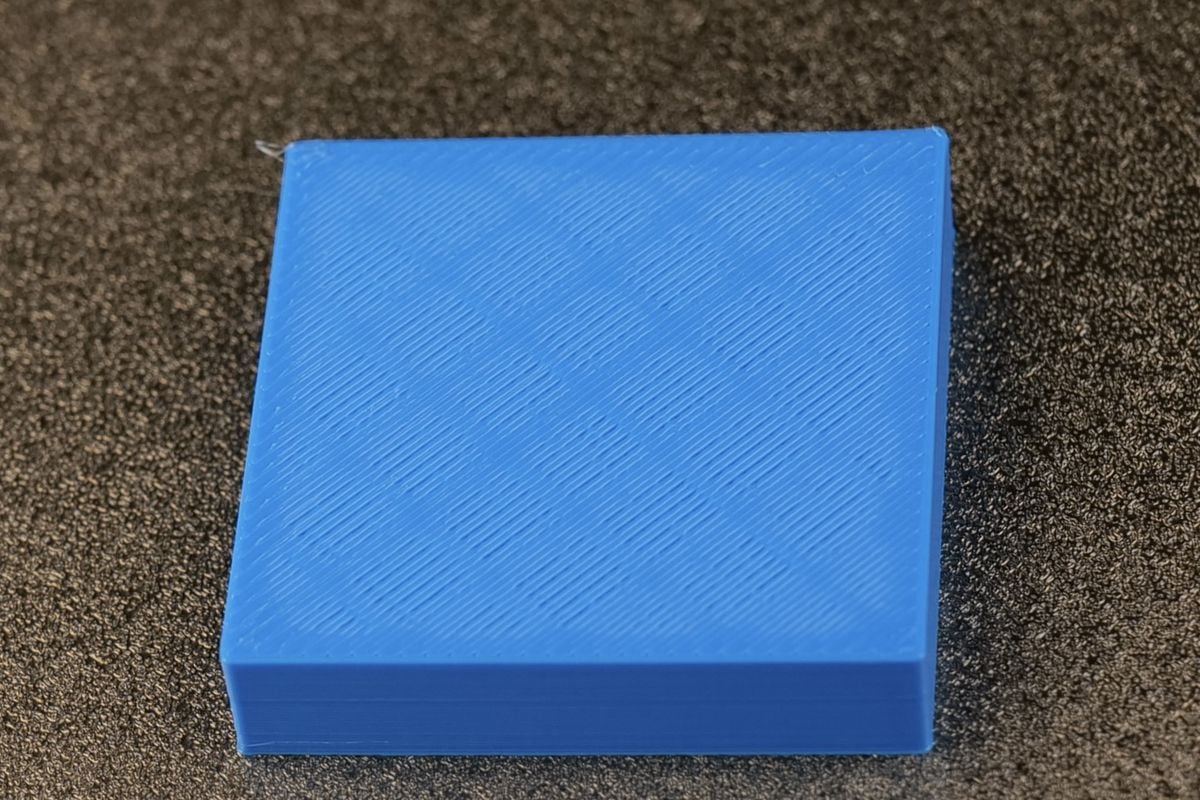
In the example below, the top layer on a print has inconsistent gaps between the printed lines
¶ Incorrect Nozzle Size
The most common reason for such inconsistent top layers is when the incorrect nozzle is used when slicing the model in Bambu Studio
For this particular example, the file was sliced with a 0.6mm nozzle while the actual nozzle installed on the printer was 0.4mm.
Bambu Studio has certain checks in place to avoid this problem, but if you encounter such results, check the nozzle installed on your printer, and the value used in Bambu Studio
¶ Top layers overlapping
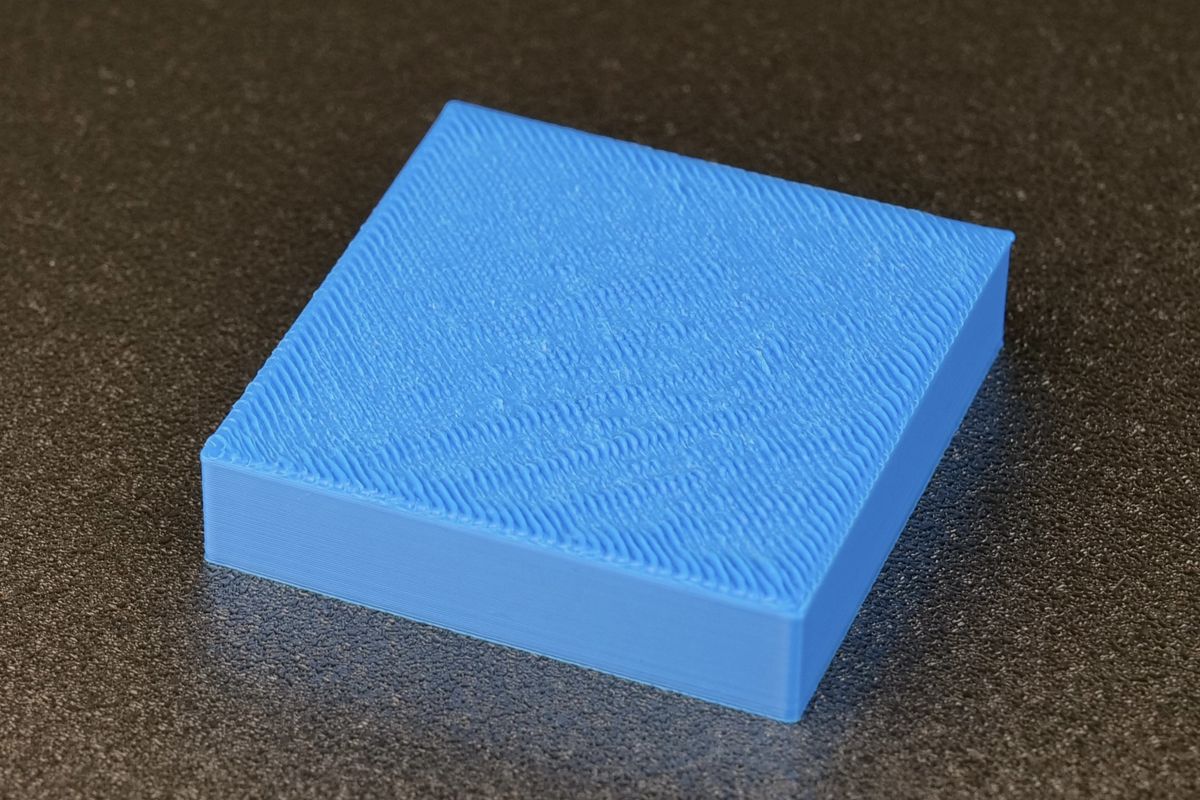
In the example below, the top layer has overlapping lines, and during printing you can hear the nozzle grinding over the layers.
¶ Flow rate too high
The most common issue for this problem is over-extrusion. This happens if the flow rate value is set too high in the slicer.
Usually, this problem occurs when the default flow rate values are changed after a calibration done with a dirty extruder or partially clogged hotend.
It is very rare for the filament to require more than a 1.00 flow rate value in the Filament profile.
If you have performed a calibration, and the flow rate is over this value, we recommend
IMPORTANT: It is very rare for the filament to require more than a 1.00 flow rate value in the Filament profile.
If you have performed a calibration, and the flow rate is over this value, we strongly recommend cleaning the extruder and the hotend before performing the Flow Rate Calibration again.
¶ Incorrect nozzle selection in slicer
Another reason for the top layer lines to be overlapping is the wrong nozzle being selected in the slicer.
As an example, if the 3D model is sliced for the 0.6mm nozzle, and printed with a 0.4 mm nozzle installed on the printer, the result can be similar to the one shown in the picture.
¶ Lines not connected to walls
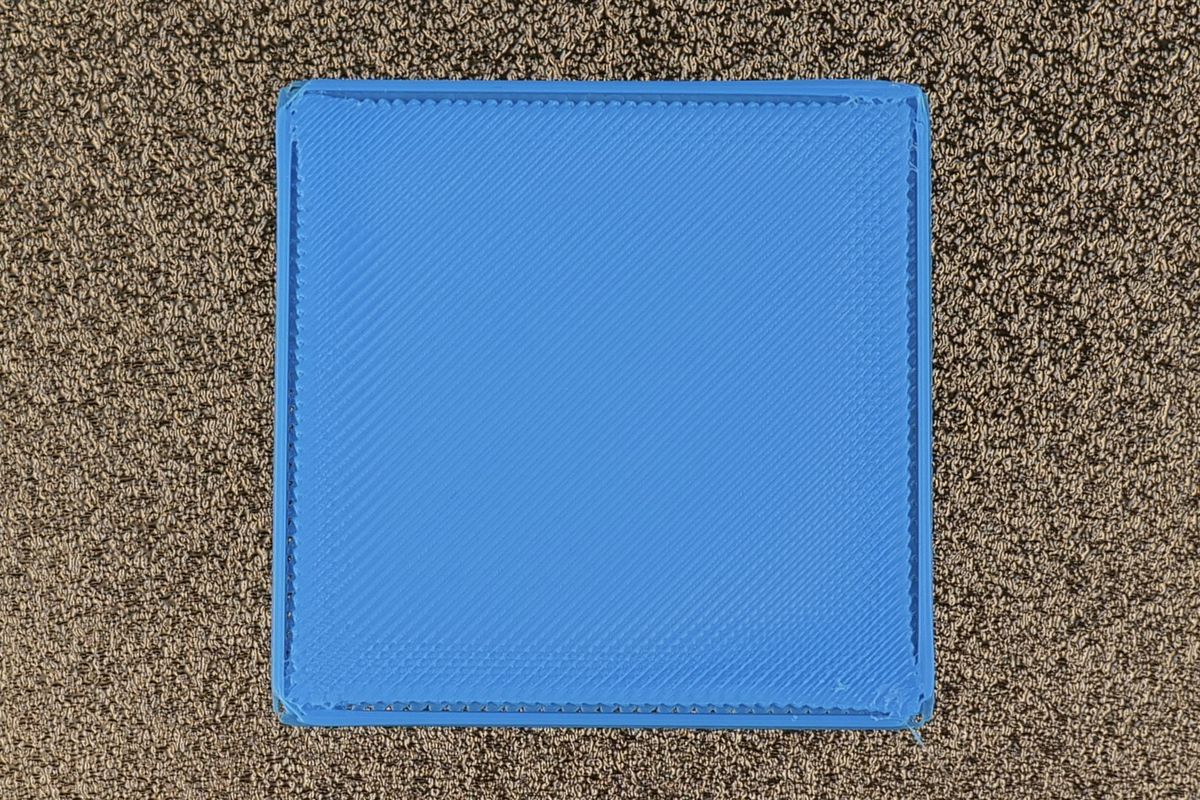
In the example below, the printed lines don't connect with each other.
¶ K-factor set too high
The most common problem which causes such print quality issues, where the printed lines are not touching with each other is caused by a K-factor which is incorrectly set to a very high value.
For Bambu Lab printers, the K-factor is calibrated using the Flow Dynamics Calibration available in Bambu Studio.
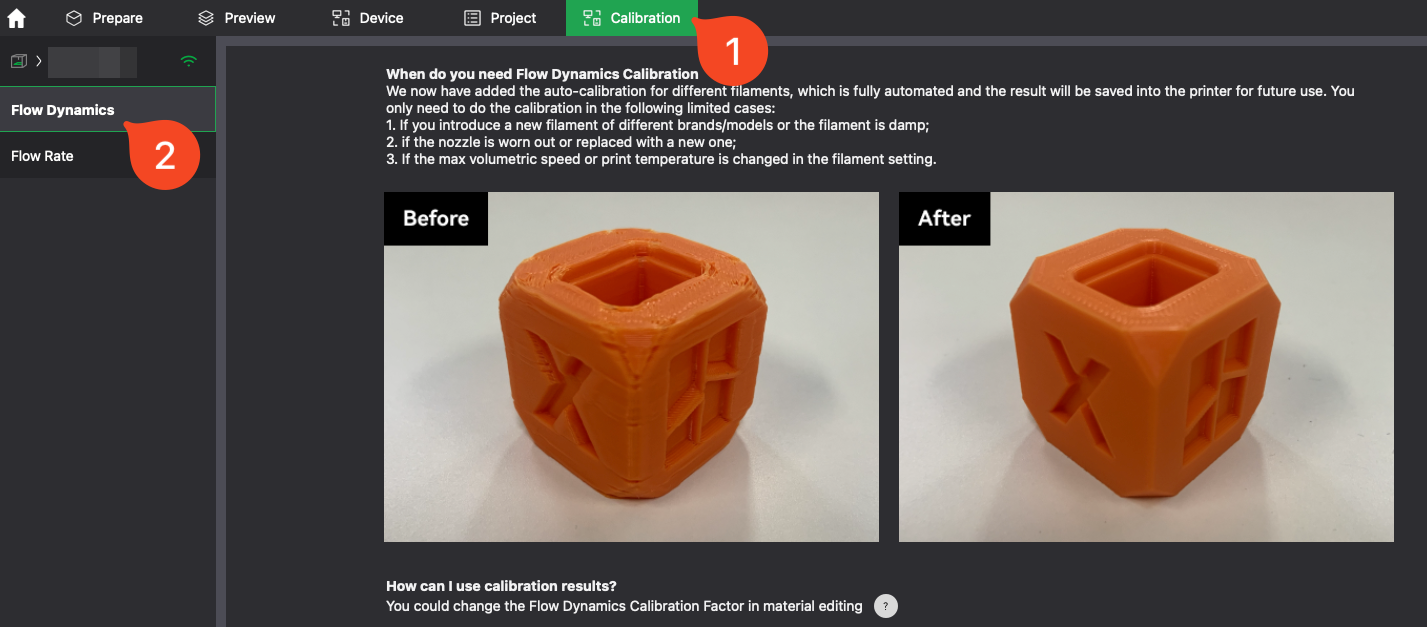
A very common mistake is to perform the calibration, and instead of inserting the correct value (ex: 0.025) the user inserts 0.25 which is ten times higher than expected.
Most common results for regular filaments give a K-factor value between 0.02 and 0.04 as long as the hotend is free from any partial clog, and the extruder is clean.
IMPORTANT: It is rare for the filament to require a K-factor larger than 0.05 and very rare to use a K factor larger than 0.1
If you have performed a Flow Dynamics Calibration, and the K-factor is larger than 0.04-0.05, we strongly recommend cleaning the extruder and the hotend before performing the Flow Dynamics Calibration again.
¶ Dots on model walls
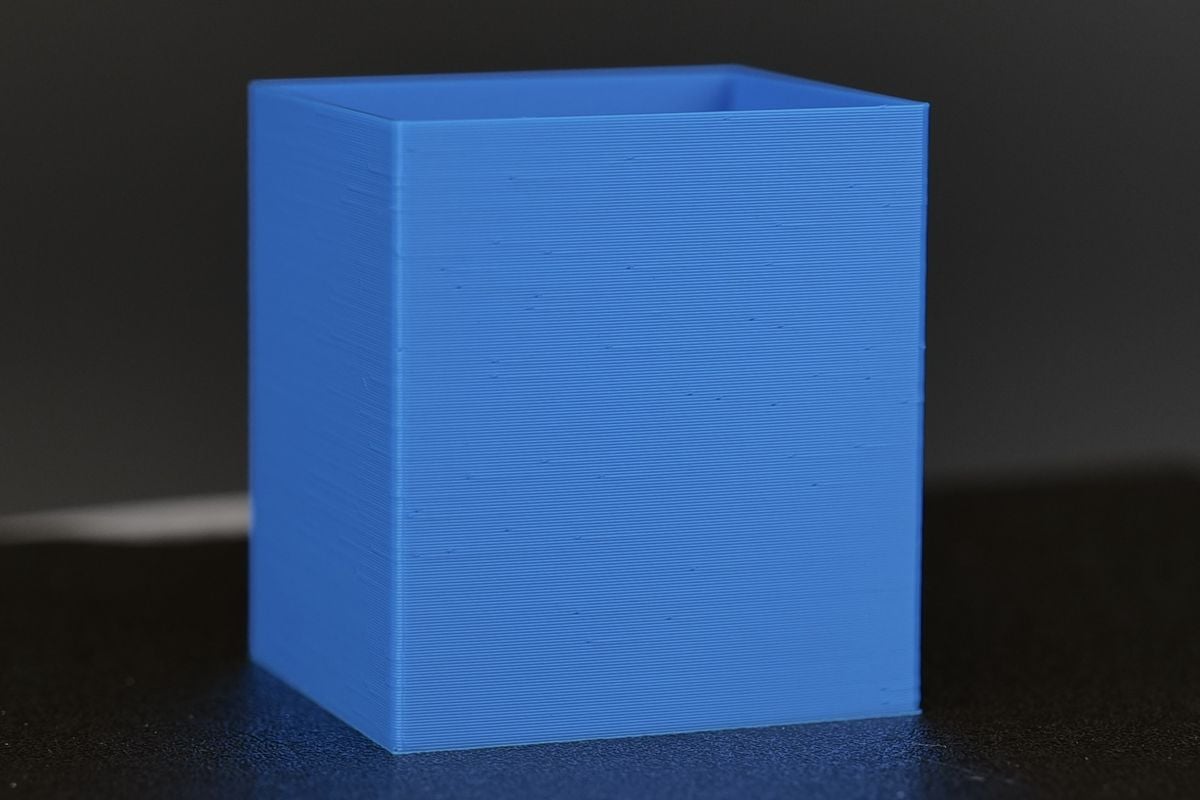
In the example below, the printed model has random dots on the surface.
¶ Seam position is set to Random
The most common reason for such a print quality defect is the Seam Position being set to Random.
You can find this option in Bambu Studio, under the Quality → Seam menu
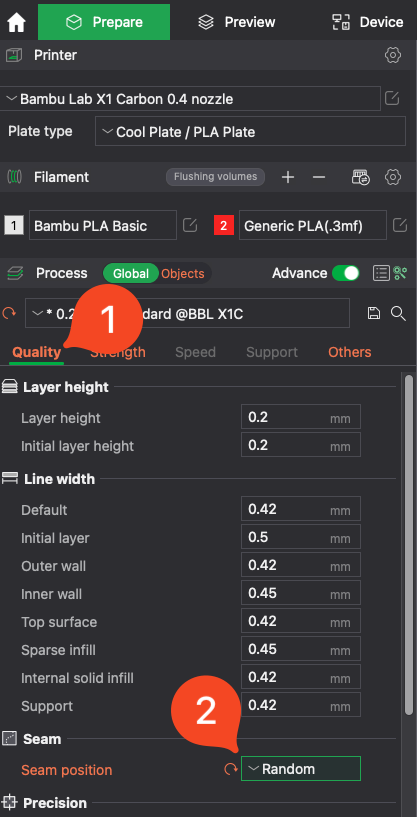
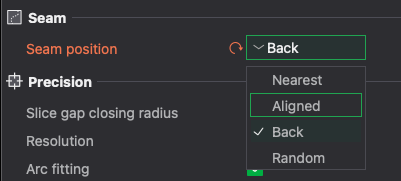
The solution is to simply change the value from Random to Aligned or Back
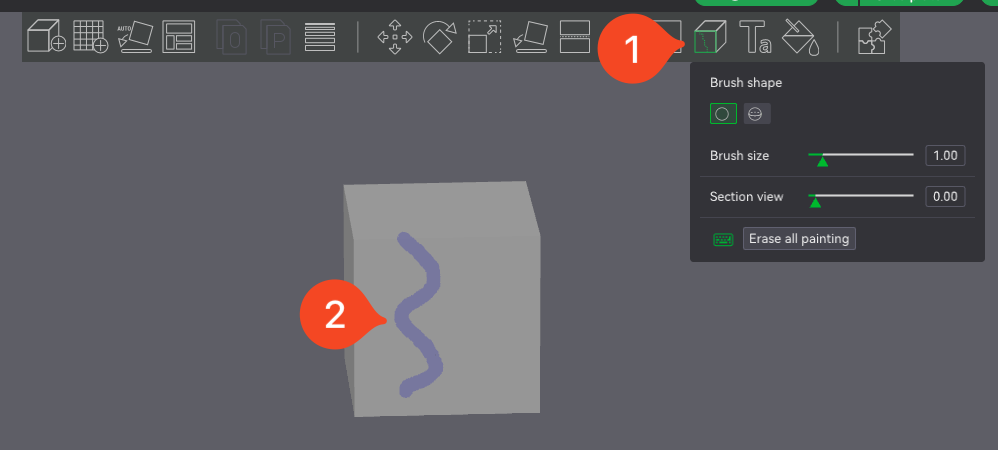
There's also the option to manually paint the seam on your model, using the paint tool in Studio
Simply select the Seam Painting tool then draw the position of the seam on your model, ideally in a place where it cannot be easily seen.
¶ Filament has absorbed moisture, and needs to be dried
Another common reason for similar dots to appear on the walls of the print is moisture that gets absorbed by the filament. When this happens, the moisture will boil away when extruded from the nozzle, and cause small gaps or imperfections in the printed lines.
Filament can absorb moisture from the atmosphere, and for best results, it is recommended to dry all filaments before starting a print. This also applies to new spools of filament.
The X1C and P1S have a dedicated filament drying option in the menu, but if you have a different printer, we recommend using a filament drier.
¶ Inconsistent adhesion on plate
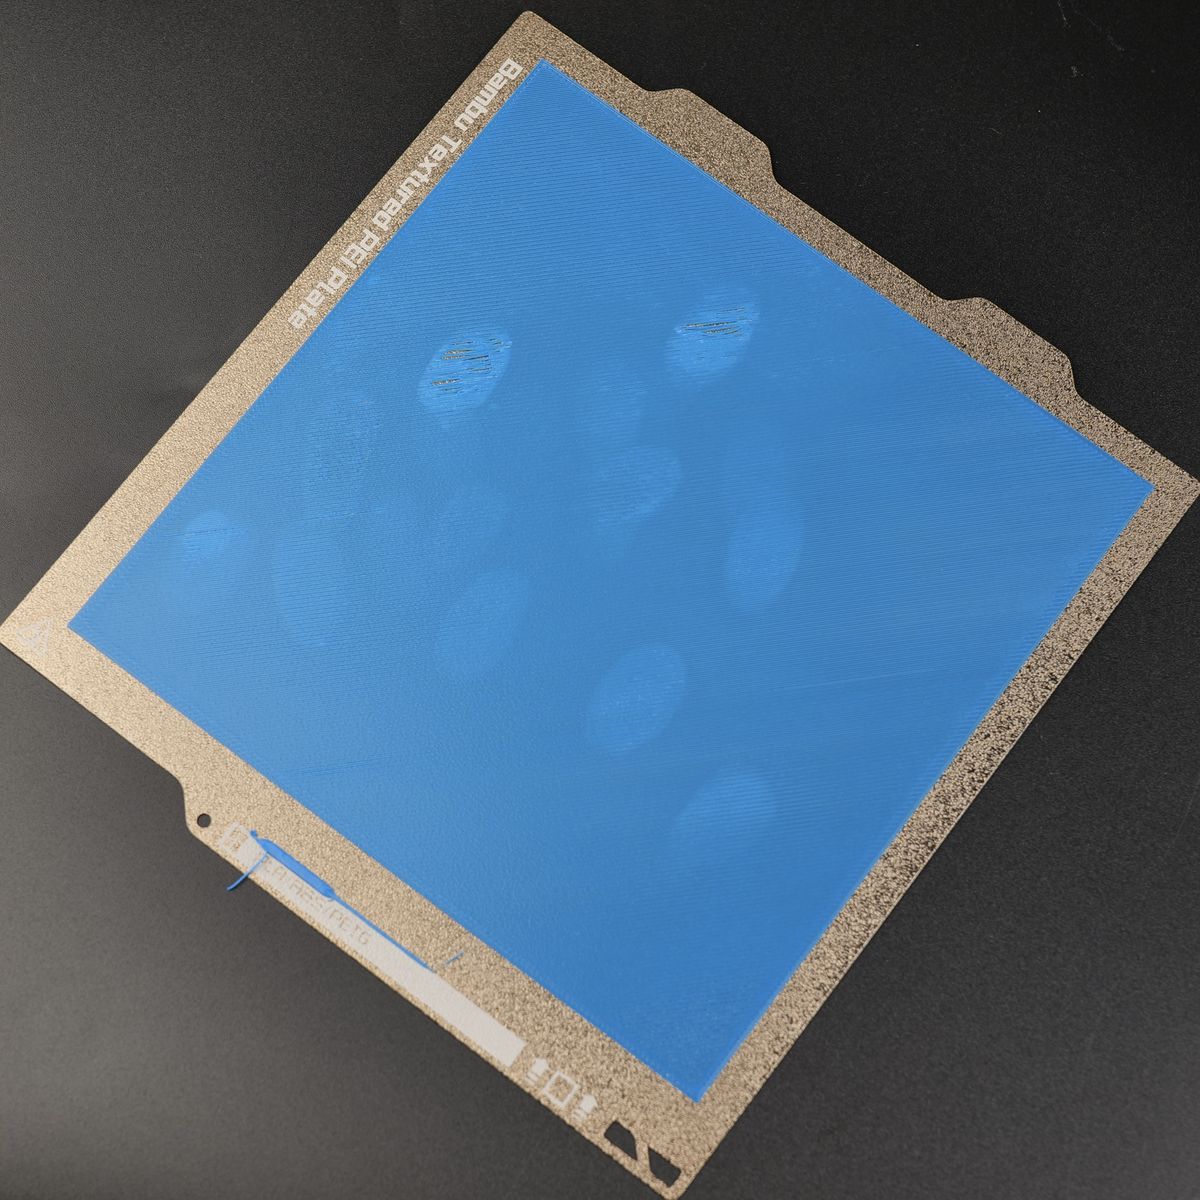
In the example below, the first layer has sections where filament is not adhering to the print surface.
¶ Plate has not been washed before starting a print
One of the most common reasons why the adhesion is inconsistent on the plate is related to debris and oils that are present on the plate.
We strongly recommend to wash the plates with hot water and detergent before printing to remove any debris or contaminants, and avoid touching the surface.
This solution solves most issues related to adhesion, as long as the right settings are used for the materials you are trying to print.
¶ Bed leveling calibration has not been performed
In some rare cases, the bed leveling from previous calibrations might be inaccurate leading to inconsistent adhesion to the plate.
If you encounter issues with the quality of the first layer, we recommend performing a bed leveling calibration.
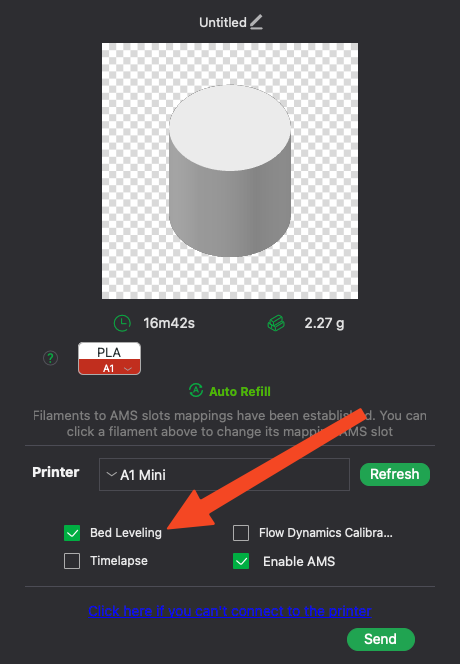
We also strongly recommend to keep the Bed Leveling Calibration option turned on when starting a print, for the highest chances of success.
¶ Layer Shifts
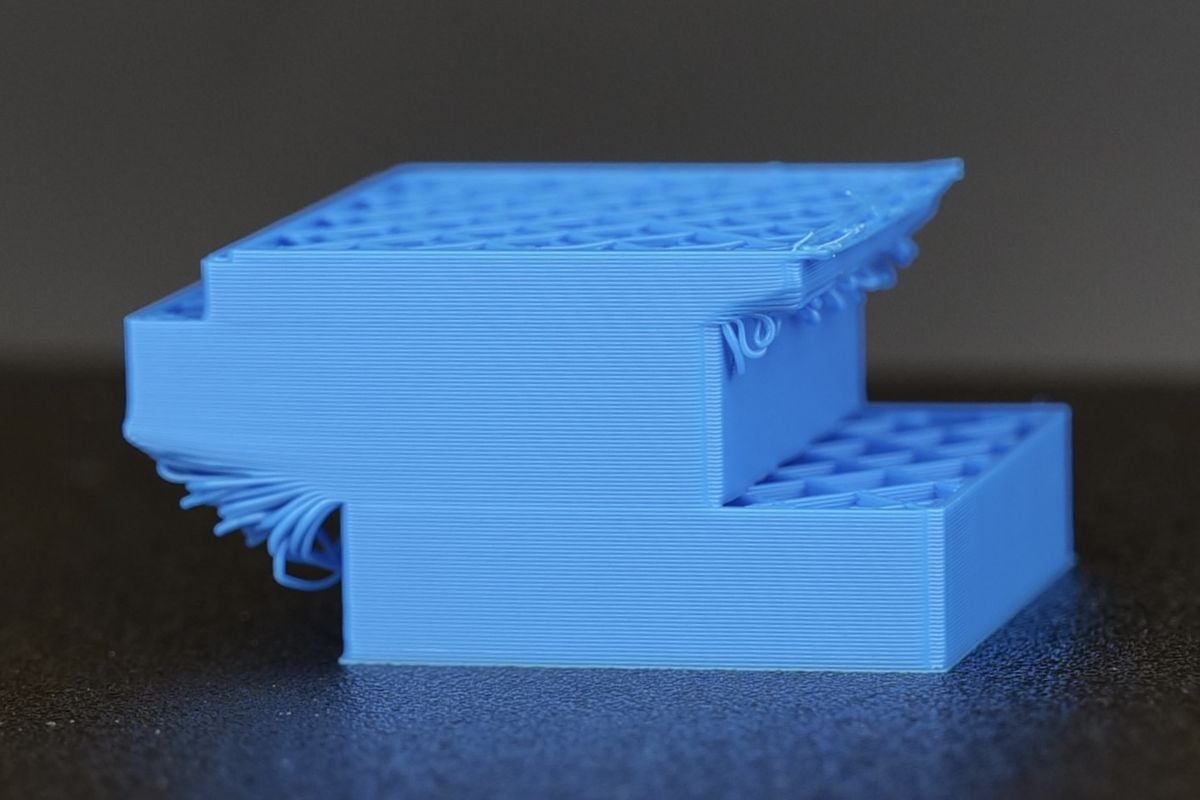
In the example below, the cube model suffers from a few layer shifts
¶ Print speed is too fast
One of the main reasons why layer shifts can occur is due to the print speed being too fast.
For example, if you start a model with the Normal print speed, then change the speed to Ludicrous mode using the on-screen buttons, the printer movements could be too fast and lead to a layer shift.
Bambu Lab printers have a Step Loss Recovery option which can be enabled in the printer menu.
Enabling this feature allows the printer to detect when there is a layer shift, to try and re-home the printer before continuing to print the rest of the model.
¶ Model is not cooled fast enough
If you print a model with customer print settings, the part cooling requirements might be altered.
In such situations, if the model is not cooled fast enough, parts of the model could curl upwards which can get caught on the nozzle.
This leads to a layer shift and can also lead to a complete print failure if the model gets detached from the heatbed.
To avoid such issues, we recommend using the stock filament profiles configured in Bambu Studio while ensuring the right printer and filament profile is selected, according to your setup.
¶ Models warping
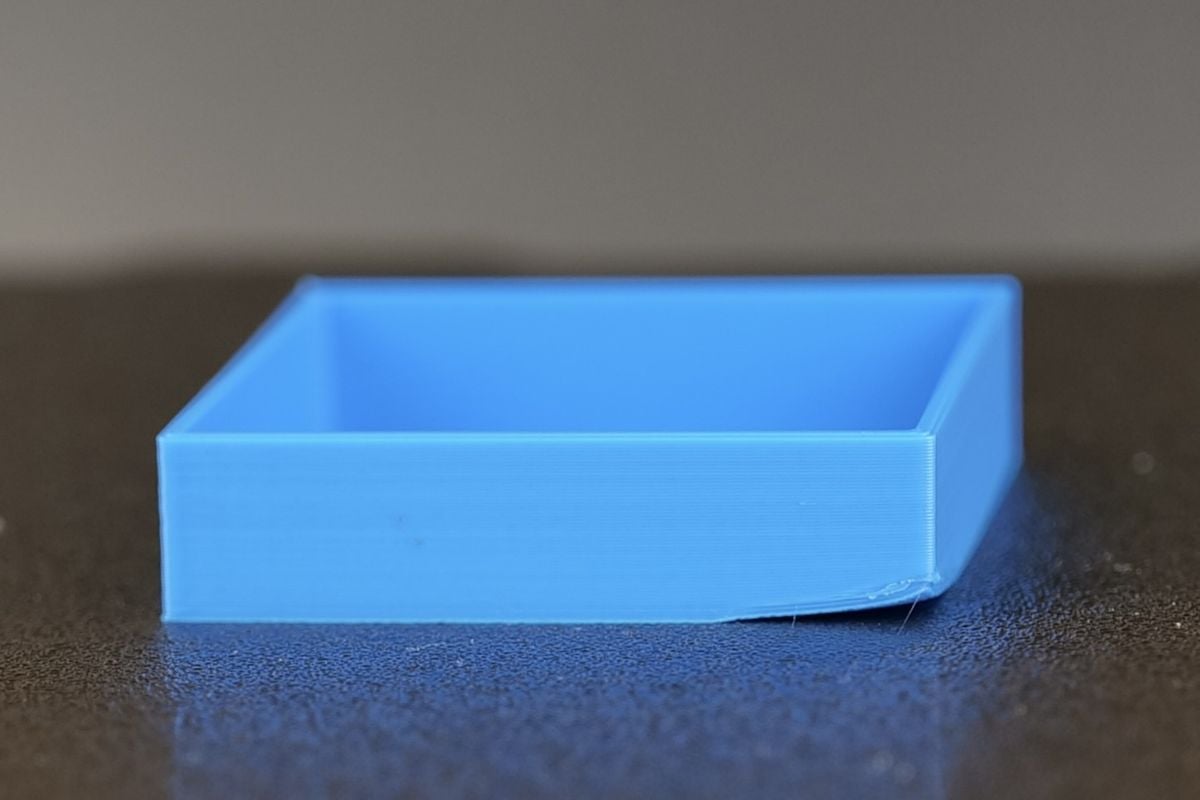
In the example below, corner of the model has warped
¶ Heatbed temperature set too low / Incorrect Plate Type
One of the most common mistakes that lead to models warping or getting loose from the heatbed is having an incorrect heatbed temperature for your filament, or an incorrectly selected plate type.
For example, if you slice a model for the Cool Plate and print it on the Textured PEI Plate, there is a high chance the model will warp, and get loose from the heatbed.
This is caused by the different plate proprieties and requirements. The Cool Plate requires around 35C for PLA while the Textured PEI Plate requires around 65C for PLA.
Selecting the correct plate type according to the filament used, while also ensuring the plate is clean before starting a print will give you the best chances of success when printing.
¶ Part cooling fans set too high
Most of the time, PLA can benefit from as much cooling as possible when printing fast. But there can be situations where too much cooling is applied to a model leading to warping.
The Bambu Studio filament profiles are fine-tuned for best results for each type of filament, and should work as expected.
If you encounter warping, we recommend double checking the Cooling tab, under the Filament Settings:
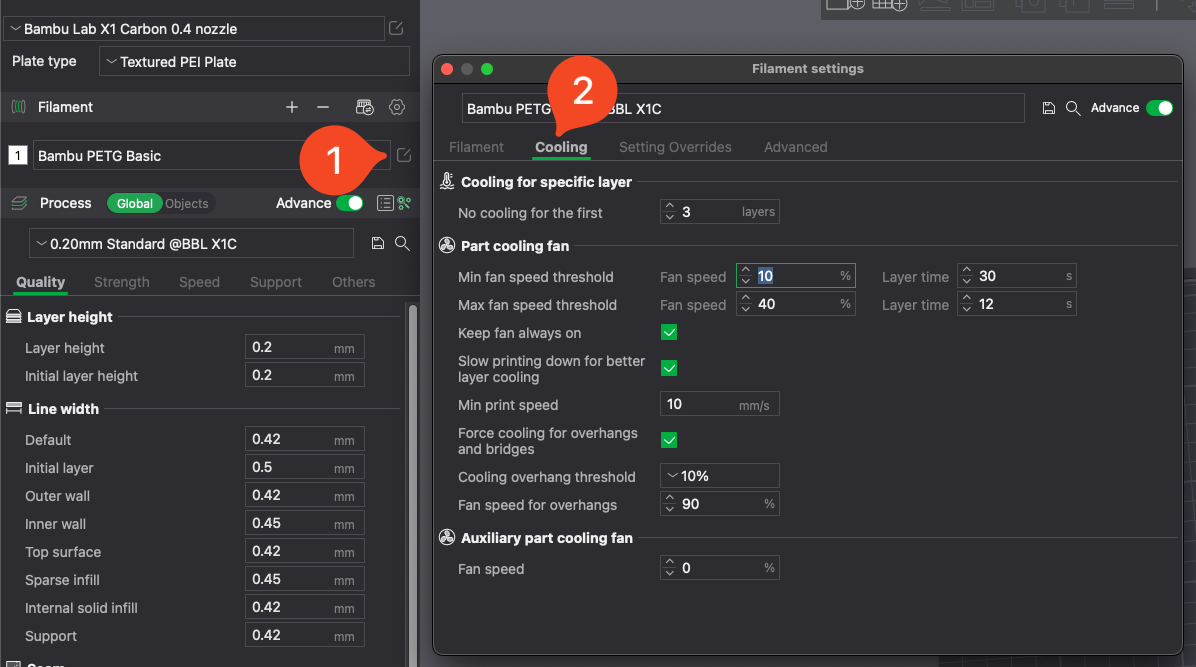
One of the most important setting to change when it comes to warping is the No cooling for the first X layers option. Ideally, you should have no cooling for the first 3 layers on most common filaments (PLA, PETG, TPU, etc)
This will ensure the best adhesion and slow cooling of the printed layers to avoid warping and a print failure.
We also recommend adjusting the Auxiliary part cooling fan if needed, by lowering it to about 40-50%.
The filament which benefits the most from a higher Auxiliary part cooling fan speed is PLA, but this mostly applies on small objects or models that have high overhangs.
If you encounter warping of the printed models, lowering the fan speed of this Auxiliary cooling fan could help.

¶ Environmental temperature is too low
Common filaments that exhibit warping easier than PLA are PETG, ABS, ASA, PA, PC.
Most of the time, the warping appears due to the fast cooling of the printed layers which generates stress forces between the layers.
These higher temperature materials are usually printed with less to no part cooling in an enclosed 3D printer, for the environmental tempearture around the part to be higher and allow slow cooling of the model.
If you print some of these filaments on a printer which is not enclosed, like the A1, warping can be common because the temperature around the model will be the same as your room temperature.
If the room where the printer is used is under 20C, warping issues occur even with PLA and PETG filaments which are more forgiving.
In situations like this, it's best to ensure a higher heatbed temperature (+10C) to give the model a better chance of success by slowing down the cooling between the printed layers and ensure there are no drafts of air around the printer.
Air drafts can cool the model faster, increasing layer bonding tension and leading to filament warping.
¶ First layer not sticking to the plate
¶ Incorrect plate type selected
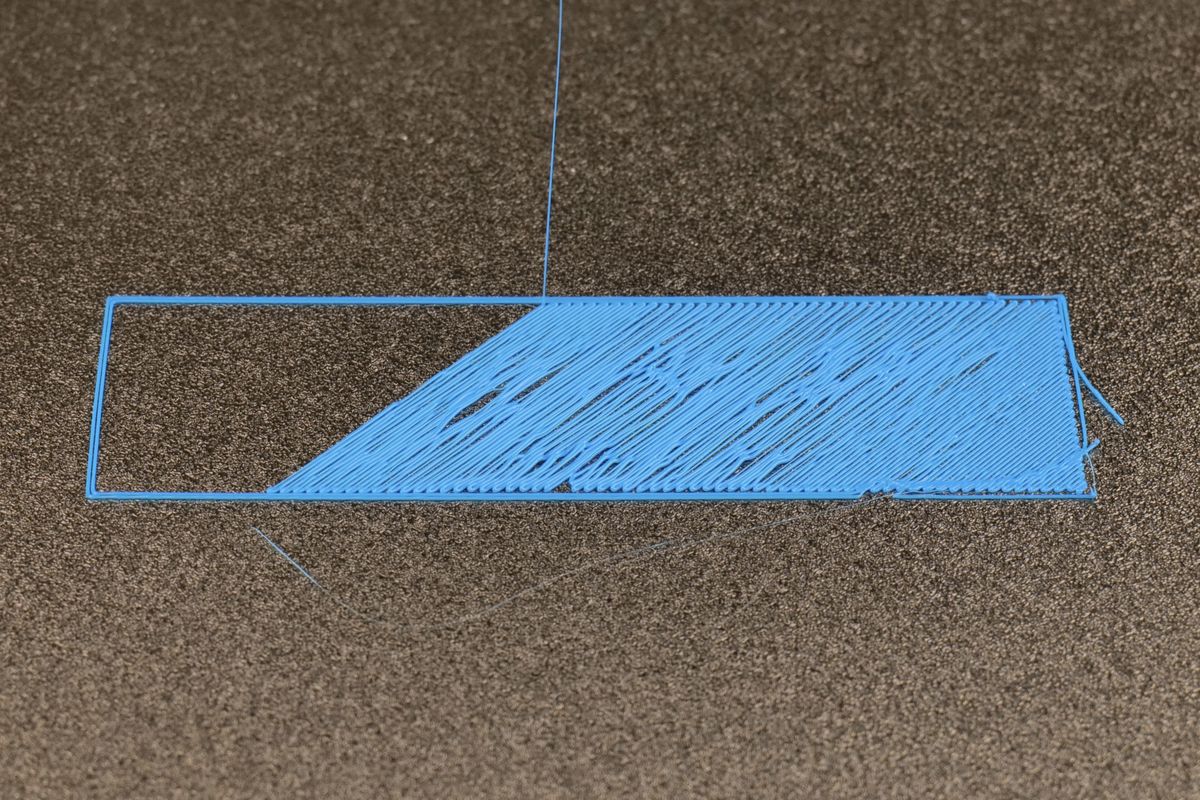
First layer adhesion issues could be related to incorrectly selecting the plate type in Bambu Studio.
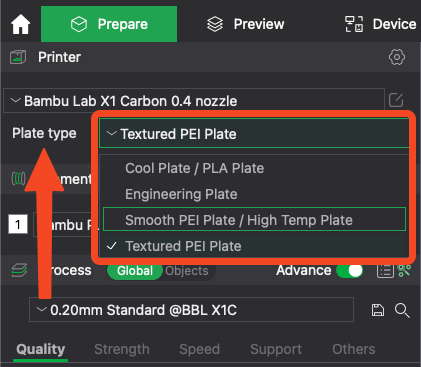
For example, if you slice a model for the Cool Plate and print it on the Textured PEI Plate, there is a high chance the model will not adhere to the plate as expected.
This is caused by the different plate proprieties and requirements. The Cool Plate requires around 35C for PLA while the Textured PEI Plate requires around 65C for PLA.
The Textured PEI Plate also has a different Z offset which impacts how close the nozzle is to the print surface for the first layer to be printed.
Selecting the correct plate type according to the filament used, while also ensuring the plate is clean before starting a print will give you the best chances of success when printing.
¶ Plate has not been washed before starting a print
We strongly recommend to wash the plates with hot water and detergent before printing to remove any debris or contaminants, and avoid touching the surface.
This solution solves most issues related to adhesion, as long as the right settings are used for the materials you are trying to print, and the correct plate type has been selected in the slicer.
¶ Bed leveling calibration has not been performed
In some rare cases, the bed leveling from previous calibrations might be inaccurate leading to inconsistent adhesion to the plate.
If you encounter issues with the quality of the first layer, we recommend performing a bed leveling calibration from the calibration menu after ensuring the nozzle tip is clean and free of any debris.
We also strongly recommend to keep the Bed Leveling Calibration option turned on when starting a print, for the highest chances of success.

¶ End Notes
We hope that the detailed guide we shared with you was helpful and informative.
We want to ensure that you can perform it safely and effectively. If you have any concerns or questions regarding the process described in this article, we encourage you to reach out to our friendly customer service team before starting the operation. Our team is always ready to help you and answer any questions you may have.
Click here to open a new ticket in our Support Page.
We will do our best to respond promptly and provide you with the assistance you need.