¶ What is volumetric speed?
Volumetric speed is the rate at which filament is pushed through the hotend and extruded onto the build plate. Instead of just thinking about movement speed (mm/s), volumetric speed measures how much filament (mm³/s) the machine can melt and extrude.
Imagine pouring syrup through a funnel. Moving faster doesn’t help if the funnel can’t keep up, eventually, it clogs or flows unevenly.
Why does it matter?
The hotend has a physical limit. If you try to extrude more material than it can melt, you’ll run into quality problems such as under-extrusion, weak layer bonding, or surface defects.
Volumetric speed is at the heart of balancing print speed with print quality.
¶ How volumetric speed works
The volumetric speed or flow rate represents the volume of filament extruded over time, expressed in mm³/s. It is influenced by several factors, including nozzle diameter, layer width, layer height, hotend design, filament characteristics, and nozzle temperature. Together, these parameters set an upper limit, known as the maximum volumetric speed. The slicer uses this value to prevent you from trying to push more filament through the hotend than it can melt reliably, preventing under-extrusion or print failures. Although the volumetric speed can be calculated with the formula below, the maximum volumetric speed can only be determined through practical testing.
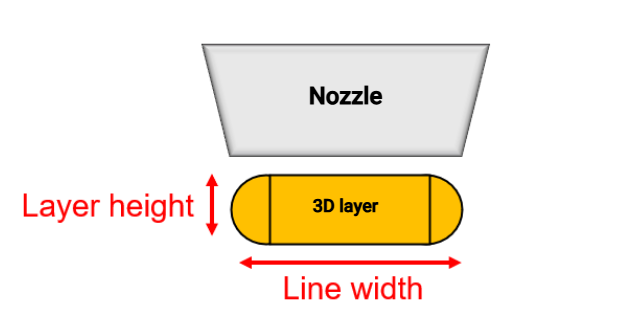
Volumetric Speed (mm³/s) = Layer height (mm) X Layer width (mm) X Print speed (mm/s)
Layer height refers to the height of each layer in the 3D printing model, while the layer width means the width of a single melted filament extruded by the nozzle during printing. Find more details on layer height and layer width on the Bambu Wiki.
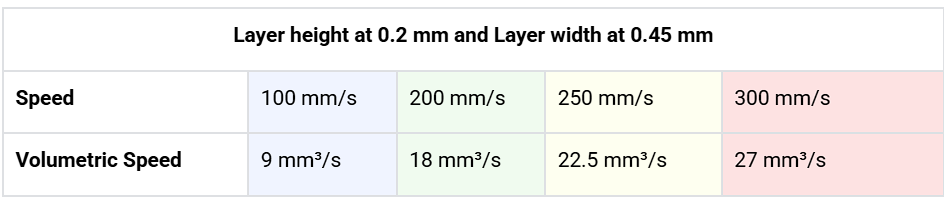
In a real-world example, if you are printing with a 0.4mm Nozzle and use a 0.45mm layer width at 0.2mm layer height with a 200mm/s speed, the machine will be outputting 18mm³/s. If the layer settings are kept the same, but we increase the speed to 300mm/s, it will result in 27mm³/s. Hopefully, this example enlightens the impact that changing speed has on flow.
Let's summarize the information above in a table, always using 0.2mm layer height and 0.45mm layer width:
Changing the print speed has a big impact on volumetric speed, as demonstrated. What about layer height, for example? Using 200 mm/s with 0.45 mm layer width, we can change the layer height in 0.05 mm increments:
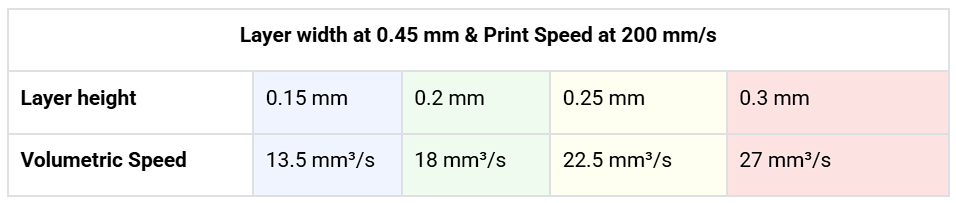
Changing layer height also has a big impact on volumetric speed. When selecting a print process in Bambu Studio, observe that the layer height changes in the different print processes:
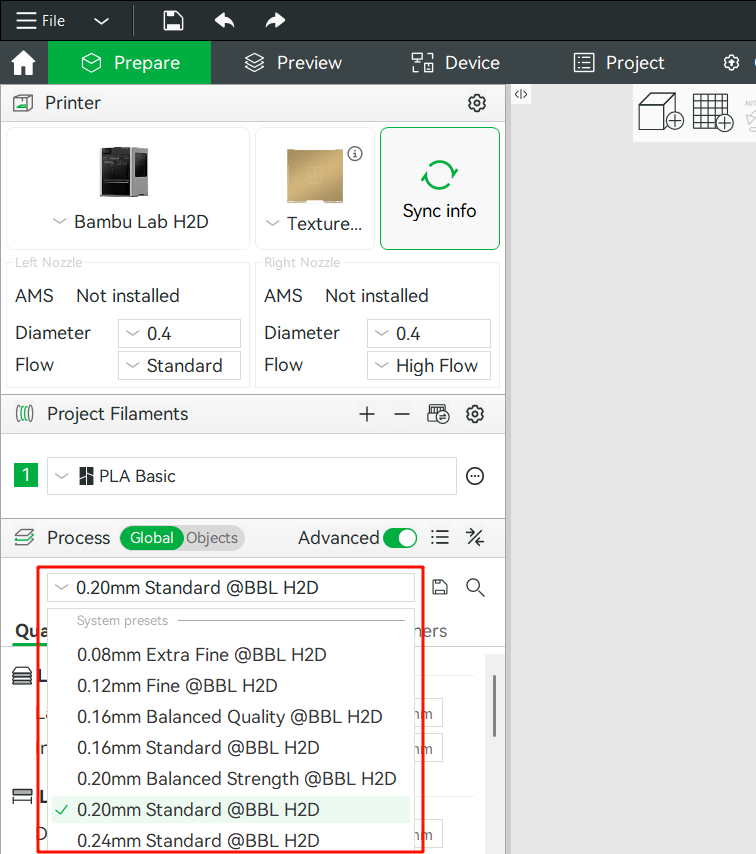
Now we must compare the actual volumetric speed against the maximum volumetric speed for each application. There is no need for complex experiments with different filaments, nozzles or temperatures, all you need to do is navigate to the Bambu Studio filament section (1), then select your desired material (2) and click to edit the preset (3).
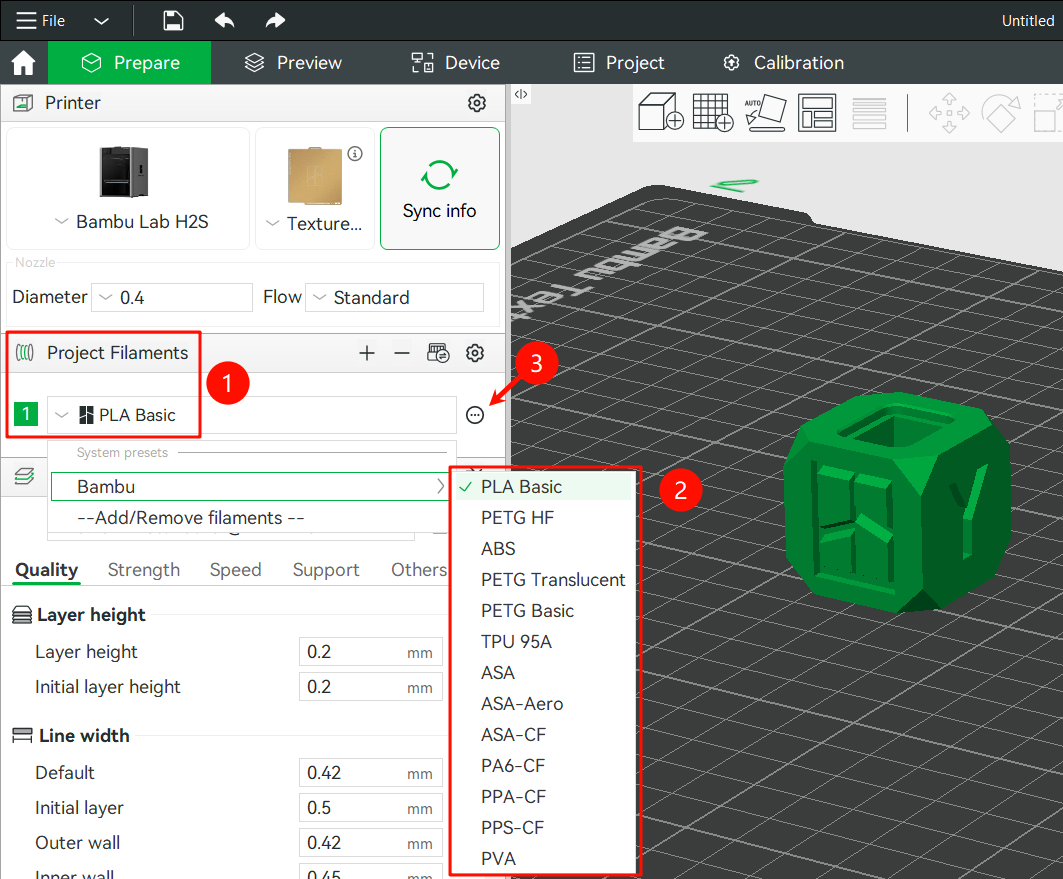
Then, ensure you are in the filament tab (4) and scroll down (5) until you find the Max volumetric speed (6).
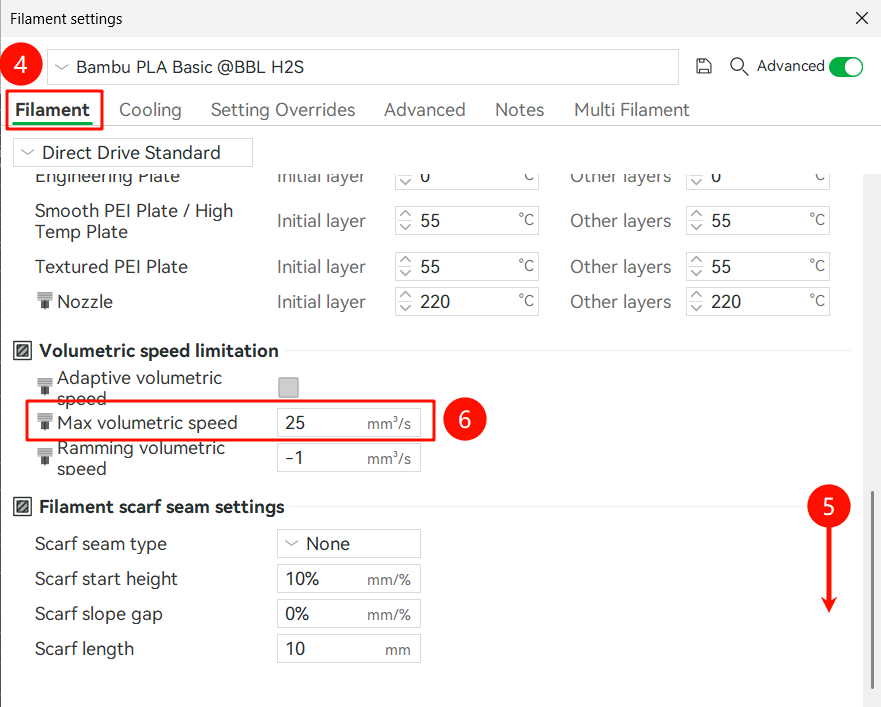
On the Bambu Lab H2S equipped with Bambu PLA Basic, the maximum volumetric speed is specified at 25 mm³/s. This value represents the upper extrusion limit that the hotend and filament can sustain reliably. This value was carefully evaluated by Bambu Lab, for different machines and filaments.
The slicer determines the required flow for every feature and toolpath during the entire model. If the calculated volumetric speed exceeds the maximum allowed value for the selected filament type, whether due to higher print speed, increased layer height, or greater layer width, the slicer automatically adjusts by reducing the speed. This ensures that the actual flow remains within the defined maximum volumetric speed, maintaining print quality. If the maximum volumetric speed is incorrect or increased, the printer may attempt to extrude material at a rate beyond its physical capability.
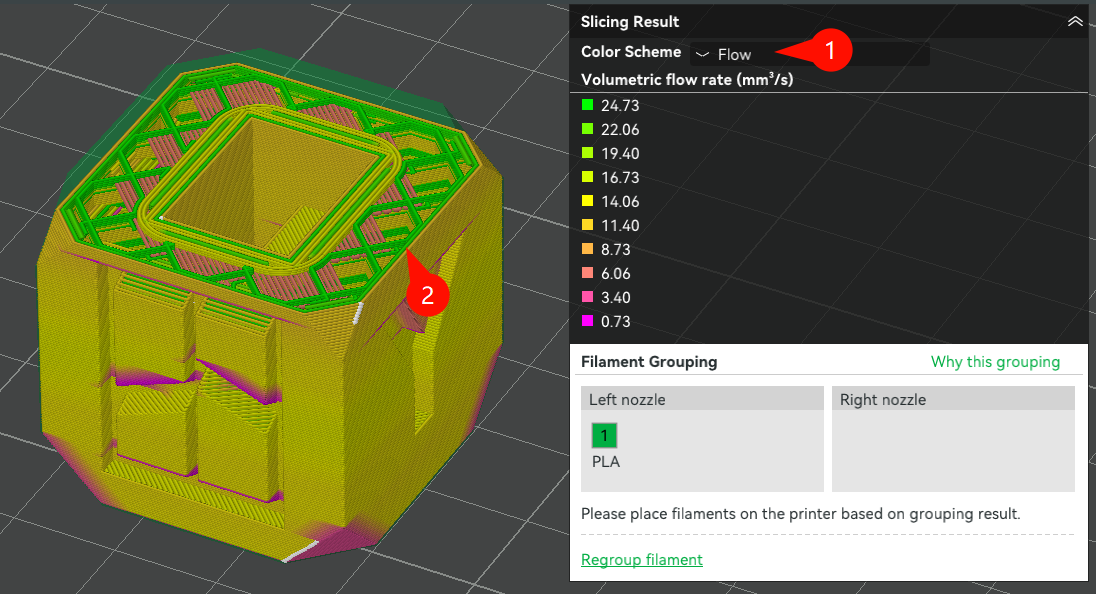
TIP: After slicing a model, if your print seems slower than expected, check the Maximum Volumetric Speed setting in Bambu Studio, under the "Flow" menu (1). It may limit speed for quality reasons, and you can see exactly where the maximum volumetric speed is achieved.
¶ How filaments influence the maximum volumetric speed
The maximum volumetric speed is not only determined by the printer hardware (hotend, nozzle, extruder) but also by the material properties of the filament. Each material behaves differently due to its: melting point, thermal conductivity, viscosity when molten, sensitivity to temperature changes and mechanical properties.
The maximum volumetric speed of a filament depends on how easily it can melt and flow through the nozzle. Materials with a lower melting point, such as PLA, reach extrusion temperature quickly and can sustain higher speeds. In contrast, high-temperature filaments like ABS take longer to melt, so the hotend struggles to keep up at fast flow rates. Thermal conductivity also matters, PLA transfers heat efficiently and melts evenly, while PETG and ABS absorb heat more slowly. If pushed too fast, their core may remain partially solid, which leads to under-extrusion.
Viscosity is another factor. PLA becomes a low-viscosity, easy-flow liquid once molten, but PETG and ABS are much thicker. They create back-pressure inside the nozzle, limiting how much material can pass through per second. Temperature sensitivity adds another constraint. PLA is forgiving across a wide range of nozzle temperatures, but PETG and TPU are more delicate. A small temperature mismatch can cause PETG to jam or string, and TPU to clog or fail.
Mechanical properties affect extrusion even before melting. Rigid filaments like PLA and ABS push smoothly through the extruder at high speeds, but TPU’s flexibility causes it to compress and buckle when forced quickly, making its maximum volumetric speed the lowest of all. PETG also tends to stick to nozzle walls when molten, adding drag that further slows flow.
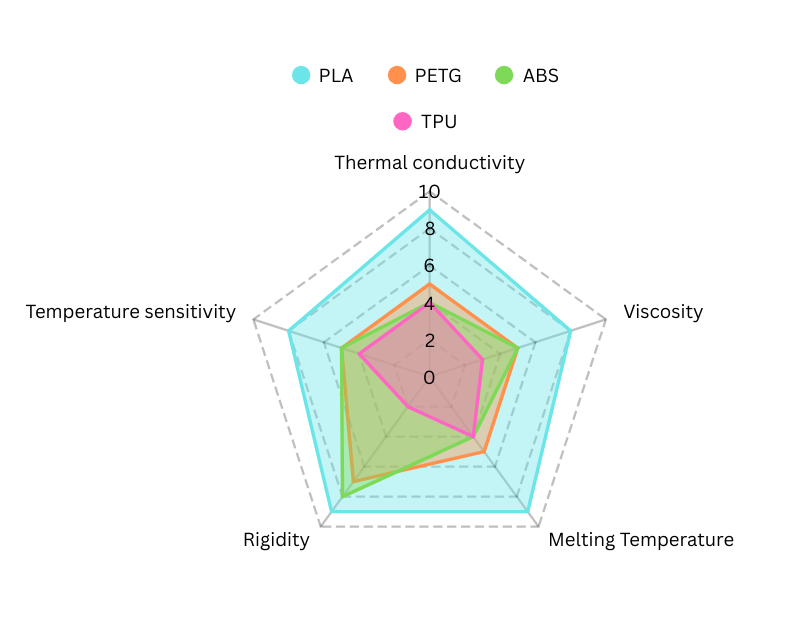
Below we have a comparison chart between PLA, PETG, ABS and TPU. A larger area means the filament has a higher maximum volumetric speed:
¶ How to increase the print speed without reaching the maximum volumetric speed
Several techniques allow you to increase print speed while staying within the maximum volumetric speed. The most effective adjustments include lowering the layer height, slightly raising the hotend temperature within the recommended range, and using a larger nozzle diameter. Each of these strategies helps to reduce the extrusion load on the hotend, making it possible to achieve faster prints without exceeding the maximum volumetric speed.
¶ Using lower layer heights
Layer height is another important factor that directly influences volumetric speed. When you reduce the layer height, each line of extrusion contains less material, which lowers the overall volume of filament that must be melted and pushed through the nozzle per second. This means the hotend is under less strain, even if the print speed remains the same. Using the volumetric speed formula along with a layer width of 0.45 mm, we can vary the speed and compare the different volumetric speeds between 0.2mm layer height, 0.3 mm and 0.16 mm.
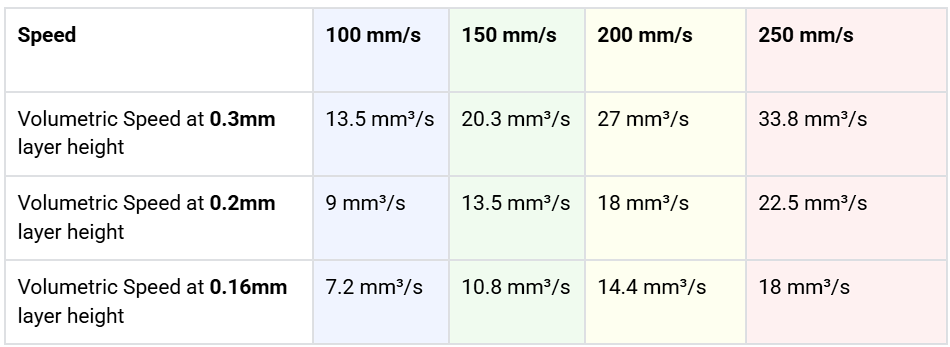
By reducing the layer height, we managed to decrease the volumetric speed. In the table above it is clear that reducing the layer height from 0.3mm to 0.16mm at 250mm/s reduced the volumetric speed from 33.8 mm³/s to 18 mm³/s. Aside from lowering volumetric load, smaller layer heights also improve the resolution and surface quality of a model. Thinner layers capture finer details, reduce the appearance of visible layer lines, and produce smoother curves and slopes. The trade-off, of course, is that print time increases significantly, since more layers are required to build the same model height.
¶ Hotend Temperature
When printing close to the maximum volumetric speed of a filament, the hotend sometimes struggles to melt material fast enough. One way to help is by slightly raising the nozzle temperature, typically in the range of 5–10 °C. This extra heat lowers the viscosity of the molten filament, allowing it to flow more easily through the nozzle and giving the printer a little extra headroom in volumetric speed.
However, temperature should never be your first adjustment. When printing close to the maximum volumetric speed, it is better to start by inspecting the print for signs of stress. Look for under-extrusion, such as visible gaps in the walls, rough infill. Also check for poor layer adhesion, which may show up as layers that separate or weak points where the part can be snapped apart too easily. These are early signs that the hotend is reaching its melting limit.
If these issues appear and lowering the speed is not an option, then carefully increasing the hotend temperature by a few degrees can often stabilize extrusion enough to finish the model successfully. This should be considered a last resort adjustment, because going too high can introduce its own problems, such as stringing, drooping overhangs, or discoloration of the material.
¶ Nozzle diameter
With a larger nozzle diameter, each line of filament has a greater cross-sectional area. This means the extruder can push more plastic through the nozzle for the same movement speed of the toolhead. Because the nozzle opening is wider, the molten filament encounters less resistance compared to being forced through a small opening. This allows the hotend to deliver higher flow rates before reaching its limit.
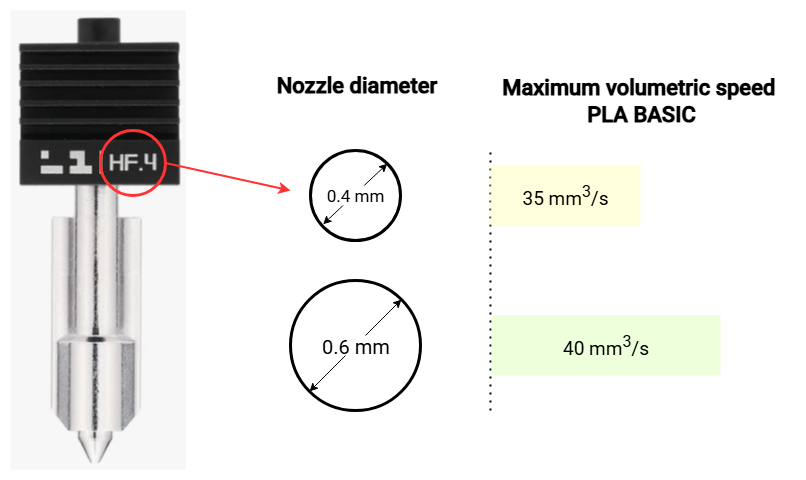
In practical terms, switching from a 0.4 mm nozzle to a 0.6 mm High Flow nozzle increases the maximum volumetric speed that the system can achieve without under-extrusion. For example, the Bambu Lab H2 Series with a 0.4 mm High Flow nozzle can reach around 35 mm³/s with PLA Basic. By moving to a 0.6 mm High Flow nozzle, the system can extrude even up to 40 mm³/s, which enables faster printing and larger headroom for Speed mode changes.
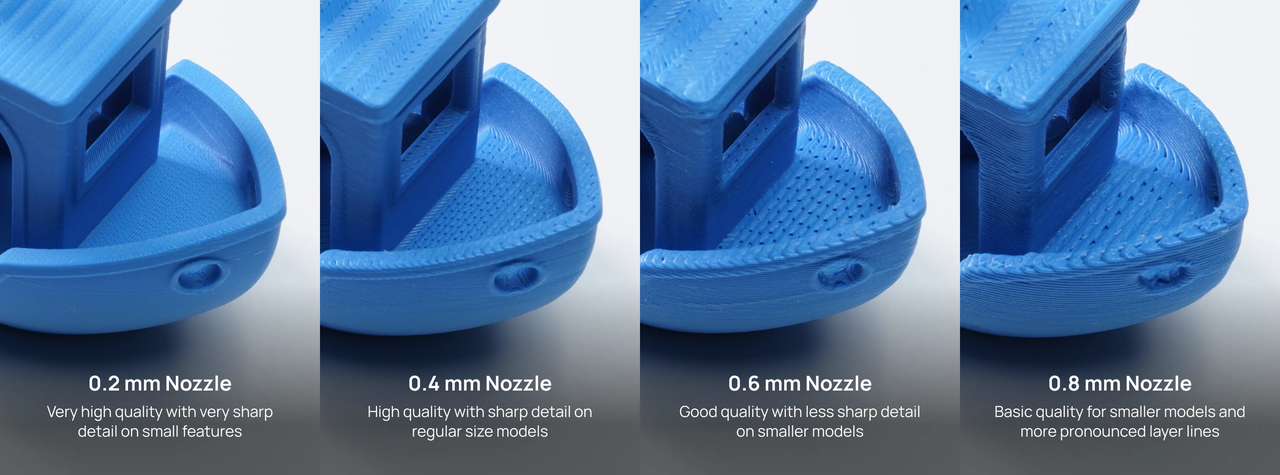
That said, larger nozzles come with trade-offs. While they boost volumetric speed and allow thicker layers and stronger parts, they also reduce the achievable detail and surface finish compared to a smaller nozzle. For projects where print quality and fine features are more important than speed, sticking with a 0.4 mm nozzle may still be the better choice.
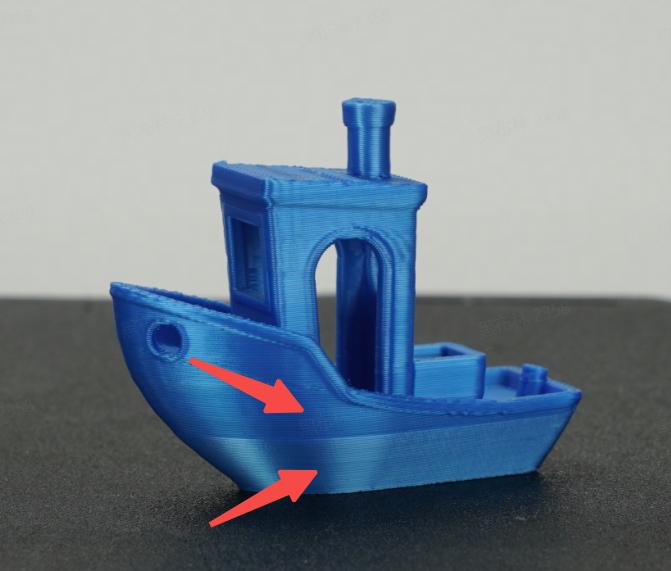
¶ Effects on Print Quality
If the maximum volumetric speed is exceeded, several print quality issues may occur. It is important to recognize these symptoms in order to adjust the settings and restore proper print quality. Typical issues include dimensional accuracy issues, under-extrusion, weak or inconsistent overhangs, poor bridging performance, variation in print shine/gloss, and reduced inter-layer bonding that may result in cracks or fragile parts.
Dimensional accuracy issues originate when the maximum volumetric speed is exceeded, the hotend simply cannot melt and deliver material at the commanded rate. The slicer still tells the toolhead to move as if the material is being laid down correctly, but the machine falls behind. This mismatch results in walls and features being thinner than intended. For example, a 0.45 mm wall might come out at 0.35 mm or less, because there wasn’t enough molten filament to fully fill the path. Small holes may close up, bridges may sag, and tolerances for mechanical parts can be completely thrown off.
The problem is that under-extrusion in this form is subtle, unlike weak adhesion, which you can feel by touching the part, or shine variation, which is visible under light, dimensional inaccuracies may not be noticed until you try to assemble a print or measure it with calipers. This is why respecting volumetric speed limits is so important for functional parts, especially those with mating features, snap fits, or tight tolerances.
Under-extrusion may occur when maximum volumetric speed is exceeded. In this situation, the toolhead moves faster than the hotend can consistently melt and deliver filament. As a result, less material is extruded than required, leaving small gaps in the printed model. Find more details about under extrusion here.
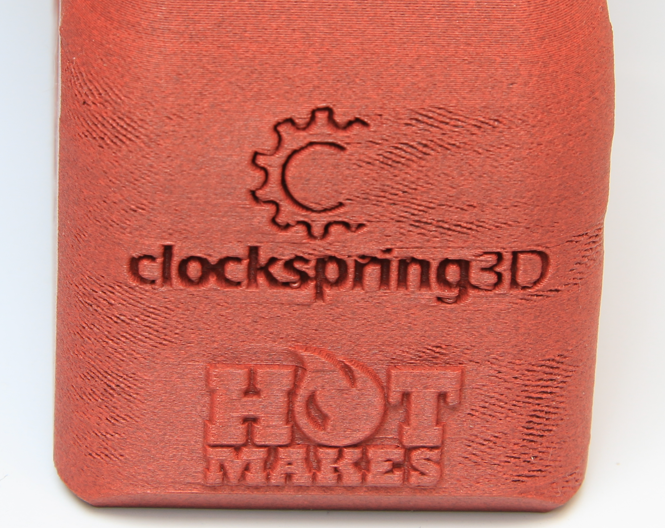
Variation in print shine/gloss may occur when the volumetric speed is rapidly changed. Under these conditions, the filament may not be fully melted or extruded evenly, which alters the way light reflects off the printed surface. This can create noticeable differences in shine or slight shifts in colour across the model, even when the same filament is used. Find more details about variation in print shine/gloss here.
Reduced inter-layer bonding can occur when the maximum volumetric speed is exceeded. If the hotend cannot fully melt the filament at the required flow rate, the extruded lines may be under-filled and deposited at a lower temperature than intended. This results in weaker adhesion between layers, which can lead to cracks or fragile areas in the printed part, reducing its overall strength and durability.

¶ Machine problems originated from exceeding the maximum volumetric speed
Exceeding the maximum volumetric speed can cause serious extrusion issues. When the filament is pushed faster than the hotend can melt it, the pressure in the hotend increases dramatically. This often leads to nozzle clogs, as partially melted filament solidifies and blocks the flow. The high resistance also causes excessive wear on the extruder gears, which may grind into the filament. Over time, the gears themselves can become clogged with filament dust and shavings, reducing their grip and making extrusion even less reliable. In such situations, it's essential to identify the cause of the issue and determine the necessary steps to resolve it. You can find more information here.
¶ How do speed modes impact the volumetric speed?
Volumetric speed and speed modes are closely related because both determine how much material your printer can extrude within a given time. Volumetric speed sets the physical limit of how fast the hotend can melt and push filament, while speed modes in Bambu Studio decide how aggressively the printer tries to approach those limits. If you choose a mode that pushes the printer beyond the filament’s maximum volumetric speed, you may run into under-extrusion, clogs, or poor print quality.
This is why understanding volumetric speed is essential before adjusting speed modes. Once you know the extrusion capacity of your filament and hotend, you can make an informed decision on which mode is suitable for your project.
The following guideline chart provides a general reference to help you decide when it is appropriate to switch modes.
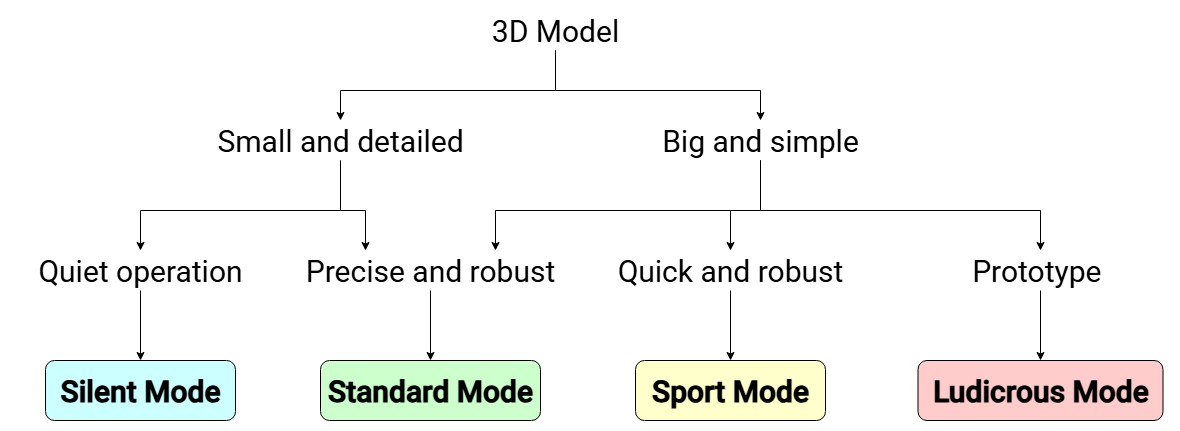
¶ When to Use Silent Mode
Silent Mode is the right choice when you need the printer to run as quietly as possible, such as during overnight prints or when the printer is placed in an office or living space. This mode slows down toolhead movement, which minimizes noise while also giving the filament more time to melt and bond. As a result, Silent Mode not only keeps the machine quiet but can also deliver excellent surface quality and strong layer adhesion
¶ When to Use Standard Mode
Standard Mode is the balanced default for most print jobs. It offers a good compromise between speed, quality, and reliability. If noise is not a concern and the part requires good accuracy and strength, Standard Mode is usually the safest choice. This mode maintains the recommended speed, cooling, and extrusion settings that have been pre-tuned in Bambu Studio for each material, ensuring consistent print quality across a wide range of models.
¶ When to Use Sport Mode
Sport Mode is designed for situations where faster print times are desired, but part quality and function still matter. It is particularly useful for utility parts, prototypes, or models where surface finish is not critical, yet the part must remain mechanically sound. Sport Mode increases print speed while staying within safe limits for extrusion and cooling, making it a good option when you want to save time but still need functional reliability.
¶ When to Use Ludicrous Mode
Ludicrous Mode prioritizes speed above all else. It is intended for very simple models or prototypes where the primary goal is to produce a part as quickly as possible. In this mode, the machine runs at maximum speed, which can cause surface imperfections, less precise details, or weaker layer bonding. Because of this, Ludicrous Mode is best reserved for parts where appearance and strength are not important, such as draft prints or quick test pieces.
¶ End Notes
We hope the detailed guide provided has been helpful and informative.
If this guide does not solve your problem, please submit a technical ticket, we will answer your questions and provide assistance.
If you have any suggestions or feedback on this Wiki, please leave a message in the comment area. Thank you for your support and attention!