¶ Issue Description
During printing, the extruder motor inside the toolhead continuously monitors extrusion force in real time. When abnormal resistance is detected, the printer triggers an error and pauses the print job. The user must troubleshoot and resolve the issue before printing can resume. When your device displays the message: HMS_0300_0900_0002_0001: The extrusion motor is overloaded. The extruder may be clogged or the filament may be stuck in the tool head. Please refer to this guide.
¶ Possible Causes
There are several potential reasons for this issue:
-
Improper Hotend Retention
The hotend may not be securely fastened if the retaining clip is not correctly installed. This can cause the hotend to become loose and scrape against the heated bed during the first layer, resulting in extrusion difficulty. -
Warped Model Causing Interference
If the model warps during printing, the hotend may collide with raised portions of the print, increasing extrusion resistance. -
Undried PVA Filament
Printing with PVA filament that has not been properly dried can lead to nozzle clogs due to moisture absorption, which impedes extrusion. -
Incorrect Hotend Temperature
An abnormal hotend temperature that is significantly lower than the required melting point of the filament will prevent proper extrusion.
For example, the standard extrusion temperature for PLA-Basic is around 220 °C. If the hotend is set to only 60 °C, the filament will not melt sufficiently and cannot be extruded. -
Partial or Complete Hotend Clog
The hotend may be partially or fully clogged. In this case, a cleaning procedure or a cold pull may be necessary to restore proper filament flow. -
Deformed or Non-Standard Filament Diameter
Filament that is warped, oversized, or inconsistent in diameter can get stuck in the extruder, causing the extruder motor to skip or click. You may hear a repetitive "clicking" sound. In such cases, the jammed filament needs to be removed. If it is difficult to reach, removing the front cover of the toolhead may be required to access the filament path more easily.
Please check below for potential solutions to each of the problems.
¶ Troubleshooting Steps

Steps 1–5 are relatively simple and require minimal technical skill. We recommend following them in order for effective diagnosis.
¶ Step 1: Check if the Extruder Overload Error Occurs During the First Layer and If the Hotend is Too Close to the Build Plate
If the error occurs while printing the first layer, observe whether the hotend is too close to the heated bed, causing it to scrape against the surface. This can result in excessive resistance and poor extrusion.
If the nozzle is indeed too close, we recommend canceling the current print. Wait until both left and right hotends have cooled down to room temperature before proceeding (this is very important to avoid burns).
Then check the following:
-
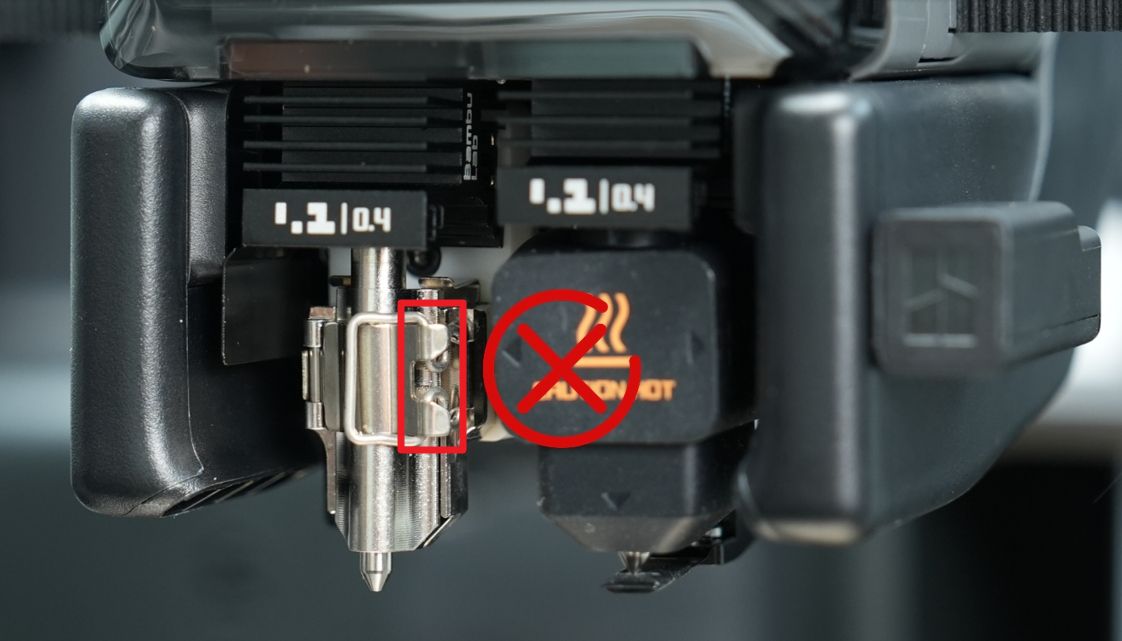
Verify if the hotend retaining clip is properly secured.
A loose clip can allow the hotend to shift downward, causing nozzle-bed collisions. -
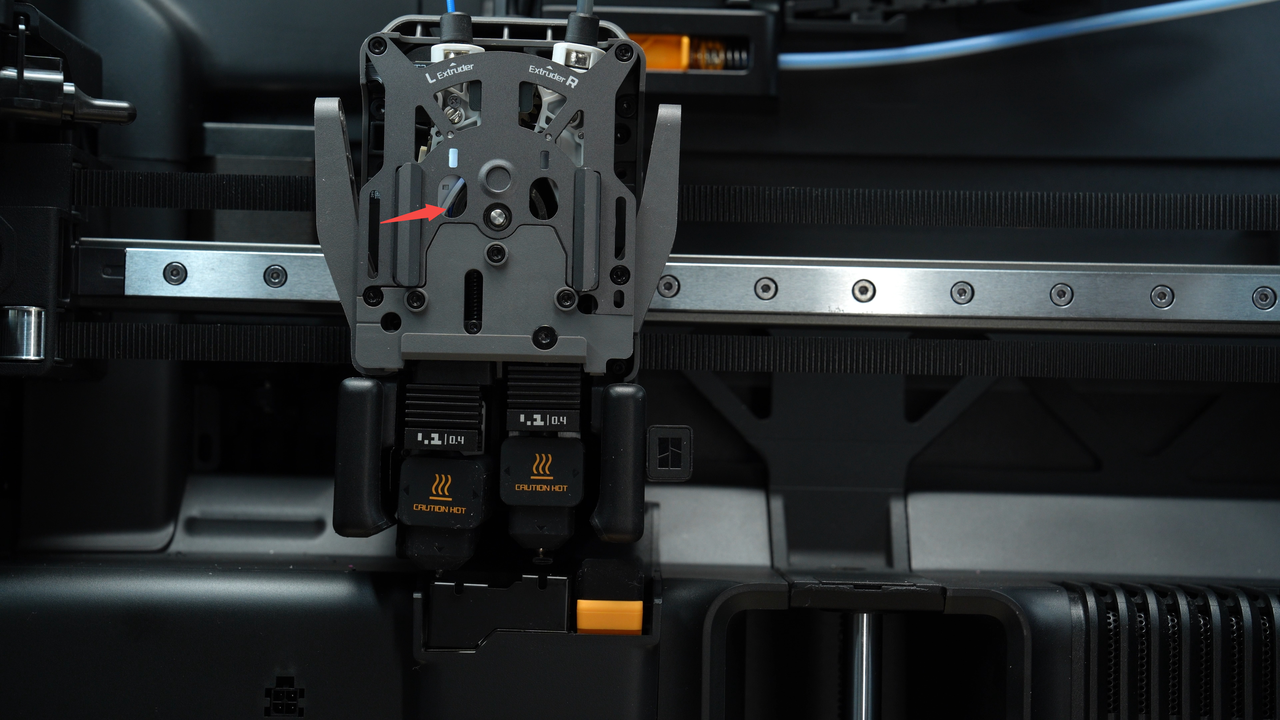
Remove the silicone sock and inspect the retention mechanism.
Confirm that the clip is fastened correctly and that the hotend is properly seated.
 |
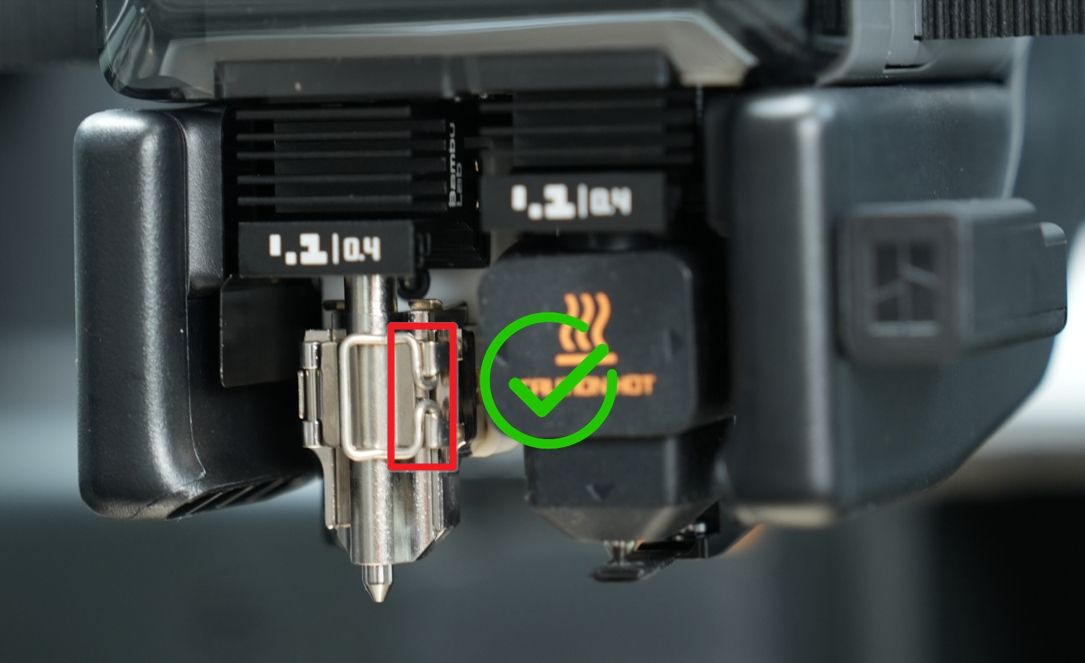 |
If the hotend retaining clip is not installed correctly, please reinstall and secure the hotend using the correct method.
.webp)
- If there is no visible downward shift of the hotend, we recommend performing a bed leveling calibration before attempting to print again.
If the nozzle is still too close to the bed in specific areas, causing it to scrape the surface, a manual bed leveling procedure may be necessary.
For detailed instructions, please refer to the following guide: H2D Bed Tramming
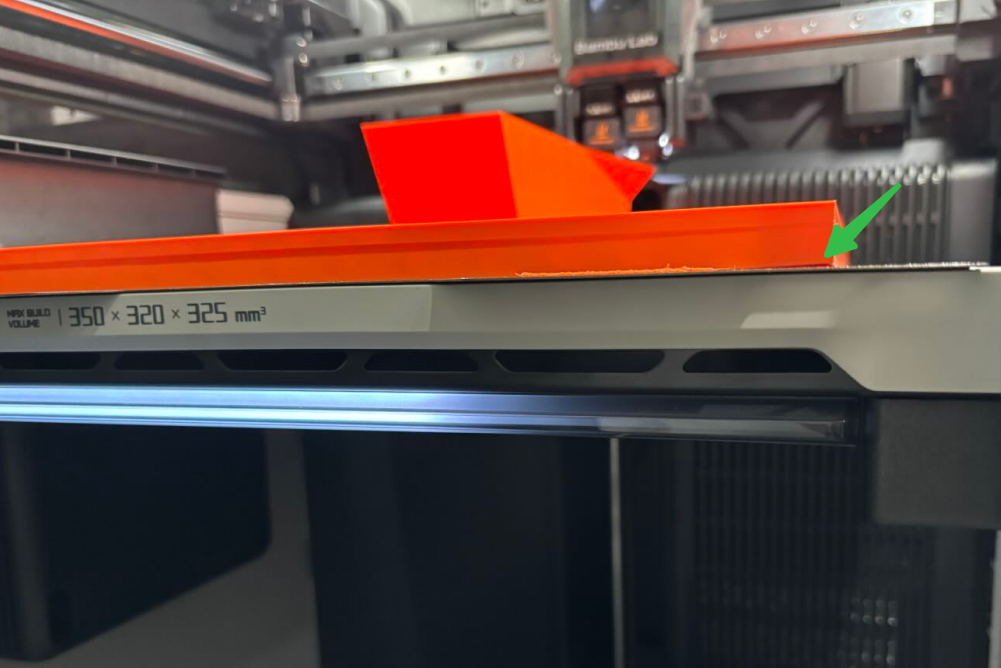
¶ Step 2: Check if the Printed Model Has Warped, Causing the Hotend to Scrape Against the Surface
If the model warps during printing, the hotend may come into contact with the lifted edges, resulting in increased resistance and poor filament extrusion.
You can refer to this wiki article to troubleshoot and prevent model warping: Printed Model Warping: Causes and Solutions. Avoiding warping will help prevent the hotend from scraping against the print surface.
¶ Step 3: Check if the Error Only Occurs During the Purging Process
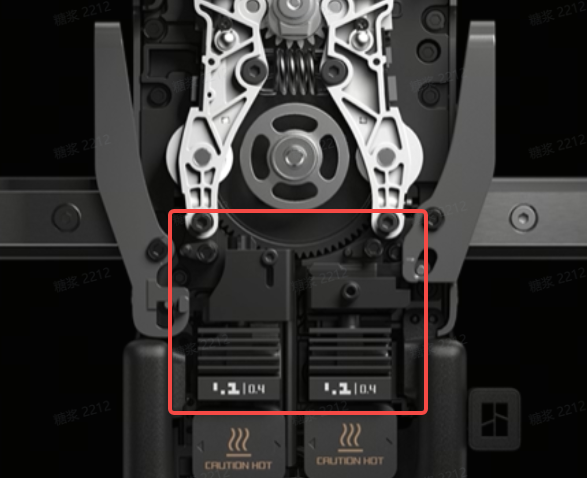
Check whether the max volumetric speed matches the type of the hotend in use.
For example, the preset max volumetric speed for PLA Basic is 25 mm³/s with a standard hotend, while it is 35 mm³/s with a high flow hotend. Using a standard hotend with parameters intended for a high flow hotend may result in extruder motor overload error.
.jpg) |
.jpg) |
¶ Step 4: Check if PVA Filament Is Being Used
When printing with PVA filament, it is essential to ensure the material is thoroughly dried before use. Even brand-new PVA filament must be dehydrated prior to printing, as PVA is highly hygroscopic and may absorb moisture even while sealed in its original packaging.
We recommend using a convection oven set to 85 °C for 12 hours to dry the filament properly.
Note: Using a 0.2 mm nozzle for PVA printing is not recommended due to the high risk of clogging.
For more guidance on printing with PVA, please refer to the following wiki: PVA Printing Guide
Friendly Reminder: Do Not Mix PVA and PETG on the Left and Right Hotends of the H2D Toolhead
PVA has a relatively low heat deflection temperature, while PETG typically requires a heated bed temperature of around 70 °C.
Mixing the two materials using both hotends simultaneously may result in clogs due to excessive heat exposure to the PVA filament.
Important Notes:
- "Mixing" here refers to printing PETG with one hotend (e.g., right) and PVA with the other (e.g., left), or vice versa.
- If PVA is required as support for PETG, it is recommended to use only the right hotend, with AMS support, mimicking the single-nozzle printing method used in the X1/P1 series.
- Do not use PVA on the left hotend when printing PETG.
¶ Step 5: Check if the Hotend Temperature Matches the Filament’s Required Printing Temperature
If the hotend temperature is set abnormally low—significantly below the required temperature for the filament—it will result in extrusion issues.
For example, PLA-Basic typically requires a printing temperature of 220 °C. If the hotend is set to only 60 °C, the filament will not melt properly and extrusion will fail.
Please verify that the hotend temperature at the time of the error (or when resuming the print) matches the filament’s recommended temperature profile.
If the print is initiated from a .gcode file, ensure that the slicing parameters (such as temperature settings) match the actual filament and hotend configuration in use.
Incorrect parameters in the G-code file may cause the hotend to cool down improperly and lead to extrusion failure.
¶ Step 6: Check for a Clogged Hotend
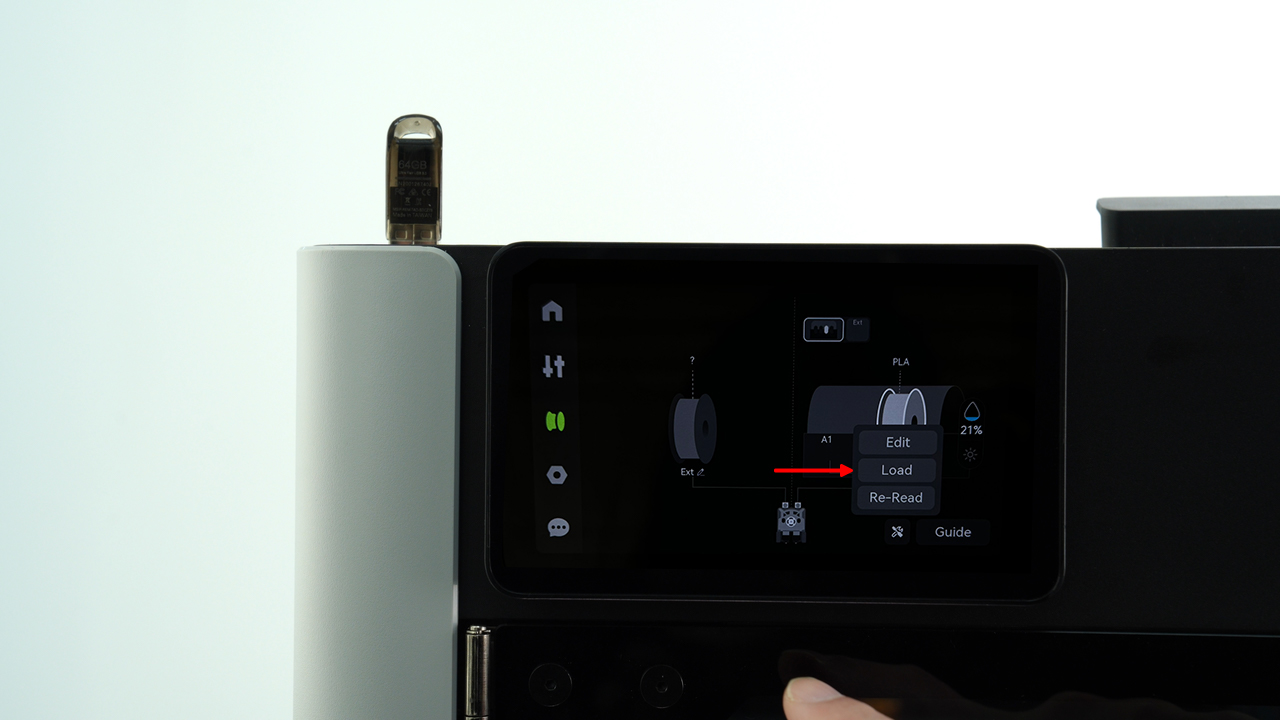
After the error occurs, the toolhead will park above the purge mechanism.
On the printer screen, tap Retry and observe whether the nozzle is able to extrude filament normally.
If filament is extruded properly, the issue is likely caused by resistance in the upstream feeding path (external to the hotend).
Check for External Feeding Resistance (e.g., Tangled Filament, Poor Routing).
Please check for any external resistance along the filament path, such as filament tangling, spool tension, or sharp bends in the feeding route.
This is especially important for PVA and TPU filaments, which are more sensitive to feeding conditions.
If you are using TPU filament, we strongly recommend referring to the following guide before continuing: TPU 85A&90A printing guide for H2D.
Note: TPU filaments typically contain a certain amount of lubricant. During extended high-temperature printing, this lubricant can carbonize inside the hotend, eventually leading to partial or complete clogs.
This is particularly common when printing large or continuous models (e.g., shoes), and may trigger extruder overload or abnormal feed errors.
Recommended Precaution: Perform Cold Pull Before TPU Printing
To minimize the risk of clogs, it is strongly recommended to perform a cold pull before each TPU printing session.
This helps to clean out any residual buildup inside the hotend.
Refer to this guide for detailed instructions: H2D Nozzle Cold Pull Maintenance and Cleaning
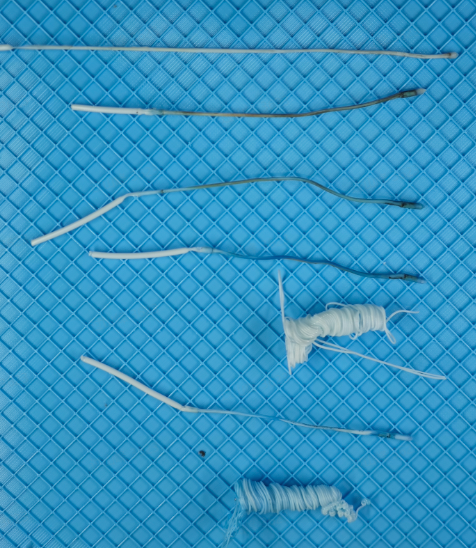
You may repeat the cold pull process multiple times until the removed filament tip appears clean and free of carbonized residue.
Please refer to the image below to see what an ideal cold pull result looks like.
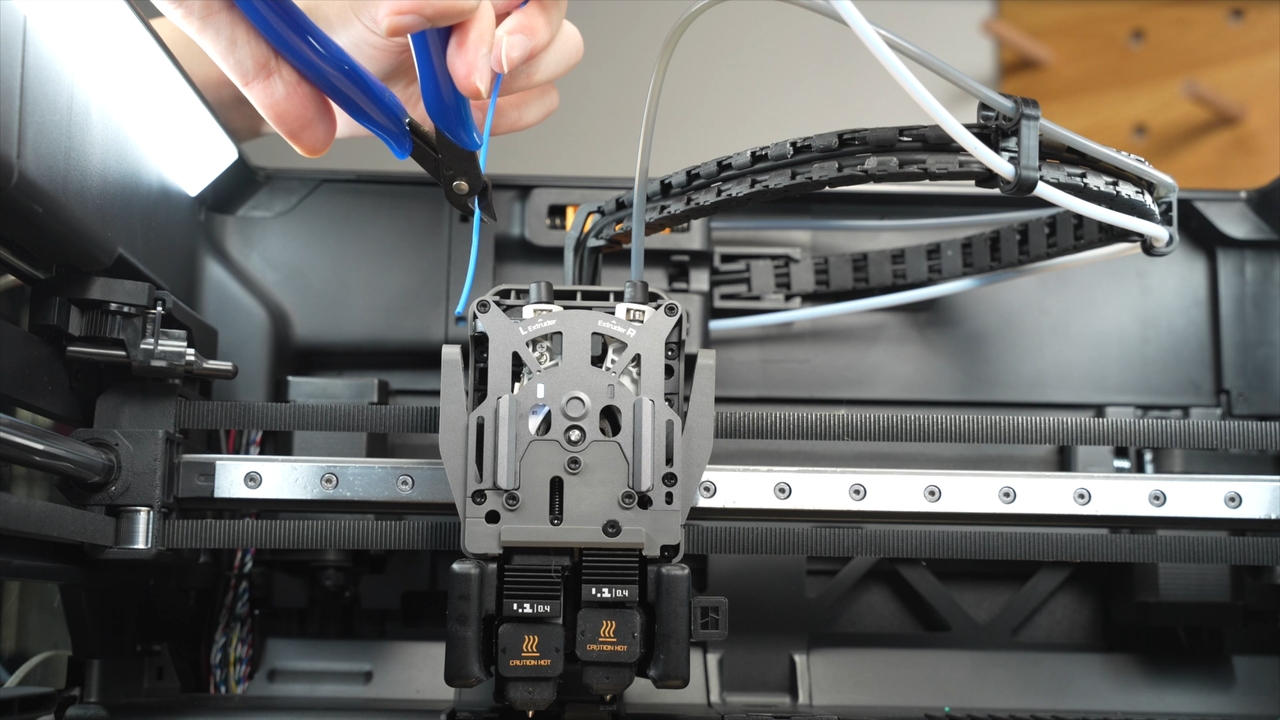
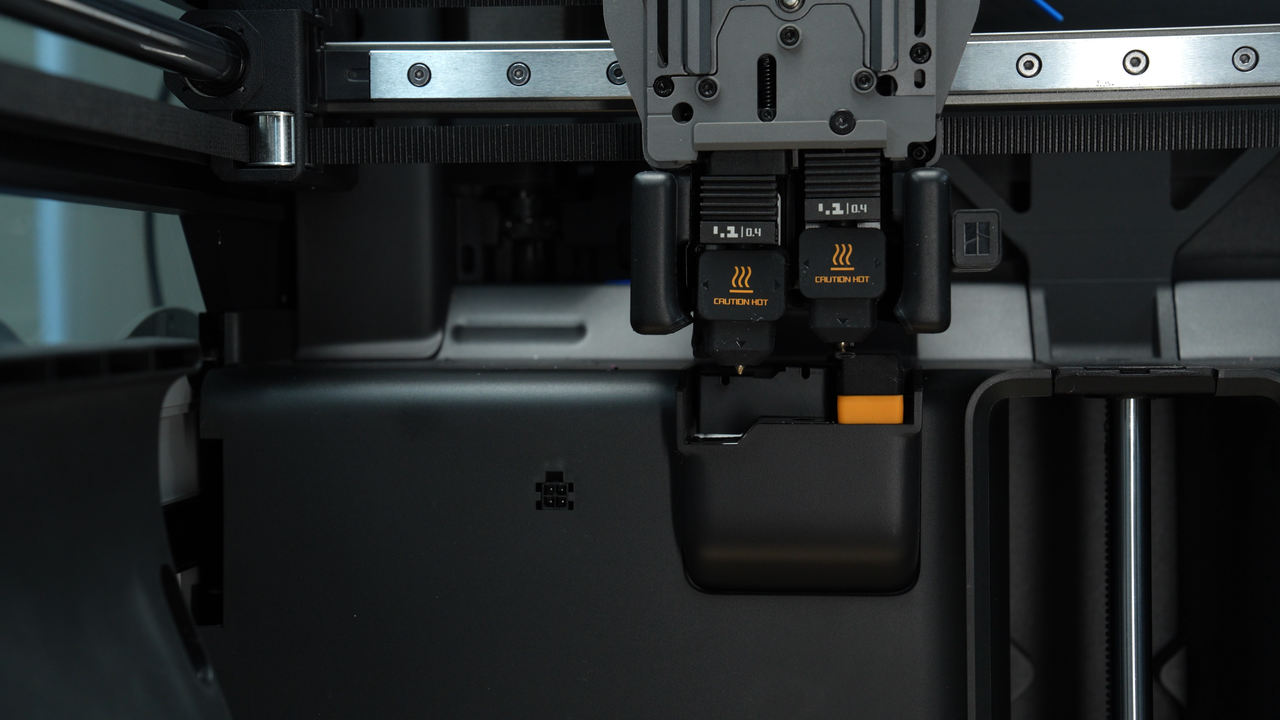
If extrusion fails, wait for the printhead to return to the waste chute and come to a complete stop. Then, wait until the hotend temperature cools down to the target temperature (40°C) before pressing the cutter to cut the filament.
It is essential to perform this operation only after the hotend has cooled to avoid the overheated filament sticking to the cutter, which could cause secondary clogging.
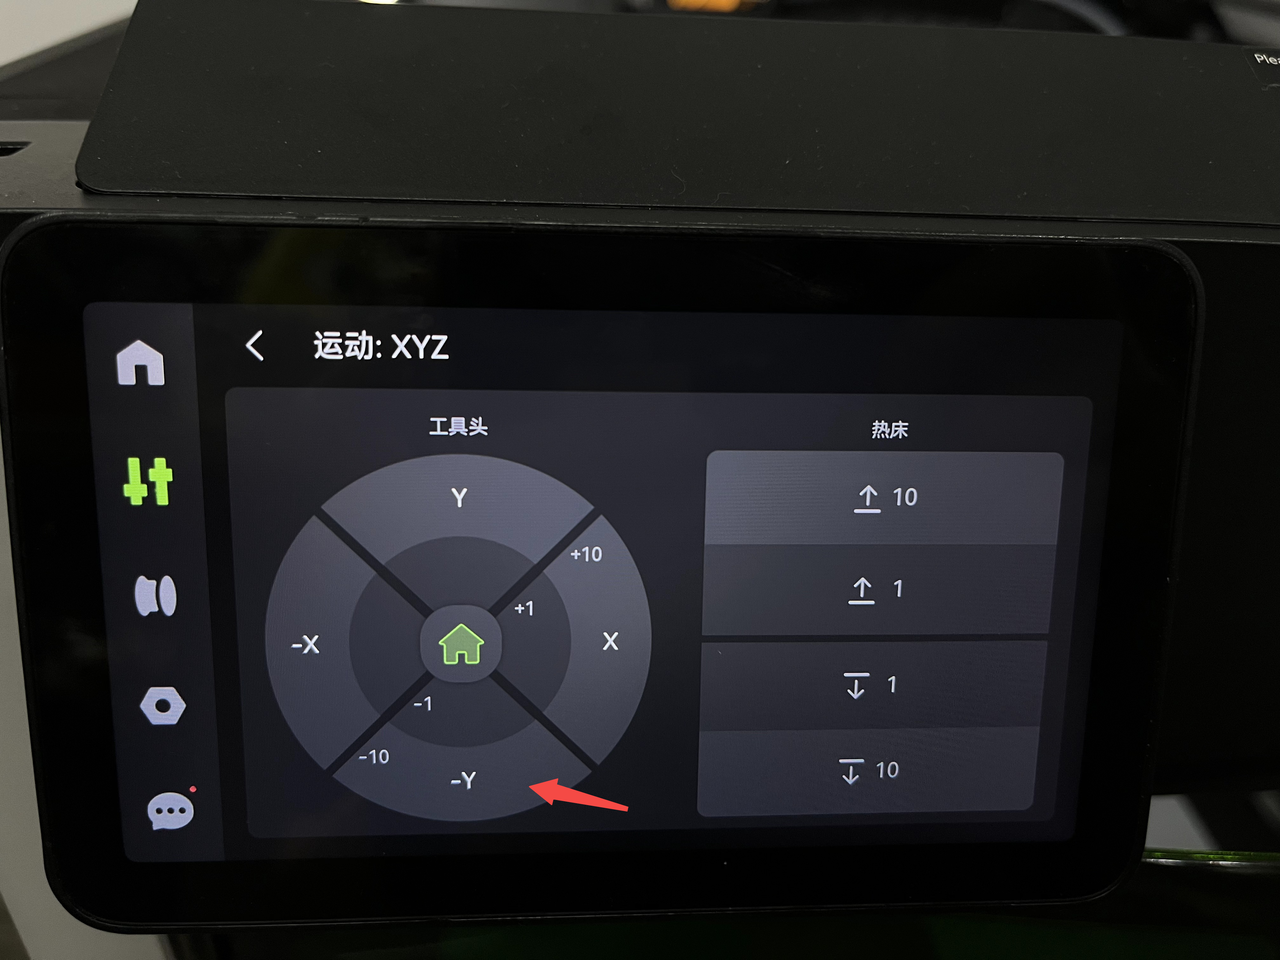
To facilitate subsequent steps, you may also move the printhead from the rear to the front of the enclosure using the Y- control on the screen, making the following operations easier to perform.
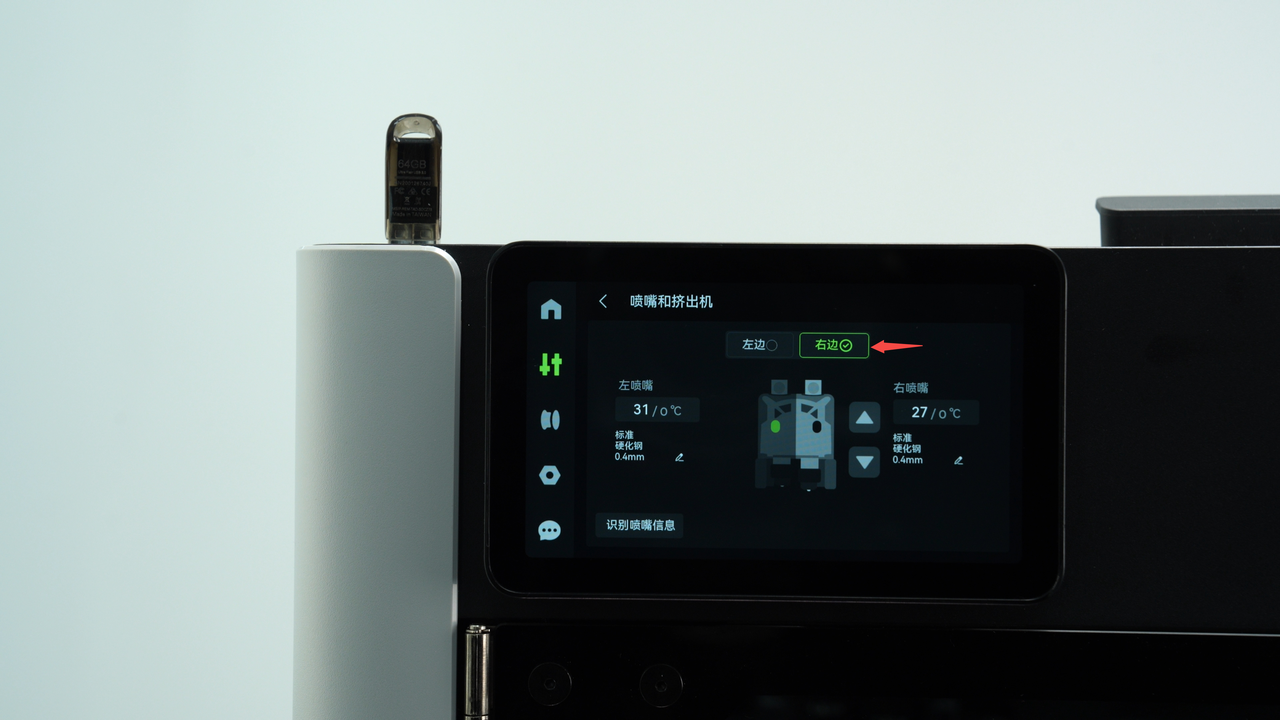
If only the left or right hotend is printing, an “extruder motor overload” error may occur. You can troubleshoot this by swapping the reported error between the left and right hotends or by using a spare new hotend from the accessory kit to determine if the issue is caused by a clogged hotend.
If you confirm that the hotend is clogged, please follow the H2D Hotend Unclogging Procedure to clean the blockage.
If the hotend is confirmed to be free of clogs—either by using a new spare hotend or verifying that the existing hotend is functioning properly—but the “extruder motor overload” error still occurs, continue troubleshooting by following Step 6 to check whether the extruder itself is clogged.
¶ Step 7: Determine Whether the Extruder Is Clogged
¶ Operation 7.1: Check if the Filament Has Deformed Due to Heat, Causing Abnormal Extrusion Resistance
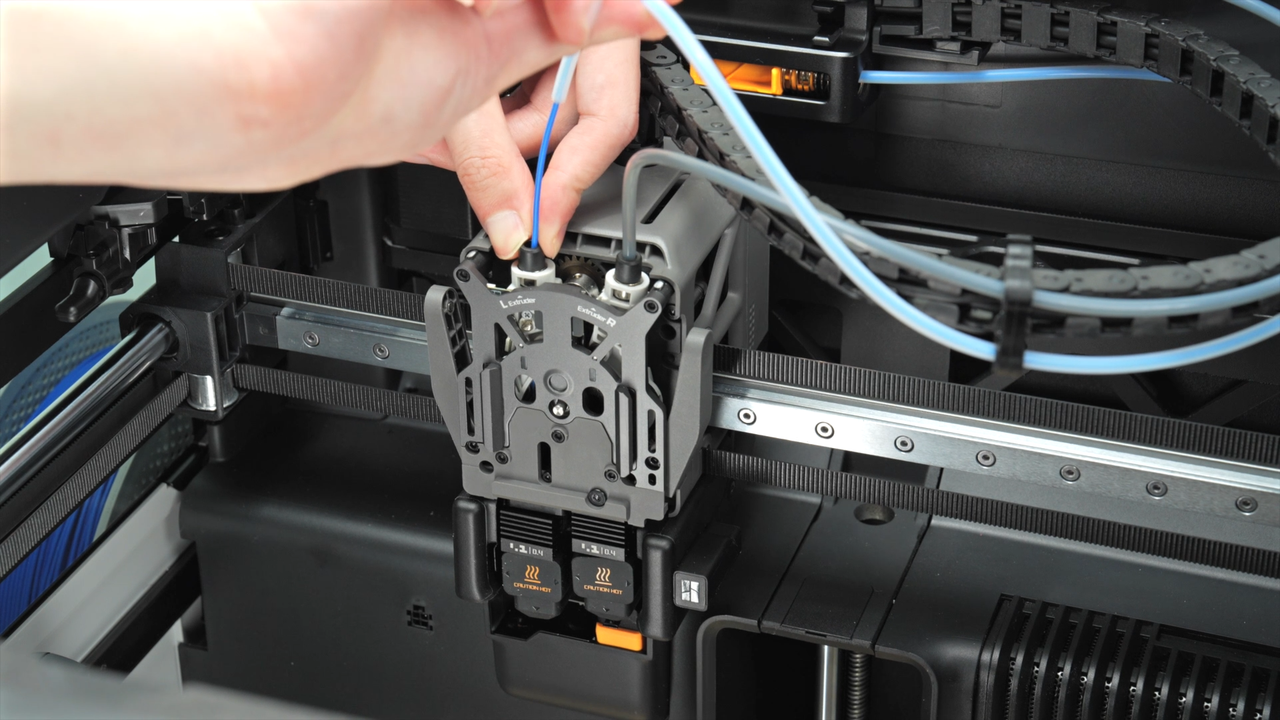
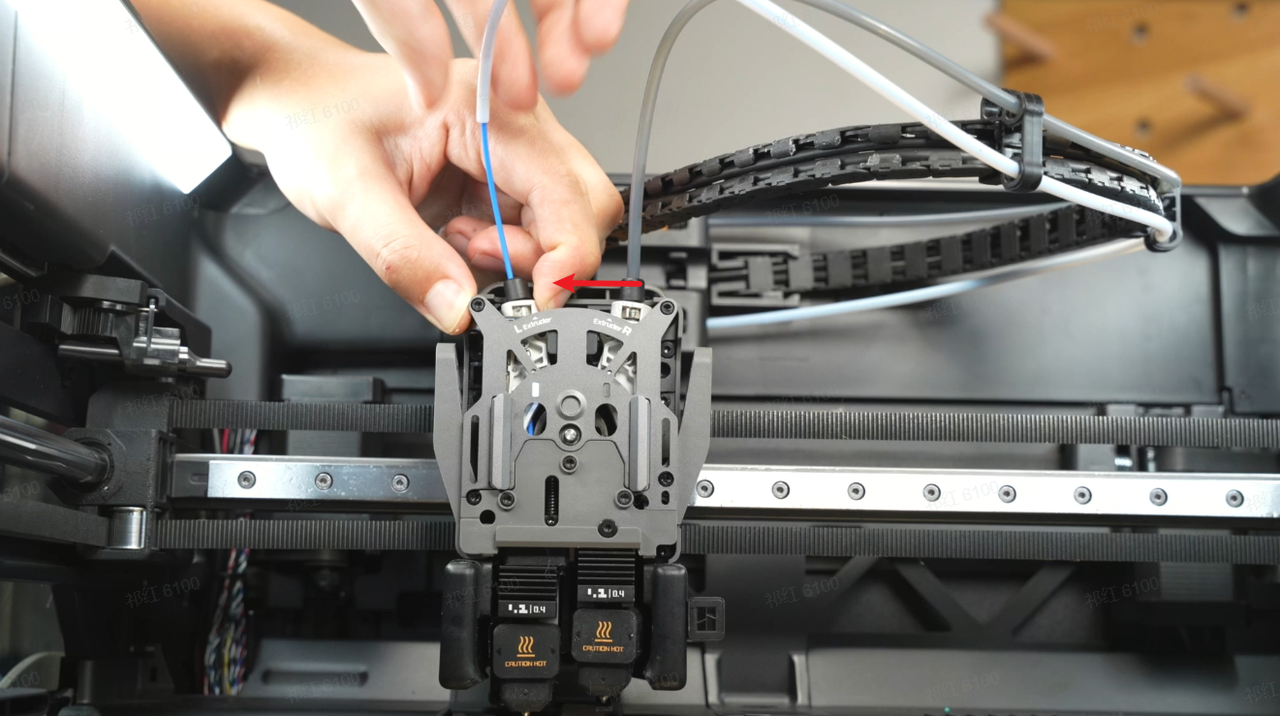
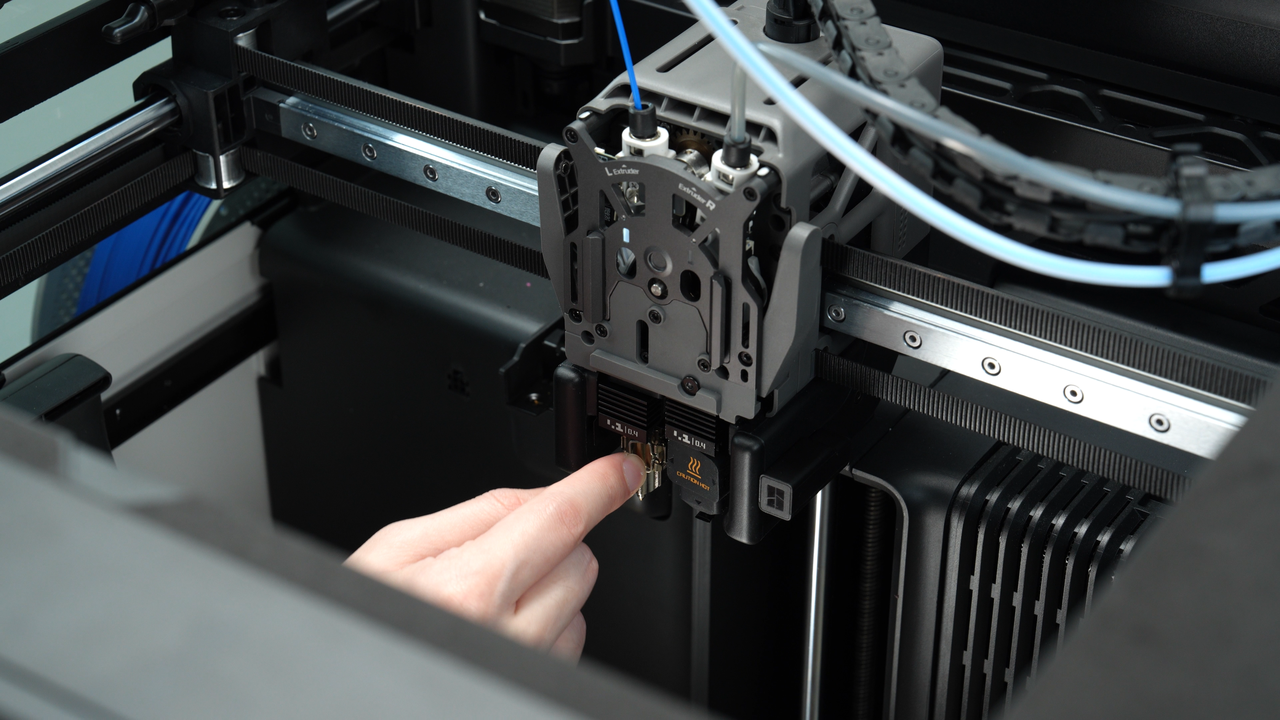
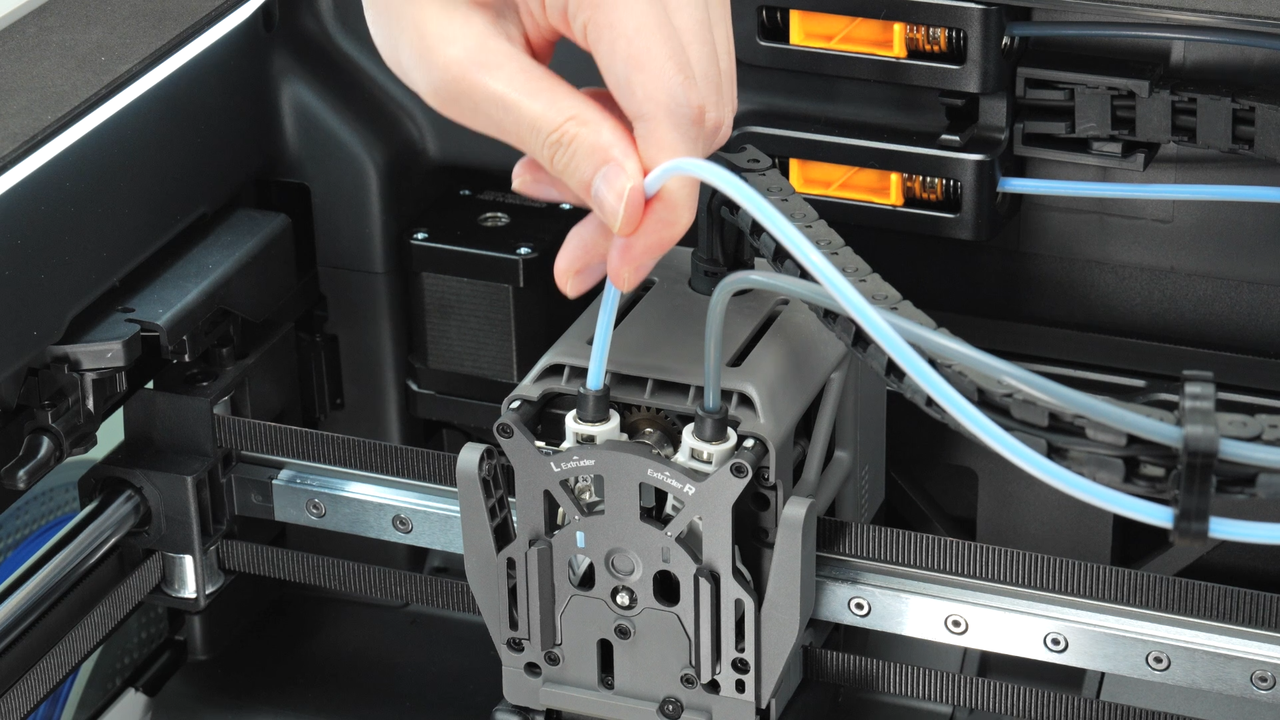
Press down on the black outer ring to disconnect the PTFE tube.
Note: When an extruder clog occurs, the filament inside the extruder softens. Simply clicking “Retract” may not automatically unload the filament, so manual filament removal is required before retrying.
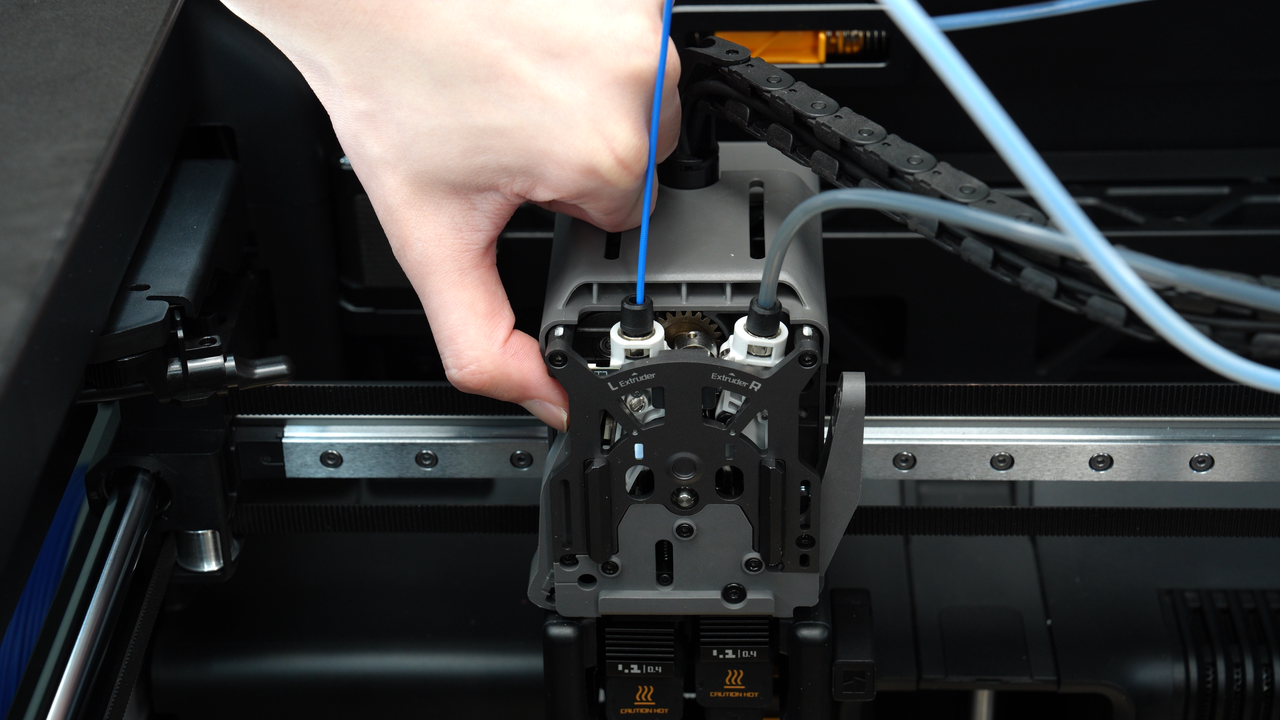
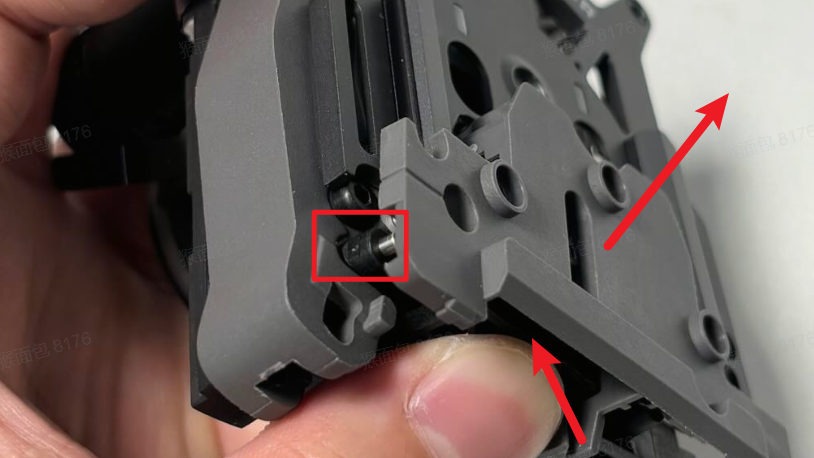
Then, apply firm pressure to push the left idler lever to the left (pushing the idler lever requires considerable force).
Push until the screw indicated in the image below is just no longer covered by the extruder front cover. Then, hold the filament by hand and gently pull it upward to remove it.
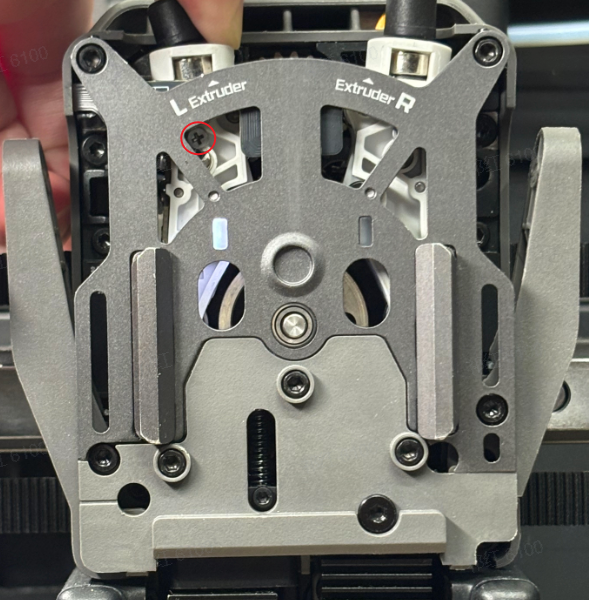
If you feel significant resistance while pulling the filament upward and cannot smoothly remove this section, it indicates that the clog may be inside the extruder assembly. Please stop forcibly pulling the filament, as strong pulling may cause abnormal filament jams within the idler lever assembly, making cleaning very difficult.
Clogs inside the extruder gear are rare, but if you do encounter this issue, please refer to the H2D Extruder Disassembly and Assembly Guide to remove the extruder front cover or drive gear for cleaning.
If you can successfully manually pull out the filament and notice obvious abnormalities in the filament, please cut off the defective section. We also recommend opening the front door and top cover during printing, and removing the printhead front cover to improve cooling of the extruder assembly, which helps prevent such clogging issues.
After improving the cooling of the extruder assembly, reinstall the hotend and the silicone sock.
Reinstall the PTFE tube;
And load the filament into the machine.
After resuming printing, observe whether the extruder gear is rotating normally and if any filament is being extruded from the hotend. If the extruder gear is rotating properly but no filament is observed extruding from the hotend, follow this wiki H2D Hotend Unclogging Procedure to clear any clogs in the hotend.
Note: Only if the filament cannot be removed at this step should you proceed to disassemble the extruder front cover for further cleaning.
¶ Operation 7.2: If filament extrusion still fails after completing Operation 7.1, it indicates excessive resistance along the path from the extruder gear to the hotend. Please stop the current print job and clean the extruder front cover guide assembly.
The resistance along the path from the extruder gear outlet to the nozzle can be caused by either the extruder front cover guide assembly or the hotend.
Since the hotend has already been confirmed to be functioning normally and unclogged in Step 6, the resistance is most likely coming from the extruder front cover guide assembly.
Please note that the front cover guide and the left and right cutter handles may interfere with each other, making disassembly somewhat challenging. However, don’t be discouraged—by following the suggestions below, you should be able to successfully remove the front cover guide assembly.
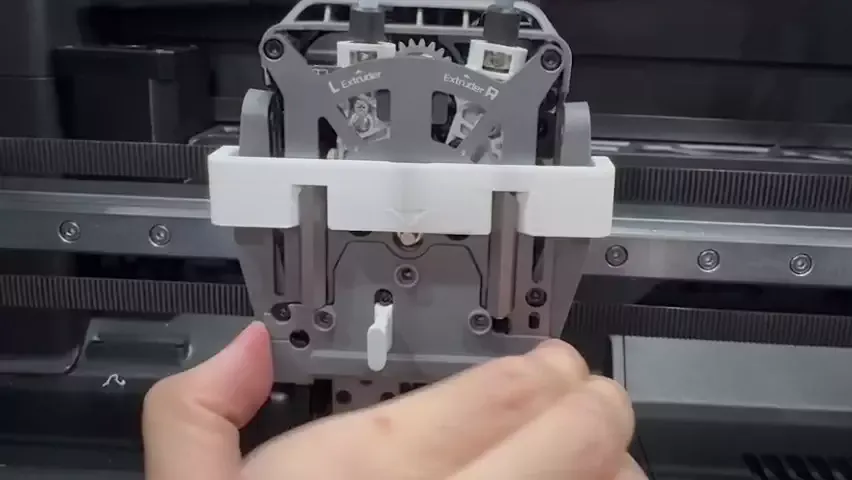
Make sure the hotend has cooled down to room temperature, then first remove the hotend that is not blocked by the nozzle clip. Next, switch the extruder on the screen and remove the other hotend as well. You can refer to this wiki: Replace H2D Hotend Guide
Remove the four screws (or three screws, depending on your version) on the front cover guide.
Press upward against the black hotend connector to slightly disengage the left cutter from the opening slot near the cutter screw. Then, pry the front cover guide outward from the lower right corner with force.
In this process, a section of filament usually passes through both the extruder and the front cover guide, so considerable force is required when removing the front cover guide. After removal, cut the filament between the guide assembly and the extruder to separate the front cover guide assembly.
- You can also refer to this wiki: Replace H2D Dual Extruder Filament Guide
Use your finger to push upward against the black hotend connector while pressing the left cutter handle to slightly disengage the left cutter from the opening slot near the cutter screw. Then, pry the front cover guide outward from the lower right corner with force.
You can also download and 3D print the disassembly aid tool from MakerWorld to make the removal and installation process easier. Download link: H2D Dual Extruder Filament Guide Installation Aid
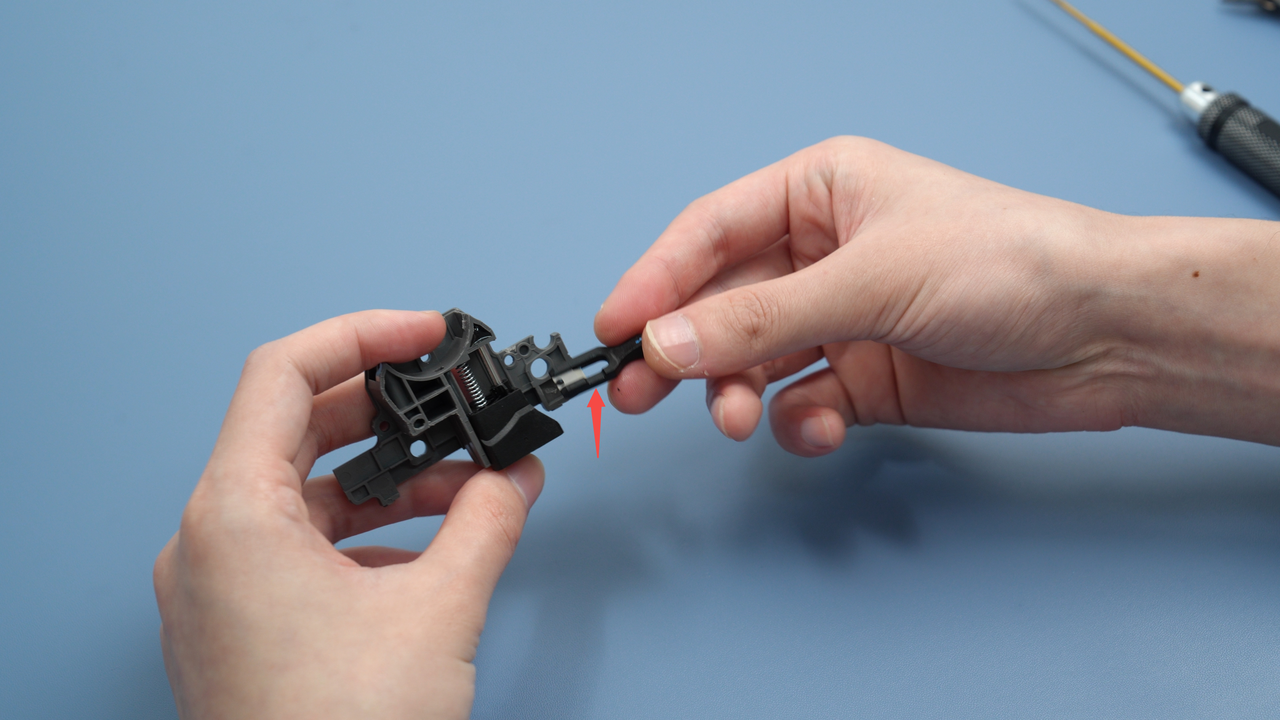
If the abnormal filament is only jammed at the entrance of the front cover guide, simply use diagonal pliers to pull it out.
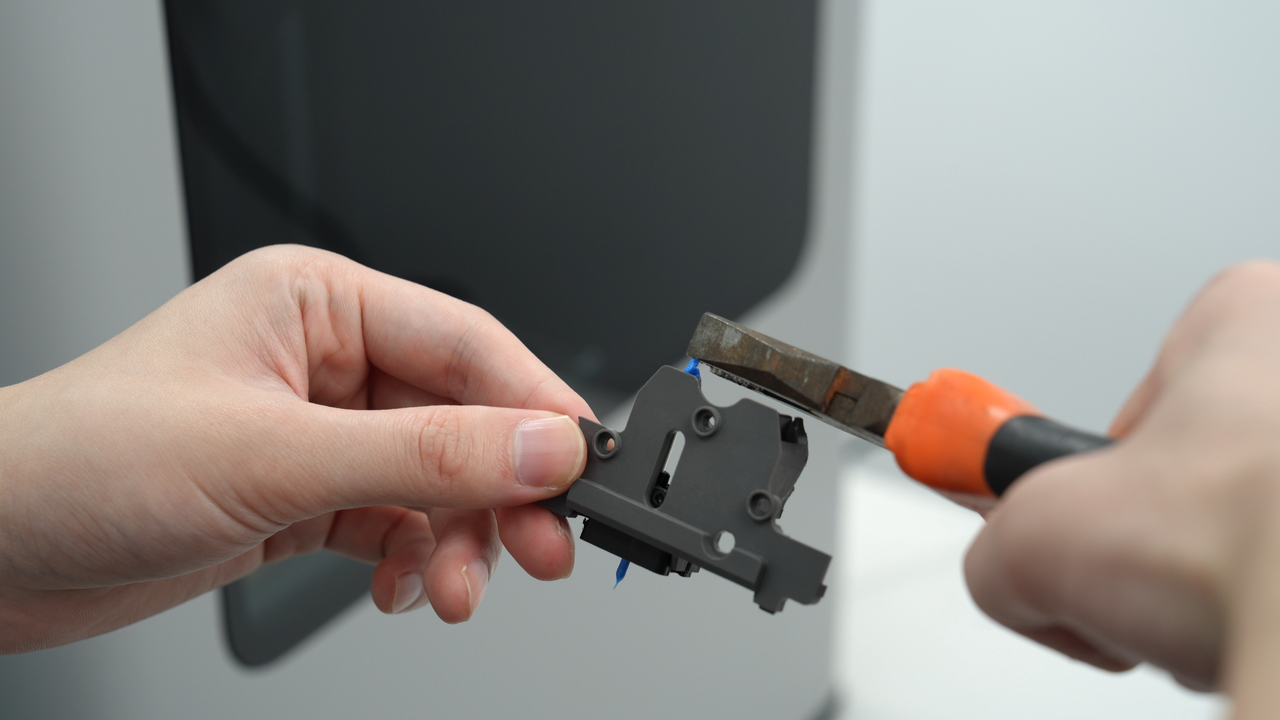
If you insert a short piece of filament into the feeding path of the front cover guide and it cannot pass through, it means the abnormal filament is clogged inside the guide. In this case, the front cover guide needs to be disassembled for cleaning.
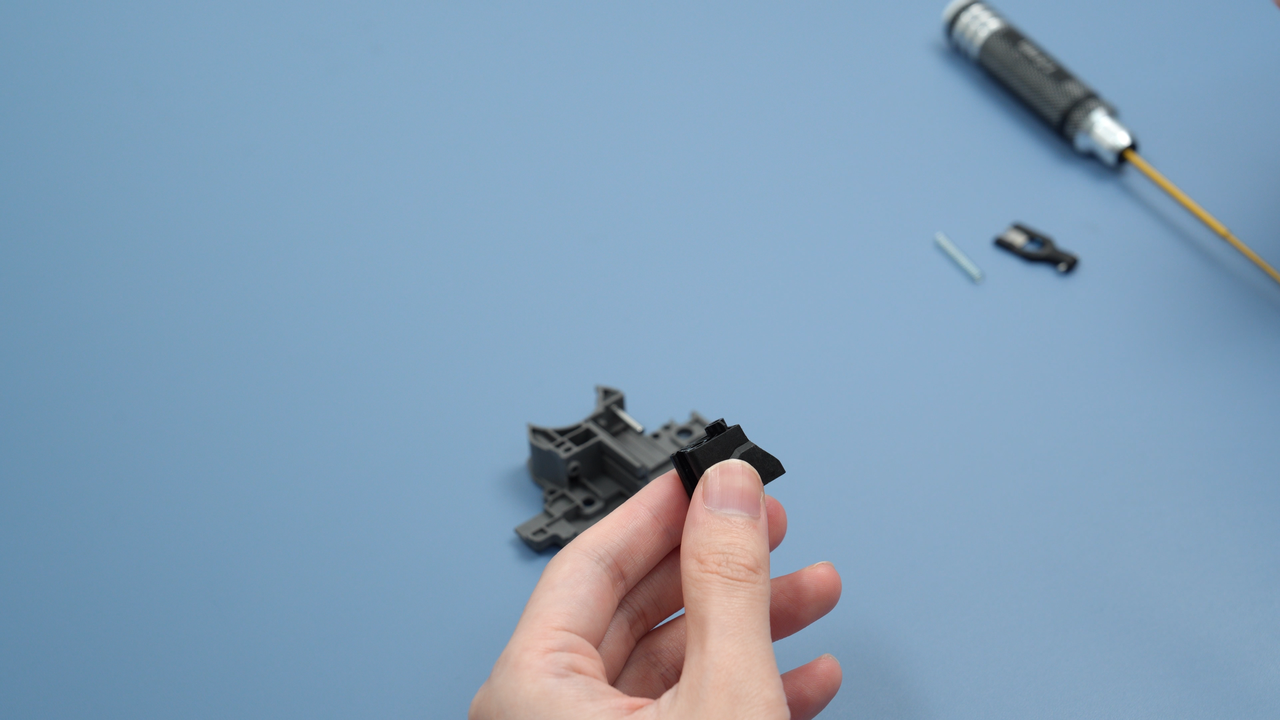
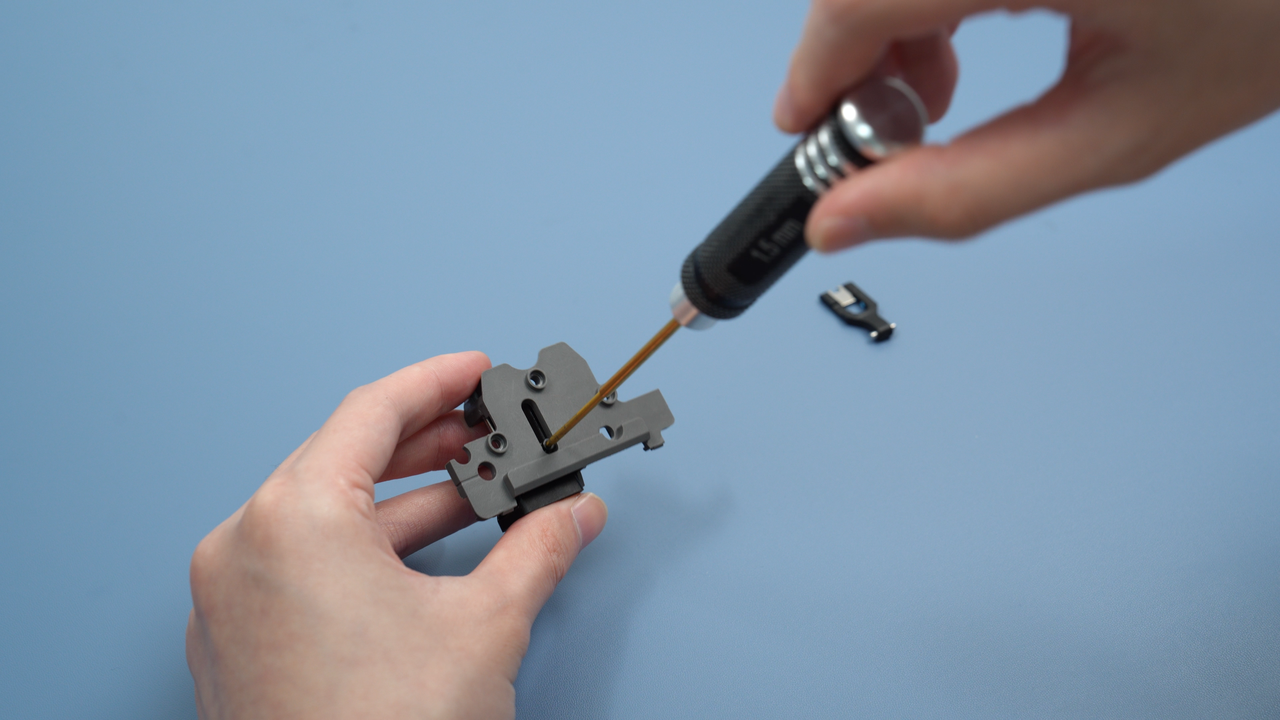
Start by removing one screw.
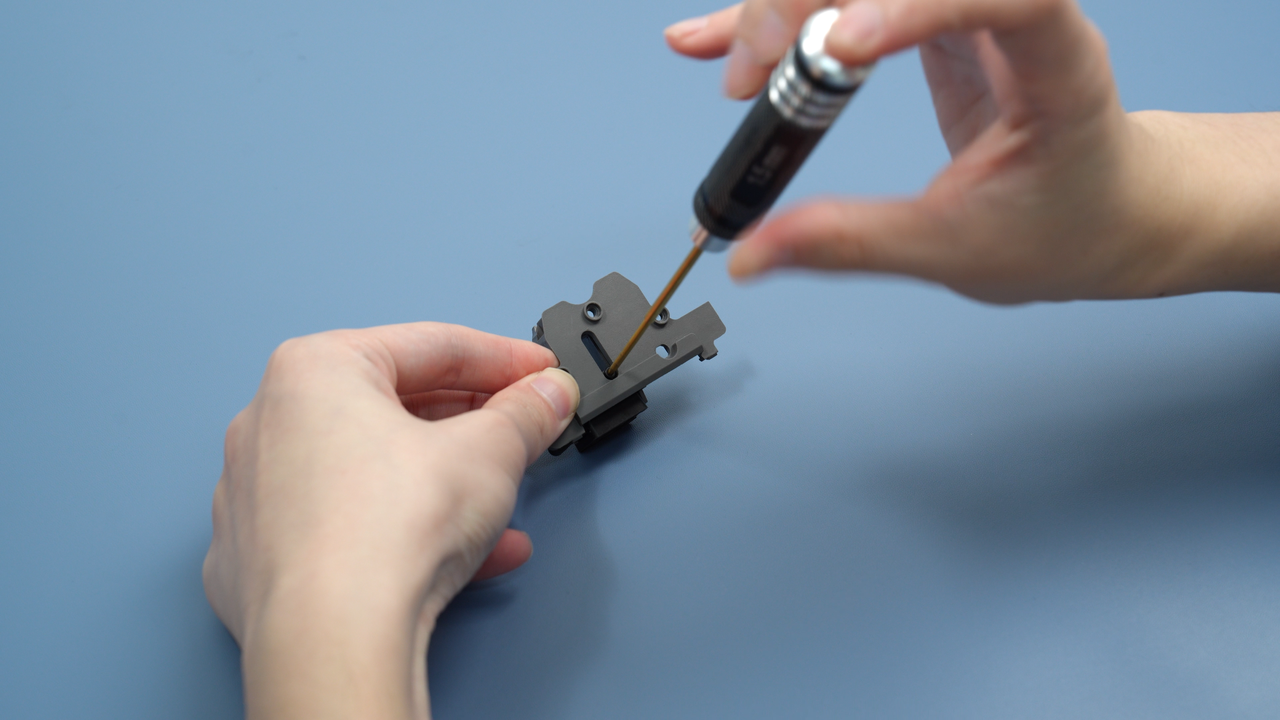
Then slide along the guide rail to remove the black connector.
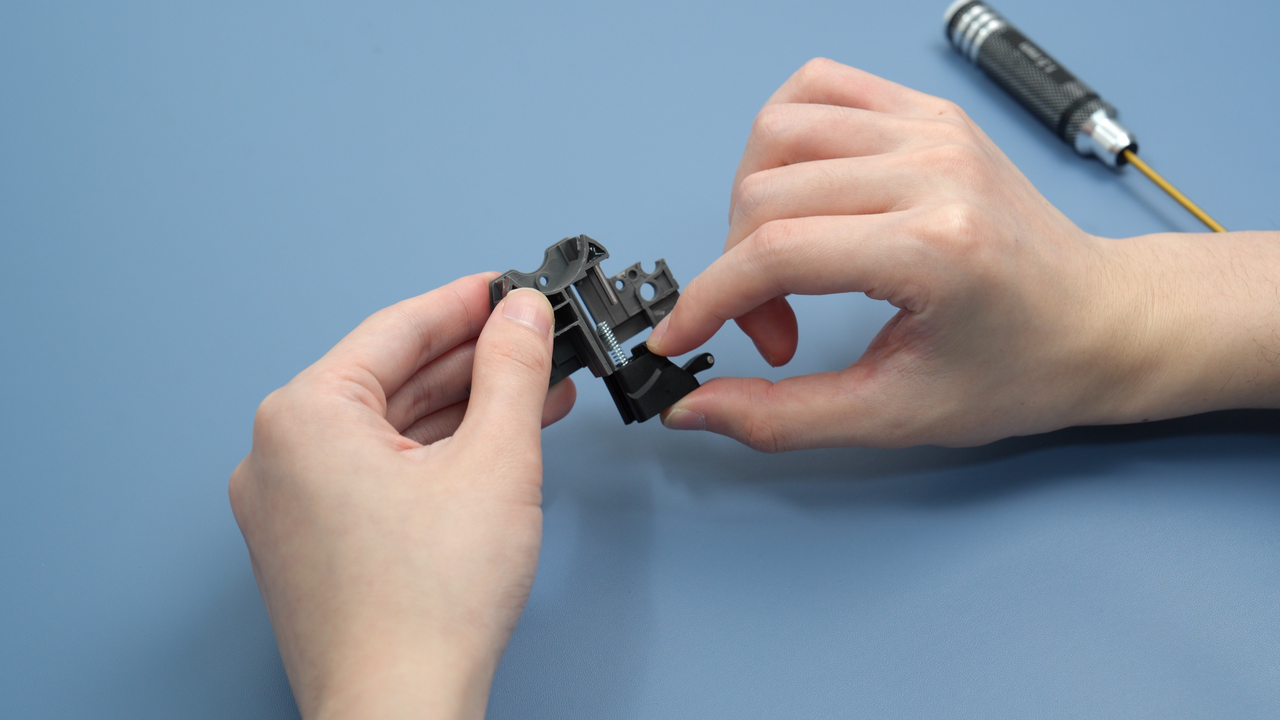
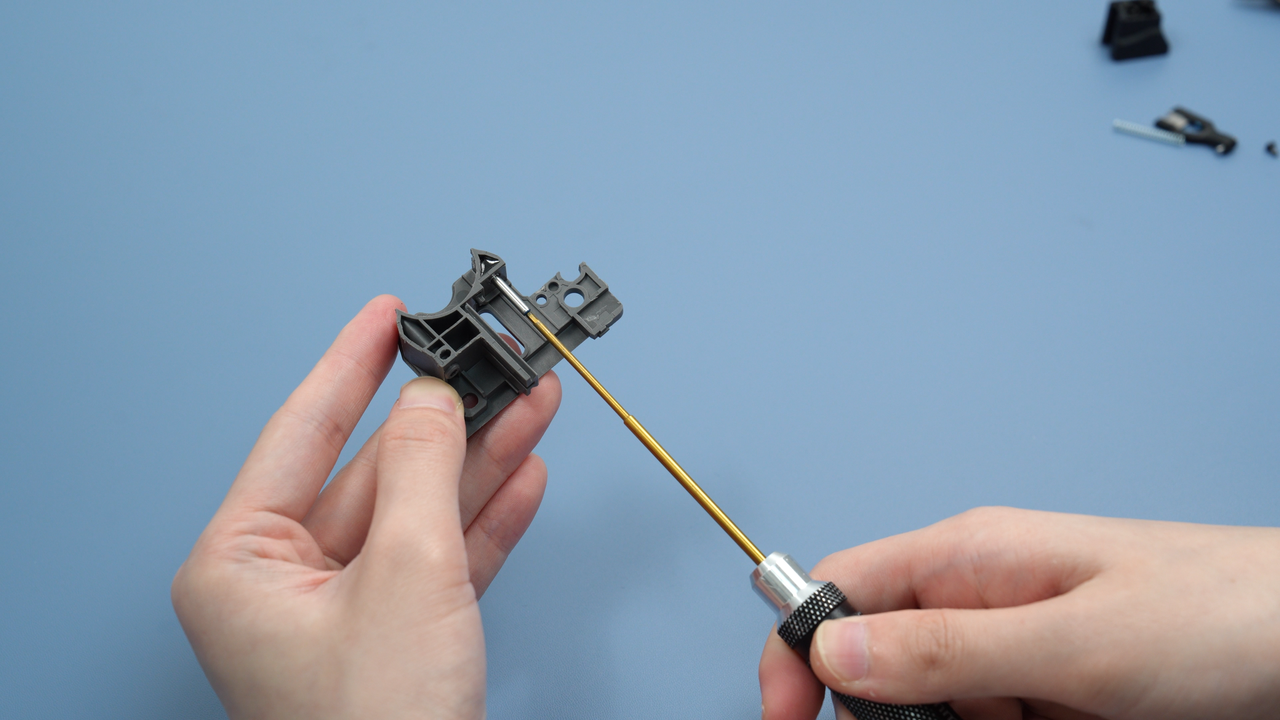
Remove the cutter and the spring.
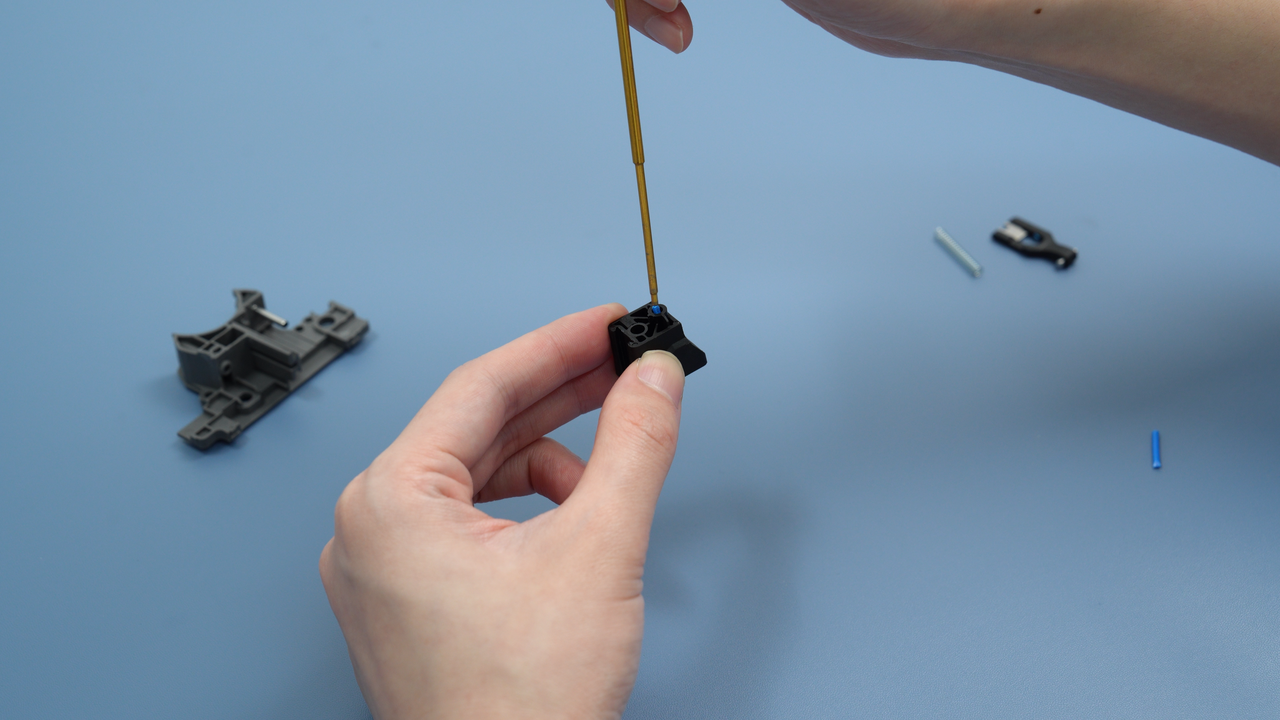
Use an H1.5 hex screwdriver to clear out the inside of the black connector and the guide assembly to ensure no filament remains jammed inside.
After cleaning, reinstall the spring onto the black connector and slide the connector back along the guide rail.
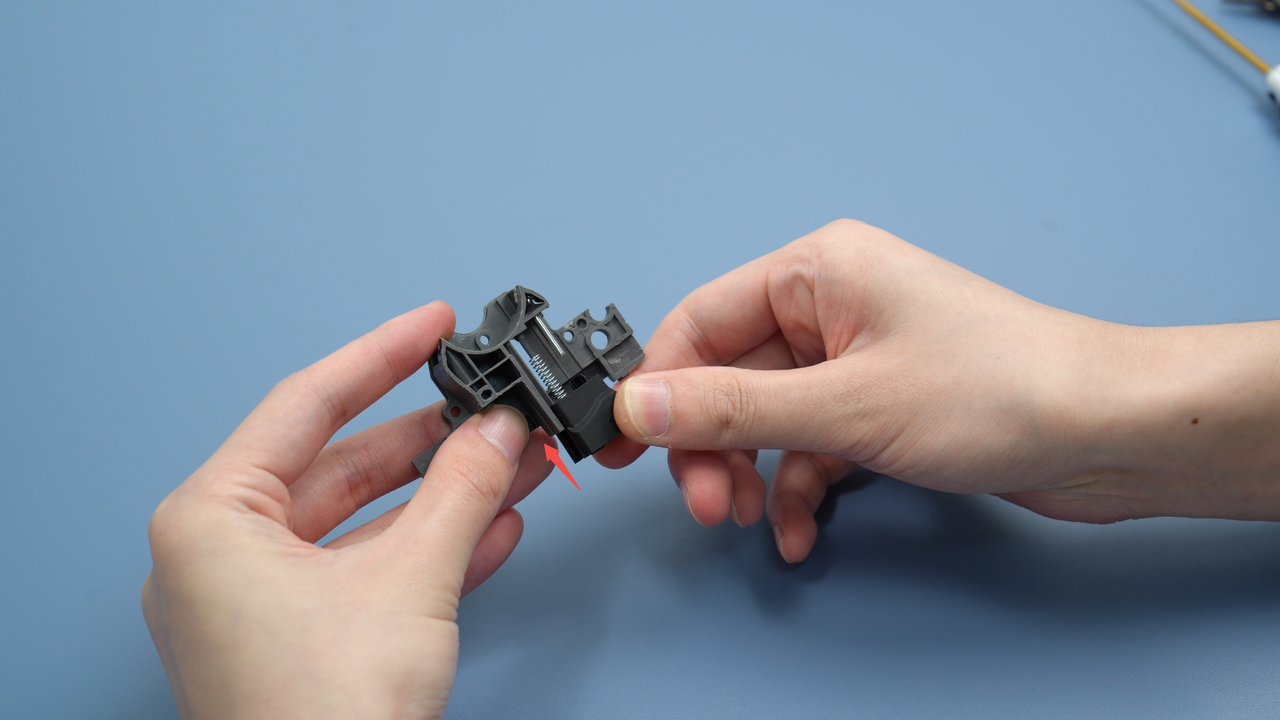
Make sure the spring is properly seated on the slider shown within the red circle.
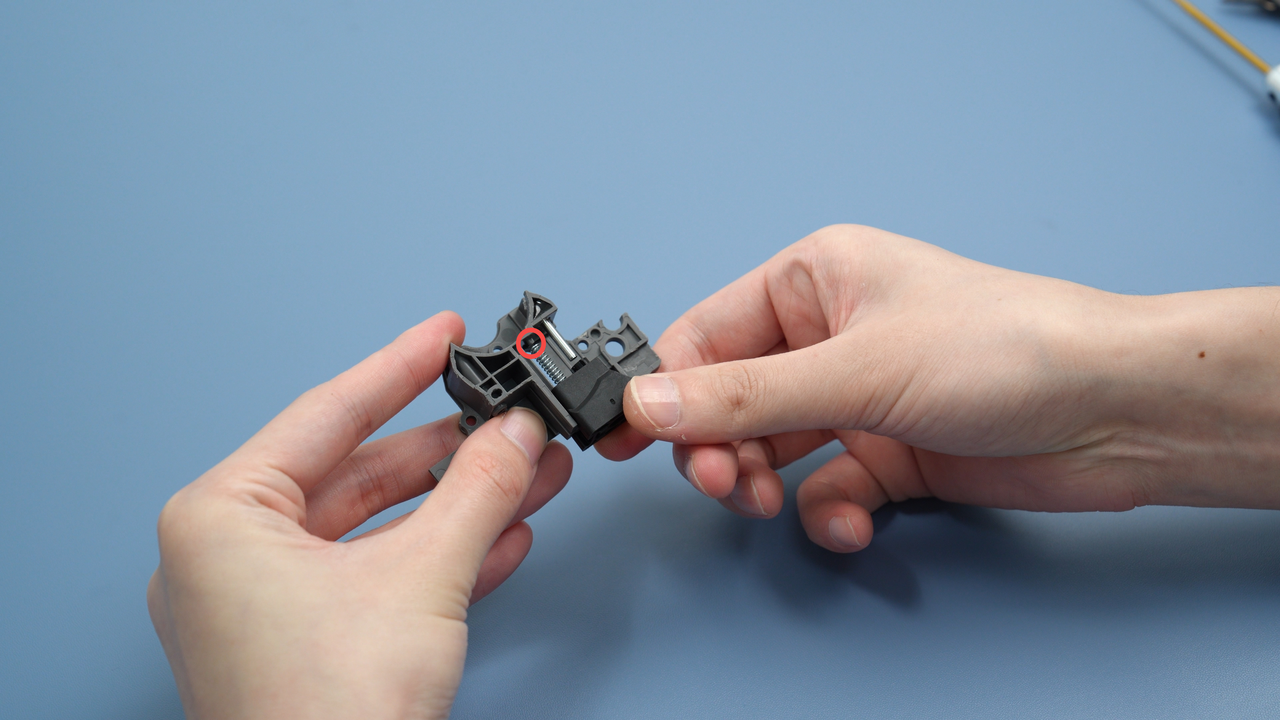
Then reinsert the screw and put the cutter back in place.
Note: One side of the cutter has a concave surface—please make sure the concave side is facing upward when reinstalling the cutter.
¶ End Notes
We hope the detailed guide provided has been helpful and informative.
If this guide does not solve your problem, please submit a technical ticket, we will answer your questions and provide assistance.
If you have any suggestions or feedback on this Wiki, please leave a message in the comment area. Thank you for your support and attention!